1
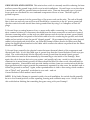
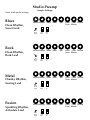
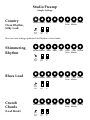
MESA/BOOGIE
The Spirit of Art in Technology
Studio Preamp
Owner’s Manual
Studio Preamp
Owner’s Manual
Congratulations on your purchase of the MESA/Boogie Studio Preamp! In this compact, rack-ready
package you’ll find all the basic tones that made Boogie famous – clean, warm, smooth rhythm
sounds; a screaming, vicious Lead voice; and enough control to produce anything in between. The
Preamp is simple and straightforward, yet sophisticated. Like all other Boogies, it’s based on a no
compromise, all-tube circuit with traditional style tone controls and instant Lead/Rhythm footswitching.
It includes a 5 band graphic EQ for tone customizing; a carefully tweaked, deep-sounding
3-spring reverb; a stereo effects loop that can accommodate either low-level or line-level effects; and
two pairs of stereo outputs (including Recording Outputs with speaker-simulator circuitry, which will
mate perfectly with either a mixing console or the front end input of most guitar amps.)
NOTE: If you are using the Studio Preamp in conjunction with a "dedicated" power amp, we strongly
recommend the use of a high quality, all tube amplifier such as our Stereo Simul-Class 295, or the
Strategy 400. Only then can you be assured of taking full advantage of the Preamp’s sound quality.
1. Connecting the Preamp: The simplest method for connecting the Preamp is to plug your guitar
into the front or rear panel INSTRUMENT INPUT, then run shielded cables from MAIN OUTPUTS
A&B into the inputs of your power amp. The two output level controls on the Preamp will determine the overall level being sent to the power amp. (If you are feeding into a mono power amp, use
either one of the Preamp’s Main Outputs A or B.
If you wish to use the Preamp in conjunction with a "normal" guitar amplifier such as a Fender,
Marshall, etc., you can either 1) run a shielded cable from one of the Preamp’s rear panel RECORDING OUTPUTS into the front panel input of the amp; or 2) run a cable from one of the MAIN OUTPUTS into the effects return or Power Amp Input jack of your amp (assuming your amp has one of
these).
If the Preamp is being used for recording and you wish to connect it directly to a mixing console, we
recommend using the RECORDING OUTPUT(s), connected to a line level input on the console. Or,
as an alternative, you can use one or both of the Preamp’s MAIN OUTPUTS for this purpose. The
Recording Outs are EQ’d differently than the Main Outs, so the choice here is mainly a matter of
taste.
2. Using Stereo Effects: The Studio Preamp is capable of stereo operation if used with a stereo
effects unit (and, of course, a stereo power amp). To do this, connect a shielded cable from the
Preamp’s EFFECTS SEND jack into the input of your effects unit, and set the Preamp’s EFFECTS
LEVEL switch to either "LOW" (for using floor pedals or "inexpensive" rack effects) or "LINE" (for
using studio-quality effects). Then connect the outputs of the effects unit to the RETURN jacks on
the Preamp using shielded cables, and use the Preamp’s Main Outputs to feed the power amp. Use
the Mix or Blend control on the effects unit to set the "wet/dry" (effect/direct) blend.
Another way to run the Preamp in stereo with effects is to connect one of the Preamp’s MAIN OUTPUTS (or both, if the effects unit has stereo inputs to the input of the effect. In this case the Preamp’s
OUTPUT LEVEL control(s) will determine the send level to the effects; the overall level going to the
power amp will be determined at the effects unit.
3. The Controls: Let’s review the controls one at a time to learn their various functions and how
they interact.
Volume: This very powerful control determines the gain in the Rhythm mode and also the amount
of signal fed to the lead mode. Lower settings of this control will result in cleaner, brighter rhythm
sounds and lower gain lead sounds. Higher settings will result in fatter clean rhythm sounds and
tighter, more focused lead tones. By experimenting with the volume control you will discover a
"sweet spot", probably somewhere between 6 and 7 1/2, where you’ll find the ultimate shimmering
warmth in your clean sound, yet enough gain to keep your lead mode tight and singing. We’ve
found that settings of 6 3/4 to 7 provide a great clean sound and yet allow instant switching to a
great lead sound. However, players who put emphasis on the ultimate clean sound will probably
want to set the Volume at 5 1/2 to 6. If you never use clean sounds or don’t need "squeaky-clean"
rhythm sounds you’ll probably be more concerned with the Lead mode. In that case a volume setting of 7 1/2 to 8 may be in order. Of course, the best way to find the setting that is "the ultimate"
for you is simply to experiment.
Master: This control serves two purposes and remains functional in both modes. It is a master volume control for the rhythm mode and it is also in series with Lead Master. This means that low settings of the Master control should be balanced with higher settings of the Lead Master control if
equal levels are desired between Lead and Rhythm modes. Similarly, higher settings on the Master
will require lower settings on the Lead Master to achieve a balance. A good basic setting for the
Master control is 5. If you start around 5, you can still increase or decrease the setting to a degree
without having to alter the Lead Master setting.
The second purpose of the Master control is that it functions as the Effects Send level. Again a setting of 5 usually provides the right amount of signal to drive most effects units. If this setting is
incompatible with your effects, adjust as needed and then re-adjust the overall loudness of the
Preamp with the Output Level controls.
Lead Drive: As you might expect, this control adjusts the gain, sustain and sensitivity of the Lead
mode. Although it is affected by the setting of the
Volume control, it has enough gain to produce anything from a "bluesy", slightly dirty tone to an
insanely overdriven "metal" sound even at very low volumes. Touch sensitive! We’ve found that the
best tones seem to occur with the Lead Drive set in either the 2-3 or the 5-6 regions.
Treble: This control adds "highs" and "bite" to your tone. It also has the effect of adding gain and
sustain to the Lead mode. Adjusting this control while switching between Lead and Rhythm modes,
you’ll find a "sweet spot", probably somewhere between 6 and 8, which gives you the right amount
of bite and penetration without sounding harsh.
Lead Fat (Switch): This rocker switch "re-voices" the Treble control shifting it’s effective range
downward to the upper mid-range zone. Affecting only the
Lead mode, it adds fatness, gain and sustain to the tone.
Bass: This powerful control adds roundness, warmth and bottom to the tone.
Like the Treble control, it should be set with both modes in mind; high settings, which may sound
great for rhythm, may sound "flabby" in lead.
However, too little bass may leave you with a "flat", two-dimensional sound. Try setting this control
between 3 and 5 for starters.
Middle: This control is the least significant and easiest to use of the three tone controls. Although it’s
action may not seem dramatic, it adds midrange warmth when used with relatively "normal" setting
of the Treble and Bass controls.
Rhythm Bright and Lead Bright (Switches): These switches accentuate the "super-top" or extreme
high frequencies, adding shimmer and sparkle to the Rhythm mode and a "searing" quality in Lead.
The Bright switches are most useful at low settings; at high gain settings they are usually unnecessary and may cause excessive noise or feedback. To avoid this, you should either reduce the Volume
(and/or Lead Drive) slightly, or turn off the Bright switch when such extreme settings are desired.
Graphic Equalizer: The Studio Preamp is equipped with an onboard graphic EQ that is specifically
tailored for guitar. The center frequencies of each of it’s 5 bands were carefully selected as the ones
most useful and effective for the instrument. What the graphic allows you to do is drastically reshape the tone structure or frequency response curve of the Preamp. The
EQ comes "after" the rotary tone controls and distortion circuitry in the
Preamp and is generally used to enhance the basic tone after you’ve set the rotaries. However, it can
also be used to p-provide a separate set of "tone controls" for the Lead mode (see explanation of EQ
AUTO below). Although the
EQ adds tremendous flexibility to the Preamp, it is not necessary for achieving a good tone, and can
be switched out of the circuit at any time.
(All the tonal R&D that went into perfecting the Preamp’s sound was done with the EQ out).
The front panel EQ Switch has three positions: EQ IN, EQ OUT (the unlabeled center position) and
EQ AUTO. When the switch is set to EQ OUT, the EQ is not active but can still be switched in via
the optional EQ footswitch. When the switch is set to EQ IN, the EQ is active (and cannot be
footswitched off). In EQ AUTO, the EQ will automatically kick in whenever you are in the Lead
mode, and will automatically switch off when you are in Rhythm. In this way, you can create a tone
"preset" for Lead that is entirely different from your Rhythm tone.
Although there are many useful EQ settings, on "graph" seems to have found its way onto every coliseum stage at one time or another: the classic "V"! This setting produces a dramatically "fat" sound
by boosting the extreme lows and highs while cutting back the mids. Specifically, you move the two
outside sliders (80 & 6600 Hz) to a setting just below the highest line.
Then you position the 2nd and 4th sliders just above the centerline. Then take the 750 Hz slider,
center it at the lower line, and fine-tune it.
(You’ll find this region very responsive to even tiny adjustments - it’s like a pivot-point of the "V"
sound.) Of course, the "V" is just one of the many possible EQ combinations. Like all the other controls, the EQ is there to help you find the tones that sound great to you.
REVERB: The Studio Preamp includes a built-in 3-spring reverb unit. The reverb circuit has been
painstakingly "tweaked" to eliminate any buzzing, "boinging" or clipping that sometimes occurs
with springs. When the reverb control is set at zero, only the "dry" or non-reverberated signal is
heard. As the control is turned up, the "wet" or reverberated signal is gradually mixed in. Try a setting of 3 for a "medium" amount of reverb, or "season to taste". Once you’ve got a setting you like,
you can switch it in or out with the optional reverb footswitch (or other external switching) via the
rear panel FUNCTION jack labeled REVERB.
OUTPUT LEVEL (A & B): This pair of controls determines the overall level being sent form Main
Outs A & B (and Recording Outs A & B) to your power amp (or mixing console). To get the best signal-to-noise ratio and to avoid clipping, the levels must be set neither too low nor too high. If you
need guidance in setting these levels, try the following method:
Start by setting both Output controls to zero. Next, set the Master control at "5" and the Lead Master
at "4". Set the Lead Drive at "6" and the Volume at "7". With these settings, the volume levels of the
Rhythm and Lead Modes will be about equal. Now we are ready to bring up the Outputs.
With the Power and Standby switches in the Preamp and power amp in the "ON" position, slowly
bring up OUTPUT LEVEL A to the desired listening level.
(Depending on the power amp being used, the setting will most likely be very low, probably
between 2 and 4). Next, increase OUTPUT LEVEL B until its level equals that of OUTPUT A. (Don’t
be surprised if the number settings on the two outputs are slightly different when equal levels are
attained. This sometimes occurs because of slight variances in the resistor values of the potentiometers.) If effects are in use in the Effects Loop and the effects send level seems too high or low, try
adjusting the INPUT LEVEL or HEADROOM control on the effect device first, if the level is still not
optimum, adjust the Preamp’s Master and Lead Master controls as needed, and then re-adjust the
OUTPUT LEVEL controls to compensate.
POWER SWITCH (and Pilot Light): This is the AC Power On/Off switch for the Preamp. When
its pilot lamp is lit, it indicates that AC voltage is being supplied to the Preamp.
STANDBY SWITCH: The Standby Switch shuts off the signal at the effects send stage. When the
Preamp is in Standby mode, any noise produced by devices in the effects loop will be audible (but
the signal "content will not be). If this noise is objectionable or undesirable, use the Standby switches on your power amp to must the noise.
We recommend switching the Preamp into its Standby mode 1) during "power-up (leave in standby
for about 30 seconds); 2) while patching in instruments and effects; 3) during set breaks at gigs or
rehearsals; and 4) before "powering down".
MODE/EQ LED INDICATORS: These three red LEDS (located under the tone controls) indicate
whether you are in the Rhythm or Lead mode, and whether the EQ is active or not.
4. REAR PANEL CONNECTIONS
INPUT: This 1/4" jack is one of two possible inputs that can be chosen; the other input location is
on the front panel. The front panel input and rear panel input are identical in function and the
choice is simply one of convenience. The input jacks are insulated mono jacks designed to handle
one instrument. (We don’t recommend using both of them at once.) Always use a high-quality
shielded cable to connect your instrument to the Preamp.
LEAD/RHYTHM FOOTSWITCH: This jack will accept either the Lead/Rhythm footswitch included with your Preamp (or any standard grounding-type footswitch) or connections from an external
switching system such as MESA/Boogie MIDI Matrix. It allows remote switching between Lead
and Rhythm modes.
FUNCTION SWITCHES (Reverb, EQ & REV, EQ): These 1/4" jacks are used to control the Reverb
and/or the EQ functions using the optional footswitches.
For controlling the Reverb alone or the EQ alone, connect our Single Footswitch to the appropriate
jack using a 2-conductor unshielded cable. If you’re using the Dual Footswitch to control both
reverb and EQ, plug it into the center (EQ & REV) jack using a 3-conductor (stereo) cable.
The function jacks can also be used to control the reverb and EQ from an external switching system
such as the MIDI Matrix.
EFFECTS LOOP: The Effects Loop in the Preamp has a mono (single) send and stereo (dual)
returns. This means you can incorporate stereo effects devices in the loop and the signal will be
maintained in full stereo all the way through to the outputs. The Effects Loop Level switch should
be set according to the type of effects you are using. For floor pedals (and some "inexpensive" rack
effects) select the "LOW" position. When "studio-quality" or line0level effects are in use, select the
"LINE" position. If your effects device also has a switch of this kind, make sure the settings of both
switches coincide.
MAIN OUTPUTS: This pair of 1/4" jacks is intended primarily for connecting the Preamp to a
power amp. Its output level is determined by the OUTPUT LEVEL controls on the front panel. If
you are using some type of stereo effect in the Preamp’s Effects Loop, then the Main Outs function
as a stereo pair. If you’re not using a stereo effect, they function simply as two mono outs (in other
words, the content of Main Output A will be the same as the content of Main Output B). If you’re
operating the Preamp in mono and you are feeding into a mono or single power amp input you can
use either Output A or Output B - it makes no difference.
RECORDING OUTPUTS: This pair of outputs (also 1/4" jacks) has been specially EQ’d and
buffered to simulate the sound of a power amp loaded by speakers, for use in "direct inject" recording situations when the Preamp is plugged directly into a mixing console. Like the Main Outs, the
Recording Outs function as either a stereo pair or as two mono outputs (depending on whether
you’ve got a "stereo-izing" device in the Effects Loop or not) at levels determined by the front panel
OUTPUT LEVEL controls.
USING THE PREAMP AS AN "EFFECT BOX": Another excellent use for the Recording Outputs is
for connecting the Preamp to the input of a normal guitar amplifier such as a Fender, Marshall, etc.
The Preamp then becomes a super "effect box", adding Tone, Gain, Footswitching, Distortion, EQ,
Reverb, and en Effects Loop to the normal capabilities of your amplifier! The Recording Outs can be
connected straight into the front panel input of the amp (there’s no need to attempt to bypass the
amp’s preamp section) and should not require any radical alteration of your normal amp settings.
LINE FUSE: A 1 1/4 amp fuse protects The Studio Preamp when operating on 100-120 V. AC.
Should the fuse blow, replace it with a Slo-Blo fuse of the same amperage.
LINE CORD: This is a standard 3-pin AC line cord. A ground-lifting (3 to 2) adapter may be found
useful in eliminating hum cased by grounds loops when the Preamp is connected to a power amp.
(This problem would not tend to arise when running into a mixing console).
GROUND ISOLATION SWITCH: This mini-rocker switch is extremely useful in reducing the hum
and buzz caused by ground loops which occur in rack installations. Ground loops occur when there
is more than one path for grounds between electronic units. There are three main type of ground
loops: each one contributes its own trademark component of buzz or hum. The three types of
ground loops are:
1) Grounds are connected via the ground lugs of the power cords on the units. The rule-of-thumb
here is that one and only one unit in a rack should have a connection to the AC power ground; all
the other units in the rack should have their grounds lifted by using 3-to-2 adapters on their AC
plugs.
2) Ground loops occurring because of two or more audio cables connecting two components. The
most common solution is to disconnect the shield from the sleeve connection at one end of some of
the inter-connecting cables, so that only one cable between each device has an intact ground shield.
Some experimentation is required to find which cable is best for conducting the ground, and which
cables are best suited to have the special "clipped ground". We recommend trying the intact-ground
cables for the signal path which flows, say, from the Preamp’s Effects Send to an effects unit; and
trying the clipped-ground method on the cable which connects the effects output back into the Effect
Return on the Preamp.
3) Ground loops created by the physical contact between the metal chassis of the components and
the steel rack rails. It is for this third type of ground loop that the Ground Isolation Switch was provided. The switch effectively lifts the electronic circuit ground from the metal chassis ground
(which otherwise must be done manually by disconnecting a wire inside of the Preamp). Here
again, the rule is that one device in your system - and usually only one - needs its circuit ground
connected to its metal chassis ground; all others should be lifted (in other words, disconnected) for
quietest operation. (Some effects units provide similar switches; some are constructed such that the
input ground and the output grounds are permanently separated; in other cases, the method used to
isolate the grounds is unclear). Again, some experimentation is vital to discovering which combination of "lifted" and "grounded" works best in your rack....and out
Ground Isolation Switch makes it much easier.
NOTE: If the Studio Preamp is operated outside of a rack installation, the switch should generally
be set to the Normal position, or else squealing, buzzing and oscillation may occur. Always check
this switch before thinking that something has gone wrong with your Preamp!!
Studio Preamp
Sample Settings
Some dual-mode settings:
8
Blues
5
6
Volume Master Treble
3
5
Bass
Mid
3
3
Bass
Mid
6
7
Bass
Mid
3
5
Bass
Mid
Clean Rhythm,
Sweet Lead
OFF
Rhythm
Bright
6
Rock
OFF
Lead
Bright
6
6
Clean Rhythm,
Rock Lead
10
Metal
ON
Lead
Bright
3
10
Chunky Rhythm,
Searing Lead
5
Fusion
OFF
Lead
Bright
7
5
Sparkling Rhythm,
Articulate Lead
OFF
Lead
Bright
Lead Lead Reverb
Drive Master
5
1.5
3
Lead Lead Reverb
Drive Master
3
4
2
Lead Lead Reverb
Drive Master
ON
Lead
Fat
Volume Master Treble
OFF
Rhythm
Bright
3
ON
Lead
Fat
Volume Master Treble
OFF
Rhythm
Bright
3
OFF
Lead
Fat
Volume Master Treble
ON
Rhythm
Bright
2
ON
Lead
Fat
5
2
3
Lead Lead Reverb
Drive Master
Studio Preamp
Sample Settings
5
Country
6
7
Volume Master Treble
3
5
Bass
Mid
Clean Rhythm,
Silky Lead
OFF
Rhythm
Bright
OFF
Lead
Bright
2
4
3
Lead Lead Reverb
Drive Master
OFF
Lead
Fat
Here are some settings optimized for Rhythm or Lead mode:
5
Shimmering
Rhythm
3.5
5.5
(Lead Mode)
OFF
Lead
Bright
5
ON
Lead
Bright
5.5
4
ON
Lead
Bright
5
Bass
Mid
5.5
4
Bass
Mid
5.5
4
Bass
Mid
-
-
3.5
Lead Lead Reverb
Drive Master
2.5
4
3
Lead Lead Reverb
Drive Master
OFF
Lead
Fat
8
Volume Master Treble
OFF
Rhythm
Bright
4.5
OFF
Lead
Fat
Volume Master Treble
OFF
Rhythm
Bright
Crunch
Chords
6.5
Volume Master Treble
ON
Rhythm
Bright
Blues Lead
4.5
ON
Lead
Fat
4.5
3.5
3
Lead Lead Reverb
Drive Master
Studio Preamp
Sample Settings
6.5
Metal Lead
4
8
Volume Master Treble
5
5
Bass
Mid
4
5
Bass
Mid
Lead Lead Reverb
Drive Master
Bass
Mid
Lead Lead Reverb
Drive Master
Bass
Mid
Lead Lead Reverb
Drive Master
(Use “V” Graph
EQ)
OFF
Rhythm
Bright
5
JAZZ
ON
Lead
Bright
6
0
(Rhythm Mode)
OFF
Lead
Bright
Lead
Bright
Lead
Bright
Lead Lead Reverb
Drive Master
-
-
3
Lead
Fat
Volume Master Treble
Rhythm
Bright
3
OFF
Lead
Fat
Volume Master Treble
Rhythm
Bright
3
ON
Lead
Fat
Volume Master Treble
ON
Rhythm
Bright
6
Lead
Fat
MESA/BOOGIE
The Spirit of Art in Technology