1
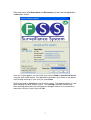
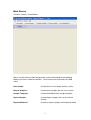
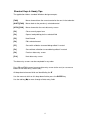
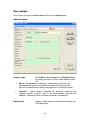
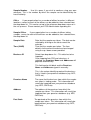
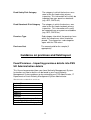
FSSNet Version 5
Food User
Guide
: [email protected]
: 0141 300 1946
: https://www.envhealth.scot.nhs.uk
http://www.food.gov.uk
http://www.hps.scot.nhs.uk
JULY 2008 © HPS
FSS UK Version: 5
2
INTRODUCTION.........................................................................................................5
USING THE FOOD SURVEILLANCE SYSTEM .....................................................6
Starting the application ...........................................................................................6
Main Screen ..................................................................................................................8
New sample..................................................................................................................10
Administration .......................................................................................................10
Food Premises – Importing premises details into FSS UK Administration details..12
Enforcement ................................................................................................................15
Enforcement ................................................................................................................15
Surveillance.................................................................................................................17
Description ..................................................................................................................19
Category Tree
................................................................................................20
Sample Taken From....................................................................................................22
Packaging ....................................................................................................................24
Code of Practice ..........................................................................................................26
Saving a sample...........................................................................................................28
Sample Templates .......................................................................................................29
New Template..............................................................................................................30
Delete Template......................................................................................................31
Copy Template .......................................................................................................31
Groups.....................................................................................................................31
Duplicate .................................................................................................................31
New Sample from template .........................................................................................32
Template Order......................................................................................................32
Browse Active Samples ...............................................................................................33
Locate Sample .............................................................................................................34
Sample Status ..............................................................................................................34
Set Prosecution............................................................................................................34
Duplicate Sample ........................................................................................................36
Export ..........................................................................................................................38
Print .............................................................................................................................41
Print Form...................................................................................................................41
Print Report .................................................................................................................42
3
Print Label...................................................................................................................43
Exported Samples........................................................................................................44
Re Export.....................................................................................................................44
Import Samples ...........................................................................................................45
Browse Samples...........................................................................................................47
Grouping Data.............................................................................................................49
Full Details..................................................................................................................50
Export to XML ............................................................................................................51
Encrypted File Viewer...........................................................................................52
APPENDIX A: DEFINITIONS .................................................................................55
Brand name of food ...............................................................................................55
Food description.....................................................................................................56
Nature of Product ..................................................................................................56
APPENDIX B: Packaging Guidance.........................................................................58
Packaging................................................................................................................58
APPENDIX C: HPS CONTACTS..............................................................................62
HPS System Administrator...................................................................................62
HPS Environmental Health Consultants .............................................................62
Postal Address ........................................................................................................62
Version Changes.....................................................................................................63
4
INTRODUCTION
Background
The surveillance system involves local councils feeding sampling data to the frontline
laboratories that in turn after analysis will upload all sampling and analysis data into
the central database held and managed at HPS (Health Protection Scotland). The
central database is accessed through a secure web server allowing different levels of
access by contributing councils, laboratories and the Food Standards Agency.
Sample Data
Data gathering by EHOs/TSOs will be conducted in the field and entered into the
network application along with sample identifiers. Samples will be identified and
submitted to an associated public analyst or NHSS laboratory. All laboratories
participating in this system will be UKAS accredited and on the EU Official List for
food law enforcement.
Sample Analysis
The laboratories will perform the appropriate analysis/examination and enter the
results in to their local database system. The public analyst laboratories are using a
dedicated laboratory information management system and the NHS laboratories are
using heterogeneous systems.
Data will be extracted from the network application into the corresponding laboratory
database. The data will be cleansed and normalised prior to uploading into the
Centralised Food Analysis Database (CFAD) maintained at HPS.
Data Abstraction and Reporting
The individual council’s surveillance and analysis data will be available for querying
using the network application. Comparisons across the country can be undertaken by
controlled access to the CFAD by local councils, public analysts, NHS laboratories
and the FSA. This will provide controlled access to the CFAD by local Councils,
Public Analysts, NHSS laboratories and the FSA. The database may be queried and
reports obtained using an authorised Internet connection to the web server.
The FSS UK Website address is https://www.envhealth.scot.nhs.uk
5
USING THE FOOD SURVEILLANCE SYSTEM
Starting the application
To open the application double click the FSS icon on your desktop
After running the program you will see the following security login screen.
You will need to enter a valid Username and Password to continue running the
application, otherwise the following warning message will be displayed.
6
After entering a valid User name and Password, you will see the application
introduction screen.
Once this screen appears you can either enter into the Food or Animal Feed Module
using the radio select buttons. (the application remembers your choice so you do not
have to keep selecting) In your case you select Food.
Select either Live or Training to enter the main screen. The Live connection is used
when inputting real data into the system. The Training connection can be used
when entering dummy data for training other colleagues and for users to familiarise
themselves with the system, then click OK.
7
Main Screen
The Main screen is shown below
Menus can be accessed from the top of the screen and clicking on the following
buttons can access common functions. These can also be accessed in the File
menu.
New Sample
Used to enter a new sample into the system
Browse Samples
Used to view samples that are in the system
Sample Templates
Used to View/Edit/Create sample template
Import Samples
Used to import samples with results into the
System
Exported Batches
Used to re export samples and view batch detail
8
Shortcut Keys & Handy Tips
The application follows standard Windows design concepts.
[TAB]
Moves forward from the current control to the next in the tab order
[SHIFT][TAB]
Moves back to the previously selected control
[CTRL][TAB]
Moves forward to the next data-entry screen
[F2]
Close currently open form
[F4]
Open a lookup dialog for the selected field
[F5]
New Record
[F6]
Edit selected record
[F7]
Save with validation to record being edited / inserted
[F8]
Save without validation to record being edited / inserted
[F9]
Previous data-entry screen
[F10]
Next data-entry screen
The data-entry screens can be completed in any order.
Press F9 and F10 to move from one data-entry screen to the next (or use mouse
button to click data-entry screen tabs)
All drop down/reference fields are identified by the Use the mouse to click on this drop down field or press the ENTER key
Use the tab key (
) to move through all data-entry fields
9
New sample
Accessed by clicking on the New Sample button from the Main Screen.
Administration
Analysis type
•
Select Micro (Microbiological) or Chemical option
by clicking on either or on the radio button to their
left.
Micro – Microbiological sampling is undertaken to ascertain the
microbiological quality of the food and to determine the possible
presence or absence of harmful microorganisms in particular foods.
Chemical - Food samples submitted for chemical sampling may
undergo specific analyses such as for contamination, presence of
additives, compliance with nutritional standards and labelling.
National Ref
Unique sample reference number allocated by the
FSS application.
10
Sample Number
Use this space if you wish to continue using your own
reference This is the number by which the sample can be identified by the
Local Authority.
Office
If your organisation has a number of offices branches in different
locations, names for each of the offices can be added to, then selected from,
the drop down list. This can be set up in the reference drop down menu or in
the set up menu. Please contact your FSS Administrator regarding this.
Sample Officer
If your organisation has a number of officers taking
samples, names for each of the officers can be added to, then selected from,
the drop down list
Sample Date
Time (24HR)
Business ID
Date that the sample was taken. The date can be
selected by clicking on the tab to reveal the
calendar
Time that the sample was taken. The time
defaults to the current time but can be changed
using the up / down arrows provided
Select from drop down list – This data has to be
imported.
Once imported into FSS and a business is
selected, the Premises Name and Addresses will
populate automatically.
This field can be left blank and the Premises
Name and Addresses typed in manually.
This is the unique identifying code of the business
that is listed in your premises database (e.g. APP;
CAPS etc).
Premises Name
The name that the business from which the sample
was taken is trading under. This information will
usually be imported from your premises database
(e.g. APP; CAPS etc).
Address
The address of the premises from which the
sample was taken. This information will usually be
imported from your premises database (e.g. APP;
CAPS etc).
Post Code
The postcode of the premises from which the
sample was taken. This information will usually be
imported from your premises database (e.g. APP;
CAPS etc).
11
Food Safety Risk Category
The category in which the business was
rated at the last food safety primary
inspection. This information will usually be
imported from your premises database
(e.g. APP; CAPS etc).
Food Standards Risk Category
The category in which the business was
rated at the last food standards primary
inspection. This information will usually
be imported from your premises database
(e.g. APP; CAPS etc).
Premises Type
Sub category into which the premises from
which the sample was taken should be
placed. These premises sub-categories
agree with the FSA return.
Purchase Cost
The amount paid for the sample (if
appropriate)
Guidance on premises and field layout
Food Premises – Importing premises details into FSS
UK Administration details
This file can be generated from your Local Authority Management System.
Instructions on how to do this can be found in your Local Authority
Management System guidance or by contacting your FSS Administrator, IT
Department or Local Authority Management System Administrator
The field order of this file is as follows:
BusinessID
PremiseName
Address1
Address2
Address3
Address4
PostCode
Food Safety Risk Category Code
PremiseType Code
Food Standards Risk Category Code
12
Food Safety Risk Category Code:
A
B
C
D
E
Import Error
Premises Type Code:
A
B
C
D
E
F
G
H
I
J
(Primary Producers)
(Slaughterhouses)
(Manufacturers/processors)
(Packers)
(Importers/Exporters)
(Distributors/Transporters)
(Retailers)
(Restaurants and other Caterers)
(Materials and Articles Manufacturers and Suppliers)
(Manufacturers mainly selling by retail)
Food Standards Risk Category Code:
A
B
C
Unrated
An example file:
A001,Greggs,144 Sauchiehall Street,Glasgow,,,G3 6LN,A,J,A
A002,Tecso,200 Argyle Street,Finnieston,Glasgow,,G5 7LA,E,J,B
A003,Safeway,300 Argyle Street,Finnieston,Glasgow,,G5 7LN,B,G,C
To import this file into FSSNet click on File Import Food Premises
Browse to the file and select Load Records
13
Once the status bar is complete click on close.
N.B. There is an option to remove all current records if you want to import a new
batch, tick the check box to do this. If you leave the box unchecked then only new
records will be added and the current records updated.
14
Enforcement
Click on the Reason tab next to Admin at the top to access this screen. Select
Enforcement/Investigation by clicking on it and checking the radio button.
•
Reason for sample taken
Enforcement / investigation – these are samples which have been
taken in response to a particular incident, allegation or contravention.
If this option is selected – the following will appear:•
Sample Type- Control / food complaint / formal / informal / other
•
Follow up sample - If this sample was taken following on from a
preceding sample (e.g. after the first sample failed)
•
Index sample number – this is the number relating to the first sample
taken, in order that preceding samples can be linked to this
15
•
Food borne illness investigation – Tick this box if this sample was
taken as part of an investigation into an alleged case of food-borne
illness
•
Details (including relevant outbreak number) – This number is
generated by the Local Authority and allows all samples forming part of
the outbreak to be linked. Sample numbers should be in a format that
is recognisable to the Local Authority and can be easily traced and
retrieved. If a sample is given a number that is too simplistic (e.g.
1/2008), it could be replicated by other Authorities inputting similar
numbers, making retrieval and identification difficult. Prefixing the
number with a code for the Local Authority (e.g. XYZ/1/2008) would
resolve this potential issue. This will also assist in the event that an
outbreak spreads across Local Authority / Health board boundaries, in
that the initiating / coordinating Authority can be recognised.
16
Surveillance
Click on the Reason tab next to the Admin tab at the top to access this window.
Select Surveillance/Monitoring by clicking on it and checking the radio button.
Surveillance / monitoring
•
Surveillance/monitoring: these are programmed samples taken as
part of a Council's sampling plan or survey.
If this option is selected – the following will appear:•
Sample type - formal / informal – select formal / informal form the
drop down menu.
•
Formal - For microbiological samples, this field relates to samples
taken, including those without a witness, in accordance with the
procedures outlined in the Code of Practice (and, if applicable, any
product specific sampling/examination legislation), and submitted to an
accredited laboratory. Single part samples taken of foods for which
17
multi-part sampling is prescribed are coded as ‘formal’ on the basis that
the sampling is carried out to Code of Practice standards.
For chemical Samples, this field relates to samples taken in
accordance with the procedures outlined in the Code of Practice (and,
if applicable, any product specific sampling/examination legislation),
and submitted to an accredited laboratory. In Scotland, such samples
would be witnessed.
Food samples which are classed as ‘formal’ may (but do not have to)
be used in evidence in a case of enforcement action. However, coding
samples for FSS as ‘formal’ refers to the integrity of the sampling
procedure and examination, not the intended use of the sample.
Informal - For microbiological and chemical samples, this definition
relates to samples which do not fall into the definition of formal samples
(e.g. have not been taken in accordance with the Code of Practice) but
which have been submitted to an accredited laboratory.
•
Microbiological samples which do not fulfill the criteria for Formal
Microbiological samples should not be logged into FSS.
Sample was taken as part of a survey – This applies where a
number of samples are all taken for a specific survey purpose (e.g. a
set time period during which monitoring of a specific product is
undertaken).
If this box is checked, the following will appear –
•
Survey body – the name of the body or organisation that is instigating
/ coordinating the survey e.g. Food Standards Agency etc.
•
Survey ref - This reference number allows all samples forming part of
the survey to be linked. The first part of the survey number will
normally be provided by the ‘Survey body’ (see above) to show that the
sample forms part of the wider survey, with an option to add further
identifying numbers for each sample if required (to allow identification
of each unique sample forming part of the larger survey).
18
Description
Click on the Description tab next to the Reason tab at the top to access this
window.
•
Brand name – The name that the product is sold under (e.g. Kellogs,
Heinz etc) [Note: Can be pre populated – Refer to Appendix A
for further details]
•
Food description – A basic description of the type of food sampled.
Where there is a name laid down by law this must be used. if not, a
customary name may be used. If there is no customary name or it is
not used, a descriptive name must be used. This can also be setup in
the Optional Look up List are in the Reference drop down menu. This is
a free text area and an example is shown below. Once saved, the
options will appear in the Food description drop down menu.
•
Nature of product – These are pre populated with the following
categories:- Ready to Eat, Processed, Raw and Swab. [Please
refer to Appendix A for more details]
19
Category Tree
You can use the plus/minus box
to expand or contract the categories.
To find a particular food category you can start typing and the search will be
narrowed down as you type.
20
In the above window the word Coleslaw is being typed by the User and is found
automatically in the Category Tree.
You can see that the second category is Vegetables – Canned and Processed, a
sub category of Fruit and Vegetables.
If the current selection of Coleslaw is correct then pressing Enter on your keyboard
or clicking the Accept Selected button will select the category for this sample.
•
Category – Food types are categorised in terms of prepopulated categories in the ‘category tree’. Selecting the ‘category
tree’ button on the right of the ‘category’ label allows the user to select
from the populated list. Clicking on one of the item headers, you will
see that there are sub-categories under each main heading. These
can be used to populate the ‘sub-categories’ lists below
•
Sub-category – see above
•
Sub-category (level 2) – see above
•
Sub-category (level 3) – see above
•
Additional Category Information – For chemical samples only. Free
Text to add any additional information.
21
Sample Taken From - For microbiological samples Only:
'Sample taken from' - The Food Hygiene Regulations 2006 requires
microbiological food samples that are submitted to the laboratory to be clearly
identified as having been taken from a producer or from a retailer. This
information must be provided for particular foods as detailed in these
Regulations and determines the tests and pass/fail criteria for assessment by
the food examiner. This is a compulsory field and there is an option to select
'N/A' when appropriate.
•
FSA code – FSA codes are pre-populated and are linked to the
‘Category Tree. This field is automatically populated following
completion of the category tree fields.
•
Manufacturer - if the name of the manufacturer is available from the
product label, enter it here. This field can be pre populated via the
Reference menu.
22
•
Distributer / supplier / packer - if the name of the company
distributing / supplying or packing the food is available from the product
label, enter it here. This field can be pre populated via the Reference
menu.
•
Importer (if appropriate) - if the name of the person or company
importing is available from the product label, enter it here. This field
can be pre populated via the Reference menu.
•
Country of origin - if the Country that the food originated from is
available from the product label, select the country form the drop-down
menu. There is also an option of ‘N/A’
23
Packaging
Click on the Additional tab next to the Description tab at the top to access this
window.
•
.
Packaging provided - The way in which the product was packaged for
sale (if applicable). Select from the drop down menu. (Also See
Appendix B for definitions)
If ‘not prepacked’ (e.g. meats sold loose from a deli-counter) – the
following button
will appear where you can then populate
information on labelling details. [For further information refer to
Appendix B]
•
Labelling - This heading relates to non pre-packed foods. This is the
information that would have been supplied at the counter / display etc,
24
e.g. minimum meat content etc. and can be selected using the options
provided.
•
Packaging material- This heading applies to foods that are prepacked. Select the type of packaging from the drop down menu.
•
Other material- this is where ‘other’ field has been selected from the
drop down menu in the ‘Packaging material’ category, above. Type in
a description of the type of material used for packaging the product
•
Pack quantity / size – this can be taken from the packaging (e.g.
500(g) – the number should be entered here, the units in the ‘pack
units field below) (Also See Appendix A)
•
Pack units – these are the units stated on the size / weight / capacity
of the product e.g. grams, kgs, mls etc (e.g. 500(g) – the (g) would
represent the pack units)
•
Batch / Lot no - some products will contain batch or unit number to
allow traceability by the manufacturer. This can be taken from the
packaging, where applicable
•
Health Mark- Some types of foodstuff (e.g. live bivalve molluscs;
minced meats; dairy products) require to be produced by a
manufacturer / premises that have been approved by the local
authority. To demonstrate that the food has come from approved
premises, the food is marked with a ‘health mark’. There are differing
forms of health mark depending on the intended destination of the
product (e.g. for sale nationally, across Europe etc). Please see
section 5 of the Code of Practice Guidance for further details.
•
Durability – the way that durability is entered will depend on the
information on the label. For example, ‘best before’ and ‘use by’ will
normally have a day, month and year which can be entered from the
product label. ‘Best before’ would normally only carry a month and
year.
•
Condition – this is the condition in which the product was held in the
store from which it was sampled, e.g. at ambient temperature, chilled,
frozen etc. This can be selected from the drop-down list.
If other, specify
•
Temperature – for products that are not stable at ambient
temperatures, the air temperature of the cabinet or area in which the
food has been stored should be taken and recorded. A negative
number must be entered for frozen products. Please see the Code of
Practice guidance for further details on obtaining temperatures when
sampling.
25
Code of Practice
Click on the COP tab next to the Additional tab at the top to access this window.
•
Sample was taken in compliance with COP and relevant
legislation
Guidance for the taking of samples can be found in the documents
‘Guidance on Food Sampling for Microbiological Examination, January
2002’ produced by LACORS and in the Food Standards Agency’s
document ‘Practical Sampling Guidance For Food Standards And
Feeding Stuffs, Part 2: Food Standards Sampling‘. In Scotland, in
order to comply with the requirements of the Code of practice, the
taking of the food sample should normally be witnessed.
•
Explanation – if the sample was not taken in compliance with the
COP, state the nature of the deviation from the COP and the reasons
why
•
Sample was transported to lab in compliance with COP
requirements
Guidance for the taking of samples can be found in the documents
‘Guidance on Food Sampling for Microbiological Examination, January
26
2002’ produced by LACORS and in the Food Standards Agency’s
document ‘Practical Sampling Guidance For Food Standards And
Feeding Stuffs, Part 2: Food Standards Sampling‘. In Scotland, in
order to comply with the requirements of the Code of practice, the
taking of the food sample should normally be witnessed.
•
Laboratory
The laboratory that the sample was sent to. Names of the relevant
labs can be pre-installed into the drop-down menu.
•
Analysis - Routine (or as defined by the laboratory) analysis
required? – Select ‘yes’ if you require the routine suite of analysis to
be undertaken by the laboratory
•
Analysis required – if tests other than routine are required to be
undertaken on the sample (i.e. ‘no’ has been answered to the question
above), state the nature of the analysis that is to be undertaken by the
laboratory
•
Additional information – including contract code
27
Saving a sample
Options on completion of sample information:
Save With Validation (F7)
Click this button or press F7 key to validate the
sample data you have entered. If required fields
are incomplete or data errors exist the invalid
field will be selected for changes to be made
Save Without Validation (F8) Click this button or press F8 key to save the
sample data you have entered. This does not
validate the data and you will not be able to
export samples data to the lab. You can later
edit the record(s) in the Samples browser
screen and then Save With Validation (F7)
Abandon And Close
Caution! Clicking this button will lose any data
you have just entered. Only use if the data
entered is not needed
28
Sample Templates
Accessed by selecting Sample Templates from the File menu or clicking on the
button.
A template provides an opportunity to reduce the commonly entered fields and to
speed up data-entry for frequently visited premises and/or frequently taken sample
types.
Templates are managed from within this screen using the buttons on the right hand
side. The facility to Add/Edit/Delete and organise Templates is only available to an
Administrator.
View
To view a template, select the template in the main screen and then click on the
View/Edit button.
Edit
To edit a template, select the template in the main screen and then click on the
View/Edit button. This will allow you to view your template. To then edit the template
press the Edit button on the right-hand side or press F6 on your keyboard.
29
New Template
To create a new template, click on the New Template button on the right hand side.
A screen similar to the New Sample screen will appear:
To create a template, fields are filled in as per a normal sample.
Certain fields cannot be filled in ahead of time and are marked N/A.
Fields that will vary with each sample should be left blank and then completed at the
time of taking the sample.
For ease of searching provide each template with a suitable description in the field
Template Description before saving.
To save the template click on the Save button on the right or press F7 on your
keyboard.
30
Delete Template
To delete a template select the template in the main screen and then click on the
Delete Template button on the right hand side. This will permanently remove the
template from the system.
Copy Template
To copy a template, select the template in the main screen and then click on the
Copy Template button on the right hand side. This will create a duplicate template
with the name prefixed with COPY OF.
Groups
Templates can be organised into logical groups if required. The Groups button
accesses the administration screen.
Duplicate
The duplicate function is used to duplicate a previously made template. This
saves you time if you create a full template from scratch and only have a
couple of changes to make, you can duplicate it and edit it.
31
New Sample from template
The facility to create a new sample from a template is only available to a User, not an
Administrator and is accessed by selecting Sample Templates from the File menu.
To create a new sample from an existing template, select your template in the main
screen and click on the Create Sample button on the right hand side.
This will prompt to create a New Sample.
Template Order
You can change the order in which the templates appear in the list by clicking
on the
option at the top right hand side. This will order the templates
in Alphabetical order making them easier to find.
.
32
Browse Active Samples
Accessed by clicking on the Browse Active Samples button from the Main Screen.
All samples entered into the system can be viewed in the Browse Samples screen.
Apply Filter
If you wish to view only a certain status of a sample e.g. Entered, to be validated,
you can change the Sample Status at the top of the screen using the tab system.
Sort Data
You can sort the data by clicking on a column header.
The example shows data ordered alphabetically by Sample Officer.
(You can see the small up arrow)
Clicking again reverses the sort order.
33
(You can see the small down arrow)
The default sort order is to have the newest sample at the top.
Locate Sample
Above are all the samples taken by officer Christine Dick since 17/04/2000 - Present
by selecting the officers name from the drop down list and entering search time
criteria.
Sample Status
New in version 5 is the colour legend which helps identify what status a particular
sample is at. The colour legend is found at the bottom of the browse samples screen
and is show below
Set Prosecution
The prosecution field should be completed for samples reported as failed and where
legal proceedings have been concluded.
The field is completed by selecting the particular sample and clicking on the
button shown on the right hand side of the grid.
34
The following message will appear once the
button is selected:-
You can then select Yes to set the prosecution or No to cancel
this option.
If Yes is selected then the following message appears:-
To check the prosecution status of a sample you can select the column view in the
browse samples area.
At the top left hand side you can select the
grid appears:-
button and the drop down field choice
Set Prosecution can then be selected by selecting and
deselecting the next to it.
If the prosecution taken has been
set then the check box under the
Prosecution taken field in the
browse samples area
corresponding to the particular
sample will appear as .
If no prosecution taken has been
set then the check box will appear
as in browse samples grid.
35
Brows samples grid status with prosecution field overview.
Duplicate Sample
Select the desired sample to duplicate in the Sample Browser screen. Then click on
the Duplicate button on the right hand side. This will create a duplicate and open the
sample in view mode.
36
Click the Edit Sample button on the right hand side.
You can then click on the Save with Validation button or the Save without
Validation button.
Note that some fields are greyed out in the duplication process and cannot be used
in order to prevent errors.
By default the newest sample will appear at the top of the grid in the Browse
Complete Samples screen.
37
Export
Accessed by clicking on the Browse Active Samples button from the Main Screen
and then clicking on the Export button on the right hand side.
.
Completed samples displayed as Validated, awaiting export or blue in status can
be exported to the laboratory using this method.
button and then by selecting the Sampling Officer from
Click on the
the Sampling Officers shown you can then move on and select the Lab the sample
is being sent to, as shown:-
38
And click send file -
39
You will then get the following message saying the message has been
successfully sent and you can be confident that the sample has been sent, if
there is any problems please contact HPS.
Then click on the
button to complete the process.
To export the sample to file click on the Export to file
button on the
right hand side. (Please note this must only be used if you have a problem with
your internet connection, if this is the case please contact HPS and your
Laboratory for further advice)
You will then be asked which location you wish to export the files to. Once you have
saved them to the desired location, e.g. Desktop then you can attach to an email or
other device and follow the procedure you have with your laboratory.
Once the files are exported they will change status and turn green in the Sample
Browser screen.
The files exported are encrypted for the purpose of data protection.
If you wish to view an encrypted file then you must use the Encrypted File Viewer
40
Print
Print Form - Example
41
Print Report - Example
42
Print Label - Example
From the Browse Active Samples screen forms can be printed as part completed or
fully completed forms by selecting the Print Form or Print Report button on the right
hand side of the Browse Active Samples screen.
The above label can be printed by selecting the Print Label button.
The label works on most smart label printers and has been tested on Smart Label
Printer 420 (54mm Model)
43
Exported Samples
Accessed by clicking on the Exported Samples button from the Main Screen.
This screen shows all samples that have been exported to the lab .
You can use the plus/minus box
on the left hand side to show the sample details within an export batch.
Re Export
To re-export a previously exported batch or file then click on the
button.
The following menu will appear:
44
Import Samples
Accessed by clicking on the Import Samples button from the Main Screen.
Update from CFAD
Samples along with their laboratory results can be retrieved from the Central Food
Administration Database (CFAD).
It is essential the system CFAD server details (Page 50) have been applied
prior to undertaking this operation.
To download the sampling data click the Log in button on the right hand side.
Logged In
This will change the status bar from yellow to green and state Logged In when the
operation has been successful.
You should then click on the Update button on the right hand side to initiate the
transfer of data to your computer.
The progress bars will incrementally turn red as the process nears completion and
change the display from 0% to 100%
A number of records will be updated in the status area.
45
Import Complete
When completed the status bar will state Import Complete.
The data is now stored in your computer and can be viewed by closing this screen
and clicking Browse Samples from the Main Screen.
46
Browse Samples
Accessed by clicking on the Browse Samples button from the Main Screen. And
selecting the Samples Complete with results tab.
This screen shows all your sampling data along with laboratory results.
Querying the database
Using the Browse Complete Samples you can look at your samples complete with
the laboratory results and the Analysts comments.
Sorting Data
To begin sorting data click on the relevant heading. A small upwards arrow will
appear on the right hand side of the heading. This indicates an ascending sort. Click
again and the arrow will point downwards indication a descending sort.
Example: Data sorted in alphabetical name order
47
Filtering Data
If you want to look at a subset of the data you can restrict the records you see by
selecting only certain data.
To apply click on the drop down button for a heading and select the value you want
to filter on.
Example: Data filtered for unsatisfactory samples
Your current filter will be shown in the bottom left of the Complete Sample Browser
screen.
Example: Data filtered for unsatisfactory samples
To remove your filter click on the red cancel button and the filter will disappear.
48
Grouping Data
You can group data by selecting a heading and dragging it into the area directly
above the current headings. To ungroup data drag the heading back to its previous
location.
You can also select which headings are visible by selecting each heading in the drop
down menu below.
Example: Data grouped according to Premise Type.
You can now filter on Analysis type for example
49
Full Details
In this screen you can view all the details for a particular sample by clicking on the All
statues tab
You can use the plus/minus box
to expand or contract relevant sections.
D
D
D
D
D
D
D
D
D
D
D
50
Export to XML
The Export Samples to XML option is available to Administrators and is provided
under the File menu.
This option will allow FSS to interface with other programs, particularly local authority
management systems.
XML files can be interfaced with a wide variety of programs or the data can be
transformed to a different file type if needed.
Once the laboratory results data has been download via the Internet then the Sample
and Result data can be exported from FSS to an XML file.
By clicking on the Export Samples to XML button, a file dialog box will ask where to
save the file.
Once the file location has been decided the progress bar will process all the samples,
turning red, up to 100%.
51
The exported XML file will now be created as requested.
The only samples that have been added or have changed since last export option
can be ticked if you wish to, as the option says, only export samples that have
changed since the last export, if you wish to export all leave un ticked.
Encrypted File Viewer
This program facilitates the viewing of previously exported encrypted files.
To run this program, select FSS Network then Encrypted File Viewer from your
start menu.
Click on the View File button at the top left hand corner and select your file.
52
53
You can then view the data in your selected file.
54
APPENDIX A: DEFINITIONS
Brand name of food
E.g. Kellogg’s, Heinz
This can be setup in the Optional Look up Lists area in the Reference drop down
menu. This is a free text area and an example is shown below. Once saved the
options will appear in the Brand Name drop down menu.
55
Food description
Where there is a name laid down by law this must be used.
If not, a customary name may be used. If there is no customary name or it is not
used, a descriptive name must be used. This can also be setup in the Optional Look
up List are in the Reference drop down menu. This is a free text area and an
example is shown below. Once saved the options will appear in the Food description
drop down menu.
Nature of Product
The definitions provided reflect current food labelling regulations.
Raw
These are foods that are not “Ready-to-eat” and which have not been processed in a
manner that is likely to have altered their original microbiological contamination
levels.
Such food would include raw red meat, poultry meat and raw fish, whether or not
they have been diced, cut or filleted. It would also include root vegetables and
shellfish that have not been processed and are not consumed raw.
In Scotland, it also includes raw milk.
56
Processed
These are foods that are not “Ready- to-eat” but have been treated or modified in a
manner that is likely to have altered their original raw state with respect to
microbiological contamination levels.
Such processes would include:
• Preservation (such as smoking, curing, pickling, marinating, freezing),
• Heat processing (such as par-cooking)
• Flash frying
• Thermising
This category also includes convenience foods and microwave meals that require reheating. Foods such as vegetables that are subjected to processes such as peeling
and blanching are also included.
Ready to eat
These are foods that are ready for consumption without further treatment or
processing.
This definition covers both unwrapped and pre-wrapped ready-to-eat foods and is
intended to apply whether the ready-to-eat food may be consumed hot or cold. The
expression “further treatment or processing” is not intended to include food
preparation activities such as light washing, slicing, chopping, portioning, marinating
or preservation carried out by the consumer by way of preference to an otherwise
ready-to-eat item.
Examples of ready-to-eat items include: cooked meats, cooked meat products and
preparations such as pies and sausage rolls, cooked/roast chickens, sandwiches and
filled rolls, dairy products such as milk and cheese, fruit, pre-washed/topped and
tailed vegetables, prepared vegetable salads, whole vegetable items such as
tomatoes and or cucumbers, quiches, scotch eggs, savoury pies, ready-to-eat and
tinned ready-to-eat fish and fish products such as salmon, tuna or sardines,
preserves and jams, condiments, bread, confectionery and biscuits.
Certain foods such as black puddings (either bought in or manufactured on site) may
be ready-to-eat or require further cooking before consumption. It remains for the
proprietor of the food business to assess the status of such foods and to display
them in the appropriate manner. To ensure that the purchaser is provided with
appropriate information, it is recommended that the retailer indicate whether the
product needs to be fully cooked prior to consumption.
Steak pies may be considered ready-to-eat or require further cooking prior to
consumption. Steak pies that have been fired off should be considered ready-to-eat
while those with raw pastry should be considered as a raw product and should be
displayed in the appropriate manner. To ensure that the purchaser is provided with
appropriate information, it is recommended that the retailer indicate that the product
needs to be fully cooked prior to consumption.
Swab
For completeness, swabs can be recorded within the Food Surveillance System. If
SWAB is selected under Nature of Product the Category, SubCategory,
Packaging & Durability fields are automatically completed.
57
APPENDIX B: Packaging Guidance
Packaging - Labelling
Not prepacked
If the Product is Not Prepacked and the Not Prepacked option is chosen from the drop down
list then the
button becomes active. The Labelling details box now appears where
additional details can be filled in (See Below)
Meat Content – Yes or No is selected and details to be filled in.
Preservatives – Yes or No is selected and details to be filled in.
Other additives – Yes or No is selected and details can be built up by clicking on the
button, the other additives option builder appears (see below)
58
Once the Other additives option builder appears you can select each additive by
clicking the box to the left of it with the mouse, once all selections have been made
click the
button then chose the
button. Your
selections will now appear in the Labelling details box in the Other additives area.
Added water - Yes or No is selected and details to be filled in.
Allergen notice – Yes or No is selected and details can be built up by clicking on the
button, the Allergen notice option builder appears (see below)
59
Once the Allergen notice option builder appears you can select each allergen by
clicking the box to the left of it with the mouse, once all selections have been made
click the
button then chose the
button. Your
selections will now appear in the Labelling details box in the Allergen notice area.
Prepacked for direct sale
As with Not prepacked the
button again becomes active and the choices
detailed in Not prepacked also apply to Prepacked for direct sale.
a) Food (other than flour confectionery, bread, edible ices and cow’s milk) that is
pre-packed by a retailer for sale by him on the premises where the food is
packed or from a vehicle or stall used by him.
b) Flour confectionery, bread and edible ices that are pre-packed by a retailer for
sale as in sub-paragraph a) of this definition, or pre-packed by the producer of
60
the food for sale by him either on the premises where the food is produced or
on other premises from which he conducts business under the same name as
the business conducted on the premises where the food is produced.
c) Cow’s milk that is put into containers on the premises where the milk is
produced by the person owning or having control of the herd from which the
milk is produced for sale by him on those premises or from a vehicle or stall
used by him.
Prepacked for ultimate consumer
(TO THE ULTIMATE CONSUMER OR CATERING ESTABLISHMENT)
Food that is put into packaging before being offered for sale in such a way that –
Food, whether wholly or only partly enclosed, cannot be altered without opening
or changing the packaging and is ready for sale to the ultimate consumer or to a
catering establishment, and includes a food which is wholly enclosed in
packaging before being offered for sale and which is intended to be cooked
without opening the packaging and which is ready for sale to the ultimate
consumer or to a catering establishment
This does not include foods such as individually wrapped sweets or chocolates
which are not enclosed in any further packaging and which are not intended for sale
as individual items.
61
APPENDIX C: HPS CONTACTS
HPS System Administrator
If you have any questions regarding the project please contact:
Lorna Dryburgh
Systems Administrator
mailto:[email protected]
Tel. 0141 300 1147
Kelly Pumfrey
Project Support Manager
mailto:[email protected]
Tel. 0141 300 1946
Craig Wallace
IT Systems Support Officer
[email protected]
Tel 0141 300 1411
HPS Environmental Health Consultants
If you have any questions or comments relating to the FSS, please contact:
Rod House
(Consultant in Environmental Health)
mailto:[email protected]
Tel. 0141 300 1116
OR
Lynn Cree
(Adviser in Environmental Health)
mailto:[email protected]
Tel. 0141 300 1114
Postal Address
HPS
Clifton House
Clifton Place
Glasgow
G3 7LN
62
Version Changes
Version 5
•
Enhanced Colour Legend for sample status differentiation
•
Option to Re Export batches
•
Option to check batch information
•
You can now filter on “Analysis Type”
•
Enhanced built in help links
•
Enhanced built in user guidance
•
Enhanced built in context sensitive help
•
Prosecution functionality
•
Enhanced Print Form, Label and Report functionality
63