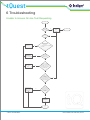
1
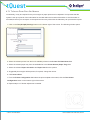
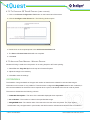
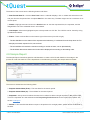
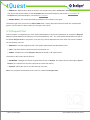
Specialised data integration for the NHS
tQuest
Primary Care
User Guide
tQuest
Specialised data integration for the NHS
Version Control
Date
Author
13th January 2014
Kathy Rogers
Summary of Changes
Doc Version No
Software Version
Release1
4.1.1
In case of query
Name
Telephone
Email Address
Indigo 4 Support Desk
0845 094 0194
[email protected]
Terms relating to the release of this document
This document contains confidential information belonging to Indigo 4 Systems Limited (“Indigo 4”) and is for the intended recipient only. Where
it contains information of a confidential nature, including without limitation, information relating to trade secrets, special terms or prices, these
shall be deemed for the purpose of the Freedom of Information Act 2000, as information provided in confidence by Indigo 4 and the disclosure of
which would be prejudicial to Indigo 4’s commercial interests.
The provision of this document is not intended to infer any commitment on the part of Indigo 4, to enter into a contract to supply any software or
services described.
Indigo 4 Standard Terms of Business apply and are available on request.
This material contains the valuable properties and trade secrets of Indigo 4, embodying substantial creative efforts and confidential information,
ideas, and expressions, no part of which may be reproduced or transmitted in any form or by any means, or retained in any storage or retrieval
system, without the express written permission of Indigo 4.
© Copyright Indigo 4 Systems Limited 2014
© INDIGO 4 SYSTEMS LIMITED
TQUEST PRIMARY CARE USER GUIDE | PAGE 2
tQuest
Specialised data integration for the NHS
Contents
1 Introduction
1.1 Online Help
2 New Request
5
5
6
2.1 Patient
6
2.2 Request
7
2.3 Order
9
2.3.1 Common Orderables
9
2.3.2 Orderable Tree View
10
2.3.3 Test Groups
11
2.3.4 Pathology Orderables
11
2.3.5 Radiology Orderables
12
2.3.6 Ordered Items
12
2.3.7 Protocols
13
2.3.8 Extended Group Questions
14
2.3.9 Previous Available Results
14
2.3.10 Outstanding Request
15
3 Collecting a Sample
17
3.1.1 To Collect all Samples on an Order
18
3.1.2 To Collect Individual Items on an Order
19
4 GP Admin
20
4.1 Incomplete
20
4.1.1 Date of Request
21
4.1.2 Requester
21
4.2 Complete
22
4.4 Practice Users
25
4.4.1 To Add a New User
26
4.5 Practice Administration
27
4.6 Comments
28
© INDIGO 4 SYSTEMS LIMITED
TQUEST PRIMARY CARE USER GUIDE | PAGE 3
tQuest
4.7 Test Print Out
Specialised data integration for the NHS
29
4.7.1 To Adjust Paper Print Out Margins
30
4.7.2 To Configure QT PrintX Printing (label printing)
31
4.7.3 Adjusting Print Margins - Windows Printing
31
4.8 Statistics
31
4.9 Sample Report
32
4.10 Request Text
33
5 Ordering Tests
34
5.1 To Order Tests for Another Practice User to Sample
34
5.2 To Order Tests for Another External User to Sample
35
5.3 To Add Additional Tests to an Existing Request
35
5.4 To Complete a Request Started by Another User
35
6 Troubleshooting
Unable to Access On-line Test Requesting
7 Associated Documents
7.1 Downloading Associated Documents
© INDIGO 4 SYSTEMS LIMITED
36
36
37
37
TQUEST PRIMARY CARE USER GUIDE | PAGE 4
tQuest
Specialised data integration for the NHS
1 Introduction
tQuest on line test requesting, is seamlessly accessed directly from a GP’s Practice Management System (PMS). It
provides a quick, effective and flexible requesting solution to meet every clinician’s requirements. Access to tQuest
is available to practice users who have user accounts configured on the PMS and tQuest.
The options are configured by Trust System Administrators dependent on the local requirements. For the purpose
of this manual, all the possible options which are available in tQuest are described.
1.1 Online Help
The Help icon is located at the top right side of the screen, using this icon will display an electronic copy of this
manual.
© INDIGO 4 SYSTEMS LIMITED
TQUEST PRIMARY CARE USER GUIDE | PAGE 5
tQuest
Specialised data integration for the NHS
2 New Request
The screen that is displayed when tQuest is accessed from the Practice Management System (PMS), is specified
by the Practice Administrator. If the administrator has not indicated a preference, and the user is configured to
make requests, the Order tab is displayed first. (See section 2.3.1 Common Orderables.)
The Patient and Request tabs will be populated automatically with details passed from the PMS.
The tQuest access screen displays the following tabs:
~~ Patient (see section 2.1 Patient)
~~ Request (see section 2.2 Request)
~~ Order (see section 2.3 Order)
On the top right side of the screen is the Help button, this gives access to an electronic version of this manual.
The bottom of the screen has the following buttons:
ZZFinish - Click the Finish button when the order is completed, this will generate a request form and/or labels.
This is the option to use when the user entering the request details will be collecting the samples immediately, or
if the request form will be given to the patient to take to an external location, for the sample to be collected.
ZZSave - Click the Save button when a request is created and the sample is to be taken at a later time/date, or
by another user at the practice. For example, the request is created by a GP but the sample is collected by the
Practice Nurse. A request form and/or labels will not be printed.
ZZCancel - Click on the Cancel button to close the request form without saving it, except users who have
accessed tQuest via the PMS TPP SystmOne, who should cancel any requests using the Cancel button at the
top left side of the screen.
2.1 Patient
Selecting the Patient tab will display the following screen.
The Family Name and Date of Birth are mandatory fields. The remaining fields may be specified as mandatory by
a Trust System Administrator.
© INDIGO 4 SYSTEMS LIMITED
TQUEST PRIMARY CARE USER GUIDE | PAGE 6
tQuest
Specialised data integration for the NHS
When tQuest is accessed from the PMS, the patient details will be populated with the patient’s demographics, as
they are recorded on the PMS. Any fields that are left blank, indicate that the information is not available in the
PMS.
In general, requests for patients who do not have an NHS number on their record can still be made, and the results
will be received by the requester. Specific Trusts may require that a valid NHS number is required and mandatory
for a request, in this situation the request cannot be made electronically.
It should be noted that it will not be possible to View Previous Results for any patient who does not have an NHS
number. (See section 2.3.9 Previous Available Results.)
The Category radio button indicates the request type for the patient. It can be changed by the requester if the
request is anything other than the default of NHS. The options are NHS, Cat2, Private. Category II status applies to
diagnosis and/or treatment, which is not available under the NHS. The work is carried out by medical staff but does
not form part of the duties of the practitioner under the terms of his contract.
An example of a Cat2 patient would be somebody who was referred by a medical adviser of the Department of
Social Security.
Sexual Health Practices who are using a requesting system other than Blithe Lilie, will have two fields Patient
Identifier and Repeat Patient Identifier. The identifier that the clinic uses should be entered in both fields. This
information will replace all patient identifiable data in the electronic request.
2.2 Request
The fields on the Request tab are configured by a Trust System Administrator and will vary between Trusts. For
the purpose of this document all possible options are described. All fields will be populated by the information held
in the PMS. An empty field indicates this information was not recorded in the PMS.
© INDIGO 4 SYSTEMS LIMITED
TQUEST PRIMARY CARE USER GUIDE | PAGE 7
tQuest
Specialised data integration for the NHS
ZZRequest ID from PMS - When tQuest is accessed from the PMS, a unique identifier will be generated. It is not
possible to make any changes to the ID.
ZZRequesting Professional - This label is populated with the user’s name for practice staff who have permission
to request tests in their own right, and are accessing the Request screen from their PMS. If the person logged
onto the PMS is making the request on behalf of another person, the requester’s name should be selected from
the drop down list to the right of this field. The drop down list is populated with information that is configured
by a Trust System Administrator. It is possible for sites to propose a user to be added to the list of Requesting
Professionals. (See section 4.4.1 To Add a New User.) The results for the requested test(s) are communicated to
the professional whose name is entered in this field.
ZZRequest Purpose - The reason for requesting the test can be selected from the drop down list.
ZZRequest Purpose/Amplification - Allows additional supporting information to be added to the reason for
requesting. This is a free text field.
ZZPregnant - Select the relevant radio button. This field displays for female patients in a specified age range.
The date ranges are specified by a Trust System Administrator.
ZZFasting - Select the relevant radio button to indicate if the patient is fasting at the time the sample is taken.
ZZUrgency - All requests will default to Normal. If the request needs to be treated as a priority, select Urgent
from the drop down list.
ZZUrgency (Amplification) - Allows additional supporting information to be added to the urgency.
ZZSend Copies to - The drop down list allows the selection of a hospital consultant to receive a copy of the test
or investigation results.
ZZRisk of Infection - Select the radio button to indicate if there is any risk of infection from the sample.
© INDIGO 4 SYSTEMS LIMITED
TQUEST PRIMARY CARE USER GUIDE | PAGE 8
tQuest
Specialised data integration for the NHS
2.3 Order
The Order screen is configured by a Trust System Administrator; therefore not all of the sections described may be
available. This screen displays all the test services that the Pathology and Radiology departments offer. The
options will be relevant to the age and gender of the patient. For example, pregnancy tests (or pregnancy related
protocols) will not be available for male patients, or female patients outside of child bearing age ranges. The
catalogue of orderables is also relevant to the individual requesters. For example, radiology investigations will be
available for GP’s or practice staff who hold an appropriate qualification only. A Trust System Administrator specifies
the fields that are mandatory.
2.3.1 Common Orderables
A Trust System Administrator will determine and configure the Common Orderables area of the Order screen.
Common Orderables are the items that are most frequently requested by GP surgeries. Typically they reflect
those that are ordered on paper requests, by completing the check boxes. Common orderables are ordered in the
same manner electronically, by ticking check boxes. The screen will display with one or more titles of Expandable
Sections on the left. The Expandable Sections give access to Common Orderables that are grouped together,
clicking on the arrow to the left of the title will open the Expandable Section.
Where only one Expandable Section is configured, the screen will display as a single table.
The name of any Common Orderable which is underlined indicates that additional information is available. To
access the information, single click on the name of the Common Orderable.
© INDIGO 4 SYSTEMS LIMITED
TQUEST PRIMARY CARE USER GUIDE | PAGE 9
tQuest
Specialised data integration for the NHS
Ordering multiple instances of a test is possible, (if configured by a Trust System Administrator). Clicking on the
orderable will display a number in the check box which increases each time the orderable is selected. The number
of requests is also reflected in the Ordered Items pane. (See section 2.3.6 Ordered Items.)
2.3.2 Orderable Tree View
Where a System Administrator has configured Orderable Tree Views to be used, a Search button will display at
the bottom of the relevant Section.
When the button is clicked, the Orderable Tree View opens to show three panes. The first pane lists (in
alphabetical order), the titles of folders that contain either further folders or orderables. The hierarchy is navigated
by clicking on the folders until the orderables are reached. Each time a new level is accessed, a further column will
open to the right of the current one. An overview of the progress down the hierarchy, is displayed in the pane on the
bottom left of the screen.
Orderables with an icon on the left indicates that additional information is available. To access the
information, single click on the icon.
© INDIGO 4 SYSTEMS LIMITED
TQUEST PRIMARY CARE USER GUIDE | PAGE 10
tQuest
Specialised data integration for the NHS
Orderables are selected by highlighting the item and clicking on Add, or double clicking on the item. The list of
ordered items shows in the pane at the bottom right of the screen.
Orderables from different folders may be added in the same request.
Clicking on the Close button, will close the Orderable Tree View and the Ordered Items pane is populated with
the information. (See section 2.3.6 Ordered Items.)
2.3.3 Test Groups
Orderables that are routinely ordered at the same time, can be configured into Test Groups by a Trust System
Administrator. The available Test Groups are seen by clicking on the Open button next to the Test Groups
heading, on the right. Selecting one of the groups from the resulting menu, will display all the tests within the group
in the Tests in Group field.
The items in a Test Group are ordered by either double clicking on the Test Group, or highlighting the Test Group
and clicking the Add button. All the tests from the highlighted group will show in the Ordered Items pane. (See
section 2.3.6 Ordered Items.)
Any item included in a Test Group, that is also a common orderable, will automatically be ticked in the common
orderables table, when ordered as part of a Test Group. (See section 2.3.3 Test Groups.)
Orders for individual items will not be duplicated if a Test Group that includes that item, is also ordered as part of
the same request.
Any age or gender restrictions applied to individual tests in the Test Group will exclude those test from view and
the request.
Orderables that have Protocols (see section 2.3.7 Protocols) attached to them, will ask additional questions when
they are added to the request, whether they are ordered individually or as part of a Test Group. (See section 2.3.3
Test Groups.)
2.3.4 Pathology Orderables
The full catalogue of Pathology Orderables is accessed from either the Pathology Search button, this is shown
below the list of disciplines, or the Open button above the Ordered Items field. Note: only one of these options will
be available, dependent on the option the Trust has chosen. The Pathology Orderables list opens on the left of
the screen in a separate window. It is possible to filter the list of orderables by selecting the discipline from the drop
down list. Alternatively, the user can type the name (full or partial) of the test into the Orderables Search field, the
field is not case sensitive. The system will search through all the available tests and display all results that contain
the search text anywhere in the test name. The pane has two buttons below it:
ZZAdd - This button can only be used once a test is highlighted, clicking the button will place the test into the
Ordered Items pane. (See section 2.3.6 Ordered Items.)
© INDIGO 4 SYSTEMS LIMITED
TQUEST PRIMARY CARE USER GUIDE | PAGE 11
tQuest
Specialised data integration for the NHS
ZZInfo - If the Info button is configured by a Trust System Administrator, additional information about the
orderable may be displayed in a web page (for example, guidelines for its suitability). The orderables that have
additional information are identified with a light blue background. To see the information, highlight the item by
clicking on it once, then click on the Info button.
2.3.5 Radiology Orderables
The full catalogue of Radiology Orderables is accessed from either the Radiology Search button, this is shown
below the list of modalities, or the Open button above the Ordered Items field. Note: only one of these options will
be available, dependant on the option the Trust has chosen.
This accesses the radiology Orderable Tree View. (See section 2.3.2 Orderable Tree View for details of ordering
using the Orderable Tree View.)
2.3.6 Ordered Items
This pane displays the names of tests and investigations the requester is ordering. If enabled by the System
Administrator, the cost for each item will show on the right under the Price column. The Total Price for the order is
calculated at the bottom.
On the bottom left of the pane are two buttons:
ZZRemove - To remove any single item from the Ordered Items pane, highlight the item and click the Remove
button, multiple items can be removed by holding the Ctrl button and selecting all items that are to be removed.
Any item can be removed regardless of whether it was added as part of a Test Group or individually.
ZZEdit - Allows the responses to any Protocols (see section 2.3.7 Protocols) to be changed. Highlight the item
in the Ordered Items pane and select Edit, all of the questions previously answered will display. Enter the new
information and click on Save to confirm the changes.
© INDIGO 4 SYSTEMS LIMITED
TQUEST PRIMARY CARE USER GUIDE | PAGE 12
tQuest
Specialised data integration for the NHS
ZZHistory - This field allows free text to be entered for any relevant patient history that the requester may wish to
record, and/or communicate to the lab.
ZZCurrent Medication - Allows entry of any medication the patient is currently taking.
ZZClinical Details - Allows any supporting clinical information to be communicated to the lab.
ZZOrdered Items Comments - Allows any supporting or relevant information to be communicated to the
laboratory.
ZZAdditional Contact Information - Allows any relevant contact information to be entered.
If configured by the System Administrator, two further buttons may be available below the History, Current
Medication, Clinical Details and Additional Contact Information fields. The buttons allow Comments to be
added or created for use in these fields.
ZZComment- This button allows the user to add further information to the request, by clicking the button and
selecting existing details from a list. The list is either populated by a System Administrator at the Trust or by
practice users. Click on the Comment button and from the list, select the relevant text and click OK. To add
multiple comments, hold the Ctrl button and select each comment to be added. Alternatively, press Shift +F8,
and then select the next comment to be added and press the Space Bar. Mark each entry in this manner and
then click on Add.
ZZSave Text - If Comments are to be used repeatedly, type the information into the field, highlight the text and
click on the Save Text button below the entry field. The information is saved for future entries and is available to
all users in the practice when the Comment button is used.
2.3.7 Protocols
A Trust System Administrator may configure some tests to prompt for additional information, before the test can be
ordered. When these items are selected, a pop up window will open and display the relevant questions.
Mandatory questions will be in bold text and will not allow the user to proceed until they are completed. Depending
on the answers, further questions may be asked. The outcome of the questions will determine whether the test
© INDIGO 4 SYSTEMS LIMITED
TQUEST PRIMARY CARE USER GUIDE | PAGE 13
tQuest
Specialised data integration for the NHS
can be ordered or not. If the test can be ordered it will be displayed in the Ordered Items pane. (See section 2.3.6
Ordered Items.)
2.3.8 Extended Group Questions
Extended Group Questions are bespoke groups of questions and/or instructions they are unique to each Trust
and developed to the Trust’s specific requirements.
Extended Group Questions can be prompted when either specific Orderables or associated Disciplines are
requested.
The questions will appear when the requester either selects Save or Finish at the end of a request. The requester
is guided through a series of questions. The answers may prompt either further questions or add items to the
request. A red asterisk indicates this is a mandatory field.
The final screen has a Save button which will complete the process. Any incomplete fields will be highlighted with a
red asterisk and prevent the request from being completed.
2.3.9 Previous Available Results
As items are selected, tQuest performs a background check on the Indigo 4 Review server, to determine if there
are any results for that test. This is dependent on the laboratory having Indigo 4’s Review software and the
availability of a valid current result. The lookup uses either the patient’s NHS number or a combination of the
Patients NHS number, Date of Birth, Sex and Family Name. The demographics used to perform this lookup are
determined by the Trust.
Where a current result is available, an alert will advise the user that there is a current result available.
Selecting OK will display the report which includes the previous result. (See Review User Manual .) The original
request for the test may have been generated from another GP surgery, outpatient clinic or while the patient was
in hospital. The report will show regardless of the requesting source. A further prompt gives the option of either
cancelling the request for the item, or continuing to add the item to the request.
© INDIGO 4 SYSTEMS LIMITED
TQUEST PRIMARY CARE USER GUIDE | PAGE 14
tQuest
Specialised data integration for the NHS
2.3.10 Outstanding Request
As items are selected, tQuest performs a background check to determine if there are any outstanding requests for
that test and patient. If an outstanding request is identified, an alert will advise the requester of an existing request
and offer to display the request details.
Selecting OK will display the request details.
The original request for the test may have been generated from another GP surgery, outpatient clinic or while the
patient was in hospital. The request details will show regardless of the requesting source. A further prompt gives
the option of either cancelling the request for the item, or continuing to add the item to the request. Note: Only
requests made using tQuest will be displayed.
2.3.11 Collect Sample Buttons
For sites that are configured to collect their own pathology samples, there are three buttons below the Ordered
Items pane:
~~ Now
~~ Later - Unknown date
~~ Later - Specific date
ZZNow - The Now radio button should be selected if the sample is being taken immediately by the requester.
Selecting Now will add the current date and time to the request form and will disable the Save button. It will only
be possible to Finish the request. The request form and/or labels will be printed.
ZZLater - Unknown date -This button is selected either when the person ordering the test will not be taking the
sample and the patient is to attend a clinic (either at the GP surgery or another location), or the requester may
wish to edit the request before printing it. Selecting this radio button will allow the user to either Finish or Save
the request. If the user selects Finish, the collection date and time field is left blank on the request print out. This
allows either the sampler to manually enter the information, or for external samplers (for example, at hospital
phlebotomy clinics) to enter the details with Indigo 4’s Sampler. Note: Finished requests cannot be accessed
© INDIGO 4 SYSTEMS LIMITED
TQUEST PRIMARY CARE USER GUIDE | PAGE 15
tQuest
Specialised data integration for the NHS
from the PMS to add sample details. Selecting Save will save the request for the requester to edit the request,
or for another user to access at the time of collecting the sample. (See section 5.4 To Complete a Request Started
by Another User.) Radiology investigations cannot be saved, selecting Save for requests that include a Radiology
order will automatically generate a print out for those investigations. In this scenario, an order that includes both
Pathology and Radiology items when saved, will produce a print out for all Radiology investigations and Save the
Pathology items only.
ZZLater - Specific Date - This radio button is selected when the sample will be collected at a future known date,
either at the GP surgery or another location. Selecting Later - Specific Date allows a date to be selected by
clicking on the Planned Date button. When a date is selected it will show on the Planned Date button. Users
can either Finish or Save the request. Finished requests will generate a request print out which includes the
expected date. This can be used as a reminder for the patient and will require the sample collector to write the
time of collection onto the request.
The laboratory will periodically remove any requests when they do not receive samples. Selecting the Later specific date button will retain the request on the laboratory system until after the specified date.
Note: When the Finish button is selected, a prompt will inform the user that the request is completed and it is not
possible to make any changes. Requests forms and/or labels will always print when the Finish button is selected.
If a user attempts to sample a completed request, a prompt will inform the user that it is not possible to update the
request.
!
Care should be taken when labelling samples and bags to ensure that the labels are applied to the
correct items, for the correct patient. The opportunity for mistakes to occur is increased when the
paperwork, printed from the system, is not used as soon as it is generated. Situations in which multiple
users share a printer increase the risk of mistakes.
It is important when labelling samples that the stickers are applied in accordance with the instructions
from the laboratory. For example, most laboratories will ask that sample labels are applied along the long
axis of the tube. Poor application of sample stickers can lead to delays in the laboratory’s workflow and
the subsequent delivery of the results.
© INDIGO 4 SYSTEMS LIMITED
TQUEST PRIMARY CARE USER GUIDE | PAGE 16
tQuest
Specialised data integration for the NHS
2.3.12 View Previous Test Results
For sites that have tQuest configured to work with Indigo 4’s Review software, a View Previous Test Results
button will be present.
Clicking this button will open Review to display any previous test results for the patient, as long as they have a valid
NHS number. (See the Review User Manual.)
3 Collecting a Sample
From the patient’s record in the PMS, select the Sample Now option. Refer to the relevant Quick Start Guide for
details of how to access tQuest to Update or Sample the request. (See 7 Associated Documents for the list of Quick
Start Guides.) The Order tab is replaced by the Sample tab.
3.1 Sample
The Sample tab displays for all practices that will be collecting their own samples.
The Sample tab is populated with details of the tests to be carried out. The left side of the screen has details of the
test name(s) and sample types to collect the sample (If relevant).
Selecting the sample in this pane will display the tests in the Ordered Items pane on the right. Below the sample
© INDIGO 4 SYSTEMS LIMITED
TQUEST PRIMARY CARE USER GUIDE | PAGE 17
tQuest
Specialised data integration for the NHS
pane is the Collect All Samples button. Clicking on this button will highlight all the sample requests in the samples
pane and add the current server date & time onto the Collection Date Time button, on the right of the screen.
ZZCollected - Adding a tick in this check box after highlighting the item in the Ordered Items pane, allows
individual items to be collected. This option is used on occasions when all samples on the request are not
collected at the same time.
ZZDetails of Sample - The details of the sample that are highlighted in the Samples pane on the left side of the
screen are entered in this field. Selecting another sample in the Samples pane will change these details.
ZZOrdered Items - Details of all Items ordered will be listed in this pane.
ZZWarning - Select the relevant radio button for any warnings that are relevant to the samples.
ZZWarning Text - This is a free text field for supporting information when a warning is selected.
ZZCollection Date Time - This button defaults to None. Selecting the Collect All Samples button will change to
the current time and date of the server. Alternatively, click on the button and select the appropriate date and time
from the calendar when the sample was collected on another date and time, to the current default.
The bottom of the screen has three buttons:
ZZDelete - Click on the Delete button to remove uncollected samples and associated tests.
ZZFinish - Click on the Finish button when samples are collected. The request form and/or labels are then
printed out. Once the Finish button is clicked, the collected samples cannot be changed by the practice users
and is moved to the Complete tab, (see section 4.2 Complete) the information is then available to the lab.
ZZCancel - Click on the Cancel button to close the Sample view, without saving any changes.
3.1.1 To Collect all Samples on an Order
The most frequently used option on the Sample screen is Collect all Samples.
From the patient’s record in the PMS select the Sample Now option. Refer to the relevant Quick Start Guide for
details of how to access tQuest, to sample the request. (See 7 Associated Documents for the list of Quick Start
Guides.)
1 Click the Collect All Samples button.
2 The current server date and time will be added to the Collection Date/Time button.
3 Click the Finish button.
4 The request form and/or labels will print out.
5 The collected items will move from the Incomplete tab (see section 4.1 Incomplete) to the Complete tab. (See
section 4.2 Complete.)
© INDIGO 4 SYSTEMS LIMITED
TQUEST PRIMARY CARE USER GUIDE | PAGE 18
tQuest
Specialised data integration for the NHS
3.1.2 To Collect Individual Items on an Order
There may be occasions when not all samples are collected on the same visit. It is possible to collect individual
items, in this situation, the collected samples will remain on the Incomplete tab. (See section 4.1 Incomplete.)
The collected samples will move to the Finished Items tab which is seen, when the Edit button is clicked on the
Incomplete tab. The uncollected samples can be seen on the Unfinished tab.
1 From the patient’s record in the PMS select the Sample Now option. Refer to the relevant Quick Start Guide
for details of how to access tQuest to sample the request. (See 7 Associated Documents for the list of Quick Start
Guides.)
2 On the left of the screen, highlight the item to be collected.
3 Click the Collected box, to add a tick.
4 Click the Finish button.
5 The request form and/or labels for the completed item will print out.
6 The collected items will move from the Incomplete (see section 4.1 Incomplete) tab to the Complete tab. (See
section 4.2 Complete. ) All outstanding items will remain on the Incomplete tab until they are collected.
7 A Collected tab will show the next time a user views the Sample screen. The Collected tab shows details for
all samples that were collected from the original request.
© INDIGO 4 SYSTEMS LIMITED
TQUEST PRIMARY CARE USER GUIDE | PAGE 19
tQuest
Specialised data integration for the NHS
4 GP Admin
The practice Admin for tQuest can be accessed from the user’s PMS. Refer to the relevant Quick Start Guide for
details of how to do this. (See 7 Associated Documents for the list of Quick Start Guides.)
The screen opens with the following tabs along the top.
~~ Incomplete (see section 4.1 Incomplete)
~~ Complete (see section 4.2 Complete)
~~ DNA List (see section 4.3 DNA List)
~~ Practice Users (see section 4.4 Practice Users)
~~ Practice Administration (see section 4.5 Practice Administration)
~~ Comments (see section 4.6 Comments)
~~ Test Print out (see section 4.7 Test Print Out )
~~ Statistics (see section 4.8 Statistics)
~~ Sample Report (see section 4.9 Sample Report)
~~ Requests Text (see section 4.10 Request Text)
The name of the practice appears on the top left of the screen. The online help icon is on the top right of the screen
on all tabs, giving access to the tQuest manual.
4.1 Incomplete
The main body of the Incomplete tab, details all requests that have been created and are waiting for samples to be
collected. Holding the mouse over any of the lines will present a tool tip with the details of the request. The request
details are listed under the following columns:
ZZPatient - The patient name as entered on the PMS.
© INDIGO 4 SYSTEMS LIMITED
TQUEST PRIMARY CARE USER GUIDE | PAGE 20
tQuest
Specialised data integration for the NHS
ZZDate of Request - The date and time the request was generated.
ZZDate of Birth - The patient’s DOB as entered on the PMS.
ZZSex - The gender of the patient as entered on the PMS.
ZZPost Code - The patient’s postcode as entered on the PMS.
ZZRequester - The name of the person the request was generated by, or on behalf of. (See section 4.1.2
Requester.)
The bottom of the screen has the following buttons.
On the left of the screen:
ZZEdit - Highlight one of the outstanding requests to open the original information entered by the requester. If
the Incomplete tab was accessed from the PMS using the options to view Incomplete Requests or Patient
Request Lists; the Edit button will take the user to the Sample screen, (see section 4.1 Incomplete) with the
Patient (see section 2.1 Patient), Request (see section 2.2 Request) and Questions tabs showing (if questions
were answered). If the Incomplete tab was accessed from the PMS using the options to view Complete
Requests, Location Reports or the Full Sample Queue; the Edit button will show the Patient, Request,
Unfinished Items and Questions tabs and the information will be read only.
ZZSearch - It is possible to search for outstanding requests for specific patients, enter the patient’s name in
the Patient Search field and click on the Search button to the right. All Incomplete requests for the patient are
displayed in the main pane.
On the right of the screen:
ZZReprint - If an Incomplete request contains any collected samples, it is possible to reprint those request forms
by clicking the Reprint button. If the request does not contain any collected samples, the Reprint button will be
greyed out.
ZZClose - Clicking on the Close button will return the user to the PMS.
4.1.1 Date of Request
The date of request can be filtered to see requests that were made within specific time frames; the drop down list
on the right of the field allows the user to filter the information. The date and time are those on which the request
was initially generated; any alterations to the request and subsequent saving will retain and display the details of
when it was originally saved.
4.1.2 Requester
The Incomplete screen can be filtered to see requests that were made by or on behalf of a specific requester, the
drop down list on the right of the field allows the user to filter the information.
© INDIGO 4 SYSTEMS LIMITED
TQUEST PRIMARY CARE USER GUIDE | PAGE 21
tQuest
Specialised data integration for the NHS
4.2 Complete
A request is complete once all the tests are sampled and the user clicks on Finish either on the Sample view, (see
section 4.1) or the Order view. (See section 2.3 Order.)
The Complete screen is divided into the following columns:
ZZPatient - The patient name as entered on the PMS.
ZZDate of Request - The date and time the request was generated. Date of Birth - The patient’s DOB as
entered on the PMS.
ZZSex - The gender of the patient as entered on the PMS.
ZZPostcode - The patient’s postcode as entered on the PMS.
ZZRequester - The name of the person the request was generated by or on behalf of.
The bottom of the screen has the following buttons.
On the left:
ZZView - Highlight the request and then click on the View button. This will display the details of the request on
screen; the details are for information only and cannot be altered from this view; the only options are Back, to
return to the Complete view, or Close to exit tQuest. When the View button is used to see the details of an
Incomplete request, the following tabs will show (dependent on the individual request).
• Patient - The patient’s details as entered on the PMS and which were included on the original request.
• Request - The details which were completed on the original request.
• Finished Items - Lists the disciplines and the samples which were collected under that discipline, and their
associated orderables. The Order Reference Number corresponds to the barcode on the printed Request Form
(printed when the Finish button was selected at the time of sampling); the printed form is included with the
sample and sent to the Lab from the practice. Each sample description details the current Lab status and may
be Not Received, Received, Damaged, Entered or Reported. The local code (Lab code) of the test appears
© INDIGO 4 SYSTEMS LIMITED
TQUEST PRIMARY CARE USER GUIDE | PAGE 22
tQuest
Specialised data integration for the NHS
after the test description.
• Questions - This tab displays any Protocol questions and answers asked at the time of selecting an
orderable. (See section 2.3.7 Protocols.) The questions are grouped under the orderable. There may also be
questions relating to a discipline which is part of the order.
• Extended Questions - This tab displays any questions and answers asked at the time of selecting an
orderable. (See section 2.3.8 Extended Group Questions.)
ZZReprint - Clicking the reprint button allows a duplicate request form to be printed.
ZZRecollect - To recollect any samples, click on the Recollect button. A warning will display, advising that a new
request will be created and recorded in tQuest. Click on OK and the original Sample screen will display. (See
section 4.1 Incomplete.) Recollecting samples does not create a new request in the PMS.
ZZSearch - It is possible to search for completed requests for specific patients. Enter the patient’s name in the
Patient Search field and click on the Search button to the right. All completed requests for the patient will be
displayed in the main pane.
On the right of the screen is a filter and the Close button. Clicking on the Close button will return the user to the
PMS. The Request Status Filter, allows the completed requests to be filtered according to their status in the Lab,
it contains the following statuses:
ZZAll - Lists all requests from the practice.
ZZNot Received - Lists all requests from the practice from which the laboratory has not received any samples.
ZZReceived In Part - Lists all requests from the practice where some samples for the request have been
received by the laboratory.
ZZReceived In Full - Lists all requests from this practice where the laboratory has received all the samples.
ZZProcessed - Lists all requests from this practice where the laboratory has processed all the samples.
ZZReported In Part - Lists all requests from this practice where some of the tests ordered in the request have
had results reported by the laboratory. Outstanding results will be reported on, and at that time the request status
will become Reported in Full.
ZZReported In Full - Lists all requests from this practice, where the laboratory has reported the results on all the
tests ordered in the request.
ZZ4.3 DNA List
The DNA (Did Not Attend) List tab is only present for Trusts that allow radiology requests via tQuest and is not
present for all practices. The details of patients who have not attended their appointments, did not book an
appointment or did not attend a drop in clinic within a specified time period, will be listed on this screen. The first
100 DNA’s will be listed on the screen, a warning will advise if there are more than 100. Filters on the Department
© INDIGO 4 SYSTEMS LIMITED
TQUEST PRIMARY CARE USER GUIDE | PAGE 23
tQuest
Specialised data integration for the NHS
and Referrer columns and on the bottom right of the screen, can be used to view DNA’s which are older than the
initial 100 on display. There is an option to take action on any of the DNA’s on the list. This action is fully audited
and the information can be retrieved by Indigo 4.
The DNA List tab is divided into the following columns:
ZZPatient Name - The full name of the patient.
ZZNHS Number - The patient’s NHS number.
ZZDOB - The patient’s date of birth.
ZZDepartment - The department to which the request was made. A drop down list allows the DNA list to be
filtered by department.
ZZReferrer - The name of the person the request was generated by or on behalf of.
ZZExams - Details the examinations that were requested. Occasionally, the full details will not display when more
than one test is on the request. A tool tip will show all of the tests when the mouse is held over the column.
ZZHandled - Details if any action has been taken for the DNA. The options are:
• Unhandled - No action has been taken.
• Handled - Action has been taken for this DNA, for example the patient has been contacted.
• Unhandled with notes - An entry was made by a practice user for this DNA but the status has not changed,
for example attempted to contact patient but no response.
ZZDays Late - The number of days that the patient is late, this information is dependent on the department’s
appointment system.
• If an appointment is required for the test and the patient made the appointment (within the expiry period) but
did not arrive, the days late count will begin the day after the appointment was missed.
• If an appointment is required, and the patient did not make the appointment within the allocated expiry period,
the days late count begins the day after the expiry period.
• If the department runs a drop in clinic, and the patient does not attend any clinic within the allocated expiry
period, the days late count begins the day after the expiry period.
© INDIGO 4 SYSTEMS LIMITED
TQUEST PRIMARY CARE USER GUIDE | PAGE 24
tQuest
Specialised data integration for the NHS
In all cases when the expiry date passes, the patient will require a new referral to continue their treatment.
The bottom left of the screen has a field to search for specific patients, by using either the family name or their NHS
number. The search will be made using the current filters that are set on the right side of the screen. If no results
are found, (but results could be found with different criteria) a prompt will advise the user. The user has an option to
view these results by clicking on the OK button.
The bottom right side of the screen has three filters and two buttons. The filters are:
ZZHandled - The status in the handled column can be filtered to show handled, unhandled with notes and
unhandled DNA’s.
ZZLate Periods - A list of preset time periods allows the DNA list to be filtered.
ZZDNA Reasons - The DNA list can be filtered according to reason. The options are: did not attend drop in
clinic, did not book appointment and did not attend appointment.
The two buttons are:
ZZHandle - Clicking on the button gives the user the option of taking action on the highlighted DNA.
ZZView - Clicking on the View button will show the details of the unattended referral.
4.4 Practice Users
The Practice Users tab allows the practice to configure the list of tQuest users. The original list of users is
managed by a System Administrator at the time of implementation, the housekeeping of this list is then managed at
practice level.:
© INDIGO 4 SYSTEMS LIMITED
TQUEST PRIMARY CARE USER GUIDE | PAGE 25
tQuest
Specialised data integration for the NHS
The screen is divided into the following columns:
ZZName - Displays the name of the practice user who has been configured to use the tQuest System.
ZZPosition - The role of the user at the practice.
ZZPMS Login Name - The details the user enters into the Login field on their PMS.
ZZODS Code - Displays the ODS code of the practice user (if relevant).
ZZCan Request - This column details the Requesting Professional for selection in the Requests view. (See
section 2.2 Request.) The possible options are No & Proposed.
• No - Identifies that the user can only request on behalf of another user.
• Proposed - Informs a System Administrator that this user can make requests in their own name. The status
will remain Proposed until a System Administrator takes action and changes the status to Yes.
The bottom left of the screen has three buttons:
ZZAdd - Clicking on Add displays the Add User window, for details of how to complete the window. (See section
5.4.1. )
ZZModify - Allows the details of the currently highlighted practice user to be changed.
ZZDelete - Highlights the details of the relevant practice user on the list and then click on Delete to remove the
user’s details from the screen and the drop down list, on the Requests screen. This will not remove the user’s
details from any historical information on the PMS or tQuest.
4.4.1 To Add a New User
1 Click on the Add button. The Practice User window opens.
1 Complete the fields with the relevant information.
ZZName
ZZPosition
ZZPMS Login Name - The name or mnemonics that the user logs into the PMS with.
© INDIGO 4 SYSTEMS LIMITED
TQUEST PRIMARY CARE USER GUIDE | PAGE 26
tQuest
Specialised data integration for the NHS
ZZODS Code - The ODS code if the user has one.
ZZCan Request - No identifies that the user can only request on behalf of another user. Proposed informs a
Trust System Administrator that the user can make requests in their own name. The status will remain Proposed
until a Trust System Administrator takes action and changes the status to Yes. Users who have a status of
Proposed should complete the request using another user’s name from the drop down list.
ZZNew Request - Starting Tab - If a ‘starting tab’ is not specified, the requester will default to the Order tab. The
options are: Patient (see section 2.1 Patient),Request (see section 2.2 Request), Order. (See section 2.3 Order.)
2 Click on Save to complete the registration. Cancel will close the form without saving any of the details.
4.5 Practice Administration
This tab allows the practice details to be configured and displays the option to force the Practice Users to use
ScriptX for their request print outs. ScriptX is third party software required by tQuest to generate the printout of
paper requests. Using ScriptX will suppress the Internet Explorer pop ups every time a request form is printed and
allows the practice to identify the print margins and printer tray to be used for all on line requests. Practices that will
be printing to labels only will not require ScriptX.
ZZPhone - The practice telephone number including the area code.
ZZFax - The practice fax number including the area code.
ZZFurther Contact Details - The practice address and postcode.
ZZPractice Management System - Three fields contain drop down lists to select the PMS supplier, system and
version number (if known).
ZZUse ScriptX at This Practice - Placing a tick in this box will force all practice users to use ScriptX for request
printing. (See section 4.7 Test Print Out for details of testing the print outs.)
ZZPrinter Configuration Storage Setting at this Practice - A radio button allows the practice administrator to
specify where the cookies required for printing configuration are stored. The options are :
© INDIGO 4 SYSTEMS LIMITED
TQUEST PRIMARY CARE USER GUIDE | PAGE 27
tQuest
Specialised data integration for the NHS
• Workstation Only - Printer settings will be stored at the workstation, this will require one user to configure the
printer settings for all users of that machine. This option is recommended for practices that have the InPS Vision
PMS.
• Workstation User - Printer settings will be stored for users of the machine. This will require each user of
each machine to configure the printer settings.
The bottom right has an Apply button, this should be used to save any changes made to the settings in this
section.
4.6 Comments
This tab allows the practice to maintain a list of Comments which may be added into any free text fields on the
Request Form. Any Comment that is added to a request and saved (see section 2.2 Request) will be saved in this
area.
Each line shows a separate comment that can be used on a request.
The following buttons can be found on the bottom left of the screen:
ZZAdd - Click on the Add button to open the Comment dialogue window, type a new Comment and click on
Save to add the new Comment to the list. This Comment is now available from the Comment button on the
Requests tab. (See section 2.2 Request.)
ZZModify - Highlight a Comment to be modified and click on the Modify button; the Add Comment dialogue
window opens with the current Comment available. Make any changes and select Save.
ZZDelete - Highlight the Comment to be deleted and click on the Delete button. This does not affect any
historical entries of this Comment.
© INDIGO 4 SYSTEMS LIMITED
TQUEST PRIMARY CARE USER GUIDE | PAGE 28
tQuest
Specialised data integration for the NHS
4.7 Test Print Out
In most cases, the Trust will complete the configuration of printers for the practice at the time tQuest is activated. It
may be necessary to adjust the print margins for request print outs, as printer alignment is important when printing
onto specialist stationery, for example, paper sheets that include labels. Full details for configuring the browser and
printing settings can be found in the tQuest Browser Config Guide found on the website see section 7 Associated
Documents.
!
Practices that use specialised paper which includes labels should pay particular attention to the printing
configuration. It is important that the system is set up to print all of the information for the label within the
bounds of the sticker. If the information is truncated, there may be an impact on the speed and accuracy
with which the laboratory can process the request. For example, if a barcode is truncated it will not scan.
The Test Printout screen shows with a Printer Configuration field. The drop down list is populated with all of the
print outs that the practice will produce, when a pathology sample is collected or radiology investigation is ordered.
A green tick indicates the type of print out that will be produced for items selected in the Printer Configuration
field. A red cross will identify when a type of print out will not be produced.
The bottom left of the screen has the following buttons:
ZZBrowser Configuration Tool - Gives guidance and troubleshooting tips to assist with configuring the browser
settings.
ZZPrinter Configuration Tool - Allows the relevant printer to be configured for paper and label print outs.
The bottom right of the screen has the following buttons:
ZZTest ScriptX Settings - This button will show when the Trust allows online test requesting for both pathology
and radiology requests and where the printouts for each service use different printers, trays, orientation or
margins. A test page can be printed and allows the user to adjust the print margins for paper printouts. See
section 4.7.1 To Adjust Paper Print Out Margins.
ZZTest Printer Configuration - Allows a test printout for the item selected in the Printer Configuration field.
© INDIGO 4 SYSTEMS LIMITED
TQUEST PRIMARY CARE USER GUIDE | PAGE 29
tQuest
Specialised data integration for the NHS
4.7.1 To Adjust Paper Print Out Margins
Occasionally, it may be required for the print margins of paper printouts to be adjusted. It is important that the
system is set up to print all of the information for the label within the bounds of the sticker. If the information is
truncated, there may be an impact on the speed and accuracy with which the laboratory can process the request.
1 Click on the Test (ScriptX) Settings button on the bottom right of the screen. The following window opens:
2 Select the relevant printer from the list of available printers in the Printer Full Path Name field.
3 Select the relevant paper tray from the available list in the Printer Source (Paper Tray) field.
4 Select the relevant Paper Orientation and Paper Size from the options.
5 Suggested print margins will be present; if required, change the values.
6 Click Save & Print.
7 From the Printer Configuration field select the print template to be tested, click the Test Printer
Configuration button on the bottom right of the screen.
8 Repeat steps 1-6 if further adjustment is needed.
© INDIGO 4 SYSTEMS LIMITED
TQUEST PRIMARY CARE USER GUIDE | PAGE 30
tQuest
Specialised data integration for the NHS
4.7.2 To Configure QT PrintX Printing (label printing)
1 Click on the Printer Configuration Tool button on the bottom left of the screen.
2 Click the Configure Label Printer link. The following window opens:
3 Double click on the required printer in the All Printers Available field.
4 The Port and Printer Name fields will auto complete.
5 Click Save.
4.7.3 Adjusting Print Margins - Windows Printing
Windows Printing is used when the practice is not using ScriptX or QT PrintX printing.
1 Select File then Page Set Up from the top left of Internet Explorer.
2 Adjust the margins as necessary.
3 Click OK to save the settings.
4.8 Statistics
The Statistics view gives details of the type and number of tests that are ordered for selected date ranges.
Information on this screen is only visible for Trusts that have configured a Weight/RAD cost for each orderable, it
will not show statistics for the actual cost of requests when a price is calculated at the time an order is placed.
The screen is divided into the following columns:
ZZOrderable Description - The name of the orderable displayed when requested.
ZZNo. of Orders - The number of orders in the specified date range.
ZZWeight/RAD Cost - The relative value of the test at the time the order was placed. The Trust System
Administrator may configure tests in price bands, this field is used to indicate which band the test is included in.
© INDIGO 4 SYSTEMS LIMITED
TQUEST PRIMARY CARE USER GUIDE | PAGE 31
tQuest
Specialised data integration for the NHS
The bottom of the screen has the following buttons and filters:
ZZDate From & Date To - Click the Date From button. A calendar displays, click on a date and select the month
and year from the drop down lists. Complete Date To in the same way. The date ranges can be a maximum of six
months apart.
ZZDetails - Highlight a test and click on the Details button to view the requested time, the requester, and the
Weight/RAD cost of the orderable when it was ordered.
ZZCSV Output - Allows the highlighted report to be exported to a CSV file. The CSV file can be viewed by using
spreadsheet software.
ZZFilters - There are three filters on the bottom right of the screen (from left to right).
• The first field filters on the status of the requests at the laboratory; it is selected from the drop down list. For
example processed, reported in full, not received.
• The second filter will reorder the results according to number of tests, cost or alphabetically.
• The final filter determines whether the list should be displayed in ascending or descending order.
4.9 Sample Report
The Sample Report view allows practice administrators to create a CSV file with details of what stage in the
process an order has reached. This is dependent on the laboratory providing the sample status to tQuest.
The screen is divided into the following fields:
ZZRequest Created Date (From) - The start date for the search period.
ZZRequest Created Date (to) - The end date for the search period.
ZZRequester - A drop down list allows the search to be refined to either a single requester or All practice staff.
This is the requester who was selected as the Requesting Professional when the request was created. See
section 2.2 Request.
ZZPatient - A free text field that allows a report to be produced for a single patient, partial names are allowed in
the field.
© INDIGO 4 SYSTEMS LIMITED
TQUEST PRIMARY CARE USER GUIDE | PAGE 32
tQuest
Specialised data integration for the NHS
ZZReport On - Radio buttons allow the report to be compiled using either Collected or Uncollected Samples.
The report uses the information on the Incomplete tab (uncollected samples), see section 4.1 Incomplete or
Complete tab (collected samples), see section 4.2 Complete.
ZZSample Status - Tick boxes allow different statuses to be included in the report.
The bottom right of the screen has an Export CSV button, clicking this button when the fields are completed will
give the user the option of either viewing or saving the CSV report.
4.10 Request Text
This information is configured by the Trust System Administrator to suit local requirements, an example of Request
Text may include details of the opening hours of the phlebotomy clinic. The Trust System Administrator will specify
the default Request Text for the practice, who then may choose alternative text to be used. The screen is divided
into the following columns:
ZZReference - The title assigned by the Trust System Administrator that identifies the text.
ZZText - The text that will be printed onto the request print out.
ZZStatus - Identifies the current Request Text that is printed on all request forms.
The bottom of the screen has two buttons:
ZZSet Default - Highlight the relevant request text and click on Default. The status column will change to Set as
Default. (The request form requires a print token to allow this action.)
ZZPreview - Allows the user to view the full body of the text.
Note: Only a System Administrator at the Trust can create new Request Text.
© INDIGO 4 SYSTEMS LIMITED
TQUEST PRIMARY CARE USER GUIDE | PAGE 33
tQuest
Specialised data integration for the NHS
5 Ordering Tests
5.1 To Order Tests for Another Practice User to Sample
1 Access the online ordering from the PMS. If the user can make requests in their own name, the default tab will
be the Order tab. Check the Patient tab and Request tabs to ensure all relevant information for the patient is
populated.
1 Click on the Order tab.
Either
Place a tick in the check box if the item is on the Common Orderables table. (See section 2.3.1 Common
Orderables.)
Or
Select the relevant test from the Orderables pane (or tree view) by selecting the appropriate discipline to which the
test is assigned. Highlight the relevant test and click on the Add button.
Or
Select the relevant tests by selecting the test group from the drop down list, next to the Test Groups field.
2 As each item is ordered, the details will display in the Ordered Items pane. (See section 2.3.6 Ordered Items.)
3 Complete any questions that are asked as the modal window displays. (See section 2.3.7 Protocols.)
4 Select the Later – unknown date radio button.
!
Care should be taken when labelling samples and bags to ensure that the labels are applied to the
correct items, for the correct patient. The opportunity for mistakes to occur is increased when the
paperwork, printed from the system, is not used as soon as it is generated. Situations in which multiple
users share a printer increase the risk of mistakes.
It is important when labelling samples that the stickers are applied in accordance with the instructions
from the laboratory. For example, most laboratories will ask that sample labels are applied along the long
axis of the tube. Poor application of sample stickers can lead to delays in the laboratory’s workflow and
the subsequent delivery of the results.
5 Click on Save.
6 The tQuest software will close and the user will be returned to their PMS system, with the details of the
requested test(s) recorded in the patient record.
© INDIGO 4 SYSTEMS LIMITED
TQUEST PRIMARY CARE USER GUIDE | PAGE 34
tQuest
Specialised data integration for the NHS
5.2 To Order Tests for Another External User to Sample
1 Follow steps 1-7 as detailed above.
2 Click on Finish on the bottom left of the screen.
3 A warning message appears, to indicate that the sample cannot be modified or deleted. Click on OK.
4 Select the printer destination and/or the Print button.
5 The request is printed with a blank sample time and date field, for the sampler to complete.
5.3 To Add Additional Tests to an Existing Request
1 From the PMS system, access online test requests (Update Request).
2 Follow steps 1-7 as detailed above. The Order screen will open and be populated with the existing request
details.
Note: It is not possible to add tests if the requester has previously selected the Finish button.
5.4 To Complete a Request Started by Another User
1 From the PMS system access online test requests.
2 From the Incomplete tab select the patient to be tested.
3 Select Edit from the bottom left of the screen.
4 The Sample screen will display with details of the test request populated.
5 Highlight the item(s) to be collected by clicking on it and putting a tick in the Collected box, or select the
Collect All Samples button.
6 Complete any warning fields that may be necessary.
7 Complete the collection time and date.
8 Click on Finish on the bottom left of the screen.
9 A warning message appears to indicate that the sample cannot be modified or deleted. Click on OK.
10 Select the printer destination and/or the Print button. The request has now disappeared from the Incomplete
tab and is available for information on the Completed tab of tQuest.
© INDIGO 4 SYSTEMS LIMITED
TQUEST PRIMARY CARE USER GUIDE | PAGE 35
tQuest
Specialised data integration for the NHS
6 Troubleshooting
Unable to Access On-line Test Requesting
Start
Is there a PMS
error displayed?
Contact the PMS
supplier
Yes
End
No
Is Internet
Explorer opening?
No
Yes
Contact the practice’s
network support
Can other websites be
accessed from the PC?
Please check:
No
· A www. address for example the BBC
· N3 address
Yes
Contact the trust as
there is a possible
firewall issue or the
server is unavailable
Yes
Does the message
‘page could not be
displayed’ appear?
No
Contact trust for IP
address adding to
tQuest
Is a blue screen with the
following message displayed?
Yes
‘this IP address nnn.nnn.nnn.nnn
has not been granted access to
the tQuest system’
No
Is a blue screen
with the following message
displayed?
Yes
‘Unfortunately no username was
passed by the PMS. Please
contact your supplier’
No
Refer to Practice Users
section of the Primary
Care User Guide
available on our website,
www.indigo4.com
Yes
Is a blue screen
with the following
message displayed?
‘unable to create a request
as login user XYZ is
unknown’
No
Document details of the
issue and contact the
PMS supplier
End
© INDIGO 4 SYSTEMS LIMITED
TQUEST PRIMARY CARE USER GUIDE | PAGE 36
tQuest
Specialised data integration for the NHS
7 Associated Documents
~~ tQuest in Primary Care
~~ EMIS LV & Indigo 4 tQuest
~~ EMIS PCS & Indigo 4 tQuest
~~ EMIS Web & Indigo 4 tQuest
~~ Advanced Health and Care Crosscare & Indigo 4 tQuest
~~ InPS Vision & Indigo 4 tQuest
~~ Microtest Evolution & Indigo 4 tQuest
~~ TPP SystmOne & Indigo 4 tQuest
~~ Review User Manual
~~ tQuest Browser Configuration
7.1 Downloading Associated Documents
All Quick Start Guides are available to download from the Indigo 4 website at:
www.indigo4.com/support/guides/
© INDIGO 4 SYSTEMS LIMITED
TQUEST PRIMARY CARE USER GUIDE | PAGE 37
Aizlewood’s Mill, Nursery Street
Sheffield, S3 8GG
Tel 0114 282 3110
Fax 0114 282 3111