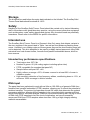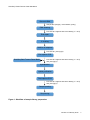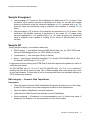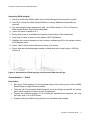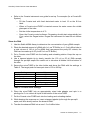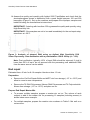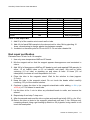
1
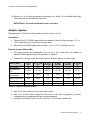
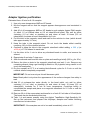
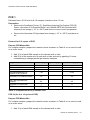
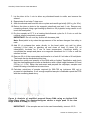
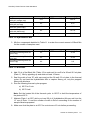
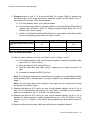
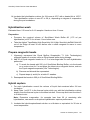
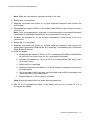
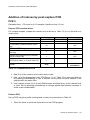
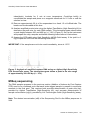
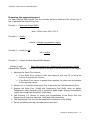
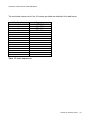
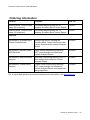
SureSeq™ Solid Tumour Panel Handbook Catalogue Numbers: 600070 (96 reactions) 600071 (16 reactions) SureSeq™ Solid Tumour Panel Handbook Oxford Gene Technology Founded by Professor Ed Southern, Oxford Gene Technology (OGT) world-class genetics research solutions to leading clinical and academic research institutions. CytoSure™ — Class-leading products and services offering the complete array solution for clinical genetics research Cytocell® — High-quality fluorescence in situ hybridisation (FISH) probes for the detection of gene rearrangements related to inherited genetic disease and cancer SureSeq™ — Delivering comprehensive, high–quality targeted sequencing products to clinical and academic researchers. Genefficiency™ — A tailored microarray and sequencing service enabling highthroughput, high-quality genomic studies for a variety of applications For more information, visit www.ogt.com. Version 2: February 2015 2 SureSeq™ Solid Tumour Panel Handbook Contents Introduction Pack contents Storage Safety Equipment and reagents required Data analysis software Procedure Sample preparation Hybridisation Addition of indexes by post-capture PCR MiSeq™ sequencing Legal information Ordering information 4 4 5 5 5 6 6 6 23 28 30 33 35 Version 2: February 2015 3 SureSeq™ Solid Tumour Panel Handbook Introduction The SureSeq™ Solid Tumour Panel has been designed by Oxford Gene Technology (OGT) in collaboration with leading cancer experts to deliver accurate detection of somatic variants in 60 cancer-associated genes (Table 1) from fresh frozen and formalin-fixed paraffin-embedded tissues (FFPE) tissue samples. The assay targets the full coding (exon) sequences for each gene allowing the detection of novel and known variants. The SureSeq Solid Tumour Panel is compatible with Illumina HiSeq™ and MiSeq™ chemistries and is intended to provide sufficient reagents to process 96 samples through the hybridisation capture process. AKT1 BRCA2 FGFR2 MAP2K1 NOTCH1 SMAD4 ALK CDH1 FGFR3 MED12 NRAS SMARCA4 APC CDKN1B FOXA1 MET PDGFRA SMARCB1 AR CDKN2A GNAS MLH1 PDGFRB SMO ARID1A CHD1 HRAS KMT2A(MLL1) PIK3CA SPOP ASXL1 CTNNB1 IDH1 KMT2D(MLL2) PTEN STK11 ATM DDR2 JAK2 KMT2C(MLL3) PTPN11 TP53 AXL EGFR JAK3 MTOR RB1 UTX/ KDM6A BRAF ERBB2 KIT NF1 RET VHL BRCA1 FGFR1 KRAS NKX3.1 ROS1 ZFHX3 Table 1: The 60 genes targeted by the SureSeq Solid Tumour Panel Assay. Pack contents Component Contents Box 1 (shipped on dry ice, store at –80°C) SureSeq Solid Tumour Panel Baits USB stick SureSeq Solid Tumour Report and SureSeq Solid Tumour Panel Handbook Version 2: February 2015 4 SureSeq™ Solid Tumour Panel Handbook Storage The kit should be used before the expiry date indicated on the kit label. The SureSeq Solid Tumour Panel baits should be stored at –80C. Safety Handling of the SureSeq Solid Tumour Panel should be carried out by trained laboratory staff in accordance with good laboratory practice, using the correct protective equipment such as laboratory coats, safety glasses and gloves. Any chemicals used are potentially hazardous. Please refer to the MSDS for specific information. Intended use The SureSeq Solid Tumour Panel is a Research Use Only assay that detects variants in the exon regions of the genes listed in Table 1 as well as short distances flanking these exons. Variants in non-coding regions of these genes (beyond the short flanking zone) will not be detected. This kit is designed to be used by suitably trained personnel using DNA extracted from fresh frozen tissues, formalin-fixed paraffin-embedded tissues, blood or bone marrow. Intended key performance specifications Total region size: 327.5 kb Number of genes: 60 (full coding regions including splice sites) FFPE compatible (for samples that pass QC) Sample failure rate post QC: <4% Highly uniform coverage: >97% of bases covered to at least 20% of mean in validation studies High sensitivity detection of low-frequency alleles, contributing down to 1.5%, at minimum 1000x coverage in dilution studies DNA input The panel has been optimised to work with as little as 100–500 ng of genomic DNA from formalin-fixed, paraffin-embedded (FFPE) samples, allowing you to unlock the potential of archived samples. The protocol incorporates several QC steps that determine the optimal processing workflow, allowing difficult samples to be recovered whilst ensuring sufficient sequencing data for confident analysis. While we recommend starting with 500 ng or more of DNA from FFPE samples to limit the level of duplication, we have successfully sequenced DNA from FFPE samples where less than 100 ng of high-integrity starting material was available. Version 2: February 2015 5 SureSeq™ Solid Tumour Panel Handbook Equipment and reagents required Required (not supplied) Covaris® Focused-ultrasonicator (or equivalent) Agilent® 2200 TapeStation (cat. no. G2965A, or equivalent) and relevant reagents Thermal cycler (e.g. BioRad MJ Research DNA Engine PTC-200) or equivalent Qubit® fluorometer (Life technologies cat. no. Q32857) DNA LoBind Tubes (Eppendorf cat. no. 022431021 or equivalent) Covaris microTUBES (cat. no. 520045) Quant-iT™ dsDNA HS Assay Kit or Quant-iT dsDNA BR Assay Kit (Life Technologies cat. no. Q32850, Q32853) Molecular Biology Grade 100% Ethanol (Sigma Aldrich cat. no. E7023 or equivalent) Molecular Biology Grade water (Sigma Aldrich cat. no. W4502-1L or equivalent) Agilent SureSelect™ XT Reagent Kit 16 reactions (cat. no. G9611A [for HiSeq] or G9612A [for MiSeq]) Dynabeads™ MyOne Streptavidin T1 (Life Technologies cat. no. 656-01, 656-02 or 656-03) Agencourt AMPure™ XP kit (Beckman Coulter Genomics cat. no. A63880, A63881, A63882) Appropriate magnetic rack for 96–well microwell plates or 1.5 ml tubes DNA Polymerase (e.g. Herculase II Fusion DNA Polymerase, Agilent cat. no. 600677, 600679) Sequencing reagents required for the MiSeq™ / HiSeq™ (e.g. Illumina cat. no. MS– 102-2002, MS-102-2022, GD-401-3001, FC-401-3001) Data analysis software Fastq files generated with the SureSeq Solid Tumour Panel can be turned into interactive reports using OGT’s powerful, standalone data analysis software provided with the kit or processed using your usual analysis pipeline. Please contact OGT for more details. Procedure Sample preparation The following section contains instructions for sample library production specific to the Illumina sequencing platform. For each sample, individual library preparations, hybridisations, and captures are performed. The samples are then tagged by PCR with an index (barcode) sequence. Version 2: February 2015 6 SureSeq™ Solid Tumour Panel Handbook Genomic DNA Sample QC (integrity, concentration, purity) DNA shearing Process QC: fragment size 150–200 bp (+/– 10%) End repair 3’ A-tailing Addition of adaptors Process QC: yield (ng/l) Pre-capture PCR SureSeq Solid Tumour Panel Baits Process QC: fragment size 250–275 bp (+/– 10%) and yield (ng/l) Hybridisation Hybrid purification Post-capture PCR Process QC: fragment size 300–400 bp (+/– 10%) and yield (ng/l) Sample pooling Sequencing Figure 1: Workflow of sample library preparation Version 2: February 2015 7 SureSeq™ Solid Tumour Panel Handbook Sample throughput Low-throughput (LT) protocol: All incubations are performed in 0.2 ml tubes. Post incubation, each reaction volume is transferred to a fresh 1.5 ml tube and sample clean-up performed using the volumes highlighted in blue (marked with a ▲). All clean-up steps are performed using a magnetic rack capable of holding 1.5 ml tubes. High-throughput (HT) protocol: All incubations are performed in 0.2 ml tubes. Post incubation, the sample clean-up is performed in the same 0.2 ml tubes using volumes highlighted in red (marked with a ●). All clean-up steps are performed using a magnetic rack capable of holding 0.2 ml tubes or 96-well plate (0.2 ml volume). Sample QC Testing sample integrity, concentration and purity * † DNA Integrity* — Use Agilent Genomic DNA ScreenTape (cat. no. 5067-5365) and Genomic DNA Reagents (cat. no. 5067-5366) (or similar) Concentration — Use Invitrogen Qubit (or similar) Purity — Use Thermo Scientific NanoDrop™ (or similar) OD 260/280 ratio of 1.8 to 2.0 and OD 260/230 ratio of 1.5 to 1.8† A requirement when working with FFPE DNA is that the fragment size peaks at a value of >1000 bp (see below) An OD 260/280 ratio of 1.8 to 2.0 and OD 260/230 ratio of 1.5 to 1.8 is essential if omitting the post shear clean-up step. Use of DNA samples with lower ratios may result in poor performance. If either ratio is not as recommended then use standard shearing in 130 μl followed by clean-up. DNA integrity — Genomic DNA TapeStation Preparation Take the Agilent Genomic DNA TapeStation Reagents (and tapes) out of the fridge at least 30 min before use to allow reagents to warm to room temperature. Open the Agilent TapeStation controller software. Load Genomic DNA ScreenTape and tips into the TapeStation. When analysing 1–15 samples it is recommended to use 2 x 8 tube strip tubes. If analysing >15 samples, it is recommended to use a 96-well plate. Version 2: February 2015 8 SureSeq™ Solid Tumour Panel Handbook Assessing DNA integrity 1. Add 4 µl of Genomic DNA Ladder into the first tube/well of the strip tube or plate. 2. Add 10 µl of Genomic DNA Sample Buffer to as many additional tubes/wells as required. 3. For each sample under assessment, add 1 µl of DNA sample to 10 µl of Genomic DNA Sample Buffer. Seal all the tubes/wells. 4. Vortex the tubes or plate for 5 s. 5. Briefly spin down to consolidate the sample to the bottom of the tubes/wells. 6. Load strip of tubes or plate into the Agilent 2200 TapeStation. 7. Highlight the required samples on the controller software and fill in the sample names in the sample sheet. 8. Select “Start” and provide a filename to save your results. 9. Check that the electropherogram shows a distribution with a peak height >1000 bp (Figure 2). Figure 2: Assessment of DNA integrity using Genomic DNA ScreenTape. Concentration — Qubit Preparation Set up the Qubit software for the particular assay that is being used, either dsDNA Broad Range or High-Sensitivity assay. Take the Life Technologies Qubit Reagents out of the fridge at least 30 min before use to allow reagents to warm to room temperature. Prepare the required number of 0.5 ml tubes for standards and samples; use only thin-wall, clear, 0.5 ml PCR tubes. Prepare sufficient Qubit working solution for standards and samples. Version 2: February 2015 9 SureSeq™ Solid Tumour Panel Handbook Assessing DNA concentration 1. Prepare the Qubit working solution by diluting the Qubit reagent 1:200 in Qubit buffer. 2. Load 190 μl of Qubit working solution into each of the tubes used for standards and 199 μl of Qubit working solution into each of the tubes used for samples. 3. Add 10 μl of each Qubit standard and 1 μl of sample to the appropriate tubes. 4. Mix by vortexing for 2–3 s being careful not to generate bubbles. 5. Incubate the tubes at room temperature for 2 min. 6. Measure DNA concentrations using the Qubit fluorometer following the onscreen prompts. Purity — NanoDrop Preparation Open the NanoDrop control software. Clean the pedestals with nuclease-free water. Use 1.5 µl of nuclease-free water to initialise the machine. “Blank” using 1.5 µl of the relevant buffer for the samples being processed. Ensure that the ‘DNA-50’ option is selected from the drop down menu on the left of the software interface. Assessing DNA purity 1. Load 1 µl of each sample onto the pedestal. 2. Click “Measure”. 3. Record the readings for 260/230, 260/280 and the concentration (ng/µl). DNA shearing Estimated time: 6 min shearing per sample. Preparation Take the AMPure XP beads, Agilent 2200 TapeStation Reagents (and tapes) out of the fridge at least 30 min before use to allow them to warm to room temperature. Make up fresh solution of 70% ethanol using molecular biology grade ethanol and molecular biology grade water. Version 2: February 2015 10 SureSeq™ Solid Tumour Panel Handbook Refer to the Covaris instrument user guide for set up. For example (for a Covaris S2 System); o Fill the Covaris tank with fresh deionized water to level 12 on the fill line label. o When a Covaris microTUBE is inserted ensure the water covers the visible glass part of the tube. o Set the chiller temperature to 4°C. o Open the Covaris control software. Degassing should start automatically but if not, select the Degas button. Degas the instrument for least 30 min before use. Shear the DNA 1. Use the Qubit dsDNA Assay to determine the concentration of your gDNA sample. 2. Dilute the desired amount of gDNA with 1x Low TE Buffer in a 1.5 ml LoBind tube to a total volume of 130 μl (or for gDNA that has passed the purity QC criteria, the DNA can be made up to 55 μl with 1x Low TE Buffer). 3. Put a Covaris microTUBE into the loading and unloading station. Keep the cap on the tube. 4. Use a tapered pipette tip to slowly transfer the 130 μl (or 55 μl) DNA sample through the pre-split septa. Be careful not to introduce a bubble into the bottom of the tube. 5. Secure the microTUBE in the tube holder and shear the DNA with the settings in Table 2. The target peak for base pair size is 150 to 200 bp. Settings Duty Cycle Intensity Cycles per Burst Time Set Mode Temperature Value 10% 5 200 6 cycles of 1 min each Frequency sweeping 4–7°C Table 2: Covaris shear settings 6. Place the microTUBE into an appropriately sized tube adapter and spin in a picofuge for 5 s to collect all liquid in the bottom of the microTUBE. 7. Put the Covaris microTUBE back into the loading and unloading station. 8. While keeping the snap-cap on, insert a tapered pipette tip through the pre-split septa, and then slowly remove the sheared DNA. 9. Transfer the sheared DNA into a new 1.5 ml LoBind tube. Version 2: February 2015 11 SureSeq™ Solid Tumour Panel Handbook IMPORTANT: When starting with only 55 μl sample, do not purify. Assess quality and quantity using the Agilent 2200 TapeStation and proceed directly to end repair. When starting with <1000 ng use High Sensitivity kits. Note: Purification post-shearing is the same for both LT and HT protocols. Shear purification Estimated time: 40 min for 8–16 samples. 1. Use only room temperature AMPure XP beads. 2. Mix well so that the AMPure XP beads appear homogeneous and consistent in colour. 3. Dispense 180 μl of homogenous AMPure XP beads to a 1.5 ml LoBind tube and add each 130 μl sheared DNA sample. (Instead add 99 μl of homogenous AMPure XP beads when starting with 55 μl of sheared sample.) Mix well on a vortex mixer and incubate for 5 min. 4. Put the tube in the magnetic stand and wait for the solution to clear (approx 3–5 min). 5. Keep the tube in the magnetic stand. Do not touch the beads while you carefully discard the cleared solution from the tubes. 6. Continue to keep the tube in the magnetic stand while you dispense 500 μl of 70% ethanol in each tube. 7. Let the tube sit for 1 min to allow any disturbed beads to settle, and remove the ethanol. 8. Repeat step 6 and step 7 step once. 9. After the second wash, spin the tube briefly and return to the magnetic rack. Ensure that all ethanol is completely removed using a P20 pipette and tip to remove any remaining ethanol. 10. Dry the samples in a 37°C heating block/thermal cycler for 3–5 min or until the residual ethanol completely evaporates. IMPORTANT: Do not over-dry as this will decrease yield. Note: Bead pellet is dry when the appearance of the surface changes from shiny to matt. 11. Add 52 μl nuclease-free water directly to the bead pellet, mix well on a vortex mixer and incubate for 2 min at room temperature. 12. Spin the tube briefly and place on the magnetic stand and leave for 2–3 min until the solution is clear. 13. Remove 50 μl of the supernatant to a fresh 1.5 ml LoBind tube. The beads can be discarded at this time. Version 2: February 2015 12 SureSeq™ Solid Tumour Panel Handbook 14. Assess the quality and quantity with Agilent 2200 TapeStation and check that the electropherogram shows a distribution with a peak height between 150 and 200 base pairs (Figure 3). Set up the machine and prepare the chip/tape, samples and ladder following the manufacturer’s instructions. IMPORTANT: If starting with less than 500 ng assess the quality and quantity using High-Sensitivity kits. IMPORTANT: If the samples are not to be used immediately for the end repair step, store them at –20°C. Figure 3: Analysis of sheared DNA using an Agilent High Sensitivity D1K ScreenTape assay. Size distribution with a peak between 150 to 200 bp (+/– 10%). Note: Post purification, typically >25% of input DNA should be returned. If yield is lower than 25% of input, do not proceed with the processing until additional DNA from the same source can be added. End repair Estimated time: 45 min for 8–16 samples. Hands-on time: 15 min. Preparation Remove the 10x End Repair Buffer and dNTP mix from storage (–15° to –25°C) and allow to come to room temperature. Remove the T4 DNA Polymerase, Klenow DNA Polymerase and T4 Polynucleotide Kinase from storage (–15° to –25°C) and place on ice. Prepare End Repair Master Mix To process multiple samples, prepare a master mix on ice. The volume of each reagent to add to the master mix for processing 16 samples (including excess) is shown below as an example. For multiple samples, prepare the reaction mix as shown in Table 3. Mix well on a vortex mixer. Version 2: February 2015 13 SureSeq™ Solid Tumour Panel Handbook Reagent DNA sample Nuclease-free H2O 10x End Repair Buffer dNTP mix T4 DNA Polymerase Klenow DNA Polymerase T4 Polynucleotide Kinase TOTAL 1x library (µl) 48 35.2 10 1.6 1 2 2.2 100 ___ x library (µl) 16x library (µl) 580.8 165 26.4 16.5 33 36.3 858 (52 µl/sample) Table 3: End Repair Mix 1. Add 52 μl of the reaction mix to each well or tube. 2. Add 48 μl of each DNA sample to the relevant well or tube. Mix by pipetting 10 times, remembering to change pipette tips between samples. 3. Incubate in a thermal cycler for 30 min at 20°C. Do not use a heated lid. End repair purification Estimated time: 40 min for 8–16 samples. 1. Use only room temperature AMPure XP beads. 2. Mix the reagent well so that the reagent appears homogeneous and consistent in colour. 3. Add 180 μl of homogenous AMPure XP beads to each end repaired DNA sample (in either 1.5 ml LoBind tubes or 0.2 ml tubes/96 well plate). Mix well by either vortexing (1.5 ml tube) or pipetting up and down at least 10 times (0.2 ml tubes/plate). Incubate at room temperature for 5 min. 4. Place the tube in the magnetic stand. Wait for the solution to clear (approx. 3–5 min). 5. Keep the tube in the magnetic stand. Do not touch the beads whilst carefully removing 170 μl of the cleared solution. 6. Continue to keep the tube in the magnetic stand/rack whilst adding ▲ 500 μl (or ● 200 μl) of 70% ethanol to each tube. 7. Let the tube sit for 1 min to allow any disturbed beads to settle, and remove the ethanol. 8. Repeat step 6 and step 7 step once. 9. After the second wash seal the tube or plate and centrifuge briefly (260 x g for 30 s). 10. Return the tube or plate to the magnetic stand/rack and wait 1 min. Remove any remaining ethanol using a gel-loading tip fitted to a 20 μl pipette, being careful to not touch the bead pellet. Version 2: February 2015 14 SureSeq™ Solid Tumour Panel Handbook 11. Dry the samples at 37°C in a heating block/thermal cycler for 3–5 min or until the residual ethanol completely evaporates. IMPORTANT: Do not over-dry as this will decrease yield. Note: Bead pellet is dry when the appearance of the surface changes from shiny to matt. 12. Add 32 μl nuclease-free water directly to the bead pellet, mix well by either vortexing (1.5 ml tube) or pipetting up and down at least 10 times (0.2 ml tubes/plate). Incubate for 3 min at room temperature. Centrifuge briefly to consolidate the sample and place on a magnetic stand/rack for 2–3 min or until the solution is clear. 13. Remove 30 μl of the supernatant and transfer to a fresh 0.2 ml tube or 96-well plate. The beads can be discard at this time. IMPORTANT: If the samples are not to be used immediately for 3’ end ‘A’ tailing, store at –20°C. 3’ end ‘A’ Tailing Estimated time: 45 min for 8–16 samples. Hands-on time: 15 min. Preparation Remove the 10x Klenow DNA Polymerase Buffer and dATP from storage (–15° to –25°C) and allow to come to room temperature. Remove the Exo-Klenow DNA Polymerase from storage (–15° to –25°C) and place on ice. Prepare ‘A’ Tailing Master Mix To process multiple samples, prepare a master mix on ice. The master mix for processing 16 samples (including excess) is shown below as an example. For multiple samples, prepare the reaction mix as shown in Table 4. Mix well on a vortex mixer. Reagent DNA sample Nuclease-free H2O 10x Klenow DNA Polymerase Buffer dATP Exo-Klenow DNA Polymerase TOTAL 1x library (µl) 30 11 ___ x library (µl) 16x library (µl) 181.5 5 82.5 1 16.5 3 49.5 50 330 (20 µl/sample) Table 4: Adding ‘A’ bases Version 2: February 2015 15 SureSeq™ Solid Tumour Panel Handbook 1. Add 20 μl of the reaction mix to each well or tube. 2. Add 30 μl of each DNA sample to the relevant well or tube. Mix by pipetting 10 times remembering to change pipette tips between samples. 3. Incubate in a thermal cycler for 30 min at 37°C. If using a thermal cycler with a heated lid, ensure that the lid temperature does not exceed 50°C. ‘A’ tailing purification Estimated time: 40 min for 8–16 samples. 1. Use only room temperature AMPure XP beads. 2. Mix the reagent well so that the reagent appears homogeneous and consistent in colour. 3. Add 90 μl of homogenous AMPure XP beads to each “A” tailed DNA sample (in either 1.5 ml LoBind tubes or 0.2 ml tubes or 96-well plate). Mix well by either vortexing (1.5 ml tube) or pipetting up and down at least 10 times (0.2 ml tubes/plate). Incubate at room temperature for 5 min. 4. Place the tube in the magnetic stand and wait for the solution to clear (which should take approx. 3–5 min). 5. Keep the tube in the magnetic stand. Do not touch the beads whilst carefully removing 130 μl of the cleared solution. 6. Continue to keep the tube in the magnetic stand/rack whilst adding ▲ 500 μl (or ● 200 μl) of 70% ethanol to each tube. 7. Let the tube sit for 1 min to allow any disturbed beads to settle, and remove the ethanol. 8. Repeat step 6 and step 7 step once. 9. After the second wash seal the tube or plate and centrifuge briefly (260 x g for 30 s). 10. Return the tube or plate to the magnetic stand/rack and wait 1 min. Remove any remaining ethanol using a gel-loading tip fitted to a 20 μl pipette, being careful to not touch the bead pellet. 11. Dry the samples at 37°C in a heating block/thermal cycler for 3–5 min or until the residual ethanol completely evaporates. IMPORTANT: Do not over-dry as this will decrease yield. Note: Bead pellet is dry when the appearance of the surface changes from shiny to matt. 12. Add 15 μl nuclease-free water directly to the bead pellet, mix well by either vortexing (1.5 ml tube) or pipetting up and down at least 10 times (0.2 ml tubes/plate). Incubate for 3 min at room temperature. Centrifuge briefly to consolidate the sample and place on a magnetic stand/rack for 2-3 min or until the solution is clear. Version 2: February 2015 16 SureSeq™ Solid Tumour Panel Handbook 13. Remove 14 μl of the supernatant and transfer to a fresh 0.2 ml tube/96-well plate. The beads can be discarded at this time. IMPORTANT: Proceed immediately to the next step. Adapter ligation Estimated time: 30 min for 8–16 samples. Hands-on time: 15 min. Preparation Remove the 5x T4 DNA Ligase buffer and Adapter Oligo Mix from storage (–15° to –25°C) and allow to come to room temperature. Remove the T4 DNA Ligase from storage (–15° to –25°C) and place on ice. Prepare Ligation Master Mix This step requires the preparation (on ice) of a 10:1 molar ratio of adapter to genomic DNA fragment using the guidance in Table 5. Prepare the reaction mixes as shown Table 5 and mix well on a vortex mixer. 1x (2–3 µg) 13 μl 1x (1–1.99 µg) 13 μl 1x (0.5– 0.99 µg) 13 μl 1x (250– 499 ng) 13 μl 1x (100– 249 ng) 13 μl 1x (50–99 ng) 13 μl 15.5 μl 15.5 μl 22.5 μl 23.5 μl 24.5 μl 25 μl 10 μl 10 μl 10 μl 10 μl 10 μl 10 μl Adapter Oligo Mix 10 μl 10 μl 3 μl 2 μl 1 μl 0.5 μl T4 DNA Ligase TOTAL 1.5 μl 50 μl 1.5 μl 50 μl 1.5 μl 50 μl 1.5 μl 50 μl 1.5 μl 50 μl 1.5 μl 50 μl Starting DNA DNA sample Nuclease-free H2O 5x T4 DNA Ligase Buffer Table 5: Ligation reaction mixes 1. Add 37 μl of the reaction mix to each well or tube. 2. Add 13 μl of each DNA sample to each well or tube. Mix by pipetting 10 times, remembering to change pipette tips between samples. 3. Incubate in a thermal cycler for 15 min at 20°C. Do not use a heated lid. Version 2: February 2015 17 SureSeq™ Solid Tumour Panel Handbook Adapter ligation purification Estimated time: 40 min for 8–16 samples. 1. Use only room temperature AMPure XP beads. 2. Mix the reagent well so that the reagent appears homogeneous and consistent in colour. 3. Add 90 μl of homogenous AMPure XP beads to each adapter ligated DNA sample (in either 1.5 ml LoBind tubes or 0.2 ml tubes/96-well plate). Mix well by either vortexing (1.5 ml tube) or pipetting up and down at least 10 times (0.2 ml tubes/plate). Incubate at room temperature for 5 min. 4. Put the tube in the magnetic stand and wait for the solution to clear (which should take approximately 3–5 min). 5. Keep the tube in the magnetic stand. Do not touch the beads whilst carefully removing 130 μl of the cleared solution. 6. Continue to keep the tube in the magnetic stand/rack whilst adding ▲ 500 μl (or ● 200 μl) of 70% ethanol to each tube. 7. Let the tube sit for 1 min to allow any disturbed beads to settle, and remove the ethanol. 8. Repeat step 6 and step 7 step once. 9. After the second wash seal the tube or plate and centrifuge briefly (260 x g for 30 s). 10. Return the tube or plate to the magnetic stand/rack and wait 1 min. Remove any remaining ethanol using a gel-loading tip fitted to a 20 μl pipette, being careful to not touch the bead pellet. 11. Dry the samples at 37°C in a heating block/thermal cycler for 3–5 min or until the residual ethanol completely evaporates. IMPORTANT: Do not over-dry as this will decrease yield. Note: Bead pellet is dry when the appearance of the surface changes from shiny to matt. 12. Add 32 μl nuclease-free water directly to the bead pellet, mix well by either vortexing (1.5 ml tube) or pipetting up and down at least 10 times (0.2 ml tubes/plate). Incubate for 3 min at room temperature. Centrifuge briefly to consolidate the sample and place on a magnetic stand/rack for 2–3 min or until the solution is clear. 13. Remove 30 μl of the supernatant and transfer to a fresh 0.2 ml tube or 96-well plate. The beads can be discarded at this time. 14. Take 1 μl and assess quantity using the Agilent TapeStation High-Sensitivity Kit. Set up the instrument and prepare the chip/tape, samples and ladder following manufacturer’s instructions. IMPORTANT: If the samples are not to be used immediately, store at 4°C. Version 2: February 2015 18 SureSeq™ Solid Tumour Panel Handbook PCR 1 Estimated time: 45–90 min for 8–16 samples. Hands-on time: 15 min. Preparation Remove the SureSelect Primer (F), SureSelect Indexing Pre-Capture PCR (R) Primer, Herculase II 5x Reaction Buffer* and 100mM dNTP Mix (included with enzyme) from storage (–15° to –25°C) and allow to come to room temperature. Remove the Herculase II Polymerase from storage (–15° to –25°C) and place on ice. Protocol for 5–8 cycles of PCR Prepare PCR Master Mix For multiple samples, prepare the reaction mixes as shown in Table 6 on ice and mix well on a vortex mixer 1. Add 15 μl of each DNA sample to the relevant well or tube. 2. Add 35 μl of the master mix to each well or tube and mix by pipetting 10 times, remembering to change pipette tips between samples. Reagent 1x library (µl) Ligated Library Nuclease-free H2O SureSelect Primer (F) SureSelect Indexing PreCapture PCR (R) primer Herculase II 5x Reaction Buffer* dNTP Mix (included with enzyme) Herculase II Polymerase TOTAL _ x library (µl) 16x library (µl) 15 21 1.25 357 21.25 1.25 21.25 10 170 0.5 8.5 1 17 50 595 (35 µl/sample) Table 6: Components for 50 µl volume PCR PCR 1b (for 9 or 10 cycles of PCR) Prepare PCR Master Mix For multiple samples, prepare the reaction mixes as shown in Table 8 on ice and mix well on a vortex mixer 1. Add 15 μl of each DNA sample to the relevant well or tube. Version 2: February 2015 19 SureSeq™ Solid Tumour Panel Handbook 2. Add 85 μl of the master mix to each well or tube and mix by pipetting 10 times, remembering to change pipette tips between samples. Reagent 1x library (µl) _ x library (µl) 16x library (µl) Ligated Library Nuclease-free H2O SureSelect Primer (F) SureSelect Indexing PreCapture PCR (R) primer Herculase II 5x Reaction Buffer* dNTP Mix (included with enzyme) Herculase II Polymerase 15 57 2.5 969 42.5 2.5 42.5 20 340 1 17 2 34 TOTAL 100 1445 (85 µl/sample) Table 7: Components for 100 µl volume PCR Perform PCR Set up PCR using the profile and settings as shown in Table 8. Step 1 2 3 4 5 6 7 Temperature (°C) 98 98 65 72 72 4 Time 2 min 30 s 30 s 1 min Repeat Step 2 through Step 4 for cycle number see below 10 min Hold Table 8: PCR Profile 1. The number of cycles (from step 2 to step 4) required can be determined using to the guidelines in Table 9. Version 2: February 2015 20 SureSeq™ Solid Tumour Panel Handbook DNA concentration (ng/µl) post adapter ligation Cycle Numbers Average expected duplication following sequencing* >20 ng 9–20 ng 4–8 ng 2–3 ng 1–1.9 ng <1 ng 5 6 7 8 9 10 <10% ≤10% 10–20% 20–30% 30–40% >40% * These percentage values will be higher for poor quality samples. Table 9: Cycle numbers — based on results from Agilent TapeStation post adapter ligation purification 2. Place the tubes in a thermal cycler and run the PCR program. Note: It is not recommended to perform >10 cycles of PCR as this will increase the percentage duplication. Optional: If a vacuum dryer is not available to concentrate samples to 147 ng/μl for hybridisation. DNA Clean & Concentrator™-5 (Zymo Research, Cat. Nos. D4003, D4004, D4013 & D4014) columns can be used to concentrate samples. In this case, the PCR 1 purification steps are not necessary and can be replaced with the Zymo Research columns. It will still be necessary to assess the quality and quantity of the DNA using the Agilent TapeStation as described above. PCR 1 purification Estimated time: 40 min for 8–16 samples. 1. Use only room temperature AMPure XP beads. 2. Mix the reagent well so that the reagent appears homogeneous and consistent in colour. 3. Add a 1.8x volume of homogenous AMPure XP beads (90 µl of beads for a 50 µl PCR reaction volume and 180 µl of beads for a 100 µl PCR reaction volume) to each PCR reaction (in either 1.5 ml LoBind tubes or 0.2 ml tubes/96-well plate). Mix well by either vortexing (1.5 ml tube) or pipetting up and down at least 10 times (0.2ml tubes/plate). Incubate at room temperature for 5 min. 4. Put the tube in the magnetic stand and wait for the solution to clear (which should take approximately 3–5 min). 5. Keep the tube in the magnetic stand. Do not touch the beads whilst carefully removing 130 μl of the cleared solution. 6. Continue to keep the tube in the magnetic stand/rack whilst adding ▲ 500 μl (or ● 200 μl) of 70% ethanol to each tube. Version 2: February 2015 21 SureSeq™ Solid Tumour Panel Handbook 7. Let the tube sit for 1 min to allow any disturbed beads to settle, and remove the ethanol. 8. Repeat step 6 and step 7 step once. 9. After the second wash seal the tube or plate and centrifuge briefly (260 x g for 30 s). 10. Return the tube or plate to the magnetic stand/rack and wait 1 min. Remove any remaining ethanol using a gel-loading tip fitted to a 20 μl pipette, being careful to not touch the bead pellet. 11. Dry the samples at 37°C in a heating block/thermal cycler for 3–5 min or until the residual ethanol completely evaporates. IMPORTANT: Do not over-dry as this will decrease yield. Note: Bead pellet is dry when the appearance of the surface changes from shiny to matt. 12. Add 32 μl nuclease-free water directly to the bead pellet, mix well by either vortexing (1.5ml tube) or pipetting up and down at least 10 times (0.2 ml tubes/plate). Incubate for 3 min at room temperature. Centrifuge briefly, to consolidate the sample and place on a magnetic stand/rack for 2–3 min or until the solution is clear. 13. Remove 30 μl of the supernatant and transfer to a fresh 0.2 ml tube or 96-well plate. The beads can be discarded at this time. 14. Assess the quality and quantity of the DNA with an Agilent TapeStation and check that the electropherogram shows a distribution with a peak height between 250 and 275 bp (+/– 10%). Setup the instrument and prepare the chip/tape, samples and ladder following manufacturer’s instructions. 15. Calculate microlitres of sample required for 500–750 ng (minimum 250 ng) to proceed to hybridisation. If not enough amplified sample is available repeat the PCR with the remaining bead slurry. Figure 4: Analysis of amplified prepped library DNA using an Agilent D1K ScreenTape assay. The electropherogram shows a single peak in the size range of 200 to 275bp (+/– 10%). IMPORTANT: If the samples are not to be used immediately, store at –20°C. Version 2: February 2015 22 SureSeq™ Solid Tumour Panel Handbook Hybridisation Before you begin It is highly recommended to test the hybridisation conditions (thermal cycler and plasticware) to ensure minimal evaporation occurs during the 24-hour incubation. To test, add 27 μl of Hybridisation Buffer (without DNA) in each well that you might use and incubate at 65°C for 24 hours. Check after 24 hours that the evaporation does not exceed 3–4 μl per well. Hybridise the library Estimated time: 25 hours for 8–16 samples. Hands-on time: 60 min. Preparation Remove the SureSelect Hybridisation Buffer #3 (yellow cap), SureSelect Indexing Block #1 (green cap), SureSelect Indexing Block #2 (blue cap) and SureSelect Indexing Block #3 (brown cap) from storage (–15° to –25°C) and allow to come to room temperature. Remove the SureSelect RNase Block and Capture Baits from storage (–15° to –25°C) and place on ice. For each DNA sample prepared, do one hybridisation capture. The hybridisation reaction requires 500–750 ng of DNA with a maximum volume of 3.4 μl. Note: As little as 250 ng of DNA can be used for hybridisation but this may result in a higher duplication after sequencing. Protocol 1. If the DNA sample concentration is below 147 ng/μl, use a vacuum dryer to concentrate a 500–750 ng aliquot of the sample down to 3.4 μl at ≤ 45°C. a) Put each sample into a separate well in row B of a 96 well plate (Plate 1). b) If the sample dries up completely, resuspend in 3.4 μl of water and mix by pipetting. c) If processing multiple samples, adjust to equivalent volumes before concentrating. 2. Prepare the components detailed in Table 10 at room temperature and incubate at 65°C whilst preparing the remaining buffers to avoid precipitation. Version 2: February 2015 23 SureSeq™ Solid Tumour Panel Handbook Reagent SureSelect Hybridisation Buffer #1 (orange cap) SureSelect Hybridisation Buffer #2 (red cap) SureSelect Hybridisation Buffer #3 (yellow cap) SureSelect Hybridisation Buffer #4 (black cap) Total 1x library (µl) ___ x library (µl) 16x library (µl) 12.5 206.25 0.5 8.25 5 82.5 6.5 107.25 24.5 (20 needed) 404.25 Table 10: Hybridisation Mix 3. Mix the components detailed in Table 11 to make the correct amount of Block Mix for the number of samples used. Reagent SureSelect Indexing Block #1 (green cap) SureSelect Indexing Block #2 (blue cap) SureSelect Indexing Block #3 (brown cap) Total 1x library (µl) ___ x library (µl) 16x library (µl) 2.5 41.25 2.5 41.25 0.6 9.9 5.6 92.4 Table 11: Block Mix 4. Add 5.6 μl of the Block Mix (Table 12) to each well in row B of a 96-well 0.2 ml plate (Plate 1). Mix by pipetting up and down at least 10 times. 5. Seal the wells of row “B” with caps and put the 96-well 0.2 ml plate in the thermal cycler. Do not heat the Hybridisation Mix or capture library yet, only the prepped library with blockers. 6. Run the following thermal cycler program a) 95°C for 5 min b) 65°C Hold Note: Set the heated lid of the thermal cycler to 105°C to hold the temperature of the plate at 65°C. 7. Maintain Plate 1 at 65°C while you load 20 μl of Hybridisation Mix per well into the “A” row of Plate 1. Load the number of wells in Row A according to the number of sample libraries prepared. 8. Make sure that the plate is at 65°C for a minimum of 5 min before proceeding. Version 2: February 2015 24 SureSeq™ Solid Tumour Panel Handbook 9. Prepare on ice: In row “C” of a second 96-well 0.2 ml plate (Plate 2), prepare the SureSeq probe mix for target enrichment. Load the number of wells filled in row “C” according to the number of libraries prepared. a) For each sample, add 2 μl of capture probes. b) Use nuclease-free water to prepare a dilution of the SureSelect RNase Block (purple cap) as listed in Table 12. Prepare enough RNase Block mix for all samples, plus some excess. c) Add 5 μl of diluted SureSelect RNase Block to each aliquot of SureSeq probe and mix by pipetting up and down at least 10 times. Reagent 1x library (µl) ___ x library (µl) 16x library (µl) SureSelect RNase Block (purple cap) 0.5 8.25 Nuclease-Free water Total 4.5 5 74.25 82.5 Table 12: RNase Block Mix 10. Add the capture library mix (7 μl) from Plate 2 row C to Plate 1 row C. a) For multiple samples, use a multi-channel pipette to load the SureSeq probe mix into the “C” row of Plate 1. b) Keep the plate at 65°C during this time. c) Seal the wells with strip caps, using a capping tool to make sure the fit is tight. d) Incubate the samples at 65°C for 2 min. Note: The following steps are to be performed as quickly as is reasonably possible whilst avoiding risk of contamination. (It may be helpful if two people perform these steps.) Note: Use new strip caps as the integrity of the caps can be compromised during the previous incubation steps. 11. Maintain the plate at 65°C while you use a multi-channel pipette, set at 13 μl, to take 13 μl of Hybridisation Mix from the “A” row (Plate 1) and add it to the SureSeq probe mix contained in row “C” of Plate 1 for each sample. 12. Maintain the plate at 65°C while you use a multi-channel pipette, set at 13 μl, to transfer the entire contents of each prepped library mix in row “B” (Plate 1) to the solution in row “C” (Plate 1). Mix well by slowly pipetting up and down at least 10 times. 13. Seal the wells with strip caps. Make sure all wells are completely sealed. Version 2: February 2015 25 SureSeq™ Solid Tumour Panel Handbook 14. Incubate the hybridisation mixture for 24 hours at 65°C with a heated lid at 105°C. The hybridisation mixture is now 27 to 29 μl, depending on degree of evaporation during the pre-incubations. Hybridisation wash Estimated time: 2.5 hours for 8–16 samples. Hands-on time: 2 hours. Preparation Pre-warm the required volume of SureSelect Wash Buffer #2 (1.75 ml per hybridisation) at 65°C for at least 1 hour before use. Take the Agilent TapeStation High Sensitivity Kit & High Sensitivity dsDNA Qubit Kit out of the fridge at least 30 min before use to allow reagents to warm to room temperature. Prepare magnetic beads 1. Vigorously resuspend the Dynal MyOne Streptavidin T1 (Life Technologies) magnetic beads on a vortex mixer as Dynal beads settle during storage. 2. Add 50 μl Dynal magnetic beads to a 1.5 ml microfuge tube for each hybridisation performed. a) To wash the beads add 200 μl of SureSelect Binding Buffer, mix the beads on a vortex mixer for 5 s and place the tubes into a magnetic device, such as the Dynal magnetic separator (Life Technologies). b) Remove and discard the supernatant. c) Repeat steps a) and b) for a total of 3 washes. 3. Resuspend the beads in 200 μl of SureSelect Binding Buffer. Hybrid capture 1. For each hybridisation record the volume of liquid that remained after 24 hour incubation. 2. Keep Plate 1 at 65°C in the thermal cycler while you add the hybridisation mixture directly from the thermal cycler to the bead solution. Close cap and invert the tube 3 to 5 times to mix. Note: Excessive evaporation, for example less than 20 μl remaining after hybridisation, can result in sub-optimal hybridisation capture performance. 3. Incubate the hybrid-capture/bead solution on a Nutator or equivalent for 30 min at room temperature. Version 2: February 2015 26 SureSeq™ Solid Tumour Panel Handbook Note: Make sure the sample is properly mixing in the tube. 4. Briefly spin in a centrifuge. 5. Separate the beads and buffer on a Dynal magnetic separator and remove the supernatant. 6. Resuspend the beads in 500 μl of SureSelect Wash Buffer #1 by mixing on a vortex mixer for 5 s. Note: Once the supernatant is removed it is recommended to resuspend the beads immediately in SureSelect Wash Buffer #1 so the beads do not dry out. 7. Incubate the samples for 15 min at room temperature, mixing every 5 min on a vortex mixer. 8. Briefly spin in a centrifuge. 9. Separate the beads and buffer on a Dynal magnetic separator and remove the supernatant (SureSelect Wash Buffer #1), replacing it immediately with SureSelect Wash Buffer #2 (below). 10. Wash the beads: a. Resuspend the beads in 500 μl of 65°C prewarmed SureSelect Wash Buffer #2 and mix on a vortex mixer for 5 s to resuspend the beads. b. Incubate the samples for 10 min at 65°C in a heating block. Mix every 3 min on a vortex mixer. c. Briefly spin in a centrifuge. d. Separate the beads and buffer on a Dynal magnetic separator and remove the supernatant. e. Once the wash buffer has been removed add fresh buffer immediately and return the tube to the heating block. f. Repeat steps a) to d) for a total of 3 washes. Note: Ensure all wash buffer has been removed each time. 11. Add 32 μl of nuclease-free water to the beads and mix on a vortex for 5 s to resuspend the beads. Version 2: February 2015 27 SureSeq™ Solid Tumour Panel Handbook Addition of indexes by post-capture PCR PCR 2 Estimated time: 1.75 hours for 8–16 samples. Hands-on time: 15 min. Prepare PCR reaction mixes For multiple samples, prepare the reaction mix as shown in Table 13, on ice. Mix well on a vortex mixer. Reagent Captured DNA and Bead Slurry Nuclease-free H2O 5x Herculase II Reaction Buffer (clear cap) 100 mM dNTP Mix (green cap) 1x library (µl) 14 22.5 _ x library (µl) 16x library (µl) 371.25 10 165 0.5 8.25 Herculase II Fusion DNA Polymerase (red cap) 1 16.5 Indexing Post-Capture PCR (Forward) Primer (orange cap) 1 16.5 PCR Primer Index (1–16, see Table 15) 1 TOTAL 577.5 µl (35 µl/reaction) 50 µl Table 13: Components for PCR 1. Add 35 μl of the reaction mix to each well or tube. 2. Add 1 μl of the appropriate index PCR Primer (1–16, Table 16) to each well and mix by pipetting remembering to use a different index primer for each sample to be sequenced in the same lane. 3. Use a pipette to add 14 μl of each DNA sample and bead slurry to the relevant well or tube. Mix by pipetting remembering to change pipette tips between samples to avoid cross-contamination. Perform PCR Set up PCR using the profile, settings and number of cycles below in Table 14. 1. Place the tubes in a thermal cycler and run the PCR program. Version 2: February 2015 28 SureSeq™ Solid Tumour Panel Handbook Step 1 2 3 4 5 6 7 Temperature (°C) 98 98 57 72 72 4 Time 2 min 30 s 30 s 1 min Repeat Step 2 through Step 4 for a total of 16 times 10 min Hold Table 14: PCR Profile Post-capture PCR purification 1. Use only room temperature AMPure XP beads. 2. Mix the reagent well so that the reagent appears homogeneous and consistent in colour. 3. Add 90 μl of homogenous AMPure XP beads to each post-hybridisation PCR reaction (in either 1.5 ml LoBind tubes or 0.2 ml tubes/96-well plate). Mix well by either vortexing (1.5 ml tube) or pipetting up and down at least 10 times (0.2 ml tubes/plate). Incubate at room temperature for 5 min. 4. Put the tube in the magnetic stand and wait for the solution to clear (which should take approximately 3–5 min). 5. Keep the tube in the magnetic stand. Do not touch the beads whilst carefully removing 130 μl of the cleared solution. 6. Continue to keep the tube in the magnetic stand/rack whilst adding ▲ 500 μl (or ● 200 μl) of 70% ethanol to each tube. 7. Let the tube sit for 1 min to allow any disturbed beads to settle, and remove the ethanol. 8. Repeat step 6 and step 7 step once. 9. After the second wash seal the tube or plate and centrifuge briefly (260 x g for 30 s). 10. Return the tube or plate to the magnetic stand/rack and wait 1 min. Remove any remaining ethanol using a gel-loading tip fitted to a 20 μl pipette, being careful to not touch the bead pellet. 11. Dry the samples at 37°C in a heating block/thermal cycler for 3–5 min or until the residual ethanol completely evaporates. IMPORTANT: Do not over-dry as this will decrease yield. Note: Bead pellet is dry when the appearance of the surface changes from shiny to matt. 12. Add 32 μl nuclease-free water directly to the bead pellet, mix well by either vortexing (1.5 ml tube) or pipetting up and down at least 10 times (0.2 ml Version 2: February 2015 29 SureSeq™ Solid Tumour Panel Handbook tubes/plate). Incubate for 3 min at room temperature. Centrifuge briefly to consolidate the sample and place on a magnetic stand/rack for 2–3 min or until the solution is clear. 13. Remove approximately 30 μl of the supernatant to a fresh 1.5 ml LoBind tube. The beads can be discarded at this time. 14. Analyse amplified product size using the Agilent TapeStation (High Sensitivity Kit) to determine the peak size for each DNA sample. The electropherogram should show a peak height between 300 and 400 bp (+/– 10%) (Figure 5). Set up the instrument and prepare the chip, samples and ladder following manufacturer’s instructions. 15. Assess the PCR yield using High Sensitivity dsDNA Qubit assay. If the yield is <1 ng/μl repeat the PCR with the remaining bead slurry. IMPORTANT: If the samples are not to be used immediately, store at –20°C. Figure 5: Analysis of amplified capture DNA using an Agilent High Sensitivity D1K ScreenTape assay. The electropherogram shows a peak in the size range of approximately 300–400 bp (+/– 10%). MiSeq sequencing The DNA samples prepared in the previous section (Addition of Indexes by Post-Capture PCR) need to be combined such that each index-tagged sample is present in equimolar amounts in the final pool. This requires both accurate determination of peak size (bp), provided by Agilent TapeStation (High-Sensitivity Kit), and accurate determination of sample concentration (ng/µl), provided by Life Technologies Qubit (High-Sensitivity) assay. Note: The desired concentration (nM) of the Sequencing Pool for the MiSeq sequencer is 2nM. Version 2: February 2015 30 SureSeq™ Solid Tumour Panel Handbook Preparing the sequencing pool For each indexed DNA sample, use the formulas below to determine the volume (µl) to use to generate the Sequencing Pool. Formula 1 — Molecular Weight (MW) MW = (Size in bp x 660) + 157.9 Formula 2 — nmol/µl nmol/µl = Sample concentration (ng/µl) MW Formula 3 — nmol/µl to nM nM = nmol/µl 106 Formula 4 — Volume of each Indexed DNA Sample Volume of each Indexed DNA Sample = Stock Pool volume (µl) x Desired pool concentration (10nM) Number of indexes in the pool x nM concentration of the sample 1. Adjusting the Stock Pool volume; If the Stock Pool volume is less than required, add Low TE to bring the volume to increase the volume. If the Stock Pool volume is greater than required, dry down and reconstitute to the required volume. 2. Perform a 1 in 5 dilution of the Stock Pool to generate the 2 nM Sequencing Pool. 3. Analyse the Stock Pool (10nM) and Sequencing Pool (2nM) using an Agilent TapeStation (High Sensitivity Kit) to determine peak height. Assess concentration (ng/µl) yield using High Sensitivity Qubit assay. 4. Use formulas 1–3 (above) to ensure that concentration of the Stock Pool and Sequencing Pool are as expected, 10nM and 2nM respectively. 5. The Sequencing Pool can now be prepared for loading on to the MiSeq. 6. Set up the MiSeq following manufacturer’s instructions. Version 2: February 2015 31 SureSeq™ Solid Tumour Panel Handbook Preparing the MiSeq SampleSheet 1. The MiSeq SampleSheet can be created in Excel using the following template. 2. All text in red is for user and sample specific information. 3. All text in black is required to ensure that the MiSeq will recognise the file. 4. The file needs to be saved using the MiSeq Reagent Tray ID, which begins with MS then has 8 numbers followed by 300V2 (when running the version 2 MiSeq chemistry), e.g. MS2016935-300V2. The file needs to be saved as a CSV (Comma delimited) file. After the MiSeq run, the software on the supplied USB stick can be used to analyse the data on a Windows desktop machine. Please refer to the manuals included on the USB stick for installation and use of the software. Version 2: February 2015 32 SureSeq™ Solid Tumour Panel Handbook The nucleotide sequences for the 16 indexes provided are detailed in the table below. Index Number 1 2 3 4 5 6 7 8 9 10 11 12 13 14 15 16 Sequence ATCACG CGATGT TTAGGC TGACCA ACAGTG GCCAAT CAGATC ACTTGA GATCAG TAGCTT GGCTAC CTTGTA AAACAT CAAAAG GAAACC AAAGCA Table 15: Index sequences Version 2: February 2015 33 SureSeq™ Solid Tumour Panel Handbook Legal information This handbook and its contents are © Oxford Gene Technology (Operations) Limited 2014. All rights reserved. Reproduction of all or any substantial part of its contents in any form is prohibited except that individual users may print or save portions of the protocol for their own personal use. This licence does not permit users to incorporate the material or any substantial part of it in any other work or publication, whether in hard copy or electronic or any other form. In particular (but without limitation), no substantial part of the handbook may be distributed or copied for any commercial purpose. SureSeq Solid Tumour Panel Assay The purchaser has the non-transferable right to use and consume the product for RESEARCH USE ONLY AND NOT FOR DIAGNOSTICS PROCEDURES. It is not intended for use, and should not be used, for the diagnosis, prevention, monitoring, treatment or alleviation of any disease or condition, or for the investigation of any physiological process, in any identifiable human, or for any other medical purpose. Trademarks Trademarks: OGT™, SureSeq™, Genefficiency™, Labefficiency™ (Oxford Gene Technology); SureSelect™ (Agilent® Technologies Inc.); NanoDrop™, SpeedVac® (Thermo Fisher Scientific); HiSeq™, MiSeq™ (Illumina Inc.); Human Cot-1 DNA®, QuantiT™, Qubit® (Life Technologies Corp.); Covaris® (Covaris, Inc.); Dynabeads™ (Dynal Inc.); Ampure™ (Beckman Coulter Inc.). Customer’s obligations The Customer acknowledges that Oxford Gene Technology (Operations) Limited (or its group companies) owns all intellectual property rights in the design of the Product, including the choice and configuration of the oligonucleotide sequences used in the Product. The Product may only be reproduced or manufactured by Oxford Gene Technology (Operations) Limited or with its permission. Contact information Oxford Gene Technology, Begbroke Hill, Woodstock Road, Begbroke, Oxfordshire, OX5 1PF, UK. Oxford Gene Technology (Operations) Ltd. Registered in England No: 03845432 Begbroke Hill, Woodstock Road, Begbroke, Oxfordshire, OX5 1PF. Tel: +44(0)1865 856826 (US: 914-467-5285) Email: [email protected] Technical support email: [email protected] Web: www.ogt.com Version 2: February 2015 34 SureSeq™ Solid Tumour Panel Handbook Ordering information Product Contents Cat. no. SureSeq Solid Tumour Panel Assay (96 reactions) Enrichment baits sufficient for 96 samples; SureSeq Solid Tumour Report 600070 SureSeq Solid Tumour Panel Assay (16 reactions) Enrichment baits sufficient for 16 samples; SureSeq Solid Tumour Report 600071 Genefficiency SureSeq Solid Tumour Panel Service Sequencing Service utilising the SureSeq Solid Tumour Panel and userfriendly and interactive Variant Analysis Report Enquire Genefficiency Whole Exome NGS Services Whole Exome Sequencing featuring OGT’s user-friendly and interactive Variant Analysis Report Enquire Genefficiency RNA-Seq NGS Services RNA-Seq Sequencing featuring OGT’s user-friendly and interactive Variant Analysis Report Enquire Genefficiency Custom NGS Services Custom Panel Sequencing featuring OGT’s user-friendly and interactive Variant Analysis Report and expert bait design algorithm. Enquire Services For an up-to-date product list and the latest product information, visit www.ogt.com. Version 2: February 2015 35 SureSeq™ Solid Tumour Panel Handbook Contact us Oxford Gene Technology, Begbroke Hill, Woodstock Road, Begbroke, Oxfordshire OX5 1PF, UK T: +44(0)1865 856826; (US: 914-467-5285) E: [email protected]; W: www.ogt.com Technical support: E: [email protected] T: +44(0)1865 856826 Item number: 990162 Version 2: February 2015 36