1
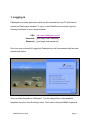
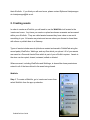
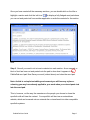
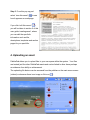
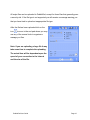
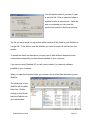
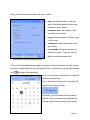
Pebblepad User Guide
Step by step guide to creating an ePortfolio
1. Logging in.................................................................................................................. 2
2. Creating assets.......................................................................................................... 3
3. Managing assets ....................................................................................................... 7
4. Uploading an asset ................................................................................................... 8
5. Linking Assets......................................................................................................... 11
6. Saving assets .......................................................................................................... 13
7. Sharing an asset...................................................................................................... 16
Kings Learning Institute
(KLI)
Note: You must have Macromedia Flash player installed in your browser in order to use
Pebblepad. Flash player can be downloaded for free from the internet. Contact your technical support if
you need help in obtaining Flash player for your computer.
PebblePad User Guide
Page 1
1. Logging in
Pebblepad is an online application which can be accessed from any PC with internet
access and Flash player installed. To log in to the PebblePad environment, type the
following information in your internet browser:
URL: http://www.pebblepad.com/kcl
Username: [your kings email username]
Password: [your kings email password]
Once you have successfully logged into Pebblepad you will be presented with the main
menu screen below:
This is a default template for Pebblepad. You can change this to other available
templates using the ‘tools & settings’ menu. Each user is allocated 20MB of space for
PebblePad User Guide
Page 2
their ePortfolio. If you think you will need more, please contact Stylianos Hatzipanagos
at [email protected].
2. Creating assets
In order to create an ePortfolio you will need to use the WebFolio tool located in the
‘create new’ menu. Any items you create or upload are known as assets and are saved
within your ePortfolio. They are called assets because they have value or are worth
something to you. All assets are private and secure unless you choose to share them
with others or publish them to a Gateway.
Types of assets include records (which are created and saved in PebblePad using the
record pads), WebFolios, WebLogs, and any files which you upload. All of your assets
are saved in a Personal Assets Store which is part of your ePortfolio system. Assets in
the store can be copied, shared, reviewed, edited or deleted.
Where an asset, including WebFolios and WebLogs, is shared the share permissions
extend to all of the items linked to the asset being shared.
Webfolio
Step 1. To create a Webfolio, go to ‘create new’ menu then
select Webfolio from the pop-up selection.
PebblePad User Guide
Page 3
Step 2. Once selected, the initial creation
E
pad on the right loads up for you to start
adding information about your asset.
F
D
C
B
A
G
H
A
B
C
D
E
F
G
H
I
J
K
Close pad
Open/Close top menu
Spell checker
Cut – Copy – Paste
Icon indicating type of asset
Hint available icon (click for hint)
Title field
Choose a category for your asset
Description text field
Page numbering and navigation
buttons
Help
I
J
K
Using the page numbering or navigation buttons (J) you can move through the pages
adding information into the pads as you progress. Don’t worry if you are not sure what
to put on these pages, you can always return to edit the text at a later stage.
Step 3. Give your ePortfolio a meaningful
name and leave the category as
‘educational’ as it is the most appropriate
selection from the drop down list. Now
type a brief description for your ePortfolio.
Once done, either click on the arrow
facing right (
) to move onto the next
page or click on page number two (
PebblePad User Guide
).
Page 4
Step 4. Here, you have a choice of
selecting the template for your ePortfolio.
This is how your ePortfolio will be viewed
in html (web page) format when you save
or export it. Each template has different
layout for buttons and contents. You can
also choose a colour scheme, which will
correspond with the banner and button on
the web pages.
Click on the arrow facing right (
) to
move onto the next page or click on page
number three.
Step 5. This is where you add new pages
to your ePortfolio. You may know them as
sections. Along with the four sections
listed on the left you can also choose to
have introduction and references etc.
Simply, click on the field labelled ‘[enter
page title here]’ then click on the arrow
button (circled) to add each page to your
ePortfolio.
PebblePad User Guide
Page 5
Once you have created all the necessary sections, you can double-click on the title or
highlight a section and click the ‘edit icon’ (
) to display a fully fledged word pad where
you can cut and paste text from another application or write the contents for the section
here.
Step 6. Now all you need to do is insert contents into each section. As an example, a
block of text has been cut and pasted onto the pad to show how it appears in the
PebblePad word pad. Now Save your work (circled above) and close the word pad.
Note: As this is a simple text editing environment you will lose any styles or
colouring you may have already applied to your work when you cut and paste text
into the word pad.
This is, however, not the way the examiners or the people you choose to share the
eportfolio with will view the content. Your eportfolio will be view as a standalone
website, which can be saved onto an external disc or transferred into other compatible
eportfolio systems.
PebblePad User Guide
Page 6
3. Managing assets
Now that you have created an asset (ePortfolio), you may want to view it to see what it
looks like. Using the manage asset on the main menu screen, you have the choice of
publishing your eportfolio on to the gateways where it will be available for everyone to
view, import or export an ePortfolio to/from a compatible eportfolio system or view your
assets.
Step 1. To view an asset, on the
main menu screen click on
‘manage assets’ then select ‘view
assets’.
Step 2. From the view assets pad you can select the assets (ePortfolio) to view. Once
clicked, another pop up pad will appear with the options to view, edit, send or see
more options available for the asset.
PebblePad User Guide
Page 7
Step 3. From this pop up pad
select ‘view this asset’ (
) to see
how it appears as a webpage.
If you click ‘edit this record’ (
)
you will be taken to section 2 of this
user guide ‘creating asset’, where
you can edit the eportfolio
information such as title,
descriptions, templates and section
pages for you eportfolio.
4. Uploading an asset
PebblePad allows you to upload files to your own space within the system. Your files
are treated just like other PebblePad assets and can be linked to other items perhaps
as evidence of an ability or achievement.
The uploading file feature can be accessed from the pebbles on the main menu screen
(circled) or wherever there is an image or file icon (
).
B
A
C
D
PebblePad User Guide
Page 8
Step 1. When the pebble on the main menu screen is clicked the above pad will be
displayed:
A. The title area allows you to give the asset a meaningful name for the file.
B. Select a category for the file. You can upload a single file one at a time,
multiple files all together or even a gallery of pictures or an entire website.
C. You can enter a description for the file.
D. Opens a window so you select and upload the file to your asset store. See
step 2.
Step 2. When the icon labelled D above is clicked the asset will automatically be saved,
however please note that this does not mean that the file had been uploaded. After the
save bar is displayed the following screen will appear:
This screen allows you to browse the
documents on your computer to find the file
that you want to upload. Click on the
‘Browse’ button to locate the file you want
to upload. Click ‘Close’ to cancel the
process and close the screen.
Clicking on the Browse button (above) will open the following screen:
This screen allows you to browse through
files on your computer and select the file
that you want to upload. Click on a file and
then click on the ‘Open’ button. This will
put the file location onto the PebblePad
screen (above). Finally click on the upload
button to send the file to your asset store.
PebblePad User Guide
Page 9
All major files can be uploaded to PebblePad, except for those files that generally pose
a security risk. If the file type is not supported you will receive a message warning you
that you have tried to upload an inappropriate file type.
After the file has been uploaded click on the
icon
to move to the end pad where you may
use any of the normal tools to organise or
manage you files.
Note: if you are uploading a large file it may
take some time to complete the uploading.
The actual time will be dependent upon the
speed of your connection to the internet
and the size of the file.
PebblePad User Guide
Page 10
5. Linking Assets
Linking allows you to create a relationship between an asset you have created in
PebblePad and other items. This means you can link to other assets stored in your
eportfolio, external web pages and email addresses. When you create a link a section
is added onto the asset view of the originating asset with a clickable link which opens
the item you have linked to in a new window.
Links can be added to assets using the end of pad options:
From this pad you can create three types of links: to asset; to an email address or to a
web page. You can also upload and link to new files to link to.
A
B
D
C
E
A. This is the view that automatically loads and it allows you to see a list of all of the
assets in your asset store. To link one of these items to your asset, click on it to
select it and then click on the
icon to confirm the link.
B. Allows you to create a hyperlink from your asset to a web site.
C. Allows you to create a hyperlink from your asset to an email address.
PebblePad User Guide
Page 11
D. Opens the browse screen and allows you to upload a file that is not already in
your asset store (See Uploading an asset section above).
E. Allows you to see any links that have already been made to the asset.
Linking to Web Pages
Clicking on the Web Link tab (labelled B above) will open the web link pad to allow you
to create a link to a website:
A. In the display text area you need to
add the text people will click on to go
to open the website. This will usually
A
be descriptive rather than a web
address.
B
B. In the web address area enter the
address of the webpage that you
want to link to.
After you have entered the information into A and B click on the
to save the link.
Linking to Email
Clicking on the email link tab (labelled C above) will open the email link pad to allow you
to create a link to an email address:
A. In the display text area, you need to
add the text people will click on to
start creating an email address you
define in B. This may be descriptive
A
or can be an email address.
B. In the email address area enter the
B
address of the person you want
emails to be sent to.
PebblePad User Guide
Page 12
After you have entered the information into A and B click on the
icon to save the link.
In your asset the text that you entered into area A will be displayed as the link, when
users click on it, it will open their email program with a new message addressed to the
email address that you entered in B.
6. Saving assets
There are two options for transferring your PebblePad assets to other systems. Export
and save to disc. Export uses international standards to build an archive which can be
transferred into other compatible eportfolio systems. Save to disk allows you to
download a Webfolio (ePortfolio) as a standalone website. All links will be maintained
so that if you link to other items in your asset store, these linked assets will be included
in your export website.
Save to Disc
Save to disk can be selected from the end of pad options or anywhere you see a Save
(
or
) icon. To access the tool options on the synopsis pad, click on the arrow in
the lower corner of the pad. Whichever way you access the Save to disk facility, you
simply have to click on the icon to begin saving the Webfolio.
Exporting eportfolio
To export your eportfolio go to the main screen menu and
select ‘manage assets’ then ‘export’.
PebblePad User Guide
Page 13
On the pop-up pad (below) you now have
three options:
•
Export your entire eportfolio in an
international standard format which
can be imported to other similar
eportfolio system
•
Export selected assets (This can be
individual files or eportfolio).
•
Export Webfolio as a standalone
website.
You final submission will be via the last method, exporting Webfolio as a standalone
website. Once you have clicked export WebFolio as website a new window will appear,
usually in the top left of the screen, which automatically builds all the items from your
Webfolio into an archive.
Depending on how your computer is set up
you may get a security warning. This is
normal and is designed to stop unwanted
files being out on your computer without
your authorisation.
To continue to download the file click on the
warning message and select Download
File…
PebblePad User Guide
Page 14
You will then be asked if you want to open
or save the file. Click on save and select a
suitable location to save the file. Once the
save is completed you can close the
window that opened to build your archive.
The file you have saved is a zip archive which contains all the items in your Webfolio in
a single file. To be able to view the Webfolio you need to extract all the files from the
archive.
To extract the files from the archive you may have to take different steps than those
outlined below depending on the software installed on your computer.
If you are not using Windows XP you will need to check if you have zip software
installed on your computer.
When you open the extracted folder you will see a list of all the files that make up your
Webfolio.
The initial page of your
Webfolio will be called
index.htm. Double
clicking on this file will
load the Webfolio into
your web browser.
PebblePad User Guide
Page 15
Creating a CD-ROM version of your Webfolio
The way you create a CD-ROM on you computer will depend upon the software you
have installed. However, whichever option you use, you need to copy all of the files
from the extracted folder onto the disc without putting them into another folder or
directly. By doing this you will create a disc which “autoruns” or automatically opens
your Webfolio when it is inserted into a computer.
Note: The autorun feature is currently only available for window-based
computers.
7. Sharing an asset
Sharing an asset allows others to view or comment on your eportfolio. There are three
things you can do with the eportfolio: put it in the gateway for the public to see, share it
with an individual or place it in a blog.
To share your eportfolio with someone,
locate your eportfolio by clicking on
‘manager assets’ then ‘view assets’ from
the main menu screen then choose the
eportfolio you want to share. ePortfolios
have this (
) icon next to the title,
You can select any type of asset; you
are not restricted to a particular type of
file. However the size limit of each
ePortfolio is 20MB. Should you require
more, please contact Stylianos
PebblePad User Guide
Page 16
Hatzipanagos at [email protected].
Once you have selected the eportfolio another pop up pad will appear like the one
shown on the right. Place the mouse over ‘Send to…’ and you will see a few options
pop up: gateway, person, blog. As you are sharing the eportfolio with another person
click on person.
If the person you want to share the eportfolio with doesn’t already exist on the list then
click on the ‘add a contact’ tab (circled). Type in the surname and first name of the
person you want to share the eportfolio with and click on the magnifying glass icon (
).
If the person also has a PebblePad account
they will be listed here. Double click on the
name to add them to the ‘sharees list’ on
the opposite page or click on
icon
between the two pages to add contact to
your share list. Now go to page two by
clicking on
icon and allow this person
the relevant permission to your asset (either files or ePortfolios).
PebblePad User Guide
Page 17
Here, you have the option to allow the user to either:
•
view: allows the sharee to view your
asset. All shared assets have the view
permission set by default.
•
comment: allows the sharee to add
comment to your asset.
•
copy: allows the sharee to make a copy
of your asset.
•
collaborate: allows the sharee to edit
your assets.
•
and cascade: allows the sharee to reshare your assets. They will only be
able to re-share the asset with
permission to view or comment if set.
Once you have decided what privileges you want to set for the sharee, you can choose
to share the asset with them for a set length of time. In which case, click on the calendar
icon (
) to bring up the date diary.
Here, you can select a date when you want the
asset to be shared until.
Or you can have it on going by clicking the ‘Or
ongoing’ box below the diary.
Optionally, you can customise the message
that will sent to your sharee automatically by
clicking on the ‘Add a message to this share’
PebblePad User Guide
Page 18
(
) icon. Finally click in icon to complete the sharing of asset.
PebblePad User Guide
Page 19