1
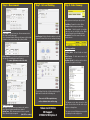
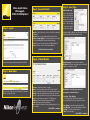
Nikon Assist Online
EDI Support 01908 214100 Option 5
Step 3 - Account Details
Step 1 - Log-in
Supplier - Specify the source of lenses to fulfil your patients
prescription.
Account - Your account number will be displayed here.
Job Type / Frame Options - If Uncut was chosen as Job Type
then only Lens Only will be shown as Frame Option.
If Edged then you can choose between R-Edged (Remote
Edging) or Frame to Follow on the Frame Options.
Step 5 - Lens Type
Nikon Online lens Please enter prescription as SV lens in the
patient tab. As per
image to the right,
the Degression/Lens
Index and Coating
can be chosen via the
lens material option.
Height and PDs for Online lens will need to be Near
Heights and Near PDs (Measurement tab).
(click instructions for details)
Step 4 - Patient Details
Enter your Username and Password and click submit.
Prism Thinning - Select standard or without.
NV Inset - Near Vision inset range between 0.0 and
5.0mm. See variable inset PDF.
Step 2 - New Order
Once you have logged in, click on Order now and New
RX Lens to start your order.
Reference - Practice reference for order.
Sphere - Enter the sphere power in 0.25 steps. This will
default to a plus (+) unless the power is prefixed with a minus.
Cylinder - Enter the cylinder power in 0.25 steps. This will
default to a plus (+) unless the power is prefixed with a minus.
Axis - Enter the value in a range of 1 to 180 degrees.
Addition - Enter the addition in quarter dioptres.
Prism - Enter the value in Prism dioptres.
Base - Indicate the direction of the prism by typing ‘in’, ‘out’,
‘up’ or ‘down’.
(click NEXT to continue)
Availability of Lens Design is based on
prescription entered in Step 4.
Lens Type - Three Options
- SV ( Single Vision), Bifocal and Progressive
SV only available based on prescription entered.
Lens Design - Select the required lens design.
Lens Material - Select the required lens material.
Coating - Select the coating required.
Tints - are in absorption.
(click NEXT to continue)
Step 6 - Measurements
Step 7 - Calc and Finishing
Step 8 - Order Summary
Once you have entered your order you can:
Uncut Lens Order
Pick a shape - Select a frame type. Enter measurements into
PD, Height, and Thickness type.
Select a standard shape by clicking on the image at the bottom.
Provide the frame measurements ABox, BBox, and DBL.
Lens Design - Click the Calculation button to view the
front and cut view. Click zoom-in to enlarge the image.
Send Now - Transmit the order to Nikon.
Preview - Display in a pop up window.
Save Order - Should you wish to send the
order later on you can click on Save Order
(order will appear in your Pending section).
New Order - Cancel the current order and
start a new one.
Tracking your Order
Pending Order - All saved orders are stored
here.
Order Status - To check current status of all
orders placed.
Archives (stock) - should you wish to archive
old orders, they can be stored here.
Pick a diameter - Select diameter required for the order.
An optional reduced diameter can be entered.
(To remove Optimum, un-check the box)
To select Edge Polish click on Tick box in Finishing Tab
which can be found in Calc & Finishing tab.
Please note all Nikon products may
not be calculated online at this stage
Remote Edge Order
Lab Trace - Select the frame type, brand, model, and size.
Enter PDs and Height measurements as required.
Upload Trace - Click on browse and select trace to upload.
Enter PDs and Heights as required.
(click NEXT to continue)
Nikon Assist Online
EDI Support 01908 214100 Option 5
The Summary section above shows the order
details. You can click on the tabs at the top at
any time to change them.
The errors section will display any errors which
occur during the order entry process.