1
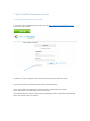
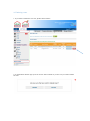
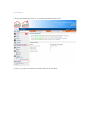
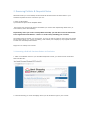
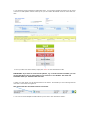
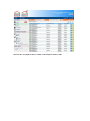
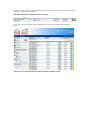
Crossflow Payments
User Guide
Ideal Shopping Direct
January 2014
Welcome to Crossflow Payments! Thank you for taking the time to sign up to Crossflow Payments.
This guide will hopefully give you all the information you need to get going. If you do have any
questions though, please visit http://isdportal.crossflowpayments.co.uk/ or contact us.
Table of Contents
1. Your Crossflow Payments Account ............................................................................ 3
1.1 Accessing your account via the web ........................................................................ 3
1.2 The main ‘Folder View’ ............................................................................................ 5
1.3 Creating a New folder .............................................................................................. 7
1.4 Permissions ............................................................................................................ 10
1.5 Add users................................................................................................................ 11
1.6 Deleting a user ....................................................................................................... 13
1.8 Change Password ................................................................................................... 14
1.9 Edit Company Information ..................................................................................... 15
1.10 Support................................................................................................................. 16
2. Receiving Picklists & Despatch Notes ...................................................................... 17
2.1
Accessing a Picklist & Purchase Orders via Email alert ..................................... 17
2.3 Working with the Picklist & Despatch Notes ......................................................... 20
3. Confirming Despatches and Order Status................................................................ 22
3.1. Confirming Despatches in Bulk ............................................................................. 22
3.2. Confirming part despatches, out of stocks or other issues .................................. 22
4. Receiving Purchase Orders & Confirmations ........................................................... 25
1. Your Crossflow Payments Account
1.1 Accessing your account via the web
1. To access your Crossflow Payments account, first visit http://isdportal.crossflowpayments.co.uk
and click the ‘Log In’ button.
2. Enter the e-mail you registered your account with and your password and click ‘Login’.
If you have forgotten your password, please choose “Forgot password?”
If you have forgotten your password you will be brought to “Password Recovery/ Reset
Form”. Please enter your email address here and click send.
The Crossflow Payments system will then send the registered account an email. Please follow the link
sent in the email to reset your password.
1.2 The main ‘Folder View’
The Crossflow Payments system all works around the central ‘Home View’. This is where you can see all
your documents (both sent and received), control your user settings and contact the support team.
The Crossflow Payments ‘Home View’:
1. Home
The “Home” button brings you to the main screen (as shown above)
2. Settings
My Account: Enables you to view and update account details and change your password.
Company Information: Allows you to view or edit your company information. Please note- if you would
like to change your company e-mail please contact Crossflow Payments
Support ([email protected]).
Manage Users: Here you can add or delete users and change user permissions on folders and
document types.
Manage Folders: Used for creating folders and subfolders.
3. Main Menu
Inbox: Documents you receive are stored here.
Sent: Documents you sent are stored here.
Draft: A document you have edited and not yet sent would be saved in Drafts.
Archived: Documents you have archived off are stored here. You archive a document by selecting the
green button on the right of the document and choosing “Archive Document”. You can also bulk
archive the document by choosing the bulk archive symbol at the top of the page and checking the
check boxes of the documents you want to archive.
Deleted: Documents you have deleted are stored here. You delete a document by selecting the green
button on the right of the document and choosing “Delete Document”. You can also bulk delete the
document by choosing the bulk delete symbol at the top of the page and checking the check boxes of
the documents you want to delete. Once a document has been deleted it cannot be moved back to the
Inbox or another folder.
4. Customised Folders
Stores the folders and sub folders that you have created.
5. Quick Links
Change my Password: Shortcut to change your account password
Support: Shortcut to Support. This brings you to our ticketing system.
6. Search
To quickly find your document:
Select the document type and search for the document reference number.
You can enter all or part of the reference number.
Advanced Search:
This give you the ability to locate your document by entering the date it was sent/received/ opened,
where to search and the name/ email of the sender/ recipient
7. Support
This brings you to our ticketing system. Here you can open a new ticket or check the status of your
previous tickets.
8. Log Out
To securely logout of Crossflow Payments.
9. Document Notifications
You can easily view the number or unread documents you have in your inbox and also what type of
document they are.
10. Document Tools
Here is a summary of the total documents attached to your account and the number of documents in
each folder.
1.3 Creating a New folder
1. To create a new folder to organise your documents click on “SETTINGS” and choose “MANAGE
FOLDERS”.
2. Add a main folder by creating a folder name in the text box provided and selecting enter of by
clicking on the green plus icon.
3. Add a sub folder by typing the folder name into the text box provided and selecting enter or by
clicking on the green plus icon.
1.4 Permissions
1. Once you have created a folder you must now give each user permission to view this folder. To give
users permissions you must choose “Manage Users” and select “Permissions”.
2. Folders and DocTypes are displayed here. Selecting the check boxes gives the user permissions.
1.5 Add users
1. To add another user to the account you can choose “Settings” and then “Manage Users”.
2. Then select the green “+Add” button to begin entering the new users details.
3. Here you enter the new user’s details.
4. Once you have entered the new users details then click on “Submit”.
5. You can now see that the new user has been added to the account.
1.6 Deleting a user
1. If you want to delete the new user, please select “Delete”.
2. A confirmation will then pop up on the screen. Select “Delete” if you are sure you want to delete
the user.
1.8 Change Password
1. You can change your password by selecting “Settings” and the “My Account”. You can also change
your password by choosing “Change My Password on the “Quick Links” bar.
2. You are then required to enter your old password and a new password twice for confirmation.
1.9 Edit Company Information
1. To view or edit company information go to “Settings” and then choose “Company Information”. If
you would like to change your company email please contact Crossflow Payments Support
([email protected]).
2. If you have any issues or problems please do not hesitate to contact Crossflow Payments Support.
1.10 Support
1. By choosing Support this takes you to Crossflow Payments Support Centre.
2. Here you can open a new ticket or check the status of an older ticket.
2. Receiving Picklists & Despatch Notes
When ISD sends you a new Picklist, the document will be delivered to the ‘New’ folder in your
Crossflow Payments account. From there you can:
1) Print out the Picklist
2) Generate and print out the Despatch Notes.
This means you’ll now have all the documentation you need to start despatching within hours (or
even minutes) of the show finishing.
Importantly, when you receive a new picklist from ISD, you will also be sent an email alert
to the registered email address – there’s no need to keep checking your account!
The support team do monitor your account too, so if you do miss any alerts or don’t open your Picklist
for any other reason (e.g. you are on holiday), we’ll contact your company by way of gentle reminder
to make sure somebody looks at them.
Right, let’s see exactly how it works:
2.1 Accessing a Picklist & Purchase Orders via Email alert
1. When a new Picklist arrives in your Crossflow Payments account, you will be sent an email alert
that looks like this:
2. The link will bring you to the homepage where you will be able to login to your account.
2.2 Accessing a Picklist & Despatch Notes via your Crossflow
Payments account
1. Once you login you will now be brought to your ‘Home View’.
2. Choose the Inbox from the Main Menu
New documents are in a bold font and the “Date Opened” column states “UNREAD”.
3. To open the Picklist, click on the icon to the right of the document list, then select ‘Open
Document’.
2.3 Working with the Picklist & Despatch Notes
The Picklist layout on Crossflow Payments portal is designed to match what was sent previously by
email.
1. The document is in two halves, a summary of products orders and a summary of customer orders.
2. You can download a PDF of the pick list by clicking the ‘Picklist PDF’ button at the bottom of the
form
3. To generate the despatch notes to go with the Picklist, you just need to click the ‘Despatch
Note’ button
4. This will generate a PDF document that you can the print out onto normal A4 paper. This can
sometimes take a few minutes to do (there’s a lot of data to work through behind the scenes) so
please be patient.
5. The new format despatch note has been designed to print on normal A4 paper – ISD is no longer
using the version of paper that included ‘peelable’ sections to be stuck on the parcel.
Here is an example:
6. It has been designed to be printed on normal A4 paper, which you can then fold and place in a
document wallet on the outside of the parcel.
3. Confirming Despatches and Order Status
Crossflow Payments will also be replacing the ‘DD tracker’ system used by ISD. This means you
simply need to confirm the despatch status of orders via the Crossflow Payments portal.
There are two ways to confirm Despatch:
1) In bulk – to be used if you despatched all orders on the same day
2) By order – to be used if you only delivered some orders, or had issues with stock.
3.1. Confirming Despatches in Bulk
If you have despatched all orders on the same day, there is now a very quick way to confirm this to
Ideal – simply enter the despatch date in the ‘Bulk Despatch’ area and click the button. That’s it!
3.2. Confirming part despatches, out of stocks or other issues
This is quick and simple to do, just follow these steps:
1. Open the Picklist you are working with and click on the ‘Generate Despatch Confirmation’ button at
the bottom.
2. You will then see the ‘Despatch Confirmation’ form. You can either update the orders one at a time,
or there is a ‘Bulk Update’ section at the top so you can confirm the details of lots of orders with one
click.
3. Once you filled out all the details, simply click ‘Send’ to send the details to ISD.
IMPORTANT: If you have to send several updates, e.g. as stock becomes available, you can
go through this process as many times as you need to for one Picklist. This form will
remember what you submitted the last time.
4. When you click ‘Send’ you will be taken back to the ‘Inbox’. The Picklist you were working with will
now have a converted icon against it.
This means that the document has been converted.
5. You can see all the Despatch Confirmations you’ve sent in the ‘Sent Items’ Folder.
That’s it! It’s as simple as that to confirm order despatch status to ISD.
4. Receiving Purchase Orders & Confirmations
When ISD sends you a new Purchase Order, the document will be delivered to the ‘New’ folder in your
Crossflow Payments account. From there you can:
1) Print out the Purchase Order
2) Accept or Reject the Purchase Order.
4.1 Working with the Purchase Orders & Confirmations
When a user opens a Purchase Order they are presented with a screen containing the
Purchase Order information and the option to accept or reject the purchase order.
2. You can download a PDF of the Purchase Order by clicking the ‘Purchase Order PDF’ button at the
bottom of the form.
5. Confirming Orders and Order Status
5.1. Older Versions of Purchase Orders
You will notice that Purchase Orders have a version number next to them. An example of this would
be – 00003-v1.
You will be notified by a banner if the Purchase Order you have opened is an older version.
5.2. Accepting & Rejecting Purchase Orders
This is quick and simple to do, just follow these steps:
1. Open the Purchase Order you are working with and scroll to the ‘Purchase Order
Confirmation’ box.
2. You must fill in the information for ’Confirmed By’, ‘Confirmed Date’ and any ‘Comments’ regarding
the Purchase Order.
3. You have the option to ’Accept’ the document or to ‘Reject’ it. Simply click the option that suits you
and the details will be sent to ISD.
IMPORTANT: Do not close your internet browser or press back while the order is processing as this
may cause an issue.
4. When you click ‘Send’ you will be taken back to the ‘Inbox’. The Picklist you were working with will
now have a converted icon against it.
This means that the document has been converted.
5. You can see all the Purchase Order confirmations you’ve sent in the ‘Filing Cabinet (Sent)’
Folder.
That’s it! It’s as simple as that to confirm a Purchase Orders to ISD.