1
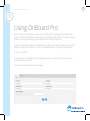
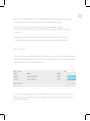
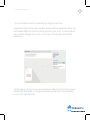
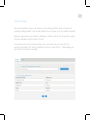
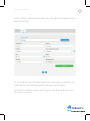
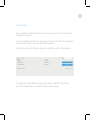
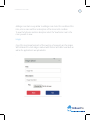
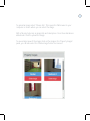
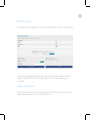
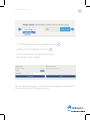
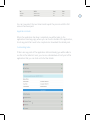
On Board Pro
WORK SMARTER, NOT HARDER
USER GUIDE VERSION 1.2
Contents
1 What is OnBoard Pro?
Page
1
Select Main Tenant
Page
23
Browser
Page
1
Joint Tenant(s)
Page
25
Internet Connection
Page
1
Final Details
Page
27
2 Seting up OnBoard Pro
Page
2
Application Fee
Page
29
Signing up
Page
2
Credit Check
Page
30
Select your Plan
Page
3
Credit Check Results
Page
33
Logging In
Page
8
5 Review
Page
38
Adding Users to a Branch
Page
10
6 Signing the Agreement
Page
41
Page
13
Tenant’s Point of View
Page
44
Create a Landlord
Page
13
Guarantor & Witness Process
Page
47
Edit a Landlord
Page
14
Landlords Signature
Page
48
Create a Property
Page
18
Meter Readings
Page
48
Edit a Property
Page
20
Property Inventory
Page
52
4 Adding your Agreement
Page
20
Rooms
Page
52
Create an Agreement
Page
20
Room Items
Page
54
Preview your Agreement
Page
22
Images
Page
55
Create a Tenant
Page
22
Application Deposit
Page
58
New Tenant
Page
22
Application Details
Page
60
Pre-Registered Tenant
Page
22
Outstanding Tasks
Page
60
Applications
Page
23
Useful Documents
Page
61
3 Using OnBoard Pro
OnBoard Pro User Guide
1
1
What is OnBoard Pro?
OnBoard Pro is a cloud based application so you don’t need to install any software
to use it, all you need is an internet connection and an internet browser.
OnBoard Pro is designed to help letting agents and landlords rent their
properties. From the moment you find a tenant to handing over the keys,
OnBoard Pro is designed to make the process as efficient and easy as possible.
This guide includes all the information you need to work with OnBoard Pro and
make full use of all it has to offer. You can use OnBoard Pro with any desktop,
laptop or tablet but it is advised that your device has a screen of 9.7 inches or
larger as smaller devices can not function correctly.
Browser
You can use all internet browsers (for example, Internet Explorer, Firefox, Safari, and Opera)
but we recommend Google Chrome for the best experience. It can be downloaded via their
website www.google.com/chrome It’s also recommended that you use the most up to date
version of the browser that you choose.
Internet Connection
OnBoard Pro requires a constant and stable internet connection to function. However, our
mobile App for Android and iOS tablets allows you to take property inventories and meter
readings on the go without an internet connection.
OnBoard Pro
2
Setting up OnBoard Pro
Signing Up
In this section we will guide you through signing up and creating your account.
If your account has already been setup you can move on to the next chapter.
In order to sign up as a letting agent you will need to go to our sign up page.
To do so type the following into your web browser:
https://app.onboardpro.co.uk/signup
Once on the Sign Up page you will see a screen similar to that shown
below. Select the ‘Are you an Agent?’ option in the middle to continue.
2
OnBoard Pro User Guide
3
Select your plan
You will be presented with the different plans available this will outline the
different modules available to you in each plan so you can customise your
OnBoard experience to fit your business needs.
OnBoard Pro
4
Use your mouse to click the ‘Select’ button under your selected plan to
continue with sign up. Once selected you will see the form below which will
ask for a number of details.
Under the user details tab you will be asked to setup your branch manager
account, you will need to provide the name, email address and password of
the branch manager that looks after the branch. Once filled out select
to continue to the branch details page.
OnBoard Pro User Guide
5
Branch Name - This will be the main name for your branch.
Branch Phone Number – This is the main phone number for your branch office.
Branch Email Address – This email is used to send notifications and is normally
a shared inbox e.g [email protected]
Once entered click on
to move to the optional details tab
OnBoard Pro
6
On this form you are asked for optional details.
Stripe Account – Stripe is an integrated service within OnBoard Pro which can
be used to take online card payments (you can find out more about Stripe at this URL
https://stripe.com/gb
If you have a Stripe account already you can untick this option to enter your Stripe key.
Default application fees – to save time when processing applications you can set up
your default application fees here. These can be changed later during an application
if you wish.
OnBoard Pro User Guide
7
Once you’ve completed these fields, click on the green ‘Submit’ button to finish
the sign up. You will now receive an email confirming that your signup has been
successful. If you have requested a Stripe account you’ll get an additional email
with details of this account shortly.
Your account is now ready to be activated. Our Support Team will check your
details and make sure we have everything we need to provision your account.
This can take up to one working day.
OnBoard Pro
Logging In
Once your account has been activated by our support team you can log in
using the email address and password that you provided when you signed
up. To log in to OnBoard Pro go to https://app.onboardpro.co.uk/login
Enter your email address and password as provided when you signed up
earlier. If you forget your credentials at any time you can use the ‘Forgot your
password?’ option to arrange for your password to be reset. Once you’re
logged in you will see your dashboard.
8
OnBoard Pro User Guide
9
The next section is completed in your browser – just follow the online guide which
will show you how to set up your landlords and properties to get started.
OnBoard Pro
10
Adding Users to a Branch
Once your account is setup you can add additional user(s) to your branch to
allow other agents to create an application. To add other users go to the branch
details page by selecting ‘Branches’ from the left hand navigation menu, then select
‘View’.
You will be presented with a list of all the branches you can manage. Select the
‘Manage’ button next to the branch you would like to add users to.
OnBoard Pro User Guide
11
1
Here you can see the details of the branch as well as a list of users currently added
to it. To add more users select the blue ‘Add User’ button
1
OnBoard Pro
12
1
2
3
4
You will be presented with a list of all the branches you can manage. Select the
‘Manage’ button next to the branch you would like to add users to.
1
Enter the User’s first and last names
2
Enter the email address of the User
3
Enter a password for the User (this can be changed by the user when they log in).
4
Select the User’s role: Branch Manager – Able to manage the branch details as well as create
applications or Agents – Able to create applications but has no access to change branch details.
13
OnBoard Pro User Guide
3
Using OnBoard Pro
So far we have learned how to sign up to OnBoard Pro, setup a branch and add
users to that branch. We’re now ready to start using OnBoard Pro. To begin, we will
guide you through setting up your landlords and their properties.
First you will need to add your landlords since they are required when a property is
added. It’s important that you create the landlord before creating their property.
Create a Landlord
To start, select ‘Landlord’ from the navigation menu on the left hand side of your
screen and then ‘Create’.
You will now see the below form appear
OnBoard Pro
14
Enter the personal address for the Landlord either by typing in the details or by
entering the post code and selecting the ‘Find my address’ button.
Once all details are entered select the green ‘Save Landlord’ button.
Your first landlord has now been created and is ready to be associated with a
property.
If you have more landlords we would advise you to repeat the above steps
to create these as well so they are ready for when you add the properties.
Edit a Landlord
If you would like to edit any details on a landlord you can do so at any time by viewing
them from your Landlord List. To view a list of your landlords select ‘Landlords’ from
the left hand menu and then select ‘View’.
In the above example there are only 2 landlords but you can have as many as you
like. To view more landlords you can change how they are viewed by changing the
entries shown option.
OnBoard Pro User Guide
15
You can also wish to search for a landlord by using the search box.
Simply start typing the first name, surname, email address or telephone number and
the list will be filtered to show the matching results of your query. To edit a landlord
select the blue ‘Manage’ button next to their name. This will display the landlord
details page.
On this page you can see how many properties are assigned to them, their personal
address and other details. To change these details you can select the blue ‘Modify’
button to the right hand side.
OnBoard Pro
16
Create a Property
Later we’ll explain how you can import your existing portfolio from a number of
industry leading portals. First we will explain how a property can be added manually.
Adding a property is very similar to adding a Landlord. Select the ‘Properties’ option
from the sidebar and then select ‘Create’.
You will now see the form below where you can enter the post code for the
property and select the ‘Find my Address’ button to search for it. Alternatively you
can enter the address manually.
OnBoard Pro User Guide
17
Once the address details have been added, select the right hand navigation arrow to
view the ‘Details’ tab.
On the details tab select the landlord (which was created earlier) as well as the rent
(PCM), deposit, level of furnishing, garden information and pet options.
Once all of the details are entered select the green ‘Save Property’ button to save
the property to your list.
OnBoard Pro
18
Edit a Property
If you would like to edit the details of a property you can do so at any time by
following these steps:
From your dashboard select the ‘Properties’ option on the left hand navigation
menu and then select the ‘View’ option that appears.
You will now see a list of all your properties similar to what is shown below.
To change the details find the property you wish to edit from the list and
select the ‘Details’ button to view the property details page.
OnBoard Pro User Guide
19
You can now select the ‘Edit’ button to change the details.
The green ‘Property Inventory’ button can also be selected to view an existing
inventory for the property.
Now that we have learned how to add a landlord and their properties, you can start
to create an application using our default Assured Shorthold Tenancy agreement.
If you are using our default documents just skip ahead to the applications section.
In the next chapter we will cover how to create your own documents within
OnBoard Pro.
OnBoard Pro
4
20
Adding your Agreement
OnBoard Pro comes with an Assured Shorthold Tenancy (AST) agreement
that has been checked and verified by a top 100 law firm but you can also upload
your own documents as we’ll explain in this chapter.
Create an Agreement
To create your own Agreement you can select ‘Agreements’ and then ‘Create’ from
the sidebar. Throughout this section we’ll refer to ‘Tags’. Tags are used to identify
pieces of information that will populate your completed documents; you can think
of them as a placeholder. For example, if you enter a tag labelled ‘Landlord Name’,
the system will fill in the chosen Landlord’s name during the application.
OnBoard Pro uses a service called DocuSign to take electronic signatures during an
application. Using electronic signatures helps to make the process quicker and
more flexible. You can find out more about electronic signatures here:
https://www.docusign.co.uk/how-it-works/electronic-signature
The mandatory tags we include are the ones which are mandated by DocuSign.
They make sure that every contributor to the AST has signed the document.
OnBoard Pro User Guide
21
1
3
2
4
1
Document Title: Here you can enter the name of the document. Make this as
clear as possible e.g. Agreement Managed Property.
2
Editor: This is where you can enter the main body of text for the document.
3
Mandatory Tags: These are the mandatory tags that every Agreement needs to
have. You can enter tags for up to four tenants; if there are less than four
during a live application, the system will just ignore the unused tags.
4
Optional Tags: These are extra tags that you may want to include in your
Agreement, arranged in groups to make them easier to find.
If you already have an Agreement in a Word document you may want to copy
and paste this rather than type it out again. To do so you can use the ‘Paste
from Word’ function.
OnBoard Pro
22
Preview your Agreement
1
Once you have created an Agreement select ‘Save’. Now you can preview your new
document by selecting the ‘Preview’ button. This will download a PDF of the
Agreement with some sample data. If there are any errors just go back to the editor
and modify the document, then click ‘save’ again.
Create a Tenant
Once you have added the landlords and properties to OnBoard Pro you are ready4 to
start creating applications. At this stage you can start to add details for prospective
tenants which can be created within OnBoard Pro in a number of ways.
New Tenant
Create a new tenant at any time by selecting ‘Tenants’ and then ‘Create’ in the sidebar.
This will allow you to enter details of the tenant and their references.
Pre-Registered Tenant
OnBoard Pro allows tenants to pre-register their details. They will receive an ID Code
that you can enter into OnBoard Pro to add all the information for you.
OnBoard Pro User Guide
23
Create a Property
Once you have the landlords, properties and tenants in place you can create a new
application. To start a new application select ‘Applications’ and then ‘Create’ from
the sidebar.
Select Main Tenant and Property
The first part of the application process is selecting the lead tenant. You will see 3
options available:
You will be asked to fill out the details of a new tenant to add them to
your tenant list.
You will be asked to select a tenant already on your tenant list. You
can enter the name of the tenant to perform a search for them in
your tenant list
Enter the code for a tenant that has already signed up via the
OnBoard Pro site.
OnBoard Pro
24
1
You will also be asked to select the property that the tenant is to move into.
This will be selected from your properties list. Similar to the tenant
selection you can type in the property address and it will search through
your properties and display the matching results.
If you are unable to find the property then it will not have been added.
You can return to the dashboard via the option to the left and select
‘Properties’ and ‘Create’ to create it.
1
Once you have selected your main tenant and Property select the ‘Next’
button to continue with the application.
OnBoard Pro User Guide
25
Joint Tenant(s)
If you have more than one tenant moving into the property you can add additional
tenants at this stage.
1
2
3
Select the blue ‘Add’ button to add a joint tenant. Again you will be given 3
options:
1 New Tenant – takes you to the New Tenant form allowing you to add a tenant
to your tenant list
2
Existing tenant – gives you the option to select a tenant from your tenant list
4 Pre-registered tenant – gives you the option to add a tenant from their ID code
OnBoard Pro
26
When you have added a joint tenant you will see a brief summary of the tenant as
shown below.
If you would like to remove the joint tenant select the cross in the corner of this
summary to remove them. To add additional joint tenants you can repeat the
process above. You can add three joint tenants to make a maximum of four tenants
on the application.
OnBoard Pro User Guide
27
Fine Details
After all the tenants have been added and the property selected you will be
prompted to select the Move in date, Rent payment date and the Rental period.
Move in Date
The move in date must be after the ‘Available from’ date of the property.
To select the date click on the move in box to reveal a calendar selection,
select the month and the year in the top boxes and then select the date the
tenant is due to move in.
Payment Date
The payment date is of the month the rent is due to be taken.
When the move in date is selected this will automatically be set to the date the
tenant moves in.
OnBoard Pro
28
If you wish to change this date then you can do so by selecting the drop down
box and then selecting the appropriate date. You can only select a payment date
between the 1st and 28th of each month, but there is also an option to choose
the last day of the month.
Rental Period
The rental period is the fixed term of the agreement and can be between 2 and
36 months.
2
1
1
2
You can choose the ‘default’ periods using the selection buttons.
If you would like to increase or decrease the number of months you can
do so by selecting the ‘+’ and ‘-’buttons respectively.
OnBoard Pro User Guide
29
Application Fee
It is at this stage of the application that the application fee is to be taken.
Manual Payment
If the application fee is paid by cash, cheque or bank transfer this can be
selected in the ‘Manual Payment’ option as above. If this is the method of
payment simply select ‘Yes’ in the ‘Has paid’ option and then select the
correct payment method. You can then select the ‘Confirm Payment’ button
below it.
Paying by Card
If you have Stripe set up on your account you can take payment direct into
your Stripe account using the ‘Pay with Card’ option. Selecting this option will
bring up the Stripe payment window.
OnBoard Pro
30
Here you will enter the Tenant’s email address, card number, expiry date and
security code from the back of the card. Once done select the ‘Pay’ button to
take the card payment. This will be paid into your Stripe account in 5 – 7 working
days.
Please note that OnBoard Pro itself does not process or handle this payment in
any way. To read more about Stripe please visit their website at:
https://stripe.com/gb.
Credit Check
It is at this stage of the application that the tenant(s) will be given a full UK Credit Check.
Before this is completed each tenant must provide consent.
OnBoard Pro User Guide
1
31
2
For each tenant you will see a section similar to the above, in order to
consent the tenant must select ‘Yes’ at the consent question
and then enter their initials in uppercase 1
e.g. ‘John Doe’ would enter ‘JD’ into the box. 2
Once all tenants have consented to a credit check select the ‘Conduct Credit
Check’ button
The tenants will now be asked to confirm their current address which is used
to find them on the electoral roll.
OnBoard Pro
32
2
4
4
3
5
1
Correct Address
If the address is correct then you can confirm this by selecting the address
and then selecting the ‘Confirm’ button.
2
3
If you have more than one tenant you will be asked to confirm the address of
all the other tenants.
Incorrrect Address
If the address is not correct it can be corrected by selecting the ‘Cancel’ button
and then the ‘Edit Tenant Details’ button
1
4
This will take you to the data input forms so that you can correct the tenants
address. If you would like to return to the Application you can do so by selecting
the ‘Back to application’ button. 5
OnBoard Pro User Guide
33
Credit Check Results
Once the address of each tenant is confirmed you will be shown the results of the
credit check. The OnBoard Pro credit checking facility is primarily powered by
Equifax. In addition to this score, we use several other metrics (such as affordability,
CCJs etc) to provide a grade which can be used to predict the prospective tenant’s
future behaviour.
You will see a ‘Grade’ given on a scale of A to F as well as recommendations based
upon the grade. The following are the recommendations of each grade given:
A = Excellent score, no additional conditions, no requirement for guarantor
B = Good score, no additional conditions, no requirement for guarantor
C = Above average score, no additional conditions, no requirement for guarantor
D = Below average score, increase of deposit x 2, guarantor may be required
E = Poor score, increase of deposit x 6, guarantor recommended
F = Fail, we recommend not to grant a tenancy for this applicant unless using
guarantor
Note: These grades are a recommendation only, you can still continue with the
application if you wish, even if a poor grade is given.
OnBoard Pro
34
Tenant Grade
As well as the overall grade you can see each tenant’s individual grade. To view this
select the individual tenant’s name where it says ‘Click here for more details.
Here you will see the Grade given to this tenant only, again from A to F. You will also
see a series of Traffic lights that indicate the score of the various sections on the
credit check. In the example above this tenant has a low ‘Affordability’ score for this
property. This would indicate the tenant may not be able to keep up with rent
payments.
OnBoard Pro User Guide
35
You can also download these details via a PDF file to be stored with other
paperwork in the tenants file.
Affordability. OnBoard Pro divides Gross Annual Salary by Annual Rent.
A green light indicates a ratio above 2.5. A red traffic light
indicates a ratio below 1.7.
Credit Check. OnBoard Pro uses the Equifax non-insight scoring product with a
scale of 0-500. A green light indicates a score above 320. A red light indicates a
score below 202.
Guarantors
In cases where the tenant receives a low score you may want to request a
Guarantor to be used to lower the risk. This can be done by clicking on the ‘
Guarantors’ bar below the credit score.
Here you can see tenants listed on the application, their grade and if they have a
Guarantor added to their profile. If you would like to add a guarantor you can do
so by selecting one of the two options.
OnBoard Pro
36
1. Request Guarantor will send an email to the tenant to request a guarantor.
This would be used if the tenant is not present.
2. Add Guarantor – This option opens a form for you to add the guarantor details
yourself. If you would like to use the guarantor for this application you can select
the ‘Request Deed’ button 3. this will send an email to the guarantor requesting
that they sign the guarantor deed. This will prompt an email to the guarantor
containing a link to their ‘Guarantor Hub‘ (see below)
On selecting ‘Begin’ the guarantor is asked to confirm the details that have been
entered.
OnBoard Pro User Guide
37
Once these details are confirmed as correct the guarantor will be asked to
perform a credit check.
OnBoard Pro
5
38
Review
Upon passing this Credit Check they will be asked to sign the guarantor deed via
DocuSign.
The next stage is a final review of the application. This is a chance to verify that all
details are correct before an Agreement is generated. Once an Agreement is
generated the details on the application cannot be changed.
OnBoard Pro User Guide
39
1
2
3
4
1
The Preview button allows you to preview the Agreement that will be generated
with the tenant’s names and property filled in. This gives you the chance to make
any changes before the Agreement is finalised.
2
The ‘Edit’ button allows you to edit the application details these include:
• The Agreement document. This allows you to use any of the documents from
your ‘Agreements’ list.
• Deposit Scheme –Allows you to change the type of Deposit Protection.
• Rent Amount.
• Deposit amount.
• Rental Period.
• Rent due date.
• Move in date.
3
Tenant details can be edited by selecting the tenant’s name from this list and
selecting the ‘Edit Details’ page
4
The Landlord section displays all of the details of the landlord for the current
property. Selecting the Edit button will take you to
the landlord’s page to allow any details to be updated.
OnBoard Pro
40
1
2
3
1
If you would like to add any additional clauses to the Agreement you can
do so here. Selecting the ‘Add Clause’ button will display a window to enter
a single line additional clause that will be added to an appendix document
with the Agreement.
2
This Guarantors section displays the status of any guarantors requested,
also allowing any additional ones to be added if desired.
3
Once all details have been checked and confirmed as correct select the
‘I confirm the details are correct’ box and then select ‘Confirm and
generate Agreement’
OnBoard Pro User Guide
6
41
Signing the Agreement
After all details are checked the Agreement is generated and signed by all required
parties. The first screen you will asks if the tenants are available to sign the
Agreement in person.
2
1
1
2
1
Email Tenant : This option will send an email to the tenant’s email address with
a link to sign the Agreement, this can be used if one or more tenants are not
currently present.
2
In-person : This option can be used if the tenant is present and can sign the
Agreement in person on the next screen.
OnBoard Pro
42
Select one of the two options for each tenant on the agreement and then select
‘Confirm details are correct’.
The Agreement will now be generated via DocuSign. If you have selected any of
the tenants as being ‘In-Person’ then they will be prompted to review and sign the
Agreement.-
The Tenant can select ‘Review Document’ to be taken to the generated Agreement,
they are encouraged to read it fully and then select the yellow button labelled
‘Start’.
OnBoard Pro User Guide
43
The tenant may be prompted to select the type of signature they would like to use.
Once selected they will see in the document where their signature is required.
Their signature will be added to the document and if any additional clauses were
added, the tenant will be asked to provide their initials for these. Once all parts have
been selected the tenant can confirm this by selecting the ‘Confirm Signing’ button.
This process will then be repeated for the next tenant until all present tenants
have signed the document.
OnBoard Pro
44
Signing the Agreement – Tenant’s Point of View
Are your applications slowing down at the Agreement stage? If so please read below
to understand how to get your Agreement signed by the tenant:
(1) When your tenants sign up they will receive an activation e-mail from
OnBoard Pro - tell your tenants this so they know what to expect.
OnBoard Pro User Guide
45
(2) The tenant clicks the login link and creates a password for the first time
3) They will then be directed to the login page to enter their full e-mail address
and password
OnBoard Pro
4) Once logged in they will access their own tenant dashboard. This will present them
with any applications they have made, and any outstanding actions such as the
Signing the Agreement (as shown below). Educate your tenants and remind them
to store their e-mail address and password. Should they choose to sign the
agreement via e-mail they will need this.
5) After clicking on ‘Requires your Signature’ they will be presented with the
Agreement via DocuSign as shown below.
46
OnBoard Pro User Guide
47
6) After signing the document electronically - they will be presented with a
completion message and notified that the Agreement has been sent to the landlord.
7) If they have lost the e-mail don't worry, just guide them to the same login page
that you (the agent) access https://app.onboardpro.co.uk/login using their email
address and password. Once logged in they can view the Agreement and sign.
OnBoard Pro
48
OnBoard Pro Tips
Tell your tenants that they will receive an e-mail from OnBoard Pro (even check
spam/junk depending on security settings).
Tell them as part of the application process they need to activate their own
account. Although they will receive an email to say an Agreement is waiting to be
signed, tell them the Agreement is awaiting signature and is stored in their own
dashboard to view and sign. Educate your tenants that electronic signatures are
secure - refer them to the DocuSign website for re-assurance.
Remember - if the tenant decides to sign via e-mail they need to access their
own dashboard. If tenant's cannot get logged in e-mail [email protected]
Landlords Signature
After the tenants have signed the Agreement it will be sent to the Landlord via
email. Via the same process as the tenant signature capture, the landlord will
be asked to review the document and sign it.
Meter Readings
The next stage of the application process is to take meter readings for the
utilities in the property and provide the details of the local authority.
OnBoard Pro User Guide
49
Gas Reading
To submit the Gas Reading first select the gas provider in the upper selection box
then type in the meter readings as displayed on the meter.
Water Reading
Water Reading
Water Readings can be submitted by selecting the water provider in the upper
selection box and then entering the reading in the lower box as it appears on the
meter. If the property doesn’t use a meter, just leave this field empty.
OnBoard Pro
Electricity Reading
The Electricity Reading also allows for additional readings to be submitted to
accommodate properties that have day / night readings or on and off peak
readings. To add additional readings you can select the ‘Add+’ button.
50
OnBoard Pro User Guide
51
The above window allows the additional readings to be submitted. Simply type a
description into the upper box and then enter the reading as displayed on the
meter in the box below. Once done select ‘Save’
Local Authority
Select the local authority from the list provided or start typing the name of the
local authority to search for them in the list.
Once all readings are entered and the local authority selected click ‘Confirm
Submission’.
OnBoard Pro
52
You will receive confirmation of the readings being successfully submitted, to
continue select ‘Next’.
Property Inventory
The inventory section is made up of Rooms, Room Items and Images/
Rooms
OnBoard Pro User Guide
53
To begin the inventory you will first need to add the rooms of the property.
To do this select the ‘Add a Room’ button to view the ‘Add a Room‘ form.
1
2
3
Here you can enter the details of the new room
1
Select the Room condition from the list
2
Enter the Room name
3
Enter a description of the room
If you have made an error adding a room you can delete it by selecting
‘Delete Room’ and then creating it again via the ‘Add a room’ button.
OnBoard Pro
Room Items
54
Once all the rooms have been added you can start
adding items in the various rooms. To add an item to a
room select ‘Add Item’ next to the room you wish to add
the item to.
OnBoard Pro User Guide
55
Adding a room item is very similar to adding a room. Select the condition of the
item, enter a name and then a description of the item and its condition.
To view the full room and item description select the ‘View’ button next to the
room you wish to view.
Images
One of the most important parts of the inventory of a property are the images.
With OnBoard Pro each image is marked with the time and date it was taken as
well as the application it was uploaded to.
.
OnBoard Pro
56
To upload an image select ‘Choose File’. This opens the file browser to your
computer or device where you can select the image.
With a file selected enter an image title and description. Once these details are
added select ‘Add’ to upload the image.
To view a larger view of the images click on the image in the ‘Property Images’
panel, you can also select the ‘Delete Image’ button to remove it.
.
OnBoard Pro User Guide
57
Each image is given a time stamp that identifies the time it was taken or when
the image is uploaded if this is unavailable. The code is in the following format:
OBP_(Application ID)_(Date)_(Time)_(Random Number)
OnBoard Pro
58
Application Deposit
The final part of the application is the deposit and first month’s rent payment.
You will see a breakdown of the final payment. This will usually include the
deposit, first month’s rent and a pet deposit if the tenant has any pets
recorded.
Multiple / Part Payments
If you have more than one tenant moving into the property you can split the
final payments between them if they so desire.
OnBoard Pro User Guide
59
1
2
To do this select the tenant that is to make a payment
and then select the modify amount button
1
2
Enter the amount that you would like this tenant to
pay and select ‘Finish Updating’.
You can now select the payment method and take the payment as normal. When
done you will see a log of this payment appear.
OnBoard Pro
60
You can now select the next tenant and repeat the process until the full
amount has been paid.
Application Details
When the application has been completed you will be taken to the
application summary page, where you can see the details of the application,
check any parts that need to be completed or download the details pack.
Outstanding tasks
If there are any parts of the application still outstanding you will be able to
see this in the tasks list. Here you can see a breakdown of each part of the
application that you can click on for further details.
OnBoard Pro User Guide
61
In this example we can see that the Tenancy agreement and Guarantors are
still waiting to be completed. By selecting the Tenancy Agreement section
we can see that the Landlord still needs to sign the agreement.
Useful Documents
You can also download a number of useful documents regarding this
application.
Full Details pack – This document features a full document with all the
details of the application including property details, tenant details, fees and
deposits, credit check and agreement status, submitted meter readings,
reference and guarantor details and full property inventory.
Inventory Details – This document is a full breakdown of the property
inventory including all rooms and descriptions, all room items with
descriptions and each image with image code.
OnBoard Pro
NOTES ...
NOTES ...
OnBoard Pro
NOTES ...
NOTES ...
OnBoard Pro
On Board Pro
WORK SMARTER, NOT HARDER
www.onboardpro.co.uk
08452 26 26 06
[email protected]
[email protected]
OnBoard Pro
Riverside House
Goldcrest Way
Newcastle upon Tyne
NE15 8NY