1
®
™
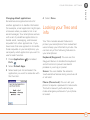
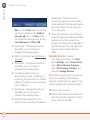
Your Palm Treo 680
Smartphone
User Guide
Intellectual Property Notices
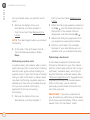
© 2006 Palm, Inc. All rights reserved. Blazer, HotSync, Palm, Palm
OS, Treo, VersaMail, and the Palm and Treo logos are among the
trademarks or registered trademarks owned by or licensed to Palm,
Inc. This product contains ACCESS Co., Ltd.’s NetFront 3.0 Internet
browser software. © 1996-2005 ACCESS Co., Ltd. and ACCESS
Systems America, Inc. NetFront is the trademark or registered
trademark of ACCESS Co., Ltd. in Japan and in other countries except
the United States of America. NetFront is a registered trademark of
NetFront Communications, Inc. in the United States of America and
is used under a license. Documents To Go is a trademark or
registered trademark of DataViz, Inc. A portion of the enclosed
product is © copyrighted by Fraunhofer IIS (2005). All rights reserved.
All other brand and product names are or may be trademarks of, and
are used to identify products or services of, their respective owners.
This product is protected by one or more of the following United
States patents:
7,007,239; 6,976,226; 6,975,304; 6,965,375; 6,961,567; 6,961,029;
6,957,397; 6,952,571; 6,950,988; 6,947,975; 6,947,017; 6,943,667;
6,940,490; 6,924,752; 6,907,233; 6,906,701; 6,906,741; 6,901,276;
6,850,780; 6,845,408; 6,842,628; 6,842,335; 6,831,662; 6,819,552;
6,804,699; 6,795,710; 6,788,285; 6,781,824; 6,781,575; 6,766,490;
6,745,047; 6,744,451; 6,738,852; 6,732,105; 6,724,720; 6,721,892;
6,712,638; 6,708,280; 6,697,639; 6,687,839; 6,685,328; 6,665,803;
6,618,044; 6,590,588; 6,539,476; 6,532,148; 6,523,124; 6,519,141;
6,516,202; 6,490,155; 6,480,146; 6,457,134; 6,456,247; 6,442,637;
6,441,824; 6,437,543; 6,429,625; 6,425,087; 6,389,572; 6,388,877;
6,381,650; 6,363,082; 6,344,848; 6,317,085; 6,241,537; 6,222,857;
6,185,423; 6,147,314; 6,115,248; 6,064,342; D421,251; D429,252;
D466,128; D478,091. Patent pending.
audio coding technology and advanced video technology licensed by
Fraunhofer IIS.
This product is protected by certain intellectual property rights of
Microsoft. Use or distribution of such technology outside of this
product is prohibited without a license from Microsoft.
The TREO trademark is used by Palm in Sweden and Denmark with
the express consent of Pfizer and its affiliated companies. The
products marketed and/or sold by Palm under the TREO trademark
are in no way affiliated with Pfizer or its business.
Swedish: Varumärket Treo används av Palm i Sverige och Danmark
med uttryckligt tillstånd från Pfizer och dess dotterbolag. De
produkter som marknadsförs och/eller säljs av Palm under varumärket
Treo ska på inget sätt alls kopplas samman med Pfizer eller dess
verksamhet.
Danish: Treo-varemærket anvendes af Palm i Danmark og Svirge
med udtrykkelig tilladelse fra Pfizer og Pfizers associerede selskaber.
De produkter, der markedsføres og/eller sælges af Palm under
Treo-varemærket, er på ingen måde tilknyttet Pfizer eller Pfizers
virksomhed.
Disclaimer and limitation of liability
Palm, Inc. and its suppliers assume no responsibility for any damage
or loss resulting from the use of this guide. Palm, Inc. and its
suppliers assume no responsibility for any loss or claims by third
parties that may arise through the use of this software. Palm, Inc. and
its suppliers assume no responsibility for any damage or loss caused
by deletion of data as a result of malfunction, dead battery, or repairs.
Be sure to make backup copies of all important data on other media
to protect against data loss.
This product also is licensed under United States patent 6,058,304.
A portion of this software includes software modules developed by
the Independent JPEG group. MPEG Layer-3 audio decoding
technology is licensed from Fraunhofer IIS and Thomson. MPEG-4
PN: 185-10425-00
v. 1.0
Contents
Welcome . . . . . . . . . . . . . . . . . . . . . . . . . . . . . . . . . . . . . . . . . . . . . . . . . . . . . . . . . . . 1
What do I need to get started? . . . . . . . . . . . . . . . . . . . . . . . . . . . . . . . . . . . . . . . . 3
Chapter 1: Setting up . . . . . . . . . . . . . . . . . . . . . . . . . . . . . . . . . . . . . . . . . . . . . . . . . . 5
Treo 680 overview . . . . . . . . . . . . . . . . . . . . . . . . . . . . . . . . . . . . . . . . . . . . . . . . . . 7
Inserting the SIM card and battery . . . . . . . . . . . . . . . . . . . . . . . . . . . . . . . . . . . . . . 9
Charging the battery . . . . . . . . . . . . . . . . . . . . . . . . . . . . . . . . . . . . . . . . . . . . . . . . . 11
Maximizing battery life . . . . . . . . . . . . . . . . . . . . . . . . . . . . . . . . . . . . . . . . . . . . . . . 13
Making your first call . . . . . . . . . . . . . . . . . . . . . . . . . . . . . . . . . . . . . . . . . . . . . . . . 15
Setting up your computer for synchronization . . . . . . . . . . . . . . . . . . . . . . . . . . . . . 16
Synchronizing information—the basics . . . . . . . . . . . . . . . . . . . . . . . . . . . . . . . . . . 23
Chapter 2: Moving around on your Palm® Treo™ 680 smartphone . . . . . . . . . . . . . . . 25
Moving around the screen . . . . . . . . . . . . . . . . . . . . . . . . . . . . . . . . . . . . . . . . . . . . 27
Using the keyboard . . . . . . . . . . . . . . . . . . . . . . . . . . . . . . . . . . . . . . . . . . . . . . . . . 31
Opening applications . . . . . . . . . . . . . . . . . . . . . . . . . . . . . . . . . . . . . . . . . . . . . . . . 35
Chapter 3: Your phone . . . . . . . . . . . . . . . . . . . . . . . . . . . . . . . . . . . . . . . . . . . . . . . . . 39
Turning your Treo 680 on and off . . . . . . . . . . . . . . . . . . . . . . . . . . . . . . . . . . . . . . . 41
Making calls . . . . . . . . . . . . . . . . . . . . . . . . . . . . . . . . . . . . . . . . . . . . . . . . . . . . . . . 43
Receiving calls . . . . . . . . . . . . . . . . . . . . . . . . . . . . . . . . . . . . . . . . . . . . . . . . . . . . . 47
Using voicemail . . . . . . . . . . . . . . . . . . . . . . . . . . . . . . . . . . . . . . . . . . . . . . . . . . . . 48
What can I do when I’m on a call? . . . . . . . . . . . . . . . . . . . . . . . . . . . . . . . . . . . . . . 50
How many minutes have I used? . . . . . . . . . . . . . . . . . . . . . . . . . . . . . . . . . . . . . . . 56
Entering names and phone numbers . . . . . . . . . . . . . . . . . . . . . . . . . . . . . . . . . . . . 57
Defining favorite buttons . . . . . . . . . . . . . . . . . . . . . . . . . . . . . . . . . . . . . . . . . . . . . 61
Using a hands-free device . . . . . . . . . . . . . . . . . . . . . . . . . . . . . . . . . . . . . . . . . . . . 64
iii
Customizing phone settings . . . . . . . . . . . . . . . . . . . . . . . . . . . . . . . . . . . . . . . . . . . 69
What are all those icons? . . . . . . . . . . . . . . . . . . . . . . . . . . . . . . . . . . . . . . . . . . . . . 75
Chapter 4: Your email and other messages . . . . . . . . . . . . . . . . . . . . . . . . . . . . . . . . . 79
Which email application should I use? . . . . . . . . . . . . . . . . . . . . . . . . . . . . . . . . . . . 81
The VersaMail application . . . . . . . . . . . . . . . . . . . . . . . . . . . . . . . . . . . . . . . . . . . . 81
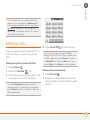
Messaging . . . . . . . . . . . . . . . . . . . . . . . . . . . . . . . . . . . . . . . . . . . . . . . . . . . . . . . . 95
Chapter 5: Your connections to the web and wireless devices . . . . . . . . . . . . . . . . . . 107
Web browser . . . . . . . . . . . . . . . . . . . . . . . . . . . . . . . . . . . . . . . . . . . . . . . . . . . . . . 109
Connecting your computer to the Internet through your Treo . . . . . . . . . . . . . . . . . 118
Connections with Bluetooth devices . . . . . . . . . . . . . . . . . . . . . . . . . . . . . . . . . . . . 121
Chapter 6: Your photos, videos, and music . . . . . . . . . . . . . . . . . . . . . . . . . . . . . . . . . 125
Camera . . . . . . . . . . . . . . . . . . . . . . . . . . . . . . . . . . . . . . . . . . . . . . . . . . . . . . . . . . . 127
Pictures & Videos . . . . . . . . . . . . . . . . . . . . . . . . . . . . . . . . . . . . . . . . . . . . . . . . . . . 131
Pocket Tunes . . . . . . . . . . . . . . . . . . . . . . . . . . . . . . . . . . . . . . . . . . . . . . . . . . . . . . 136
Chapter 7: Your personal information organizer . . . . . . . . . . . . . . . . . . . . . . . . . . . . . . 143
Calendar . . . . . . . . . . . . . . . . . . . . . . . . . . . . . . . . . . . . . . . . . . . . . . . . . . . . . . . . . . 145
World Clock . . . . . . . . . . . . . . . . . . . . . . . . . . . . . . . . . . . . . . . . . . . . . . . . . . . . . . . 152
Tasks . . . . . . . . . . . . . . . . . . . . . . . . . . . . . . . . . . . . . . . . . . . . . . . . . . . . . . . . . . . . 154
Chapter 8: Your memos and documents . . . . . . . . . . . . . . . . . . . . . . . . . . . . . . . . . . . 159
Documents To Go Professional . . . . . . . . . . . . . . . . . . . . . . . . . . . . . . . . . . . . . . . . 161
Memos . . . . . . . . . . . . . . . . . . . . . . . . . . . . . . . . . . . . . . . . . . . . . . . . . . . . . . . . . . . 162
Voice Memo . . . . . . . . . . . . . . . . . . . . . . . . . . . . . . . . . . . . . . . . . . . . . . . . . . . . . . . 163
Chapter 9: Your application and info management tools . . . . . . . . . . . . . . . . . . . . . . . 165
Using Find . . . . . . . . . . . . . . . . . . . . . . . . . . . . . . . . . . . . . . . . . . . . . . . . . . . . . . . . 167
Viewing and using the alerts . . . . . . . . . . . . . . . . . . . . . . . . . . . . . . . . . . . . . . . . . . 167
Calculator . . . . . . . . . . . . . . . . . . . . . . . . . . . . . . . . . . . . . . . . . . . . . . . . . . . . . . . . . 168
iv
Installing applications . . . . . . . . . . . . . . . . . . . . . . . . . . . . . . . . . . . . . . . . . . . . . . . . 170
Removing applications . . . . . . . . . . . . . . . . . . . . . . . . . . . . . . . . . . . . . . . . . . . . . . . 172
Viewing application info . . . . . . . . . . . . . . . . . . . . . . . . . . . . . . . . . . . . . . . . . . . . . . 173
Sending information with Bluetooth wireless technology . . . . . . . . . . . . . . . . . . . . 174
Beaming information . . . . . . . . . . . . . . . . . . . . . . . . . . . . . . . . . . . . . . . . . . . . . . . . 176
Synchronizing information—advanced . . . . . . . . . . . . . . . . . . . . . . . . . . . . . . . . . . . 179
Using expansion cards . . . . . . . . . . . . . . . . . . . . . . . . . . . . . . . . . . . . . . . . . . . . . . . 185
Chapter 10: Your personal settings . . . . . . . . . . . . . . . . . . . . . . . . . . . . . . . . . . . . . . . 191
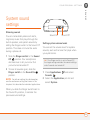
System sound settings . . . . . . . . . . . . . . . . . . . . . . . . . . . . . . . . . . . . . . . . . . . . . . . 193
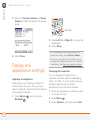
Display and appearance settings . . . . . . . . . . . . . . . . . . . . . . . . . . . . . . . . . . . . . . . 194
Applications settings . . . . . . . . . . . . . . . . . . . . . . . . . . . . . . . . . . . . . . . . . . . . . . . . 197
Locking your Treo and info . . . . . . . . . . . . . . . . . . . . . . . . . . . . . . . . . . . . . . . . . . . . 199
System settings . . . . . . . . . . . . . . . . . . . . . . . . . . . . . . . . . . . . . . . . . . . . . . . . . . . . 206
Connecting to a VPN . . . . . . . . . . . . . . . . . . . . . . . . . . . . . . . . . . . . . . . . . . . . . . . . 208
Chapter 11: Common questions . . . . . . . . . . . . . . . . . . . . . . . . . . . . . . . . . . . . . . . . . 211
Upgrading . . . . . . . . . . . . . . . . . . . . . . . . . . . . . . . . . . . . . . . . . . . . . . . . . . . . . . . . . 213
Desktop software installation . . . . . . . . . . . . . . . . . . . . . . . . . . . . . . . . . . . . . . . . . . 215
Resetting your Treo . . . . . . . . . . . . . . . . . . . . . . . . . . . . . . . . . . . . . . . . . . . . . . . . . 215
Replacing the battery . . . . . . . . . . . . . . . . . . . . . . . . . . . . . . . . . . . . . . . . . . . . . . . . 217
Screen . . . . . . . . . . . . . . . . . . . . . . . . . . . . . . . . . . . . . . . . . . . . . . . . . . . . . . . . . . . 219
Synchronization . . . . . . . . . . . . . . . . . . . . . . . . . . . . . . . . . . . . . . . . . . . . . . . . . . . . 220
Phone . . . . . . . . . . . . . . . . . . . . . . . . . . . . . . . . . . . . . . . . . . . . . . . . . . . . . . . . . . . . 227
Hands-free devices . . . . . . . . . . . . . . . . . . . . . . . . . . . . . . . . . . . . . . . . . . . . . . . . . . 229
Email . . . . . . . . . . . . . . . . . . . . . . . . . . . . . . . . . . . . . . . . . . . . . . . . . . . . . . . . . . . . . 230
Messaging . . . . . . . . . . . . . . . . . . . . . . . . . . . . . . . . . . . . . . . . . . . . . . . . . . . . . . . . 231
Web . . . . . . . . . . . . . . . . . . . . . . . . . . . . . . . . . . . . . . . . . . . . . . . . . . . . . . . . . . . . . 232
Camera . . . . . . . . . . . . . . . . . . . . . . . . . . . . . . . . . . . . . . . . . . . . . . . . . . . . . . . . . . . 235
Making room on your Treo . . . . . . . . . . . . . . . . . . . . . . . . . . . . . . . . . . . . . . . . . . . . 236
v
Third-party applications . . . . . . . . . . . . . . . . . . . . . . . . . . . . . . . . . . . . . . . . . . . . . . 237
Error messages . . . . . . . . . . . . . . . . . . . . . . . . . . . . . . . . . . . . . . . . . . . . . . . . . . . . 238
Where to learn more . . . . . . . . . . . . . . . . . . . . . . . . . . . . . . . . . . . . . . . . . . . . . . . . . . 241
Terms . . . . . . . . . . . . . . . . . . . . . . . . . . . . . . . . . . . . . . . . . . . . . . . . . . . . . . . . . . . . . . 243
Regulatory information . . . . . . . . . . . . . . . . . . . . . . . . . . . . . . . . . . . . . . . . . . . . . . . . . 247
Specifications . . . . . . . . . . . . . . . . . . . . . . . . . . . . . . . . . . . . . . . . . . . . . . . . . . . . . . . . 259
Index . . . . . . . . . . . . . . . . . . . . . . . . . . . . . . . . . . . . . . . . . . . . . . . . . . . . . . . . . . . . . . 263
vi
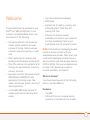
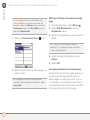
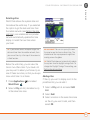
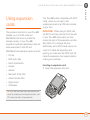
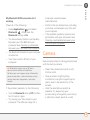
Welcome
Congratulations on the purchase of your
Palm® Treo™ 680 smartphone! In one
compact and indispensable device, you
now have all of the following:
•
Contacts application that stores the
names, phone numbers, and even
pictures of friends, family, business
contacts—everyone you stay in touch
with
•
Email application for receiving and
sending email (business and personal)
•
Palm OS® personal info applications for
storing your appointments, to-do lists,
memos, and more
•
Expansion card slot that accepts cards
(MultiMediaCard/SD/SDIO; sold
separately) for storing music files,
videos, dictionaries, games, and lots of
other applications
•
A VGA (640x480) digital camera for
snapping photos and capturing short
videos
•
Text and multimedia messaging
•
MP3 player
•
Applications for reading, creating, and
editing Microsoft Office files and
viewing PDF files
•
Software for entering names,
addresses, and more on your computer,
and then transferring them to your
smartphone with one press of a button
NOTE Phone and text messaging services
require a service contract with your
wireless service provider. Web, email, and
multimedia messaging services require a
service contract and data services, such as
GPRS or EDGE, from your wireless service
provider. Data speeds vary based on
network availability and capacity.
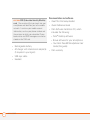
What’s in the box?
You should have received all the following
items in the Treo 680 box:
Hardware
•
•
Treo 680
SIM card from your wireless service
provider (not included with all models)
WELCOME
1
Documentation and software
SIM (Subscriber Identity Module)
card The smartcard that you insert into your
smartphone and identifies you to the mobile
network. It contains your mobile account
information, such as your phone number and
the services to which you subscribe. Phone
book entries and SMS messages can also be
stored on the SIM card.
KEY TERM
•
•
•
•
2
Rechargeable battery
AC charger with international adapter(s)
(if required in your region)
USB sync cable
Headset
WELCOME
•
Read This First setup booklet
•
Quick Reference Guide
•
Palm Software Installation CD, which
includes the following:
•
•
Palm® Desktop software
•
Bonus software for your smartphone
•
Your Palm Treo 680 Smartphone User
Guide (this guide)
Palm warranty
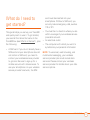
What do I need to
get started?
This guide helps you set up your Treo 680
and quickly learn to use it. To get started,
you need all the items that came in the
Treo 680 box (see What’s in the box? ), plus
the following:
•
A SIM card. If you do not already have a
SIM card and your smartphone box did
not contain a SIM card, you need to
contact your wireless service provider
to get one. Be sure to sign up for a
mobile account with data services. To
use your smartphone on your wireless
service provider’s network, the SIM
card must be inserted into your
smartphone. Without a SIM card, you
can only make emergency calls, such as
112 or 911.
•
You must be in a location where you are
within coverage of your wireless service
provider’s network.
•
An electrical outlet
•
The computer with which you want to
synchronize your personal information
NOTE To use email, web browsing, and
multimedia messaging, your wireless
service provider plan must include data
services. Please contact your wireless
service provider for details about your data
service options.
WELCOME
3
4
WELCOME
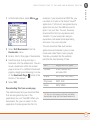
C H A PT ER
1
Setting up
Congratulations on the purchase of your new Palm® Treo™ 680
smartphone. You’re about to discover the many things about
your smartphone that will help you better manage your life and
have fun, too.
As you become more familiar with your smartphone, you’ll
want to personalize the settings and add applications to make it
uniquely yours. But first, take these few easy steps to set up
your smartphone and get it running.
Benefits
•
Know where your smartphone
controls are located
•
Start using your smartphone right
away
•
Establish a link between your
smartphone and your computer
In this chapter
Treo 680 overview . . . . . . . . . . . . . . . . . . . . . . . . . . . . . . . . . . . . . . 7
Inserting the SIM card and battery. . . . . . . . . . . . . . . . . . . . . . . . . . 9
Charging the battery. . . . . . . . . . . . . . . . . . . . . . . . . . . . . . . . . . . . . 11
Maximizing battery life . . . . . . . . . . . . . . . . . . . . . . . . . . . . . . . . . . . 13
Making your first call . . . . . . . . . . . . . . . . . . . . . . . . . . . . . . . . . . . . 15
Setting up your computer for synchronization . . . . . . . . . . . . . . . . . 16
Synchronizing information—the basics . . . . . . . . . . . . . . . . . . . . . . 23
1
CHAPTER
SETTING UP
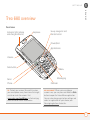
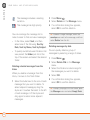
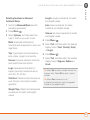
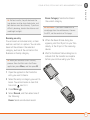
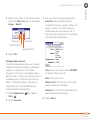
Treo 680 overview
Front view
Indicator light (phone
and charge indicator)
Earpiece
5-way navigator and
Center button
Power/End
Applications
Volume
Side button
Menu
Messaging
Send
Phone
Protect your screen. Be careful to store
your smartphone away from items that might
scratch or crush the screen. Visit
www.palm.com/treo680gsm to find carrying
cases and other useful accessories.
TIP
Calendar
When your smartphone
screen is on, you can press and hold the Side
button to open the Voice Memo application.
You can also change your button settings and
select an application of your choice; see
Reassigning buttons for details.
DID YOU KNOW?
7
CHAPTER
1
SETTING UP
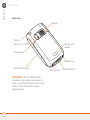
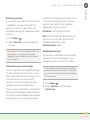
Back view
Speaker
Stylus
Battery door
release
Self-portrait mirror
Camera lens
Headset jack
Expansion slot door
IMPORTANT The Treo 680 speaker
includes a large magnet, so be sure to
keep your smartphone away from credit
cards or other items that could be
demagnetized.
8
Microphone
Multi-connector
Top view
NOTE Your SIM card may already be
installed in your smartphone. Follow steps
1–3 to check. If a SIM card did not come
with your smartphone, you may already
have one; otherwise, your wireless service
provider will give you one when you
subscribe.
Infrared (IR) port Ringer switch
DID YOU KNOW? The Ringer switch silences all
sounds at once. You don’t need to hunt for Off
buttons all over the device.
1
CHAPTER
SETTING UP
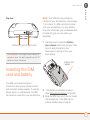
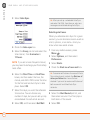
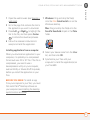
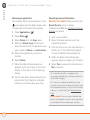
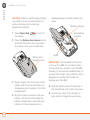
1 Use one hand to press the Battery
door release button and use your other
hand to slide the battery door
downward to remove it from your
smartphone.
Battery door
release
Inserting the SIM
card and battery
Your SIM card contains account
information such as your phone number
and voicemail access number. To use the
phone, email, or web features, the SIM
card must be inserted in your smartphone.
2 If the battery is installed, remove it.
(See Replacing the battery for details.)
3 Slide the SIM tray out of the slot inside
the smartphone. If the SIM card is
already installed, skip to step 6.
9
SETTING UP
CHAPTER
1
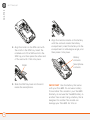
4 Align the notch on the SIM card with
the notch in the SIM tray. Insert the
notched end of the SIM card into the
SIM tray, and then press the other end
of the card until it falls into place.
Notch
5 Slide the SIM tray back into the slot
inside the smartphone.
10
6 Align the metal contacts on the battery
with the contacts inside the battery
compartment, insert the battery into the
compartment at a 45-degree angle, and
then press it into place.
Battery
contacts
Smartphone
contacts
IMPORTANT Use the battery that came
with your Treo 680. Do not use a battery
from another Treo model in your Treo 680.
Similarly, do not use the Treo 680 battery in
another Treo model. Using a battery that is
designed for another Treo model can
damage your Treo 680. For info on
replacement batteries, see Replacing the
battery.
7 Slide the battery door onto the back of
the smartphone until it clicks into place.
8 Your Treo screen wakes up and begins
the setup process. When the language
selection screen appears, select the
language you want to use, and then
follow the onscreen instructions to set
up your Treo.
If your Treo does not turn on, you need to
connect it to the AC charger. If it still does not
turn on after being connected to the AC
charger for five minutes, then do a soft reset.
See Performing a soft reset.
TIP
IMPORTANT Always use the same
language for your Treo, your computer
operating system, and your desktop
software. Otherwise, you may lose
information or have difficulty with
synchronization. Support is not provided for
mismatched language setups.
The power-saving feature turns off the Treo
screen after a period of inactivity. To wake up
the screen, press and release Power/End,
and then press Center on the 5-way to turn off
Keyguard.
TIP
1
CHAPTER
SETTING UP
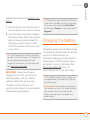
Charging the battery
The battery comes with a sufficient charge
to complete the setup process and activate
your phone. After activation, we
recommend charging your smartphone for
three hours (or until the indicator light is
solid green) to give it a full charge. See
Maximizing battery life for tips on
maximizing the life of your Treo battery.
To avoid draining the battery, charge your
smartphone every day, especially if you use
your phone often.
TIP
If your battery ever becomes
fully drained, your info is still stored safely on
your smartphone until you recharge the
battery or connect your smartphone to a
power source.
DID YOU KNOW?
11
CHAPTER
1
SETTING UP
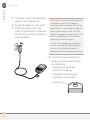
1 If necessary, connect the international
adapter to the AC charger plug.
2 Plug the AC charger into a wall outlet.
3 Connect the charger cable to the
bottom of your smartphone. Make sure
the arrow on the connector is facing up,
toward the screen.
You can also trickle charge your
smartphone without the AC charger by
connecting it to your computer with the sync
cable. However, it takes longer to charge the
battery without the AC charger, and if your
laptop isn’t plugged into a power source, it can
drain the laptop’s battery. For the quickest
charge time, use the AC charger.
DID YOU KNOW?
TIP When trickle charging your smartphone
with the sync cable, the indicator light may
not turn on. To make sure the battery is
charging, check the onscreen battery indicator.
4 To confirm that your smartphone is
charging, check the indicator light on
your smartphone.
•
Solid red indicates that your
smartphone is charging.
•
Solid green indicates that your
smartphone is fully charged.
Indicator light
12
If the battery is fully drained, it may take a
few moments for the indicator light to turn on
when you begin charging.
TIP
If the indicator light does not turn on when
you connect your smartphone to the AC
charger, double-check the cable connection
and the electrical outlet to which it is
connected.
TIP
To see exactly how much power is left in
your battery, tap the onscreen battery icon.
TIP
1
CHAPTER
SETTING UP
Battery icon
When your Treo is on (see Turning your
Treo 680 on and off), the onscreen battery
icon displays the charging status:
A red lightning bolt indicates that
the battery is connected to a wall
outlet and is charging.
A green lightning bolt indicates that
the battery is connected to a wall
outlet and is fully charged.
A partial battery without a lightning
bolt indicates that the battery is not
connected to a wall outlet and it
has some power.
An almost empty battery that is red
at the bottom indicates that you
need to charge the battery
immediately.
Maximizing battery
life
Battery life depends on how you use your
smartphone. You can maximize the life of
your battery by following a few easy
guidelines:
IMPORTANT Use the battery that came
with your Treo 680. Do not use a battery
from another Treo in your Treo 680.
Similarly, do not use the Treo 680 battery in
another Treo. Using a battery that is
13
CHAPTER
1
SETTING UP
designed for another Treo can damage your
Treo 680. For info on replacement
batteries, see Replacing the battery.
You can buy an extra battery as a spare for
long airplane trips or periods of heavy use. To
purchase batteries that are compatible with
your Treo 680, go to www.palm.com/
treo680gsm.
TIP
•
•
14
Charge your smartphone whenever you
can. Charge it overnight. The battery
has a much longer useful life when it is
topped off frequently, rather than
charging it after it is fully drained.
The wireless features (phone, email,
messaging, and web) and media
features (camera, media players,
eBooks, and games) of your
smartphone consume more power than
its organizer features. Speakerphone
usage also consumes more power than
using the earpiece. If you use the
wireless, speakerphone, and media
features often, keep an eye on the
battery icon and charge when
necessary.
•
If you don’t plan to use the wireless
features on your Treo for a while, turn
off your phone (see Turning your phone
on and off) and let all calls be picked up
by voicemail.
•
As with any mobile phone, if you are in
an area with no wireless coverage, your
Treo searches for a signal, which
consumes power. If you cannot move to
an area of better coverage, temporarily
turn off your phone. While your phone is
off, you can continue to use the
nonwireless features of your Treo.
•
Turn down the screen brightness (see
Adjusting the brightness).
•
Decrease the settings in Power
Preferences and turn off Beam Receive
(see Optimizing power settings).
•
Turn off the Bluetooth® feature if you’re
not using it. See Connecting to a
Bluetooth hands-free device.
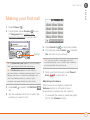
Making your first call
1 Press Phone
1
CHAPTER
SETTING UP
.
2 If prompted, press Center
to turn
off Keyguard (see Locking your
keyboard (Keyguard) for more info).
5 Press Send
Center
to dial the number.
6 If prompted, press Center
Yes and turn on your phone.
to select
If you are inside a coverage area and
cannot complete a call, contact your wireless
service provider for assistance.
TIP
If Check SIM Card appears in the title bar,
see Inserting the SIM card and battery.
TIP
If No Service appears in the title bar,
you’re outside a wireless coverage area. If you
believe you are in a wireless coverage area
and this problem persists, contact your
wireless service provider for assistance.
TIP
3 Press Left
tab.
to select the Dial Pad
4 Tap the onscreen Dial Pad to enter the
number you want to call.
7 After you finish the call, press Power/
End
to end the call.
Adjusting call volume
While a call is in progress, press the
Volume button on the side of your
smartphone to adjust the call volume.
•
To increase the volume, press the upper
half of the Volume button.
15
CHAPTER
1
SETTING UP
•
To decrease the volume, press the
lower half of the Volume button.
TIP If your phone number doesn’t appear in
Phone Info, make sure your SIM card is
properly inserted in your smartphone. If your
phone number still does not appear in Phone
Info, your wireless service provider may not
support this feature. Look for your phone
number on the plastic holder to which the SIM
card was attached. If you still need assistance,
please contact your wireless service provider.
Volume
Side button
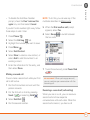
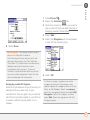
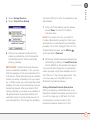
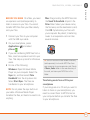
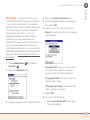
What’s my phone number?
1 Make sure your phone is on (see
Turning your phone on and off).
2 Press Phone
3 Press Menu
.
.
4 Select Options, and then select Phone
Info.
Look here for
your phone
number
16
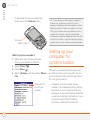
Setting up your
computer for
synchronization
Why set up a connection between your
smartphone and your computer? So you
can synchronize. Why synchronize? Here
are two good reasons:
•
It’s easier to enter names, phone
numbers, and addresses using the big
keyboard on your computer than the
keyboard on your smartphone. Whether
you enter or change information on your
computer (using Palm® Desktop
software or Microsoft Outlook for
Windows) or on your smartphone, you
automatically update the info in both
places when you synchronize. So
there’s no need to enter the info twice.
•
You have a backup copy of all your info.
Should anything happen to your
smartphone, your info still exists on
your computer.
We strongly recommend that you
synchronize your smartphone with your
computer frequently to keep your
information up-to-date (and backed up) in
both locations.
Before you can synchronize, you need to
install the desktop synchronization
software and connect the sync cable to
your computer.
System requirements
Your computer should meet the following
minimum system profiles for Windows or
Mac computers:
•
Windows 2000 or XP (or later)
•
32MB of available memory (RAM)
•
170MB of free hard disk space
•
CD drive
•
•
Available USB port
1
CHAPTER
SETTING UP
Mac OS X version 10.2 or later
•
128MB of total memory (RAM)
•
190MB of free hard disk space
•
CD drive
•
Available USB port
Upgrading from another Palm OS® device
NOTE If you are setting up your first Palm
OS® device, skip ahead to Installing the
desktop synchronization software.
You can transfer all compatible applications
and information from your previous Palm
OS device—whether it’s a handheld or a
Treo— to your new Treo 680, so long as the
space taken up by all the info you want to
transfer is 64MB or less. This includes your
calendar events, contacts, memos, and
tasks, as well as your application settings
and any compatible third-party applications
and files.
When you install the desktop software
from the Palm Software Installation CD,
some third-party applications may be
quarantined because they are not
compatible with the Palm OS software
17
CHAPTER
1
SETTING UP
version 5.4.9 on your Treo 680.
Quarantined files are not installed on your
Treo 680, nor are they deleted; these files
are placed in a new folder on your
computer: C:\Program Files\Palm\<device
name>\PalmOS5 Incompatible Apps.
(Can’t find a Palm folder in Program Files?
Then look for a folder labeled palmOne or
Handspring instead. For more info, see I
can’t find my user folder.)
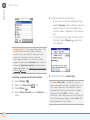
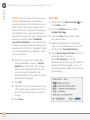
•
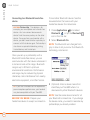
At the bottom of the screen, select
Size.
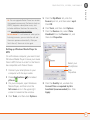
•
Look at the numbers on the Free
Space line and subtract the number
on the left from the number on the
right to calculate the space used. For
example, on the device shown here,
22.4 – 17.5 = 4.9. This means that
4.9MB of space is occupied on this
device.
IMPORTANT Do not synchronize your Treo
680 with any previous versions of
Palm Desktop software.
We do not recommend using third-party
utilities that back up your old device’s
information onto an expansion card and then
transfer the info to your Treo 680. Such
methods transfer all applications to your
smartphone, including ones that are not
designed to work with Palm OS version 5.4.9.
TIP
1 Calculate how much space your apps
and info occupy on your previous Palm
OS device:
18
•
In Applications View, open the menus.
•
Select Info on the App menu.
2 If the space occupied on your previous
device is 64MB or less, then go to step
3. If the space occupied is greater than
64MB, then do any of the following to
reduce the storage space you’re using
before you go to the next step:
•
Delete any third-party applications
that you no longer use.
•
Move large files, such as eBooks and
images, to an expansion card.
•
Move third-party applications to an
expansion card.
•
Purge old info in applications such as
Calendar (Date Book), Tasks (To Do),
and email. Refer to the
documentation that came with your
previous device for instructions on
these items.
3 Synchronize your previous device with
your previous desktop software to back
up your information one last time.
4 Install the desktop synchronization
software from your new Palm Software
Installation CD (see Installing the
desktop synchronization software).
5 During the installation process, sync
your Treo 680 with your new desktop
software as instructed. When
prompted, do the following:
•
•
Connect your Treo 680 to your
computer (see Connecting your
smartphone to your computer).
Indicate whether you want to sync
only the info in your PIM apps
(Calendar, Contacts, Memos, and
Tasks) or all info and apps (excluding
apps known to be incompatible).
•
1
CHAPTER
SETTING UP
Select a device name for your Treo
680; be sure to select the same name
that you used for your old device.
(This is the name that appears in the
User list in Palm Desktop software.)
6 MAC ONLY If you have pictures on
your previous device, copy them from
your previous device to an expansion
card or beam them to your Treo 680.
7 If you plan to continue using your
previous device, perform a hard reset
on your previous device to remove its
associated device name. (See the
documentation that came with your
previous device for instructions on
performing a hard reset.) Each device
you synchronize with your computer
must have a unique name. The next
time you synchronize your previous
device with your computer, be sure to
assign it a new name.
If any third-party applications are
quarantined during the installation, do not
manually install them. Contact the
third-party developer for software updates
19
CHAPTER
1
SETTING UP
and info about compatibility with your Treo
680.
If you have trouble upgrading or finding
quarantined files, see Upgrading.
TIP
Installing the desktop synchronization
software
1 Close any applications that are currently
running on your computer, including
those that are minimized. Your
computer needs to have all its
resources available to install the
software.
2 Insert the Palm Software Installation CD
into the CD drive on your computer.
IMPORTANT Even if you already own a
Palm OS device and have installed a
previous version of the desktop software,
you must install the software from the
Palm Software Installation CD that came
with your Treo 680.
BEFORE YOU BEGIN If you are installing
on a computer at work, make sure your
computer is configured to let you install
new software. Contact your company’s
IT department for help.
If you want to sync info with applications
other than Palm Desktop or Microsoft
Outlook, you need to purchase additional
third-party sync software. This sync software
is sometimes called a conduit.
TIP
20
3 If you are installing on a Mac,
double-click the CD icon on the desktop,
and then double-click the
PalmSoftware.pkg icon.
4 When the installation wizard opens,
follow the onscreen instructions. Please
note these important points about the
installation process:
•
When the language selection screen
appears, select the same language
you selected on your Treo 680.
•
WINDOWS ONLY You can choose
which desktop software you want to
use for synchronization:
Palm Desktop software or Microsoft
Outlook.
NOTE Whether you select to synchronize
with Microsoft Outlook or Palm Desktop
software, Palm Desktop software is still
installed on your computer. If you use
Outlook as your desktop email application,
select Outlook as your desktop
synchronization software. Remember that
when you enter information on your
computer, enter it in the software you
selected in this step.
•
The install process prompts you to
connect your smartphone to your
computer. Go to the next section.
Connecting your smartphone to your
computer
1
CHAPTER
SETTING UP
After you install the desktop software (see
Installing the desktop synchronization
software), you’re ready to connect your
smartphone to your computer.
BEFORE YOU BEGIN To set up your
computer, you need the sync cable that
came with your Treo 680.
1 If necessary, connect the international
adapter to the AC charger plug.
2 Plug the AC charger into a wall outlet.
3 Plug the USB sync cable into an
available USB port or a powered USB
hub on your computer.
For best performance, plug your sync
cable directly into a USB port on your
computer. If your computer has USB ports on
both the front and back, we suggest using the
back port; the front port is often a low-power
port. If you use a USB hub, make sure the hub
has its own power supply.
TIP
0
21
CHAPTER
1
SETTING UP
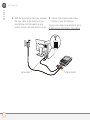
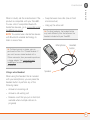
4 With the sync button facing up, connect
the sync cable to the bottom of your
smartphone. Do not press the sync
button until you are instructed to do so.
Sync cable
22
5 Connect the charger cable to the
bottom of your smartphone.
You are now ready to synchronize; go to
Synchronizing information—the basics.
Sync button
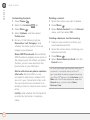
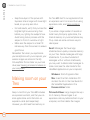
Synchronizing
information—the
basics
Synchronizing means that info you enter or
change in one place (your smartphone or
your computer) is automatically entered or
changed in the other; so there’s no need to
enter the info twice. We strongly
recommend that you sync your
smartphone with your computer or
corporate server frequently to keep your
info up-to-date (and backed up) in
both locations.
1
CHAPTER
SETTING UP
The info from all the following applications
is updated by default each time you sync
your smartphone with your desktop
software:
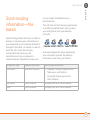
How each application syncs depends on
your computer type and the desktop
software you are using, as follows:
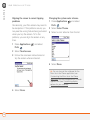
0
Computer type
Desktop software
What syncs and where
Windows
Microsoft Outlook
•
Calendar, Contacts, Memos, and
Tasks sync with Outlook
•
Pictures & Videos syncs with
Palm Desktop
Windows
Palm Desktop
All apps sync with Palm Desktop
Mac
Palm Desktop
All apps sync with Palm Desktop
23
CHAPTER
1
SETTING UP
For more sync options, including which
apps sync, see Synchronizing information—
advanced.
TIP
BEFORE YOU BEGIN To sync your info,
you must install Palm Desktop software
from the Palm Software Installation CD
that came with your Treo 680—even if you
sync with Outlook or another third-party
application. See Installing the desktop
synchronization software for instructions.
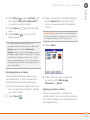
1 Connect your Treo 680 to your
computer, as described in Connecting
your smartphone to your computer.
2 Press the sync button on the sync
cable.
Sync button
24
Messages on both your computer and
your smartphone indicate that
synchronization is in progress.
3 Wait until you see the message on your
smartphone that the HotSync operation
is complete; then disconnect the sync
cable. Do not disconnect the sync cable
until you see this message.
TIP Problems synchronizing? See
Synchronization for troubleshooting
suggestions.
If you’re finishing your initial setup, you
now have the option to install bonus
software from the Palm Software
Installation CD. If you choose to install
some of the bonus software, you need to
sync again to install the software on your
smartphone. You can also install bonus
software later; see Installing bonus
software from the CD.
TIP For info on locating your pictures and
videos on your computer, see Viewing
pictures and videos on your computer.
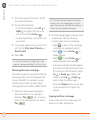
C H A PT ER
2
Moving around on your
Palm® Treo™ 680 smartphone
Have you ever been to a new city and felt a bit lost until you
figured out that the numbered streets run north/south and the
avenues run east/west? Learning to move around on your
smartphone is similar. Most Palm OS® applications use the
same set of controls. So once you learn how to use these
controls on your Palm® Treo™ 680 smartphone, you’ll be driving
all over town and you won’t even need a map.
Benefits
•
Find and open applications quickly
•
Access extra features with menus
•
Move around in applications with
one hand, using the 5-way
navigator
•
Access many more characters and
symbols than are displayed on the
keyboard
In this chapter
Moving around the screen . . . . . . . . . . . . . . . . . . . . . . . . . . . . . . . . 27
Using the keyboard . . . . . . . . . . . . . . . . . . . . . . . . . . . . . . . . . . . . . 31
Opening applications . . . . . . . . . . . . . . . . . . . . . . . . . . . . . . . . . . . . 35
Moving around the
screen
Some third-party applications may not
work with the 5-way navigator, and you must
use the stylus instead
TIP
2
CHAPTER
MOVING AROUND ON YOUR PALM® TREO™ 680 SMARTPHONE
In this guide, we use arrow
icons to indicate directions on the 5-way.
These are different from any onscreen arrows
that you tap with your stylus or select with the
5-way to display pick lists.
DID YOU KNOW?
To move around the Treo 680 screen, you
can use the 5-way navigator for
one-handed navigation, or you can tap
items on the screen with the stylus. With
use, you will find your own favorite way to
scroll, highlight, and select menu items.
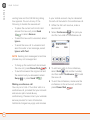
The 5-way includes the following buttons:
Center
Up
Left
Right
Down
27
CHAPTER
2
MOVING AROUND ON YOUR PALM® TREO™ 680 SMARTPHONE
Highlighting and selecting items
On most screens, one item—a button, a
list entry, or a check box—is highlighted by
default. The highlight identifies which item
is affected by your next action. Use Left ,
Right , Up , and Down on the
5-way to move the highlight from one item
to another.
If the item you want doesn’t appear on the
screen, try tapping the onscreen scroll arrows
to view more info.
TIP
Learn to recognize the highlight. It can take
two forms:
Border glow: When an entire screen, an
onscreen button (such as Done, New, or
OK), or a pick list is highlighted, a glow
appears around its border. If an entire
screen is highlighted, the glow appears at
the top and bottom of the screen only.
When a border appears at the top and
bottom of a list screen, press Center on the
5-way to highlight the first item in the list.
TIP
28
Colored background: When a phone
number, text, an email address, a web link,
or an item in a list is highlighted, the item is
displayed as white text against a colored
background. Examples of lists include the
Contacts list, the Messaging Inbox, and the
Tasks list.
After highlighting an item, you can select or
activate it by pressing Center
, or by
tapping the item with the stylus.
TIP After you open an application (see
Opening applications), experiment with using
the 5-way to highlight various screen
elements.
Highlighting text
Selecting menu items
You can use the stylus to highlight text on
the screen.
Many applications have menus to give you
access to additional features. These menus
are usually hidden from view, but they
appear when you press Menu
. To get
the most out of your smartphone, it’s a
good idea to familiarize yourself with the
additional features available through the
various application menus.
•
Tap and drag the stylus across the text
you want to highlight.
•
To highlight a word, double-tap it.
•
To highlight a paragraph, triple-tap it.
Accessing command buttons
In most applications, command buttons
such as New, OK, and Details appear at the
bottom of the screen. In many cases, you
can jump directly to these buttons instead
of scrolling to them.
•
From a list screen, such as the Memos
list, press Right to jump to the first
button.
•
From a screen where you create or edit
entries, such as Contact Edit, press
Center
to jump to the first button.
•
From a dialog box, such as Edit
Categories, press Up
or Down
scroll to the buttons.
to
2
CHAPTER
MOVING AROUND ON YOUR PALM® TREO™ 680 SMARTPHONE
1 Press Menu
to display an
application’s menus.
Menu shortcut
2 Press Right and Left
between menus.
to switch
3 Press Up
and Down
menu item.
to highlight a
4 Press Center
to select the menu
item, or press Menu
to close the
menu and cancel your selection.
29
MOVING AROUND ON YOUR PALM® TREO™ 680 SMARTPHONE
CHAPTER
2
•
Most menu items have menu shortcuts
listed in the menu. To use a menu shortcut,
press Menu plus the shortcut letter. You don’t
have to see the menu item to use the menu
shortcut. For example, when you’re in
Calendar, you can press Menu + N to create a
new event.
TIP
Selecting options in a pick list
A range of options is often presented in a
type of menu called a pick list, which can
be identified by a downward-pointing
arrow. Pick lists are different from the
application menus previously described.
The application menus give you access to
additional features and pick lists let you
select the contents for a particular field.
You can select items from a pick list with
the 5-way or the stylus.
5-way: Use the 5-way
to highlight the
pick list, and then press Center
to
display the items in the list.
30
•
Press Up
and Down
the item you want.
to highlight
•
Press Center
to select the
highlighted item.
To exit the pick list without making a
selection, press Left or Right .
Stylus: Use your stylus to tap the pick list.
•
Tap the item you want from the list.
•
To exit the pick list without making a
selection, tap outside the list.
2
CHAPTER
MOVING AROUND ON YOUR PALM® TREO™ 680 SMARTPHONE
Using the keyboard
Backlight
Backspace
Return
Option
Shift/Find
Menu
Space
Alt
NOTE Your keyboard may have a different
layout based on the country where you
purchased your smartphone.
31
MOVING AROUND ON YOUR PALM® TREO™ 680 SMARTPHONE
CHAPTER
2
•
When using the keyboard, most people
find it easiest to hold the Treo with two hands
and use the tips of both thumbs to press the
keys.
TIP
DID YOU KNOW? The Treo 680 includes a
keyboard backlight that turns on and off when
the screen turns on or off. The backlight also
dims when an active call lasts longer than a
specified period of time. See Optimizing
power settings to adjust the automatic
shut-off and dimming intervals.
Entering numbers, punctuation, and
symbols
Numbers, punctuation, and symbols
appear above the letters on the keys.
To enter these characters, do one of
the following:
Entering lowercase and uppercase letters
•
To enter lowercase letters, press the
desired keys.
•
To enter an uppercase letter, press
Shift/Find
and then press a letter
key. You don’t need to press and hold
Shift/Find
while entering a letter.
When Shift is active, an up arrow
appears in the lower-right corner of the
screen.
•
32
To turn Option Lock on, press Option
twice. To turn it off, press Option
once. When Option Lock is on, the
To turn Caps Lock on, press Shift/
Find
twice. To turn it off, press
Shift/Find
once. When Caps Lock
is on, an underlined up arrow
appears in the lower-right corner of the
screen.
Symbol
Letter
•
Press Option
, and then press the
key with the desired character shown
above the letter. You don’t need to press
and hold Option
while pressing the
second key. When Option is active, the
symbol appears in the lower-right
corner of the screen.
symbol
appears in the lower-right
corner of the screen.
Some application views
automatically default to Option Lock, such as
the Dial Pad tab in the Phone application or
the Calculator. In this case, you do not need to
press Option to enter numbers.
DID YOU KNOW?
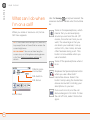
Entering other symbols and accented
characters
Symbols and accented characters that do
not appear on the keyboard are available by
using the Alt
key.
1 Enter the character that corresponds to
the symbol or accented character you
want. See the table on the next page.
2 Press Alt
2
CHAPTER
MOVING AROUND ON YOUR PALM® TREO™ 680 SMARTPHONE
.
3 Press Up , Down , Right , or Left
to highlight the desired character.
4 Press Center
character.
to insert the
Alternate characters are
grouped by their similarity to the base key. For
example, the alternate characters for the e key
are é, è, ë, and ê.
DID YOU KNOW?
33
CHAPTER
2
MOVING AROUND ON YOUR PALM® TREO™ 680 SMARTPHONE
0
Symbols and accented characters
Enter…
Then press
Alt
to
select…
Enter…
Then press
Alt
to
select…
Enter…
Then press
Alt
to
select…
a
áàäâãåæ
n
ñ
u
úùüû
A
ÁÀÄÂÃÅÆ
N
Ñ
U
ÚÙÜÛ
b or B
ß
o
óòöôœõ
x or X
x¤
c
碩
O
ÓÒÖÔŒÕ
y
ýÿ
C
Ç¢©
p or P
Y
ÝŸ
e
éèëê
r or R
®
!
¡
E
ÉÈËÊ
s
ßš
?
¿
i
íìïî
S
ߊ
:
:-) :-( ;-)
I
ÍÌÏÎ
t or T
™
$
l or L
£
Press Alt
characters:
by itself, after a space or at the beginning or end of a line, to select these
;_•\%=°÷
34
£¥¢
£¥¢[]{}<>«»©®™~^ø|
Opening applications
When you open an application using a
quick button or Applications View, you
automatically close the app you were
previously using.
Using the quick buttons
2
CHAPTER
MOVING AROUND ON YOUR PALM® TREO™ 680 SMARTPHONE
The front of the Treo 680 has three quick
buttons—Phone, Calendar, and
Messaging—that open applications. The
fourth button opens Applications View (see
Using Applications View).
You can customize the quick buttons
yourself; see Reassigning buttons for details.
TIP
Phone
Applications
Messaging
Calendar
35
CHAPTER
2
MOVING AROUND ON YOUR PALM® TREO™ 680 SMARTPHONE
Each of quick button opens two
applications:
•
To access a button’s primary application,
simply press the button.
Button
Primary app
Phone
Calendar
Messaging
•
Using Applications View
You can access all available applications
through Applications View.
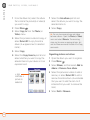
1 Press Applications
.
If prompted, press Center on the 5-way to
turn off Keyguard (see Locking your keyboard
(Keyguard) for more info).
TIP
2 Use the 5-way
to highlight the
application you want to use.
To access a button’s secondary
application, press Option
and then
press the quick button.
Buttons
Secondary app
+
Web
+
Memos
+
Email
3 Press Center
application.
to open the selected
In Applications View, you can also do any of
the following:
DID YOU KNOW? Pressing Option + Menu dims
your smartphone screen.
36
•
Press Applications
repeatedly to
cycle through various categories of
applications. See Applications settings
for more info on categories.
•
Enter the first few letters of the
application’s name to highlight it. For
example, if you press P, it highlights
Phone; if you then press R, it highlights
Prefs. If you pause and then press R, it
highlights the first application that starts
with R.
2
CHAPTER
MOVING AROUND ON YOUR PALM® TREO™ 680 SMARTPHONE
37
CHAPTER
2
38
MOVING AROUND ON YOUR PALM® TREO™ 680 SMARTPHONE
C H A PT ER
3
Your phone
The Phone application is your home base for making and receiving calls
and for storing info about the people you need to stay in touch with.
You can creatively manage multiple calls, such as swapping between
calls, sending text messages to ignored calls, and creating conference
calls with up to five callers. Your Palm® Treo™ 680 smartphone helps you
perform all these tasks with ease.
And you can do more than manage your phone calls, too. You can send
text messages, open applications, go to your favorite web pages, see
your upcoming appointments, and even find out how many unread
email messages you have.
Benefits
•
Stay in touch—you choose how
•
Save time with shortcuts to your
favorite info
•
Have fun: add wallpaper and
ringtones
In this chapter
Turning your Treo 680 on and off . . . . . . . . . . . . . . . . . . . . . . . . . . . 41
Making calls . . . . . . . . . . . . . . . . . . . . . . . . . . . . . . . . . . . . . . . . . . . 43
Receiving calls . . . . . . . . . . . . . . . . . . . . . . . . . . . . . . . . . . . . . . . . . 47
Using voicemail . . . . . . . . . . . . . . . . . . . . . . . . . . . . . . . . . . . . . . . . 48
What can I do when I’m on a call? . . . . . . . . . . . . . . . . . . . . . . . . . . 50
How many minutes have I used?. . . . . . . . . . . . . . . . . . . . . . . . . . . 56
Entering names and phone numbers . . . . . . . . . . . . . . . . . . . . . . . . 57
Defining favorite buttons . . . . . . . . . . . . . . . . . . . . . . . . . . . . . . . . . 61
Using a hands-free device . . . . . . . . . . . . . . . . . . . . . . . . . . . . . . . . 64
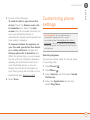
Customizing phone settings. . . . . . . . . . . . . . . . . . . . . . . . . . . . . . . 69
What are all those icons? . . . . . . . . . . . . . . . . . . . . . . . . . . . . . . . . . 75
Turning your Treo 680
on and off
NOTE Throughout this guide we use the
term smartphone to describe your device
and its physical aspects. We use the term
phone to describe the feature of your Treo
that lets you connect to your wireless
service provider network to make and
receive calls and transmit data.
The phone and the screen of your Treo 680
can be turned off and on separately. This
means that you can wake up the screen to
use just the organizer features of your
smartphone, without turning on the phone.
Also, when the screen is turned off, the
phone can be on and ready for you to
receive and make calls.
Waking up the screen and turning it off
Wake up the screen and leave the phone
turned off when you want to use only the
organizer features of your Treo 680; for
example, when you’re on a plane and want
to look at your calendar.
1 Press and release Power/End
to wake up the screen.
3
CHAPTER
YOUR PHONE
You can also press any of the quick buttons
or the Applications button to wake up your
smartphone screen.
TIP
Power/End
Center
2 Press Center
to turn off Keyguard.
For more info about turning Keyguard on
and off, see Locking your keyboard
(Keyguard).
3 Press and release Power/End
to turn off the screen and lock the
keyboard.
You can set how long the screen stays on.
Press Applications, select Preferences,
select Power, and then adjust the Auto-off
after setting.
TIP
41
CHAPTER
3
YOUR PHONE
Turning your phone on and off
When your phone is on, it is connected to
your wireless service provider’s network
(provided you are in a coverage area) so
that you can make and receive phone calls
and use wireless services, such as email,
messaging, and the web browser. During
initial setup, your phone is automatically
turned on, so you can use wireless
services right away.
If you turn off your phone, you can still use
the organizer features such as Calendar
and Contacts, as well as the media
features such as Pocket Tunes and Pictures
& Videos. You might hear this referred to as
flight mode because you must turn your
phone off when you’re on a plane.
TIP If you’re outside a coverage area, No
Service appears in the upper-left corner and
the indicator light flashes red.
3 Press and hold Power/End
again to turn off your phone.
You know your phone is off when you
go to the Main tab of the Phone
application and you see Phone Off at
the top of the screen.
Opening the Phone application
Press Phone
to display the Main tab in
the Phone application.
1 Wake up the screen.
2 Press and hold Power/End
turn on your phone.
go to the Main tab of the Phone
application and you see the Signal
Strength
icon at the top of the
screen.
to
Status icons
If the Ringer switch is in the Sound On
position, you hear a series of tones when you
turn your phone on and off (see Silencing
sounds).
TIP
You know your phone is on and that
you’re inside a coverage area when you
42
Tabs
3
CHAPTER
YOUR PHONE
DID YOU KNOW? You can choose which tab
appears when you press the Phone button.
See Customizing the Main tab in the Phone
application for details. If you change the
default tab, you need to modify the steps in
this chapter accordingly.
Making calls
4 Press Send
There are several ways to make a call. Try
them all to find out which way you like
best.
Dialing using the onscreen Dial Pad
1 Press Phone
to make the call.
You can paste numbers
directly into the Dial Pad. Copy a number from
another application, press Phone and select
the Dial Pad tab. Open the Edit menu and
select Paste. Press Send to dial the number.
DID YOU KNOW?
.
2 Select the Dial Pad
tab.
3 Enter the phone number by tapping the
onscreen Dial Pad with the stylus.
TIP Press Backspace to delete numbers
you’ve entered. To cancel the call altogether,
press Phone to return to the Main tab in the
Phone application.
Dialing using the keyboard
1 Press Phone
.
2 Press the numbered keys to enter the
phone number. (You don’t need to press
Option.)
43
YOUR PHONE
CHAPTER
3
SIM card (see tip on Viewing your SIM
Phonebook).
1 Press Phone
.
2 Select the Contacts
tab.
3 Using the keyboard, just start entering
one of the following for the contact you
want to call:
3 Press Send
to make the call.
After you enter a phone number, you can
also press Center on the 5-way to select
whether you want to make a phone call or
send a text message to that number.
TIP
Dialing by contact name
You need to have names and numbers in
your contact list before you can make a call
by contact name. You can add contacts
directly into your smartphone (see Adding a
contact), but the fastest way to enter lots
of contacts is to enter them in your
desktop software and then synchronize to
transfer them to your smartphone (see
Synchronizing information—the basics).
You can also import contacts from your
44
•
First name (JOH for John)
•
Last name (SMI for Smith)
•
First initial and last name (JSM for
John Smith)
For example, entering SM would display
Smilla Anderson, John Smith, and
Sally Martin. Entering JSM finds only
John Smith.
Text appears
here as you
enter it
To restart your search, press Backspace to
delete letters you’ve entered. Or press Phone
to return to the Main tab in the Phone
application.
TIP
Look for the
icon to distinguish a
speed-dial favorite from other types of
favorites.
3
CHAPTER
YOUR PHONE
To view more favorite buttons, repeatedly
press Down on the 5-way.
TIP
4 Select the number you want to dial.
5 Press Send
to make the call.
To see more info for a contact, highlight
the name and press Center on the 5-way to
view the address, company, and other details.
TIP
DID YOU KNOW? If you want to be able to
search for a contact by entering a name from
the Main tab in the Phone application, you can
change a setting to do that (see Customizing
phone settings).
Dialing with a speed-dial favorite button
Your smartphone comes with a few
predefined speed-dial favorite buttons, but
you can also create your own favorites. See
Creating a speed-dial favorite button.
1 Press Phone
.
2 Select the Favorites
You can see all the contact numbers for
the selected person or business. Highlight a
speed-dial favorite button and press Space
on the keyboard.
TIP
4 Press Send
make the call.
or Center
to
tab.
3 Use the 5-way
to highlight the
speed-dial favorite you want.
45
CHAPTER
3
YOUR PHONE
Dialing from a web page or message
Redialing a recently called number
Your Treo recognizes most phone numbers
that appear on web pages or in text, email,
or multimedia messages.
To dial the last number: Select the
Main
tab, and then press and hold
Send
to dial the last number you
called.
1 Select the phone number on the web
page or in the message.
If you can’t use the 5-way or stylus to
highlight and dial a phone number on a web
page or in a message, it means that your Treo
doesn’t recognize the number as a phone
number. You can still use the menus to copy
and paste the number into the Dial Pad.
To select from your most recently dialed
numbers: Select the Main
tab, press
Send
to open the Redial list,
highlight the number you want to call,
and then press Send
again to
make the call.
TIP
2 Press Center
to open the Dial
Number dialog box.
3 Select Dial to make the call.
46
To select from your call history list:
Select the Call Log
tab, highlight the
number you want to call, and then press
Send
to dial the number.
3
CHAPTER
YOUR PHONE
See a photo of the person calling you!
Learn how to assign a caller ID photo in
Assigning a caller ID photo.
DID YOU KNOW? You can send a text message
from Contacts or your Call Log by highlighting
a number, pressing Center on the 5-way, and
then selecting Message.
TIP
To answer a call, do one of the following:
Receiving calls
To receive calls, your phone must be on.
This is different from having only the
screen turned on (see Turning your phone
on and off). When your phone is off, your
calls go to voicemail.
DID YOU KNOW? If music is playing and a call
arrives, the music pauses automatically and
resumes when you hang up or ignore the call.
•
Press Send
•
Select Answer.
.
•
Press the headset button (if the
headset is attached).
The headset button may work differently
on headsets other than the one provided with
your smartphone.
TIP
NOTE Pressing Phone
silences the
ringer, but it does not answer the call.
47
CHAPTER
3
YOUR PHONE
To ignore a call, do one of the following:
Send the call to voicemail: Press Power/
End
or select Ignore.
Send the caller a text message: Select
Ignore with Text. This option sends the
call to voicemail and opens a text message
addressed to the caller.
NOTE Sending text messages to land line
Your wireless service may include
voicemail. Keep in mind that airtime and
other charges may apply when using
voicemail from your phone.
Setting up voicemail
phones may not be supported.
1 Press Phone
To silence the phone while it is ringing, do
one of the following:
2 Press and hold 1 to dial your wireless
service provider’s automated voicemail
system.
•
Press any key on your Treo except Send,
Power/End, or the 5-way.
•
Slide the Ringer switch to the Sound
Off
position. This immediately
silences all system sounds, including
the ringer.
DID YOU KNOW? When you silence the ringer
while it is ringing, you can either answer the
call or let it ring through to voicemail.
48
Using voicemail
.
TIP You can also access your wireless service
provider’s voicemail system by selecting the
Favorites tab and then selecting the
Voicemail favorite.
3 Follow the voice prompts to set up your
voicemail.
TIP If you can’t connect to your wireless
service provider’s voicemail system, contact
your wireless service provider for assistance.
Voicemail notification
Listening to voicemail messages
When you have a new voicemail message,
you are notified with an Alert dialog box.
1 Press Phone
3
CHAPTER
YOUR PHONE
.
2 Press and hold 1 to dial the voicemail
system.
You can also select the Voicemail favorite
button to dial the voicemail system.
TIP
3 Enter your voicemail password using
the keyboard.
Remember, you don’t need to press
Option to enter numbers, *, or # during a call.
TIP
•
To dismiss the Alert dialog box, select
OK.
•
To play the message, select Listen.
When you have messages that you have
not listened to, a Voicemail
icon also
appears in the title bar of the Phone
application. You can also select this icon to
listen to your voicemail.
NOTE If you defined Extra Digits for the
Voicemail favorite button (see Editing a
favorite button for details), you can select
this button to enter your password.
49
CHAPTER
3
YOUR PHONE
What can I do when
I’m on a call?
Use the 5-way
or stylus to select the
onscreen buttons. Here’s what the buttons
do:
0
When you make or receive a call, Active
Call View appears.
If the screen dims during a call, press any
key except Send or Power/End to restore the
screen brightness.
TIP
DID YOU KNOW? You can set how long the
screen stays at full brightness during phone
calls. See Optimizing power settings for
details.
Caller’s name
and number
Call duration
Call status
Button label
50
Turns on the speakerphone, which
means that you and everybody
around you can hear the call. (Of
course, the caller can hear you as
well.) The advantage is that you
can check your calendar, look up
contact info, take notes, and use
other features during a call. This
button is not available when you
use a headset.
Turns off the speakerphone when it
is on.
Replaces the Speakerphone button
when you use a Bluetooth®
hands-free device. Select this
button to stop using the hands-free
device and switch to holding your
smartphone to your ear.
Puts a call on hold, and the call
status changes to On Hold. To take
the call off hold, select this button
again.
Lets you make another call while
the first call is on hold; see Making
a second call for details. For info on
handling a second incoming call,
see Receiving a second call (call
waiting).
Do you accidentally press
onscreen buttons when you’re on a call? You
can disable the screen’s touch-sensitive
feature during phone calls, see Locking your
screen.
DID YOU KNOW?
Opens the Dial Pad so you can use
it to dial additional numbers, such
as an extension or a response to a
voice prompt.
Ending a call
•
Press Power/End
Dials any extra digits (such as a
password or an extension) that you
assigned to a speed-dial favorite
button. See Defining favorite
buttons for information on defining
extra digits. This button disappears
after you select it to dial the
numbers.
•
Press the button on the headset (if the
headset is attached).
Mutes the microphone so that you
and the noise around you can’t be
heard on the other end. The call
status changes to Muted. When
you want to speak, be sure to
select the Mute button again.
3
CHAPTER
YOUR PHONE
Do one of the following:
.
Switching applications during a call
You can use your organizer apps and other
applications while you’re talking on the
phone; so go ahead and check your
calendar, or go to Memos and enter the
driving directions your caller is giving you.
You can even send text messages while
you’re on a call.
NOTE What you can’t do, however, is
make a data connection while on a call.
This means that you can’t browse the web
or send or receive email or multimedia
messages.
51
CHAPTER
3
YOUR PHONE
1 (Optional) If you want to continue
talking while viewing another
application, select Speakerphone or
connect a headset (see Using a
hands-free device).
2 Press Applications
.
3 Select the icon for the application you
want to open.
4 When you’re ready to leave the app,
open another app or press Phone
to return to Active Call View.
TIP You can turn the Add New Number prompt
on and off. In Contacts, open the Options
menu, and select Preferences. To turn this
option on, check the Ask to add unknown
phone numbers after calls box. To turn this
option off, uncheck this box.
DID YOU KNOW? You can press Phone to toggle
between Active Call View and the Main tab in
the Phone app, so you can access other tabs,
such as Contacts and Favorites, during a call.
•
To create a new contact entry for this
number, select Create a New Contact,
and enter the contact’s info.
•
To add this number to an existing
contact entry, select Add to a Contact,
and then select the contact. This pastes
the number into the first available phone
number field for that contact.
•
To decline adding this number, select
Cancel.
Saving phone numbers
After you complete a call to a number that
is not in your Contacts list, you are
prompted to add the number to your
Contacts list.
52
•
To disable the Add New Number
prompt, check the Don’t ask me this
again box, and then select Cancel.
If you don’t add a number right away, follow
these steps to add it later.
1 Press Phone
NOTE To do this, you can use any of the
methods described in Making calls.
5 When the Dial another call prompt
appears, select Yes.
6 Select Swap
the two calls.
.
2 Select the Call Log
3
CHAPTER
YOUR PHONE
to switch between
tab.
3 Highlight the number you want to save.
4 Press Menu
.
5 Select Add Contact.
6 Select New to create a new contact, or
select Add to add this number to an
existing contact.
7 Enter the information for the entry, and
then select Done.
Making a second call
You can make a second call while your first
call is still active.
1 Dial the first number and wait until the
person answers.
2 Put the first call on hold by pressing
Send
or selecting Hold
.
3 Select Add Call
.
4 Dial the second number.
7 To end the active call, press Power/End
.
When you hang up one call,
you can continue your conversation with the
remaining call.
DID YOU KNOW?
Receiving a second call (call waiting)
When you are on a call, you can receive a
second call and have separate
conversations with each caller. When the
second call comes in, you hear a call
53
CHAPTER
3
YOUR PHONE
waiting tone and the Call Waiting dialog
box appears. You can do any of the
following to handle the second call:
•
To place the current call on hold and
answer the new call, press Send
or select Answer.
•
To send the new call to voicemail, select
Ignore.
•
To send the new call to voicemail and
send the caller a text message, select
Ignore with Text.
in your mobile account may be deducted
for each call included in the conference call.
1 While the first call is active, make a
second call.
2 Select Conference
. This joins you
and the two calls in a conference call.
NOTE Sending text messages to land line
phones may not be supported.
•
To hang up the current call and answer
the new call, press Power/End
.
•
To switch between the original call and
the second call you answered, select
Swap
or press Send
.
Making a conference call
You can join a total of five other calls in a
conference call, provided that your network
and service plan include 6-way
conferencing. Please contact your wireless
service provider for more information.
Additional charges may apply and minutes
54
3 To add more calls to the conference,
select Hold
, dial another number,
and then select Conference
to add
the new call.
4 To end the conference, make sure the
conference is the active call, and then
press Power/End
.
4 Select the Forward all calls pick list.
If you want to continue a conversation
with one of the people on a conference call,
you can extract that call from the conference.
Select Extract Call (the onscreen button on
the far right), and then select the call you want
to extract.
TIP
•
If the forwarding number appears in
the pick list, select the number.
•
If the forwarding number does not
appear in the pick list, select Edit
Numbers, and then select New.
Enter a forwarding number, including
the area code and country code if
they are different from your mobile
phone number. Select OK. Select the
number you just entered, and then
select OK.
Forwarding all calls
You can forward all your calls to another
telephone number. You can also selectively
forward certain calls (see Forwarding calls
under certain conditions). Please check
with your wireless service provider about
availability and pricing of forwarded calls,
as additional charges may apply.
1 Press Phone
2 Press Menu
.
.
3 Select Options, and then select Call
Preferences.
3
CHAPTER
YOUR PHONE
5 Select OK.
After you set the number you want to
forward all your calls to, the call forwarding
icon appears in the title bar (see What are all
those icons?). We also recommend that you
call your Treo 680 to confirm that your call
forwarding settings work properly.
TIP
To turn off forwarding for all calls, select
Off from the Forward all calls pick list.
TIP
Forwarding calls under certain conditions
You can forward calls to another number
when the line is busy, a call is unanswered,
your smartphone is off, or you are outside a
coverage area.
55
CHAPTER
3
YOUR PHONE
1 Press Phone
2 Press Menu
.
.
3 Select Options, and then select Call
Preferences.
How many minutes
have I used?
4 Select the Forward all calls pick list and
select Off.
2 Select the Call Log
5 Select any of the following pick lists:
3 Press Menu
When busy: Forwards calls if the phone
is busy.
1 Press Phone
.
tab.
.
4 Select Totals from the Record menu.
Not answered: Forwards calls if you do
not answer.
Off/No service: Forwards calls when
your smartphone is not connected to a
mobile network.
6 If the forwarding number appears in the
pick list, select the number. If the
forwarding number does not appear in
the pick list, select Edit Numbers and
then select New. Enter a forwarding
number, and select OK. Select the
number you just entered.
7 Select OK, and then select OK again.
56
5 (Optional) To reset the counters to zero,
select Reset Counters.
6 Select Done.
Entering names and
phone numbers
Contacts is where you enter information
about the people you want to stay in
contact with. You can get to this info from
the Phone application, to dial phone
numbers and create favorites, and from the
Messaging and email applications, to send
messages. When you create a contact, you
can also assign a photo and ringtone ID to
that contact, so you know when they call
you.
If you add a symbol at the
beginning of a contact’s last name, such as
#Smith, the contact appears at the top of your
contact list.
DID YOU KNOW?
6 Do any of the following:
Adding a contact
1 Press Phone
.
2 Select the Contacts
3 Press Menu
3
CHAPTER
YOUR PHONE
tab.
.
4 Select New Contact from the Record
menu.
5 Use the 5-way
to move between
fields as you enter info.
Add a caller ID photo: Select the
Picture box. (See Assigning a caller ID
photo for more info.)
Add a caller ID ringtone: Select the
Ringtone pick list. (See Assigning a
caller ID ringtone for more info.)
Place the entry in a category and
mark it private: Select Details. (See
Working with private entries for more
info.)
57
CHAPTER
3
YOUR PHONE
Add a note to an entry: Select Note
.
Display additional fields for this
contact: Select Plus
.
7 After you enter all the information,
select Done.
Import contacts from your SIM card
quickly and easily. In the Contacts list, open
the Record menu and select Import from
SIM.
TIP
Viewing or changing contact information
1 Press Phone
.
2 Select the Contacts
tab.
3 Begin entering one of the following for
the contact you want to view or edit:
•
First name (JOH for John)
•
Last name (SMI for Smith)
•
First initial and last name (JSM for
John Smith)
4 Select the name of the entry you want
to open.
58
TIP To edit the entries on your SIM card you
must either Import them into Contacts or
press Applications, select SIM Book, and
edit them in the phone book on your SIM card.
5 Select Edit.
6 Make changes to the entry as
necessary, and then select Done.
Assigning a caller ID photo
1 Press Phone
.
2 Select the Contacts
tab.
3 Open the contact you want to add the
photo to (see Viewing or changing
contact information).
4 Select Edit.
5 Select the Picture box and do one of
the following:
•
Select Camera to take a photo and
add it to this contact entry when you
save the photo.
•
Select Photos and select an existing
photo that you want to assign to this
contact.
1 Press Phone
.
2 Select the Contacts
3
CHAPTER
YOUR PHONE
tab.
3 Open the contact to whom you want to
give a caller ID ringtone (see Viewing or
changing contact information).
4 Select Edit.
5 Select the Ringtone pick list and select
a tone for this contact entry.
6 Select Done.
DID YOU KNOW? If you assign pictures to your
contacts in Microsoft Outlook or
Palm Desktop software and you install the
desktop software from the Palm Software
Installation CD, the pictures are automatically
added to your contact entries on your
smartphone when you sync. If you use
third-party synchronization software, picture
sync may not be supported. Check with the
software developer for information.
6 Select OK.
You can assign a ringtone to an entire
category of contacts. For example, use a
special ringtone for categories such as Family,
Work, or Golf Buddies. Select the category
pick list in the upper-left corner and select Edit
Categories. Select the category, and then
select Edit. Select the ringtone on the Edit
Category screen.
TIP
Assigning a caller ID ringtone
Caller ID ringtones can let you know who is
calling before you even look at your
smartphone. This is a great way to identify
calls from important people in your life and
to screen calls that you’d prefer not to
answer.
59
CHAPTER
3
YOUR PHONE
Customizing Contacts
Deleting a contact
1 Press Phone
1 Open the contact you want to delete.
.
2 Select the Contacts
3 Press Menu
tab.
.
4 Select Options, and then select
Preferences.
5 Set any of the following options:
Remember Last Category: Sets
whether Contacts opens to the last
category you selected.
Show SIM Phonebook: Sets whether
SIM Phonebook appears as an option in
the category pick list. When you check
this box, you can view entries in the
phone book on your SIM card.
Ask to add unknown phone numbers
after calls: Sets whether you are
prompted to add phone numbers that
are not in your Contacts list after a call.
You can add unknown numbers to an
existing contact or create a new contact
entry.
List By: Sets whether the Contacts list
is sorted by last name or company
name.
60
2 Press Menu
.
3 Select Delete Contact from the Record
menu, and then select OK.
Creating a business card for beaming
1 Create a new contact and enter your
own business card info.
2 Open the contact entry containing your
business card info.
3 Press Menu
.
4 Select Select Business Card from the
Record menu.
TIP After you create your business card, you
can beam it to another device with an IR
port—provided the device supports beaming
with Palm OS® devices. Go to Contacts or the
Main tab in the Phone application, open the
Record menu, and then select Beam
Business Card.
Viewing your SIM Phonebook
1 Press Phone
.
2 Select the Contacts
3 Press Menu
tab.
Defining favorite
buttons
.
4 Select Options, and then select
Preferences.
5 Make sure the Show SIM Phonebook
box is checked.
Your Treo provides an unlimited number of
favorite buttons for quick access to the
following common tasks:
•
Dialing a phone number (speed-dial)
6 Select OK.
•
Opening an application
7 In the Contacts list, select the category
pick list at the top of the screen and
select SIM Phonebook.
•
Accessing a web page
•
Addressing a message (text, MMS, or
email)
•
Accessing voicemail (preset on your
Treo)
If you imported contacts from your SIM
card to Contacts, you may want to uncheck
the Show SIM Phonebook box to avoid
seeing duplicate entries.
TIP
Need to copy a contact to your phone
book on your SIM card? In Contacts, select
the contact you want to copy, open the
Record menu, and then select Export to
SIM.
TIP
3
CHAPTER
YOUR PHONE
Your wireless service provider may preset
favorite buttons on your smartphone that are
customized for their services.
TIP
61
YOUR PHONE
CHAPTER
3
5 Enter a label for the favorite:
•
If the entry is for an existing contact,
select Lookup. Start entering the last
name of the contact, and select the
contact when it appears in the lookup
list.
•
If the entry is for a new contact, enter
the label, press Down , and enter
the number.
If you’re upgrading from a Treo
600/650, most of your favorites should
transfer from your old Treo along with your
other info. However, you may need to
rearrange the order in which your favorites
appear by opening the Record menu and then
selecting Organize Favorites. For more info
about upgrading, see Upgrading from another
Palm OS® device.
DID YOU KNOW?
Creating a speed-dial favorite button
1 Press Phone
.
2 Select the Favorites
3 Press Menu
Quick Key A letter that you can
press and hold to activate a favorite from any
tab in the Phone app. For example, create a
speed-dial button for your mother’s number
and enter the letter M for “Mom” as the
Quick Key. Then when you want to call her, go
to the Phone app and press and hold M. Your
smartphone dials the number.
KEY TERM
tab.
.
4 Select New Favorite on the Record
menu.
62
6 (Optional) Enter a Quick Key.
7 (Optional) Select More, and then select
advanced options:
Extra Digits: Defines additional digits to
dial, such as a password or extension.
To enter a one-second pause, insert a ,
(comma) between digits. To add a
longer pause, either enter more
commas, or enter a p to add a 3-second
pause.
Dial Extra Digits Automatically: Dials
predefined extra digits immediately
after dialing the phone number, when
checked.
8 Select OK.
DID YOU KNOW? You can assign a special
ringtone for a contact. See Assigning a caller
ID ringtone for details.
Creating other types of favorite buttons
DID YOU KNOW? When creating a Message or
Email favorite, you can enter multiple
addresses; simply separate each address with
a comma. This is an easy way to send
messages to a group of people.
1 Press Phone
.
2 Select the Favorites
3 Press Menu
3
CHAPTER
YOUR PHONE
tab.
.
4 Select New Favorite on the Record
menu.
5 Select the Type pick list and select
Application, Message, Email, or Web
Link.
6 Enter a label for the favorite and enter
any other necessary information on
the screen.
7 (Optional) Enter a Quick Key.
8 Select OK.
Editing a favorite button
1 Press Phone
.
2 Select the Favorites
tab.
3 Highlight the favorite button you want to
edit.
4 Press Menu
.
5 Select Edit Favorite on the Record
menu.
6 After you make your changes, select
OK.
63
CHAPTER
3
YOUR PHONE
TIP To arrange your favorites, open the Record
menu and select Organize Favorites.
Highlight the favorite you want to move, and
then press and hold Option + Up or Down to
move the button to another position. Select
Done.
Deleting a favorite button
Some favorites, such as voicemail, cannot
be deleted. If a favorite can’t be deleted, the
Delete button does not appear on the screen.
TIP
1 Press Phone
.
2 Select the Favorites
tab.
3 Highlight the favorite button you want to
delete.
4 Press Menu
.
5 Select Edit Favorite on the Record
menu.
6 Select Delete.
Using a hands-free
device
If you need to use your phone while driving
and this is safe and permitted in your area,
use a phone headset (wired headset
included) or car kit (sold separately) for
hands-free operation. Using a hands-free
device also makes it easy to check your
calendar, look up contact info, take notes,
and use other features during a call.
In addition to the headset included with
your Treo, your Treo is compatible with the
following types of hands-free devices that
are sold separately:
•
Wired headsets and car kits with a
2.5mm connector (3-pin or 4-pin)
•
Wireless headsets and car kits enabled
with Bluetooth 1.1 or 1.2 wireless
technology
7 Select OK.
TIP The headset designed for Treo 180/270/
300 is not compatible with your Treo 680.
Check the specifications for your
hands-free device to confirm compatibility.
64
When in doubt, ask the manufacturer if the
product is compatible with your Treo 680.
To view a list of compatible Bluetooth
hands-free devices, go to www.palm.com/
treo680gsm-support.
NOTE You cannot use a hands-free device
with Bluetooth wireless technology to
listen to music files.
•
Swap between two calls (one on hold
and one active)
•
Hang up the active call
On other headsets, the headset button
may work differently than the button on the
headset included with your Treo 680.
TIP
Microphone
To listen to music in stereo, you can
purchase the Palm 2-in-1 Stereo Headset. If
you want to use a stereo headset with a
3.5mm connector, then you need to purchase
a stereo adapter. Visit www.palm.com/
treo680gsm for more info on audio
accessories.
TIP
Using a wired headset
3
CHAPTER
YOUR PHONE
Headset
button
Speaker
When using the headset that is included
with your smartphone, you can press the
headset button to perform any of the
following tasks:
•
Answer an incoming call
•
Answer a call-waiting call
•
Resume a call that you put on hold (not
available when multiple calls are in
progress)
65
CHAPTER
3
YOUR PHONE
Connecting to a Bluetooth hands-free
device
KEY TERM Partnership Two devices—for
example, your smartphone and a hands-free
device—that can connect because each
device finds the same passkey on the other
device. Once you form a partnership with a
device, you don’t need to enter a passkey to
connect with that device again. Partnership is
also known as paired relationship, pairing,
trusted device, and trusted pair.
from another Bluetooth device. See the
documentation that came with your
hands-free device for instructions.
1 Press Applications
and select
Bluetooth
or tap the Bluetooth
icon in the title bar.
2 Select Bluetooth On.
NOTE The Bluetooth icon changes from
gray to blue to let you know that Bluetooth
technology is turned on.
Once you set up a partnership with a
Bluetooth hands-free device, you can
communicate with that device whenever it
is turned on and within range. Bluetooth
range is up to 30 feet in optimum
environmental conditions. Performance
and range may be reduced by physical
obstacles, radio interference from nearby
electronic equipment, and other factors.
If you hear a headset buzz or experience
poor microphone performance, your headset
may be incompatible with your Treo 680.
TIP
3 (Optional) Enter a device name that
identifies your Treo 680 when it is
discovered by other Bluetooth devices.
NOTE Use the same device name for all
BEFORE YOU BEGIN Prepare your
hands-free device to accept a connection
66
your Bluetooth connections. If you change
the device name, you need to recreate any
partnerships you already created.
4 Select Setup Devices.
5 Select Hands-free Setup.
the more difficult it is for the passkey to be
deciphered.
3
CHAPTER
YOUR PHONE
7 After you finish setting up the device,
select Done to return to Trusted
Devices View.
NOTE For some car kits, you need to
6 Follow the onscreen instructions to
create a partnership with the specific
hands-free device. When prompted,
enter a passkey.
IMPORTANT Some hands-free devices
have a predefined passkey; if so, you can
find the passkey in the documentation for
that device. Other devices provide a screen
where you enter a passkey that you make
up. In either case, you must use the same
passkey on both your smartphone and your
hands-free device. We recommend that
where possible, you make up a passkey of
16 alphanumeric characters (letters and
numerals only) to improve the security of
your smartphone. The longer the passkey,
initiate a Bluetooth connection from your
smartphone to complete the partnership
process. To do this, highlight the car kit in
Trusted Devices View, press Menu
,
and then select Connect.
8 (Optional) Enable advanced hands-free
features by pressing the multifunction
button (MFB) on the hands-free device.
You can tell the connection is successful
when you see a light blue headset icon in
the title bar of the Phone application. You
can now use your Treo 680 with the
Bluetooth hands-free device.
Using a Bluetooth hands-free device
After you create a partnership with your
Bluetooth hands-free device and you turn it
on within range (up to 30 feet), the Treo
automatically routes all calls to the
hands-free device instead of to the
67
CHAPTER
3
YOUR PHONE
earpiece on your Treo. When a call comes
in, your smartphone rings and the
hands-free device beeps. Even if you
answer the call on your Treo, the call goes
to the hands-free device. If you prefer to
route calls to the earpiece on your Treo,
you can change the settings on your
smartphone to do this; see Customizing
advanced settings for your hands-free
device for details.
If you’re using a Bluetooth hands-free
device and you want to return to the earpiece
or a wired headset during a call, select Cancel
Bluetooth in Active Call View. To return the
call to the hands-free device, open the
Options menu and select Connect
Bluetooth.
TIP
The features of your hands-free device vary
by model. Check the documentation for
your hands-free device for details about
these features. Your Treo 680 can support
the following actions, provided that your
hands-free device also supports them:
68
•
Answer an incoming call
•
Hang up a call and answer a call-waiting
call
•
Place a call on hold and answer a
call-waiting call
•
Hang up a single call
•
Transfer an outgoing call from the
earpiece on your Treo to the hands-free
device
•
Ignore an incoming call
•
Redial the last number you called from
the hands-free device
If you have more than one
Bluetooth hands-free device, the last one you
connected to becomes the active device. To
switch between devices, turn off the active
device before you try to connect to the other
device.
DID YOU KNOW?
Customizing advanced settings for your
hands-free device
You can set whether your hands-free
device automatically answer calls, provided
the device supports this feature.
1 Press Applications
Prefs
.
2 Select Hands-free.
and select
3 Do one of the following:
To send all calls to your hands-free
device: Check the Always route calls
to handsfree box. Select the Auto
answer pick list and select whether you
want your hands-free device to
automatically answer incoming calls and
how quickly it answers.
To choose between the earpiece on
your Treo and your hands-free device
on a call-by-call basis: Uncheck the
Always route calls to handsfree box.
When the phone rings, you can answer
the call with your hands-free device by
pressing the multifunction button on
your hands-free device, or you can
answer the call with the earpiece on
your Treo by using the controls on your
smartphone (see Receiving calls).
4 Select Done.
Customizing phone
settings
3
CHAPTER
YOUR PHONE
You can download any
compatible ringtone directly to your
smartphone (see Downloading files from a
web page). You can also download ringtones
to your computer and then email them to your
smartphone.
DID YOU KNOW?
Selecting ringtones
You can set various tones for various types
of incoming calls.
1 Press Phone
2 Press Menu
.
.
3 Select Options, and then select Sound
Preferences.
4 Select the Application pick list and
select Ring Tones.
69
YOUR PHONE
CHAPTER
3
Roaming: A special tone for incoming
calls when you’re outside your home
mobile network. This tone overrides all
other ringtones, unless you select No
Sound.
9 Select Done.
You can assign a ringtone to a
contact or an entire category of contacts.
DID YOU KNOW?
5 Select the Volume pick list and select
the volume level.
6 Select the Vibrate pick list and select
when you want your smartphone to
vibrate for an incoming call.
7 (Optional) Check the Escalate ring
tone volume box if you want the ring to
play softly and then increase to full
volume the longer it rings.
8 Select a ringtone from the pick list to
identify each of the following:
Known Caller: An incoming call from
someone in your Contacts or Favorites.
Unknown Caller: An incoming call from
someone identified by caller ID who is
not in your Contacts or Favorites. This
includes callers that have blocked their
caller ID.
70
Creating and managing ringtones
You can also record sounds and use them
as ringtones.
1 Press Phone
2 Press Menu
.
.
3 Select Options, and then select Sound
Preferences.
4 Select Manage.
5 Do one of the following:
•
To record a sound, select New.
•
To play a sound, select it with the
5-way
.
•
To delete a sound, highlight it and
press Backspace
.
•
To send a sound, highlight it and
select Send.
6 Select Done twice.
You can also create a new sound by
selecting New in Sound & Alerts Preferences.
TIP
6 Select the Vibrate pick list and select
when you want your smartphone to
vibrate for a phone alert.
7 Select an alert tone from the pick list for
each of the following:
Selecting Phone alert tones
Voicemail Alert: Plays when you have
new voicemail.
You can set various tones for various types
of alerts.
1 Press Phone
2 Press Menu
Coverage in/out: Plays when you move
into or out of a coverage area.
.
.
3 Select Options, and then select Sound
Preferences.
4 Select the Application pick list and
select Phone Alerts.
3
CHAPTER
YOUR PHONE
8 Select Done.
Adjusting call volume
While a call is in progress, press the
Volume button on the side of your Treo to
adjust the call volume.
•
To increase the volume, press the upper
half of the Volume button.
•
To decrease the volume, press the
lower half of the Volume button.
5 Select the Volume pick list and select
the volume level.
71
YOUR PHONE
CHAPTER
3
1 Press Phone
2 Press Menu
.
.
3 Select Options, and then select Call
Barring.
Volume
Side button
4 Select the Outgoing and Incoming pick
lists, and then select the type of calls
you want to prevent.
5 Select OK.
Adjusting ringer volume
When a call is not in progress and music is
not playing, press the Volume button on
the side of your Treo to adjust ringer
volume, and then press the Side button to
confirm your selection.
Barring calls
Call Barring lets you prevent unauthorized
calls on your smartphone. You must enter
your Call Barring password every time you
change your Call Barring preferences.
Contact your wireless service provider if
you do not know this password or if you
need more information.
Call barring may not be available in some
areas.
TIP
72
Customizing the Main tab in the Phone
application
Phone Display Options let you customize
the appearance and entry mode of the
Main tab in the Phone application.
1 Press Phone
2 Press Menu
.
.
3 Select Options, and then select Phone
Display Options.
4 Set any of the following options:
Wallpaper: Sets the wallpaper that
appears on the Main tab in the Phone
application. To change the wallpaper,
select the thumbnail image and then
select an image to use as wallpaper.
3
CHAPTER
YOUR PHONE
DID YOU KNOW? You can also set the
background for Calendar Agenda View. See
Customizing display options for your calendar
for details.
Fade: Adjusts the intensity level of the
wallpaper image.
Typing…: Sets whether typing in the
Main tab in the Phone app displays the
Dial Pad and enters numbers you want
to dial, or whether it displays the
Contacts tab and starts a contacts
search.
If you select the Typing starts contacts
search option, you can still enter a phone
number from the Main tab in the Phone app
by pressing Option followed by the number.
TIP
5 Select OK.
Setting your dialing preferences
Dialing preferences let you assign a prefix
to your phone numbers. For example, you
can automatically dial a 1 before all 10-digit
phone numbers. You can add a different
prefix based on the length of the phone
number.
1 Press Phone
Show Calendar event: Sets whether
the current event from the Calendar
application appears in the Main tab in
the Phone app. When this option is
enabled, you can then select this event
to jump to the Calendar app.
Default View: Sets the tab that appears
when you press Phone
.
2 Press Menu
.
.
3 Select Options, and then select Dial
Preferences.
4 Set any of the following options:
Dialing from North America: Formats
phone numbers using North American
conventions (XXX-XXX-XXXX).
73
CHAPTER
3
YOUR PHONE
Always dial +1 in front of the area
code: Adds a 1 in front of 10-digit phone
numbers. This option is available only
when Dialing from North America is
enabled.
Manually selecting the wireless network
You may be able to search for other
wireless network services in your current
location.
1 Press Phone
To 7 digit numbers: Adds a prefix to
7-digit numbers. For example, enter
your own area code to automatically add
your area code when you dial local
numbers.
To (6), (5), (4), digit numbers: Adds a
prefix to numbers with the specified
number of digits. For example, if all the
phone numbers in your office have the
408 area code and a 555 exchange,
followed by a 4-digit extension, select 4
and enter the prefix 408555. To call a
colleague, simply dial your colleague’s
4-digit extension; your smartphone
automatically dials the rest and makes
the call. You can also create contact
entries with just the extension number
and then dial the number from your
Contacts list.
5 Select OK.
74
2 Press Menu
.
.
3 Select Select Network from the
Options menu.
4 Select another network, if available.
5 Select OK.
Using TTY
A TTY (also known as TDD or text
telephone) is a telecommunications device
that allows people who are deaf or hard of
hearing, or who have speech or language
disabilities, to communicate by telephone.
Your Treo 680 is compatible with select
TTY devices. You can connect a TTY/TDD
machine to your smartphone through the
headset jack, but you cannot use your
headset jack with a headset while this
mode is enabled. Please check with the
manufacturer of your TTY device for
connectivity information and to ensure that
the TTY device supports digital wireless
transmission.
What are all those
icons?
3
CHAPTER
YOUR PHONE
You can monitor the status of several items
using icons in the title bar in the Phone
application:
To use TTY, you may need to make
additional arrangements with your wireless
service provider. Please contact your
wireless service provider’s customer
service department for more information.
1 Press Phone
.
2 Select the Dial Pad
tab.
3 Enter #*TTY.
4 Press Send
.
5 When a message appears indicating
that TTY is enabled, select OK. To
disable TTY, repeat these steps.
TIP A red T appears at the top of the Phone
screen to indicate that TTY is enabled.
75
CHAPTER
3
YOUR PHONE
0
Your phone is on and you are in
your wireless service provider’s
coverage area. If you are outside
a coverage area, No Service or
No Service—SOS Only appears
instead. No Service means that
there is no coverage at all and
No Service—SOS Only means
that you can call only
emergency numbers, such as
112. When you turn off your
phone, Phone Off appears.
Call forwarding is active.
Your phone is on. The bars
display the signal strength. The
stronger the signal, the more
bars that appear. If you are
outside a coverage area, no bars
appear.
Your phone is on and a GPRS or
EDGE network is within range,
but you are not actively
transmitting data. You can still
make and receive calls.
Your phone is on and a GPRS or
EDGE data connection is active.
76
You have new voicemail
messages. You can select this
icon to retrieve your messages.
If you have alternate line service
(ALS), the left side is shaded
when you have voicemail on
line 1, and the right side is
shaded when you have
voicemail on line 2.
You have a new alert, such as a
Calendar alarm or a new text
message. To view the alert,
press and hold Center
or
select the icon. See Viewing
and using the alerts.
The Bluetooth wireless
technology icon appears in gray
when this feature is off, in blue
when this feature is on, and in
reverse blue when your
smartphone is communicating
with another Bluetooth device.
This icon replaces the Bluetooth
icon when your smartphone is
connected to a Bluetooth
hands-free device. This icon
appears in dark blue when a call
is in progress and in light blue
when a call is not in progress.
This icon replaces the Bluetooth
icon when your smartphone is
connected to your computer
using a dial-up networking
(DUN) connection.
Your battery is partially drained.
When the battery drains to 20%
of its capacity, the icon changes
from blue to red. At 10% of its
capacity, you begin to receive
warning messages, and at 5%
of its capacity, the smartphone
beeps (if the Ringer switch is in
the Sound On position) and the
icon changes from red to clear.
Your battery is fully charged and
your smartphone is not
connected to the charger.
3
CHAPTER
YOUR PHONE
You have new text or
multimedia messages. The
number next to the icon
indicates the number of unread
messages in your Inbox. You
can select this icon to retrieve
your messages.
You have new email messages.
The number next to the icon
indicates the number of unread
messages in your Inbox. If you
set up multiple email accounts
on your smartphone, this
number reflects only the
account that you most recently
accessed. You can select this
icon to retrieve your messages.
Your battery is being charged.
The lightning bolt turns from red
to green when the battery is
fully charged and your
smartphone remains connected
to the charger.
77
CHAPTER
3
YOUR PHONE
KEY TERM GPRS (General Packet Radio
Service) A mobile connectivity technology
that provides persistent data connections.
(Additional charges may apply.)
EDGE (Enhanced Data rate for GSM
Evolution) An enhanced version of GPRS
that delivers data speeds that are up to three
times faster than standard GPRS connections.
(Additional charges may apply.)
KEY TERM
DID YOU KNOW? You can tap the Bluetooth
icon to quickly turn Bluetooth wireless
features on and off.
To display the remaining battery power,
tap the battery icon at the top of the screen.
TIP
78
C H A PT ER
4
Your email and other
messages
You already know how efficient email and messaging are for
staying in touch. Now your Palm® Treo™ 680 smartphone brings
you a new level of convenience: email on the go. Enjoy the
ease and speed of communicating with friends, family, and
colleagues anywhere you can access your wireless service
provider’s data network.
You can send photos to your friends and family, or create
Microsoft Word or Excel files and send them to your
colleagues. You can also receive attachments to view and edit
at your convenience.
Benefits
•
Access email on the go
•
Send and receive photos, sound
files, Word and Excel files, and
more
•
Save messages from your
computer to view at a convenient
time
In this chapter
Which email application should I use? . . . . . . . . . . . . . . . . . . . . . . . 81
The VersaMail application. . . . . . . . . . . . . . . . . . . . . . . . . . . . . . . . . 81
Messaging . . . . . . . . . . . . . . . . . . . . . . . . . . . . . . . . . . . . . . . . . . . . 95
Which email
application should I
use?
Your Treo 680 includes the VersaMail®
application (called Email in Applications
View), which you can use to access your
corporate, personal, and fee-based Internet
email. You can also access web-based
email, like Yahoo! Mail or Hotmail, from the
web browser on your Treo.
An email application is not an email
provider. An email application just transfers
messages from an account that you have
already set up with a provider.
TIP
Email provider The service you
use to send and receive email. Your email
provider’s name appears between the @
symbol and the dot in your email address.
KEY TERM
NOTE You must activate data services on
your your wireless service provider account
before you can use email on your
smartphone.
The VersaMail
application
4
CHAPTER
YOUR EMAIL AND OTHER MESSAGES
Before you can use VersaMail, you need to
enter your email account settings. If you
have multiple email accounts, you must
enter settings for each email account.
After you enter your email account
settings, see the User Guide for the
VersaMail Application on your computer for
info on sending and receiving messages
and customizing your VersaMail settings.
Windows: Start>Programs>Palm
Mac: Insert the Palm Installation CD and
click the link to the User Guide for the
VersaMail Application in the
Documentation folder.
How do I get started?
1 If either of the following is true, read the
User Guide for the VersaMail
Application on your computer:
•
You used the VersaMail application on
your previous Palm OS® device, and
81
YOUR EMAIL AND OTHER MESSAGES
CHAPTER
4
you want to transfer those settings to
your smartphone.
•
You plan to use VersaMail to access
an email account on a Microsoft
Exchange ActiveSync server, a Lotus
Notes server, or a Microsoft MAPI
server.
2 If your email provider is listed in the
following table, then skip to Setting up
VersaMail to work with common
providers.
Hong Kong: 1O1O, 3-DUALBAND-,
Netvigator (IMS), and One2Free.
Ireland: o2 Ireland and Vodafone
Ireland.
Italy: interfree, kataweb, libero, Tim,
tin.It, and Tiscali.
Australia: Bigpond Mail and OptusNet.
Malaysia: Jaring and Maxis Net.
Belgium: Scarlet, Skynet, Swing, and
Tiscali Belgium.
Mexico: Mensaje Telcel and yahoo!.
Brazil: UOL.
Netherlands: @Home, Chello, Het Net,
Planet Internet, Tiscali, Wanadoo,
XS4ALL, and Zonnet.
Canada: Rogers High Speed and
Sympatico.
New Zealand: Vodafone NZ.
Denmark: Cybercity, Sonofon, TDC, and
Tiscali.
Norway: Telenor and Netcom.
Finland: TeliaSonera.
Philippines: GlobeQuest and Pacific
Internet - PH.
France: 9 Telecom, Cegetel,
Club-Internet, Free, Freesurf, La Poste,
Noos, Orange, SFR.net, Tele2, Tiscali,
Wanadoo, and yahoo!.
82
Germany: debitel E-Mail, E-Plus imail,
Freenet Email-Office, GMX eMail,
T-online eMail, Vodafone eMail, and
Web.de E-Mail.
Singapore: Pacific Internet, Singnet,
and StarHub.
Spain: Movistar, Telefonica, Terra.es,
Vodafone, and Wanadoo.
Sweden: Bredbandsbolaget, Chello,
Com Hem, Tele2, TeliaSonera Mail,
Vodafone Euromail, and yahoo!.
Switzerland: Bluewin, GMX, green.ch,
Orange, Sunrise (my), Sunrise Freesurf,
SwissOnline, Tiscali, and yahoo!.
Setting up VersaMail to work with other
providers:
•
Mail protocol: POP or IMAP
•
Incoming and outgoing mail server
names, such as mail.myisp.com
•
Incoming and outgoing mail server
port numbers, such as 110 (incoming
POP), 143 (incoming IMAP), or 25
(outgoing POP or IMAP)
•
(If necessary) Security settings: APOP,
ESMTP, SSL
Taiwan: HiNet Umail.
Thailand: AIS Mail.
United Kingdom: Blueyonder, BT
Internet, BT Openworld, BT Yahoo!,
Clara.net, Demon, Freeserve, Lycos,
NTL, O2, Orange, Pipex, Tiscali, UK
Online, Virgin, Vodafone, Wanadoo, and
yahoo!.
United States: AOL, Apple.Mac, AT&T
Worldnet, Bell South, Cablevision,
Charter, Comcast, CompuServe,
EarthLink, Gmail, Mail.com, NetZero,
Speakeasy, Verizon DSL, and Yahoo!.
3 If your email provider’s name is not
listed, then you need to obtain the
following info from your system
administrator or ISP, and then skip to
4
CHAPTER
YOUR EMAIL AND OTHER MESSAGES
Setting up VersaMail to work with
common providers
1 Press Applications
and select
Email
to open the VersaMail
application.
2 If prompted to select an initial setup
option, select Continue.
3 Make up a name that describes this
account and enter it in the Account
Name field. For example, Work Email.
4 Select the Mail Service pick list, and
then select your email provider, such as
EarthLink, and then select Next.
83
YOUR EMAIL AND OTHER MESSAGES
CHAPTER
4
Setting up VersaMail to work with other
providers
1 Press Applications
and select
Email
to open the VersaMail
application.
2 If prompted to select an initial setup
option, then select Continue.
5 Enter the username for your email
account. Your username usually appears
before the @ symbol in your email
address.
NOTE For some email providers, such as
Gmail, your username is your entire email
address. Check with your email provider if
you are not sure what to enter as your
username.
6 Select the Password box, enter your
email account password, select OK, and
then select Next.
7 Select Next, and then select Done.
To enter settings for another email
account, open the Accounts menu and select
Account Setup.
TIP
84
3 Make up a name that describes this
account and enter it in the Account
Name field. For example, Work Email.
4 Select the Mail Service pick list, and
then select Other.
5 Select the Protocol pick list, select POP
or IMAP (based on the info you got from
your system administrator or ISP), and
then select Next.
6 Enter the username for your email
account. Your username usually appears
before the @ symbol in your email
address.
NOTE For some email providers, such as
Gmail, your username is your entire email
address. Check with your email provider if
you are not sure what to enter as your
username.
Creating and sending messages
4
CHAPTER
YOUR EMAIL AND OTHER MESSAGES
1 From the Inbox, select New.
2 Begin entering one of the following for
the addressee:
•
Email address
•
First name
•
Last name
If you enter address info that matches one
or more of your contacts, VersaMail displays
the matching contacts. To accept a
suggestion, select the correct contact. To
send to a different address, keep entering the
email address or name.
TIP
7 Select the Password box, enter your
email account password, select OK, and
then select Next.
8 Enter your email address and the
names of the incoming and outgoing
mail servers, and then select Next.
9 If your system administrator or ISP
provided port numbers or security
settings, select Advanced, and then
enter those settings.
3 Enter the subject and message text.
To move between fields, press Up or
Down on the 5-way.
TIP
4 Select one of the following:
You can also select Advanced to set more
options for incoming and outgoing messages.
TIP
10 Select Done.
Send: Connects and sends all
messages immediately. If the message
cannot be sent for any reason, the
message is stored in your Outbox.
Outbox: Puts the message in the
Outbox to send later.
85
YOUR EMAIL AND OTHER MESSAGES
CHAPTER
4
Drafts: Saves the message so you can
continue working on it at another time.
Attaching photos and videos
1 Create the message to which you want
to attach the photo or video.
2 On the New Message screen, select
the red paper clip
icon in the
upper-right corner.
3 From the Type pick list, select Photo/
Video.
DID YOU KNOW? VersaMail makes up to five
attempts to send a message; if it is still not
successful, an alert message appears and you
must try to manually send the message again.
Adding attachments to your messages
You can attach several types of files to your
email messages.
.
To remove an attachment, select the file in
the Attachments box, and then select
Delete.
TIP
4 On the Select Media screen, select the
Album pick list to go to the album
containing the photo or video you want,
and then check the box to the left of the
photo or video.
5 Select Done.
.
TIP To attach more than one file to a message,
repeat steps 3 and 4.
86
Attaching ringtones
1 Create the message to which you want
to attach the ringtone.
2 On the New Message screen, select
the red paper clip
icon in the
upper-right corner.
3 From the Type pick list, select Sounds.
Ringtones that are copy-protected appear
in the Sounds application with a lock icon. You
can use these ringtones on your phone, but
you cannot send them as attachments.
TIP
4 Select the ringtone you want, and then
select Insert.
5 Select Done.
Attaching Word, Excel, PowerPoint, and
PDF files
1 Create the message to which you want
to attach the file.
2 On the New Message screen, select
the red paper clip
icon in the
upper-right corner.
3 From the Type pick list, select
Documents.
4
CHAPTER
YOUR EMAIL AND OTHER MESSAGES
4 Select the file you want on the
Documents screen.
5 Select Done.
Attaching other types of files
1 Create the message to which you want
to attach the item.
2 On the New Message screen, select
the red paper clip
icon in the
upper-right corner.
3 From the Type pick list, select the type
of file to attach—for example, Address,
Appointment, or Memo/Text.
4 Select the item you want from the list in
the Type box.
5 Select Done.
Receiving and viewing messages
1 From any mailbox, select Get or Get &
Send.
2 From the Inbox, select the message you
want to view.
87
YOUR EMAIL AND OTHER MESSAGES
CHAPTER
4
Replying to or forwarding messages
When you respond to messages, you can
select whether to include the original text
(see Customizing your email settings).
The VersaMail application
sends all messages as plain text only, with all
HTML tags stripped, even if you are
forwarding or replying to a message that was
originally received as HTML.
DID YOU KNOW?
1 From the Inbox or another folder, open
the message you want to respond to.
2 In Message View, select Reply. Select
whether to reply to just the sender or to
reply to both the sender and all
addressees on the message.
3 Enter your reply.
3 If a large incoming message is
truncated, select More
.
When viewing a message, tap the scroll
arrows at the top of the screen to view the
previous or next message.
TIP
4 Select Done.
88
4 Select Send.
TIP You can also tap the folder icon to the left
of the attachment name to open a menu of
tasks you can do with the attachment,
including View, Install, or Unzip, depending on
the attachment file type; Save to card to save
the attachment to an expansion card; or select
Viewer to select the application you want to
use to view the attachment.
Viewing attachments
You can also tap the folder icon to the left
of the attachment name to open a menu of
tasks you can do with the attachment,
including View, Install, or Unzip, depending on
the attachment file type; Save to card to save
the attachment to an expansion card; or select
Viewer to select the application you want to
use to view the attachment.
TIP
There are a number of attachment types
you can open with the built-in software
on your smartphone (for example,
Microsoft Word, Excel, PowerPoint, and
PDF files; ringtones; and photos).
1 From any folder, open the message with
the attachment you want to view.
Messages with downloaded
attachments appear with a paper clip
icon to the left of the message icon.
If an attachment is not downloaded
because it is larger than your maximum
message size, the paper clip icon does not
appear, and the attachment does not display
at the bottom of the message screen. Select
More to download and display any
attachments.
TIP
2 Tap the attachment name at the bottom
of the message screen to view it in the
default viewer on your smartphone.
4
CHAPTER
YOUR EMAIL AND OTHER MESSAGES
3 When you finish with the attachment,
select Done to return to the
Attachments dialog box.
NOTE If there is no Done button, press
Applications
and select Email to
return to the account’s Inbox.
Managing your messages
The status icons that appear near the
messages in your Inbox indicate the
following:
0
The message is unread when the
subject appears in bold.
The message includes an
attachment.
89
YOUR EMAIL AND OTHER MESSAGES
CHAPTER
4
The message includes a meeting
invitation.
This message has high priority.
You can rearrange the message list to
make it easier to find and view messages.
•
•
In the Inbox, select Sort, and then
select one of the following: Sort by
Date, Sort by Name, Sort by Subject.
To quickly switch between folders in list
view, select the folder pick list at the
top of the screen and select the desired
folder.
Deleting selected messages from the
Inbox
When you delete a message from the
Inbox, it moves to the Trash folder.
1 Select the bullet next to the icon of each
message that you want to delete. To
select adjacent messages, drag the
stylus so it touches the bullet to the left
of each message. Lift the stylus and
drag again to select more adjacent
messages.
90
2 Press Menu
.
3 Select Delete on the Message menu.
4 If a confirmation dialog box appears,
select OK to confirm deletion.
TIP To delete a single message, select the
envelope icon next to the message, and then
select Delete from the list.
Deleting messages by date
You can quickly delete a group of
messages by selecting a range of dates.
1 Press Menu
.
2 Select Delete Old on the Message
menu.
3 Select the folder and a date range for
the messages you want to delete.
4 Select OK.
5 If a confirmation dialog box appears,
select OK to confirm deletion.
TIP To empty (or purge) the Trash folder, open
the Message menu and select Empty Trash.
Switching accounts
If you create more than one email account
in VersaMail, you need to switch from
account to account to get, send, and
otherwise manage the messages in each
account.
1 Press Menu
.
2 Select Accounts, and then select an
account.
DID YOU KNOW? If you assigned VersaMail to a
quick button, you can press that button
repeatedly to switch between your different
email accounts.
Customizing your email settings
You can customize the VersaMail settings
for each individual email account on your
Treo. The preferences you set apply only to
the email account you are currently
viewing. If you have multiple accounts,
configure each account separately.
You can set up a schedule to automatically
retrieve email messages; set preferences
for how and when messages are retrieved;
add a signature to an outgoing message;
and more. For complete information on all
of the email settings you can customize,
see the User Guide for the VersaMail
Application on your computer.
4
CHAPTER
YOUR EMAIL AND OTHER MESSAGES
Windows: Start>Programs>Palm
Mac: Insert the Palm Installation CD and
click the link to the User Guide for the
VersaMail Application in the
Documentation folder.
Scheduling Auto Sync
You can set up VersaMail to automatically
download new email messages to your
smartphone with the Auto Sync feature.
You need to set up a separate Auto Sync
schedule for each email account. This feature
may not work with email accounts that require
VPN connection.
TIP
1 Press Menu
.
2 Select Options, and then select
Preferences.
91
CHAPTER
4
YOUR EMAIL AND OTHER MESSAGES
3 Select Auto Sync.
TIP After you set up a scheduled Auto Sync
and select Get Mail, from then on, only new
messages are retrieved during Auto Sync.
Selecting alert tones
When you schedule Auto Sync for a given
account, you can choose a sound—such as
a bird, a phone, or an alarm—to let you
know when new email arrives.
4 Check the Auto-sync box.
5 Select the Every pick list and select the
time interval, from 5 minutes to
12 hours.
NOTE If you set a more frequent interval,
you may need to recharge your Treo battery
more often.
6 Select the Start Time and End Time
boxes, and then select the hour, the
minute, and AM or PM to enter the time
for the first and last Auto Sync to take
place. Select OK.
92
1 From any mailbox screen, press
Menu
.
2 Select Options, and then select
Preferences.
3 Select Alerts.
4 Check the Alert me of new mail box.
TIP To receive notifications of successful Auto
Sync retrievals only, uncheck the Alert me of
auto sync failures box. Leave the box
checked if you want to receive notifications of
both successful and failed Auto Sync
retrievals.
7 Select the days you want the schedule
to be active. You can choose any
number of days, but you can set up only
one schedule for each email account.
5 Select the Alert Sound pick list, and
then select a sound. Your Treo plays a
brief demo of the sound.
8 Select OK, and then select Get Mail.
6 Select OK.
Setting preferences for getting messages
1 From any mailbox screen, press
Menu
.
2 Select Options, and then select
Preferences.
3 Select Incoming.
Unread messages (IMAP accounts
only): Downloads only unread mail to
your smartphone. If you don’t check this
box and you select Get & Send, all the
messages on your mail server are
downloaded to your Inbox, including
messages you’ve read.
4
CHAPTER
YOUR EMAIL AND OTHER MESSAGES
The POP protocol does not support
retrieval of unread mail only from the server. If
you have a POP email account, VersaMail
downloads all messages regardless of
whether you have read them, and regardless
of whether the Unread messages box is
checked.
TIP
4 Set any of the following preferences,
and then select OK.
Get: Indicates whether to get message
subjects only or entire messages.
Ask Every Time: Indicates if you want
to see a dialog box for selecting
subjects only or entire messages each
time you retrieve email. If the box is
unchecked, messages are retrieved
according to the option you select in the
Get pick list.
Mail from last: Gets messages sent
within the number of days you specify.
Download attachments: Automatically
downloads files attached to email,
except for attachments that exceed the
maximum message size.
Maximum message size: Sets the
maximum size of an incoming email
message. Enter the size in kilobytes
(KB). The default is 5KB, but you can
enter any size up to 2048KB
[approximately 2 megabytes (MB)],
93
CHAPTER
4
YOUR EMAIL AND OTHER MESSAGES
including attachments. The maximum
message size that you can retrieve is
60KB for the body text and
approximately 5MB of total data for any
attachments.
Message Format: Sets the format for
messages you retrieve.
•
HTML: Displays messages sent in
HTML format with basic formatting
intact and displays other messages as
plain text.
•
Text: Displays all messages as plain
text, regardless of the format in which
they were sent.
Attaching a signature to a message
You can attach a personal signature, with
info like your company’s address and
phone numbers, to the bottom of all
messages you send.
1 From any mailbox screen, press
Menu
.
2 Select Options, and then select
Preferences.
3 Select Signature.
94
4 Check the Attach Signature box.
5 Enter your signature information, and
then select OK.
Working with Microsoft Exchange
ActiveSync
Microsoft Exchange ActiveSync works with
the VersaMail, Calendar, and Contacts apps
on your smartphone to directly access
corporate groupware information on a
Microsoft Exchange 2003 server. You can
synchronize business email, calendar, and
contact info with the Exchange 2003
server from your smartphone without
using a desktop computer.
When you create a Microsoft Exchange
ActiveSync account in the VersaMail
application, your email, calendar, and
contact info sync directly with the
Exchange Server; information does not
sync with the desktop software application
on your computer, such as Microsoft
Outlook or Palm Desktop software. Other
information that is stored on your
computer, such as tasks and memos,
continues to synchronize with your desktop
software.
For complete info on using a Microsoft
Exchange ActiveSync account, see the
User Guide for the VersaMail Application
on your computer.
Windows: Start > Programs > Palm
Mac: Insert the Palm Installation CD and
click the link to the User Guide for the
VersaMail Application in the
Documentation folder.
Messaging
Creating and sending a text message
4
CHAPTER
YOUR EMAIL AND OTHER MESSAGES
Each text message can have up to
160 characters. Messages with more than
160 characters are automatically split into
several messages. (If you send a text
message to an email address, the email
address is deducted from the
160-character count.)
You can page someone to call
you by sending them a blank text message.
DID YOU KNOW?
1 Press Messaging
.
2 Select New.
You can use the Messaging application to
exchange brief text messages (SMS) and
multimedia messages (MMS) with other
devices and email addresses that support
these forms of messaging. Before you use
your Treo to send or receive messages,
refer to your service plan for pricing and
availability of messaging services.
DID YOU KNOW? You can address messages to
multiple recipients by separating the
addresses with a comma. If you address a
single message to three people, you will be
billed for three messages.
3 Select the To field to address the
message:
•
Press Center
. If the recipient’s
name appears in the list of recent
addresses, select it from the list.
•
If the recipient is in your Contacts list,
enter the first initial and last name (no
spaces), and then select the
recipient’s phone number or email
address, depending on where you
want to send the message.
95
CHAPTER
4
YOUR EMAIL AND OTHER MESSAGES
•
If the recipient’s name isn’t in the list
of recent addresses or your Contacts
list, enter the phone number or email
address.
If you see numbers when you expect to
see letters (or the other way around), you
need to turn Option Lock on by pressing
Option twice or turn it off by pressing Option
once.
TIP
5 Select Send.
NOTE Sending text messages to land line
TIP Select Save as Draft to save a draft of the
message without sending it. To access the
draft, select the category pick list at the top of
the screen and select Drafts.
phones may not be supported.
4 Enter your message or select
QuickText
to insert predefined
phrases. To insert emoticons, select
.
To add a new QuickText phrase, select
Edit QuickText from the list.
TIP
Creating and sending a multimedia
message
Slide A collection of text, pictures,
videos, and sounds that are grouped together
within a multimedia message. During
playback, all the items within a particular slide
appear on the same screen. If a multimedia
message contains multiple slides, each slide
can be viewed separately during playback.
KEY TERM
NOTE Some symbols can’t be used in text
messages. The Messaging application
automatically replaces invalid characters.
96
Multimedia messages consist of text,
photos, videos, and sounds presented as
one or more slides.You can include any of
the following items:
•
If the recipient’s name is not in the list
of recent addresses or your Contacts
list, enter the phone number or email
address.
4
CHAPTER
YOUR EMAIL AND OTHER MESSAGES
5 Enter a subject.
0
Item
Supported File Types
Pictures
JPEG, GIF, WBMP
Videos
MPEG4, 3GGP, 3GPP2
Ringtones
MIDI
Sound clips
AMR, QCELP
1 Press Messaging
.
2 Select New.
3 Select Add Media.
4 Select the To field to address the
message with up to 25 addresses:
•
Press Center
. If the recipient’s
name appears in the list of recent
addresses, select it from the list.
•
If the recipient is in your Contacts list,
enter the first initial and last name (no
spaces), and then select the
recipient’s phone number or email
address.
6 Select the image placeholder, and then
select one of the following:
Attach image: Insert one photo or
video from your smartphone or an
expansion card.
Take new picture: Take a picture with
the built-in camera and add it to the
message.
Take new video: Capture a short video
with the built-in camcorder and add it to
the message.
97
CHAPTER
4
YOUR EMAIL AND OTHER MESSAGES
When creating a message, you can
preview or delete an item. Highlight the item,
press Center on the 5-way, and then select
Remove, View, or Play.
7 (Optional) Select Sound , and then
select one of the following:
Record new: Record a sound clip of up
to 1 minute.
Attach voice memo: Select a memo
you recorded in the Voice Memo
application.
Attach ringtone: Select a ringtone.
8 Enter a text message or caption.
9 Select Add slide to insert additional
slides.
10 (Optional) Select Preview to view the
message as the recipient will see it.
98
You can send a contact or
calendar entry. Select the entry, open the
Record menu, select Send, and then select
Messaging.
DID YOU KNOW?
TIP
Receiving messages
When your phone is turned on and is in an
area of wireless coverage, you
automatically receive new text messages.
For multimedia messages, you can set
your smartphone to automatically
download new messages or to notify you
that a message is ready to be downloaded
(see Customizing your Messaging
settings). You can also configure how your
smartphone notifies you when a new
message arrives (see Selecting Messaging
alert tones).
The new message alert may include any of
the following buttons:
11 (Optional) Press Menu
, and then
select High Priority from the Compose
menu to mark the message as urgent.
•
OK: Dismisses the alert and places the
message in your Inbox.
12 Select Send.
•
Reply: Opens Chat View, where you
can reply with a text message. To send
an MMS reply, select Add from Chat
View.
•
Call Back: Dials the sender’s phone
number.
•
Go To Msg: Opens the message so you
can view its full contents.
•
Delete: Moves the message from your
Inbox to the Deleted folder.
4
CHAPTER
YOUR EMAIL AND OTHER MESSAGES
Using links in messages
When you receive a text message that
contains a telephone number, email
address, or URL, you can dial the number,
send an email message, or go to the web
page immediately.
1 Press Messaging
.
2 Select the message that contains the
link you want to use.
3 Select the phone number, email
address, or URL (appears as underlined
blue text).
Your Treo automatically launches the
appropriate application from the link.
When you receive a message, you can
also press Send to call the sender.
TIP
If you have multiple alerts, the Alert dialog
box displays all your pending alerts. Select an
item’s description to jump to that item, or
check the box to clear that item. To view all
your pending alerts from any screen on your
smartphone, press and hold Center on the
5-way.
TIP
Viewing/playing a multimedia message
1 Press Messaging
.
2 Select the message you want to view.
3 If there are sounds or multiple slides,
playback begins immediately.
4 Do any of the following:
•
Use the onscreen controls to scroll to
other slides and messages.
99
YOUR EMAIL AND OTHER MESSAGES
CHAPTER
4
•
100
To save a sound, press Menu
, and
select Save Sound from the
Message menu. You can access
saved sounds later by pressing
Applications
and selecting
Sounds
or Voice Memo
.
•
To save a picture, press Menu
,
and select Save Picture from the
Message menu. You can access
saved pictures later by pressing
Applications
and selecting
Pics&Videos
.
•
To copy the text, use the stylus to
highlight the text, then press Menu
, select Edit, and then select
Copy.
•
To stop playback of a message, select
Play/Stop.
•
To view message details, press Menu
and select Message Details from
the Message menu.
•
To save a calendar or contact entry,
open the message details. You can
access saved entries later by pressing
Applications
and selecting
Calendar
or Contacts
(depending on the type of entry you
saved).
5 Select OK.
Arranging your messages
You can rearrange the messages in any
folder by using the Sort command.
1 Press Messaging
.
2 Select the folder list in the title bar and
select the folder you want to sort.
3 Press Menu
Chatting with Messaging
.
4 Select View, and then select Sort by
Name or Sort by Date.
Deleting messages
You can delete several messages at once
from any folder by using the Purge
command.
To delete an individual message, highlight
it in the message list, and then select Delete.
TIP
1 Press Messaging
.
2 Select the folder list in the title bar and
select the folder that contains the
messages you want to delete.
3 Press Menu
.
4 Select Purge from the Message menu.
5 Select the Purge pick list, and then
select an option.
6 Select OK.
4
CHAPTER
YOUR EMAIL AND OTHER MESSAGES
You can send and receive text
messages even while you are on a phone call.
This is easiest when using a hands-free device
or the speakerphone.
DID YOU KNOW?
When you exchange more than one
message with a single contact, the
messages you exchange with that person
are grouped into a chat session. When you
select a chat session from your message
list, the upper part of Chat View displays all
messages you’ve exchanged with this
contact, and the lower part provides an
entry area.
You can carry on multiple chats at the same
time and easily switch between them,
using the pick list at the top of the screen.
To find a chat you had with someone, open
your Messaging Inbox and select a chat
session.
TIP
1 Press Messaging
.
2 Do one of the following:
Start a new chat: Select a message
and reply to it.
101
CHAPTER
4
YOUR EMAIL AND OTHER MESSAGES
Continue an existing chat: Select a
message that displays the Chat
icon.
Create new messages as: Indicates
whether text or multimedia messaging
is the default format for a new
message.
3 Enter your message.
Pale gray text indicates that a message is
pending or enroute.
TIP
4 Select Send.
NOTE If your wireless service provider
Customizing your Messaging settings
supports delivery receipts for text
messages, an additional setting appears
here.
1 Press Messaging
2 Press Menu
.
.
3 From the Options menu, select
Preferences.
4 On the Messages tab, set any of the
following preferences for your individual
messages:
102
Request Receipts (MMS only):
Indicates whether you want to receive a
confirmation when an outgoing MMS
message is delivered.
Confirm message deletions: Indicates
whether you want deletion confirmation
prompts to appear.
Privacy Mode (hide text): Indicates
whether you want the body text to
appear in the alert when you receive a
new message, or whether you want the
alert to hide the text and prompt you to
go to the message.
Message validity period: Indicates
how long you want an outgoing
message to be valid.
5 Select the Chat tab and set any of the
following preferences for chat sessions.
Display my name in chat window as:
Enter the name you want to use as the
label for your messages in Chat View.
4
CHAPTER
YOUR EMAIL AND OTHER MESSAGES
Label color: Select a color to
differentiate your messages from the
sender’s messages while in Chat View.
Use color for: Indicate whether you
want both your name and message text
in the selected label color, or only your
name.
6 Select the Network tab and set any of
the following preferences for network
connections.
Create chats from messages: Indicate
when you want to group messages
from the same person into a chat.
Show timestamps in chats: Indicate
whether you want to see the local date
and time the message was sent next to
each message.
Automatically collect MMS
messages: Indicate whether you want
to download multimedia messages
automatically.
103
CHAPTER
4
YOUR EMAIL AND OTHER MESSAGES
Even when roaming: Indicate whether
you want to automatically receive
multimedia messages while roaming.
3 Select Options, and then select Alerts.
Network Configuration: Indicate if you
want to use Automatic or Manual
message retrieval. If you select Manual,
select Edit and enter your wireless
service provider’s settings.
NOTE We recommend that you do not
change the Network Configuration
settings.
4 Select the Application pick list and
select Messaging.
7 Select OK.
5 Select the Volume pick list and select
the volume level.
Selecting Messaging alert tones
6 Select the Vibrate pick list and select
when you want your smartphone to
vibrate.
Your Treo includes a silent alert
that can vibrate even when the Ringer switch
is set to Sound Off.
DID YOU KNOW?
1 Press Messaging
2 Press Menu
.
.
7 Select the Message Tone pick list and
select a tone for incoming message
alerts for a message alert.
8 Check the boxes if you want to see
onscreen alerts when a new message
arrives and when a message you sent is
received.
9 Select Done.
104
What are all those icons?
By default, the Messaging app shows the
Inbox folder. To view a different folder, select
the folder list in the title bar and select a
different folder from the list.
TIP
The message descriptions in the Inbox,
Outbox, and Sent folders show the
message status:
•
Unread messages appear in bold.
•
Read messages appear in plain text.
•
Urgent messages appear with a red
exclamation point (!).
A multimedia message that is ready
for you to download
4
CHAPTER
YOUR EMAIL AND OTHER MESSAGES
A multimedia message that is fully
downloaded
A multimedia message that is fully
downloaded and contains sound
A voicemail page
A message that is waiting to be
sent
A receipt, which you requested,
confirming delivery of the message
An outgoing message with an error
The following icons show the message
type and additional status info:
If you are outside a coverage
area or if your phone is turned off, outgoing
messages go into the Outbox. When you
return to a coverage area or turn your phone
on, your pending messages are automatically
sent and transferred to the Sent folder.
DID YOU KNOW?
A text message
A chat session
105
CHAPTER
4
106
YOUR EMAIL AND OTHER MESSAGES
C H A PT ER
5
Your connections to the web
and wireless devices
You use the web for many things: driving directions, shopping,
news, web-based email. Now, with your wireless service
provider network and the built-in web browser, you can take
the web with you almost anywhere.
The built-in Bluetooth® feature of your Palm® Treo™ 680
smartphone helps you easily set up wireless connections to a
number of devices, so you can enjoy the convenience of
cable-free connectivity. You can also use your smartphone to
connect your computer to the Internet and to share contacts or
your favorite photos with other people.
Benefits
•
Carry the web with you
•
•
Store web pages for offline
viewing
Connect to Bluetooth headsets
and car kits
•
Connect your computer to the
Internet through your smartphone
In this chapter
Web browser . . . . . . . . . . . . . . . . . . . . . . . . . . . . . . . . . . . . . . . . . . 109
Connecting your computer to the Internet through your Treo . . . . . 118
Connections with Bluetooth devices . . . . . . . . . . . . . . . . . . . . . . . . 121
Web browser
The Blazer® web browser on your Treo
provides quick and easy access to web
pages. You can view most sites you use on
your computer, including those with
security and advanced features, such as
JavaScript and frames. To browse the web,
you must activate data services from your
wireless service provider.
content without scrolling left or right. You
can also switch to Wide Page Mode if you
like.
5
CHAPTER
YOUR CONNECTIONS TO THE WEB AND WIRELESS DEVICES
You can send email from a
web page on your Treo. Email addresses
appear as links on web pages. After you
configure an email application on your Treo,
you can select an email address link to create
a message to the selected address.
DID YOU KNOW?
Optimized Mode
The security certificates and
128-bit Secure Sockets Layer (SSL) encryption
let you visit secure websites, like ones for
banking and using email. Some secure sites
also require specific browsers, so those may
not work with your web browser.
DID YOU KNOW?
DID YOU KNOW? The web browser supports
JavaScript, SSL strong encryption, and
cookies, but does not support plug-ins (such
as Flash or Shockwave) or Java applets.
Wide Page Mode
Viewing a web page
To make viewing web pages on your Treo a
better experience, the web browser
reformats web pages into a single column
and resizes images. In this format—called
Optimized Mode—you can see most
109
CHAPTER
5
YOUR CONNECTIONS TO THE WEB AND WIRELESS DEVICES
Follow a link to another web page: In
Optimized Mode, highlight the link by
pressing Left or Right and then
press Center
to go to the selected
page. In Wide Page Mode, use the
stylus to select a link.
1 Press Applications
and select Web
to open the Blazer web browser. If
necessary, select Yes to turn on your
phone, and Yes to connect to the
Internet.
If you do not see either of these icons
in the title bar, data services are
not available in your current location and
you cannot connect to the Internet.
Submit a form: Enter the info and then
select the onscreen button to submit
the form. If the form doesn’t have an
onscreen button, press Return .
2 Enter a web page address (URL) in the
Address Bar and select Go.
To adjust the font size, open the Options
menu and select Font. To fit more text on the
screen, select Small. To make the text easier
to read, select Large.
TIP
NOTE If you browse to a secure web
page, a lock
Address Bar.
icon appears in the
3 Do any of the following to navigate
within the web page:
View a page in wide layout format (as
on your computer): Press Menu
,
select Options, and then select Wide
Page Mode.
Scroll through the page: In Optimized
Mode (the default format) press Up
or Down . In Wide Page Mode, use all
buttons on the 5-way
to scroll in
any direction.
110
4 Use the 5-way
to access any of
the following icons in the title bar:
0
Goes to your home page.
Opens a dialog box where you
can enter a web address or view
a list of recently viewed web
pages.
Goes back in order through
pages you viewed.
Goes forward in order through
pages you viewed.
Gets the latest version of the
current web page. This is
sometimes called refreshing the
web page.
4 Change the entries in the Name and
Description fields.
5
CHAPTER
YOUR CONNECTIONS TO THE WEB AND WIRELESS DEVICES
5 Select OK, and then select OK again.
Opens a list where you can
select Fast mode (no images or
style sheets) or Normal mode
(with images and style sheets).
Creating a bookmark
With bookmarks, you can instantly access
a web page without entering the address
every time. The web browser can store up
to 100 bookmarks or saved pages, allowing
you to open your favorite web pages
quickly. Note that a bookmark is different
from a saved page and different from a
favorite (see Defining favorite buttons).
DID YOU KNOW? The predefined bookmarks
take you to pages that are optimized for your
Treo.
Saving a page
You can use the web browser to save a
page for offline viewing, so you don’t need
a wireless connection to view it later.
1 Go to the page you want to save.
2 Press Menu
.
3 Select Save Page from the Page menu.
4 Select OK, and then select OK again.
1 Go to the page you want to bookmark.
Viewing bookmarks or saved pages
2 Press Menu
Bookmarks and saved pages both appear in
Bookmarks View. Saved pages are
indicated by a small triangle in the
upper-right corner of the bookmark.
.
3 Select Add Bookmark from the Page
menu.
111
CHAPTER
5
YOUR CONNECTIONS TO THE WEB AND WIRELESS DEVICES
You can make Bookmarks
View the default view when you open the
browser. Open the Options menu and select
Preferences. Select the Start With pick list
and select Bookmarks.
DID YOU KNOW?
1 Select the Bookmarks View
icon.
Editing or deleting a bookmark or saved
page
1 In Bookmarks View, press Menu
.
2 Select Edit Bookmarks from the
Bookmarks menu.
3 Select the bookmark you want to edit or
delete.
TIP If you can’t edit, delete, or beam a
bookmark, it is probably locked and these
actions are prohibited.
4 Enter the desired changes or select
Delete.
5 Select OK.
2 Select the bookmark or saved page you
want to view.
To go back to the last web page you
viewed without selecting a bookmark, select
Page View.
TIP
112
Arranging bookmarks and saved pages
Bookmarks View has ten pages where you
can store and arrange bookmarks and
saved pages in a way that works for you.
For example, you can store travel links on
one bookmark page, stock links on another,
and business links on a third page.
1 In Bookmarks View, press Menu
.
2 Select Edit Bookmarks from the
Bookmarks menu.
3 Enter a title for this page of bookmarks.
4 Use the stylus to drag and drop a
bookmark into the desired slot. You can
move a bookmark within the current
page or move it to a different bookmark
page by dragging and dropping it on one
of the Bookmark Page
icons at the
bottom of the screen.
5 Select OK.
example, if you download an MP3 file, you
can listen to it later in the Pocket Tunes™
application. If a file is not recognized by any
application on your Treo 680 you cannot
open it on your Treo. You can, however,
download the file to an expansion card,
transfer it to your computer using an
expansion card reader (sold separately),
and view it on your computer.
5
CHAPTER
YOUR CONNECTIONS TO THE WEB AND WIRELESS DEVICES
You can download files such as new
applications and choose to play or save
music and video files in many popular
formats—provided that the website
permits the downloading of files:
Item
Supported File Types
Pictures
JPEG, WBMP, GIF,
animated GIF
Videos
MP4, 3G2, ASF, WMV
Ringtones
MIDI, AAC
Music
MP3, WMA
Downloading files from a web page
The web browser lets you download files
that are recognized by one of the
applications on your Treo 680. When you
download a file, you can open it in the
application that recognizes the file. For
You can also access software and other
downloads using the Downloads bookmark.
TIP
113
CHAPTER
5
YOUR CONNECTIONS TO THE WEB AND WIRELESS DEVICES
1 Go to the page with the link to the file
you want to download.
2 Do one of the following:
•
In Optimized Mode, press Left or
Right to highlight the link to the
file, and then press Center
.
•
In Wide Page Mode, tap the link with
your stylus.
3 If prompted, select what you want to do
with the file: Play, Save To Device, or
Save To Card.
TIP The web browser recognizes streamed
content that is not supported by any of the
applications on your Treo 680, and it displays a
Media type not supported message.
2 Once streaming begins, playback starts
automatically. Use the following
controls when viewing or listening:
•
Select
to return to the web page
containing the streamed content.
•
Select
or press Center
pause playback.
•
Select
or press Center
to
resume playback after pausing.
•
A few seconds after playback begins,
the toolbar is hidden and you can view
the content on the full screen. Press
Up
or Down
to display the
toolbar; press Up
or Down
again to hide the toolbar again.
•
Press the Volume button on the side
of your smartphone to adjust the
volume.
4 Select Yes.
You can also save an image from a web
page by tapping and holding it with the stylus.
TIP
Streaming files from a web page
The web browser lets you stream files that
are recognized by one of the applications
on your Treo 680. For example, you can
choose to play music and video files in
many popular formats (MP3, WMA, WMV).
1 When the web browser recognizes
streamed content on a web page, it
displays a Play
icon. To view or
listen to the streamed content, select
Play
.
114
to
Copying text from a web page
You can copy text from a web page and
paste it into other applications.
1 Use the stylus to highlight the text you
want to copy.
2 Select Find Text on Page from the
Page menu.
2 Press Menu
3 Enter the text you want to find.
.
4 Go to the app in which you want to
paste the text and position the cursor
where you want to paste the text.
4 Check or uncheck the Wrap Search box
to indicate whether you want the search
to wrap from the end of the page to the
beginning when the end is reached.
5 Press Menu
5 Select Find to start the search.
3 Select Edit, and then select Copy.
.
6 Select Edit, and then select Paste.
If the web browser does not
recognize a phone number as dialable, you
can copy the phone number (as text) and
paste it into the Dial Pad (see Dialing from a
web page or message).
DID YOU KNOW?
5
CHAPTER
YOUR CONNECTIONS TO THE WEB AND WIRELESS DEVICES
Customizing your web browser settings
1 In Page View, press Menu
.
2 Select Options, and then select
Preferences.
3 Select Page and set any of the following
preferences:
Returning to recently viewed pages
The History list stores the addresses of the
last 100 pages you visited. Items in the
History list are sorted chronologically.
1 In Page View, press Menu
.
2 Select History from the Page menu.
3 Select the web page you want to load.
Finding text on a web page
1 In Page View, press Menu
.
Start With: Determines which view
appears when you open the browser.
115
CHAPTER
5
YOUR CONNECTIONS TO THE WEB AND WIRELESS DEVICES
Home Page: Sets the page that appears
when you select
.
Restore Default: Selects the original
home page, if you changed it.
Show Address Bar: Sets whether the
web address appears in Page View.
When it is visible, you can select the
pick list to go to a previously viewed
page or enter a URL directly from Page
View.
4 Select General and set any of the
following preferences:
Disable cookies: Determines whether
websites can store personalized info on
your Treo. Some sites do not work
properly if you select this option.
Disable JavaScript: Bypasses
JavaScript elements on the web pages
you view.
Tap and Drag: Determines whether
dragging the stylus selects text or
scrolls through the content of the page.
Normal mode/Fast mode: Determines
whether a web page appears as
designed (Normal mode) or with some
of the items removed for faster display.
Selecting Fast mode gives you the
following options:
•
Auto-complete: Determines whether
the web browser suggests text, based
on your previous entries, when you
begin entering info.
116
Disable cascading style sheets:
Determines whether style sheets are
applied when you load a web page.
When style sheets are disabled,
pages download faster, but you may
lose some of the formatting.
KEY TERM Cascading Style Sheets (CSS) A
file that governs design elements of a web
page, such as its fonts, colors, and layout.
•
Don’t download images!
Determines whether images appear
when you load a web page. If you
select not to view images, you can
still see any image by selecting the
placeholder box on the web page.
Lots of pretty graphics slowing you down?
Browse the web faster by enabling the Don’t
download images! option.
TIP
5 Select Advanced and set any of the
following preferences:
Cookies: Indicates how much memory
is being used by cookies. To free up this
memory, select Clear Cookies.
5
CHAPTER
YOUR CONNECTIONS TO THE WEB AND WIRELESS DEVICES
Cache: Indicates how much memory is
being used by your cache to store
recent pages and history. To free up this
memory, select Clear Cache.
Clear cache on exit: Determines
whether the cache clears each time you
exit the web browser.
Set Proxy: Sets up a proxy server to
access the Internet. If your connection
requires a proxy server, please contact
your Internet service provider or IT
administrator for this information.
6 Select OK.
Set memory limit for storing pages:
Sets the amount of memory used for
your cache. Pages are cached so that
they load faster the next time you view
them.
117
CHAPTER
5
YOUR CONNECTIONS TO THE WEB AND WIRELESS DEVICES
Connecting your
computer to the
Internet through
your Treo
Creating a partnership between your Treo
and your computer
Dial-up networking (DUN) is the feature
that converts your smartphone into a
modem so that you can access the Internet
from your computer. If your computer is
enabled with Bluetooth wireless
technology, you can set up your
smartphone as a wireless modem using
the built-in Bluetooth technology.
2 On your smartphone, press
Applications
and select
Bluetooth
.
1 Make sure that your computer’s
Bluetooth setting is on and that your
computer is ready to create a Bluetooth
partnership. Check the documentation
that came with your computer to find
and change these settings.
3 Select Bluetooth On if it is not already
selected, and then select Setup
Devices.
4 Select Trusted Devices.
The following procedures describe the
process of setting up your smartphone as a
wireless modem using the built-in
Bluetooth technology.
If your computer is not enabled with
Bluetooth wireless technology, you need to
purchase a wireless Bluetooth adapter
accessory for your computer to use this
feature.
TIP
118
5 Select Add Device. The discovery icon
appears, indicating that the discovery
process is active.
6 Select your computer from the Trusted
Devices list, and then select OK.
Accessing the Internet using a Bluetooth
DUN connection
7 Make up a passkey, enter it on the
Bluetooth Security screen, and then
select OK. The passkey can be up to 16
numbers.
The steps for accessing the Internet on
your computer may vary depending on your
operating system and how Bluetooth
wireless technology is set up on your
computer—for example, if it is built-in
versus if you are using a Bluetooth adapter.
If you need additional info, check your
computer’s documentation for how to set
up Bluetooth technology to access the
Internet using a DUN connection.
NOTE You need this passkey in the next
step, so be sure to write it down exactly.
We recommend that you use a passkey of
16 numbers, where possible, to improve
the security of your Treo. The longer the
passkey, the more difficult it is for the
passkey to be deciphered.
5
CHAPTER
YOUR CONNECTIONS TO THE WEB AND WIRELESS DEVICES
You may need to use a virtual private
network (VPN) to access corporate email.
Check with your system administrator for
more information.
TIP
8 Enter the same passkey on your
computer when prompted.
9 Select Done, and then select Done
again to return to the Bluetooth screen.
Setting up your computer for a Bluetooth
DUN connection
Follow the instructions from the
manufacturer of your Bluetooth adapter to
enable DUN.
BEFORE YOU BEGIN Verify that DUN is
enabled on your computer. See the
documentation that came with your
computer for details.
1 Open the Bluetooth application on your
computer and let it locate the Treo you
paired it with in the previous procedure.
119
CHAPTER
5
YOUR CONNECTIONS TO THE WEB AND WIRELESS DEVICES
2 Double-click the icon or option
representing your smartphone. Your
computer connects to your smartphone
and shows that DUN services are
available.
3 Double-click the DUN icon.
4 Enter your wireless service provider’s
settings. Contact your wireless service
provider if you don’t have these
settings.
5 Click Dial. Once the connection is
successfully established, you can
browse the Internet on your computer
or download your email.
If you get a message asking whether you
want your computer to remember the dial text
for this connection, we recommend that you
say yes. This avoids errors and the
inconvenience of entering the dial text for
every session.
TIP
6 Look for a network connection icon in
the taskbar at the bottom of your
computer screen to verify that you are
connected.
120
DID YOU KNOW? You can check the status of the
connection by right-clicking the Bluetooth
network icon in the taskbar.
NOTE When a DUN connection is active,
you cannot use data services on your
smartphone. For example, you cannot
browse the Web, or send or receive email
messages. Also, any scheduled automatic
email retrievals do not take place. You can,
however, use other wireless features of
your smartphone, such as making and
receiving phone calls or sending and
receiving text messages.
Terminating a Bluetooth DUN Internet
session
It is important to end a Bluetooth DUN
session after you finish using it. Ending the
DUN session lets you use the wireless
features of your Treo 680 that require a
data connection, it frees up the Bluetooth
feature so that you can connect to other
Bluetooth devices, and it optimizes battery
life, too.
1 On your computer, right-click the icon or
option representing your smartphone.
2 Click Disconnect.
Connections with
Bluetooth devices
With the built-in Bluetooth wireless
technology on your Treo, you can connect
to a number of Bluetooth devices,
including a hands-free device such as a
headset or car kit, a printer, or a GPS
receiver, as well as to other smartphones
and handhelds that are equipped with
Bluetooth wireless technology. If your
computer is enabled with Bluetooth
wireless technology, you can also
synchronize wirelessly or use your phone
to connect your computer to the Internet.
You can create a list of Bluetooth devices
that you trust to communicate with your
Treo. When communicating with trusted
devices, your Treo skips the discovery
process and creates a secure link as long
as the device is within range. Bluetooth
range is up to 30 feet depending on
environmental conditions, including
obstacles, radio interference from nearby
electronic equipment, and other factors.
5
CHAPTER
YOUR CONNECTIONS TO THE WEB AND WIRELESS DEVICES
When you configure a hands-free device,
as described previously in Connecting to a
Bluetooth hands-free device, the
hands-free device automatically appears in
your Trusted Devices list. Follow the steps
in this section to add other devices to your
Trusted Devices list, such as a friend’s
handheld.
Your Treo does not support
wireless connections to Bluetooth stereo
headphones.
DID YOU KNOW?
121
CHAPTER
5
YOUR CONNECTIONS TO THE WEB AND WIRELESS DEVICES
Requesting a connection with another
Bluetooth device
1 Press Applications
Bluetooth
.
5 Select Trusted Devices.
and select
2 Select Bluetooth On.
6 Select Add Device. The Discovery icon
appears, indicating that the discovery
process is active.
3 (Optional) Enter a device name that
identifies your Treo 680 when it is
discovered by other Bluetooth devices.
NOTE Use the same device name for all
your Bluetooth connections. If you change
the device name, you need to recreate any
partnerships you already created.
4 Select Setup Devices.
122
7 Select the Show pick list and select
Nearby devices.
8 If the device you want to add doesn’t
appear on the Discovery Results list,
make sure that the other device is ready
to receive a connection request (see the
device’s documentation), and then
select Find More on your Treo to search
again.
9 Enter the same passkey on your
smartphone and on the Bluetooth
device, and select OK.
IMPORTANT Some Bluetooth devices
have a preset passkey; if so, you can find
the passkey in the documentation for that
device. Other devices provide a screen
where you enter a passkey that you make
up. In either case, you must use the same
passkey on both your smartphone and the
other Bluetooth device. We recommend
that where possible, you make up a
passkey of 16 alphanumeric characters
(letters and numerals only) to improve the
security of your Treo. The longer the
passkey, the more difficult it is for the
passkey to be deciphered.
2 Select Bluetooth On.
5
CHAPTER
YOUR CONNECTIONS TO THE WEB AND WIRELESS DEVICES
3 (Optional) Enter a device name that
identifies your Treo 680 when it is
discovered by other Bluetooth devices.
NOTE Use the same device name for all
10 Select Done.
Accepting a connection from another
Bluetooth device
For the smartphone to be visible to
Bluetooth devices, the Bluetooth setting must
be set to On and visibility must be set to
Visible or Temporary.
TIP
1 Press Applications
Bluetooth
.
and select
your Bluetooth connections. If you change
the device name, you need to recreate any
partnerships you already created.
4 Select the Visibility pick list and select
one of the following:
Visible: Enables Bluetooth devices that
are not on your Trusted Devices list to
request a connection with your
smartphone. Your smartphone remains
accessible to other devices until you
turn this option off. After you’re done
using this setting, remember to change
it back to Hidden.
123
CHAPTER
5
YOUR CONNECTIONS TO THE WEB AND WIRELESS DEVICES
IMPORTANT Some Bluetooth devices,
Use the Visible option only when you need
your smartphone to be accessible for an
extended period of time. For short term
accessibility, use the Temporary option.
TIP
Temporary: Enables Bluetooth devices
that are not on your Trusted Devices list
to request a connection with your
smartphone during the next two
minutes. Your smartphone reverts to
the Hidden setting and becomes
inaccessible to other devices after two
minutes.
Hidden: Allows only devices with which
you have previously formed a partnership
to request a connection with your
smartphone. New devices cannot request
a connection.
5 Enter the same passkey on your
smartphone and on the Bluetooth
device.
124
such as headsets and GPS receivers, have
a preset passkey; if so, you can find the
passkey in the documentation for that
device. Other devices provide a screen
where you enter a passkey that you make
up. In either case, you must use the same
passkey on both your Treo and the other
Bluetooth device. We recommend that
where possible, you make up a passkey of
16 alphanumeric characters (letters and
numerals only) to improve the security of
your Treo. The longer the passkey, the
more difficult it is for the passkey to be
deciphered.
6 (Optional) Check the Add to trusted
device list box if you want to form a
partnership with the requesting device.
7 Select OK.
C H A PT ER
6
Your photos, videos, and
music
Do you have a wallet bulging with photos of friends, family, pets,
and your most recent vacation?
Are you tired of carrying both your MP3 player and your phone?
Your Palm® Treo™ 680 smartphone solves both problems. You can
keep your favorite photos right on your Treo—videos, too. And
there's no need to carry an expensive MP3 player; you can play
music on your Treo. Simply transfer songs onto your Treo or an
expansion card and then listen through your stereo headphones
(cards and headphones sold separately).
Benefits
•
Never be far from your favorite
people, places, and songs
•
Arrange your photos, videos, and
songs
•
No separate photo viewer, MP3,
CD, or mini-disc player required
In this chapter
Camera. . . . . . . . . . . . . . . . . . . . . . . . . . . . . . . . . . . . . . . . . . . . . . . 127
Pictures & Videos . . . . . . . . . . . . . . . . . . . . . . . . . . . . . . . . . . . . . . . 131
Pocket Tunes . . . . . . . . . . . . . . . . . . . . . . . . . . . . . . . . . . . . . . . . . . 136
Camera
Your Treo 680 comes with an easy-to-use,
built-in, VGA camera with 2x digital zoom.
You can use the camera to take and view
pictures and videos and send them to your
friends and family. To add a personal touch
to your Treo, use your pictures as your
wallpaper for the Main tab in the Phone
application and as caller ID images.
New Albums: Opens a dialog box
where you can enter an album name
and select the storage location
(smartphone or expansion card).
6
CHAPTER
YOUR PHOTOS, VIDEOS, AND MUSIC
Taking a picture
You can store pictures on your smartphone
or on an expansion card.
The default camera resolution is VGA (640
x 480) and it also supports QVGA (320 x 240)
resolution. To view these settings before you
take a picture, press Menu.
TIP
1 Press Applications
Camera
.
and select
2 By default, the Camera application
stores pictures you take in the PALM
folder on your expansion card (if a card
is inserted). Otherwise, Camera stores
pictures in the PALM album on your
Treo. To store a picture in a different
location, select one of the following:
<Album name>: Stores the picture in
the selected album. The storage
location is based on the location of the
album (smartphone or expansion card).
3 Find your subject in the screen on your
Treo (the lens is on the back of your
Treo).
4 (Optional) To get a close-up of your
subject, press Up
to select 2x. Press
Down
to return to 1x.
5 Press Center
picture.
to capture the
127
CHAPTER
6
YOUR PHOTOS, VIDEOS, AND MUSIC
6 Do any of the following:
TIP To add an audio caption later, open the
picture and then select Audio Caption from
the Photo menu.
You can personalize a picture.
Open the Photo menu, select Draw on, and
then use the drawing tools to add your own
personal touch. When you save the picture,
you can replace the original or save a copy.
DID YOU KNOW?
Recording a video
Saves the picture in the location
you selected in step 2.
You can store videos on your smartphone
or on an expansion card.
Deletes the picture.
1 Press Applications
Camera
.
Opens a dialog box where you
can select how you want to send
the picture: Messaging,
Bluetooth, or Email. The receiving
device must support the method
you select.
Lets you add a voice caption.
2 Select Camcorder
and select
.
TIP The video recording screen displays the
approximate recording time you have left
based on the space available on your
smartphone or expansion card. Actual
recording time may vary depending on how
fast you are moving, how many colors you are
recording, and so on.
3 By default, the Camera application
stores videos you record in the PALM
folder on your expansion card (if a card
is inserted). Otherwise, Camera stores
128
pictures in the PALM album on your
Treo. To store a video in a different
location, select one of the following:
4 Find your subject in the screen on your
Treo (the lens is on the back of your
Treo).
<Album name>: Stores the video in the
selected album. The storage location is
based on the location of the album
(smartphone or expansion card).
5 Press Center
6
CHAPTER
YOUR PHOTOS, VIDEOS, AND MUSIC
to start recording.
6 After you finish recording, press
Center
again to stop.
7 Select any of the following:
New Albums: Opens a dialog box
where you can enter an album name
and select the storage location
(smartphone or expansion card).
Plays the video, so you can
review it.
Saves the video in the location
you selected in step 2.
The default camcorder resolution is CIF
(352 x 288) and it also supports QCIF (176 x
144). To view these settings before you
capture a video, press Menu.
TIP
Deletes the video.
129
YOUR PHOTOS, VIDEOS, AND MUSIC
CHAPTER
6
Opens a dialog box where you
can select how you want to send
the video: Messaging, Bluetooth,
or Email. The receiving device
must support the method you
select and video messages.
Opens a dialog box where you
can adjust the volume during
playback.
3 Set any of the following preferences:
Effects: Sets the color palette for the
current picture or video. You cannot
change an item’s palette after you take
the picture or video.
Prompt sound: (Pictures only) Sets the
sound that plays before you take
the picture.
Shutter sound: Determines whether a
sound plays when you take a picture.
During playback, tap and drag the
progress indicator bar to jump to a different
section of the video. Select Pause to pause
video playback.
TIP
Customizing your Camera settings
You can customize the built-in camera’s
settings for your Treo 680.
1 Go to Camera View
View
.
or Camcorder
2 Press Menu
. If you are in Camera
View, the Photo Settings screen
appears. If you are in Camcorder View,
the Video Settings screen appears.
130
Microphone: (Videos only) Turns the
microphone on and off so that you can
record videos with or without sound.
Resolution: Sets the default size for
newly captured pictures or videos.
Date stamp: (Pictures only) Determines
whether the date the picture is taken
appears on your pictures.
Review photos/videos: Determines
whether you can review pictures or
videos before saving them and how
quickly they are automatically saved.
Auto naming: Assigns a name to a
series of pictures to be captured, such
as Seattle001, Seattle002, and so on.
Internet. Your smartphone supports the
following picture formats:
•
JPG
•
TIF
•
BMP
•
GIF
1 Press Applications
Pics&Videos
.
6
CHAPTER
YOUR PHOTOS, VIDEOS, AND MUSIC
and select
2 Select the album that contains the
picture you want to see.
To view an album from an expansion card,
insert the card and select the album from the
Album list. If the items on the card are not
grouped into albums, select the card name
from the list.
TIP
4 Select Done.
3 Select the picture you want to view.
Pictures & Videos
Viewing a picture
In addition to viewing the pictures you
capture with the built-in camera, you can
view pictures captured on many popular
digital cameras or downloaded from the
4 Press Right or Left to scroll to the
next item in the album.
To see the outer edges of a
picture that may not be visible, use the stylus
to tap and drag the picture in any direction.
DID YOU KNOW?
131
CHAPTER
6
YOUR PHOTOS, VIDEOS, AND MUSIC
5 If the picture has a voice caption, select
to hear it.
•
ASF (with MPEG-4 video and
IMA-ADPCM audio)
6 Tap the picture or press Center
return to Thumbnail View.
•
AVI (with MJPEG video and PCM audio)
to
In Thumbnail View, you can group photos
or videos to more easily locate them. Select
one of the grouping options from the View
menu.
TIP
Viewing a video
In addition to viewing the videos you
capture with the built-in camera, you can
view videos captured on many popular
digital cameras. Your smartphone supports
the following types of video files:
•
3GP (with H.263 video and AMR audio)
•
3G2 (with MPEG-4 video and QCELP
audio)
•
MP4 (with MPEG-4/H.264 video and
MP3/AAC/AAC+ audio)
•
MPG (with MPEG-1 video and MPEG-1
audio)
•
132
M4V (with MPEG-4/H.264 video and
MP3/AAC/AAC+ audio)
1 Press Applications
Pics&Videos
.
and select
2 Select the album that contains the video
you want to see.
3 Select the video you want to view.
Playback begins automatically.
4 Hold down Right or Left to seek
within the current video, or press Right
or Left to scroll to the next item in
the album.
5 Press Center
to return to
Thumbnail View.
If you pause video playback
and then close the video, the video starts
where you left off the next time you play it.
DID YOU KNOW?
Viewing a slide show
1 Press Applications
Pics&Videos
.
and select
2 Select the album you want to view.
3 Press Menu
, select Options, and
then select Auto-hide Toolbar Off if
you want to see the toolbar.
4 Press Space
show.
to start the slide
5 Press Center
previous view.
to return to the
To set slide show options such as
background music and transitions, open the
Options menu and select Slideshow
Setting. Keep in mind that background music
overrides audio captions when you’re running
a slide show. Background music for a slide
show also overrides any music that might be
playing using the Pocket Tunes application on
your smartphone.
TIP
3 Select the pictures or videos to send, or
select Select All to send the entire
album. (A + appears next to selected
items.)
6
CHAPTER
YOUR PHOTOS, VIDEOS, AND MUSIC
You cannot send copyrighted
pictures or videos that appear with a Lock icon
in Thumbnail View or in the Picture list.
DID YOU KNOW?
4 Select Send.
Sending pictures or videos
You can send pictures or videos to an
email address or to other devices that
support picture and video messaging.
5 Select how you want to send the
picture or video: Messaging,
Bluetooth, or Email.
1 From the Album list, select the album
that contains the picture(s) or video(s)
you want to send.
Copying a picture or video
2 Select Send
.
You can copy pictures or videos into
another album. You can also copy pictures
and videos between your smartphone and
an expansion card.
133
CHAPTER
6
YOUR PHOTOS, VIDEOS, AND MUSIC
1 From the Album list, select the album
that contains the picture(s) or video(s)
you want to copy.
7 Select the Into album pick list and
select the album you want to copy the
selected items to.
2 Press Menu
8 Select Copy.
.
3 Select Copy to from the Photo (or
Video) menu.
4 Select the pictures or videos to copy, or
select Select All to copy the entire
album. (A + appears next to selected
items.)
TIP You can also move pictures and videos
between albums. Open the Photo (or Video)
menu and select Move to. The remaining
steps are the same as copying pictures, but
use the Move commands instead of the Copy
commands.
5 Select Copy.
6 Select the Copy items to pick list and
select whether you want to copy the
selected items to your device or to an
expansion card.
+ sign
indicates a
picture is
selected
Organizing pictures and videos
1 Open the album you want to organize.
2 Press Menu
.
3 Select Album, and then select Add to
album or Remove from album.
4 Select the pictures or videos to add or
remove, or select Select All to add or
remove the entire album. (A + indicates
that you want to add the item. An X
indicates that you want to remove the
item.)
5 Select Add or Remove.
134
Adding a picture to a contact entry
You can also open the Album
list from Camera View or Camcorder View by
selecting the icon in the lower-left corner.
1 Display the picture you want to add to a
contact.
®
TIP Install the Palm Files application from the
Palm Software Installation CD to easily
browse and manage files on an expansion
card.
3 Select Options, and then select Save
as Contact.
DID YOU KNOW?
To change the name, add a caption, or
view other picture or video information,
highlight (or open) the item, open the Photo
(or Video) menu, and select Details.
TIP
2 Press Menu
6
CHAPTER
YOUR PHOTOS, VIDEOS, AND MUSIC
.
4 Select the contact you want to add this
picture to.
Rotating a picture
1 Display the picture you want to rotate.
Saving a picture as wallpaper
2 Press Menu
You can select a picture to use as wallpaper
for the Main tab in the Phone application.
3 Select Rotate from the Photo menu.
.
4 Select the orientation.
1 Display the picture you want to save as
wallpaper.
Deleting a picture or video
2 Press Menu
1 Open the album that contains the
picture(s) or video(s) you want to delete.
.
3 Select Options, and then select Save
as Wallpaper.
4 When the confirmation message
appears, confirm by selecting Yes, or
decline by selecting No.
2 Press Menu
.
3 Select Delete from the Photo (or
Video) menu.
4 Select the pictures or videos that you
want to delete, or select Select All to
delete the entire album. (An X appears
next to selected items.)
135
CHAPTER
6
YOUR PHOTOS, VIDEOS, AND MUSIC
5 Select Delete.
6 Select Delete to confirm the deletion.
You can also highlight a picture or video in
Thumbnail View, and then press Backspace to
delete the highlighted item.
TIP
the Media icon. You can refer to the
Palm Desktop Online Help for information
about using the Palm Media desktop
application.
Pocket Tunes
Viewing pictures and videos on your
computer
When you synchronize your Treo 680, your
pictures and videos are copied to your
desktop computer. You can view pictures in
JPEG format and videos in MPEG-4 format
(3G2 file extension). You can email them to
friends using your desktop email
application.
BEFORE YOU BEGIN To view and edit
videos you captured on your smartphone
on your computer, you must first install
QuickTime from the Palm Software
Installation CD.
On a Windows computer, you can view
and edit synchronized pictures and videos
in the Palm Media desktop application.
Open Palm® Desktop software and click
136
You can listen to music through the
speaker on the back of your smartphone or
through a stereo headset or headphones
(stereo headphone adapter or 2.5mm
stereo headphone or headset required,
sold separately). To listen to music on your
smartphone, you need to convert the
music files into MP3 format using
Windows Media Player (Windows
computers) or iTunes (Mac computers),
and then transfer the music files to your
smartphone or an expansion card. After
you transfer the music files, you can play
them using Pocket Tunes on your
smartphone.
You can upgrade Pocket Tunes to a version
that supports more music file formats (such as
WMA); supports subscription music; and
includes additional features. For more info,
visit www.pocket-tunes.com/palm.
TIP
If a call comes in when you’re
listening to music, you can take the call and
the music pauses automatically. After you
finish the call, the music starts again.
DID YOU KNOW?
5 Click the Rip Music tab, click the
Format pick list, and then select mp3.
Click OK.
6
CHAPTER
YOUR PHOTOS, VIDEOS, AND MUSIC
6 Click Tools, and then click Options.
7 Click the Devices tab, select Palm
Handheld from the Devices list, and
then click Properties.
Setting up Windows Media Player for
MP3
On a Windows computer, you need to set
Windows Media Player to save your music
files in MP3 format in order for the files to
be compatible with Pocket Tunes.
Select your
smartphone
1 Connect your smartphone to your
computer with the sync cable.
Click
Properties
2 Press Applications
pTunes
.
and select
3 On your computer, open Windows
Media Player, and then click the
full-screen icon in the upper-right
corner to maximize the window.
8 Click the Quality tab, uncheck the
Convert files as required by this
handheld (recommended) box. Click
Apply.
4 Click Tools, and then click Options.
137
YOUR PHOTOS, VIDEOS, AND MUSIC
CHAPTER
6
3 Click the Advanced button at the top of
the window, and then click Importing.
Uncheck
box
4 Click the Import Using pop-up menu
and select MP3 Encoder.
5 Click the Setting pop-up menu and
select Good Quality.
TIP Mac If you want greater control over the
file size and sound quality of your MP3 files,
select Custom from the Setting pop-up
menu.
Transferring MP3 files from your computer
9 Click OK, and then click OK again.
You now have set up Windows Media
Player to transfer MP3 files to the Pocket
Tunes application on your smartphone.
Setting up iTunes for MP3
On a Mac, use iTunes (included with OS X)
to convert music from a CD to MP3 format.
For more information on using the iTunes
software, see the documentation that
came with your Mac.
1 On your Mac, open iTunes.
2 Select Preferences.
138
If your MP3 files are already on your
computer’s hard drive, you just need to
transfer them onto your smartphone to
listen to them with Pocket Tunes.
If an expansion card is inserted into the
smartphone, Windows Media Player
copies the MP3 files to the expansion card.
If you don’t have an expansion card
inserted, the MP3 files are copied to your
Treo.
IMPORTANT You must synchronize your
smartphone with your computer at least
once before you can transfer MP3 files
from your computer.
BEFORE YOU BEGIN On a Mac, you need
an expansion card (sold separately) to
listen to music on your Treo. You cannot
transfer MP3 files from your Mac directly
onto your Treo.
1 Connect your Treo to your computer
with the USB sync cable.
Mac: Drag and drop the MP3 files onto
the Send To Handheld droplet in the
Palm folder. Select your device name,
the file name, and the destination (card).
Click OK. Synchronize your Treo with
your computer. Be patient; transferring
music to an expansion card can take
several minutes.
6
CHAPTER
YOUR PHOTOS, VIDEOS, AND MUSIC
2 On your smartphone, press
Applications
and select
pTunes
.
3 If you are transferring MP3 files from a
Mac, insert an expansion card into your
Treo. This step is optional for Windows
users.
4 Do one of the following:
Windows: Open Windows Media
Player on your computer. Select the
Sync tab, and then select Palm
Handheld from the drop-down list.
Select Start Sync. The files are
transferred to your smartphone.
NOTE Do not press the sync button on
your cable. Windows Media Player
transfers the files, so there’s no need to do
anything.
You can also use a card reader accessory
(sold separately) to transfer MP3 files from
your computer to your expansion card. Create
a Music_Audio folder in the root directory of
the card, and store your MP3 files in this
folder.
TIP
Transferring music from a CD to your
smartphone
If your songs are on a CD and you want to
listen to them on your smartphone, you
need to convert them to MP3 format on
your computer before you transfer the files
to your smartphone.
139
CHAPTER
6
YOUR PHOTOS, VIDEOS, AND MUSIC
WINDOWS ONLY
1 On your computer, open Windows
Media Player.
2 Insert the music CD into your
computer’s CD drive.
3 Select the Rip tab.
4 Select the tracks you want to convert to
MP3.
5 Select Rip Music.
6 Transfer the MP3 files to your
smartphone as described in Transferring
MP3 files from your computer.
6 Transfer the MP3 files to your
smartphone as described in Transferring
MP3 files from your computer.
Listening to music on your Treo
CAUTION Protect your hearing. Listening
to this device at full volume for a long
period of time can damage your hearing.
1 Make sure the Ringer switch is set to
the Sound On position. See Silencing
sounds for more information.
2 Press Applications
pTunes
.
and select
MAC ONLY
1 On your Mac, open iTunes.
2 Insert the music CD into the CD drive
on your Mac.
3 Check the boxes next to the tracks you
want to convert to MP3.
4 Click the Import button in the
upper-right corner of the iTunes window.
5 When the songs are finished importing,
click the Eject Disk button in the
lower-right corner of the iTunes window.
140
TIP You can change the settings on your Treo
so that pressing and holding the Side button
opens Pocket Tunes. See Reassigning buttons
for details.
3 Use the 5-way
to access any of
the following icons:
Play: Plays or resumes playback of
the current song.
Next song: Plays the next song.
Previous song: Plays the previous
song.
Choose song: Displays a list of
songs to choose from.
Pause: Pauses playback.
DID YOU KNOW? You can also press Space to
pause and resume playback, as well as use
the 5-way to navigate among songs or pause
and resume playback.
Pocket Tunes continues playing until it
reaches the end of your list or until you
select Pause
. Music continues to play
even if you switch to another application or
turn off your screen. If you want to stop
playing music when you exit Pocket Tunes,
open the Background Prefs menu and
uncheck the Enable background play box,
and then select OK.
NOTE To adjust the volume during
playback, press the Volume button on the
side of your Treo.
Creating a playlist
Progress
indicator
1 Press Applications
pTunes
.
Play/Pause
Volume
6
CHAPTER
YOUR PHOTOS, VIDEOS, AND MUSIC
If you want to play a group of songs in a
particular order, you can create a playlist.
2 Press Menu
and select
.
3 Select Actions, and then select
Manage Playlists.
4 Select New, and then enter a name for
the playlist.
Choose
song
Previous
song
Next
song
141
CHAPTER
6
YOUR PHOTOS, VIDEOS, AND MUSIC
5 Select Add Song. Select the songs you
want to include on the playlist.
2 Press Menu
.
3 Select Actions, and then select
Manage Playlists.
4 Highlight a playlist, and then select Edit.
5 Do any of the following:
•
To delete a song from the playlist,
select the song and then select
Remove.
•
To add a song, select Add Song,
check a song’s box, and then
select Done.
•
To move a song up or down one slot,
select a song and then select Up or
Down.
6 Select Save List.
To play songs from a playlist, open Pocket
Tunes, select Choose Songs, and then select
Playlists. Select the playlist you want to play,
and then select All.
TIP
6 Select Save List.
To delete a playlist, select Manage
Playlists from the Actions menu, select the
playlist, and then select Delete List. Select
Yes to confirm the deletion.
TIP
Editing a playlist
1 Press Applications
pTunes
.
142
and select
C H A PT ER
7
Your personal information
organizer
Say good-bye to paper calendars and throw away those
scribbled to-do lists. Your Palm® Treo™ 680 smartphone is all
you need to organize your personal information and keep it with
you wherever you go.
You never lose your information, even if your battery is
completely drained. All of your personal info is backed up each
time you synchronize, and your info is kept private when you
use the security features on your Treo. Also, you can easily
share info with others electronically.
Benefits
•
Track current, future, and past
appointments
•
Make to-do lists that get done
•
Set reminders for appointments,
birthdays, important tasks, and
more
•
Before you call your friend in
London, check the time first
In this chapter
Calendar . . . . . . . . . . . . . . . . . . . . . . . . . . . . . . . . . . . . . . . . . . . . . . 145
World Clock . . . . . . . . . . . . . . . . . . . . . . . . . . . . . . . . . . . . . . . . . . . 152
Tasks . . . . . . . . . . . . . . . . . . . . . . . . . . . . . . . . . . . . . . . . . . . . . . . . 154
Calendar
Calendar is a powerful organizer application
that helps you manage your schedule. You
can view your calendar by day, week, or
month, or as an agenda list that combines
your Tasks list and email notifications with
your appointments. Schedule repeating
meetings or a block of vacation time by
creating an event that repeats at an interval
you specify. Color-code your appointments
by category and add notes with helpful
information.
DID YOU KNOW? If your company uses
Microsoft Exchange Server 2003, you may be
able to wirelessly synchronize Calendar
events directly with the server. See Working
with Microsoft Exchange ActiveSync for
information.
list that are overdue or due today. If
there’s room, Agenda View also lists
events on future dates.
•
Day View: Shows your daily schedule
one day at a time.
•
Week View: Shows your schedule for
an entire week. The time frames are
based on the Start Time and End Time
settings in Calendar Preferences.
•
Month View: Shows your schedule for
a whole month.
In most Calendar views, you can do the
following:
•
Open the Options menu and select
Year View to view a calendar for an
entire year.
•
Use the 5-way
to go to another
day, week, month, or year —based on
the current view. (Not available in
Agenda View.)
Displaying your calendar
Press Calendar
repeatedly to cycle
through the various views:
•
Agenda View: Shows your daily
schedule, the number of unread email
messages, and any items on your Tasks
7
CHAPTER
YOUR PERSONAL INFORMATION ORGANIZER
145
CHAPTER
7
YOUR PERSONAL INFORMATION ORGANIZER
•
Select Go To, and then select a date
from the calendar. (Not available in
Agenda View.)
3 Using the keyboard, enter a starting
hour and minute for the event, such as
545 for 5:45.
4 Select the End Time box and enter the
ending hour and minute for the event.
Creating an event
If you have several appointments to enter,
it’s more efficient to use Palm® Desktop
software or Microsoft Outlook on your
computer and then synchronize your Treo 680
with your computer. For more information,
see Synchronizing information—the basics.
TIP
5 To assign a time zone to the event,
select the Time Zone pick list and
select a city in the time zone you want.
6 Select OK.
7 Enter a description for the event.
IMPORTANT If you use Palm Desktop
Press Calendar
appears.
until Day View
1 Select Go To and then select the
desired day.
Selected
date
Selected
day
software, do not add time zones to your
events. Palm Desktop does not support
time zones.
If you use Microsoft Outlook, you can use
the time zone feature, but you must install
the conduit that came with your Treo 680
(or a subsequent update) on all the
computers with which you sync your
smartphone. Chapura PocketMirror and
other earlier Microsoft Outlook conduits do
not support time zones.
0
2 Select New.
146
4 Select OK.
To automatically assign a time zone to your
events, open the Options menu, select
Preferences, and check the New events use
time zones box. All your new events will be
assigned to your local time zone (existing
events aren’t affected), and you can change
the time zone setting for individual events.
TIP
If you want your events with time zones to
stay at the same time in Calendar, regardless
of the time zone you are in, go to Date & Time
Preferences, select the Automatically set
pick list, and select Date and time. If you
select Date, time and time zone, the event
time shifts if you travel to a different time
zone. See Setting the date and time for
information.
Type of time
units
Number of
time units
TIP
Adding an alarm to an event
1 In Calendar, select the event.
2 Select Details.
3 Check the Alarm box and select the
number of minutes, hours, or days
before the event you would like to
receive the alarm.
The alarm for untimed events is defined by
minutes, days, or hours before midnight of the
date of the event.
TIP
7
CHAPTER
YOUR PERSONAL INFORMATION ORGANIZER
When an alarm occurs, the
Alert dialog box displays all your pending
alerts. Select an alert description to jump to
that item, or check the box to clear that alert.
DID YOU KNOW?
Creating an untimed event
An untimed event, such as a holiday or
deadline, does not occur at a particular
time.
Press Calendar
View.
until you are in Day
5 Press Left or Right
date of the event.
to go to the
6 Make sure no times are highlighted.
147
CHAPTER
7
YOUR PERSONAL INFORMATION ORGANIZER
7 Enter a description for the event.
A diamond appears next to the
description of an untimed event.
select Other to define a custom
interval.
4 Select OK.
Scheduling a repeating event
This icon
indicates a
repeating
event.
To enter a birthday or anniversary, add this
info to the person’s Contacts entry and it
automatically appears in your Calendar.
TIP
To enter a holiday, create an untimed
event. Then, from the Details screen, select
Every year as the repeat interval.
TIP
1 Create an event, and then select it.
2 Select Details.
3 Select the Repeat pick list, and then
select a repeat interval. If the interval
you need doesn’t appear on the list,
148
If you sync with Microsoft
Outlook and your events include other people,
a With field appears in the Details dialog box
and your attendee info appears in this field
after you sync.
DID YOU KNOW?
Color-coding your schedule
Changing or deleting an event
Use color-coding to quickly spot various
types of events. For example, make
appointments with family green,
coworkers blue, and friends red. Follow
these steps to create a category and
assign it a color code.
1 Select the event you want to edit or
delete.
1 In Day View, select an event description
or select an empty time slot.
2 Select Details.
3 In addition to the settings covered
earlier in this chapter, you can also
change any of the following settings:
2 Select Details.
Date and Time: Displays when the
event takes place. Change these
settings to reschedule the event.
3 Select the Category pick list and select
Edit Categories.
Location: Provides a description of
where the event takes place.
4 Do one of the following:
•
To create a new category, select New
and then enter a category name.
•
To add a color to an existing category,
select a category and select Edit.
5 Select the color you want to give this
category, and then select OK.
6 (Optional) Repeat steps 4 and 5 to add
or edit more categories.
7 Select OK two more times.
Now that the categories are set up with
colors, you can assign categories to your
events to color-code them. See the next
section for details.
7
CHAPTER
YOUR PERSONAL INFORMATION ORGANIZER
Category: Sets the color-coded
category for this event.
Note
: Provides space for you to
enter additional text.
Delete: Removes the event from your
calendar.
4 Select OK.
To save memory, you can purge your old
events. Open the Record menu and select
Purge. Select the Delete events older than
pick list and select a time frame. Select OK.
TIP
149
CHAPTER
7
YOUR PERSONAL INFORMATION ORGANIZER
Customizing display options for your
calendar
1 Press Menu
.
2 Select Options, and then select
Display Options.
3 Select the Default View pick list and
select the view you want to see when
you open Calendar.
4 Select Agenda and set any of the
following options:
Show Due Tasks: The tasks that are
due today and the tasks that are
overdue appear in Agenda View.
Show Messages: The number of read
and unread email messages displays in
Agenda View.
Background: A favorite photo becomes
the Agenda View background. Check
the Background box, select the image
placeholder, and then select a photo.
Adjust the fade setting so that the text
is easy to read against the photo.
5 Select Day and set any of the following
options:
Show Category List: The Category pick
list appears in Day View.
Show Time Bars: The time bars appear
in Day View to show the duration of an
event and to illustrate event conflicts.
Compress Day View: When this box is
unchecked, all time slots appear on the
screen. When this box is checked, start
and end times appear for each event,
but blank time slots near the bottom of
the screen disappear to minimize
scrolling.
Show Category Column: The
color-coded category marker appears
between the time and the description to
150
7
CHAPTER
YOUR PERSONAL INFORMATION ORGANIZER
indicate under which category the event
is filed.
7 Select OK.s
6 Select Month and set any of the
following options:
Show Category List: The Category pick
list appears in Month View.
Timed Events: The events that are
scheduled for a specific time appear in
Month View.
Untimed Events: The events that are
scheduled for a specific date but not a
specific time appear in Month View.
Daily Repeating Events: The events
that repeat every day appear in Month
View.
You can customize your smartphone to
display the most current Calendar event in the
Main tab in the Phone application. Press
Phone, open the Options menu, and then
select Phone Display Options. Check the
Show Calendar event box.
TIP
Selecting alarm tones
1 Press Menu
.
2 Select Options, and then select Sound
Preferences.
3 Select the Application pick list and
select Calendar.
4 Select the Volume pick list and select
the volume level.
151
CHAPTER
7
YOUR PERSONAL INFORMATION ORGANIZER
5 Select the Vibrate pick list and select
when you want your smartphone to
vibrate for an event alarm.
6 Select tones from any of the following
pick lists:
Alarm Sound: The tone that plays the
first time your alarm goes off.
Reminder Sound: The tone that plays if
an alarm is not acknowledged and
the alarm repeats itself.
Repeat: The number of times the alarm
repeats itself if the alarm is not
acknowledged.
Default Alarm: A default amount of
time before the event for which the
alarm goes off.
TIP You can also record sounds and use them
as alarms. Select Manage on the Sound &
Alerts Preferences screen.
•
To record a sound, select New.
•
To play a sound, select it and press Center
on the 5-way.
•
To delete a sound, select it and press
Backspace.
•
To send a sound, select it and then select
Send.
Your Treo includes a silent
alarm that can vibrate even when the Ringer
switch is set to Sound Off.
DID YOU KNOW?
World Clock
World Clock displays the day and time in
three cities anywhere around the globe.
Whether you’re traveling or staying home,
it’s easy to keep track of the best time to
reach your business associates, friends,
and family in faraway places.
7 Select Done.
152
7
CHAPTER
YOUR PERSONAL INFORMATION ORGANIZER
Selecting cities
World Clock shows the system date and
time above the world map. If you selected
the option to get the date and time from
the mobile network (see Setting the date
and time), your wireless service provider
network automatically updates the time
display to match the local time when
you travel.
If you did not select the option to get the
date and time from the mobile network, then
you can set the city at the top of the screen to
a fixed location.
TIP
You can run your stylus over
the map to see the time in other cities. The
shadow over the map represents nighttime
moving across the globe.
DID YOU KNOW?
World Clock does not automatically update
the system time for daylight savings time. To
change the Daylight Savings Time setting, see
Setting the date and time.
TIP
Below the world map, you can view the
time in two other cities. If you travel a lot
you may want to select your home city as
one of these two cities, so that you always
know what time it is at home.
1 Press Applications
World Clock
.
and select
2 Select a City pick list, and select a city
in the same time zone.
Adding cities
If the city you want to display is not in the
predefined list, you can add it.
1 Select a City pick list and select Edit
List.
2 Select Add.
3 Select a location in the same time zone
as the city you want to add, and then
select OK.
153
CHAPTER
7
YOUR PERSONAL INFORMATION ORGANIZER
4 Enter the name of the city.
5 Select Location, select Map, select the
location of the city, and then select OK.
6 If the city is not on Daylight Savings
Time, uncheck this box. If Daylight
Savings Time is observed, enter Start
and End dates.
7 Select OK, and then select Done.
Setting an alarm
The next time you travel, don’t rely on a
hotel alarm clock to get you to that
important meeting. Use your smartphone
instead. World Clock includes a built-in
alarm feature that you can use as a travel
alarm.
Tasks
You can use Tasks to remind you of tasks
you need to complete and to keep a record
of when you finish tasks.
Adding a task
1 Press Applications
Tasks
.
and select
2 Select New to create a new task.
1 Select Off in the upper-right corner.
2 Select the time you want the alarm to
sound.
3 Select OK.
To customize the alarm sound and volume,
open the Options menu and select Alarm
Preferences.
3 Enter a description of the task. The text
can be longer than one line.
TIP
Make sure the Ringer switch is set to
Sound On, so that you can hear the alarm.
TIP
154
Setting task priority, due date, and other
details
The Details dialog box enables you to
assign a priority level, due date, category,
privacy flag, and other details for each task.
1 Select the task to which you want to
assign details.
2 Select Details.
3 Set any of the following:
Priority: Select the priority number for
this task (1 is most important). Later
you can arrange your tasks based on the
importance of each task.
repeating task, the next instance of this
task automatically appears in your task
list.
7
CHAPTER
YOUR PERSONAL INFORMATION ORGANIZER
Private: Check this box to mark this
task private. See Working with private
entries for additional information.
: Select this button to enter
additional text that you want to
associate with the task.
You can also select the priority from the
Tasks list by selecting the number next to a
task and then selecting a priority level.
TIP
Category: Assign the task to a specific
category.
Due Date: Select the Due Date pick list
and select a due date for the task.
4 Select OK.
If you turn on the Show Due Dates option
in the Tasks Preferences screen, you can
select the due date in the Tasks list to set a
new date.
TIP
Press Menu to access other features such
as importing phone numbers into the Tasks
list.
TIP
Alarm: Set an alarm for this task.
Checking off a task
Repeat: Indicate whether the task
occurs at regular intervals and how
often it repeats. When you check off a
1 Select the task you want to check off.
2 Press Center
or tap in the box to
check off the task.
155
YOUR PERSONAL INFORMATION ORGANIZER
CHAPTER
7
Organizing your tasks
In the Tasks list, select one of these
options:
All: Displays all your tasks.
If you accidentally check off a task and
need to uncheck it, highlight the task again
and press Center on the 5-way to uncheck it.
TIP
You can set Tasks to record the date that
you completed a task, and you can select to
show or hide completed tasks. Completed
tasks remain in the memory of your
smartphone until you purge them.
TIP
DID YOU KNOW? Overdue tasks have an
exclamation point (!) next to the due date.
156
Date: Displays tasks that are due in a
specific time frame. With Date selected,
press Down
to select the pick list, and
then press Center
to see the various
options: Due Today, Last 7 Days, Next 7
Days, or Past Due.
Category: Displays tasks that are assigned
to the selected category. Select the
Category pick list to select a different
category.
1 Select the task you want to delete.
2 Select Options, and then select
Preferences.
2 Press Menu
3 Set any of the following preferences:
Deleting a task
.
3 Select Delete Task from the Record
menu.
Sort by: Indicates the order in which
your tasks appear in the list.
4 Select OK.
Show Completed Tasks: Displays
tasks you’ve checked off.
To save memory, you can purge all
completed tasks. Open the Record menu and
select Purge. Select OK.
TIP
Customizing Tasks
The Tasks Preferences screen enables you
to control the appearance of the Tasks list
screen.
1 In the Tasks list screen, press
Menu
.
7
CHAPTER
YOUR PERSONAL INFORMATION ORGANIZER
Record Completion Date: Replaces
due date with the completion date
when you complete (check off) the task.
Show Due Dates: Displays task due
dates and inserts an exclamation point
(!) next to overdue tasks.
Show Priorities: Displays the priority
setting for each task.
Show Categories: Displays the
category for each task.
Alarm Sound: Sets the sound for the
alarms you assign to your tasks.
4 Select OK.
You can display your tasks in
your calendar. See Customizing display
options for your calendar for details.
DID YOU KNOW?
157
CHAPTER
7
158
YOUR PERSONAL INFORMATION ORGANIZER
C H A PT ER
8
Your memos and documents
With its ability to store large amounts of important information, your
Palm® Treo™ 680 smartphone lets you take your office with you—
including your Microsoft Office and PDF files. You can keep updated
copies of the files on both your smartphone and your computer so that
you can work on them in the most convenient location any time.
Leave your note pad and voice recorder at home. Use Memos to type
notes. Use Voice Memo to record notes, agenda items, and other
important thoughts, and play them back, right on your smartphone. You
can even send your notes and voice memos to a friend or colleague by
attaching them to an email or multimedia message.
Benefits
•
Manage Word, Excel, PowerPoint,
and PDF files on your smartphone
•
Improve productivity by taking
important docs, spreadsheets, and
presentations with you
•
Capture thoughts on the fly
In this chapter
Documents To Go Professional . . . . . . . . . . . . . . . . . . . . . . . . . . . . 161
Memos. . . . . . . . . . . . . . . . . . . . . . . . . . . . . . . . . . . . . . . . . . . . . . . 162
Voice Memo . . . . . . . . . . . . . . . . . . . . . . . . . . . . . . . . . . . . . . . . . . . 163
Documents To Go
Professional
NOTE The Palm Software Installation CD
includes the Documents To Go® desktop
software. On your smartphone, the
companion for Documents To Go is named
Documents and it’s already installed on
your smartphone.
With the Documents application, you can
take your important office info with you.
You can carry, create, view, and edit
Microsoft Word and Excel files directly on
your smartphone. You can also view, carry,
and manage PowerPoint and PDF files. For
example, you can open email attachments,
files you download with the web browser,
and files stored on an expansion card—as
long as the files are in a supported format.
If you install the Documents To Go desktop
software (from the Palm Software
Installation CD), you can use Documents
To Go to transfer files from your computer
to your smartphone when you synchronize.
Here are a few more examples of what you
can do with Documents:
•
Send and receive email attachments in
Word, Excel, PowerPoint, and Acrobat
file formats (DOC, XLS, PPT, and PDF).
•
View Word, Excel, PowerPoint, and
Acrobat files (DOC, XLS, PPT, and PDF).
•
Create or edit a Word-compatible
document or Excel-compatible
spreadsheet on your smartphone, and
then save it in the native DOC or XLS
format.
•
Create a PowerPoint presentation on
your computer, use the Documents To
Go desktop application to optimize the
file for your smartphone, and then sync
the file onto your smartphone to view it
on the go.
8
CHAPTER
YOUR MEMOS AND DOCUMENTS
NOTE The Documents application does
not support some editing functions, such
as multiple font sizes and spell checking.
161
CHAPTER
8
YOUR MEMOS AND DOCUMENTS
For more info on the Documents To Go
application on your smartphone, go to
www.dataviz.com. If you installed the desktop
application from the Palm Software
Installation CD, you can also click the
Documents To Go icon on your computer,
and then click Help.
TIP
Install the Files application from the Palm
Software Installation CD to easily browse and
manage files on an expansion card.
2 Select the document you want from the
list.
TIP When you work on a file on your
smartphone, you can save it to your
smartphone or an expansion card. Open the
File menu, select Save As, and then select
the location where you want to save the file.
TIP
Memos
Opening a document
In the Documents application, you can
view and open any Word, Excel,
PowerPoint, or Acrobat (PDF) file on your
smartphone or an expansion card that is
inserted in the expansion slot.
1 Press Applications
Documents
.
and select
Memos are a great way to store notes on
your Treo 680.
DID YOU KNOW? Each memo can include 4,096
characters of text.
Creating a memo
1 Press Applications
Memos
.
and select
2 Enter the text you want to appear in the
memo.
3 Select Done.
162
important thoughts directly on your
smartphone.
8
CHAPTER
YOUR MEMOS AND DOCUMENTS
Creating a voice memo
When recording a voice memo, hold your
smartphone with the screen facing
towards you while speaking.
You can assign categories to your memos.
Open the memo you want to change, select
the category pick list at the top of the screen,
and select a category.
TIP
The memo is automatically saved to
your smartphone.
2 (Optional) Enter a title for the memo.
Deleting a memo
1 Open the memo you want to delete.
2 Press Menu
1 Press and hold the Side button on your
smartphone while recording your
memo. After you finish recording,
release the Side button.
.
3 Select Delete Memo from the Record
menu.
4 Select OK.
You can also access Voice Memo, by
pressing Applications and selecting Voice
Memo.
TIP
If you need to pause while recording,
press and hold Center on the 5-way. Release
the button to resume recording.
TIP
You can use a voice memo as
a ringtone. Highlight the voice memo in the
list, open the Voice Memo menu, and then
select Copy to Ringtone.
DID YOU KNOW?
Voice Memo
Voice Memo provides a place for you to
record and play back notes and other
163
CHAPTER
8
YOUR MEMOS AND DOCUMENTS
Listening to a voice memo
1 Press Applications
Voice Memo
.
and select
2 In the Voice Memo list, navigate to the
voice memo title and then press
Center
to select it. The voice
memo begins to play.
3 Press Center
playback.
164
to pause or stop
TIP To adjust the volume level, press the
Volume button on the side of your
smartphone.
TIP To change a voice memo title, open the
Voice Memo menu and select Rename
Memo.
DID YOU KNOW? You can send a voice memo in
an email or MMS message (see the
documentation for your email application, or
Creating and sending a multimedia message).
You can also use Bluetooth® wireless
technology to send a voice memo to a nearby
Bluetooth device (see Sending info over a
Bluetooth wireless connection).
C H A PT ER
9
Your application and
info management tools
Synchronization is a great way to transfer, update, and back up
info on your Palm® Treo™ 680 smartphone. Synchronizing
simply means that info you entered or updated in one place
(your Treo or your computer) is automatically updated in the
other. There’s no need to enter info twice.
Expansion cards (sold separately) provide a compact and
limitless storage solution. When one card becomes full, simply
use another card to carry your extra music and video clips and
to install and run cool games and other software, from
dictionaries to travel guides.
Benefits
•
Locate info in your applications
with the Find feature
•
Install applications, games, and
other software
•
Quickly enter, update, and protect
your info on your computer and
your Treo
•
Store, carry, and exchange info
In this chapter
Using Find . . . . . . . . . . . . . . . . . . . . . . . . . . . . . . . . . . . . . . . . . . . . 167
Viewing and using the alerts . . . . . . . . . . . . . . . . . . . . . . . . . . . . . . 167
Calculator . . . . . . . . . . . . . . . . . . . . . . . . . . . . . . . . . . . . . . . . . . . . . 168
Installing applications . . . . . . . . . . . . . . . . . . . . . . . . . . . . . . . . . . . . 170
Removing applications . . . . . . . . . . . . . . . . . . . . . . . . . . . . . . . . . . . 172
Viewing application info . . . . . . . . . . . . . . . . . . . . . . . . . . . . . . . . . . 173
Sending information with Bluetooth wireless technology . . . . . . . . 174
Beaming information . . . . . . . . . . . . . . . . . . . . . . . . . . . . . . . . . . . . 176
Synchronizing information—advanced . . . . . . . . . . . . . . . . . . . . . . . 179
Using expansion cards . . . . . . . . . . . . . . . . . . . . . . . . . . . . . . . . . . . 185
9
CHAPTER
YOUR APPLICATION AND INFO MANAGEMENT TOOLS
Using Find
The Find feature locates any text in the
built-in applications and databases and
in some third-party applications. The Find
feature searches for the group of
characters you specify, including characters
that are part of a word. Find is not
case-sensitive.
DID YOU KNOW? Find locates any word that
begins with the text you enter. For example,
entering “plane” finds “planet,” but not
“airplane.”
1 Press Option
, and then press Shift/
Find
to open the Find dialog box.
2 Enter the text you want to find.
3 Select OK to start the search.
4 In the search results, select the text you
want to review, or select Find More to
continue the search.
Viewing and using
the alerts
The Alert dialog box on your smartphone
shows info about incoming items, such as
new email messages and Calendar events.
An alert also notifies you when you miss a
phone call.
To view the Alert dialog box, tap the
blinking bell
with your stylus when it
appears in the upper-left corner of any
screen, or press and hold Center
when the blinking bell appears.
167
CHAPTER
9
YOUR APPLICATION AND INFO MANAGEMENT TOOLS
In the Alert dialog box, you can do any of
the following:
•
Check the box next to the alert to
remove it from the list.
•
Select the alert to open the
corresponding application and view the
alert item (message, event, missed call,
and so on).
•
Select Done to close the Alert dialog
box. The alert remains active and the
bell continues to blink in the upper-left
corner of the screen.
•
Select Clear All to delete all alerts in
the Alert dialog box.
3 Select Options, and then select
Advanced Mode or Basic Mode.
Calculator
Calculator includes a basic calculator, plus
an advanced calculator with scientific,
financial, and conversion functions.
Switching between Basic and Advanced
Calculator Modes
1 Press Applications
.
2 Press Menu
168
.
and select Calc
In Basic Mode, you can also press Right
on the 5-way to switch to Advanced Mode. In
Advanced Mode, press Right on the 5-way to
cycle between functions, and press Left on
the 5-way to return to Basic Mode.
TIP
You can tap the onscreen
number pad or use the keyboard to input
numbers.
DID YOU KNOW?
Selecting functions in Advanced
Calculator Mode
Length: Length conversions for metric
and English values.
1 Switch to Advanced Mode (see the
preceding procedure).
Area: Area conversions for metric,
traditional, and English values.
2 Press Menu
.
3 Select Options, and then select the
type of function you want to use:
Math: Advanced mathematical
functions such as exponents, roots, and
logarithms.
Volume: Volume conversions for metric
and English values.
4 Press Menu
.
5 Select Pref, and then select the decimal
display format: Float, Fixed(x), Sci(x),
or Eng(x).
Trig: Trigonometric functions such as
sine, cosine, tangent, and variants.
6 Press Menu
Finance: Financial calculator functions
such as APR and amortization.
7 Select Pref, and then select the number
display format: Degrees, Radians, or
Grads.
Logic: Hexadecimal characters in
keypad, plus logic functions such as
And, Not, Or, and Xor.
Statistics: Statistical functions such as
sum, factorial, and random number
generator.
9
CHAPTER
YOUR APPLICATION AND INFO MANAGEMENT TOOLS
.
TIP Select Sto to store a number in one of ten
memory slots. Select Rcl to recall a stored
number.
TIP Select Con to access a list of
mathematical constants such as Avogadro’s
number or the speed of light.
Weight/Tmp: Weight and temperature
conversions for metric and English
values.
169
CHAPTER
9
YOUR APPLICATION AND INFO MANAGEMENT TOOLS
Installing applications
Your Treo 680 comes with several built-in
and ready-to-use applications. You can also
install additional applications, such as
business software, games, and more. The
Palm Software Installation CD includes
several bonus software apps, and you can
purchase other third-party Palm OS® apps
as well. To learn about applications you can
add to your Treo 680, go to
www.palm.com/treo680gsm.
NOTE The instructions in this section tell
you how to install basic PRC (Palm OS
application) and PDB (Palm OS database)
files on your Treo. Some Palm OS software
uses an installer or wizard to guide you
through the process. For details, consult
the documentation that came with the
software.
Installing bonus software from the CD
The Palm Software Installation CD includes
several bonus software applications that
you can install on your smartphone. You
can install these applications when you
170
install the desktop software, or you can
install them later.
1 Insert the Palm Software Installation CD
into the CD drive on your computer.
2 Click Install bonus software.
3 Click the name of the application you
want to install.
4 Click Install (on the right side of the
screen).
5 Repeat steps 3 and 4 to install additional
applications.
6 Synchronize your smartphone with your
computer to install the application(s) on
your Treo.
Installing applications from the Internet
You can use the web browser on your Treo
to install Palm OS files (PRC or PDB)
directly from the Internet. When you
download a PRC or PDB file, it is
automatically installed on your Treo. If a file
is compressed (ZIP or SIT files), you need
to download it to your computer, expand
the file, and then synchronize to transfer
the expanded file to your Treo.
1 Open the web browser (see Viewing a
web page).
2 Go to the page that contains the link to
the application you want to download.
3 Press Left or Right to highlight the
link to the file, and then press Center
to initiate the download process.
1 Windows: Drag and drop the file(s)
onto the Palm Quick Install icon on the
Windows desktop.
9
CHAPTER
YOUR APPLICATION AND INFO MANAGEMENT TOOLS
Mac: Drag and drop the file(s) onto the
Send To Handheld droplet in the Palm
folder.
4 Follow the onscreen instructions to
accept and install the application.
Installing applications from a computer
When you download an application to your
computer, it is probably in a compressed
format such as a ZIP or SIT file. If the file is
compressed, you need to use a
decompression utility on your computer,
such as WinZip or Allume Stuffit Expander,
before you install the application on your
Treo.
2 Select your device name from the User
list, and then click OK.
3 Synchronize your Treo with your
computer to install the application(s) on
your Treo 680.
BEFORE YOU BEGIN To install an app
from your computer to your Treo, you must
first install Palm® Desktop software on
your computer (see Installing the desktop
synchronization software).
171
CHAPTER
9
YOUR APPLICATION AND INFO MANAGEMENT TOOLS
Want to install an app to an expansion card
rather than your smartphone?
TIP
Windows: Open Palm® Quick Install and drag
the file to the Expansion Card pane.
Mac: In the menu for Palm Desktop software,
click HotSync, select Install Handheld files,
and select expansion card as the file’s
destination.
On a Windows computer, you can also
access Palm Quick Install by selecting the
Quick Install icon in Palm Desktop software
or from the Programs folder in the Start
menu.
TIP
Getting help with third-party applications
If you encounter a problem (such as an
error message) with a third-party
application, contact the application’s author
or vendor. For general troubleshooting of
third-party applications, see Third-party
applications.
Removing
applications
If you decide that you no longer need an
application, or you want to free up
memory, you can remove apps from your
Treo or an expansion card (for more on
expansion cards, see Inserting an
expansion card). You can remove only
apps, patches, and extensions that you
install; you cannot remove the built-in apps
that reside in the ROM portion of your Treo.
Applications that you cannot remove
appear with a Lock icon next to them.
Applications deleted from your
smartphone are kept on your computer in the
Archive folder of your user folder. If you have
trouble locating your user folder, see I can’t
find my user folder.
DID YOU KNOW?
1 Press Applications
.
2 If you want to remove an application
from an expansion card, insert the card
into your Treo.
172
3 Press Menu
.
4 Select Delete on the App menu.
5 Select the Delete From pick list and
select the location of the application you
want to remove: Phone or <card
name>.
6 Select the application that you want to
remove.
If you upgraded from a previous version
of Palm Desktop, your Backup subfolder
may be located in the palmOne or
Handspring folder.
9
CHAPTER
YOUR APPLICATION AND INFO MANAGEMENT TOOLS
2 If you find a PRC or PDB file for the
application you just removed, delete the
file from the Backup subfolder.
3 Delete the file from your device again.
7 Select Delete.
8 Synchronize to remove the application
from the Backup subfolder on your
computer.
Viewing application
info
Manually deleting applications
If an app you delete reappears on your
smartphone, you may need to manually
delete the app from your computer.
The Info screens display basic statistics
about the applications on your Treo.
1 Locate your Backup subfolder on your
computer.
2 Press Menu
Windows: C:\Program
Files\Palm\<device name>.
Mac: Mac
HD\Applications\Palm\Users\<device
name>.
1 Press Applications
.
.
3 Select Info on the App menu.
4 Select the Device pick list and select
the location of the app you want to view
info for: Phone or <card name>.
173
CHAPTER
9
YOUR APPLICATION AND INFO MANAGEMENT TOOLS
5 At the bottom of the screen, select the
type of information you want to view:
Version: The version numbers of
applications on your Treo 680.
Size: The size (in kilobytes) of
applications and information on your
Treo 680.
Records: The number of entries in
various applications on your Treo 680.
6 Scroll to the application you want to see
info about.
7 Select Done.
Sending information
with Bluetooth
wireless technology
The range of Bluetooth® wireless
technology is up to 30 feet in optimum
environmental conditions. Performance
and range may be affected by physical
obstacles, radio interference from nearby
electronic equipment, and other factors.
TIP Check your battery level before
establishing a Bluetooth wireless connection.
If the battery level is very low, you can’t make
a Bluetooth wireless connection.
Sending info over a Bluetooth wireless
connection
In most applications, you can send an
individual entry or item such as a contact or
a picture. You can also send all the entries
in a category, such as all contacts in the
Business category.
1 Press Applications
Bluetooth
.
174
and select
2 Select Bluetooth On.
3 Open an application.
4 Select the entry or category you want to
send. You cannot send an item that has
a lock
next to it.
5 Press Menu
.
6 Select Send from the leftmost menu.
7 Select Bluetooth, and then select OK.
8 Select the receiving device(s) from the
Discovery Results list, and then select
OK.
7 Select the application you want to
transfer. You cannot send an item that
has a lock
next to it.
8 Select Send.
9 Select Bluetooth, and then select OK.
10 Select the receiving device(s) from the
Discovery Results list, and then select
OK.
11 Wait for a message to indicate that the
transfer is complete before you
continue using your Treo.
9 Wait for a message to indicate that the
transfer is complete before you
continue using your Treo.
Receiving info over a Bluetooth wireless
connection
Sending an app over a Bluetooth wireless
connection
2 Select Bluetooth On.
1 Press Applications
Bluetooth
.
and select
2 Select Bluetooth On.
3 Press Applications
4 Press Menu
.
.
5 Select Send from the App menu.
6 Select the Send From pick list and
select the location of the app you want
to send: Phone or <card name>.
9
CHAPTER
YOUR APPLICATION AND INFO MANAGEMENT TOOLS
1 Press Applications
Bluetooth
.
and select
3 Select the Visibility pick list and select
one of the following:
Visible: Enables Bluetooth devices that
are not on your Trusted Devices list to
request a connection with your
smartphone. Your smartphone remains
accessible to other devices until you
turn this option off. After you’re done
using this setting, remember to change
it back to Hidden.
175
CHAPTER
9
YOUR APPLICATION AND INFO MANAGEMENT TOOLS
Temporary: Enables Bluetooth devices
that are not on your Trusted Devices list
to request a connection with your
smartphone during the next two
minutes. Your smartphone reverts to
the Hidden setting and becomes
inaccessible to other devices after two
minutes.
4 Use the other device to discover your
Treo 680 and send information to it:
•
•
See the other device’s documentation
to learn how to discover and send
information over a Bluetooth wireless
connection.
If the Ringer switch is set to Sound
On, your Treo beeps to notify you of
the connection and then prompts you
to accept the info. Select a category
or expansion card to file the item(s). If
you don’t select a category, the
item(s) goes into the Unfiled category.
5 Select Yes to receive the information or
No to refuse it.
176
TIP The Device Name in the Bluetooth app is
the name other devices with Bluetooth
wireless technology see when they connect
to your smartphone. The default name is the
name you gave your device during setup. You
can change this name if you want to.
When you receive an
application over a Bluetooth connection, you
can store the application on your smartphone
or send it to an expansion card inserted into
the expansion card slot.
DID YOU KNOW?
Beaming information
Your Treo 680 is equipped with an IR
(infrared) port so that you can beam
information to another device with an IR
port—provided the other device supports
IR communications with Palm OS devices.
The IR port is located on the top of your
Treo 680, next to the Ringer switch, behind
the small dark shield.
For best results, the path between the
two devices must be clear of obstacles, and
both devices must be stationary. If you have
difficulty beaming, shorten the distance and
avoid bright sunlight.
TIP
Beaming an entry
You can beam an individual entry or item
such as a contact or a picture. You can also
beam all the entries in the selected
category, such as all the contacts in the
Business or Family category.
Beam your business card in two key
presses: From the Main tab in the Phone
application, press Menu, and then press M.
Beam Category: Sends all entries in
the current category.
9
CHAPTER
YOUR APPLICATION AND INFO MANAGEMENT TOOLS
If you beam a bookmark or
saved page from the web browser, it beams
the URL, not the contents of that page.
DID YOU KNOW?
5 When the Beam Status dialog box
appears, point the IR port on your Treo
directly at the IR port of the receiving
device.
6 Wait for the Beam Status dialog box to
indicate that the transfer is complete
before you continue using your Treo.
TIP
1 Open the application that holds the
entry you want to beam.
2 Select the entry or category you want to
beam. You cannot beam an item that
has a lock
next to it.
3 Press Menu
.
4 Select Record, and then select one of
the following:
Beam: Sends an individual record.
177
CHAPTER
9
YOUR APPLICATION AND INFO MANAGEMENT TOOLS
Beaming an application
Receiving beamed information
Not all applications can be beamed. A lock
icon appears on the Beam screen next
to applications that cannot be beamed.
BEFORE YOU BEGIN Make sure that the
1 Press Applications
2 Press Menu
.
.
3 Select Beam from the App menu.
4 Select the Beam From pick list and
select the location of the application you
want to beam: Phone or <card name>.
5 Select the application you want to
transfer.
6 Select Beam.
7 When the Beam Status dialog box
appears, point the IR port on your Treo
directly at the IR port of the receiving
device.
8 Wait for the Beam Status dialog box to
indicate that the transfer is complete
before you continue using your Treo.
Beam Receive option in Power
Preferences is On. See Optimizing power
settings for details.
1 Turn on your screen.
2 Select the beam command on the
transmitting device.
3 Point the IR port on your Treo directly at
the IR port of the transmitting device
to open the Beam Status dialog box.
4 When the Beam Status dialog box
appears, select a category for the entry.
5 Select Yes to receive the information or
No to refuse it.
TIP If you do not select a category upon
receiving a beamed item, the item is placed in
the Unfiled category.
TIP If you can’t receive beamed info, make
sure that you are not running a third-party app
that disables beaming. If you still can’t receive
a beam, try a soft reset (see Resetting your
Treo).
You can store a beamed app
on your smartphone or send it to an expansion
card inserted into the expansion card slot.
DID YOU KNOW?
178
Synchronizing
information—
advanced
Changing which applications sync
By default, information from Calendar,
Contacts, Memos, Pictures & Videos, and
Tasks is updated each time you
synchronize your smartphone. You can
change which applications synchronize. For
example, if you don’t use the Memos
application and you want to speed up
synchronization, you can turn off
synchronization for Memos.
TIP Windows If you set up your smartphone
to sync with Outlook, you can learn how to
change which applications synchronize, by
doing the following: Click the HotSync
manager icon in the taskbar and select
Custom. Select a conduit that syncs with
Outlook, click Change, and then click Help.
WINDOWS ONLY
9
CHAPTER
YOUR APPLICATION AND INFO MANAGEMENT TOOLS
1 Click HotSync® manager
in the
taskbar in the lower-right corner of your
screen.
2 Select Custom.
3 Select your device name from the User
list at the top of the screen.
4 Select the application for which you
want to turn synchronization on or off,
and then click Change.
5 Select Synchronize the files to turn on
synchronization for an app.
Select Do nothing to turn off
synchronization for an app that currently
synchronizes (for example, to turn off
synchronization for Memos if you do not
use this app).
179
CHAPTER
9
YOUR APPLICATION AND INFO MANAGEMENT TOOLS
NOTE If you want the information in one
location (smartphone or computer) to
completely replace the information in the
other location for that app, select one of
the two overwrite options. For example, if
the Calendar info on your smartphone is
accurate but the info on your computer has
become corrupted, select Handheld
overwrites Desktop for the Calendar app
to have your smartphone info replace your
computer info. Note that “handheld” refers
to your smartphone and “desktop” refers
to your computer.
6 (Optional) If you want to make this
change permanent, check the Set as
default box. Otherwise, your change
affects only one synchronization (the
next one you do); thereafter, the
synchronization action reverts to what it
was before the change.
7 Click OK.
8 (Optional) To turn synchronization on or
off for other apps, repeat steps 4, 5, 6,
and 7 for each application you want to
change.
9 Click Done.
180
MAC ONLY
1 Double-click the Palm Desktop
in the Palm folder.
icon
2 From the HotSync menu, select
Conduit Settings.
3 From the User pop-up menu, select
your device name.
4 Select the application for which you
want to turn synchronization on or off,
and then click Conduit Settings.
5 Select Synchronize the files to turn on
synchronization for an app.
Select Do nothing to turn off
synchronization for an app that currently
synchronizes (for example, to turn off
synchronization for Memos if you do not
use this app).
NOTE If you want the information in one
location (smartphone or computer) to
completely replace the information in the
other location for that app, select one of
the two overwrite options. For example, if
the Calendar info on your smartphone is
accurate but the info on your Mac has
become corrupted, select Handheld
overwrites Macintosh for the Calendar
app to have your smartphone info replace
the info on your Mac. Note that
“handheld” refers to your smartphone.
6 (Optional) If you want to make this
change permanent, click Make Default.
Otherwise, your change affects only
one synchronization (the next one you
do); thereafter, the synchronization
action reverts to what it was before the
change.
7 Click OK.
8 (Optional) To turn synchronization on or
off for other apps, repeat steps 4, 5, 6,
and 7 for each application you want to
change.
9 Close the Conduit Settings window.
Setting up a Bluetooth connection for
synchronization
9
CHAPTER
YOUR APPLICATION AND INFO MANAGEMENT TOOLS
If your computer is enabled with Bluetooth
wireless technology, you can synchronize
wirelessly over a Bluetooth connection.
1 Press Applications
Bluetooth
.
and select
2 Select Bluetooth On.
3 (Optional) Enter a device name that
identifies your Treo 680 when it is
discovered by other Bluetooth devices.
NOTE Use the same device name for all
your Bluetooth connections. If you change
the device name, you need to recreate any
partnerships you already created.
4 Select the Visibility pick list and select
Visible or Temporary.
181
CHAPTER
9
YOUR APPLICATION AND INFO MANAGEMENT TOOLS
After you form a partnership with a device,
you can change the Visibility setting back to
Hidden. That way only devices with which
you’ve already formed a partnership can find
your smartphone. New devices cannot
request a connection.
TIP
5 Select Setup Devices.
6 Select HotSync Setup.
8 After you finish the HotSync setup,
select Done to return to Applications
View.
0
You’re now ready to sync your Treo 680
with your Bluetooth computer.
Synchronizing over a Bluetooth
connection
When you synchronize using the Bluetooth
wireless feature on your Treo, you don’t
need your sync cable. This is especially
useful if you travel with a laptop enabled
with Bluetooth wireless technology.
BEFORE YOU BEGIN Verify the following
on your computer:
7 Follow the onscreen instructions to
create a partnership between your
smartphone and your computer.
In some cases you may need to
perform setup steps on your computer
before you can complete this step.
Check your computer’s documentation
for specific setup instructions.
182
•
It includes built-in Bluetooth wireless
technology or a Bluetooth adapter.
•
Bluetooth is turned on.
•
HotSync manager is active. On a
Windows computer, you know HotSync
manager is active when its icon appears
in the lower-right corner of your screen.
1 Press Applications
HotSync
.
and select
Synchronizing over an infrared
connection
9
CHAPTER
YOUR APPLICATION AND INFO MANAGEMENT TOOLS
When you synchronize using the IR port on
your Treo, you don’t need your sync cable.
This is especially useful if you travel with
an IR-enabled laptop.
BEFORE YOU BEGIN Your computer must
include the following items:
•
An enabled IR port and driver or an IR
device attached to it. Check your
computer’s documentation to see if it
supports IR communication.
•
HotSync manager must be active. On a
Windows computer, you know HotSync
manager is active when its icon appears
in the lower-right corner of your screen.
2 Select Local.
3 Select the pick list below the HotSync
icon, and then select the name of the
PC you set up for Bluetooth
synchronization (see Setting up a
Bluetooth connection for
synchronization).
4 Select the HotSync
smartphone.
icon on your
When synchronization is complete, a
message appears at the top of your
smartphone screen. Be patient;
synchronization may take a few minutes.
WINDOWS ONLY
1 On your computer, click HotSync
manager
in the taskbar in the
lower-right corner of your screen. Make
sure that Infrared is selected.
183
YOUR APPLICATION AND INFO MANAGEMENT TOOLS
CHAPTER
9
MAC ONLY
1 Double-click the HotSync manager
icon in the Palm folder.
2 Click the HotSync Controls tab, and
then select Enabled.
3 Click the Connection Settings tab, and
then check the On box next to IR port.
2 On your smartphone, press
Applications
and select
HotSync
.
3 Select Local.
4 Select the pick list below the HotSync
icon and select IR to a PC/Handheld.
5 Position the IR port on your Treo within
a few inches of your computer’s IR port.
6 Select the HotSync
smartphone.
icon on your
When synchronization is complete, a
message appears at the top of your
smartphone screen. Be patient;
synchronization may take a few minutes.
184
4 Close the HotSync Software Setup
window.
5 On your smartphone, press
Applications
and select
HotSync
.
6 Select Local.
7 Select the pick list below the HotSync
icon and select IR to a PC/Handheld.
8 Position the IR port on your Treo within
a few inches of your Mac’s IR port.
9 Select the HotSync
smartphone.
icon on your
When synchronization is complete, a
message appears at the top of your
smartphone screen. Be patient;
synchronization may take a few minutes.
Using expansion
cards
Your Treo 680 is also compatible with SDIO
cards, which you can use to add
accessories, such as an FM radio module,
to your Treo.
The expansion card slot on your Treo 680
enables you to add SD cards and
MultiMediaCard cards to extend the
storage capacity of your Treo 680
(expansion cards sold separately). Here are
some examples of what SD and
MultiMediaCard expansion cards can store:
IMPORTANT When using an SDIO card,
•
Photos
•
MP3 audio files
•
Email attachments
•
Games
•
eBooks
•
Microsoft Office files
•
Adobe Acrobat files
•
Applications
•
Databases
9
CHAPTER
YOUR APPLICATION AND INFO MANAGEMENT TOOLS
the SDIO card may protrude from the side
of your Treo 680 and prevent you from
closing the door of the expansion card slot.
Be careful not to damage the door.
Additionally, some SDIO cards may be too
wide to fit inside the expansion door
opening, so make sure the SDIO card fits
inside the expansion door opening before
making your purchase.
Inserting an expansion card
1 Open the expansion slot door.
SD cards are faster than MultiMediaCard
cards for reading and writing information, and
SD cards also offer write-protection.
TIP
185
CHAPTER
9
YOUR APPLICATION AND INFO MANAGEMENT TOOLS
2 Hold your Treo with the screen facing
you, and hold the card with the label
facing you. The notch on the card should
be in the upper corner closest to the
screen.
3 Insert the card into the expansion card
slot until you feel it lock into place.
Removing an expansion card
1 Open the expansion slot door.
2 Press the card into the expansion slot to
release it from the expansion slot.
3 After you feel the expansion card slot
eject the card, remove the card
from the slot.
The expansion card slot has a push-push
mechanism: push in gently to insert a card;
push in gently to remove it.
TIP
If the Ringer switch is set to Sound On,
you hear a confirmation tone when you insert
or remove an expansion card.
TIP
Notch
4 Close the expansion slot door.
Opening applications on an expansion
card
4 Close the expansion slot door.
After you insert an expansion card into the
expansion card slot, you can open any of
the applications stored on the expansion
card.
1 Insert the expansion card into the
expansion card slot. The Card category
186
of Applications View automatically
appears.
1 Insert the expansion card into the
expansion card slot. The Card category
of Applications View automatically
appears.
9
CHAPTER
YOUR APPLICATION AND INFO MANAGEMENT TOOLS
2 Select the category pick list in the title
bar, and select All.
3 Select the icon for the application in
which you want to open the item. For
example, to view a picture, select
Pics&Videos.
2 Select the icon for the application you
want to open.
Copying applications between an
expansion card and your Treo
3 Press Center
application.
You can copy applications from your Treo to
your expansion card and vice versa.
to open the
Install the Files application from the Palm
Software Installation CD to easily browse and
manage files on an expansion card.
TIP
Accessing items stored on an expansion
card
Before you copy an application to an
expansion card, make sure that it is
compatible with Palm OS software version
5.4.5 or later. Some applications do not work
with expansion cards and do not allow you to
store files in a location that is separate from
the application.
TIP
When an expansion card contains items
such as pictures or songs, you can’t view
them directly from the Card category in
Applications View. You must open the app
that recognizes the item.
187
CHAPTER
9
YOUR APPLICATION AND INFO MANAGEMENT TOOLS
1 Press Applications
2 Press Menu
.
.
3 Select Copy from the App menu.
Viewing expansion card information
The Card Info application displays general
information about the expansion card that
is currently in the expansion slot, and it
enables you to rename and format a card.
4 Select the Copy To pick list and select
the destination: Phone or <card
name>.
•
5 Select the From pick list and select the
location of the application you want to
copy: Phone or <card name>.
Renaming an expansion card
6 Highlight the application you want to
copy.
7 Select Copy.
Press Applications
Card Info
.
and select
If you change the contents of an expansion
card, you may at some point want to
rename the card to better match its
contents.
1 Insert the expansion card into the
expansion card slot.
2 Select the category pick list at the top
of the screen and select All.
188
3 Select Card Info
4 Press Menu
.
.
5 Select Rename Card from the Card
menu.
6 Enter a new name for the card.
7 Select OK.
If you have trouble copying info to,
renaming, or formatting an expansion card,
make sure the card is not write-protected.
Press Applications and select Card Info. If a
This card is read-only message appears, then
the card is write-protected. If you’re using an
SD card, you can slide the write-protect tab to
the opposite position to write to the card. See
the instructions that came with your card for
additional info.
If you format a card, any photos or
documents that were previously stored on the
card are deleted from your desktop software
the next time you sync. You can recover these
files from the backup folder, or you can
prevent the deletion by temporarily changing
your sync settings for the affected application
to Desktop overwrites handheld.
TIP
9
CHAPTER
YOUR APPLICATION AND INFO MANAGEMENT TOOLS
TIP
1 Insert the expansion card into the
expansion card slot.
2 Select the category pick list at the top
of the screen and select All.
3 Select Card Info
4 Press Menu
.
.
5 Select Format Card from the Card
menu.
Formatting an expansion card
6 Enter a new name for the card.
Formatting an expansion card is similar to
formatting a disk on a computer. When
you format an expansion card, you erase all
the information stored on the card.
7 Select OK.
189
CHAPTER
9
190
YOUR APPLICATION AND INFO MANAGEMENT TOOLS
C H A PT ER
10
Your personal settings
Customizing your Palm® Treo™ 680 smartphone is great way to
make it match your lifestyle and work even harder for you.
On your Treo, you can easily customize the sounds, fonts,
screen colors, and more. Take advantage of different levels of
security. Prevent making an accidental (and expensive) phone
call by locking the keyboard. Some settings can help extend the
life of your Treo battery. There are lots of ways to make your
Treo work better for you.
Benefits
•
Access applications quickly
•
Conserve power
•
Make your screen easy to read
•
Enjoy your smartphone more
In this chapter
System sound settings. . . . . . . . . . . . . . . . . . . . . . . . . . . . . . . . . . . 193
Display and appearance settings . . . . . . . . . . . . . . . . . . . . . . . . . . . 194
Applications settings . . . . . . . . . . . . . . . . . . . . . . . . . . . . . . . . . . . . 197
Locking your Treo and info . . . . . . . . . . . . . . . . . . . . . . . . . . . . . . . . 199
System settings . . . . . . . . . . . . . . . . . . . . . . . . . . . . . . . . . . . . . . . . 206
Connecting to a VPN . . . . . . . . . . . . . . . . . . . . . . . . . . . . . . . . . . . . 208
10
CHAPTER
YOUR PERSONAL SETTINGS
System sound
settings
Silencing sounds
You can immediately silence all alerts,
ringtones, music that plays through the
built-in speaker, and system sounds by
sliding the Ringer switch to the Sound Off
position. This does not mute the audio
during a phone call.
1 Slide the Ringer switch to the Sound
Off
position. Your smartphone
vibrates once to let you know that
you’ve turned sounds off.
2 To hear all sounds again, slide the
Ringer switch to the Sound On
position.
NOTE For info on setting the vibrate option,
see the section on setting alert tones in the
chapters that describe the individual applications.
Sound On
Sound Off
Setting system volume levels
You can set the volume level for system
sounds, such as the tone that plays when
you synchronize.
If the Ringer switch is set to Sound Off,
the ringer setting overrides the sound settings
and all sounds are turned off.
TIP
1 Press Applications
Sounds
.
and select
2 Select the Application pick list and
select System.
When you slide the Ringer switch back to
the Sound On position, it restores the
previous sound settings.
193
CHAPTER
10
YOUR PERSONAL SETTINGS
3 Select the System Volume and Game
Volume pick lists and select the volume
levels.
Backlight
2 Press Left
brightness.
and Right
to adjust the
3 Select Done.
TIP To temporarily set the backlight to the
preset low setting, press Option + Menu.
4 Select Done.
Display and
appearance settings
Adjusting the brightness
Depending on the lighting conditions in
which you’re using your Treo, you may
need to adjust the brightness of the screen
and keyboard backlight.
1 Press Option
Backlight
.
, and then press
TIP You can also adjust the backlight and set
the brightness duration during a call in Power
Preferences. See Optimizing power settings.
Changing the screen font
You can change the screen font in
Calendar, Contacts, Memos, Messaging,
Tasks, and Web. The font styles may vary
between applications and some
applications may offer fewer choices.
1 Open the application in which you want
to change the font.
2 Press Menu
.
3 Select Options, and then select Font.
194
4 Select a font style. (In the web browser,
select the Font size pick list and select
Large or Small.)
Small font
3 Set any of the following preferences:
10
CHAPTER
YOUR PERSONAL SETTINGS
Preset to: The standard number
conventions for your country. When you
select a country, the other Formats
Preferences are automatically set to
that country’s conventions. You can also
edit each option individually.
Large font
Small bold font
Large bold font
5 Select OK.
Setting display formats
Formats Preferences enable you to select
number conventions based on geographic
regions. For example, in the United
Kingdom, time often is expressed using a
24-hour clock. In the United States, time is
expressed using a 12-hour clock with an
AM or a PM suffix. Many of the built-in
applications on your Treo 680 use the
Formats Preferences settings.
1 Press Applications
Prefs
.
and select
Time: The time format. Select HH:MM
to display a 24-hour clock.
Date: The date format.
Week starts: The first day of the week
(usually Sunday or Monday).
Numbers: The format for numbers with
decimal points and commas.
4 Select Done.
2 Select Formats.
195
CHAPTER
10
YOUR PERSONAL SETTINGS
Aligning the screen to correct tapping
problems
Occasionally, your Treo screen may need to
be readjusted. If this problem occurs, you
may see the wrong feature being activated
when you tap the screen. To fix the
problem, you can align the screen at any
time.
1 Press Applications
Prefs
.
Changing the system color scheme
1 Press Applications
Prefs
.
and select
2 Select Color Theme.
3 Select a color scheme from the list.
and select
2 Select Touchscreen.
3 Follow the onscreen instructions and
tap the screen where indicated.
4 Select Done.
TIP You can also set the wallpaper for the
Main tab in the Phone application (see
Customizing the Main tab in the Phone
application) and the background for Calendar
Agenda View (see Customizing display
options for your calendar).
4 Select Done.
196
Applications settings
To create a new category, select the
category pick list and select Edit Categories.
Select New, and then enter the category
name. Select OK to close the dialog box, and
then select OK.
TIP
You can change the Applications settings
on your Treo so that you can easily access
the applications you use most often.
You can arrange and display your
applications by category, reassign
the buttons on your Treo, and select default
applications for specific tasks.
Arranging applications by category
If there is an expansion card in
the expansion slot, the card appears in the
category pick list and is treated as a category
when you press Applications repeatedly.
DID YOU KNOW?
Displaying applications by category
Do one of the following:
You can assign an application to a category
and then display a specific category of
applications in Applications View.
•
Press Applications
repeatedly to
cycle through the categories.
1 Press Applications
•
Select the category pick list at the top
of the screen and select a category.
Select All to display all of your
applications.
2 Press Menu
.
.
3 Select Category on the App menu.
4 Select the pick list next to each
application and select a category.
5 Select Done.
10
CHAPTER
YOUR PERSONAL SETTINGS
Changing Applications View
By default, Applications View displays each
application as an icon. As an alternative,
you can view a list of applications. The list
view is particularly useful when you have
so many applications in a category that the
applications fill up more than one screen.
197
CHAPTER
10
YOUR PERSONAL SETTINGS
1 Press Applications
2 Press Menu
.
.
3 Select Options, and then select
Preferences.
3 Select the pick list next to the item you
want to reassign, and then select an
application.
4 Select the View By pick list and select
List.
5 Select OK.
Reassigning buttons
With Buttons Preferences, you can select
which applications are associated with the
quick buttons and the Side button on your
Treo. You can assign a primary and
secondary application to each of the three
quick buttons that open an application.
NOTE We recommend that you keep the
primary button assignments on the factory
settings until you become comfortable with
the features of your smartphone. If you do
change the primary button assignments,
remember that the instructions in this
guide and in the other help features refer to
the original button settings.
1 Press Applications
Prefs
.
2 Select Buttons.
198
and select
4 Select Done.
You can also choose an
application to open with the sync button on
the USB sync cable. To change this setting,
select HotSync on the Buttons Preferences
screen.
DID YOU KNOW?
TIP To restore all the buttons and key
combinations to their factory settings, select
Default.
Some third-party applications
automatically take over a button when you
install the application.
DID YOU KNOW?
Changing default applications
Sometimes one application looks for
another application to handle information
(for example, a mail application might open
a browser when you select a link in an
email message). Your smartphone comes
with a set of predefined applications to
handle email, messaging, and browser
requests from other applications. If you
have more than one application to handle
these requests on your smartphone, you
can specify which application you want to
use for each function.
4 Select Done.
Locking your Treo and
info
Your Treo includes several features to
protect your smartphone from inadvertent
use and keep your information private. You
can lock any of the following features on
your smartphone:
2 Select Default Apps.
Keyboard (Keyguard): You can use the
Keyguard feature to disable the keyboard
and all buttons to prevent accidental
presses in your bag or pocket.
3 Select each pick list and select the
application you want to associate with
that function.
Screen: You can disable the screen’s
touch-sensitive feature during an active call
or call alert.
1 Press Applications
Prefs
.
and select
10
CHAPTER
YOUR PERSONAL SETTINGS
Phone (Phone Lock): You can set your
phone to require a password to make calls.
The built-in security software lets you
make emergency calls even if your phone
is locked.
199
CHAPTER
10
YOUR PERSONAL SETTINGS
Treo: You can set your Treo to require a
password for you to see any information on
your Treo.
2 Press Center
to turn off Keyguard.
Entries: You can mask or hide entries
marked as private and set your smartphone
to require a password for viewing them.
Locking your keyboard (Keyguard)
The Keyguard feature locks the keyboard so
that you don’t accidentally press buttons or
activate items on the screen while your
smartphone is in a pocket or bag.
By default, Keyguard turns on whenever
the screen is off. Each time you wake up
the screen, you must turn off Keyguard to
unlock the keyboard and use your
smartphone.
To turn off Keyguard, do the following:
1 When the screen is off, press Power/
End
to wake up the screen.
200
You can change how quickly Keyguard turns
on, or you can disable this feature
altogether. To change the Keyguard
settings, do the following:
1 Press Applications
Prefs
.
and select
2 Select Keyguard.
3 Select the Auto-Keyguard pick list, and
then do one of the following:
•
Select how quickly you want Keyguard
to turn on: When power is turned
off, 5 seconds after power off, or 30
seconds after power off.
•
Select Disable to completely disable
the Keyguard feature until you turn it
on again by pressing Option
+
Power/End
when the screen is
4 Select Done.
on.
When you check the boxes to
disable the touchscreen during a call, the
touchscreen is automatically enabled again
after you end the call.
DID YOU KNOW?
4 Select Done.
Locking your screen
You can set your smartphone to
automatically lock the screen’s
touch-sensitive features in certain
situations.
1 Press Applications
.
10
CHAPTER
YOUR PERSONAL SETTINGS
and select Prefs
2 Select Keyguard.
3 Check any of the following boxes:
Incoming calls received: Disables the
screen when the phone rings. You must
use the 5-way
to select the
onscreen Answer and Ignore buttons, or
press Send
to answer the call
or Power/End
to ignore the
call.
On a call: Disables the screen after you
answer a call. You must use the 5-way
to select the onscreen buttons
during the call. Use this setting to avoid
accidentally pressing onscreen buttons
while you’re holding your smartphone
near your ear to speak.
Locking your phone (Phone Lock)
You can lock your SIM card to prevent
unauthorized calls and use of other
wireless features. When your SIM card is
locked, you must enter the correct PIN
code to unlock it, even if you move it to a
different phone. You can still make
emergency calls when your phone is
locked, however.
IMPORTANT If your SIM card is locked
and you enter the wrong PIN more than
three times, you must call your wireless
service provider for your unique PIN unlock
key (PUK) to unlock your SIM card.
When Phone Lock is turned on, other
people can still see the info on your
smartphone, but they cannot make or receive
phone calls or use the other wireless features
without your password.
TIP
201
CHAPTER
10
YOUR PERSONAL SETTINGS
1 Press Phone
2 Press Menu
.
.
3 Select Options, and then select Phone
Lock.
TIP To manage your FDN list, press
Applications select SIM Book, press Menu,
and then select Modify FDN from the
Options menu.
4 Check the Lock SIM box.
5 When prompted, enter the current PIN
and select OK. (Unless you changed
your PIN, enter the default PIN,
provided with your wireless service
provider’s account materials.)
6 If you want to change the PIN, select
Change PIN, enter a new PIN, and then
select OK. Repeat this step to verify the
new PIN.
7 If your SIM card supports fixed number
dialing (FDN), select Advanced and
check the Enable Fixed Number
Dialing box to restrict dialing to the
numbers in your FDN list. When
prompted, enter your PIN2 and then
select OK.
8 Turn your phone off to activate the
phone lock feature.
9 To turn your phone on again, press and
hold Power/End
, enter your
PIN, and then select OK to unlock your
smartphone.
202
Your SIM card locks again when you turn
off your smartphone and then turn it back
on.
To disable the current Phone Lock settings:
1 Press Phone
2 Press Menu
.
.
3 Select Options, and then select Phone
Lock.
4 Uncheck the Lock SIM box.
5 Enter your PIN code.
6 Select OK.
Locking your Treo
To protect your personal information, you
can lock your Treo 680 so that you need to
enter your password to access any of your
information or use any of the features on
your Treo, including the phone. You can,
however, still make emergency calls when
your Treo is locked.
IMPORTANT If you lock your Treo, you
4 Select the Auto Lock Device box.
must enter the exact password to unlock it.
If you forget the password, you need to
perform a hard reset to resume using your
Treo. Performing a hard reset deletes all
the entries in your Treo. If you use
password protection in Palm Desktop
software, you must remember your
password to restore your info. However, if
you do not use password protection in
Palm Desktop software, you can restore all
previously synchronized info the next time
you sync (see Synchronizing information—
the basics).
5 When prompted, enter your password
and select OK.
1 Press Applications
Security
.
10
CHAPTER
YOUR PERSONAL SETTINGS
6 Select one of the following options:
Never: Prevents your Treo from locking
automatically.
and select
2 Select the Password box.
On power off: Locks your Treo when
you turn off the screen, or when it
shuts off with the Auto-off feature.
At a preset time: Locks your Treo at a
specific time of day.
After a preset delay: Locks your Treo
after a period of inactivity.
7 Select OK.
8 Do one of the following:
3 Assign a password and a password hint.
•
Select Lock & Turn Off to lock your
Treo immediately.
203
CHAPTER
10
YOUR PERSONAL SETTINGS
•
Press Applications
to accept
your settings and continue using your
Treo.
After you create a password, you can lock
your system manually. Press Applications
and select Security. Select Lock & Turn Off,
and then select Off & Lock.
TIP
To change your password, select the
Password box, enter your current password,
and then enter the new password. To delete
your password, select the Password box and
then select Unassign.
TIP
After you enable the mask or hide setting,
any entries marked as private are
immediately hidden or masked. If you
define a password, you must enter it to
display private entries. If you do not define
a password, you (or anyone else) can reveal
private entries without a password.
1 Open the entry that you want to mark
private.
2 Select Details.
3 Check the Private box.
4 Select OK.
Working with private entries
In most applications, you can mark
individual entries as private. All private
entries remain visible and accessible until
you select the Security setting. You have
three Security setting options:
Show Records: Private records are visible.
Hide Records: Private entries do not
appear anywhere in the application.
Mask Records: Private entries are
replaced with a gray bar that lets you know
the entry is there but keeps it from being
legible.
204
Hiding or masking all private entries
Make sure the entries you want to mask or
hide are marked private.
1 Press Applications
Security
.
and select
2 Select the Current Privacy pick list and
select either Hide Records or Mask
Records.
3 If prompted for your password, enter it
and then select OK.
Viewing all private records
You can reveal all the entries you’ve hidden
or masked.
Security and Palm Desktop software
(Windows)
Viewing private entries in a specific
application
You can set the Windows version of
Palm® Desktop software to observe the
security password for your Treo 680. If you
forget your password, you cannot view
your information in Palm Desktop. If your
smartphone is unlocked, you can change
your password on your smartphone, but all
entries marked as private are deleted. You
can restore your private entries the next
time you sync and then create a new
password.
1 Open the application that contains the
private entries you want to see.
Follow these steps to recover from a lost
password:
1 Press Applications
Security
.
and select
2 Select the Current Privacy pick list and
select Show Records.
3 If prompted for your password, enter it
and then select OK.
2 Press Menu
.
3 Select Options, and then select
Security.
4 Select the Current Privacy pick list and
select Show Records.
5 Select OK.
6 If prompted for your password, enter it
and then select OK.
1 Press Applications
Security
.
10
CHAPTER
YOUR PERSONAL SETTINGS
and select
2 Select the Password box.
3 Select Lost Password.
4 Select Yes.
If you want additional security for
Palm Desktop files, you may want to purchase
a third-party solution.
TIP
205
CHAPTER
10
YOUR PERSONAL SETTINGS
Entering owner information
You can use Owner Preferences to record
information that you want to associate with
your Treo 680, such as your name,
company name, and home phone number.
If you lock your Treo (see Locking your
Treo), the Owner Preferences information
appears on the screen that requests your
password to unlock it, and you must also
enter your password to change the Owner
Preferences information.
1 Press Applications
Prefs
.
and select
5 Select Done.
System settings
2 Select Owner.
3 If you assigned a password with the
Security application, select Unlock,
enter your password, and then select
OK to continue.
4 Enter the text that you want to appear in
the Owner Preferences screen.
Setting the date and time
Date & Time Preferences enable you to
manually set the date, time, and location
(time zone) setting for your smartphone.
You can also set your Treo to synchronize
the date, time, and time zone with your
wireless service provider network when
your phone is on, you are inside a coverage
area, and the date, time, and time zone are
available from the network.
1 Press Applications
Prefs
.
2 Select Date & Time.
206
and select
3 Select the Automatically set pick list
and select one of the following settings:
Date, time and time zone: The date,
time, and time zone are acquired from
your wireless service provider’s
network (if settings are available from
the network).
Date and time: Lets you set the time
zone manually. The date and time are
acquired from your wireless service
provider’s network (if settings are
available from the network).
Nothing: Lets you set the date, time,
and time zone manually. No info is
acquired from your wireless service
provider’s network.
4 If the Location pick list appears, select
it, and then select a city in your time
zone.
10
CHAPTER
YOUR PERSONAL SETTINGS
If a city in the same time zone is not on
the list, select Edit List, select Add, select a
city in your time zone, and then select OK. If
necessary, modify any of the settings in the
Edit Location dialog box, and then select OK.
TIP
5 If the Date and Time fields appear,
select the Date field and select the
date, and then select the Time field and
select the time.
6 Select Done.
You can also set time zones for Calendar
events. See Creating an event.
TIP
Optimizing power settings
Power Preferences enable you to adjust
settings to maximize the battery’s
performance.
1 Press Applications
Prefs
.
and select
2 Select Power.
207
CHAPTER
10
YOUR PERSONAL SETTINGS
3 Set any of the following preferences:
Brightness: Sets the intensity of the
screen and keyboard backlights. Drag
the slider or press Left and Right
to adjust the brightness level.
Beam Receive: Determines whether
your Treo is ready to receive information
over an infrared beam. If you leave this
option turned off, you must return to
this screen to turn on this option the
next time you want to receive a beam.
4 Select Done.
TIP You can also access the brightness setting
by pressing Option + P. To temporarily set the
backlight to the preset low setting, press
Option + Menu.
Auto-off after: Determines how long
your screen stays on during a period of
inactivity. When there is no interaction
with the keyboard or screen for the
specified time period, your smartphone
turns off automatically.
On a call, dim backlight after:
Determines how long the backlight
stays on at normal intensity during a
phone call. After the specified time
period, the backlight dims to conserve
power during a long phone call.
208
Connecting to a VPN
If you want to use your Treo to access your
corporate email account or other files on
your corporate server, you may need to set
up a virtual private network (VPN) on your
Treo. A VPN enables you to log in to your
corporate server through the company’s
firewall (security layer). You need a VPN
client on your smartphone if your
smartphone and your company’s server are
located on opposite sides of the firewall.
Check with your company’s system
administrator to see if a VPN is required to
access the corporate server. If a VPN is
necessary, you must purchase and install a
third-party VPN client on your smartphone
to use this feature.
For information about third-party VPN
client software, see the Palm Software
Installation CD or visit www.palm.com/
treo680gsm.
TIP
1 Install your third-party VPN client. See
Installing applications for details.
2 Press Applications
Prefs
.
10
CHAPTER
YOUR PERSONAL SETTINGS
and select
3 Select VPN.
4 Enter the settings provided by your
corporate system administrator.
209
CHAPTER
10
210
YOUR PERSONAL SETTINGS
C H A PT ER
11
Common questions
Although we can’t anticipate all the questions you might have,
this chapter provides answers to some of the most commonly
asked questions. For additional information and answers to
other common questions, visit www.palm.com/
treo680gsm-support.
In this chapter
Upgrading. . . . . . . . . . . . . . . . . . . . . . . . . . . . . . . . . . . . . . . . . . . . . 213
Desktop software installation. . . . . . . . . . . . . . . . . . . . . . . . . . . . . . 215
Resetting your Treo . . . . . . . . . . . . . . . . . . . . . . . . . . . . . . . . . . . . . 215
Replacing the battery . . . . . . . . . . . . . . . . . . . . . . . . . . . . . . . . . . . . 217
Screen . . . . . . . . . . . . . . . . . . . . . . . . . . . . . . . . . . . . . . . . . . . . . . . 219
Synchronization . . . . . . . . . . . . . . . . . . . . . . . . . . . . . . . . . . . . . . . . 220
Phone . . . . . . . . . . . . . . . . . . . . . . . . . . . . . . . . . . . . . . . . . . . . . . . . 227
Hands-free devices . . . . . . . . . . . . . . . . . . . . . . . . . . . . . . . . . . . . . 229
Email . . . . . . . . . . . . . . . . . . . . . . . . . . . . . . . . . . . . . . . . . . . . . . . . 230
Messaging . . . . . . . . . . . . . . . . . . . . . . . . . . . . . . . . . . . . . . . . . . . . 231
Web . . . . . . . . . . . . . . . . . . . . . . . . . . . . . . . . . . . . . . . . . . . . . . . . . 232
Camera. . . . . . . . . . . . . . . . . . . . . . . . . . . . . . . . . . . . . . . . . . . . . . . 235
Making room on your Treo . . . . . . . . . . . . . . . . . . . . . . . . . . . . . . . . 236
Third-party applications . . . . . . . . . . . . . . . . . . . . . . . . . . . . . . . . . . 237
Error messages . . . . . . . . . . . . . . . . . . . . . . . . . . . . . . . . . . . . . . . . 238
Upgrading
If you experience problems with your
Palm® Treo™ 680 smartphone after
performing the upgrade steps in this guide,
you may have incompatible applications or
settings that were not quarantined during
the installation process. These
Incompatible applications or settings can
lead to numerous issues, including system
resets and freezes. If you experience a
problem after upgrading, follow the steps
in this section to remove the incompatible
apps from your smartphone and to transfer
your other info to your new smartphone.
NOTE If you have trouble installing a
third-party application, contact the
developer for assistance.
We recommend that you do not install
apps that do any of the following:
•
Modify phone functions, such as
ringtones, dialing, or caller ID
•
Replace organizer features, such as
Contacts or Calendar
•
Set data connection features, such as
activating or ending data connections
•
Provide web clipping features, such as
PQA files
•
Provide instant messaging features
11
CHAPTER
COMMON QUESTIONS
If you want to continue using these types
of applications, please contact the
third-party developer for software updates
and info about compatibility with your Treo
680.
WINDOWS ONLY
1 On your computer, click
Start>Programs>Palm>Safe HotSync.
2 Follow the instructions on the screen.
3 Locate the Old_Apps folder on your
computer. This folder is usually located
inside one of the following folders:
C:\Program Files\Palm\
C:\Program Files\palmOne\
C:\Program Files\Handspring\
4 To help you identify the app that is
causing the problem, move one app at a
time from the Old_Apps folder to the
Backup folder, and then sync.
213
CHAPTER
11
COMMON QUESTIONS
If the problem recurs, delete the last
app you installed and report the
problem to its developer.
2 Select your user folder and Option-drag
it to your Mac desktop to make a copy
of that folder.
5 Repeat step 4 for each of the apps in
the Old_Apps folder.
3 Confirm that your copy includes the
Backup subfolder and that all the files in
the original Backup subfolder are also in
the copy of the Backup subfolder.
NOTE If you have trouble moving apps
from the Old_Apps folder to the Backup
folder, or determining which files to move,
try reinstalling the app using the original
third- party developer files.
Need more info on the Backup folder? See
What is the backup folder?.
TIP
MAC ONLY
1 Locate your user folder on your
computer.
NOTE Your user folder name is the same
as your device name and is usually found in
this location: <Mac hard drive> : Users :
<your Mac username> : Documents :
Palm : Users
4 Delete all files from the original Backup
subfolder.
5 Perform a hard reset on your Treo 680.
See Resetting your Treo for instructions.
6 Sync your Treo 680 with your new
desktop software and be sure to select
your existing device name from the
User list.
7 To help you identify the app that is
causing the problem, move one
third-party app from the copy of the
Backup subfolder to the original
Backup subfolder, and then sync.
If the problem recurs, delete the last
app you installed and report the
problem to its developer.
8 Repeat step 7 for each of the third-party
apps in the copy of the Backup folder.
214
Desktop software
installation
If you are having trouble installing the
desktop software, you may have the wrong
version of the software or some of your
computer’s resources may be unavailable.
The Palm Software Installation CD installs
software that lets you synchronize using
Palm® Desktop software or Microsoft Outlook
for Windows. If you want to synchronize using
a different personal information manager
(PIM), you must install a third-party solution.
Contact the PIM’s author or vendor to learn if
software is available for your Treo 680.
3 Quit any active applications, including
virus scanners and Internet security
applications.
11
CHAPTER
COMMON QUESTIONS
4 Make sure you’re installing the software
from the Palm Software Installation CD
that came with your new Treo 680.
Other versions of the desktop software
may not work with your Treo 680.
5 Insert the Palm Software Installation CD
to restart the installation.
TIP
IMPORTANT Always use the same
language for your Treo, your computer
operating system, and your desktop
software. Otherwise, you may lose
information or have difficulty with
synchronization. Support is not provided for
mismatched language setups.
Follow these steps to retry the installation.
1 Make sure your computer profile
includes administrator rights to install
software. In large organizations, these
are usually granted by the system
administrator.
2 Restart your computer.
Resetting your Treo
Performing a soft reset
A soft reset is similar to restarting a
computer. If your Treo is not responding
or you have trouble synchronizing with your
computer, a soft reset may help. All your
215
CHAPTER
11
COMMON QUESTIONS
info is retained when you perform a soft
reset.
1 Remove the battery from your
smartphone, and then reinsert it.
Don’t know how? See Replacing the
battery.
NOTE The reset begins when you reinsert
the battery.
2 At the end of the soft reset, Date &
Time Preferences appears. Select
Done.
Don’t know how? See Replacing the
battery.
2 When the Palm logo appears, press and
hold Up
until the black status bar at
the bottom of the screen fills and
disappears, and then release Up .
3 Delete the third-party application that
you suspect is causing the problem.
4 Perform a soft reset. The wireless
features of your smartphone are not
available until you complete this step.
Performing a hard reset
Performing a system reset
A system reset, also called a safe or warm
reset, tells your Treo to stop what it’s doing
and start over again without loading any
system extras. If your Treo loops or freezes
during or after a soft reset, a system reset
may help. Performing a system reset can
release your Treo from an endless loop so
that you can uninstall a third-party
application that may be causing
the looping.
1 Remove the battery from your
smartphone, and then reinsert it.
216
A hard reset erases all information and
third-party software on your Treo. Never
perform a hard reset without first trying a
soft reset, a system reset, and trying to
resolve third-party software issues. (See
Third-party applications for suggestions on
diagnosing third-party software issues.)
After a hard reset, you can restore
previously synchronized information the
next time you sync.
IMPORTANT If you set a password on
your smartphone, performing a hard reset
reformats your smartphone. This is a more
severe form of a hard reset, which
removes all your information, and restores
your formats, preferences, and other
settings to the factory default settings.
Some third-party applications do not
create a backup on your computer when you
synchronize. If you perform a hard reset, you
may lose data in these applications and you
will need to reinstall the application after the
hard reset. Please contact the application’s
developer to find out which data is backed up
during synchronization.
TIP
1 Remove the battery from your
smartphone, and then reinsert it.
Don’t know how? See Replacing the
battery.
2 When the Palm logo appears, press and
hold Power/End
until the black
status bar at the bottom of the screen
fills and disappears, and then release
Power/End
.
3 When the Erase all data? prompt
appears, press Up
to confirm the
hard reset.
IMPORTANT If a Reformatting in
progress message appears, do not touch
your smartphone until the process is
complete. This may take up to 10 minutes.
11
CHAPTER
COMMON QUESTIONS
4 When the language selection screen
appears, select the same language you
selected for your desktop software.
IMPORTANT Always use the same
language for your Treo, your computer
operating system, and your desktop
software. Otherwise, you may lose
information or have difficulty with
synchronization. Support is not provided for
mismatched language setups.
5 (Optional) If you want to confirm that
the hard reset was successful, press
Applications
and select
HotSync
. If you see your device
name in the upper-right corner, the hard
reset was not successful.
Replacing the battery
Your Treo 680 comes with a replaceable
battery. Be sure to use a replacement
battery that is recommended or sold by
Palm and is compatible with the Treo 680.
217
CHAPTER
11
COMMON QUESTIONS
CAUTION Failure to use the proper battery
may result in a risk of personal injury or
product damage, and it voids your
smartphone warranty.
1 Press Power/End
the screen.
45-degree angle, and then press it into
place.
Battery contacts
Smartphone
contacts
to turn off
2 Press the Battery door release button,
and slide the battery door downward
to remove it from your smartphone.
Battery door
release button
Notch
IMPORTANT Use the battery that came
3 Place a finger in the notch next to the
battery, and lift up the old battery at a
45-degree angle to remove it from the
compartment.
4 Align the metal contacts on the new
battery with the contacts inside the
battery compartment, insert the new
battery into the compartment at a
218
with your Treo 680. Do not use a battery
from another Treo model in your Treo 680.
Similarly, do not use the Treo 680 battery in
another Treo model. Using a battery that is
designed for another Treo model can
damage your Treo 680.
5 Slide the battery door onto the back of
the smartphone until it clicks into place.
6 Connect your Treo to the charger or
sync cable to charge the new battery.
Be sure to dispose of your old battery
properly. In some areas, disposal in household
or business trash is prohibited.
TIP
11
CHAPTER
COMMON QUESTIONS
5 If the problem persists, connect your
Treo to the charger (see Charging the
battery) and perform a soft reset again.
6 If that doesn’t work, perform a hard
reset (see Performing a hard reset).
Screen
The screen appears blank
1 When a call lasts longer than the limit
specified in Power Preferences, the
screen dims automatically. In certain
lighting conditions, the screen may
appear blank when this occurs.
Press any key except Power/End to
restore the screen to normal brightness.
Pressing Power/End hangs up the call.
2 When a period of inactivity lasts longer
than the limit specified in Power
Preferences, the screen turns off. Press
and release Power/End
to
wake up the screen.
3 Look closely at the screen. If you can
see a dim image, try adjusting the
screen brightness (see Adjusting the
brightness).
To find carrying cases that protect the
screen and other useful accessories, visit
www.palm.com/treo680gsm.
TIP
The screen doesn’t respond accurately to
taps or it activates wrong features
1 Press Applications
.
2 Use the 5-way
to select Prefs
3 Use the 5-way
Touchscreen.
to select
.
4 Follow the onscreen instructions to
align the screen.
5 Select Done.
6 If the problem persists, check for dirt
between the screen and the edge of the
smartphone.
7 If you’re using a screen protector, make
sure that it is properly installed.
4 If the screen is still blank, perform a soft
reset (see Performing a soft reset).
219
CHAPTER
11
COMMON QUESTIONS
There’s a blinking bell in the upper-left
corner
The blinking bell in the upper-left corner of
the screen is the Alert icon. It appears
when you have alarms or messages that
you haven’t acknowledged.
1 Press and hold Center
or tap the
blinking bell
with your stylus.
2 When the list of pending alerts appears,
do any of the following:
•
Select the text of the alert to view the
item. The item stays in the list.
•
Check the box next to an alert to clear
it from the list, and then select Done.
Synchronization
Synchronization backs up the information
from your Treo onto your computer and
vice versa. If you ever need to perform a
hard reset or otherwise need to erase all
your information on your smartphone, you
can synchronize your smartphone with
your computer to restore the info. Similarly,
if your computer crashes and your Palm
Desktop info is damaged, you can recover
220
your info by synchronizing with your
smartphone. To make sure you always
have an up-to-date backup of your info,
synchronize frequently.
This section describes synchronization
between your Treo and a desktop
computer running Palm Desktop software.
You can also synchronize the information
on your Treo using third-party applications.
See the documentation for the third-party
application for information on features and
configuration.
Before you attempt to synchronize, make
sure you’ve installed the desktop
synchronization software from the Palm
Software Installation CD.
TIP Every device needs a unique name. Never
synchronize more than one device to the
same device name on your computer.
I can’t find my user folder
Windows: If your device name is one
word, your user folder name is the first six
characters of your device name. If your
device name is two words, your user folder
name consists of the first six characters of
the second word of your device name
followed by the first letter of the first word.
For example, if your device name is John
Smith, your user folder is named SmithJ.
Your user folder is usually located inside
one of the following folders:
C:\Program Files\Palm\
C:\Program Files\palmOne\
C:\Program Files\Handspring\
Mac: Your user folder name is the same as
your device name and is usually found in
this location: <Mac hard drive> : Users :
<your Mac username> : Documents :
Palm : Users
What is the backup folder?
The Backup folder is located inside your
user folder (see I can’t find my user folder).
During synchronization, HotSync® Manager
puts a copy of most of your info and
applications in the Backup folder. (Some
third-party apps do not put a copy in the
Backup folder.) The next time you sync,
HotSync Manager compares the contents
of the Backup folder to the contents of your
smartphone, and then restores any missing
info or applications.
If an app that you deleted reappears on
your smartphone, try deleting the app from
your Backup folder.
11
CHAPTER
COMMON QUESTIONS
Palm Desktop does not respond to a sync
attempt
1 Make sure that the USB sync cable is
securely connected to the USB port on
your computer and on the bottom of
your smartphone (see Synchronizing
information—the basics).
If you’re having trouble trying to sync
using an IR or Bluetooth® wireless technology
connection, try using the USB sync cable
instead. If this solves the problem, then check
your IR or Bluetooth settings (see
Synchronizing information—advanced).
TIP
2 Make sure that HotSync manager is
running:
Windows: Right-click HotSync
manager
in the taskbar in the
lower-right corner of your computer
screen, and make sure that Local USB
is checked. If you don’t see the HotSync
manager icon, click Start, select
Programs, select Palm, and then select
HotSync Manager.
221
COMMON QUESTIONS
CHAPTER
11
Mac: Find the Palm folder on your Mac
hard drive. Double-click the HotSync
manager
icon in the Palm folder. In
the Connection Settings panel, set the
Local Setup port to Palm USB.
3 Synchronize. If the synchronization is
successful, you do not need to
complete the remaining steps.
4 Perform a soft reset (see Performing a
soft reset).
5 Synchronize. If the synchronization is
successful, you do not need to
complete the remaining steps.
6 If problems persist and you’re
synchronizing through a USB hub, try
connecting the sync cable to a different
USB port or directly to your computer’s
built-in USB port.
7 Synchronize. If the synchronization is
successful, you do not need to
complete the remaining steps.
8 Check the multi-connector on the
bottom of your smartphone for debris or
222
discoloration. Carefully clean the
connector by dipping a cotton swab in
some rubbing alcohol and gently wiping
the metal contacts on the connector.
Try to sync again.
9 Check the connector on the USB sync
cable for integrity and cleanliness. Make
sure the pins on the connector are
straight, protruding, and not damaged. If
the cable appears to be damaged, stop
here and locate another USB sync
cable.
10 WINDOWS ONLY Uninstall
Palm Desktop software. Click Start,
select Settings, select Control Panel,
select Add or Remove Programs,
select Palm Desktop software, and
then click Change/Remove.
NOTE Mac computers do not provide an
option for uninstalling Palm Desktop
software. Contact Technical Support if the
problem persists after completing step 7.
11 Reboot your computer.
12 Reinstall Palm Desktop software from
the Palm Software Installation CD that
came with your Treo 680.
Synchronization starts but stops without
finishing
The HotSync Log can give you information
about your most recent synchronization.
TIP
Windows: Right-click the HotSync manager
icon in the taskbar in the lower-right corner of
your computer screen, and then select View
Log.
Mac: Open Palm Desktop software. From the
HotSync menu, select View Log.
®
If you upgraded from a previous Palm OS
device or received a system error, such as
Sys0505, there may be conflicts with
software on your smartphone.
1 Locate your Backup subfolder and
rename the folder (for example,
BackupOld).
Windows: C:\Program
Files\Palm\<device name>
Mac: <Mac hard drive> : Applications
: Palm : Users : <device name>
NOTE Can’t find a Palm folder in Program
Files? Then look for a palmOne or
Handspring folder instead. For more info,
see I can’t find my user folder.
2 Synchronize.
11
CHAPTER
COMMON QUESTIONS
3 If the problem is resolved, begin
reinstalling your third-party applications
one at a time by double-clicking a single
file in the original Backup subfolder that
you renamed, and sync after each
application you install. If the problem
recurs, delete the last application you
installed and report the problem to its
developer.
4
WINDOWS ONLY If the Windows
New Hardware Wizard appears, the
synchronization process may be timing
out before the wizard completes its job.
Follow all instructions in the New
Hardware Wizard, and then sync again.
5 WINDOWS ONLY Uninstall
Palm Desktop software. Click Start,
select Settings, select Control Panel,
select Add or Remove Programs,
select Palm Desktop software, and
then click Change/Remove.
NOTE Mac computers do not provide an
option for uninstalling Palm Desktop
software. Contact Technical Support if the
problem persists after completing step 3.
6 Reboot your computer.
223
CHAPTER
11
COMMON QUESTIONS
7 Reinstall Palm Desktop software from
the Palm Software Installation CD that
came with your Treo 680.
Synchronization finishes but info doesn’t
appear where it should
1 Make sure you’re synchronizing with
the intended desktop personal
information manager (PIM). The Palm
Software Installation CD enables you to
choose whether you want to
synchronize with Palm Desktop
software or Microsoft Outlook for
Windows. Reinsert the installation CD
and select Change your
synchronization method if necessary.
If you use a different PIM, you need to
install third-party software to
synchronize. For more information,
consult the company that makes the
PIM.
2 If multiple Palm OS devices are
synchronizing with your computer,
make sure the name of the device you
are synchronizing appears in the User
field on the toolbar of Palm Desktop
software.
224
3 Open HotSync manager on your
computer, and make sure the necessary
conduits are set to Synchronize the
files.
NOTE If you need to change the setting to
Synchronize the files, be sure to check
the Set as default box as well.
4 WINDOWS ONLY Uninstall
Palm Desktop software. Click Start,
select Settings, select Control Panel,
select Add or Remove Programs,
select Palm Desktop software, and
then click Change/Remove.
MAC ONLY Mac computers do not
provide an option for uninstalling Palm
Desktop software. Contact Technical
Support if the problem persists after
completing step 3.
5 Reboot your computer.
6 Reinstall Palm Desktop software from
the Palm Software Installation CD that
came with your Treo 680.
7 (Outlook only) If you’re trying to
synchronize offline, set your Outlook
Calendar, Contacts, Notes, and Tasks to
be available offline.
5 Click Change.
Outlook subfolders and public folders are
not accessible with the included software. You
may wish to use a third-party solution instead.
TIP
(Outlook only) If you want to sync your
info with a global Exchange Address Book,
you must copy the addresses to your local
Contacts list in Outlook (right-click the
addresses and select Add to Personal
Address Book).
TIP
For more info on Outlook conduits,
right-click the HotSync manager icon in the
taskbar, select Custom, select an app with
Outlook in its name, and then select Help.
TIP
I have duplicate entries in Microsoft
Outlook after I sync
1 Open Microsoft Outlook and delete the
duplicate entries.
2 On your computer, go to the application
with duplicate entries and manually
enter any info you added to your
smartphone since the last time
you synchronized.
3 Right-click HotSync manager
taskbar and select Custom.
in the
4 Select an application that has duplicate
entries and also has Outlook in its
name.
11
CHAPTER
COMMON QUESTIONS
6 Select Desktop overwrites handheld,
and then click OK.
7 If more than one application has
duplicate entries, repeat steps 4
through 6 for each application with
duplicates.
8 Click Done.
9 Synchronize your smartphone and your
computer.
My appointments show up in the wrong
time slot after I sync
If you create an appointment in the wrong
time zone (i.e., your desktop was set to the
wrong time zone), it shows up in the wrong
time zone on your Treo. To be safe, enable
local network time and avoid assigning
time zones to your appointments.
If you’re using Microsoft Outlook:
1 Make sure that you installed the
Microsoft Outlook conduit that came
with your Treo 680. If you’re not sure
whether this software is installed,
reinstall Palm Desktop software from
the Palm Software Installation CD that
came with your smartphone.
225
CHAPTER
11
COMMON QUESTIONS
2 Open Microsoft Outlook and correct the
wrong entries.
3 On your computer, manually enter any
Calendar info you added to your
smartphone since the last time
you synchronized.
4 Click HotSync manager
in the
taskbar and select Custom.
5 Select an application that has both
Calendar and Outlook in its name.
6 Click Change.
7 Select Desktop overwrites handheld,
and then click OK.
8 Synchronize your smartphone and your
computer.
9 Repeat steps 4 through 6 to open the
Calendar Change HotSync Action dialog
box again.
10 Make sure Synchronize the files is
selected and Set as default is checked,
and then click OK.
You should now be able to assign time
zones to your events without encountering
this problem.
226
If you’re using Palm Desktop software:
1 On your smartphone, press Calendar
.
2 Press Menu
.
3 Select Options, and then select
Preferences.
4 Uncheck the New events use time
zones box (if it’s checked).
5 On your computer, open Palm Desktop
software and correct the wrong entries.
6 On your computer, manually enter any
Calendar info you added to your
smartphone since the last time
you synchronized.
7 Click HotSync manager
in the
taskbar and select Custom.
8 Select Calendar.
9 Click Change.
10 Select Desktop overwrites handheld,
and then click OK.
11 Synchronize your smartphone and your
computer.
12 Repeat steps 7 through 9 to open the
Calendar Change HotSync Action dialog
box again.
13 Make sure Synchronize the files is
selected and Set as default is checked,
and then click OK.
You should now be able to assign time
zones to your events without
encountering this problem.
IMPORTANT To avoid this problem in the
future, do not assign time zones to your
events. Palm Desktop software does not
support time zones.
The text of my memos is truncated after I
sync
If you use your desktop software to create
a memo that is longer than 4,096
characters, the excess characters are
truncated when you transfer the memo to
your Treo 680.
strength by looking at the Signal Strength
icon in the title bar of the Main tab in
the Phone application. The stronger the
signal, the more bars that appear. If you are
outside a coverage area, no bars appear.
1 If you’re standing, move about ten feet
in any direction.
2 If you’re in a building, move near a
window. Open any metal blinds.
3 If you’re in a building, move outdoors or
to a more open area.
4 If you’re outdoors, move away from
large buildings, trees, or electrical wires.
5 If you’re in a vehicle, move your Treo so
that it’s close to a window of your
vehicle.
My Treo won’t connect to the mobile
network
Phone
1 Try the suggestions about signal
strength described in Signal strength is
weak.
Signal strength is weak
2 Turn off your phone and turn it on again
(see Turning your phone on and off).
Become familiar with low coverage areas
where you live, commute, work, and play.
Then you will know when to expect signal
strength issues. You can check signal
11
CHAPTER
COMMON QUESTIONS
3 Remove the SIM card and reinsert it
(see Inserting the SIM card and battery).
227
CHAPTER
11
COMMON QUESTIONS
4 Perform a soft reset (see Performing a
soft reset).
My voice is too quiet on the other end
•
Be sure to place the bottom of the Treo,
or the hands-free microphone, close to
your mouth.
•
Check the Signal Strength
icon in
the title bar of the Main tab in the
Phone application. If the signal is weak
(few bars are displayed), try the
suggestions about signal strength
described in Signal strength is weak.
The other person hears an echo
•
Try decreasing the volume on your Treo
to avoid coupling or feedback on the
other person’s end. This applies to both
the speakerphone and the earpiece.
•
Position the earpiece closer to your ear
to prevent sound leaking back to the
microphone. Keep your hand away from
the microphone hole, which is on the
bottom right side of the smartphone.
•
If you’re using the speakerphone
feature with your Treo lying on a flat
surface, try turning the Treo face down
(screen facing the surface).
I hear my own voice echo
Ask the person on the other end of the call
to turn down the volume on his or her
phone or to hold the phone closer to his or
her ear.
I hear static or interference
Check the Signal Strength
icon in the
title bar of the Main tab in the Phone
application. If the signal is weak (few bars
are displayed), try the suggestions about
signal strength described in Signal strength
is weak.
If you’re using a Bluetooth hands-free
device, see I hear static or interference
when using my Bluetooth
hands-free device.
My phone seems to turn off by itself
If a system error and reset occur, the Treo
680 automatically turns the phone on if it
was on before the reset. However, if the
228
Treo 680 can’t determine if your phone was
on before the reset, the phone does not
automatically turn on (see Turning your
phone on and off). If the problem persists
and you’re using third-party applications,
see Third-party applications for additional
suggestions.
Hands-free devices
Bluetooth range is up to 30 feet in
optimum environmental conditions.
Performance and range may be affected by
physical obstacles, radio interference from
nearby electronic equipment, and other
factors.
TIP
My Treo makes or answers calls when it’s
in a bag or pocket
Items in your bag or pocket may be
pressing the onscreen Answer button or
otherwise activating screen items. If this
happens, be sure to press Power/End
to turn off the screen before
placing your Treo in a bag or pocket. You
may also want to disable the screen’s
touch-sensitive feature during incoming
calls (see Locking your screen).
To find carrying cases that can help
prevent your smartphone from making calls,
as well as other useful accessories, visit
www.palm.com/treo680gsm.
11
CHAPTER
COMMON QUESTIONS
I can’t make or receive calls using a
Bluetooth hands-free device
Confirm all the following:
•
The Bluetooth device is compatible with
your smartphone. Go to
www.palm.com/treo680gsm-support
for a list of compatible devices.
•
Press Applications
and select
Bluetooth
. Make sure the
Bluetooth setting is On.
•
You have already formed a partnership
between your Treo 680 and your
hands-free device, and that the
hands-free device appears in the
Trusted Devices list. (see Connecting to
a Bluetooth hands-free device).
TIP
229
CHAPTER
11
COMMON QUESTIONS
•
•
Your hands-free device is charged and
turned on.
Your Treo is within range of the
hands-free device.
If the problem persists, turn the Bluetooth
setting Off and then turn it On again. If it
still persists, create a new partnership with
the hands-free device (see Connecting to a
Bluetooth hands-free device).
I hear static or interference when using
my Bluetooth hands-free device
•
•
•
230
TIP For best performance, keep your
Bluetooth hands-free device and your phone
on the same side of your body.
Try moving your Treo closer to the
hands-free device. Audio quality
degrades as the distance between your
Treo and hands-free device increases.
The effective range for a device varies
between manufacturers.
Confirm that no obstructions, including
your body, are between your Treo and
your hands-free device.
If the problem persists, turn the
Bluetooth setting Off and then turn it
back on again. If it still persists, create a
new partnership with the hands-free
device (see Connecting to a Bluetooth
hands-free device).
Some features of my Bluetooth
hands-free device don’t work with my
Treo
•
Check the Palm compatibility list at
www.palm.com/treo680gsm-support to
ensure that your device is compatible.
•
Check the documentation that came
with your device or the manufacturer’s
website for information specific to
your device.
Email
•
For troubleshooting info on the
VersaMail® application, see the User
Guide for the VersaMail Application on
your computer.
Windows: Start>Programs>Palm
Mac: Insert the Palm Installation CD
and click the link to the User Guide for
have been correctly activated, and that
they are available at your location. Your
wireless service provider should be able
to tell you if text messaging services
have been experiencing transmission
delays. Delays can also occur between
the time that a message is sent and the
time it is received.
the VersaMail Application in the
Documentation folder.
Messaging
I can’t tell if data services are available
When your phone is on, icons appear in the
title bar in the Main tab in the Phone
application to indicate whether data
services are available and whether a data
connection is active. Make sure that either
of the following icons appears in the title
bar of the Main tab:
. If you do not
see either of these icons, data services are
not available in your current location and
you cannot exchange multimedia
messages.
I can’t send or receive text messages
•
Make sure your SIM card is inserted
correctly (see Inserting the SIM card
and battery) and your phone is turned on
(see Turning your phone on and off).
•
Contact your wireless service provider
to verify that your plan includes text
messaging services, that these services
•
Verify with the recipient that the
receiving device can handle text
messages.
•
If a text message arrives but does not
display an alert, perform a soft reset
(see Performing a soft reset).
11
CHAPTER
COMMON QUESTIONS
I can’t send or receive multimedia
messages
•
Make sure your phone is turned on (see
Turning your phone on and off).
•
Contact your wireless service provider
to verify that your plan includes
multimedia messaging services (MMS),
that these services have been correctly
activated, and that they are available at
your location. Your wireless service
provider should be able to tell you if
multimedia messaging services have
been experiencing transmission delays.
231
COMMON QUESTIONS
CHAPTER
11
Delays can also occur between the time
that a message is sent and the time it is
received.
•
Make sure that either of the following
icons appears in the title bar of the Main
tab:
. If you do not see either of
these icons, data services are not
available in your current location and you
cannot exchange multimedia messages.
•
Verify with the recipient that the
receiving device can handle multimedia
messages.
•
If a message arrives but does not
display an alert, perform a soft reset
(see Performing a soft reset).
Web
I can’t tell if data services are available
When your phone is on, icons appear in the
title bar in the Main tab in the Phone
application to indicate whether data
services are available and whether a data
connection is active. Make sure that either
of the following icons appears in the title
bar of the Main tab:
. If you do not
232
see either of these icons, data services are
not available in your current location and
you cannot connect to the Internet.
My Treo won’t connect to the Internet
Your Treo 680 supports GPRS and EDGE
wireless data networks. To connect to the
Internet, you must subscribe to and
activate data services with your wireless
service provider, and you must be in a
location with data coverage.
1 Press and hold Power/End
to
turn off your phone. Then press
and hold the same button to turn it back
on again.
2 Press Phone
and look for either of
the following icons in the title bar of the
Main tab:
.
3 If you see these icons, you are in a data
coverage area. Try connecting to the
Internet again. If you do not see either
of these icons, press Applications
,
select Prefs
, and continue with the
following steps.
4 Select Network.
5 Select the Service pick list and select
your wireless service provider’s data
service.
6 Select Connect.
7 If the connection is successful, go the
web browser. If you still can’t make a
connection, perform a soft reset (see
Performing a soft reset).
8 If your phone did not turn on
automatically after the soft reset, press
and hold Power/End
to turn on
your phone, and try connecting to the
Internet.
9 Contact your wireless service provider
to verify the following:
•
Your subscription plan includes
high-speed data services.
•
Data services have been activated on
your account.
•
Data coverage is available in your
location.
•
There are no data service outages in
your location.
I can’t access a web page
11
CHAPTER
COMMON QUESTIONS
First, make sure you have Internet access:
Open the web browser and try to view
another web page you’ve loaded before. To
ensure you’re viewing the page directly
from the Internet, press Menu
, select
Go, and then select Refresh.
If you can view the other web page after
you refresh it, but you still can’t access the
page you were originally trying to view, the
page may contain elements that are not
supported by the web browser. These
include Flash, Shockwave, VBScript,
WMLScript, and other plug-ins.
Some websites use a redirector to their
true home page. If the web browser on
your smartphone can’t follow the
redirector, try using a desktop browser to
see the landing page of the redirector, and
then enter that address in the web browser
on your smartphone.
Your Treo can open your email application
when you select an email address on a web
page. If nothing happens when you select the
link, make sure your email application is
already set up.
TIP
233
CHAPTER
11
COMMON QUESTIONS
It takes a long time for a web page to load
If it is taking longer than usual to load web
pages, you may have traveled from an
EDGE service area to a GPRS service area.
Although GPRS data service is considered
a high-speed data service, it seems slow if
you are used to EDGE speed.
1 Press Phone
and look for either of
the following icons in the title bar of the
Main tab to confirm that you have a data
connection:
.
2 Try opening a different web page to see
if the problem persists.
•
If you can open a different web page,
it is likely that the original web site is
experiencing problems, and the
problem is not related to your Treo.
•
If the problem persists on a different
web page, you may have a problem
with your connection to your wireless
service provider network.
3 To be sure there is not a problem with
your connection to your wireless
service provider network, press and
hold Power/End
to turn off
your phone. Then press and hold the
same button to turn it back on again.
234
4 Try opening the web page again to see
if it loads faster.
An image or map is too small on
my screen
The web browser has two modes:
Optimized and Wide Page. Optimized
Mode resizes all images and page
elements to fit in a single column on the
smartphone screen. Switch to Wide Page
Mode to see the full-size image (see
Viewing a web page).
You may also be able to save the image on
your smartphone or an expansion card and
then view the image later on your
computer.
A secure site refuses to permit a
transaction
Some websites don’t support certain
browsers for transactions. Please contact
the site’s webmaster to make sure the site
allows transactions using Blazer™ web
browser from your Treo.
computer varies between
manufacturers.
My Bluetooth DUN connection isn’t
working
Check all of the following:
•
Press Applications
and select
Bluetooth
. Make sure the
Bluetooth setting is On.
•
You have already formed a partnership
between your Treo 680 and your
computer (see Creating a partnership
between your Treo and your computer).
•
The Bluetooth feature on your computer
is turned on.
•
Your Treo is within 30 feet of your
computer.
Bluetooth range is up to 30 feet in
optimum environmental conditions.
Performance and range may be affected by
physical obstacles, radio interference from
nearby electronic equipment, and other
factors.
TIP
If the problem persists, try the following:
•
Turn the Bluetooth setting Off and then
turn it back on again.
•
Try moving your Treo closer to your
computer. The effective range for a
•
Confirm that no obstructions, including
your body, are between your Treo and
your computer.
•
If the problem persists, create a new
partnership with your computer (see
Creating a partnership between your
Treo and your computer).
11
CHAPTER
COMMON QUESTIONS
Camera
Here are some tips for taking good pictures
with the built-in camera:
•
Clean the camera’s lens with a soft,
lint-free cloth.
•
Take pictures in bright lighting
conditions. Low-light images may be
grainy, due to the sensitivity of the
camera.
•
Hold the smartphone as still as
possible. Try supporting your
picture-taking arm against your body or
a stationary object (such as a wall).
235
CHAPTER
11
COMMON QUESTIONS
•
Keep the subject of the picture still.
Exposure time is longer with lower light
levels, so you may see a blur.
•
For best results, verify that you have the
brightest light source coming from
behind you, lighting the subject’s face.
Avoid taking indoor pictures with the
subject in front of a window or light.
•
Make sure the subject is at least 18
inches away from the camera to ensure
good focus.
Remember that when you synchronize
your smartphone with your computer, your
camera images are stored in the My
Pictures/Palm Photos folder on your hard
drive (see Viewing pictures and videos on
your computer).
the Treo 680 itself to run applications from
an expansion card. For more info on using
expansion cards, see Using expansion
cards.
If you store a large number of records or
install many third-party applications, the
internal memory on your smartphone may
fill up. Here are some common ways to
clear space:
Email: Messages that have large
attachments can quickly consume memory
on your Treo. Delete messages with large
attachments. If you have hundreds of
messages with or without attachments,
you may want to delete older messages to
make room (see the User Guide for the
VersaMail Application on your computer).
Windows: Start>Programs>Palm
Making room on your
Treo
Keep in mind that your Treo 680 includes
an expansion card slot, and that you can
store applications and information on
expansion cards (sold separately).
However, you still need free memory on
236
Mac: Insert the Palm Installation CD
and click the link to the User Guide for
the VersaMail Application in the
Documentation folder.
Pictures & Videos: Large images take up a
lot of memory. Move images to an
expansion card or synchronize them to your
computer, and then delete the images
from your Treo (see Viewing pictures and
videos on your computer).
Music: Music files often consume a lot of
memory. Move music files to an expansion
card, or delete large files from your Treo.
Messaging: Multimedia content can also
consume a lot of memory. Move
multimedia content to an expansion card,
or delete large files from your Treo (see
Deleting messages).
Internet: If you set a large web browser
cache, you may want to use the web
browser’s advanced Memory Management
settings to clear all recent pages
(see Customizing your web browser
settings).
Third-party applications: You can delete
infrequently used applications (see
Removing applications) or move them to an
expansion card (see Copying applications
between an expansion card and your Treo).
Third-party
applications
11
CHAPTER
COMMON QUESTIONS
Some third-party applications can cause
conflicts on your Treo 680. For example,
third-party applications that were not
written with the Treo keyboard and 5-way
navigator in mind may cause strange
behavior or errors when using the keyboard
and 5-way navigator in these applications.
Third-party applications that modify
wireless features may require extra
troubleshooting.
If you recently installed an application and
your device seems to be stuck, try the
following:
1 Perform a soft reset (see Performing a
soft reset).
2 If the problem persists, perform a
system reset (see Performing a system
reset).
3 Delete the most recently installed
application from your Treo 680 (see
Removing applications).
237
CHAPTER
11
COMMON QUESTIONS
4 If the problem persists, perform another
system reset.
5 If possible, synchronize your
smartphone with your computer to back
up your most recent info.
6 If you’re unable to perform the
preceding steps or the problem
persists, locate your Backup subfolder
on your computer and rename the
folder (for example, BackupOld).
Windows: C:\Program
Files\Palm\<device name>
file in the original Backup subfolder that
you renamed, and sync after each
application you install.
10 If the problem recurs, delete the last
application you installed and report the
problem to its developer.
I can’t exit a game or third-party
application
Press Option
+ Applications
return to Applications View.
to
Getting more help
Mac: Mac hard drive> : Applications :
Palm : Users : <device name>
NOTE Can’t find a Palm folder in Program
Files? Then look for a palmOne or
Handspring folder instead. For more info,
see I can’t find my user folder.
7 Perform a hard reset (see Performing a
hard reset).
8 Sync to restore your info in Calendar,
Contacts, Tasks, Memos, and Pictures
& Videos.
9 If the problem is resolved, begin
reinstalling your third-party applications
one at a time by double-clicking a single
238
Contact the author or vendor of the
third-party software if you require further
assistance.
Error messages
Your Treo 680 is designed to minimize
interruptions when a system error occurs.
If your smartphone encounters a system
error, it automatically resets itself and
resumes functioning as normal. If possible,
it even turns the phone back on if it was on
before the error occurred.
Sometimes you might want to know more
about an error. Your Treo 680 uses a special
interface to show error messages in
greater detail.
3 Review the screen with details about
the conditions that led up to the most
recent automatic reset.
1 Press Phone
NOTE Third-party developers create their
own error messages. If you do not
understand an error message, please
contact the developer of the application for
help.
.
2 Enter #*377, and then press Send
.
11
CHAPTER
COMMON QUESTIONS
4 Select OK.
239
CHAPTER
11
240
COMMON QUESTIONS
Where to learn more
Whether you’re on the go or at your
computer, there are several ways to learn
more about using your Palm® Treo™ 680
smartphone.
For a quick introduction
Quick Tour: The Quick Tour introduces you
to many of the features on your Treo 680.
It is already installed on your Treo, and you
can open it any time. Press Applications
, and then select Quick Tour
.
While using your Treo
On-device User Guide: A copy of this
guide is included right on your smartphone.
The on-device guide is specially formatted
for your smartphone screen. To view the
on-device guide, press Applications
,
and then select My Treo
.
Tips: Many of the built-in applications
include helpful tips for getting the most out
of your Treo. To view these tips, open an
application, press Menu
, select
Options, and then select Tips.
Information: Many dialog boxes have a
Tips
icon in the upper-right corner.
Select the Tips icon to learn about the
tasks you can perform in that dialog box.
Online support from Palm: For up-to-date
downloads, troubleshooting, and support
information, go to
www.palm.com/treo680gsm-support.
If you need more information
Books: Many books on Palm OS® devices
are available in local or online book retailers
(look in the computers section), or visit
www.palm.com/treo680gsm.
Online forums: Consult online user
discussion groups to swap Treo
information and learn about Treo topics you
may find nowhere else. Visit
www.palm.com/treo680gsm for details.
Customer service from your wireless
service provider: For questions about your
mobile account or features, contact your
wireless service provider.
WHERE TO LEARN MORE
241
242
WHERE TO LEARN MORE
Terms
Alt (alternative)
A keyboard key. Enter a letter on the
keyboard, and then press Alt
to access
variations such as international characters
and symbols.
Applications View
The screen on your Palm® Treo™ 680
smartphone from which you can open all
applications.
Auto-off interval
The time of inactivity that passes before
the screen on your smartphone turns off.
The wireless features on your smartphone
are unaffected by this setting.
Beam
The process of sending or receiving an
entry or application using the infrared (IR)
port on your Treo.
®
Bluetooth wireless technology
information over short distances. For more
info, visit www.bluetooth.com.
CSD (circuit-switched data)
A dial-up Internet connection. You pay for
the connection time, not how much
information you transfer. Contrast with
GPRS.
Device name
The name associated with your Treo 680
and with the info in your desktop software.
The device name (sometimes called the
username) distinguishes your Treo 680
from all other Palm OS® devices. When you
first synchronize your Treo 680, you are
asked to give it a device name. This name
appears in the User list in Palm Desktop
software. Every Palm OS device that is
synchronized with the same computer
must have a unique device name.
Dialog box
A set of options and command buttons that
is enclosed by a border and that enables
you to carry out a specific task.
Technology that enables devices such as
smartphones, mobile phones, and
computers to connect wirelessly to each
other so that they can exchange
TERMS
243
EDGE (Enhanced Data rates for GSM
Evolution)
An enhanced version of GPRS that delivers
data speeds that are up to three times
faster than standard GPRS connections.
(Additional charges may apply.)
A way of transmitting information using
light waves; this is called beaming. The IR
port on your Treo enables you to transfer
information to other IR devices within a
short radius.
Favorite
Lithium Ion (Li-Ion)
A button that provides quick access to a
phone number (speed-dial button) or
commonly used application (such as Web
or Messaging). You can define an unlimited
number of favorite buttons in the Phone
application.
The rechargeable battery technology used
in the Treo 680.
GPRS (General Packet Radio Service)
A mobile Internet connectivity technology
that allows persistent data connections.
(Additional charges may apply.)
HotSync®
The technology that synchronizes your Treo
and your computer with the simple press
of a button.
HotSync manager
The computer application that manages the
synchronization of your Treo with your
computer.
244
Infrared (IR)
TERMS
MMS (Multimedia Messaging System)
An enhanced form of messaging that
enables you to send pictures, videos,
animations, sounds, and ringtones almost
instantly.
Option key
The keyboard key that enables you to
access the alternative feature that appears
above the letter on each key.
Palm® Desktop software
A PIM application for computers that helps
you manage your personal information and
keep your personal information
synchronized with your Treo.
Palm OS
PIM (personal information manager)
The operating system of your Treo 680.
Palm OS is known for its simplicity of use
and for the large number of compatible
third-party applications that can be added
to your smartphone.
A genre of software that includes
applications such as Palm Desktop
software, Microsoft Outlook, Lotus Notes,
and ACT!. PIMs generally store contacts,
schedules, tasks, and memos.
Palm™ Quick Install
PIN (personal identification number)
The component on your Windows
computer that enables you to install Palm
OS applications and other information on
your Treo.
The four-digit password assigned to your
SIM card by your wireless service provider.
Turning on the PIN lock secures your
wireless account. See also PUK.
Partnership
PIN2 (personal identification number 2)
Two Bluetooth devices—for example, your
smartphone and a hands-free device—that
can connect because each device finds the
same passkey on the other device. Once
you form a partnership with a device, you
don’t need to enter a passkey to connect
with that device again. Partnership is also
known as paired relationship, pairing,
trusted device, and trusted pair on some
devices.
A code that protects certain network
settings such as call barring or fixed dialing.
Phone
A letter that you can press and hold to
activate a favorite from any tab in the
Phone app. For example, create a
speed-dial button for your mother's
number and enter the letter M for “Mom”
The application on your Treo 680 that
enables you to make and receive phone
calls.
PUK (PIN unlock key)
A special extended password assigned to
your SIM card. If you enter the wrong PIN
more than three times, your SIM card will
be blocked and you must call your wireless
service provider for the PUK.
Quick key
TERMS
245
as the Quick Key. Then when you want to
call her, go to the Phone app and press and
hold M. Your smartphone dials the number.
SIM (Subscriber Identity Module) card
The smartcard, inserted in your Treo 680,
that contains your mobile account
information, such as your phone number
and the services to which you subscribe.
Phonebook entries and SMS messages
can also be stored on the SIM card.
Slide
A collection of text, pictures, videos, and
sounds that are grouped together within a
multimedia message created in the
Messaging application. During playback, all
the items within a particular slide appear
on the same screen. If a multimedia
message contains multiple slides, each
slide can be viewed separately during
playback.
SMS (Short Messaging Service)
The service that exchanges short text
messages almost instantly. Text messages
246
TERMS
are typically sent to a mobile phone
number, rather than an email address
(although this too is possible). These
messages can usually include up to 160
characters; messages with more than 160
characters are automatically split into
several messages. You can send and
receive SMS messages while you are on a
voice call.
Streaming
Technology that enables you to access
media content—for example, watch video
or listen to an audio program—directly
from the Internet on your smartphone
without needing to download a file to save
on your smartphone.
User folder
The folder on your computer that contains
the information you enter in Palm Desktop
software and the information you enter on
your smartphone and synchronize with
Palm Desktop software.
Regulatory
information
Manufacturers Name:
Palm Inc.
Importer Name/Address:
Roy Bedlow
Buckhurst Court
London Road
Wokingham, Berkshire RG40 1PA,
UK
FCC Notice
Type of Equipment:
Smartphone
This equipment has been tested and found to comply with the limits
for a Class B digital device, pursuant to part 15 of the FCC Rules.
These limits are designed to provide reasonable protection against
harmful interference in a residential installation. This equipment
generates, uses and can radiate radio frequency energy and, if not
installed and used in accordance with the instructions, may cause
harmful interference to radio communications. However, there is no
guarantee that interference will not occur in a particular installation. If
this equipment does cause harmful interference to radio or television
reception, which can be determined by turning the equipment off and
on, the user is encouraged to try to correct the interference by one or
more of the following measures:
Model Number:
Treo 680
Year of Manufacture:
2006
•
Reorient or relocate the receiving antenna.
•
Increase the separation between the equipment and receiver.
In order to comply with FCC RF exposure safety guidelines, users
MUST use one of the following types of bodyworn accessories.
•
Connect the equipment into an outlet on a circuit different from
that to which the receiver is connected.
•
Consult the dealer or an experienced radio/TV technician for help.
CE Declaration of Conformity
Application of Council Directive(s):
89/336/EEC (EMC directive), 99/5/EC (R&TTE directive)
73/23/EEC (Low Voltage Directive)
Standards to which Conformity is Declared:
EN55022
EN301-489
EN300-328
EN55024
EN60950
EN50360/50361
Digital Device Emissions (Class B)
Radio Device EMC
Radio Equipment Emissions
Digital Device EMC
Product Safety
SAR Safety
Antenna Care/Unauthorized Modifications
Use only the supplied integral antenna. Unauthorized antenna
modifications or attachments could damage the unit and may violate
FCC regulations. Any changes or modifications not expressly
approved by the party responsible for compliance could void the
user's authority to operate the equipment.
FCC RF Safety Statement
1
A Palm® brand body-worn accessory that has been tested for
SAR compliance and is intended for use with this product.
2
An accessory that contains NO metal (snaps, clips, etc.) and
provides AT LEAST 1.5 cm of separation between the users body
and the unit.
Do NOT use the device in a manner such that it is in direct contact
with the body (i.e., on the lap or in a breast pocket). Such use will
likely exceed FCC RF safety exposure limits See www.fcc.gov/oet/
rfsafety/ for more information on RF exposure safety.
Specific Absorption Rates (SAR) for Wireless
Smartphones
The SAR is a value that corresponds to the relative amount of RF
energy absorbed in the head of a user of a wireless handset.
The SAR value of a smartphone is the result of an extensive testing,
measuring and calculation process. It does not represent how much
REGULATORY INFORMATION
247
RF the smartphone emits. All smartphone models are tested at their
highest value in strict laboratory settings. But when in operation, the
SAR of a smartphone can be substantially less than the level reported
to the FCC. This is because of a variety of factors including its
proximity to a base station antenna, smartphone design and other
factors. What is important to remember is that each smartphone
meets strict federal guidelines. Variations in SARs do not represent a
variation in safety.
All smartphones must meet the federal standard, which incorporates
a substantial margin of safety. As stated above, variations in SAR
values between different model smartphones do not mean variations
in safety. SAR values at or below the federal standard of 1.6 W/kg are
considered safe for use by the public.
To view the highest reported (FCC) SAR values of the Palm® Treo™
680 smartphone, visit www.palm.com/38086.
FCC Radiofrequency Emission
This smartphone meets the FCC Radiofrequency Emission
Guidelines and is certified with the FCC as.
FCC ID number: O8F850.
Industry Canada ID number: 3905A-850
More information on the smartphone's SAR can be found from the
following FCC Website:
https://gullfoss2.fcc.gov/prod/oet/cf/eas/reports/GenericSearch.cfm.
(The following information comes from a consumer information
Website jointly sponsored by the U.S. Food and Drug Administration
(FDA) and the Federal Communications Commission (FCC), entitled
“Cell Phone Facts: Consumer Information on Wireless Phones.” The
information reproduced herein is dated July 29, 2003. For further
updates, please visit the Website:
http://www.fda.gov/cellphones/qa.html.)
What is radiofrequency energy (RF)? Radiofrequency energy (RF)
is another name for radio waves. It is one form of electromagnetic
energy that makes up the electromagnetic spectrum. Some of the
other forms of energy in the electromagnetic spectrum are gamma
rays, x-rays and light. Electromagnetic energy (or electromagnetic
radiation) consists of waves of electric and magnetic energy moving
together (radiating) through space. The area where these waves are
found is called an electromagnetic field.
248
REGULATORY INFORMATION
Radio waves are created due to the movement of electrical charges in
antennas. As they are created, these waves radiate away from the
antenna. All electromagnetic waves travel at the speed of light. The
major differences between the different types of waves are the
distances covered by one cycle of the wave and the number of waves
that pass a certain point during a set time period. The wavelength is
the distance covered by one cycle of a wave. The frequency is the
number of waves passing a given point in one second. For any
electromagnetic wave, the wavelength multiplied by the frequency
equals the speed of light. The frequency of an RF signal is usually
expressed in units called hertz (Hz). One Hz equals one wave per
second. One kilohertz (kHz) equals one thousand waves per second,
one megahertz (MHz) equals one million waves per second, and one
gigahertz (GHz) equals one billion waves per second.
RF energy includes waves with frequencies ranging from about 3000
waves per second (3 kHz) to 300 billion waves per second (300 GHz).
Microwaves are a subset of radio waves that have frequencies
ranging from around 300 million waves per second (300 MHz) to
three billion waves per second (3 GHz).
How is radiofrequency energy used? Probably the most
important use of RF energy is for telecommunications. Radio and TV
broadcasting, wireless phones, pagers, cordless phones, police and
fire department radios, point-to-point links and satellite
communications all rely on RF energy.
Other uses of RF energy include microwave ovens, radar, industrial
heaters and sealers, and medical treatments. RF energy, especially at
microwave frequencies, can heat water. Since most food has a high
water content, microwaves can cook food quickly. Radar relies on RF
energy to track cars and airplanes as well as for military applications.
Industrial heaters and sealers use RF energy to mold plastic
materials, glue wood products, seal leather items such as shoes and
pocketbooks, and process food. Medical uses of RF energy include
pacemaker monitoring and programming.
How is radiofrequency radiation measured? RF waves and RF
fields have both electrical and magnetic components. It is often
convenient to express the strength of the RF field in terms of each
component. For example, the unit “volts per meter” (V/m) is used to
measure the electric field strength, and the unit “amperes per
meter” (A/m) is used to express the magnetic field strength. Another
common way to characterize an RF field is by means of the power
density. Power density is defined as power per unit area. For
example, power density can be expressed in terms of milliwatts (one
thousandth of a watt) per square centimeter (mW/cm2) or microwatts
(one millionth of a watt) per square centimeter (µW/cm2).
The quantity used to measure how much RF energy is actually
absorbed by the body is called the Specific Absorption Rate or SAR.
The SAR is a measure of the rate of absorption of RF energy. It is
usually expressed in units of watts per kilogram (W/kg) or milliwatts
per gram (mW/g).
What biological effects can be caused by RF
energy? The biological effects of radiofrequency energy should not
be confused with the effects from other types of electromagnetic
energy.
Very high levels of electromagnetic energy, such as is found in X-rays
and gamma rays, can ionize biological tissues. Ionization is a process
where electrons are stripped away from their normal locations in
atoms and molecules. It can permanently damage biological tissues
including DNA, the genetic material. Ionization only occurs with very
high levels of electromagnetic energy such as X-rays and gamma
rays. Often the term radiation is used when discussing ionizing
radiation (such as that associated with nuclear power plants).
The energy levels associated with radiofrequency energy, including
both radio waves and microwaves, are not great enough to cause the
ionization of atoms and molecules. Therefore, RF energy is a type of
non-ionizing radiation. Other types of non-ionizing radiation include
visible light, infrared radiation (heat) and other forms of
electromagnetic radiation with relatively low frequencies.
Large amounts of RF energy can heat tissue. This can damage
tissues and increase body temperatures. Two areas of the body, the
eyes and the testes, are particularly vulnerable to RF heating because
there is relatively little blood flow in them to carry away excess heat.
The amount of RF radiation routinely encountered by the general
public is too low to produce significant heating or increased body
temperature. Still, some people have questions about the possible
health effects of low levels of RF energy. It is generally agreed that
further research is needed to determine what effects actually occur
and whether they are dangerous to people. In the meantime,
standards-setting organizations and government agencies are
continuing to monitor the latest scientific findings to determine
whether changes in safety limits are needed to protect human health.
FDA, EPA and other US government agencies responsible for public
health and safety have worked together and in connection with WHO
to monitor developments and identify research needs related to RF
biological effects.
What levels of RF energy are considered safe? Various
organizations and countries have developed standards for exposure
to radiofrequency energy. These standards recommend safe levels of
exposure for both the general public and for workers. In the United
States, the FCC has used safety guidelines for RF environmental
exposure since 1985.
The FCC guidelines for human exposure to RF electromagnetic fields
are derived from the recommendations of two expert organizations,
the National Council on Radiation Protection and Measurements
(NCRP) and the Institute of Electrical and Electronics Engineers
(IEEE). In both cases, the recommendations were developed by
scientific and engineering experts drawn from industry, government,
and academia after extensive reviews of the scientific literature
related to the biological effects of RF energy.
Many countries in Europe and elsewhere use exposure guidelines
developed by the International Commission on Non-Ionizing Radiation
Protection (ICNIRP). The ICNIRP safety limits are generally similar to
those of the NCRP and IEEE, with a few exceptions. For example,
ICNIRP recommends different exposure levels in the lower and upper
frequency ranges and for localized exposure from certain products
such as hand-held wireless telephones. Currently, the World Health
Organization is working to provide a framework for international
harmonization of RF safety standards.
The NCRP, IEEE, and ICNIRP all have identified a whole-body Specific
Absorption Rate (SAR) value of 4 watts per kilogram (4 W/kg) as a
threshold level of exposure at which harmful biological effects may
occur. Exposure guidelines in terms of field strength, power density
and localized SAR were then derived from this threshold value. In
addition, the NCRP, IEEE, and ICNIRP guidelines vary depending on
the frequency of the RF exposure. This is due to the finding that
whole-body human absorption of RF energy varies with the
frequency of the RF signal. The most restrictive limits on whole-body
exposure are in the frequency range of 30-300 MHz where the
REGULATORY INFORMATION
249
human body absorbs RF energy most efficiently. For products that
only expose part of the body, such as wireless phones, exposure
limits in terms of SAR only are specified.
The exposure limits used by the FCC are expressed in terms of SAR,
electric and magnetic field strength, and power density for
transmitters operating at frequencies from 300 kHz to 100 GHz. The
specific values can be found in two FCC bulletins, OET Bulletins 56
and 65: http://www.fcc.gov/oet/info/documents/bulletins/#56;
http://www.fcc.gov/oet/info/documents/bulletins/#65.
Why has the FCC adopted guidelines for RF exposure? The FCC
authorizes and licenses products, transmitters, and facilities that
generate RF and microwave radiation. It has jurisdiction over all
transmitting services in the U.S. except those specifically operated by
the Federal Government. While the FCC does not have the expertise
to determine radiation exposure guidelines on its own, it does have
the expertise and authority to recognize and adopt technically sound
standards promulgated by other expert agencies and organizations,
and has done so. (Our joint efforts with the FDA in developing this
website is illustrative of the kind of inter-agency efforts and
consultation we engage in regarding this health and safety issue.)
Under the National Environmental Policy Act of 1969 (NEPA), the FCC
has certain responsibilities to consider whether its actions will
significantly affect the quality of the human environment. Therefore,
FCC approval and licensing of transmitters and facilities must be
evaluated for significant impact on the environment. Human
exposure to RF radiation emitted by FCC-regulated transmitters is
one of several factors that must be considered in such environmental
evaluations. In 1996, the FCC revised its guidelines for RF exposure
as a result of a multi-year proceeding and as required by the
Telecommunications Act of 1996.
Radio and television broadcast stations, satellite-earth stations,
experimental radio stations and certain wireless communication
facilities are required to undergo routine evaluation for RF compliance
when they submit an application to the FCC for construction or
modification of a transmitting facility or renewal of a license. Failure
to comply with the FCC's RF exposure guidelines could lead to the
preparation of a formal Environmental Assessment, possible
Environmental Impact Statement and eventual rejection of an
application. Technical guidelines for evaluating compliance with the
FCC.
250
REGULATORY INFORMATION
RF safety requirements can be found in the FCC's OET Bulletin 65:
http://www.fcc.gov/oet/info/documents/bulletins/#65.
Low-powered, intermittent, or inaccessible RF transmitters and
facilities are normally excluded from the requirement for routine
evaluation for RF exposure. These exclusions are based on standard
calculations and measurement data indicating that a transmitting
station or equipment operating under the conditions prescribed is
unlikely to cause exposures in excess of the guidelines under normal
conditions of use. Such exclusions are not exclusions from
compliance, but, rather, exclusions from routine evaluation. The
FCC's policies on RF exposure and categorical exclusion can be found
in Section 1.1307(b) of the FCC's Rules and Regulations [(47 CFR
1.1307(b)].
How can I obtain the Specific Absorption Rate (SAR) value for
my wireless phone? The FCC requires that wireless phones sold in
the United States demonstrate compliance with human exposure
limits adopted by the FCC in 1996. The relative amount of RF energy
absorbed in the head of a wireless telephone-user is given by the
Specific Absorption Rate (SAR), as explained above. The FCC requires
wireless phones to comply with a safety limit of 1.6 watts per
kilogram (1.6 W/kg) in terms of SAR.
Information on SAR for a specific phone model can be obtained for
many recently manufactured phones using the FCC identification (ID)
number for that model. The FCC ID number is usually printed
somewhere on the case of the phone. Sometimes it may be
necessary to remove the battery pack to find the number. Once you
have the ID number, go to the following Web address: www.fcc.gov/
oet/fccid. On this page, you will see instructions for entering the FCC
ID number. Type the FCC ID number exactly as requested (the
Grantee Code is the first three characters, the Equipment Product
Code is the rest of the FCC ID number). Then click on “Start Search.”
The “Grant of Equipment Authorization” for your telephone should
appear. Read through the grant for the section on “SAR Compliance,”
“Certification of Compliance with FCC Rules for RF Exposure” or
similar language. This section should contain the value(s) for typical or
maximum SAR for your phone.
Phones and other products authorized since June 2, 2000, should
have the maximum SAR levels noted directly on the “Grant of
Equipment Authorization.” For phones and products authorized
between about mid-1998 and June 2000, detailed information on
SAR levels is typically found in the exhibits associated with the grant.
Once a grant is accessed, the exhibits can be viewed by clicking on
“View Exhibit.” Grants authorized prior to 1998 are not part of the
electronic database but, rather, have been documented in the form of
paper records.
The FCC database does not list phones by model number. However,
consumers may find SAR information from other sources as well.
Some wireless phone manufacturers make SAR information available
on their own Web sites. In addition, some non-government websites
provide SARs for specific models of wireless phones. However, the
FCC has not reviewed these sites and makes no guarantees of their
accuracy. Finally, phones certified by the Cellular Telecommunications
and Internet Association (CTIA) are required to provide SAR
information to consumers in the instructional materials that come
with the phones.
Do hands-free kits for wireless phones reduce risks from
exposure to RF emissions? Since there are no known risks from
exposure to RF emissions from wireless phones, there is no reason
to believe that hands-free kits reduce risks. Hands-free kits can be
used with wireless phones for convenience and comfort. These
systems reduce the absorption of RF energy in the head because the
phone, which is the source of the RF emissions, will not be placed
against the head. On the other hand, if the phone is mounted against
the waist or other part of the body during use, then that part of the
body will absorb more RF energy. Wireless phones marketed in the
U.S. are required to meet safety requirements regardless of whether
they are used against the head or against the body. Either
configuration should result in compliance with the safety limit.
Do wireless phone accessories that claim to shield the head from
RF radiation work? Since there are no known risks from exposure
to RF emissions from wireless phones, there is no reason to believe
that accessories that claim to shield the head from those emissions
reduce risks. Some products that claim to shield the user from RF
absorption use special phone cases, while others involve nothing
more than a metallic accessory attached to the phone. Studies have
shown that these products generally do not work as advertised.
Unlike “hand-free” kits, these so-called “shields” may interfere with
proper operation of the phone. The phone may be forced to boost its
power to compensate, leading to an increase in RF absorption. In
February 2002, the Federal trade Commission (FTC) charged two
companies that sold devices that claimed to protect wireless phone
users from radiation with making false and unsubstantiated claims.
According to FTC, these defendants lacked a reasonable basis to
substantiate their claim.
What are wireless telephone base stations? Fixed antennas used
for wireless telecommunications are referred to as cellular base
stations, cell stations, PCS (“Personal Communications Service”)
stations or telephone transmission towers. These base stations
consist of antennas and electronic equipment. Because the antennas
need to be high in the air, they are often located on towers, poles,
water tanks, or rooftops. Typical heights for freestanding base station
towers are 50-200 feet.
Some base stations use antennas that look like poles, 10 to 15 feet in
length, that are referred to as “omni-directional” antennas. These
types of antennas are usually found in rural areas. In urban and
suburban areas, wireless providers now more commonly use panel
or sector antennas for their base stations. These antennas consist of
rectangular panels, about 1 by 4 feet in dimension. The antennas are
usually arranged in three groups of three antennas each. One
antenna in each group is used to transmit signals to wireless phones,
and the other two antennas in each group are used to receive signals
from wireless phones.
At any base station site, the amount of RF energy produced depends
on the number of radio channels (transmitters) per antenna and the
power of each transmitter. Typically, 21 channels per antenna sector
are available. For a typical cell site using sector antennas, each of the
three transmitting antennas could be connected to up to 21
transmitters for a total of 63 transmitters. However, it is unlikely that
all of the transmitters would be transmitting at the same time. When
omni-directional antennas are used, a cellular base station could
theoretically use up to 96 transmitters, but this would be very
unusual, and, once again, it is unlikely that all transmitters would be in
operation simultaneously. Base stations used for PCS
communications generally require fewer transmitters than those
used for cellular radio transmissions, since PCS carriers usually have
a higher density of base station antenna sites.
Are wireless telephone base stations safe? The electromagnetic
RF signals transmitted from base station antennas stations travel
toward the horizon in relatively narrow paths. For example, the
radiation pattern for an antenna array mounted on a tower can be
REGULATORY INFORMATION
251
likened to a thin pancake centered around the antenna system. The
individual pattern for a single array of sector antennas is
wedge-shaped, like a piece of pie. As with all forms of
electromagnetic energy, the power decreases rapidly as one moves
away from the antenna. Therefore, RF exposure on the ground is
much less than exposure very close to the antenna and in the path of
the transmitted radio signal. In fact, ground-level exposure from such
antennas is typically thousands of times less than the exposure levels
recommended as safe by expert organizations. So exposure to
nearby residents would be well within safety margins.
Cellular and PCS base stations in the United States are required to
comply with limits for exposure recommended by expert
organizations and endorsed by government agencies responsible for
health and safety. Measurements made near cellular and PCS base
station antennas mounted on towers have confirmed that
ground-level exposures are typically thousands of times less than the
exposure limits adopted by the FCC. In fact, in order to be exposed to
levels at or near the FCC limits for cellular or PCS frequencies an
individual would essentially have to remain in the main transmitted
radio signal (at the height of the antenna) and within a few feet from
the antenna. This is, of course, very unlikely to occur.
When cellular and PCS antennas are mounted on rooftops, RF levels
on that roof or on others near by would probably be greater than those
typically encountered on the ground. However, exposure levels
approaching or exceeding safety guidelines should be encountered
only very close to or directly in front of the antennas. In addition, for
sector-type antennas, typically used for such rooftop base stations, RF
levels to the side and in back of these antennas are insignificant.
General guidelines on antenna installations and circumstances that
might give rise to a concern about a facility's conformance with FCC
regulations can be found in A Local Government Official's Guide to
Transmitting Antenna RF Emission Safety: Rules, Procedures, and
Practical Guidance. This Guide can be accessed at: http://
www.fcc.gov/oet/rfsafety.
Who regulates exposure to radiation from microwave ovens,
television sets and computer monitors? The Food and Drug
Administration is responsible for protecting the public from harmful
radiation emissions from these consumer products.
Does the FCC routinely monitor radiofrequency radiation from
antennas? The FCC does not have the resources or the personnel
252
REGULATORY INFORMATION
to routinely monitor the emissions for all the thousands of
transmitters that are subject to FCC jurisdiction. However, the FCC
does have measurement instrumentation for evaluating RF levels in
areas that may be accessible to the public or to workers. If there is
evidence for potential non-compliance with FCC exposure guidelines
for a FCC-regulated facility, staff from the FCC's Office of Engineering
and Technology or the FCC Enforcement Bureau can conduct an
investigation, and, if appropriate, perform actual measurements.
Circumstances that could give rise to a concern about a facility's
conformance with FCC regulations can be found in A Local
Government Official's Guide to Transmitting Antenna RF Emission
Safety: Rules, Procedures, and Practical Guidance. This Guide can be
accessed at: http://www.fcc.gov/oet/rfsafety. Potential exposure
problems should be brought to the FCC's attention by contacting the
FCC RF Safety Program at: 202-418-2464 or by email:
[email protected].
Does the FCC maintain a database that includes information on
the location and technical parameters of all the transmitting
towers it regulates? Each of the FCC Bureaus maintains its own
licensing database system for the service(s) it regulates (e.g.,
television, cellular service, satellite earth stations.) The FCC issues
two types of licenses: site specific and market based. In the case of
site specific licensed facilities, technical operating information is
collected from the licensee as part of the licensing process. However,
in the case of market based licensing (e.g., PCS, cellular), the
licensee is granted the authority to operate a radio communications
system in a geographic area using as many facilities as are required,
and the licensee is not required to provide the FCC with specific
location and operating parameters of these facilities.
Information on site specific licensed facilities can be found in the
“General Menu Reports” (GenMen) at http://gullfoss2.fcc.gov/cgi-bin/
ws.exe/genmen/index.hts.
The various FCC Bureaus also publish on at least a weekly basis, bulk
extracts of their licensing databases. Each licensing database has its
own unique file structure. These extracts consist of multiple, very
large files. The FCC's Office of Engineering and Technology (OET)
maintains an index to these databases at http://www.fcc.gov/oet/info/
database/fadb.html. Entry points into the various databases include
frequency, state/county, latitude/longitude, call-sign and licensee
name. For further information on the Commission's existing
databases, you can contact Donald Campbell at [email protected] or
202-418-2405.
Can local and state governmental bodies establish limits for RF
exposure? Although some local and state governments have
enacted rules and regulations about human exposure to RF energy in
the past, the Telecommunications Act of 1996 requires the Federal
Government to control human exposure to RF emissions. In
particular, Section 704 of the Act states that, “No State or local
government or instrumentality thereof may regulate the placement,
construction, and modification of personal wireless service facilities
on the basis of the environmental effects of radio frequency
emissions to the extent that such facilities comply with the
Commission's regulations concerning such emissions.” Further
information on federal authority and FCC policy is available in a fact
sheet from the FCC's Wireless Telecommunications Bureau at
www.fcc.gov/wtb.
Do wireless phones pose a health hazard? The available scientific
evidence does not show that any health problems are associated
with using wireless phones. There is no proof, however, that wireless
phones are absolutely safe. Wireless phones emit low levels of
radiofrequency energy (RF) in the microwave range while being used.
They also emit very low levels of RF when in the stand-by mode.
Whereas high levels of RF can produce health effects (by heating
tissue), exposure to low level RF that does not produce heating
effects causes no known adverse health effects. Many studies of low
level RF exposures have not found any biological effects. Some
studies have suggested that some biological effects may occur, but
such findings have not been confirmed by additional research. In
some cases, other researchers have had difficulty in reproducing
those studies, or in determining the reasons for inconsistent results.
What is FDA's role concerning the safety of wireless
phones? Under the law, FDA does not review the safety of
radiation-emitting consumer products such as wireless phones
before they can be sold, as it does with new drugs or medical
devices. However, the agency has authority to take action if wireless
phones are shown to emit radiofrequency energy (RF) at a level that
is hazardous to the user. In such a case, FDA could require the
manufacturers of wireless phones to notify users of the health hazard
and to repair, replace or recall the phones so that the hazard no longer
exists.
Although the existing scientific data do not justify FDA regulatory
actions, FDA has urged the wireless phone industry to take a number
of steps, including the following:
•
Support needed research into possible biological effects of RF of
the type emitted by wireless phones;
•
Design wireless phones in a way that minimizes any RF exposure
to the user that is not necessary for device function; and
•
Cooperate in providing users of wireless phones with the best
possible information on possible effects of wireless phone use
on human health
FDA belongs to an interagency working group of the federal agencies
that have responsibility for different aspects of RF safety to ensure
coordinated efforts at the federal level. The following agencies belong
to this working group:
•
National Institute for Occupational Safety and Health
•
Environmental Protection Agency
•
Federal Communications Commission
•
Occupational Safety and Health Administration
•
National Telecommunications and Information Administration
The National Institutes of Health participates in some interagency
working group activities, as well.
FDA shares regulatory responsibilities for wireless phones with the
Federal Communications Commission (FCC). All phones that are sold
in the United States must comply with FCC safety guidelines that
limit RF exposure. FCC relies on FDA and other health agencies for
safety questions about wireless phones.
FCC also regulates the base stations that the wireless phone
networks rely upon. While these base stations operate at higher
power than do the wireless phones themselves, the RF exposures
that people get from these base stations are typically thousands of
times lower than those they can get from wireless phones. Base
stations are thus not the primary subject of the safety questions
discussed in this document.
What kinds of phones are the subject of this update? The term
“wireless phone” refers here to hand-held wireless phones with
REGULATORY INFORMATION
253
built-in antennas, often called “cell,” “mobile,” or “PCS” phones.
These types of wireless phones can expose the user to measurable
radiofrequency energy (RF) because of the short distance between
the phone and the user's head. These RF exposures are limited by
Federal Communications Commission safety guidelines that were
developed with the advice of FDA and other federal health and safety
agencies. When the phone is located at greater distances from the
user, the exposure to RF is drastically lower because a person's RF
exposure decreases rapidly with increasing distance from the source.
The so-called “cordless phones,” which have a base unit connected
to the telephone wiring in a house, typically operate at far lower
power levels, and thus produce RF exposures well within the FCC's
compliance limits.
What are the results of the research done already? The research
done thus far has produced conflicting results, and many studies
have suffered from flaws in their research methods. Animal
experiments investigating the effects of radiofrequency energy (RF)
exposures characteristic of wireless phones have yielded conflicting
results that often cannot be repeated in other laboratories. A few
animal studies, however, have suggested that low levels of RF could
accelerate the development of cancer in laboratory animals.
However, many of the studies that showed increased tumor
development used animals that had been genetically engineered or
treated with cancer-causing chemicals so as to be pre-disposed to
develop cancer in the absence of RF exposure. Other studies
exposed the animals to RF for up to 22 hours per day. These
conditions are not similar to the conditions under which people use
wireless phones, so we don't know with certainty what the results of
such studies mean for human health.
Three large epidemiology studies have been published since
December 2000. Between them, the studies investigated any
possible association between the use of wireless phones and
primary brain cancer, glioma, meningioma, or acoustic neuroma,
tumors of the brain or salivary gland, leukemia, or other cancers.
None of the studies demonstrated the existence of any harmful
health effects from wireless phone RF exposures. However, none of
the studies can answer questions about long-term exposures, since
the average period of phone use in these studies was around three
years.
254
REGULATORY INFORMATION
What research is needed to decide whether RF exposure from
wireless phones poses a health risk? A combination of laboratory
studies and epidemiological studies of people actually using wireless
phones would provide some of the data that are needed. Lifetime
animal exposure studies could be completed in a few years.
However, very large numbers of animals would be needed to provide
reliable proof of a cancer promoting effect if one exists.
Epidemiological studies can provide data that is directly applicable to
human populations, but 10 or more years' follow-up may be needed
to provide answers about some health effects, such as cancer. This is
because the interval between the time of exposure to a
cancer-causing agent and the time tumors develop—if they do—may
be many, many years. The interpretation of epidemiological studies is
hampered by difficulties in measuring actual RF exposure during
day-to-day use of wireless phones. Many factors affect this
measurement, such as the angle at which the phone is held, or which
model of phone is used.
What is FDA doing to find out more about the possible health
effects of wireless phone RF? FDA is working with the U.S.
National Toxicology Program and with groups of investigators around
the world to ensure that high priority animal studies are conducted to
address important questions about the effects of exposure to
radiofrequency energy (RF).
FDA has been a leading participant in the World Health Organization
International Electromagnetic Fields (EMF) Project since its inception
in 1996. An influential result of this work has been the development
of a detailed agenda of research needs that has driven the
establishment of new research programs around the world. The
Project has also helped develop a series of public information
documents on EMF issues.
FDA and the Cellular Telecommunications & Internet Association
(CTIA) have a formal Cooperative Research and Development
Agreement (CRADA) to do research on wireless phone safety. FDA
provides the scientific oversight, obtaining input from experts in
government, industry, and academic organizations. CTIA-funded
research is conducted through contracts to independent
investigators. The initial research will include both laboratory studies
and studies of wireless phone users. The CRADA will also include a
broad assessment of additional research needs in the context of the
latest research developments around the world.
What steps can I take to reduce my exposure to radiofrequency
energy from my wireless phone? If there is a risk from these
products--and at this point we do not know that there is--it is probably
very small. But if you are concerned about avoiding even potential
risks, you can take a few simple steps to minimize your exposure to
radiofrequency energy (RF). Since time is a key factor in how much
exposure a person receives, reducing the amount of time spent using
a wireless phone will reduce RF exposure.
If you must conduct extended conversations by wireless phone every
day, you could place more distance between your body and the
source of the RF, since the exposure level drops off dramatically with
distance. For example, you could use a headset and carry the
wireless phone away from your body or use a wireless phone
connected to a remote antenna.
Again, the scientific data do not demonstrate that wireless phones
are harmful. But if you are concerned about the RF exposure from
these products, you can use measures like those described above to
reduce your RF exposure from wireless phone use.
What about children using wireless phones? The scientific
evidence does not show a danger to users of wireless phones,
including children and teenagers. If you want to take steps to lower
exposure to radiofrequency energy (RF), the measures described
above would apply to children and teenagers using wireless phones.
Reducing the time of wireless phone use and increasing the distance
between the user and the RF source will reduce RF exposure.
Some groups sponsored by other national governments have advised
that children be discouraged from using wireless phones at all. For
example, the government in the United Kingdom distributed leaflets
containing such a recommendation in December 2000. They noted
that no evidence exists that using a wireless phone causes brain
tumors or other ill effects. Their recommendation to limit wireless
phone use by children was strictly precautionary; it was not based on
scientific evidence that any health hazard exists.
What about wireless phone interference with medical
equipment? Radiofrequency energy (RF) from wireless phones can
interact with some electronic devices. For this reason, FDA helped
develop a detailed test method to measure electromagnetic
interference (EMI) of implanted cardiac pacemakers and defibrillators
from wireless telephones. This test method is now part of a standard
sponsored by the Association for the Advancement of Medical
instrumentation (AAMI). The final draft, a joint effort by FDA, medical
device manufacturers, and many other groups, was completed in late
2000. This standard will allow manufacturers to ensure that cardiac
pacemakers and defibrillators are safe from wireless phone EMI.
FDA has tested hearing aids for interference from handheld wireless
phones and helped develop a voluntary standard sponsored by the
Institute of Electrical and Electronic Engineers (IEEE). This standard
specifies test methods and performance requirements for hearing
aids and wireless phones so that no interference occurs when a
person uses a “compatible” phone and a “compatible” hearing aid at
the same time. This standard was approved by the IEEE in 2000.
FDA continues to monitor the use of wireless phones for possible
interactions with other medical devices. Should harmful interference
be found to occur, FDA will conduct testing to assess the
interference and work to resolve the problem.
Which other federal agencies have responsibilities related to
potential RF health effects? Certain agencies in the Federal
Government have been involved in monitoring, researching or
regulating issues related to human exposure to RF radiation. These
agencies include the Food and Drug Administration (FDA), the
Environmental Protection Agency (EPA), the Occupational Safety and
Health Administration (OSHA), the National Institute for Occupational
Safety and Health (NIOSH), the National Telecommunications and
Information Administration (NTIA) and the Department of Defense
(DOD).
By authority of the Radiation Control for Health and Safety Act of
1968, the Center for Devices and Radiological Health (CDRH) of the
FDA develops performance standards for the emission of radiation
from electronic products including X-ray equipment, other medical
devices, television sets, microwave ovens, laser products and
sunlamps. The CDRH established a product performance standard for
microwave ovens in 1971 limiting the amount of RF leakage from
ovens. However, the CDRH has not adopted performance standards
for other RF-emitting products. The FDA is, however, the lead federal
health agency in monitoring the latest research developments and
advising other agencies with respect to the safety of RF-emitting
products used by the public, such as cellular and PCS phones.
REGULATORY INFORMATION
255
The FDA's microwave oven standard is an emission standard (as
opposed to an exposure standard) that allows specific levels of
microwave leakage (measured at five centimeters from the oven
surface). The standard also requires ovens to have two independent
interlock systems that prevent the oven from generating microwaves
the moment that the latch is released or the door of the oven is
opened. The FDA has stated that ovens that meet its standards and are
used according to the manufacturer's recommendations are safe for
consumer and industrial use. More information is available from:
www.fda.gov/cdrh.
The EPA has, in the past, considered developing federal guidelines for
public exposure to RF radiation. However, EPA activities related to RF
safety and health are presently limited to advisory functions. For
example, the EPA now chairs an Inter-agency Radiofrequency
Working Group, which coordinates RF health-related activities among
the various federal agencies with health or regulatory responsibilities
in this area.
OSHA is responsible for protecting workers from exposure to
hazardous chemical and physical agents. In 1971, OSHA issued a
protection guide for exposure of workers to RF radiation [29 CFR
1910.97]. However, this guide was later ruled to be only advisory and
not mandatory. Moreover, it was based on an earlier RF exposure
standard that has now been revised. At the present time, OSHA uses
the IEEE and/or FCC exposure guidelines for enforcement purposes
under OSHA's “general duty clause” (for more information see:
http://www.osha-slc.gov/SLTC/radiofrequencyradiation/index.html.
NIOSH is part of the U.S. Department of Health and Human Services.
It conducts research and investigations into issues related to
occupational exposure to chemical and physical agents. NIOSH has,
in the past, undertaken to develop RF exposure guidelines for
workers, but final guidelines were never adopted by the agency.
NIOSH conducts safety-related RF studies through its Physical
Agents Effects Branch in Cincinnati, Ohio.
The NTIA is an agency of the U.S. Department of Commerce and is
responsible for authorizing Federal Government use of the RF
electromagnetic spectrum. Like the FCC, the NTIA also has NEPA
responsibilities and has considered adopting guidelines for evaluating
RF exposure from U.S. Government transmitters such as radar and
military facilities.
256
REGULATORY INFORMATION
The Department of Defense (DOD) has conducted research on the
biological effects of RF energy for a number of years. This research is
now conducted primarily at the U.S. Air Force Research Laboratory
located at Brooks Air Force Base, Texas. The DOD Web site for RF
biological effects information is listed with other sites in conjunction
with a question on other sources of information, below.
Who funds and carries out research on the biological effects of
RF energy? Research into possible biological effects of RF energy
is carried out in laboratories in the United States and around the
world. In the U.S., most research has been funded by the
Department of Defense, due to the extensive military use of RF
equipment such as radar and high-powered radio transmitters. In
addition, some federal agencies responsible for health and safety,
such as the Environmental Protection Agency (EPA) and the U.S.
Food and Drug Administration (FDA), have sponsored and conducted
research in this area. At the present time, most of the non-military
research on biological effects of RF energy in the U.S. is being funded
by industry organizations. More research is being carried out
overseas, particularly in Europe.
In 1996, the World Health Organization (WHO) established the
International EMF Project to review the scientific literature and work
towards resolution of health concerns over the use of RF technology.
WHO maintains a Web site that provides extensive information on
this project and about RF biological effects and research
(www.who.ch/peh-emf).
FDA, EPA and other US government agencies responsible for public
health and safety have worked together and in connection with WHO
to monitor developments and identify research needs related to RF
biological effects.
How does FCC audit cell phone RF? After FCC grants permission
for a particular cellular telephone to be marketed, FCC will
occasionally conduct “post-grant” testing to determine whether
production versions of the phone are being produced to conform with
FCC regulatory requirements. The manufacturer of a cell phone that
does not meet FCC's regulatory requirements may be required to
remove the cell phone from use and to refund the purchase price or
provide a replacement phone, and may be subject to civil or criminal
penalties. In addition, if the cell phone presents a risk of injury to the
user, FDA may also take regulatory action. The most important
post-grant test, from a consumer's perspective, is testing of the RF
emissions of the phone. FCC measures the Specific Absorption Rate
(SAR) of the phone, following a very rigorous testing protocol. As is
true for nearly any scientific measurement, there is a possibility that
the test measurement may be less than or greater than the actual RF
emitted by the phone. This difference between the RF test
measurement and actual RF emission is because test measurements
are limited by instrument accuracy, because test measurement and
actual use environments are different, and other variable factors. This
inherent variability is known as “measurement uncertainty.” When
FCC conducts post-grant testing of a cell phone, FCC takes into
account any measurement uncertainty to when determining whether
regulatory action is appropriate. This approach ensures that
when FCC takes regulatory action, it will have a sound, defensible
scientific basis.
FDA scientific staff reviewed the methodology used by FCC to
measure cell phone RF, and agreed it is an acceptable approach,
given our current understanding of the risks presented by cellular
phone RF emissions. RF emissions from cellular phones have not
been shown to present a risk of injury to the user when the
measured SAR is less than the safety limits set by FCC (an SAR of 1.6
w/kg). Even in a case where the maximum measurement uncertainty
permitted by current measurement standards was added to the
maximum permissible SAR, the resulting SAR value would be well
below any level known to produce an acute effect. Consequently,
FCC's approach with measurement uncertainty will not result in
consumers being exposed to any known risk from the RF emitted by
cellular telephones.
FDA will continue to monitor studies and literature reports concerning
acute effects of cell phone RF, and concerning chronic effects of
long-term exposure to cellular telephone RF (that is, the risks from
using a cell phone for many years). If new information leads FDA to
believe that a change to FCC's measurement policy may be
appropriate, FDA will contact FCC and both agencies will work
together to develop a mutually-acceptable approach.
Static Electricity, ESD, and Your Palm® Device
Electrostatic discharge (ESD) can cause damage to electronic devices
if discharged into the device, so you should take steps to avoid such
an occurrence.
Description of ESD Static electricity is an electrical charge caused by
the buildup of excess electrons on the surface of a material. To most
people, static electricity and ESD are nothing more than annoyances.
For example, after walking over a carpet while scuffing your feet,
building up electrons on your body, you may get a shock—the
discharge event—when you touch a metal doorknob. This little shock
discharges the built-up static electricity.
ESD-susceptible equipment Even a small amount of ESD can
harm circuitry, so when working with electronic devices, take
measures to help protect your electronic devices, including your
Palm® device, from ESD harm. While Palm has built protections
against ESD into its products, ESD unfortunately exists and, unless
neutralized, could build up to levels that could harm your equipment.
Any electronic device that contains an external entry point for
plugging in anything from cables to docking stations is susceptible to
entry of ESD. Devices that you carry with you, such as your Palm
device, build up ESD in a unique way because the static electricity
that may have built up on your body is automatically passed to the
device. Then, when the device is connected to another device such
as a docking station, a discharge event can occur.
Precautions against ESD Make sure to discharge any built-up
static electricity from yourself and your electronic devices before
touching an electronic device or connecting one device to another.
The recommendation from Palm is that you take this precaution
before connecting your Palm device to your computer, placing a
device in a cradle, or connecting it to any other device. You can do
this in many ways, including the following:
•
Ground yourself when you’re holding your device by
simultaneously touching a metal surface that is at earth ground.
For example, if your computer has a metal case and is plugged
into a standard three-prong grounded outlet, touching the case
should discharge the ESD on your body.
•
Increase the relative humidity of your environment.
•
Install ESD-specific prevention items, such as grounding mats.
Conditions that enhance ESD occurrences Conditions that can
contribute to the buildup of static electricity in the environment
include the following:
•
Low relative humidity.
REGULATORY INFORMATION
257
•
Material type. (The type of material gathering the charge. For
example, synthetics are more prone to static buildup than natural
fibers like cotton.)
•
The rapidity with which you touch, connect, or disconnect
electronic devices.
While you should always take appropriate precautions to discharge
static electricity, if you are in an environment where you notice ESD
events, you may want to take extra precautions to protect your
electronic equipment against ESD.
Precaution against hearing loss Protect your hearing. Listening to
this device at full volume for a long period of time can damage your
hearing.
A pleine puissance, l'écoute prolongée du baladeur peut
endommager l'oreille de l'utilisateur. Consultez notre site web
www.palm.com/fr pour plus d'informations.
Waste disposal Please recycle appropriately. For appropriate
recycling and disposal instructions please visit: www.palm.com/
environment.
Précautions d'usage de votre téléphone mobile
Le taux de DAS(1) (Débit d’Absorption Spécifique) de votre Treo 680
smartphone est 0,655 w/kg
Conseils d'utilisation pour réduire le niveau d'exposition aux
rayonnements : Utiliser le plus souvent possible les kits piétons
(oreillettes), notamment en cas d'usage fréquent ou prolongé du
258
REGULATORY INFORMATION
téléphone mobile Ils apportent en outre un plus grand confort
d’utilisation.
Eloigner le téléphone mobile de certaines zones sensibles telles que
le ventre chez les femmes enceintes ou le bas-ventre chez les
adolescents, plus particulièrement lors d’une communication.
Utiliser votre téléphone mobile dans de bonnes conditions de
réception. Celle-ci est indiquée sur l’écran de votre téléphone par la
matérialisation de barrettes. 3 ou 4 barrettes, la réception est de
bonne qualité pour passer vos communications. Ce n'est pas
toujours le cas dans certaines zones ou situations, notamment les
parking souterrains, les ascenseurs, en train ou en voiture ou tout
simplement dans un secteur mal couvert par le réseau.
Mesures touchant à la sécurité : Dans certains lieux ou situations,
tels que les avions, les hôpitaux, les stations-service et les garages
professionnels, l'usage du téléphone est interdit. Il est donc impératif
de respecter strictement les consignes de sécurité propres à
chacune de ces situations et d’éteindre votre téléphone lorsque cela
est requis.
Par ailleurs pour éviter les risques d’interférences, les personnes
porteuses d’implants électroniques (stimulateurs cardiaques,
pompes à insuline, neurostimulateurs..) doivent conserver une
distance de 15 cm entre le mobile et l’implant et ne l’utiliser que du
côté opposé au côté où celui-ci est situé.
Téléphoner en conduisant, même avec des équipements qui ne sont
pas interdits par la réglementation, est dangereux car il augmente
potentiellement le risque d’accident provenant de la distraction créée
par la conversation elle même. Aussi, est-il recommandé de ne
jamais téléphoner en conduisant et de considérer que l’utilisation
d’un kit mains-libres n’est pas une solution.
(1) Valeur DAS la plus élevée pour ce modèle de téléphone et pour
une utilisation à l’oreille, communiquée par le constructeur. Le DAS,
exprimé en w/kg, quantifie le niveau d’exposition aux ondes
électromagnétiques et permet de vérifier la conformité des mobiles à
la réglementation française et européenne qui impose que celui-ci
soit inférieur à 2w/kg.
Specifications
Radio
Phone features
•
GSM 850/900/1800/1900 quad band world phone
•
GPRS class 10, class B
•
EDGE up to 59kbps per time-slot
•
Supports CSD (circuit-switched data)
•
Speakerphone
•
Hands-free headset jack (2.5mm, 3 or 4-barrel connector)
•
Microphone mute option
•
TTY/TDD compatible
•
3-way calling
Processor technology
Intel PXA270 Bulverde processor, 312MHz
Expansion
SD/MultiMediaCard/SDIO card slot
Battery
•
1200mAH, rechargeable lithium ion
•
Removable for replacement
®
Palm OS version
Palm OS 5.4.9
Camera
•
Still image capture resolution (640 x 480)
•
2x digital zoom
•
Video capture resolution (320 x 240)
•
Automatic light balance
Size
4.44 in. x 2.33 in. x 0.84 in. (112.9mm x 59.3mm x 22.4mm)
Weight
5.6 ounces (157 grams)
SPECIFICATIONS
259
Connectivity
Display
Keyboard
Included software
•
IR
•
Bluetooth® wireless technology (1.2 compliant)
•
Touch-sensitive LCD screen (includes stylus)
•
65,536 colors (16-bit color)
•
User-adjustable brightness
•
320 x 320 resolution
•
Built-in QWERTY keyboard plus 5-way navigator
•
Backlight for low lighting conditions
•
Phone (including Favorites
and Dial Pad)
•
•
System requirements
260
SPECIFICATIONS
Pictures & Videos
(includes camera and
camcorder)
Messaging (text and
multimedia)
•
Blazer® web browser
(Internet)
•
Pocket Tunes™VersaMail
(email)
•
Contacts
•
Calendar
•
Memos
•
Tasks
•
Voice Memo
•
Documents To Go
Professional®
•
Calculator Basic and
Advanced
•
World Clock
•
Palm® Desktop software
®
•
Windows 2000 or XP with USB port
•
Mac OS 10.2 –10.3 with USB port
•
Later versions may also be supported
Operating and storage
temperature range
•
32°F to 104°F (0°C to 40°C)
•
5% to 90% relative humidity (RH)
SPECIFICATIONS
261
262
SPECIFICATIONS
Index
SYMBOLS
! in Tasks list 156
NUMERICS
112 calls 76, 201
24-hour clock 195
3G2 files 132, 136
3GP files 132
5-way navigator
accessing applications and
36
accessing command
buttons and 29
answering phone calls and
201
entering alternate
characters and 33
highlighting and selecting
items and 28
location of 7
moving around screen and
27
navigating pick lists and 30
scrolling web pages and
110
selecting menu items and
29
A
AC charger 11, 12
accented characters 33, 34
accessing
Alert dialog box 167
alternate character list 34
application menus 29
applications 36, 37
Applications View 35
calculator 168
Call Log 46
camera 127
command buttons 29
Compose dialog box 95,
97
corporate servers 209
Dial Pad 51
email 81–95, 208
Favorites pages 45
files 161, 208
HotSync manager 179
information 202
items on expansion cards
187
items on pick lists 30
music player 139
on-device documentation
241
Palm online support 241
Pocket Tunes 140
Quick Tour 241
secure websites 109,
110, 234
voicemail 48, 49
web browser 36, 110
web pages 109, 111, 233
World Clock 153
accessories 7, 251
Account Name field 83
Account Setup command 84
Account Setup dialog box 83,
84
accounts
See also email accounts
call forwarding and 55
conference calls and 54
corporate mail servers and
208
customer service support
for 241
setting preferences for 91
voicemail and 48
Accounts command 91
Acrobat files 161
activating items on screen 28
INDEX
263
Active Call View screen 50,
52, 68
active calls. See phone calls
Add Bookmark command
111
Add Call button 51
Add Contact command 53
Add New Number dialog box
52
Add New Number prompt 52
Add Song button 142
Add to album command 134
adding
accessories 7
additional security 205
attachments 86–87
Bluetooth devices 66–67,
122
bookmarks 111
business cards 60
caller ID photos 58, 59
captions to photos 128,
135
categories for applications
197
cities to World Clock 153
contacts 57
email addresses 85
emoticons 96
264
INDEX
events 146, 147
favorite buttons 61–63
hands-free devices 64, 68
memos 162
partnerships 67, 118
passwords 203, 204
phone numbers 52
photos to albums 134
playlists 141, 142
private entries 204
QuickText phrases 96
signatures 94
tasks 154
videos to albums 134
voice memos 163
wallpaper 135
Address Bar 110
addresses
adding multiple recipients
63, 95
assigning to favorite
buttons 63
highlighting email 28
multimedia messages and
97
sending email and 85
synchronizing 225
text messages and 95, 99
viewing website 115, 116
web links and 109
adjusting screen brightness
50, 194, 208
adjusting volume
alarm tones 151
music 141
phone calls 15, 71
ringer 72
video clips 130
voice memos 164
Advanced Mode (calculator)
168, 169
Advanced Mode command
168
agenda lists 145
Agenda View 73, 145, 150
Alarm check box 147
alarm clock 154
Alarm Preferences command
154
Alarm Sound pick list 152,
157
alarm tones 151
alarms
See also alerts
adding to calendar 147,
151
adding to tasks 155, 157
recording sounds for 152
setting for clock 154
Album command 134
Album list 131, 133, 135
albums. See photo albums;
video albums
Alert dialog box 49, 99, 167
alert icon 76
Alert Sound pick list 92
alert tones 71, 92, 104
alerts
See also alarms
clearing 168
displaying 167
message text in 103
receiving messages and
92, 98
responding to 49, 99, 220
voicemail and 49
aligning the screen 196
Alt key 33, 243
alternate characters 33, 34
alternate characters list 34
anniversaries 148
Answer button 47
answering phone calls 47
antenna 247
applets 109
application categories 37
application list view 197
Application pick list 193
application preferences 198,
199
applications
See also specific built-in
applications
accessing 36, 37
associating with buttons
63, 198
beaming 178
categorizing 197
caution for 187, 213
changing screen fonts for
194
closing 35
copying 187
copying text to 115
customizing 197–198
deleting 18, 172, 173, 237
displaying 197
downloading 113, 171
getting help with 172
installing 170–171, 213
moving around in 25
opening 7, 35, 36, 52, 186
playing music and 141
running on expansion
cards 236
searching in 167
sending over Bluetooth
devices 175
setting default 199
switching 51
synchronizing 23, 179
transferring 17, 19, 175,
178, 187
troubleshooting 213
viewing information about
173–174
viewing menus for 29
viewing tips for 241
Applications button 7, 35, 37,
41
Applications View
accessing 35
accessing items on
expansion cards and
187
copying applications from
188
defined 243
displaying applications in
197
opening applications and
35
overview 36–37
applications, exiting 238
appointments 146, 225
INDEX
265
See also events
Archive folder 172
area codes 74
area conversions 169
arrow icons 27
ASF files 132
Ask to add unknown phone
numbers option 52, 60
Attach image option 97
Attach ringtone option 98
Attach Signature check box
94
Attach voice memo option 98
attachments
adding 86–87
displaying 89
downloading 89
multimedia messages and
97
multiple files and 86
opening 161
pictures as 86, 128
removing 86
storing large 236
supported formats for 161
video clips as 86, 130
voice memos as 164
attendee information 148
audio 193
266
INDEX
See also multimedia
messages; music; voice
memos
audio adapter 65
Audio Caption command 128
audio captions
adding 128, 135
background music and
133
playing 132
Audio icon 132
Auto answer pick list 69
Auto Lock Device box 203
Auto naming pick list 130
Auto Sync dialog box 91
auto sync failures 92
Auto-complete check box
116
Auto-hide Toolbar option 133
Auto-Keyguard pick list 200
automated voicemail
systems 48
Auto-off After pick list 208
auto-off interval 243
AVI files 132
B
back icon (browser) 110
Background check box 150
background music 133
backgrounds 73, 150
backing up information 18,
23, 217
backlight (keyboard) 32, 194,
208
Backlight button 194
Backspace key 31
Backup folder 173, 214
Basic Mode (calculator) 168
Basic Mode command 168
basics 241
battery
charging 11–13
displaying remaining
power on 78
disposing of 219
inserting 10
maximizing life of 13, 207
removing 218
replacing 14, 217–218
viewing status of 13
battery consumption 14
battery door release 8
battery icon 13, 77
Beam Business Card
command 60
Beam Category command
177
Beam command 177, 178
Beam From pick list 178
Beam Receive pick list 208
Beam Status dialog box 177,
178
beaming
battery life and 14
defined 243
overview 176–178
troubleshooting 177, 178
turning off 208
bell 76, 167, 220
birthdays 148
blank screens 219
blank text messages 95
blank time slots 150
Blazer application 109
See also web browser
blinking bell 76, 167, 220
Bluetooth adapter 118, 119
Bluetooth application
opening 66
sending from 175
setting up connections
with 122, 123, 181
setting up dial-up
networking and 119
visibility options in 175,
182
Bluetooth devices
connecting to 66, 121–
124, 181
disabling or enabling 14,
68, 175
entering passkeys for 122,
123, 124
optimal range for 66
receiving information from
175
receiving phone calls and
50, 67, 228
sending over 174, 175
setting up 66–67
synchronizing over 181,
182, 221
troubleshooting 229, 230,
235
visibility options for 123,
175
Bluetooth icon 66, 78
Bluetooth icons (Phone
application) 76
Bluetooth network icon 120
Bluetooth wireless
technology 118, 243
BMP files 131
bonus software. See built-in
applications
Bookmark Page icon 113
bookmarks 111–113, 177
Bookmarks View 111, 112
Bookmarks View icon 112
border glow (highlight) 28
brightness (screen) 14, 50,
194, 208
brightness duration
(backlight) 194, 208
Brightness slider 208
browsing files 187
browsing the web. See web
browsing
built-in applications 170, 172,
241
See also applications;
specific application
built-in camera. See camera
built-in security software 199
business cards 60, 177
buttons
See also favorite buttons
5-way navigator 27
accessing command 29
changing defaults for 198
customizing 198
disabling 51, 201
highlighted on screen 28
INDEX
267
restoring factory defaults
198
speed-dialing with 45, 62–
63
web browsing and 110
Buttons Preferences screen
198
C
cache 117, 237
Calc button 168
calculating disk space 18
calculator 33, 168
Calculator application 168–
169
calculator modes 168
calendar
See also Calendar
application
customizing 150–151
deleting events from 149
displaying 145
saving 100
scheduling events for 146,
147, 148
selecting alarm tones for
151
selecting specific dates on
146
268
INDEX
viewing tasks on 150
Calendar application
changing fonts for 194
changing views for 145
color-coding events 149
creating events with 146,
147, 148
displaying events 73
opening 36, 73
overview 145
setting alarms from 147
setting default view for
150
setting display options in
150–151
synchronizing information
in 23
Calendar button 7, 35, 36,
145
Calendar views 145, 150
Call Barring command 72
Call Barring preferences 72
call forwarding 55–56
call forwarding icon 76
Call Log screen 46, 53
Call Preferences command
55
Call Preferences dialog box
55, 56
Call Totals dialog box 56
call waiting 53
Call Waiting dialog box 54
caller IDs 58, 59
calls. See phone calls
camcorder 128, 129, 130
camcorder buttons 129
Camcorder View 130, 135
camera 127, 130, 235
camera buttons 128
Camera icon 127, 128
camera lens 8
Camera View 130, 135
cancelling menu selection 29
Caps Lock mode 32
captions. See audio captions;
voice captions
Card category 186
Card Info application 188–
189
Card Info button 188
card readers 139
carrying cases 229
cascading style sheets 111,
116
categories
adding ringtones for 59
applications and 37, 197
beaming and 177
color-coding in 149
contacts and 57, 60
creating 197
events and 149, 150
memos and 163
naming 197
receiving from Bluetooth
and 176
tasks and 155, 156, 157
Category command 197
category marker 150
Category pick list 150, 151,
197
CDs 139
Center button 7
certificates 109
changing
bookmarks 112
button defaults 198
contact information 58
default applications 199
email accounts 91
events 149
favorite buttons 63
information 16
owner information 206
passwords 204, 205
personal IDs 202
playlists 142
QuickText phrases 96
screen fonts 194
synchronization defaults
179, 180, 181, 189
synchronization software
224
web page layouts 110
character entry 32, 34
See also text
character limits
memos 162
text messages 95
character searches 167
charge indicator 7, 12, 13
charger cable 12
charging
smartphone 11, 12, 14
smartphone battery 11–13
charging status 13
chat icon 102, 105
Chat page (Preferences) 103
chat sessions 101, 103
Chat view 101
Choose song button 141
Choose Songs command
142
circuit-switched data
connections 243
city information 153, 207
City pick list 153
Clear Cache button 117
Clear Cookies button 117
clock 152, 195
See also World Clock
closing
application menus 29
applications 35
pick lists 30
closing applications 238
color palette 130
color preferences 103, 130,
196
Color Theme Preferences
screen 196
color-coded category marker
150
color-coding events 149
colored backgrounds 28
command buttons 29
commands. See menu items
completed tasks 155, 156,
157
completion dates 157
components (smartphone) 1
Compose dialog box 95, 96,
97
Compress Day View check
box 150
INDEX
269
compressed files 170, 171
computers
connecting smartphone to
16, 21
creating partnerships for
118
downloading applications
to 171
installing applications from
171, 215
installing synchronization
software on 20
quarantined files on 18,
19, 213
setting up DUN
connections for 119
synchronizing with 17, 23
transferring information to
23
transferring multimedia to
136
transferring music from
138, 139–140
Con button (calculator) 169
Conduit Settings command
180
conduits 146, 225
Conference button 54
conference calls 54
270
INDEX
Confirm message deletion
check box 102
conflicting applications 18,
187, 213
conflicting events 150
Connect Bluetooth
command 68
connecting
headsets 64–65
to Bluetooth devices 66,
121–124
to personal computers 16,
21
to virtual private networks
208
to voicemail system 48,
49
to websites 109, 110,
117, 118
connection icons (browser)
110
connections
dial-up networking and
118, 120
messaging preferences
for 103
receiving over Bluetooth
175
restrictions for 51
sending over Bluetooth
174, 175
setting up Bluetooth 181
setting up smartphone 16
synchronizing over
Bluetooth 181, 182
synchronizing over
infrared 183–184
troubleshooting 48, 227,
232, 235
unsupported 121
viewing status of 76, 110,
120, 231, 232
constants 169
consumption factors (battery)
14
Contact Edit dialog box 57
contact names 44
contacts
See also Contacts
application
adding photos to 135
adding speed-dial buttons
for 62
assigning caller IDs to 59
copying 61
creating 57
customizing 60
deleting 60
displaying 58
editing 58
entering phone numbers
for 52, 73
importing 58
looking up 62
marking as private 57
reordering 57
saving 100
searching for 44, 58, 73
viewing details about 45
Contacts application 57
adding events to 148
changing fonts for 194
synchronizing information
in 23
Contacts list 28, 57, 60
contracts 1
conversion functions
(calculator) 168, 169
cookies 109, 116, 117
Copy button 134, 188
Copy command 115, 188
Copy Items dialog box 134
Copy items to pick list 134
Copy to command 134
Copy To pick list 188
copying
applications 187
contact information 61
multimedia files 136, 139
music files 138
phone numbers 43, 115
photos 133
text 114
user folders 214
videos 133
copyrighted materials 133
corporate email accounts
208
corporate servers 23, 208
country-specific preferences.
See language settings
coupling 228
coverage area 14, 76, 227
coverage area alerts 71
Coverage in/out pick list 71
crashes 220
Create chats from messages
pick list 103
Create new messages as
pick list 102
creating
albums 134
audio captions 128, 135
bookmarks 111
business cards 60
caller ID photos 58, 59
categories for applications
197
chat sessions 101, 103
cities for World Clock 153
contacts 57
email messages 85, 109
events 146, 147
memos 162
multimedia messages 97
partnerships 67, 118
passwords 203, 204
playlists 141, 142
private entries 204
QuickText phrases 96
signatures 94
speed-dial buttons 62–63
tasks 154
text messages 95–98
voice memos 163
wallpaper 135
CSD (circuit-switched data)
243
current date and time 152
current events 73
Current Privacy pick list 204,
205
customer service (Palm) 241
customizing
applications 197–198
INDEX
271
buttons 198
calendar 150–151
camera 130
chat sessions 103
contacts 60
email 91–94
Keyguard 200
messaging options 102
smartphone 151, 191
system date and time 206
system sounds 193–194
tasks 157
web browser 115–117
D
daily events 145
Daily Repeating Events
check box 151
daily schedules 145
data. See information
data service icons 231, 232
data services 81, 109
data transfer 1, 76
databases 167
Date & Time Preferences
screen 147, 206
date formats 195
date preferences 206
Date stamp pick list 130
272
INDEX
dates
adding to photos 130
changing event 149
completed tasks and 156,
157
displaying 145, 152
selecting 146
setting 155, 206
sorting on 101
synchronizing 206
viewing due 156, 157
datestamps 130
Day View 145, 150
daylight savings 153, 154
Daylight Savings Time check
box 154
decimal display formats
(calculator) 169
decimal values 169, 195
decompression utilities 171
Default Alarm pick list 152
Default Apps Preferences
screen 199
default settings 198
Default View pick list 73, 150
degrees 169
delays 203, 231
Delete command 90, 135,
173
delete confirmation
messages 102
Delete Contact command 60
Delete events older than pick
list 149
Delete From pick list 173
Delete Memo command 163
Delete Old command 90
Delete Task command 157
deleting
albums 134, 135
alerts 168
applications 18, 172, 173,
237
attachments 86
bookmarks 112
contacts 60
cookies 117
device names 19
email 90, 236
events 149
favorite buttons 64
files 237
memos 163
messages 101, 102
music from playlists 142
passwords 204
photos 128, 134, 136
playlists 142
tasks 157
video clips 129, 134, 136
desktop software. See Palm
Desktop software
Details button 29
Details command 135
Device Name field 66, 176
device names
Bluetooth devices and 66,
176, 181
defined 243
entering 19, 220
devices
See also Bluetooth
devices; hands-free
devices; smartphone
entering passkeys and 67
radio frequency emissions
and 247, 251
synchronization and 224
upgrades and 17, 62, 223
Dial another call prompt 53
Dial button 46
Dial Extra Digits
Automatically option 63
Dial Number dialog box 46
Dial Pad 33, 43
Dial Pad button 51
Dial Preferences screen 73
dial text 120
dialog boxes
accessing command
buttons on 29
defined 243
getting help with 241
highlighted buttons in 28
dial-up networking 77, 118–
121, 235
digital cameras 131
See also camera
dimmed images 219
dimming keyboard backlight
194, 208
dimming the touchscreen 36
Disable cookies check box
116
Disable JavaScript check box
116
disabling
Add New Number prompt
52
Bluetooth devices 14, 68
cookies 116
Keyguard 41, 200
onscreen buttons 51, 201
Phone Lock settings 202
system sounds 193
the touchscreen 200
touch-sensitive features
201
web page images 111,
117
disconnecting sync cable 24
discovery 121, 122, 176
Discovery icon 122
Discovery Results list 122,
175
discussion groups 241
disk space (smartphone) 17,
18, 236
Display my name in chat
window as entry field 103
Display Options command
150
Display Options dialog box
150
displaying
alerts 167
alternate characters 34
application information
173–174
application menus 29
applications 197
attachments 89
available disk space 18
bookmarks 111
INDEX
273
connection status 76, 110,
120, 231, 232
contact information 45, 58
current date and time 152
due dates 156, 157
email messages 87, 88
error messages 239
event categories 150
events 73, 145, 150, 151
favorite buttons 45
items in pick lists 30
multimedia messages 99
overdue tasks 145
personal calendar 145
photos 130, 131, 136
private entries 205
Quick Tour documentation
241
signal strength 76
slide shows 132
tasks 150, 156, 157
unread messages 77,
145, 150
video clips 130, 132, 136
video recording time 128
voicemail messages 76
web addresses 116
web pages 109, 110
DOC files 161
274
INDEX
documentation 2, 3, 27, 241
Documents application 161–
162
Documents button 162
Documents To Go application
161
Documents To Go icon 162
Down button (navigator) 28,
29, 30
downloading
applications 113, 171
attachments 89
email messages 91
files 113, 131, 170
multimedia messages 103
Palm-specific information
and updates 241
ringtones 69
text messages 98
Downloads bookmark 113
drafts 86, 96
Drafts button 86
drained battery icon 13
draining the battery 11, 13
Draw on command 128
drivers 183
Due Date pick list 155
due dates 155, 157
DUN (dial-up networking)
connections 77, 118–121,
235
E
earpiece 7
eBooks 19
echoes 228
EDGE connections 76, 244
troubleshooting 232, 234
Edit Bookmark List dialog box
113
Edit Bookmarks command
112, 113
Edit Category screen 59
Edit Favorite command 63
Edit Location dialog box 207
Edit Playlist dialog box 142
edit screens 29
editing. See changing
Effects pick list 130
electrostatic discharge 257
email
accessing 81–95, 208
adding multiple recipients
to 63, 95
adding signatures 94
attaching photos to 86,
128, 133
attaching ringtones 87
attaching videos to 86,
130, 133
attaching voice memos to
164
checking 77
creating 85, 109
customizing 91–94
defining favorite buttons
for 63
deleting 90, 236
dialing from 46
downloading 91
forwarding 88
opening attachments for
161
removing attachments for
86
replying to 88
requirements for 1
resending 86
restrictions for 51
retrieving 77, 87
scrolling 88
selecting default
application for 199
sending 86, 99, 109
setting alerts for 92
sort options for 90
storing attachments 236
troubleshooting 230
viewing attachments 89
viewing status of 89
viewing unread messages
for 77, 145, 150
email accounts
changing 91
setting email preferences
and 91
setting up 81, 83, 84, 94
email application 81
email applications 57, 233
Email icon 83
email options 85, 90
email providers 81, 82
emergency calls 76, 201
emoticons 96
empty battery icon 13
empty time slots 150
emptying Trash folder 90
Enable background play
check box 141
Enable Fixed Number Dialing
check box 202
encryption 109
Eng(x) display format 169
engineering notation 169
entering
alternate characters 33, 34
decimal values 169, 195
device names 19, 220
email addresses 85
events 146, 147, 148
information 16
lock codes 201
numbers 32, 168
owner preferences 206
passkeys 66, 67, 119, 122
passwords 49, 203, 204
phone numbers 43–46,
56, 60, 73
tasks 154
text 32, 162
URLs 110, 116
web addresses 110
entry fields 174
envelope icon 90
erasing information 220
error messages 238
errors 223, 228, 238
Escalate ring tone volume
check box 70
ESD (electrostatic discharge)
257
event conflicts 150
INDEX
275
Event Details dialog box 147,
148, 149
events
changing 149
color-coding 149
creating 146, 147
deleting 149
displaying 73, 145, 150,
151
incorrect time zones and
225
scheduling repeating 148
setting alarms for 147,
151
setting preferences for
147
synchronizing 145
troubleshooting 225–227
viewing categories of 150
viewing duration of 150
Excel spreadsheets 79, 87,
161
Exchange ActiveSync 94
Exchange Address Book 225
Exchange Servers 94, 145
exiting applications 238
expansion card slot 185, 186
expansion cards
accessing items on 187
276
INDEX
caution for 18, 187, 189
copying to 133, 138, 187,
189
deleting applications on
172
displaying photo or video
albums on 131
downloading to 113
formatting 189
inserting 185
installing applications on
172
managing files on 187
moving files to 19
opening items on 162,
186, 236
removing 186
renaming 188
sending attachments to
88, 89
storing information on 18,
165, 185
transferring applications
from 187
viewing information about
188
extensions (phone) 51, 63
extra digits button (Active
Call View) 51
Extra Digits option (New
Favorites) 63
Extract Call button 55
F
factory-installed applications
172
fade setting 150
Fast mode (browser) 116
Fast mode icon 111
favorite buttons
adding 61–63
defined 244
deleting 64
dialing with 45
displaying 45
editing 63
organizing 64
transferring to smartphone
62
Favorites tab 45
FDN list 202
features (smartphone) 1, 7–8
feedback 228
fields 30
file types 97, 113, 131, 132
files
accessing 161, 208
attaching to email 86, 87
browsing 187
checking size of 174
deleting 237
downloading 113, 131,
170
incompatible applications
and 18, 19
moving to expansion cards
19, 237
opening 161, 162
saving 162
streaming 114
transferring to smartphone
17, 161
Files application 187
financial calculator 168
financial functions 169
Find dialog box 167
Find More button 167
Find Text on Page command
115
finding
chat sessions 101
contacts 44, 58, 73
specific characters 167
text 115, 167
firewalls 208
5-way navigator
accessing applications and
36
accessing command
buttons and 29
answering phone calls and
201
entering alternate
characters and 33
highlighting and selecting
items and 28
location of 7
moving around screen and
27
navigating pick lists and 30
scrolling web pages and
110
selecting menu items and
29
Fixed display format 169
fixed number dialing 202
flight mode 42
Float display format 169
folder pick list 90
folders
accessing 225
locating 18, 220
removing messages from
101
sorting messages in 100
switching between email
90
Font command 110, 194
font size 110, 195
Font size pick list 195
fonts 194
forgetting passwords 203,
205
Format Card command 189
Formats Preferences screen
195
Formats tab 195
formatting expansion cards
189
forums 241
Forward all calls pick list 55,
56
forward icon (browser) 110
forwarding
email 88
phone calls 55–56
free disk space, determining
18
freeing disk space 18, 236
freeing memory 117, 172,
236
freezes 213, 216
From pick list 188
INDEX
277
full charge (battery) 11
G
Game Volume pick list 194
General Packet Radio Service
(GPRS) technology 244
getting started 3, 5, 15, 241
GIF files 131
Glossary 243
glow (highlight) 28
GPRS connections 76, 232,
234, 244
GPRS technology 244
GPS receivers 124
gradients 169
graphics. See images
grouping photos or videos
132
groupware 94
H
hands-free devices
adding 64, 68
checking status of 77
connecting to 66, 121
disabling or enabling 50
entering passkeys for 67
finding compatible 65
passkeys and 67
278
INDEX
receiving phone calls and
67, 68
restrictions for 65
switching between 68
troubleshooting 229–230
hands-free kits 251
Hands-free Preferences
screen 68
Hands-free Setup button 67
hanging up phone 51, 53, 54
hard resets 203, 216
hardware 1
headphones 65, 136
headset button 47, 50, 65
headset jack 8
headsets
See also hands-free
devices
connecting to smartphone
64–65
entering passkeys for 124
receiving phone calls and
47, 50, 51
restrictions for 65
help 211, 238, 241
hexadecimal characters 169
Hide Records option 204
hiding
blank time slots 150
Pictures & Videos toolbar
133
private entries 204
web browser toolbar 114
High Priority command 98
highlighted buttons 28
highlighting
applications 36, 37
favorite buttons 45
items in pick lists 30
items on screen 28
menu items 29
phone numbers 46
text 28, 29, 115
web links 28, 110
hints 203
History command 115
History list 115
Hold button 50
holidays 148
home city 153
home page 116
home page icon 110, 116
HotSync Log 223
HotSync manager 179, 182,
183, 244
HotSync manager icon 179,
221
HotSync Setup button 182
HotSync technology 244
hypertext links. See web
links
I
icons 75, 140, 197
Ignore button 48
Ignore with Text button 48
image files 97, 113, 131
images
See also photos; pictures
dimmed 219
disabling web page 111,
117
downloading 113
saving 114
selecting as wallpaper 72
sending 97
storing 236
transferring to expansion
cards 19, 236
troubleshooting 234
Import from SIM command
58
importing
contact information 58
phone numbers 155
inactivity 203, 208, 219
Inbox 28, 87, 105
Inbox icons 89
Incoming dialog box 93
incoming messages 104
incoming phone calls 47, 53,
69, 201
incompatible applications 18,
187, 213
Incompatible Apps directory
18
indicator light 7, 12, 13
Info command 18, 173
Info screens 173
information
accessing 202
backing up 18, 23, 217
beaming 177
changing 16
entering 16, 32–33
erasing all 220
hard resets and 203, 216
losing 189, 203, 217
marking as private 204–
205
masking 200, 204
protecting 199, 202
receiving 175, 178
sending over Bluetooth
devices 174
storing 18, 165, 185, 236
synchronizing 17, 20, 23,
179
transferring 17, 23, 176
updating 17, 23, 165
infrared port
beaming from 177, 178
defined 244
location of 9
synchronizing with 183,
221
inserting
battery 10
SIM card 9
installer 170
installing
applications 170–171, 213
bonus software 24, 170
Palm Desktop software
17, 171, 215
synchronization software
20–21
third-party applications
236
VPN client software 209
interference 228, 230
international characters. See
alternate characters
international clock. See
World Clock
INDEX
279
international settings. See
language settings
Internet 107, 131, 170, 232
See also web browsing;
websites
interruptions 238
Into album pick list 134
invalid characters 96
IR communications 176
IR port
beaming from 177, 178
defined 244
location of 9
synchronizing with 183,
221
items in pick lists 30
items on screen
activating 28
highlighting 28
selecting 28
iTunes 136, 138, 140
K
key terms. See Glossary
keyboard
accessing alternate
characters on 32
dialing with 43
entering information from
32–33
illustrated 31
incremental searches
from 44, 73
locking 41, 200
restoring factory defaults
198
keyboard backlight 32, 194,
208
Keyguard 200–201
Keyguard Preferences
screen 200, 201
Known Caller pick list 70
L
J
Java applets 109
JavaScript elements 116
JPEG formats 136
JPG files 131
280
INDEX
Label color pick list 103
land lines 48
language selection screen
11, 21
language settings 11, 195,
215
laptops 182, 183
large attachments 236
Left button (navigator) 28,
29, 30
length functions 169
liability ii
lightning bolts 13, 77
Li-Ion battery 244
See also battery
links 99
See also web links
List By option 60
list screens 28, 29
See also pick lists
list view (applications) 197
listening to
music 65, 136, 140
voice captions 132
voice memos 164
voicemail 49
Lithium Ion battery 244
See also battery
Local button 183
locating
chat sessions 101
contacts 44, 58, 73
specific characters 167
text 115, 167
location information 206
Lock & Turn Off option 204
lock codes 201
Lock Device dialog box 203
Lock icon 110, 133, 172, 177
Lock SIM check box 202
locking
keyboard 41, 200
phone 201–202
screen 201
Treo smartphone 202,
203
logging in to corporate
servers 208
logic functions 169
looking up contacts 62
Lookup button 62
loops 216
losing
information 189, 203, 217
passwords 203, 205
Lost Password option 205
low coverage areas 227
lowercase letters 32
M
M4V files 132
Mac systems
installing applications from
171
installing synchronization
software on 20
installing to expansion
cards and 172
removing applications and
173
requirements for 17
sending email and 81, 91
synchronizing with 23,
180, 184, 222, 223
transferring music from
138, 139, 140
uninstalling desktop
software and 222
upgrading and 19
user folders on 214
magnet 8
mail. See email
Mail Service pick list 83, 84
Manage Playlists command
141, 142
map (World Clock) 153
marking information as
private 57, 204–205
Mask Records option 204
masks 200, 204
mathematical functions 169
maximizing battery life 13,
207
Media application 136
media features 14
Media Player 137, 139, 140
memory 117, 149, 236
freeing 172, 236
memory slots (calculator)
169
memos
See also Memos
application; notes
creating 162
deleting 163
recording 163
sending voice 98
truncated text in 227
Memos application
changing fonts for 194
entering text in 162
opening 36, 162
overview 159
removing memos from
163
synchronizing information
in 23
Memos button 162
menu items 29
Menu key 7, 30, 31
menu shortcuts 30
menus 29
INDEX
281
Message command 47
message icons 105
message lists 101
Message Tone pick list 104
Message validity period pick
list 103
messages
See also email; multimedia
messages; text
messages
adding graphical elements
to 97
adding multiple recipients
for 63
arranging in folders 100
chat sessions and 101
checking status of 77
checking voicemail 76
creating 95, 97, 98
defining favorite buttons
for 63
deleting 101, 102
displaying status of 105
displaying unread 77, 145,
150
including in alerts 103
invalid characters in 96
memory consumption and
237
282
INDEX
paging from 95
previewing 98
retrieving voicemail 49, 76
saving 96
selecting phone numbers
in 46
setting colors for 103
setting preferences for
102–104
specifying priority settings
for 98
storing 105
troubleshooting 231
Messages page
(Preferences) 102
messaging 79, 231–232
See also text messages
Messaging application
See also multimedia
messages; text
messages
changing fonts for 194
creating chat sessions
from 101
creating multimedia
messages with 97
creating text messages
with 95
customizing 102
deleting messages in 101
opening 36
overview 95
sorting messages in 100
status indicators for 105
viewing contacts from 57
viewing multimedia
messages in 99
messaging applications 199
Messaging button 7, 35, 36
Messaging Inbox 28
messaging preferences 102–
104
messaging services 1, 95
metric values 169
microphone 8, 51, 130
Microphone pick list 130
Microsoft Excel 79, 87, 161
Microsoft Exchange
ActiveSync 94
Microsoft Exchange Servers
94, 145
Microsoft Office Manager
See Documents
application
Microsoft Outlook. See
Outlook
Microsoft Windows. See
Windows systems
Microsoft Word documents
79, 87, 161
minutes usage information
(phone) 56
mirror 8
mismatched language
setups 215
MMS messaging services
95, 231, 244
mobile networks 227
modems 118
Modify FDN command 202
monitoring phone status 75
Month View 145, 151
Move to command 134
moving around on screen 25,
27
moving through web pages
110, 116
MP3 files 138
MP3 formats 136
MP4 files 132
MPEG-4 formats 136
MPG files 132
multi-connector pin 8
multimedia files 97, 131,
132, 237
multimedia message icons
105
multimedia messages
See also Messaging
application
addressing 97
attaching photos to 128,
133
attaching videos to 130,
133
attaching voice memos to
164
checking status of 77
creating 97
deleting 101
dialing from 46
displaying details of 100
downloading 103
memory consumption and
237
playing 99
previewing 98
requirements for 3
restrictions for 51
retrieving 77, 98
selecting alert tones for
104
selecting text in 100
sending 95, 98
setting delivery
confirmation for 102
troubleshooting 231
viewing 99
multimedia messaging
services 1, 95, 231
Multimedia Messaging
System (MMS) 244
MultiMediaCard cards 185
music
adjusting volume 141
answering phone calls and
47
changing playlists for 142
converting to MP3 formats
137, 138, 139
creating playlists for 141,
142
downloading 113
hands-free devices and 65
listening to 65, 136, 140
memory consumption and
237
pausing 141
playing 114, 140, 141
selecting 141
stopping 141
uploading 138
music files 113, 136, 138,
237
INDEX
283
music player. See Pocket
Tunes
music subscription services
137
Music_Audio folder 139
mute button 51
My Treo icon 241
N
names
email providers and 81
sorting on 101
synchronizing and 220,
243
naming
categories 197
device 19, 220
email accounts 83
expansion cards 189
photo albums 127
photo groups 130
playlists 141
video albums 129
voice memos 163, 164
navigator buttons 7, 27
See also 5-way navigator
Network Configuration
options 104
network connection icon 120
284
INDEX
Network Preferences page
103
networks 74, 227, 232
New Bookmark dialog box
111
New button 29
New Contact command 57
New Favorite command 62
New Favorites dialog box 62,
63
New Message dialog box 85,
86
Next Song button 140
No Service message 15, 76
No Service—SOS Only
message 76
Normal mode (browser) 111,
116
Note button 58
notes
adding 58, 149, 155
storing 162
notifications 49, 76, 92
See also alerts
number formats 195
numbers
calculator display options
for 169
entering 32, 168
O
offline synchronization 224
offline viewing (web) 111
OK button 29
online forums 241
online support (Palm) 241
opening
Alert dialog box 167
application menus 29
applications 7, 35, 36, 52,
186
Applications View 35
Bookmarks View 111
Call Log 46
Dial Pad 43, 51
email applications 233
email attachments 161
files 161, 162
History list 115
HotSync manager 179
on-device documentation
241
Pocket Tunes 140
Quick Tour 241
web browser 36, 110
web pages 99, 116, 234
World Clock 153
operating system
(smartphone) 17, 245
operating systems (PCs) 17,
215
Optimized Mode (browser)
109, 110
Option key 31, 32, 36, 244
Option key indicator 32
Option Lock indicator 32
Option Lock mode 32, 96
options in pick lists 30
Organize Favorites command
62, 64
organizer features 14, 42
Outbox 105
Outbox button 85
outgoing messages 105
Outlook
caller IDs and 59
duplicate entries in 225
entering appointments
and 146
incorrect time zones and
225
synchronizing with 16, 21,
23, 224, 225
time zones and 146
Outlook folders 225
overdue tasks 145, 150, 156
owner information 206
Owner Preferences screen
206
P
page icon 105
Page View 112, 115, 116
paging 95
paired relationships. See
partnerships
pairing. See partnerships
Palm (online support) 241
Palm Desktop software
caller IDs and 59
defined 244
device names in 243
incorrect time zones and
226
installing 17, 171, 215
multiple appointments and
146
password-protecting 205
reinstalling 224
synchronizing with 16, 18,
23, 221
time zones and 146
troubleshooting 215, 221
uninstalling 222
viewing and editing media
from 136
PALM folder 127, 128
Palm OS software 17, 170,
245
Palm OS-compatible
applications 170
Palm Quick Install. See Quick
Install
Palm Software Installation
CD 2, 20, 215
paper clip icon 86, 89
partial battery icon 13
partnerships 67, 118, 245
passkeys 66, 67, 119, 122
Password box 203, 205
password hints 203
passwords
call barring and 72
changing 204, 205
deleting 204
dialing 51, 63
email and 84, 85
forgetting 203, 205
owner preferences and
206
private entries and 200,
204
requiring 202
unlocking smartphone and
203
INDEX
285
voicemail and 49
Paste command 43, 115
pasting
phone numbers 43
text 115
Pause button 141
pausing
music 141
streamed content 114
video playback 130, 132
video recording 130
voice memos 163, 164
PCs. See personal
computers
PDB files 170
PDF files 87, 161
pending alerts 99, 220
pending messages 102, 105
personal computers
connecting smartphone to
16, 21
creating partnerships for
118
downloading applications
to 171
installing applications from
171, 215
installing synchronization
software on 20
286
INDEX
quarantined files on 18,
19, 213
setting up DUN
connections for 119
synchronizing with 17, 23
transferring information to
23
transferring multimedia to
136
transferring music from
138, 139–140
personal identification
numbers (PINs) 245
personal information 143,
199, 202, 206
See also information
personal information
managers 215, 245
personal schedules 145
personalizing smartphone
151, 191
See also preferences
phone
See also phone calls
answering 47
conference calls and 54
dialing 43–46, 62, 115
documentation
conventions for 41
getting started with 15
hands-free devices and
64, 67, 68
hanging up 51, 53, 54
locking 201–202
overview 50–51
restrictions for 51
selecting alert tones for 71
selecting ringtones for 69–
70
setting preferences for 55,
56, 73
silencing ringer for 48, 193
troubleshooting 227–229
turning on and off 42
viewing Call Log for 46
viewing minutes usage for
56
viewing status of 75
Phone application
accessing Dial Pad in 51
adding caller IDs 58, 59
contact information and
44, 57, 58
creating speed-dial
buttons from 62
customizing 72–73
defined 245
displaying events in 151
opening 36, 42
overview 39
selecting wallpaper for 72,
135
selecting wireless
networks from 74
setting alert tones from 71
setting dialing preferences
in 73
status icons for 75–77
using TTY 75
Phone button 7, 35, 36
Phone Call screen 47
phone calls
See also phone; phone
numbers
adding a second 53
adjusting volume for 15,
71
answering multiple 54
automatically answering
69
barring 72
disabling screen for 201
forwarding 55–56
keyboard backlight and 32
listening to music and 47
making 43–46, 51, 53
placing on hold 50, 53
receiving 47, 53
restricting 202
running applications and
51
sending to voicemail 48
switching between active
54
text messages and 99
viewing details about 50
Phone Display Options
command 72
phone icons 76
phone indicator. See indicator
light
Phone Info command 16
Phone Info screen 16
Phone Lock 201
Phone Lock command 202
Phone Lock settings 202
phone numbers
adding 52
assigning prefixes to 74
assigning to Quick Keys
62
clearing 43
copying 43, 115
creating speed-dial
buttons for 62–63
dialing extra digits with 51,
63
entering 43–46, 56, 60, 73
getting device 16
highlighting 28
importing 155
pasting into Dial Pad 43
redialing most recent 46
saving 53
selecting 46
Phone Off message 42, 76
photo albums 127, 131, 134
Photo Settings screen 130
photos
See also pictures
adding as wallpaper 135
adding caller ID 58, 59
adding captions to 128
adding to albums 134
adding to contacts 135
attaching to multimedia
messages 97
backing up 136
copying 133
deleting 128, 136
displaying information
about 135
downloading 113
grouping 132
INDEX
287
personalizing 128
removing from albums
134, 135
repositioning 131
rotating 135
saving 100, 128, 130
selecting as backgrounds
150
sending 86, 128, 133
setting default size 130
setting preferences for
130
storing 125, 127
viewing 130, 131, 136
pick lists 28, 30
Pics&Videos icon 131
picture formats 131
Picture list 133
pictures
See also images; photos
adding to contacts 59
previewing 130
saving 100, 128, 130
setting preferences for
130–131
taking 127, 127–128, 235
Pictures & Videos application
copying pictures and
videos in 134
288
INDEX
creating wallpaper with
135
hiding toolbar in 133
opening 131
organizing media with 134
removing photos or videos
from 135
rotating photos in 135
sending pictures or videos
from 133
synchronizing information
in 23
viewing pictures in 131
viewing slide shows in
132
viewing videos in 132
PIMs 215, 245
PIN unlock key 245
PINs 201, 245
plain text formats 88
Play button 140
Play icon (browser) 114
playback
pausing 114, 130, 132,
141
resuming 114, 141
stopping 100, 141, 164
playing
multimedia messages 99
music 114, 140, 141
streamed content 114
video clips 129, 132
voice captions 132
voice memos 164
playlists 141–142
Playlists command 142
plug-ins 233
Pocket Tunes application
changing playlists in 142
compatible formats for
137
creating playlists in 141
opening 139
overview 136
playing music from 140,
141
upgrading 137
Pocket Tunes icons 140
POP protocols 93
Power Preferences screen
14, 207
Power/End button 7, 41, 42
PowerPoint files 87, 161
PPT files 161
PRC files 170
precautions 247, 257, 258
predefined passkeys 67,
123, 124
preferences
alarm tones 151
alert tones 71
applications 198, 199
buttons 198
calculator 169
camcorder 130
camera 130
contact information 60
country-specific 195
dialing 73
email 91, 93–94
events 147
hands-free devices 68
Keyguard 200
messaging 102–104
owner information 206
phone 55, 56, 73
power settings 208
ringtones 69, 70
system colors 196
system date and time 147,
206
system sounds 193
tasks 157
web browser 112
web pages 115–117
prefixes (phone numbers) 74
Prefs button 206
preinstalled applications 170,
172, 241
See also applications;
specific application
preset delays 203
preset passkeys 67, 123,
124
pressing keyboard keys 32
pressing onscreen buttons
201
previewing messages 98
Previous Song button 140
primary applications 36, 198
primary button assignments
198
prioritizing tasks 155, 157
priority levels 155, 157
priority settings 98
privacy flag 155
Privacy Mode check box 102
Private check box 204
private entries 200, 204–205
caution for 205
programs. See applications;
software
progress indicator bar (video
recording) 130
Prompt sound pick list 130
protecting personal
information 199, 202
protecting the screen 7
protecting Treo smartphone
199–206
Protocol pick list 84
proxy servers 117
pTunes icon 139
PUK (PIN unlock key) 245
punctuation marks 32, 34
Purge command 101, 149,
157
Purge pick list 101
purging old information 19
Q
quarantined files 18, 19, 213
quick buttons 35, 36, 198
Quick Install 172, 245
Quick Keys 62, 63, 245
Quick Tour 241
Quick Tour icon 241
QuickText button 96
QuickText phrases 96
R
radians 169
radio frequency emissions
247, 248
INDEX
289
random number generator
169
range (Bluetooth devices) 66
Rcl button (calculator) 169
readjusting the screen 196
receipts (messaging) 102
recently viewed web page
icon 110
rechargeable battery 2
See also battery
Record command 177
Record Completion Date
check box 157
Record new option 98
recorder 163
recording
ringtones 70
sounds 152
videos 97, 128–129
voice memos 163
Records button 174
recovering information 220
recovering lost passwords
205
recurring events. See
repeating events
red paper clip icon 86
Redial list 46
redirector (websites) 233
290
INDEX
reducing storage space 18
Refresh command 233
refresh icon (browser) 111
refreshing web pages 111,
233
Regulatory Information 247
reinstalling Palm Desktop
software 224
reinstalling third-party
applications 213, 214, 217
Remember Last Category
option 60
Reminder Sound pick list 152
reminders. See alarms; alerts
Remove from album
command 134
removing
albums 134, 135
alerts 168
applications 18, 172, 173,
237
attachments 86
bookmarks 112
contacts 60
cookies 117
device names 19
email 90, 236
events 149
expansion cards 186
favorite buttons 64
files 237
memos 163
messages 101, 102
music from playlists 142
passwords 204
photos 128, 134, 136
playlists 142
tasks 157
video clips 129, 134, 136
Rename Card command 189
Rename Memo command
164
repeat intervals (events) 148
Repeat pick list 148, 152,
155
repeating alarms 152
repeating event icon 148
repeating events 148, 151
repeating tasks 155
replacing smartphone battery
14, 217–218
Request Receipts pick list
102
rescheduling events 149
Reset Counters button 56
resets 213, 215–217, 228,
238
caution for 203, 216
resizing text 110
Resolution pick list 130
resolution settings
(camcorder) 129
resolution settings (camera)
127
restarting Treo smartphone.
See resets
restoring factory defaults 198
resuming playback 114, 141
Return key 31
Review photos/videos pick
list 130
RF emissions 247, 248
Right button (navigator) 28,
29, 30
ringer
adjusting volume 72
silencing 48
turning off 193
Ringer switch 9, 42, 193
ringtone file types 97, 113
Ringtone pick list 59
ringtone preferences 69, 70
ringtones
assigning to caller IDs 59
downloading 69, 113
recording 70
sending with messages
87, 97, 98
setting for phone 69–70
roaming 70, 104
Roaming pick list 70
Rotate command 135
rotating photos 135
S
Safety Statement (FCC) 247
Save As command 162
Save as Contact command
135
Save as Wallpaper command
135
Save List button 142
Save Page command 111
Save Picture command 100
Save Sound command 100
saved web page indicator
111
saving
calendars 100
contact information 100
files 162
images 114
messages 96
phone numbers 53
pictures 100, 128, 130
playlists 142
video clips 129, 130
voice memos 163
web pages 111
schedules 145
scheduling events 146, 147,
148
Sci(x) display format 169
scientific calculator 168
scientific notation 169
screen
accessing command
buttons on 29
activating items on 28
activating wrong features
219
adjusting brightness 50,
194, 208
aligning 196
battery life and 14
dimming 36
disabling 200, 201
highlighting items on 28
locking 201
moving around on 25, 27
protecting 7
selecting items on 28, 30
troubleshooting 219–220,
229
INDEX
291
turning on or off 41, 208,
229, 243
waking up 41
screen fonts 194
screen protectors 219
scroll arrows 28, 88
scrolling 110
scrolling preferences 116
SD cards 185
SDIO cards 185
search results 167
searching for
contacts 45, 58, 73
specific characters 167
text 115, 167
wireless services 74
secondary applications 36,
198
secure websites 109, 110,
234
security 67, 199, 204, 205
Security button 203, 204
security certificates 109
Security command 205
Security screen 203
security software 199
Select Business Card
command 60
292
INDEX
Select Font dialog box 195
Select Media screen 86
Select Network command 74
selecting
alarm tones 151
applications 36, 37
chat sessions 101
dates 146
favorite buttons 45
home city 153
items in pick lists 30
items on screen 28
menu items 29
music 141
phone numbers 46
photo albums 131, 133
playlists 142
text 29, 100, 116
video albums 132, 133
wallpaper 72, 135
web links 110
wireless networks 74
self-portrait mirror 8
Send button 7, 46, 85
Send command 175
Send From pick list 175
Send To Handheld droplet
139
sending
applications over
Bluetooth 175
calls to voicemail 48
email 86, 99, 109
information over Bluetooth
174
photos 86, 128, 133
text messages 47, 48, 95
to chat rooms 102
video clips 130, 133
voice memos 164
Sent folder 105
servers 23, 208
service contracts 1
setting
alarm clocks 154
passwords 49, 203, 204
settings (incompatible) 213
Setup Devices button 182
Setup Devices dialog box 67,
118, 122, 182
Shift/Find indicator 32
Shift/Find key 32, 167
Short Messaging Service
(SMS) 246
shortcuts 30, 37
Show Address Bar check box
116
Show Calendar event check
box 73, 151
Show Categories check box
157
Show Category Column
check box 150
Show Category List check
box 150, 151
Show Completed Items
check box 157
Show Due Dates check box
155, 157
Show Due Tasks check box
150
Show Messages check box
150
Show Priorities check box
157
Show Records option 204,
205
Show SIM Phonebook check
box 60, 61
Show Time Bars check box
150
Show timestamps in chats
check box 103
Shutter sound pick list 130
Side button 7, 140, 163, 198
signal strength 76, 227
Signal Strength icon 42
signatures 94
silencing system sounds 48,
193
silencing the ringer 48
silent alarm 70, 71, 152, 193
silent alerts 104
SIM card 9, 201, 246
SIM Phonebook 58, 60, 61
SIT files 170, 171
Size button 18, 174
slide shows 132
slides 97, 246
Slideshow Setting command
133
smartcard 246
smartphone
adding additional security
for 205
additional information for
241
battery life for 13
charging 11, 12, 14
compatible headsets for
64
components of 1
connecting to PCs 16, 21
customizing 151, 191
defined 41
entering passkeys for 67
features described 7–8
freeing disk space on 172,
236
getting free disk space 18
getting help with 211, 241
locking 202, 203
naming 19, 220
navigating around on 25
not responding 215
overview 1
phone number for 16
precautions for 10, 13,
247, 258
preset buttons on 61
protecting 199–206
required items for 3
resetting 203, 215–217
setting owner preferences
for 206
storing 7, 8
synchronization defaults
for 23
third-party applications and
237
transferring data to 17, 23
transferring files to 17, 18
troubleshooting 211, 241
turning on and off 11, 41
INDEX
293
unauthorized users and
199
unsupported connections
for 121
viewing signal strength for
76
SMS messaging services
246
soft resets 178, 215
software
See also applications;
synchronization
software
accessing from web
browser 113
conflicts with 223
included with smartphone
2
installing 24, 170
reinstalling 224
troubleshooting 215
uninstalling 222
updating 213
Software Installation CD 2,
20, 215
songlists. See playlists
songs. See music
Sort by check box 157
Sort by Date command 101
294
INDEX
Sort by Name command 101
Sort command 100
sorting
messages 90, 100
tasks 157
Sound & Alerts Preferences
screen 151, 193
sound clips 97, 98
Sound Off position (ringer)
48, 193
Sound On position (ringer)
193
sound preferences 151
sounds 97, 152, 193
Sounds button 193
Space key 31
speaker 8
speakerphone 14, 50, 228
Speakerphone button 50
special characters 32, 34, 96
specifications 259
speed-dial buttons 45, 62–63
speed-dial indicator 45
spreadsheets 79, 87, 161
Start With pick list 112
static 228, 230
statistical functions 169
statistical information 173
status icons (email) 89
status icons (phone) 75–77
stereo adapters 65, 136
stereo headsets 65, 136
Sto button (calculator) 169
stopping
multimedia playback 100
music playback 141
video recording 129
voice memo playback 164
storage solutions 165
storage space. See disk
space
storing
images 236
information 18, 165, 185,
236
messages 105
music files 139
notes 162
photos 125, 127
smartphone 7, 8
videos 125, 128
streaming content 114, 246
style sheets 111, 116
stylus 8, 27, 30
submitting web forms 110
support (Palm) 241
support (wireless service
provider) 241
Swap button 53
symbols 32, 34, 57, 96
sync. See synchronization;
synchronizing
Sync automatically check box
92
sync button 22, 24, 139
sync cable 21, 24
synchronization
ActiveSync and 94
Bluetooth devices and
181, 182
caution for 18
changing defaults for 179,
180, 181, 189
device names and 19
overview 165
preparing for 17
recommendations for 23
removing applications and
173
selecting applications for
179–181
setting default application
for 198
setting up connections for
16
third-party applications and
215, 217, 220
transferring music files
and 138
troubleshooting 220–227
wireless connections and
121
synchronization software
20–21, 224
Synchronize the files setting
224
synchronizing
applications 23, 179
Calendar events 145
dates and time 206
information 17, 20, 23,
179
offline 224
over infrared connections
183–184
photos and videos 136
time zones 206
with Outlook 16, 21, 23,
224, 225
system colors 196
system dates and time 153,
206
system errors 223, 228, 238
system requirements
personal computers 17
system resets 213, 216,
228, 238
system sounds 48, 193–194
System Volume pick list 194
T
tabs 43, 52, 73
Take new picture option 97
Take new video option 97
taking pictures 127, 127–
128, 235
Tap and Drag check box 116
tapping 27, 28, 30, 196
Task Details dialog box 154,
155
tasks
See also events; Tasks
application
adding 154
assigning to attachments
88, 89
checking off 155
deleting 157
displaying 145, 150, 156,
157
marking as private 155
prioritizing 155, 157
setting alarms for 155,
157
INDEX
295
setting preferences for
157
viewing due dates for 156,
157
Tasks application
changing fonts for 194
opening 154
synchronizing information
in 23
Tasks button 154
Tasks list 145, 155, 156, 157
Tasks Preferences screen
157
technical support (Palm) 241
technical support (wireless
service provider) 241
telephone calls. See phone;
phone calls
temperature conversions
169
text
copying 114
entering 32, 162
finding 115, 167
highlighting 28, 29, 115
resizing 110
selecting 29, 100, 116
truncated 227
296
INDEX
viewing against photos
150
text fields 30
text message icon 105
text messages
See also messages
addressing 95
checking status of 76, 77
containing links 99
creating 95–98
deleting 101
dialing from 46
receiving 104
requirements for 3
retrieving 77, 98
selecting alert tones for
104
sending 47, 48, 95, 101
setting priority of 98
special characters and 96
troubleshooting 231
text messaging services 1,
231
third-party applications
5-way navigator and 27
adding security and 205
backing up information
and 18, 217
beaming and 178
caller IDs and 59
caution for 198, 213
compatibility with 17, 19
deleting 18, 237
getting help with 172
hard resets and 216
installing 213, 236
manually deleting 173
reinstalling 213, 214, 217
searching in 167
transferring to expansion
cards 19
troubleshooting 27, 237–
238
uninstalling 172, 216
VPN clients and 209
third-party software. See
third-party applications
Thumbnail View 132, 133,
136
TIF files 131
time
displaying video recording
128
scheduling events and
146, 149
setting 206
synchronizing 206
viewing 152
time bars 150
time formats 195
time preferences 206
time slots (calendar) 150
Time Zone pick list 146
time zones 147, 206, 225
Timed Events check box 151
timestamps 103
tips 241
Tips command 241
Tips icon 241
to do items. See tasks
toolbars 114, 133
Totals command 56
touchscreen. See screen
Touchscreen Preferences
screen 196
transactions 110, 234
transmission delays 231
Trash folder 90
travel alarm 154
Treo smartphone. See
smartphone
trigonometric functions 169
troubleshooting 211, 241
truncated text 227
trusted devices 121
See also partnerships
Trusted Devices button 118,
122
Trusted Devices list 119,
121, 123, 175
trusted pairs. See
partnerships
TTY/TDD machine 75
turning on or off
Bluetooth devices 68, 175
Caps Lock 32
keyboard backlight 32
Keyguard 41, 200
microphone 130
phone 42
screen 41, 208, 229
smartphone 11, 41
speakerphone 50
touch-sensitive features
201
Typing starts contacts search
option 73
U
unauthorized users 199
Unfiled category 176
uninstalling
Palm desktop software
222
third-party applications
172, 216
Unknown Caller pick list 70
unlocking
the keyboard 200
Treo smartphone 202,
203
unread messages 77, 105,
145, 150
untimed event icon 148
untimed events 147, 148,
151
Untimed Events check box
151
Up button (navigator) 28, 29,
30
updating
application software 213
information 17, 23, 165
system date and time 153
World Clock 153
upgrades 17–20, 62, 223
troubleshooting 213–214
uploading music files 138
uppercase letters 32
urgent messages 105
URLs
See also web links
beaming 177
INDEX
297
entering 110, 116
in text messages 99
USB hub 21, 222
USB ports 21
Use color for pick list 103
user discussion groups 241
user folders 214, 220, 246
User Guide 241
usernames 84, 85
V
Verizon Wireless
preset buttons and 62
VersaMail application
accessing email and 81
adding attachments from
86–87
creating email messages
from 85
customizing 91–94
displaying attachments
with 89
documentation for 236
Exchange ActiveSync
accounts and 94
getting started with 81
opening 36, 83
overview 81
298
INDEX
responding to messages
from 88
setting up accounts with
83, 84
sorting messages with 90
switching accounts from
91
troubleshooting 230
Version button 174
version numbers 174
VGA digital camera. See
camera
Vibrate pick list 70, 71, 152
vibrating alarm 70, 71, 152,
193
video albums 129, 131, 134
video file types 97, 113, 132
video recording screen 128
Video Settings screen 130
videos
adding to albums 134
adjusting volume for 130
attaching to email 86, 130
attaching to multimedia
messages 97
backing up 136
copying 133
deleting 129, 136
displaying information
about 135
downloading 113
grouping 132
jumping to specific
sections of 130
pausing 130, 132
playing 114, 129, 132
recording 97, 128–129
removing from albums
134, 135
saving 129, 130
sending 130, 133
setting default size 130
setting preferences for
130
storing 125, 128
viewing 130, 132, 136
View By pick list 198
viewing
alerts 167
alternate characters 34
application information
173–174
application menus 29
applications 197
attachments 89
available disk space 18
bookmarks 111
connection status 76, 110,
120, 231, 232
contact information 45, 58
current date and time 152
due dates 156, 157
email messages 87, 88
error messages 239
event categories 150
events 73, 145, 150, 151
favorite buttons 45
items in pick lists 30
multimedia messages 99
overdue tasks 145
personal calendar 145
photos 130, 131, 136
private entries 205
Quick Tour documentation
241
signal strength 76
slide shows 132
tasks 150, 156, 157
unread messages 77,
145, 150
video clips 130, 132, 136
video recording time 128
voicemail messages 76
web addresses 116
web pages 109, 110
virtual private networks
(VPNs) 208
Visibility pick list 123, 175
voice captions
adding 128, 135
background music and
133
playing 132
Voice Memo application 159,
163–164
Voice Memo list 164
voice memos 98, 163, 164
voicemail
checking 76
listening to 49
retrieving messages 49,
76
sending calls to 48
setting alert tones for 71
setting up 48
Voicemail Alert pick list 71
Voicemail icon 49, 76
voicemail notifications 49, 76
voicemail page icon 105
volume
alarm tones 151
alert tones 71
music 141
phone 15, 71, 228
ringer 72
ringtones 70
video clips 130
voice memos 164
Volume button 7, 15, 71
volume conversions
(calculator) 169
Volume pick list 70, 71
volume preferences 193
VPN client software 209
W
waking up screen 41
wallpaper 72, 135
warranty 218
web addresses 110, 115,
116
See also URLs; web links
web browser
accessing email providers
and 81
auto-completion options
for 116
beaming from 177
bookmarking and 111,
112
customizing 115–117
deleting cookies for 117
INDEX
299
dialing phone numbers
and 115
hiding toolbar in 114
opening 36, 110
overview 107, 109
restrictions for 109
selecting default views for
112
selecting home page for
116
streaming and 114
unsupported elements for
233
viewing connection status
for 110
web browser application.
See Blazer web browser;
web browser
web browser buttons 110
web browsing
See also web browser
dial-up networking and
118, 120
from smartphone 109,
118
memory consumption and
237
requirements for 3
restrictions for 51
300
INDEX
secure sites and 109, 110,
234
selecting default
application for 199
troubleshooting 232–234
web browsing service 1
web forms 110
Web icon 110
web links
assigning to favorite
buttons 63
creating email from 109
highlighting 28
Palm online support 241
selecting 110
web pages
accessing 109, 111, 233
bookmarking 111–113
caching 117, 237
changing fonts for 194
changing layouts for 110
copying text from 114
disabling images for 111,
117
displaying 109, 110
finding text on 115
loading 116, 234
opening from text
messages 99
opening History list for
115
optimizing 234
refreshing 111, 233
resizing text on 110
saving 111
scrolling 110, 116
selecting most recent 112
selecting phone numbers
on 46
selecting text on 115, 116
sending email from 109
setting initial view for 115
setting preferences for
115–117
viewing offline 111
web-based email 81
websites
See also web browsing
accessing 109, 110, 118
accessing Palm online
support 241
browsing to secure 110
displaying recently visited
110
downloading files from
113, 131
installing applications from
170
redirectors and 233
submitting transactions
and 110, 234
Week View 145
weight conversions 169
Wide Page Mode (browser)
110
Windows systems
installing applications from
171
installing to expansion
cards and 172
removing applications and
173
requirements for 17
sending email and 81, 91
synchronization defaults
for 23
synchronizing with 179,
183, 221, 223
transferring music from
137, 139, 140
viewing multimedia on
136
wireless accounts. See
accounts; wireless service
provider
wireless connections 107,
121, 174, 175
See also connections
wireless devices. See
Bluetooth
devices hands-free
devices; smartphone
wireless features 14, 237
wireless modems 118
wireless networks 74
wireless service provider
onscreen message 76
phone services and 54, 55
smartphone requirements
for 1
technical support for 241
text messaging and 1
troubleshooting
connections to 234
troubleshooting Internet
connections and 233
voicemail and 48
voicemail services and 48
wizards 170
WMA formats 137
Word documents 79, 87,
161
word searches 167
words, selecting 29
World Clock 152–154
World Clock icon 153
world map 153
Wrap Search check box 115
X
XLS files 161
Y
Year View 145
Z
ZIP files 170, 171
zoom settings (camera) 127
INDEX
301
302
INDEX