1
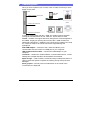
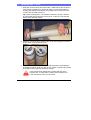
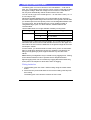
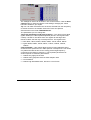
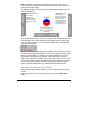
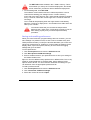
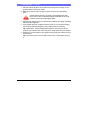
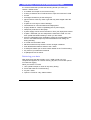
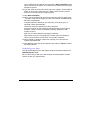
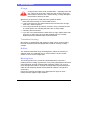
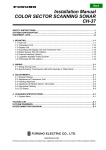
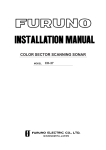
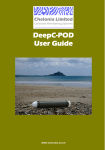
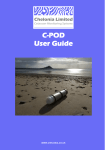
Chelonia Limited
Cetacean Monitoring Systems
T-POD
User Guide
WWW.CHELONIA.CO.UK
POD, TAD, TPOD and T-POD are trademarks of Chelonia Limited.
Information in this document is subject to change without notice.
© 2007 Chelonia Limited. All rights reserved.
November 2007
2
T-POD USER GUIDE
Contents
1
Introduction ................................................................................................ 5
What are T-PODs? ...................................................................................... 5
Here to help.................................................................................................. 6
2
Checking parts ........................................................................................... 7
3
Opening the T-POD.................................................................................... 8
4
Using the Battery Packs............................................................................ 9
Fitting batteries............................................................................................. 9
5
Installation ................................................................................................ 11
Installing the software and support files..................................................... 11
Setting up USB communications ............................................................... 11
Uninstalling the software............................................................................ 12
6
Setting up the POD .................................................................................. 13
Connecting to the T-POD........................................................................... 13
Using standard settings ............................................................................. 15
Deciding on custom settings ...................................................................... 16
Reducing the detection range............................................................... 16
Increasing the detection range ............................................................. 16
Reducing memory use in long deployments......................................... 17
Reducing noise logged ......................................................................... 17
Preventing dolphins from being recorded on porpoise settings............ 17
Preventing porpoises from being recorded on dolphin settings ........... 18
Discriminate between two species using the same modal
frequencies ........................................................................................... 18
Discriminating between two species using different modal
frequencies ........................................................................................... 18
Some points to remember .................................................................... 18
Recording settings used ....................................................................... 19
Creating your own settings ........................................................................ 19
Logging settings.................................................................................... 19
Scan settings ........................................................................................ 19
Saving your settings.............................................................................. 21
Setting the angle sensor ....................................................................... 21
Sending your settings to the T-POD .......................................................... 22
T-POD USER GUIDE
3
Saving and recalling preferences...............................................................23
7
Closing the T-POD ...................................................................................24
8
Deploying T-PODs....................................................................................25
Calculating the maximum deployment time ...............................................25
Lost and found ...........................................................................................25
Moorings ....................................................................................................25
Buoyancy ..............................................................................................25
Location.................................................................................................26
Security .................................................................................................26
Using anchors .......................................................................................26
Buoys ....................................................................................................26
Cordage ................................................................................................26
Theft ......................................................................................................27
Depth limits ...........................................................................................27
Directionality..........................................................................................27
Towing the T-POD ................................................................................27
9
Retrieving T-PODs and downloading data ............................................29
Retrieving your data ...................................................................................29
Analysing your data....................................................................................31
10
Maintenance .............................................................................................32
O-rings........................................................................................................32
Transducer housing ...................................................................................32
Buffers ........................................................................................................32
Mooring lines ..............................................................................................32
Electronics..................................................................................................33
Silica Gel ....................................................................................................33
Storage.......................................................................................................33
Calibrate Vertical........................................................................................33
4
T-POD USER GUIDE
1
Introduction
This User Guide describes how to set up, deploy and retrieve data from
your T-POD.
What are T-PODs?
T-PODs are fully automated, static, passive acoustic monitoring systems
that detect porpoises, dolphins and other toothed whales by recognising
the trains of echo-location clicks they make to detect their prey, orientate
and interact.
T-PODs select tonal clicks and record only the time and duration of each
click. Both are logged in 10 microsecond units. Digitised sound is not
stored.
In every minute the T-POD runs 6 successive scans of 9.3 seconds each
that may select clicks using different criteria (for the remaining 4.2
seconds, the T-POD is in sleep mode).
Every minute these data are also logged:
battery voltage
angle sensor value, which gives the angle of the POD to the vertical
system noise
temperature
The POD characteristics and all the settings in use during logging are
recorded in one or more data files stored in the POD’s memory. The
settings can be viewed using the TPOD software when a data file is open.
Continuous or intermittent logging may used. In Intermittent logging mode
the POD can switch off for any number of minutes before switching on for
one minute. This can be used to prolong battery life or memory life. A POD
can monitor a whole year if monitoring one in every two minutes using
lithium batteries. When a POD is not logging (in sleep mode) it consumes
about a quarter of full power.
TPOD software, included with your product, has highly developed click
train recognition system that produces fully automated, accurate data on
the behaviour and identification of cetacean species. Chelonia PODs are
currently the only commercially available tools to offer this unique feature.
Without automated detection of click trains, the task of analysing large
volumes of data is vast. It is this process of click train detection that is the
key to the efficient, high quality output of our instruments.
T-POD USER GUIDE
5
T-PODs can be deployed for up to one year of continuous, autonomous
operation. These non-invasive systems have been successfully deployed
in a wide range of environments – from the Arctic to the Amazon – and our
deep water version can operate down to depths of 3000 metres making it
suitable for species such as the beaked whales.
Here to help
Your T-POD purchase entitles you to free email support and future
software upgrades.
We also supply a range of additional services, including project planning,
project management, data analysis and interpretation.
For more information, please visit our web site at www.chelonia.co.uk or
contact us using the details below:
Chelonia Limited
Beach Cottage
5 Beach Terrace
Long Rock
Penzance
TR20 8JE
UK
Tel: +44 (0)1736 711783
Fax: +44 (0)870 0554967
Mobile: +44 (0)7766 532361
Email: [email protected]
6
T-POD USER GUIDE
2
Checking parts
Once you have unpacked your T-POD, check to make sure that you have
all the correct parts:
T-POD
Holds the battery power pack
POD USB
Adaptor
USB communications cable
T-POD User
Guide
Contains the electronics
Houses the hydrophone
Spare O-rings
Silica gel
T-POD CD-ROM
In order to communicate with the T-POD you will also need a computer
running Microsoft Windows 95, NT, 2000, XT, Server 2003 or Vista.
T-POD – consists of an upper and lower casing that is screwed together in
the middle. A light grey housing at one end of the T-POD contains the
ultrasound hydrophone. T-PODs are very robust, but be careful not to drop
the T-POD or subject it to hard knocks as this might damage the
hydrophone.
POD USB Adaptor – connects to the T-POD and allows you to
communicate with the T-POD via a USB port on your computer.
USB communications cable – connects the USB Adaptor to your
computer.
T-POD CD – contains the TPOD software, communications driver, T-POD
settings files, sample data files, documentation and tutorials.
Spare O-rings – used to seal the T-POD and keep it waterproof when it is
closed. Use these spares to replace the existing O-rings if they become
damaged.
Silica gel pack – used to prevent condensation on the inside of the
T-POD when it is deployed.
T-POD USER GUIDE
7
3
Opening the T-POD
1. Wrap the centre mooring line around the T-POD and secure the line by
using a large screwdriver or other bar while you unscrew the battery
housing (see below). Alternatively two people, one at each end of the
T-POD, can hold and unscrew it.
Tip: When working alone, it is sometimes easiest to tie the T-POD to
an immovable object using the mooring line, so that you can twist the
battery pack with both hands.
2. When the T-POD is open, keep the two ends close together so that the
power cable is not stretched too far.
3. Remove the silica gel bag from the T-POD and place it immediately in
an airtight container while you work on the T-POD. The silica gel should
look clean and the granules should be orange.
If the granules look blue/green it means that they have
become wet. To restore the crystals, place the bag in an
oven and heat at 120°C for two hours.
8
T-POD USER GUIDE
4
Using the Battery Packs
The battery pack can hold 3 columns of 5 D cell batteries – 15 D cells in
total. The T-POD battery pack uses the column of five D cells that provides
the highest voltage. When the voltage from this column of cells falls too
low, the pack automatically selects another stack of five cells.
You can use any type of D cell that gives 6 – 12 volts from 5 cells ( i.e. 1.2
to 2.2 volts per cell).
NiCad rechargeable batteries are not recommended as they are heavy
and have a high self-discharge rate so that the running time is shorter than
you would expect from the capacity of the cell. Rechargeable alkaline cells
run much longer, but do deteriorate over a much smaller number of
charge/discharge cycles. For these reasons, alkaline batteries are
recommended.
Use the table below as a rough estimate of battery running times.
D Cell Type
Stack of 5 cells
Alkaline
Approximate running time
1
4 - 5 weeks
2
8 - 10 weeks
3
12 - 15 weeks
T-POD buoyancy varies with total cell weight. The T-POD mooring line is
attached at the centre so that in tidal streams the forces on the upper and
lower halves of the T-POD are balanced so the greater weight at the lower
end keeps it vertical.
For this reason, you should include 15 cells even if you do not need them.
Tip: To avoid partly discharging all of them, isolate the cell stack(s) not
being used by placing a piece of paper between any two cells in the
stacks.
Note: Memory management may be critical for long logging times. Testing
at sea will be needed in order to optimise this for dolphin detection.
Tip: All logging times can be increased by logging alternate minutes only,
as the power consumption is about 20% when not logging.
Fitting batteries
1. Lift the battery pack out of the T-POD housing using the central metal
button.
2. Disconnect the power lead and then remove the battery pack fully from
the housing.
The battery pack can hold three columns of five D cells.
T-POD USER GUIDE
9
All the cells face the same way – negative towards the springs.
3. For each column of cells, insert each cell in the middle of the battery
pack, where the outer bars can flex to allow the battery to be fitted (see
below left). Then slide each cell along to the end of the pack.
4. Check the voltage of each stack by pressing the small white buttons on
the top of the battery pack in turn.
battery test buttons
battery status LED
The LED next to the power connector lights according to the battery
stack voltage:
Green – more than 7 volts
Red – between 5 and 7 volts
No light – less than 5 volts. Replace batteries
5. Lower the battery pack into the housing (it may descend gently under
its own weight) and stop it before the top goes into the housing.
6. Plug in the power lead. The T-POD beeps to confirm that power has
been connected. Allow the battery pack to descend fully into the
housing.
7. Leave the T-POD open so that you can set it up ready for deployment.
10 T-POD USER GUIDE
5
Installation
The installation procedure, described below, consists of copying files from
your T-POD Installation CD and installing a communications driver for the
USB adaptor.
Installing the software and support files
To install the TPOD software and support files:
1. Create a folder called TPOD on your computer.
2. Insert the TPOD Installation CD into your computer’s CD drive.
3. Copy all the files from the TPOD Installation CD to the new folder.
Setting up USB communications
To communicate with the T-POD via a POD USB Adaptor, you need to
install a Virtual Com Port driver (made by Future Technology Devices
International Ltd).
To install the Virtual Com Port driver:
1. In the TPOD folder, open the folder USB Driver.
2. Double-click on the file CDM 2.02.04.exe.
The Virtual Com Port driver is installed.
3. Plug the USB communications cable into the POD USB Adaptor.
4. Plug the other end of the USB communications cable into any USB port
on your computer (see below).
Plug into any USB port on
your computer
POD USB
Adaptor
USB cable
5. Verify the USB installation on your computer by opening Control Panel
> System > Hardware > Device Manager > Ports (COM & LPT).
The entry should show 'USB Serial Port (COMx)', where x is a value
from 2 to 7. Make a note of the number as you will need to enter it
when you run TPOD.exe.
Installation is complete and your computer is now ready to communicate
with the T-POD.
T-POD USER GUIDE
11
Uninstalling the software
To uninstall the USB interface driver:
1. In the folder TPOD\USB driver double-click on Ftdiunin.exe.
You are prompted to confirm the action.
2. Click Continue.
The USB interface driver is uninstalled.
To uninstall the TPOD software:
1. Delete the TPOD folder, along with any other POD-related files.
12 T-POD USER GUIDE
6
Setting up the POD
When the TPOD software and support files have been installed on your
computer, you’re ready to set up the T-POD.
All communication with your T-POD is carried out via the program
TPOD.exe. This section describes how to use the TPOD software to set up
your T-POD ready for deployment. Other, more advanced, options are
described in the tutorials, located in the TPOD\Reference folder.
Note: If possible, set up the T-POD using the same computer that will be
used to retrieve data after deployment.
Connecting to the T-POD
To set up your T-POD:
1. Open the T-POD and place both halves next to one-another.
2. Connect battery power. The T-POD beeps to confirm that power has
been connected.
3. Plug the USB communications cable into the POD USB Adaptor.
4. Plug the other end of the USB communications cable into the USB port
on your computer.
5. Plug the POD USB Adaptor directly into the T-POD (see below).
POD USB Adaptor
USB port
Battery pack
power cable
6. In the TPOD folder on your computer, double-click TPOD.exe.
The TPOD main window is displayed.
T-POD USER GUIDE
13
The upper part of the window shows options that you normally use
when displaying data.
The lower part of the window displays the menu area, which consists of
nine tabs. Each tab displays a different page with appropriate functions,
depending on your current task.
The menu area can be hidden or displayed by clicking the Menu
button.
Tip: Many items show a help tip if you put the mouse pointer over them
for 2 seconds.
The colour of text in the program means:
Maroon: clickable
Red:
selected
Blue:
mostly data
Black:
general information
7. Click Menu to show/hide the Menu window. You normally hide this
window when you are looking at data and show it when you want to use
a menu option.
8. Select your communication settings:
For parallel port communications, select the right-hand printer button
and ensure that the correct port is selected.
14 T-POD USER GUIDE
For USB communications, select the USB button and enter the number
of your USB port in the COMM port box.
9. Click CONNECT to POD.
The T-POD beeps and TPOD.exe retrieves the current settings.
Using standard settings
Standard settings for various purposes can be selected from the Set POD
menu page.
1. Click the Set POD tab.
2. Choose your target species from the list.
These settings will serve for most purposes and it is best to use them
until you have gained some experience of how the detection efficiency
and memory usage vary. For most projects they do not require
modification.
Porpoises – these animals always seem to use approximately the
same sound frequency, so the settings file does the same.
Dolphin sweep – most delphinids use a range of sound frequencies
and these are trial settings that allow you to quickly discover which
frequencies are most used.
Dolphins at 50kHz – this is the sound frequency most used by
dolphins and these settings do not use other frequencies.
Dolphins at 50kHz + Porpoises – where both types of cetacean occur
you need to monitor both of them as dolphins can produce narrowband
clicks at porpoise frequencies, while porpoises do not produce clicks
with large energy peaks below 100kHz.
User settings – this option is used only when you have created a file
for repeated use on the Settings page (see Creating your own settings
on page 19).
3. Click View Settings and set switch.
The Open POD settings file dialog box is displayed, showing the
name of the file that contains your chosen settings.
4. Choose the V5 version of the file and click Open.
The Settings window is displayed.
T-POD USER GUIDE
15
Deciding on custom settings
This section gives advice on how to choose custom T-POD settings based
on your project requirements.
Tip: You can read more about this subject in Clicks and Trains and
Species Discrimination in the Reference Guide in the folder
TPOD\Reference.
If you would like to discuss your project requirements with us,
please contact us for free advice (see Here to help on page 6).
Reducing the detection range
To reduce the detection range:
Decrease the sensitivity value. Sensitivity can be set on a 15 point
scale. The lowest values give a short detection range that may be
useful for limiting detection to animals close to a net.
Reduce the click bandwidth. This makes the T-POD more selective at
the same time as reducing its sensitivity. However, a value below 3 for
porpoises or below 4 for dolphins will probably greatly reduce
detections.
Increasing the detection range
To increase the detection range:
Increase the sensitivity value. However, please note that higher
sensitivity can cause the following problems:
more noise is logged and the memory fills too quickly.
if more noise is logged it may reduce the ability of the software to
find trains, so that the real sensitivity (to trains) actually falls.
where there are many animals they may overfill the memory. In this
case you can set a lower limit on the number of clicks logged per
scan and keep your sensitivity higher.
in all cases, remember that a long deployment may encounter much
more extreme conditions than a short test, so leave a generous
margin to allow for this. For example, plan to use only half of the
available memory rather than all of it.
Increase the click bandwidth. This makes the T-POD less selective at
the same time as increasing its sensitivity. However, please note that a
value above 5 may greatly increasing noise detections.
16 T-POD USER GUIDE
Reducing memory use in long deployments
There are several possible methods:
Set a value above 10 microseconds for the shortest clicks logged. This
works because cetacean clicks are mostly longer than ambient noise
clicks. This is particularly true for porpoises and beaked whales.
Set a lower limit on the number of clicks logged in each scan.
Reduce sensitivity.
Reduce click bandwidth.
Try different settings for the reference frequency.
Use the ++ setting for noise adaptation.
Log alternate minutes or even 1 in 3.
Reducing noise logged
This is the same as reducing memory use, except that if you are really
lucky and most of your clicks are coming from animals (shown by displays
of all clicks versus trains having all the same peaks) then the logic
changes:
Reducing click bandwidth may give you a higher (or lower? – not yet
seen but not inconceivable) fraction of clicks classified into trains.
Consider logging alternate minutes with a higher limit (or none) on each
scan if you want to see long trains.
Preventing dolphins from being recorded on porpoise settings
To prevent dolphins from being recorded on porpoise settings:
Ensure the reference frequency is on the same side of the porpoise
target frequency as the commonest dolphin clicks. This nearly always
means that the reference frequency should below the target frequency.
Try a low click bandwidth value (4 or even 3) and see if you make the
system too insensitive to porpoises.
Remember that neither of these will be 100% effective and if you have
both species you have to consider the rate at which dolphins show up
as porpoises. Dolphins do produce some very narrow band, high
frequency clicks at times – the standard description of the differences
between dolphins and porpoises tends to highlight the differences and
underplay this little-described area of overlap.
Finally you may need to resort to encounter classification to evaluate
your data clearly.
T-POD USER GUIDE
17
Preventing porpoises from being recorded on dolphin settings
To prevent porpoises from being recorded on dolphin settings:
Ensure that the reference frequency is between the porpoise modal
frequency (generally 120 - 150kHz) and dolphin target frequency. Such
scans will log dolphins only.
If you want to study porpoise frequencies used by dolphins, encounter
analysis will be essential.
Discriminate between two species using the same modal
frequencies
This is very difficult, if not impossible. It requires a great deal of visually
validated species data and often also requires multivariate analysis of
minutes with different settings in different scans, carefully chosen to
capture suspected differences. The possible approaches to capturing
those difference are:
Try different click bandwidths.
Try different reference frequencies – ideally with some guidance from
known click spectra.
Discriminating between two species using different modal
frequencies
This is like dolphin/porpoise discrimination. In that case the confidence we
have in porpoises not producing clicks with more energy at low
frequencies than high is very helpful. Where no such category of easily
identified clicks exists the problem is just like the one above, but a bit
easier.
Some points to remember
If you encounter difficult areas remember:
Detection thresholds rise as a click frequency gets further away from
the target frequency. If the click frequency moves towards the reference
frequency, detection will cease (at any intensity) when the click
frequency is midway between the two, but as it moves away from the
target and away from the reference frequency the limit is a long way off,
with sensitivity falling all the way. For example, a 130kHz target, 90kHz
detection cannot detect anything below 110kHz, but can detect very
loud sounds at 200kHz.
18 T-POD USER GUIDE
It is generally more efficient to keep the reference frequency not much
beyond 30-40% above or below the target frequency. At bigger
spacings there is higher sensitivity for the same bandwidth setting, but
this will probably produce many more noise clicks.
If you log a lot of noise clicks there will be many very doubtful trains
found by the TPOD software, having arisen by chance, and a few
doubtful and low probability cetacean trains too. You should not trust
low probability (Cet Lo) detections displayed by the TPOD software
unless there are high probability (Cet Hi) train detections.
Recording settings used
T-POD settings from any logging are saved as part of the data file created
on your computer after retrieval and can be seen when the file is
subsequently opened using the TPOD software.
Creating your own settings
The Settings window allows you to view and change settings for the
T-POD before activating it.
Logging settings
Minutes OFF between each minute ON – Normally, when the T-POD is
deployed it logs every minute. However, if you need to extend memory and
battery life, you can set the T-POD to stop logging for one or more minutes
between each minute that it logs. Power consumption is about a quarter
when not logging.
Log only click longer than – Use this feature to reduce the number of
non-porpoise clicks logged where a T-POD must be deployed close to a
source of many short clicks, such as moving sand. Be aware however, that
this does reduce sensitivity, as weak cetacean clicks normally appear as
short clicks. You can read more about this subject in the tutorial Clicks and
Trains in the folder TPOD\Reference.
Scan settings
When a T-POD is in logging mode, during each minute, it performs six
scans of 9.3 seconds duration (for the remaining 4.2 seconds, the T-POD
is in sleep mode). You can specify parameters for each of the six scans.
Scans can have individual settings, or can all be set to the same values.
T-POD USER GUIDE
19
The settings for each scan is shown in one vertical column. Click the Scan
setting button to rotate through the scan settings, changing the values
below it to whatever you require.
Tip: You can read more about how clicks are selected from the cacophony
of marine sounds in the tutorials Clicks and Trains and Species
Discrimination in the folder TPOD\Reference.
The parameters you can change are:
Target (A) and Reference (B) filter frequency – The range is from 9kHz
(sperm whales) to 176kHz (small delphinids) and is in two registers that
overlap. It is best to use values from one register for the target and
reference filters, but this may not always be true. The registers are:
lower 9kHz, 16kHz, 22kHz, 29kHz, 36kHz, 41kHz, 50kHz, 56kHz.
higher 30kHz, 50kHz, 70kHz, 92kHz, 113kHz, 130kHz, 159kHz,
176kHz.
Click bandwidth – High values admit sounds of high bandwidth; that is
sounds that are spread across a wide spectrum of frequencies. Low values
only admit sounds that have a lot of energy at the target frequency
compared to the reference frequency. This important parameter has
serious impacts on detection performance.
3 admits only highly tonal clicks
4 admits many porpoise clicks but fewer dolphin clicks
5 is the default
6 allows high bandwidth clicks, but lets in a lot of noise
20 T-POD USER GUIDE
Noise adaptation – If set to ++, energy coming through the reference filter
lowers the effective value of the bandwidth setting. Dolphins are very noisy
animals and this helps to select the best clicks. It should never be used
during any tank testing of the T-POD, as radio frequency interference is
widespread and will often be varying the performance in an unpredictable
way through this adaptation. In the sea however, radio frequencies are
screened by the water. The setting + holds back noise adaptation until the
surroundings get very noisy and allow T-PODs to be tested out of the sea.
Therefore ++ is the normal operational setting, and + is the normal testing
setting.
Sensitivity – can be set on a 15 point scale. 10 is the normal operational
setting. For porpoises it can be higher but this may be of no benefit for
dolphin detections.
Scan limit on N of clicks logged – is useful to avoid the risk of filling the
memory with boat sonar clicks, which can come in thousands due to
multiple echoes of these very loud sources.
Saving your settings
Settings can be stored in *.pds files so that settings schemes can be
reloaded and transferred to other T-PODs, preventing setup differences
between different T-PODs when you want them to be the same.
To save your settings:
1. In the Settings tab, click Save settings.
2. Give your T-POD settings file an appropriate name and click Save.
To recall saved settings:
1. In the Settings tab, click Read settings file.
2. Locate and select the correct T-POD settings file and click Open.
To get settings information from a connected T-POD:
1. In the Settings tab, click Get settings.
2. The software communicates with the T-POD and retrieves its current
settings.
Setting the angle sensor
The T-POD contains an angle sensor which can switch logging on and off
depending on the angle of the T-POD to vertical.
This allows you to ensure that the T-POD does not begin logging until it is
deployed, thus saving battery power and memory space (while above the
water the T-POD could log ultrasound noise; even radio waves, which can
resemble cetaceans).
T-POD USER GUIDE
21
Note: Deepwater T-PODs have a special high strength casing which
normally faces downwards during deployment, so they have a reversed
version of the angle sensor.
The ON/OFF angle is shown graphically in the Settings window when you
read the settings file.
Hydrophone end down
Hydrophone end up
POD is sleeping.
Logging is OFF.
The POD beeps every
2 seconds to tell you
that it is set up, ready
to log.
POD is logging.
When immersed, the
buoyancy of the POD
ensures that the
hydrophone housing
floats uppermost and
the angle sensor
switches logging ON.
Default is 80 degrees from
vertical which allows the
POD to be transported lying
horizontally.
In the Angle sensor box you can see the angle of the hydrophone end from
vertical at which the T-POD will switch from logging mode to sleep mode
using the current settings. You can also set the ON/OFF angle manually
using the spin buttons.
Tip: If the T-POD is in quiet waters and unlikely to deviate far from vertical,
you might set an angle of 60 degrees. Then, the T-POD will be OFF if lying
flat during transportation. If conditions are less predictable, set a much
bigger angle, 150 degrees, for example. Then it will only be off while
hanging from a peg by its handle. If you really want it to be ON even if it is
upside down, set the angle to 180 degrees (the switch diagram is all blue).
You can still identify the start and end of deployments from the angles
shown in the data display when you analyse the data after retrieval.
Sending your settings to the T-POD
When you are happy with the settings, you are ready to send them to the
T-POD.
Settings are sent to the T-POD only when you click on the SET POD
button.
22 T-POD USER GUIDE
The SET POD erases all data in the T-POD’s memory. This is
normal when you set up the T-POD for deployment, but should
not be used when you want to retrieve data after deployment.
1. On the Settings tab, click SET POD.
The software communicates with the T-POD and performs a check
routine before loading your settings into the T-POD’s memory.
At the end of the setup process, the T-POD should respond by beeping
every 2 seconds, unless the current angle of the T-POD is within the
ON range.
The T-POD will stop beeping when the angle switch is activated by
tilting the T-POD or by deployment – the transition from ON to OFF can
take up to 2 minutes.
You should check that you can hear the beeps before
deploying the T-POD. If the T-POD does not beep, it has not
been set up properly and you should repeat the setup
procedure.
Saving and recalling preferences
When you close TPOD.exe, program settings are lost. However, you can
store settings in a preferences file, so that it can be recalled at any time.
TPOD preferences files (*.ini files) are text files that allow you to save and
reload your preferences for TPOD.exe. These include the settings for the
display, filters, export and upload, but they do not include the logging
settings that go to the POD.
To save preferences:
1. Click show options and choose the Preferences tab.
2. Click Save present TPOD.exe settings.
3. Enter a suitable name for your preferences file or save your settings in
the default TPOD.ini file.
Tip: You can save different setup preferences in different files. This is very
useful for viewing data files or exporting data, where different TPOD
options need to be set. You won’t need to remember the settings as you
can load them from the appropriate preferences file.
To load a preferences file:
1. Click show options and choose the Preferences tab.
2. Click Load saved TPOD.exe settings.
3. Select the correct file and click Open.
T-POD USER GUIDE
23
7
Closing the T-POD
1. Place the silica gel place in the electronics half of the housing on the
opposite side to the power cable.
2. Make sure there are two O-rings in place on the end of the battery
pack.
Check that the O-rings are clean. Check particularly that
there are no hairs or grit/sand trapped beneath the O-rings
as these could cause damaging leaks.
3. Align the two halves of the T-POD housing carefully and begin screwing
the two halves together.
4. If the thread does not engage first time round do not continue rotating
the housings (this will wind the power cable inside excessively).
Tip: Rotate the T-POD housings backwards for two full turns at the
beginning to minimise the risk of the power cable becoming too twisted.
5. Screw the T-POD together very tightly ensuring that the visible O-ring is
compressed.
Tip: The mooring line can be used to anchor the T-POD while closing
it.
24 T-POD USER GUIDE
8
Deploying T-PODs
This section contains advice and information to help you plan your
deployment.
Calculating the maximum deployment time
To calculate the approximate maximum running time for your T-PODs,
refer to the table in the section Using the Battery Packs on page 9.
Memory management may be critical for long logging times. Testing at sea
is needed to optimise this for dolphin detection.
The 128 megabyte memory in the T-POD can store seven years of
housekeeping data or 33 million click start and end times at 10
microseconds resolution. There is a simple memory use calculator on the
TPOD software Settings tab.
All logging times can be increased by logging alternate minutes only as the
power consumption is about 20% when not logging.
Lost and found
Write your contact details on the outside of the T-POD using indelible ink.
Place a label inside the T-POD as well.
If you prefer not to write your contact details on the T-POD, you can rely
on the contact web site, www.phonehome.org.uk embossed in the end
cap.
This is a simple web site that will allow someone who finds a T-POD to
contact us so that we, in turn, can contact you to arrange its return.
Moorings
Buoyancy
A T-POD containing 15 alkaline cells has a positive buoyancy of
approximately 1kg. This means that it can be moored by its own mooring
line and allowed to float with the hydrophone housing upwards.
The T-POD mooring line is attached at the centre so that in tidal streams
the forces on the upper and lower halves of the T-POD are balanced so
the greater weight at the lower end keeps it vertical.
For this reason, you should include 15 cells even if you do not need them.
Tip: To avoid partly discharging all of them, isolate the cell stack(s) not
being used by placing a piece of paper between any two cells in the
stacks.
T-POD USER GUIDE
25
Location
Moorings on the sea bed are generally a better option as they are further
from the noisy surface. For most deployments the aim is to have the
T-POD either 3 metres up from the bottom or about 5 metres down from
the surface. The surface is a source of a lot of tonal ultrasound from rain
and breaking waves, so deeper deployments are preferred in most
locations.
Deepwater T-PODs are not buoyant and are better moored upside down
(hydrophone housing facing downwards). The angle switch in the
deepwater T-POD can be set to allow this. Contact us for details of how to
do this. You can also force any T-POD to be ON at all angles (see the
section Setting the angle sensor on page 21).
Security
The main problems with moorings are theft and being moved by trawlers
or storms.
Using anchors
A few concrete blocks are not adequate on a sandy sea bed as these are
dynamic and move with tidal currents. Massive concrete anchors, digging
metal anchors or heavy metal anchors are needed. Manhole covers with a
central attachment are effective but can be hard to lift.
Buoys
Try to use the smallest buoy that you will be able to find on retrieval. This
helps to minimises drag in storms. However, some users have deployed
large surface markers with radar reflectors and 4 tonne anchors.
You might prefer to use a short line that results in the buoy spending most
of the time submerged due to the tide stream or tide height, appearing only
briefly at the surface when the tide is slack or at low water. However, make
sure the float will not be collapsed by the pressure.
Cordage
Design the mooring using buoyant and sinking ropes so that no loops of
cordage float at the surface to entangle propellers or lie on the bottom and
suffer excessive abrasion.
Use knots or fixings that grip the T-POD attachment rope thimble so that
there is no possibility of continual movement making noise. If you use a
shackle you can tape this with sticky tape. If the T-POD attachment rope
becomes damaged, replacements are available from us.
26 T-POD USER GUIDE
Theft
This is a serious risk in many areas. Some possible solutions are
suggested below:
Get cooperation and advice from local fishermen, who may allow you to
use their gear.
Use a very small marker, for example, a single fishing float on a thin
line, that is only at the surface at low slack tide. The disadvantage is
that it may wind itself around weed or anything else.
Do not use buoys. Use a line between two anchors that can be located
via GPS using a grapple.
Use pop-ups. These are commercially available acoustic releases.
However, currently they are very expensive.
Use C-links that dissolve after a set time in the water and then release
a recovery buoy from the bottom.
Use divers to deploy and recover your T-PODs.
Depth limits
The limit for centre-opening T-PODs is more than 150m depth.
A deepwater T-POD, with an aluminium housing is available that can be
used to 2500m. It may be possible to deploy them to 3500m, but this has
not been tested.
Directionality
All T-PODs show lower sensitivity directly along the long axis of the
housing, especially in the battery pack direction.
Towing the T-POD
Towing T-PODs is not normally recommended, for the following reasons:
Animals are more or less undetectable unless they face the
hydrophone.
Porpoises tend to move away from moving boats and become
undetectable over a width and distance that varies both with boat
characteristics and with porpoise familiarity.
Detection well beyond the range of responsive movement is unlikely
with the T-POD so no undisturbed data set is available.
Dolphins find towed T-PODs very interesting and will follow for long
periods and get detected easily, but again the variables controlling this
interaction are almost impossible to determine.
T-POD USER GUIDE
27
Towing a long way behind a yacht might give a usable way of filling
weather-gaps in survey data for porpoises, and crude dolphin-encounter
data.
28 T-POD USER GUIDE
9
Retrieving T-PODs and downloading data
It is recommended that you take the following kit with you when you
retrieve T-PODs at sea.
a scrubber and scraper to remove bio-fouling
a heavy screwdriver and T-POD wrench to open and close the T-POD
a towel
an airtight container to put the silica gel in
paper towels to clean any sand or grit that may have lodged under the
O-rings
a spare set of O-rings in case of damage
new batteries for communication and redeployment
a laptop tested for T-POD compatibility plus its power supply
waterproof protection for the laptop
a power supply unit for the PC that will run from your deployment vessel
a spare T-POD that you can swap with the retrieved T-POD. You can
then upload data while travelling or when you are ashore
a fresh T-POD battery pack available to power the communication with
the PC. Use adhesive tape to prevent the batteries from falling out
during handling
a T-POD communications lead
blackout material to help view the screen in bright conditions
fresh identification labels to attach to the T-POD
a waterproof marker pen to write contact details on the T-POD housing
any tools for your attachment method
a splashproof box for this kit.
Retrieving your data
After deployment the data stored in your T-POD is read onto your
computer and appears as a series of click (.pdc) files, one for each period
of continuous logging.
When you retrieve a T-POD:
1. Use a plastic scraper to clean off any heavy fouling.
2. Scrub and wash the T-POD housing.
3. Dry the T-POD.
4. Open the T-POD in a dry, stable location.
T-POD USER GUIDE
29
In order to communicate with the T-POD it is essential that at
least one battery pack connected to the T-POD is above 8.5
volts.
5. It is recommended that you replace one stack of 5 cells to ensure full
voltage for communication.
6. Connect your computer to the T-POD.
Tip: If possible, use the same computer that you used to set up the
T-POD.
7. Run TPOD.exe on your computer.
Tip: TPOD.exe provides several useful options that you can set at
upload. Click the show options button in the main window and display
the Upload page.
Two options that you might want to use immediately are:
No date in file names – This is provided if you prefer to put the date of
upload in another date format in the file name and don't want the date
of start of logging in the name.
Split files at month end – Most users like long files. Files are always
split at the year end as TPOD.exe cannot do some display or export
processes across year ends.
Link files at upload – Each time the T-POD is switched off by the
angle sensor, a new file is created. This setting fills gaps between
successive files with blank minutes that may occur if the T-POD moved
around more than your angle switch setting allowed for. If you set link
files at upload you can edit unwanted pre- and post-deployment time
from the click data file later.
Erase files shorter than 0 mins – Use this option to automatically
remove short ON period files that may be created during T-POD
handling.
8. Click the Get POD data tab.
9. Click CONNECT to POD.
30 T-POD USER GUIDE
The T-POD beeps and after a few seconds the GET POD DATA button
shows the amount of data on the T-POD and an estimate of how long it
will take to upload.
10. Type any notes in the text box at the top of the window. These might be
notes on where the T-POD was in the water column and any storms
that have occurred during the logging period.
11. Click GET POD DATA.
12. When you are prompted for a file name, enter the place of deployment
– the date of the start of logging and the POD number are added to the
file name automatically.
If multiple files were started on the same day, each file is given a
separate number automatically.
TPOD.exe saves the data files as click (.pdc) files.
Progress is shown by the red activity text which tells you the logging
duration, number of clicks, estimated remaining upload time and
number of errors.
Tip: You can abort upload by pressing the F10 key.
Tip: If there are errors during upload, consider using new batteries,
check communications connections or try another computer.
13. When upload is complete, TPOD.exe prompts you to process the
longest downloaded file.
14. Click OK to process the file for cetacean click trains or Cancel to defer
this step until later.
Analysing your data
For help with analysing your data, please read the tutorials located in the
TPOD\Reference folder.
We can also help you with your data analysis and interpretation. Please
contact us with your requirements.
T-POD USER GUIDE
31
10 Maintenance
O-rings
O-rings must be clean of all contamination – especially hairs and
grit – before you close the T-POD. Any dirt on the O-rings may
cause water to leak into the T-POD housing, causing damage to
the electronics and loss of data.
Whenever you open the T-POD, follow the guidelines below:
Place the POD housings on a clean hard surface.
Look to see if there is any water between the outer and inner O-rings
when the T-POD is opened.
If an O-ring has picked up particles, remove it using a tool like the end
of a small spoon, first checking that there are no sharp edges.
Carefully clean all surfaces.
If you are in any doubt about the state of the O-rings, replace them with
new ones. A spare set of O-rings with supplied with new T-PODs.
Replacements are available from Chelonia Limited.
Transducer housing
Bio-fouling or contamination with grease or paint can be removed using
the kind of abrasive pads and preparations used for cleaning cooking
utensils.
Buffers
The external solid rubber rings are designed to reduce the intensity of
vibration when a T-POD falls over on a hard surface, as this creates
strains on some circuit components.
Mooring lines
The mooring lines on the T-POD are Dyneema® lines, each with a
breaking strain of 740kg. (Dyneema is a very strong polyethylene fibre that
offers maximum strength combined with minimum weight. It is up to 15
times stronger than steel on a weight for weight basis. Dyneema floats on
water and is extremely durable and resistant to moisture, UV light and
chemicals.)
Inspect the mooring lines after every deployment for signs of wear –
mainly abrasion against rough surfaces.
32 T-POD USER GUIDE
Electronics
Do not connect batteries or other DC power supplies above
11 volts.
Silica Gel
For long, continuous deployments, silica gel packs should be inserted into
the T-POD to absorb any water vapour and keep the electronics dry.
When you remove a silica gel pack after opening a T-POD, put it
immediately into an airtight container.
When new, silica gel is yellow/orange in colour. The crystals turn green
when saturated.
To restore the crystals, place the bag in an oven and heat at 120°C for two
hours.
Storage
Before you store your T-PODs:
Remove all batteries.
Clean off all barnacles and other marine encrustation.
Wash the outside of the POD housing and any mooring lines using
fresh water.
Protect the T-PODs from direct sunlight – this causes slow deterioration of
the housing and mooring ropes.
If you are storing T-PODs in a dry place, leave them open.
If you are storing T-PODs in a damp place, store them closed, with active
silica gel packs inside.
Calibrate Vertical
T-PODs have angle sensors that detect the angle of the T-POD to vertical.
They are calibrated during manufacture and re-calibration is not likely to be
required.
However, if this is necessary, you can recalibrate the angle sensor as
follows:
1. Connect the T-POD to your computer as described in the section
Connecting to the T-POD on page 13.
2. Position the POD so that it is vertical, with the hydrophone up and the
open end of the housing resting on a firm surface.
3. Run TPOD.exe and click the POD ID tab.
T-POD USER GUIDE
33
4. Click the Calibrate vertical button.
5. Keep the POD vertical until you are prompted to put it the other way up,
again vertical and resting on a firm surface. The POD should not be
held free as this allows small vertical movements.
The values for 0 degrees from vertical and 180 degrees are stored in
the POD.
34 T-POD USER GUIDE
T-POD USER GUIDE
35
Chelonia Limited
Cetacean Monitoring Systems
Beach Cottage, 5 Beach Terrace,
Long Rock, Penzance, TR20 8JE, UK
Tel: +44 (0)1736 711783
Fax: +44 (0)870 0554967
Mobile: +44 (0)7766 532361
Email: [email protected]
Web: www.chelonia.co.uk
Company Registered in UK, no. 5472768