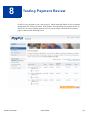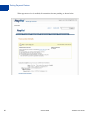
1
Sandbox User Guide
For Professional Use Only
Currently only available in English.
A usage Professional Uniquement
Disponible en Anglais uniquement pour l’instant.
Last updated: October 2009
PayPal Sandbox User Guide
Document Number: 100007.en_US-200910
© 2009 PayPal, Inc. All rights reserved. PayPal is a registered trademark of PayPal, Inc. The PayPal logo is a trademark of PayPal, Inc. Other
trademarks and brands are the property of their respective owners.
The information in this document belongs to PayPal, Inc. It may not be used, reproduced or disclosed without the written approval of PayPal, Inc.
Copyright © PayPal. All rights reserved. PayPal (Europe) S.à r.l. et Cie., S.C.A., Société en Commandite par Actions. Registered office: 22-24 Boulevard
Royal, L-2449, Luxembourg, R.C.S. Luxembourg B 118 349.
Consumer advisory: The PayPal™ payment service is regarded as a stored value facility under Singapore law. As such, it does not require the approval
of the Monetary Authority of Singapore. You are advised to read the terms and conditions carefully.
Notice of non-liability:
PayPal, Inc. is providing the information in this document to you “AS-IS” with all faults. PayPal, Inc. makes no warranties of any kind (whether express,
implied or statutory) with respect to the information contained herein. PayPal, Inc. assumes no liability for damages (whether direct or indirect), caused
by errors or omissions, or resulting from the use of this document or the information contained in this document or resulting from the application or use
of the product or service described herein. PayPal, Inc. reserves the right to make changes to any information herein without further notice.
Preface . . . . . . . . . . . . . . . . . . . . . . . . . . . . . . . . . . 5
This Document . . . . . . . . . . . . . . . . . . . . . . . . . . . . . . . . . . . . . . . . . 5
Intended Audience . . . . . . . . . . . . . . . . . . . . . . . . . . . . . . . . . . . . . . . 5
Organization of This Document . . . . . . . . . . . . . . . . . . . . . . . . . . . . . . . . 5
Notational Conventions . . . . . . . . . . . . . . . . . . . . . . . . . . . . . . . . . . . . 6
Revision History . . . . . . . . . . . . . . . . . . . . . . . . . . . . . . . . . . . . . . . . 7
Chapter 1
Overview to the PayPal Sandbox . . . . . . . . . . . . . . 9
Get Started Quickly: Integration Center . . . . . . . . . . . . . . . . . . . . . . . . . . . . 9
At a Glance: Differences between the Sandbox and Live PayPal . . . . . . . . . . . . . . . 9
Chapter 2
Accessing the PayPal Sandbox . . . . . . . . . . . . . . . 13
Signing Up for Sandbox Access . . . . . . . . . . . . . . . . . . . . . . . . . . . . . . . 13
Welcome to the PayPal Sandbox . . . . . . . . . . . . . . . . . . . . . . . . . . . . . . 15
Test Email . . . . . . . . . . . . . . . . . . . . . . . . . . . . . . . . . . . . . . . . . . 16
Chapter 3
Setting Up Test Accounts . . . . . . . . . . . . . . . . . . 17
Planning the Types of Test Accounts You Need . . . . . . . . . . . . . . . . . . . . . . . 17
Managing Test Accounts . . . . . . . . . . . . . . . . . . . . . . . . . . . . . . . . . . . 18
Creating a Preconfigured Account . . . . . . . . . . . . . . . . . . . . . . . . . . . . 18
Verified Account Status . . . . . . . . . . . . . . . . . . . . . . . . . . . . . . . . . 22
Resetting a Preconfigured Account . . . . . . . . . . . . . . . . . . . . . . . . . . . 22
Creating a Test Account Manually . . . . . . . . . . . . . . . . . . . . . . . . . . . . 26
Creating a Website Payments Pro Account . . . . . . . . . . . . . . . . . . . . . . . . . 27
Adding a Funding Source . . . . . . . . . . . . . . . . . . . . . . . . . . . . . . . . . . 28
Changing or Adding Additional Bank Accounts . . . . . . . . . . . . . . . . . . . . . 28
Adding Credit Cards . . . . . . . . . . . . . . . . . . . . . . . . . . . . . . . . . . . 29
Generating a Credit Card Number to Test PayPal Account Optional . . . . . . . . . . 30
Chapter 4
Testing PayPal Website Features . . . . . . . . . . . . . . 31
Website Payments with Buy Now Button . . . . . . . . . . . . . . . . . . . . . . . . . . 31
Encrypted Website Payments . . . . . . . . . . . . . . . . . . . . . . . . . . . . . . 32
Testing Payments with Buy Now Button . . . . . . . . . . . . . . . . . . . . . . . . . 32
Verifying a Test Payment . . . . . . . . . . . . . . . . . . . . . . . . . . . . . . . . 32
Handling Pending Transactions . . . . . . . . . . . . . . . . . . . . . . . . . . . . . . . 33
Creating a Pending Transaction . . . . . . . . . . . . . . . . . . . . . . . . . . . . . 33
Sandbox User Guide
October 2009
3
Completing or Canceling a Pending Transaction . . . . . . . . . . . . . . . . . . . . 33
Verifying a Test Refund . . . . . . . . . . . . . . . . . . . . . . . . . . . . . . . . . . . 34
Transferring Funds to a Test Account . . . . . . . . . . . . . . . . . . . . . . . . . . . . 35
Clearing or Failing Test eCheck Transactions . . . . . . . . . . . . . . . . . . . . . . . . 35
Sending Funds to a Seller . . . . . . . . . . . . . . . . . . . . . . . . . . . . . . . . . . 36
Billing A Customer . . . . . . . . . . . . . . . . . . . . . . . . . . . . . . . . . . . . . . 36
Chapter 5
Testing PayPal NVP APIs . . . . . . . . . . . . . . . . . . 39
Testing Express Checkout . . . . . . . . . . . . . . . . . . . . . . . . . . . . . . . . . . 39
Chapter 6
Sandbox Test Tools . . . . . . . . . . . . . . . . . . . . . 43
Instant Payment Notification Simulator . . . . . . . . . . . . . . . . . . . . . . . . . . . 43
Testing IPN Messages in the Sandbox . . . . . . . . . . . . . . . . . . . . . . . . . 45
Chapter 7
Testing Error Conditions . . . . . . . . . . . . . . . . . . 47
API Testing . . . . . . . . . . . . . . . . . . . . . . . . . . . . . . . . . . . . . . . . . . 48
Negative Testing Using an Amount-Related Trigger Field . . . . . . . . . . . . . . . . 50
Negative Testing Using a Non-Amount Trigger Field . . . . . . . . . . . . . . . . . . 50
Negative Testing With Multiple Messages . . . . . . . . . . . . . . . . . . . . . . . . 51
Testing Using AVS Codes . . . . . . . . . . . . . . . . . . . . . . . . . . . . . . . . . . 52
Testing an AVS Code Using Virtual Terminal . . . . . . . . . . . . . . . . . . . . . . 53
Testing an AVS Code Using DoDirectPayment . . . . . . . . . . . . . . . . . . . . . 54
Testing Using CVV Codes . . . . . . . . . . . . . . . . . . . . . . . . . . . . . . . . . . 56
Testing a CVV Code Using Virtual Terminal . . . . . . . . . . . . . . . . . . . . . . . 56
Testing a CVV Code Using DoDirectPayment . . . . . . . . . . . . . . . . . . . . . . 57
Chapter 8
Testing Payment Review
. . . . . . . . . . . . . . . . . . 59
Chapter 9
Technical Support . . . . . . . . . . . . . . . . . . . . . . 61
Contacting Customer Service for Live PayPal Website Help . . . . . . . . . . . . . . . . 61
Contacting Developer Technical Support for API Help . . . . . . . . . . . . . . . . . . . . 61
Index . . . . . . . . . . . . . . . . . . . . . . . . . . . . . . . . . . . . 63
4
October 2009
Sandbox User Guide
Preface
This Document
This document describes the PayPal test environment called the Sandbox.
Intended Audience
This document is written for merchants and developers who want to test their PayPal-based
applications before using them in production.
Organization of This Document
Chapter 1, “Overview to the PayPal Sandbox,” describes the Sandbox in general and lists the
differences between the Sandbox and the production PayPal services.
Chapter 2, “Accessing the PayPal Sandbox,” describes how to gain access to the Sandbox.
Chapter 3, “Setting Up Test Accounts,” describes the different kinds of business roles and
corresponding test accounts you need to set up on the Sandbox for effective testing of your
PayPal-based applications.
Chapter 4, “Testing PayPal Website Features,” describes how you can use the Sandbox
(https://www.sandbox.paypal.com) to test features that correspond to the features on the main
PayPal interactive site https://www.paypal.com/.
Chapter 5, “Testing PayPal NVP APIs,” describes how to test the Express Checkout NVP API
in the Sandbox.
Chapter 6, “Sandbox Test Tools,” describes how to use Sandbox test tools, such as the Instant
Payment Notification simulator.
Chapter 7, “Testing Error Conditions,” describes how to use the negative testing feature to
simulate error conditions.
Chapter 8, “Testing Payment Review,” provides information about a feature for testing
recurring payments.
Chapter 9, “Technical Support,” provides information on contacting Technical Support.
Sandbox User Guide
October 2009
5
Notational Conventions
Notational Conventions
This document uses typefaces to identify the characteristics of text. These typefaces and the
characteristics they imply are described below:
Typeface
How Used
serif italics
A document title.
A term being discussed or defined.
For example: A file is a readable or writable stream of characters …
Boolean values (not keywords).
For example: The function returns true if it encounters an error.
monospaced
Pathnames or file names that appear in body text frames.
Code-related names that appear in body text frames. Such names are used for
functions, callbacks, arguments, data structures, and fields.
For example: AbstractResponseType is the SOAP response type definition on
which all PayPal API response methods are based.
Components of Internet protocol requests and responses, such as HTTPS and
FORM variables.
For example: The PayPal system uses a method=POST request to return IPN
status variables related to subscriptions, such as txn_type.
Serif bold
User interface names, such as window names or menu selections.
For example: On the Profile page, click Email to confirm your email address.
San-serif
oblique
Placeholders used in the context of a format or programming standard or formal
descriptions of PayPal system syntax. Placeholders indicate values or names that
the reader should provide.
Example: For example, amount is the variable for a single-item shopping cart, but
amount_X is the name of the variable for a multi-item shopping cart. amount_3
is the item amount for the third item in a multiple-item shopping cart.
To convey additional information, this document may also apply color and underlining to
words or phrases that use the typefaces described above. Such use is described below:
6
Text attribute
How Used
xxxxxx
Hypertext link to a page in the current document or to another document in the set.
xxxxxx
Hypertext link to a URL or that initiates a web action, such as sending mail.
October 2009
Sandbox User Guide
Revision History
Revision History
Revision history for PayPal Sandbox User Guide.
TABLE P.1 Revision History
Sandbox User Guide
Date
Description
October 2009
Added information about creating preconfigured accounts, which now works for
more countries. Removed chapter about “Testing Recurring Payments” because
it is no longer relevant.
September 2008
Added information about testing payment review and updated screens related to
payment review.
April 2008
Added information about the Instant Payment Notification simulator, described
changes to the Sandbox user interface, and corrected all known problems.
December 2007
Added information about the account reset feature, changed screens to reflect
changes in the user interface, and corrected all known problems.
September 2007
Changed screens to reflect new user interface, added information about testing
recurring payments, and corrected all known problems.
August 2007
Changed PayPal logo and corrected all known problems.
May 2007
Revised manual to reflect new “autocreated” accounts feature.
April 2007
Added chapters on negative testing and testing APIs using the Express Checkout
NVP API. Added new section on handling pending transactions and made
miscellaneous changes.
July 2006
Correction of variable name ‘ipn_test,” which should be “test_ipn”.
June 2006
Correction of Sort Code necessary to test UK accounts in Sandbox. Proper Sort
Code is 609204.
December 2005
Miscellaneous corrections.
October 2009
7
Revision History
8
October 2009
Sandbox User Guide
1
Overview to the PayPal Sandbox
The PayPal Sandbox is a self-contained environment within which you can prototype and test
PayPal features and APIs. The PayPal Sandbox is an almost identical copy of the live PayPal
website. Its purpose is to give developers a shielded environment for testing and integration
purposes and to help avoid problems that might occur while testing PayPal integration
solutions on the live site. Before moving any PayPal-based application into production, you
should test the application in the Sandbox to ensure that it functions as you intend and within
the guidelines and standards set forth by the PayPal Developer Network (PDN).
Get Started Quickly: Integration Center
PayPal’s Integration Center at https://www.paypal.com/integration has step-by-step details for
getting started with the PayPal Software Development Kits (SDKs), Website Payments Pro,
Express Checkout, Website Payments Standard, Authorization & Capture, Instant Payment
Notification, and more.
Visit the Integration Center at: https://www.paypal.com/integration
At a Glance: Differences between the Sandbox and Live PayPal
The following table compares the Sandbox and Live PayPal. This is an at-a-glance view of the
differences from the perspective of an in-house or third-party developer for a business.
You can also use this table as a checklist.
TABLE 1.1 Differences between PayPal Sandbox, and Live PayPal
PayPal Sandbox
Live PayPal Website and API Service
Type of PayPal
Accounts
Depending on the feature you want to develop and
test, you need a Personal, Business, or Premier
account.
Personal, Business, or Premier account
Site logos in
upper left
corner
https://www.sandbox.paypal.com
https://www.paypal.com
Sandbox User Guide
October 2009
9
Overview to the PayPal Sandbox
At a Glance: Differences between the Sandbox and Live PayPal
TABLE 1.1 Differences between PayPal Sandbox, and Live PayPal
10
PayPal Sandbox
Live PayPal Website and API Service
NVP API
Servers
https://api.sandbox.paypal.com/nvp/
For API Certificate security:
https://api.paypal.com/nvp/
For API Signature security:
https://api-3t.paypal.com/nvp/
SOAP API
Servers
https://api.sandbox.paypal.com/2.0/
For API Certificate security:
https://api.paypal.com/2.0/
For API Signature security:
https://api-3t.paypal.com/2.0/
Business roles
You fill all roles you need to test: merchant, buyer,
and seller.
Real-world people fill these roles.
Company and
people’s names
and postal
addresses
Completely fictitious. Before you begin working
with the Sandbox, create the details for all the
business roles you must fulfill.
The Sandbox simulates verification of postal
addresses and names.
Real companies’ and people’s names and postal
addresses.
Email
addresses and
email inboxes
The Sandbox has a special-purpose email inbox for
your testing, contained in the Sandbox itself.
Real email address and inbox for each business role
Bank account
and credit card
numbers
The Sandbox creates bank accounts, credit card
numbers, and CVV2 numbers you need in order to
develop and test; all of which are fictitious and only
used within the Sandbox. The Sandbox simulates
the verification of these numbers. Transactions do
not affect real accounts and actual money is never
exchanged.
Actual verification of bank account numbers, credit
card numbers, and CVV2 numbers
Social Security
Number for
Billing
Agreements
111-nn-nnnn
Real social security numbers
PayPal
transactions
The Sandbox creates all fictitious bank accounts,
credit card numbers, and CVV2 numbers you need
for development and testing. The Sandbox
simulates the verification of these numbers.
Live transactions, cleared by live PayPal processes
Fraud
detection
Fraud detection is not enabled for the Sandbox.
Full protection through PayPal’s fraud detection
Digital
certificates
After you request digital certificates for use with
the PayPal Web Services API, the Sandbox
automatically generates them. They are available
for immediate downloading.
To safeguard your and your customers’ security,
requests for digital certificates for use with the Live
PayPal Web Services API must be verified by
PayPal before they are issued. You are notified in
email when your request has been approved.
October 2009
Sandbox User Guide
Overview to the PayPal Sandbox
At a Glance: Differences between the Sandbox and Live PayPal
TABLE 1.1 Differences between PayPal Sandbox, and Live PayPal
PayPal Sandbox
PayPal
Merchant
Features
supported
Sandbox User Guide
Live PayPal Website and API Service
All features of the live PayPal website, except
closing an account, auction features, monthly
statements, shipping preferences, and PayPal
Shops.
October 2009
11
Overview to the PayPal Sandbox
At a Glance: Differences between the Sandbox and Live PayPal
12
October 2009
Sandbox User Guide
2
Accessing the PayPal Sandbox
To access the PayPal Sandbox, sign up for an account at https://developer.paypal.com. After
signing up, you access the Sandbox either programatically or by logging in.
Depending on the PayPal feature you want to test with an application, you need to set up
different types of test accounts: PayPal Personal (or Premier) and Business accounts. See
“Planning the Types of Test Accounts You Need” on page 17.
Signing Up for Sandbox Access
To sign up for Sandbox access:
1. Go to https://developer.paypal.com. The log in screen is shown below:
2. If you already have an account, enter your Log In Email and Password and click Log In.
Sandbox User Guide
October 2009
13
Accessing the PayPal Sandbox
Signing Up for Sandbox Access
3. If you do not already have an account, click Sign Up Now and provide the requested
information shown below:
IMPO RTANT: Do
not use the same log in email address or password that you use for
logging into the live paypal.com site because later you may allow someone
to work in the Sandbox on your behalf but not want to allow access to your
regular PayPal account.
After you sign up, PayPal sends login instructions to the email address you used to sign-up.
If you have mail filtering enabled in your mail software, the email sent by PayPal might be
filtered out or stored in a folder where you are not expecting it to be. For instance, with
Microsoft Outlook mail software, your filtering might cause the email to be stored in
“Junk” or “Spam.”
4. Respond to the confirmation e-mail and log in.
14
October 2009
Sandbox User Guide
Accessing the PayPal Sandbox
Welcome to the PayPal Sandbox
Welcome to the PayPal Sandbox
When you log in to the Sandbox, the Sandbox Test Environment home page appears, as
follows:
On this page, you can perform the following actions:
z
z
z
z
z
z
Create test accounts. You can create and manage test accounts from the Test Accounts tab.
From this tab, you can also enter the Sandbox Test Site, which simulates the live
paypal.com site. For more information, see “Setting Up Test Accounts” on page 17.
Access email sent to test accounts from the Test Email tab. For more information, see
“Test Email” on page 16.
View API credentials for business test accounts from the API Credentials tab. An API
signature, which is the preferred kind of credential, is automatically created when you
create a Business test account. You need the information on this tab when you test APIs.
Obtain technical information about PayPal products and APIs using the Help link.
Simulate Instant Payment Notifications using a test tool. For more information, see
“Sandbox Test Tools” on page 43.
Change the log in password using the Profile link.
N O T E : You
Sandbox User Guide
cannot change the Log In Email address.
October 2009
15
Accessing the PayPal Sandbox
Test Email
Test Email
When certain kinds of transactions occur in the live PayPal system, PayPal sends email
messages to the real email addresses of the participants. From these email messages, the
recipient or initiator of an event or transaction can verify that the event took place and that the
monetary amounts associated with the event are correct.
PayPal test email, however, is a self-contained email system in the Sandbox itself. You see
email messages addressed only to the Sandbox test accounts you set up. Up to 30 of the latest
email messages are listed on the Test Email tab. The subject line of email messages you have
not read are in bold. Click a subject line to read the message.
16
October 2009
Sandbox User Guide
3
Setting Up Test Accounts
Depending on the business application you are developing and testing, you need different
types of test accounts. There are two types of test accounts: Personal (or Premier) and
Business.
Planning the Types of Test Accounts You Need
Determine the types of test accounts you need to test the applications you are developing. In
addition, determine the number of different accounts you need. Typically, you create at least
one seller (Business) account and one buyer (Personal or Premier) account. You might need
several different Personal or Business PayPal test accounts to test your application.
When you create a test account, the following information is generated for you:
z
z
z
Mailing address
Email address and password for the test PayPal account. You can specify the same
password (not email address) for all your test accounts so that you can more easily
remember it.
Security questions and answers. You can use the same security questions and answers for
all your test accounts so that you can more easily remember them.
IMPO RTANT: Never
use real email addresses or live paypal.com passwords for a test
account. Only use fictitious information in your answers to the security
questions. All of this data should be fictional.
z
Personal or Business account
z
Your agreement to the terms of using the Sandbox
For Business accounts, the following additional information is generated for you:
Sandbox User Guide
z
Business name and address
z
Customer service contact information
z
Business owner contact information
z
Business owner address
z
Social Security Number to sign up for Website Payments Pro
October 2009
17
Setting Up Test Accounts
Managing Test Accounts
Managing Test Accounts
You can view, work with, or launch the Sandbox Test Site for all your test accounts. You can
also create new accounts or remove test email addresses from your view.
z
z
z
To work with test accounts, log in to https://developer.paypal.com, and click the Test
Accounts tab.
To create a new account, click the Create Account link.
To work with the account, select the account by clicking the radio button associated with it
on the left.
You can simulate the live paypal.com site for the selected account by clicking Enter
Sandbox Test Site. When you logged in to https://developer.paypal.com, you might have set the
Log me in automatically checkbox to allow direct access to https://www.sandbox.paypal.com/,
in which case you do not have to launch the Sandbox to access it.
IMPO RTANT: The Delete
button does not delete the test account. It removes the test
account from your list of accounts, but the email address for the test account
is still on file for the Sandbox. You cannot reuse an email address that is still
on file for the Sandbox. If you want to rerun a test, do not delete the account;
you can use the Reset option instead.
The following sections describe how to create a preconfigured test account, which allows
merchants to create an account using a typical configuration that is useful for most testing.
You can also create a test account manually, which might be required if the preconfigured test
account is not adequate for your needs.
N O T E : The
first test account that you create is always a preconfigured test account. After you
create the first account, you click Preconfigured to create a preconfigured test account
or Create Manually to create the test account manually. The following sections
assume that a test account has not yet been created.
Creating a Preconfigured Account
To create a preconfigured account:
1. After logging in, select Test Accounts and click the Create Test Account link.
18
October 2009
Sandbox User Guide
Setting Up Test Accounts
Managing Test Accounts
2. Choose the country for which you want the account to be registered.
Sandbox User Guide
October 2009
19
Setting Up Test Accounts
Managing Test Accounts
3. Specify the Account Type and make other selections or accept the defaults.
4. Click Create Account.
20
October 2009
Sandbox User Guide
Setting Up Test Accounts
Managing Test Accounts
The result is shown below.
Sandbox User Guide
October 2009
21
Setting Up Test Accounts
Managing Test Accounts
N O T E : The
Login Email is a pseudo-randomized address, which is based on the address you
specified. Credit card and bank account numbers are also generated randomly, which
are shown when you view details:
Verified Account Status
By default, a preconfigured test account has a confirmed bank account and email addresses. To
create an unverified account change the bank account to unconfirmed.
Resetting a Preconfigured Account
You can reset a preconfigured test account. This is useful when you want to rerun transactions
and need to start from the same point as the original test. Resetting a test account preserves
information required to rerun the test, such as the account email address, API credentials,
credit card and bank accounts, and starting balance. It does not, however, use the same bank
22
October 2009
Sandbox User Guide
Setting Up Test Accounts
Managing Test Accounts
account or credit card numbers. Consider the following account information associated with a
test account:
Sandbox User Guide
October 2009
23
Setting Up Test Accounts
Managing Test Accounts
When you click Reset for the account from the Test Accounts tab, you are prompted to enter a
new password and a note to associate with the account:
24
October 2009
Sandbox User Guide
Setting Up Test Accounts
Managing Test Accounts
After you reset the account, the information to rerun your test is preserved:
Sandbox User Guide
October 2009
25
Setting Up Test Accounts
Managing Test Accounts
Creating a Test Account Manually
You can create a test account manually by clicking the Create Manually link for Create
Account. This action automatically places you in the Sandbox Test Site, where you create the
test account just as you would on the live site:
26
October 2009
Sandbox User Guide
Setting Up Test Accounts
Creating a Website Payments Pro Account
Creating a Website Payments Pro Account
You can use a wizard to create a Website Payments Pro business account by clicking the
Website Payments Pro link for Create Account. This action automatically places you in the
Sandbox Test Site, where you create the test account just as you would create a Website
Payments Pro account on the live site using a wizard to take you through the steps:
To complete the application for Website Payments Pro, you must enter a Social Security
Number. You can enter a Social Security Number in the following format:
111xxxxxx
where x is any digit.
N O T E : The
SSN you enter must not have already been recorded for some other account in the
Sandbox.
Sandbox User Guide
October 2009
27
Setting Up Test Accounts
Adding a Funding Source
Adding a Funding Source
To test transactions, you must add a source of funds to your buyer test account. The following
sections describe your choices:
1. “Changing or Adding Additional Bank Accounts” on page 28. You can add bank accounts,
but they will not contain funds unless you use Send Money to send the bank account holder
money.
2. “Adding Credit Cards ” on page 29. For testing, this is the most efficient way to add funds.
N O T E : No
money or funds are actually transferred in the Sandbox; however, to protect
confidentiality, you should not use actual credit card numbers or bank accounts if you
allow other people to log in to your Sandbox account.
Changing or Adding Additional Bank Accounts
You add a bank account to the Sandbox test account representing a customer or buyer so that
you can test transactions between the buyer’s account and another account; typically, the other
account is a business account that represents yourself as a merchant. Adding a bank account
also changes the account status from “Unverified” to “Verified.”
The bank account is a source of funds for a user’s PayPal account, and thus for transactions
between that test account and other test accounts. A test account can have multiple bank
accounts, but at least one is required in order to verify the test account.
The Sandbox automatically generates bank account and sort code numbers when you add a
bank account.
For Australia, Canada, Germany, or UK
Use the automatically generated bank account information only for test US bank accounts. To
add test Canadian, German, or UK bank account information, follow these guidelines.
TABLE 3.1 Australian German, Canadian, and UK Test Bank Account Information
28
Australia
Canada
Germany
UK
BSB Number: 242200
Transit Number:
00001
Routing Number:
37020500
Bank Account
Number: Any 8digit number
Account Number:
any random number
Institution Number:
311
Bank Account
Number: Any 10digit number
Sort Code: 609204
or 700709
Bank Account
Number: Any one-digit
to 12-digit number
Sort Code: Any 8digit number
October 2009
Sandbox User Guide
Setting Up Test Accounts
Adding a Funding Source
Steps for All Countries
1. Select a test account and click Enter Sandbox Test Site.
2. Navigate to My Account > Profile.
3. Under the Financial Information header, click the Bank Accounts link.
4. In the Bank Account window, click Add.
5. In the Add Bank Account window:
– Enter a fictitious bank name. Using the automatically generated bank account number as
the name of the bank will make that account number visible to you for use in testing later.
– Except for UK or German test bank accounts, leave all other automatically generated
information as is.
– Make a note of the test bank account number, because it will be handy to have when you
do your testing.
– Click Add Bank Account.
6. In the resulting success window, click the Continue button at the bottom.
The My Account > Overview page opens.
7. Click the Confirm Bank Account link in the Activate Account box at the left side.
8. In the Confirm Bank Account window, click Submit.
Adding Credit Cards
A credit card is a source of funds for the buyer’s PayPal account, and thus can be used for
transactions between a buyer’s test account and other test accounts. A test account can have
multiple credit cards. Test credit card numbers cannot be used to pay for real-world
transactions.
To create additional credit card accounts for an already existing test account:
1. Select a buyer’s test account and click Enter Sandbox Test Site.
2. Navigate to My Account > Profile.
3. Under the Financial Information header, click the Credit Cards link.
4. In the Credit Cards window, click the Add button.
5. In the Add Credit Card window, leave the automatically generated information as is.
6. Make a note of the credit card number for your use in later testing.
7. Click Add Credit Card.
Sandbox User Guide
October 2009
29
Setting Up Test Accounts
Adding a Funding Source
Generating a Credit Card Number to Test PayPal Account Optional
To obtain a test credit card number for testing PayPal Account Optional:
1. Select a buyer’s test account and click Enter Sandbox Test Site.
2. Navigate to My Account > Profile.
3. Under the Financial Information header, click the Credit Cards link.
Make a note of the credit card number for your use in later testing.
30
October 2009
Sandbox User Guide
4
Testing PayPal Website Features
This chapter describes PayPal products features you can test in the Sandbox without PayPal
APIs:
z
z
z
Website Payments with Buy Now Buttons: Use the Sandbox to test accepting PayPal as a
payment mechanism on a website.
Shopping Cart Purchases: Use the Sandbox to test the purchase of multiple items in a
single transaction using a single payment.
Instant Payment Notification (IPN). Use the Sandbox to test IPN for updates and
payment notifications.
z
Refunds: Use the Sandbox to test refunding payments from a test buyer.
z
Subscriptions: Use the Sandbox to test subscription buttons.
IMPO RTANT: To execute test transactions on Sandbox you need to complete a purchase as a
test buyer with your buyer test account. Typically, you go through your
website purchase flow as a buyer. You must ensure that you execute your test
on www.sandbox.paypal.com instead of www.paypal.com.
Website Payments with Buy Now Button
You can use the Sandbox to familiarize yourself with the PayPal Buy Now button, with which
you can associate PayPal with a specific item you sell on your website.
To create a test Buy Now button:
1. From the Test Accounts tab, select a business account and click Enter Sandbox Test Site.
2. Go to the Merchant Services tab.
3. Select the Buy Now Buttons link under the Key Features heading to get to the Button
Factory. You can also search the Help for “Button Factory.”
4. Follow the online instructions to create a Buy Now button. For more information, see the
Website Payments Standard Integration Guide.
5. Copy and paste the code into your web page file wherever you would like the button image
to appear. Typically, the button should be located next to the description of the item or
service. Your web page does not have to be published to your web server for you to check
the button placement; it can be on you own local hard drive.
IMPO RTANT: You
must change the form action to redirect to the Sandbox, using the
following URL:
Sandbox User Guide
October 2009
31
Testing PayPal Website Features
Website Payments with Buy Now Button
https://www.sandbox.paypal.com/cgi-bin/webscr"
method="post"
Use the PayPal Help link to answer related questions, such as “How do I make a Buy Now
Button compatible with the Shopping Cart feature?” For general information, see
https://www.paypal.com/pdn-item. For general information about shopping cart purchases, see
https://www.paypal.com/shoppingcart. For general information about subscriptions, see
https://www.paypal.com/pdn-recurring.
Encrypted Website Payments
The Sandbox also supports Encrypted Website Payments (EWP), as does the PayPal SDK
console.
For information about what EWP is and how to use it, see the Website Payments Standard
Integration Guide
For information about using the PayPal SDK console to generate EWP HTML, see the PayPal
SDK Guide for any of the supported platforms.
Testing Payments with Buy Now Button
For the purposes of testing the Buy Now button, your web page does not need to be published
to your web server. It can reside on your local hard drive. However, you do need to be logged
in to the Sandbox.
1. Log in to https://developer.paypal.com, click the Test Accounts tab, select the desired test
account, and click Enter Sandbox Test Site.
2. Open the HTML file containing the Buy Now Button.
3. Click the Buy Now Button.
4. Log in using your test buyer account.
5. Follow the on-screen instructions to complete your test payment.
Verifying a Test Payment
1. Log in to https://developer.paypal.com and click the Test Email tab.
Your Sandbox inbox shows payment confirmation email messages for the seller and buyer.
2. To further verify that the payment was successful:
– Check your web server for IPN notifications related to the payment.
– Launch the Sandbox as your test buyer or seller account and navigate to My Account >
Overview to see the transaction in your Recent Activity.
32
October 2009
Sandbox User Guide
Testing PayPal Website Features
Handling Pending Transactions
Handling Pending Transactions
Transactions typically are credited to your PayPal account instantly after the buyer completes
the transaction; however, a buyer might select a payment method that is not completed
instantly. In these cases, the transaction goes into a pending state and the transaction is
completed after a couple of days. The following sections describe how to set up pending status
transactions that can either be completed or canceled.
Creating a Pending Transaction
1. Log in to https://developer.paypal.com, click the Test Accounts tab, select a buyer (personal
or premier) test account, and click Enter Sandbox Test Site.
2. Log in to your test buyer account and create a transaction, such as one created using a Buy
Now button or by passing parameters in the URL as in the following example:
https://www.sandbox.paypal.com/
us/cgi-bin/webscr?cmd=_xclick&[email protected]
3. On the Review Purchase Page click on the link Change under funding method.
4. Select eCheck as the funding method and click Continue.
5. Click Pay to create the transaction.
To verify the creation of the transaction, see “Verifying a Test Payment” on page 32.
Completing or Canceling a Pending Transaction
1. In the buyer’s transactions log, click the Details link (in the Details column).
2. In the Transaction Detail window, there are two links to simulate actual bank clearing.
These links appear only in the Sandbox, as shown below:
– Clear Transaction: Click to complete the transaction.
Sandbox User Guide
October 2009
33
Testing PayPal Website Features
Verifying a Test Refund
– Fail Transaction: Click to cancel the transaction.
Verifying a Test Refund
To verify a test refund, you must have already made a test payment.
1. Log in to https://developer.paypal.com.
2. Click the Test Email tab.
Your Sandbox inbox shows refund confirmation email messages for the seller and buyer.
3. To further verify that the refund was successful:
– Check your Web server for IPN notifications related to the refund.
34
October 2009
Sandbox User Guide
Testing PayPal Website Features
Transferring Funds to a Test Account
– Launch the Sandbox as your test buyer or seller account and navigate to My Account >
Overview to see the transaction in your Recent Activity.
Transferring Funds to a Test Account
To transfer funds to a test account:
1. After logging into https://developer.paypal.com, select a test account and click Enter
Sandbox Test Site.
2. Navigate to My Account > Add Funds.
3. Click the Transfer funds from a Bank Account link.
4. On the Add Funds by Electronic Funds Transfer page:
– Select the bank account from which the funds are coming in the From drop-down list.
– Enter the amount to transfer in the Amount box.
– Click Continue.
5. On the resulting Add Funds Confirmation page, click Submit.
Navigate to My Account > Overview to see that the transfer transaction is listed.
Clearing or Failing Test eCheck Transactions
When you use eCheck to transfer funds or send payments, the transaction appears as pending
until you manually clear or fail it. Manual clearing is only necessary in the Sandbox.
To clear or fail test eCheck transactions:
1. In the transactions log, click the Details link (in the Details column).
2. In the Transaction Detail window, there are two links to simulate actual bank clearing.
These links appear only in the Sandbox:
– Clear Transaction: Click to complete the transaction.
– Fail Transaction: Click to cancel the transaction.
3. Click Return to Log to see the transfer completed and the money in the Sandbox account.
The My Account > Overview page opens.
4. Click the View Limits links on the My Account > Overview page to see the spending
limits for the current test account.
For an alternative example, see “Completing or Canceling a Pending Transaction” on page 33.
Sandbox User Guide
October 2009
35
Testing PayPal Website Features
Sending Funds to a Seller
Sending Funds to a Seller
To purchase goods or services, a PayPal user must send funds to a seller. In the PayPal
Sandbox, you can simulate the actions of a buyer by manually initiating the payment of funds.
You must use a Personal test account to represent the buyer.
To send funds from one test account to another:
1. Log in to https://developer.paypal.com, click the Test Accounts tab, select a test account, and
click Enter Sandbox Test Site.
2. Navigate to the Send Money tab.
3. On the Send Money page, enter the email address (PayPal account name) for the test
account in Recipient’s Email box.
4. Enter the amount to send to the seller’s test account in the Amount box.
5. Select the currency for the funds in the Currency drop-down list. (Note: Auction is not an
option in the drop-down list.)
6. Select the reason for sending the funds in the Type drop-down list.
7. Enter text in the Subject box, if you want to. This text is the subject of the email sent to the
recipient about the transfer of funds.
8. Enter text in the Note memo box. This text appears in the body of the notification email.
9. Click Continue. This does not send the money; a confirmation step follows.
10.On the Check Payment Details page, review the transaction details for correctness. You
can click More Funding Options to change the source of fund used for payment.
11. Click Send Money. This triggers the actual transfer of funds.
12.Your Test Email tab contains all the email messages that are sent to the test account
sending the money and the test account receiving the money. See “Test Email” on page 16.
Log in as the seller test account and navigate to the My Account > Overview tab to see the
transaction for the recipient’s account.
Billing A Customer
PayPal business users can bill another PayPal user for the purchase of goods or services. In
PayPal terminology, the feature to bill a customer is called Request Money. In the PayPal
Sandbox, you can manually initiate a request for funds from a test account. One test account is
the seller. The other test account is the buyer.
To request funds from a buyer:
36
October 2009
Sandbox User Guide
Testing PayPal Website Features
Billing A Customer
1. Log in to https://developer.paypal.com, click the Test Accounts tab, select a test account for
which funds are requested, and click Enter Sandbox Test Site.
2. Navigate to the Request Money tab.
3. On the Request Money page, enter the email address (PayPal login name) for the test
account being billed in the Recipient’s Email box.
4. Enter the billed amount in the Amount box.
5. Select the currency for the funds in the Currency drop-down list.
6. Select the reason for the request for funds (billing) in the Type drop-down list. (Note:
Auction is not an option in the drop-down list.)
7. Enter text in the Subject box. This text is the subject of the email sent to the recipient
regarding the sent funds.
8. Enter text in the Note memo box. This text appears in the body of the notification email.
9. Click Continue.
10.On the Request Money – Confirm page, click Request Money. This triggers the actual
request for funds.
11. Navigate to the My Account > Overview tab. The request for money should be listed.
12.Log in as the buyer and navigate to the My Account > Overview tab to see the transaction
for the buyer’s test account. The transaction for the request for money appears on the My
Account > Overview tab with Pay and Cancel buttons. Click Pay, and in the confirmation
window, click Send Money. This completes the transfer of requested funds.
To view the email messages sent to both test accounts, select the Test Email tab. For
details about your Sandbox email, see “Test Email” on page 16.
Sandbox User Guide
October 2009
37
Testing PayPal Website Features
Billing A Customer
38
October 2009
Sandbox User Guide
5
Testing PayPal NVP APIs
This chapter describes how to test the Express Checkout name-value pair (NVP) API in the
Sandbox. For more sophisticated examples, PayPal recommends you use the PayPal SDK that
matches your environment, such as PHP or ASP. You can also use this chapter for ideas on
how to establish a general testing procedure for PayPal APIs called from your site.
Testing Express Checkout
The following diagram shows the Express Checkout flow, which uses the Sandbox as the API
server. The pages on the left represent your site.
Sandbox User Guide
October 2009
39
Testing PayPal NVP APIs
Testing Express Checkout
N O T E : For
information about Express Checkout, see the Express Checkout Integration Guide
and the PayPal NVP API Developer Guide and Reference.
The following steps match the circled numbers in the diagram. Perform the actions in each
step to test Express Checkout.
1. Invoke a form on your site that calls the SetExpressCheckout API on the Sandbox. To
invoke the API, set form fields whose names match the NVP names of the fields you want
to set, specify their corresponding values, and then post the form to https://api3t.sandbox.paypal.com/nvp, as shown in the following example:
<form method=post action=https://api-3t.sandbox.paypal.com/nvp>
<input type=hidden name=USER value= API_username>
<input type=hidden name=PWD value= API_password>
<input type=hidden name=SIGNATURE value= API_signature>
<input type=hidden name=VERSION value=2.3>
<input type=hidden name=PAYMENTACTION value=Authorization>
<input name=AMT value=19.95>
<input type=hidden name=RETURNURL
value=http://www.YourReturnURL.com>
<input type=hidden name=CANCELURL
value=http://www.YourCancelURL.com>
<input type=submit name=METHOD value=SetExpressCheckout>
</form>
N O T E : The
API username is a Sandbox business test account for which a signature exists.
See the API Credentials tab of the Sandbox to obtain a signature.
2. PayPal responds with a message, such as the one shown below. Note the status, which
should include ACK set to Success, and a token that is used in subsequent steps.
TIMESTAMP=2007%2d04%2d05T23%3a23%3a07Z
&CORRELATIONID=63cdac0b67b50
&ACK=Success
&VERSION=2%2e300000
&BUILD=1%2e0006
&TOKEN=EC%2d1NK66318YB717835M
3. If the operation was successful, use the token and redirect your browser to the Sandbox, as
follows:
https://www.sandbox.paypal.com/cgi-bin/webscr?cmd=_express-checkout
&token=EC-1NK66318YB717835M
N O T E : You
may need to replace hexadecimal codes with ASCII codes; for example, you
may need to replace %2d in the token with a hyphen ( - ).
4. Log into the Sandbox and confirm details. You must log in to https://developer.paypal.com
and select the test account that represents the buyer, not the API_username business test
account that represents you as the merchant. Then click Enter Sandbox Test Site.
When you confirm, the Sandbox redirects your browser to the return URL you specified
when calling SetExpressCheckout, as in the following example:
40
October 2009
Sandbox User Guide
Testing PayPal NVP APIs
Testing Express Checkout
http://www.YourReturnURL.com/
?token=EC-1NK66318YB717835M&PayerID=7AKUSARZ7SAT8
5. Invoke a form on your site that calls the GetExpressCheckout API on the Sandbox:
<form method=post action=https://api-3t.sandbox.paypal.com/nvp>
<input type=hidden name=USER value= API_username>
<input type=hidden name=PWD value= API_password>
<input type=hidden name=SIGNATURE value= API_signature>
<input type=hidden name=VERSION value=2.3>
<input name=TOKEN value=EC-1NK66318YB717835M>
<input type=submit name=METHOD value=GetExpressCheckoutDetails>
</form>
If the operation was successful, the GetExpressCheckout API returns information about
the payer, such as the following information:
TIMESTAMP=2007%2d04%2d05T23%3a44%3a11Z
&CORRELATIONID=6b174e9bac3b3
&ACK=Success
&VERSION=2%2e300000
&BUILD=1%2e0006
&TOKEN=EC%2d1NK66318YB717835M
&EMAIL=YourSandboxBuyerAccountEmail
&PAYERID=7AKUSARZ7SAT8
&PAYERSTATUS=verified
&FIRSTNAME=...
&LASTNAME=...
&COUNTRYCODE=US
&BUSINESS=...
&SHIPTONAME=...
&SHIPTOSTREET=...
&SHIPTOCITY=...
&SHIPTOSTATE=CA
&SHIPTOCOUNTRYCODE=US
&SHIPTOCOUNTRYNAME=United%20States
&SHIPTOZIP=94666
&ADDRESSID=...
&ADDRESSSTATUS=Confirmed
6. Invoke a form on your site that calls the DoExpressCheckoutPayment API on the
Sandbox:
<form method=post action=https://api-3t.sandbox.paypal.com/nvp>
<input type=hidden name=USER value= API_username>
<input type=hidden name=PWD value= API_password>
<input type=hidden name=SIGNATURE value= API_signature>
<input type=hidden name=VERSION value=2.3>
<input type=hidden name=PAYMENTACTION value=Authorization>
<input type=hidden name=PAYERID value=7AKUSARZ7SAT8>
<input type=hidden name=TOKEN value=EC%2d1NK66318YB717835M>
<input type=hidden name=AMT value= 19.95>
<input type=submit name=METHOD value=DoExpressCheckoutPayment>
Sandbox User Guide
October 2009
41
Testing PayPal NVP APIs
Testing Express Checkout
</form>
7. If the operation was successful, the response should include ACK set to Success, as
follows:
TIMESTAMP=2007%2d04%2d05T23%3a30%3a16Z
&CORRELATIONID=333fb808bb23
&ACK=Success
&VERSION=2%2e300000
&BUILD=1%2e0006
&TOKEN=EC%2d1NK66318YB717835M
&TRANSACTIONID=043144440L487742J
&TRANSACTIONTYPE=expresscheckout
&PAYMENTTYPE=instant
&ORDERTIME=2007%2d04%2d05T23%3a30%3a14Z
&AMT=19%2e95
&CURRENCYCODE=USD
&TAXAMT=0%2e00
&PAYMENTSTATUS=Pending
&PENDINGREASON=authorization
&REASONCODE=None
42
October 2009
Sandbox User Guide
6
Sandbox Test Tools
Instant Payment Notification Simulator
You can use the Instant Payment Notification (IPN) Simulator to send IPNs to the URL that
you set up to receive them. You can use this tool to verify that you are receiving IPNs
correctly.
To set up and send an IPN, select Instant Payment Notification (IPN) simulator from Test
Tools. You can enter the URL to receive the notification and the kind of notification on the
following screen:
Sandbox User Guide
October 2009
43
Sandbox Test Tools
Instant Payment Notification Simulator
When you select the kind of transaction that you want to test, a form containing test data
appears:
44
October 2009
Sandbox User Guide
Sandbox Test Tools
Instant Payment Notification Simulator
You can modify the fields that you want to include in the IPN; however, the simulator does not
check the validity of any field that you change.
N O T E : By default, only populated fields are displayed. You can check the Show
box to view all fields.
all fields
After you have viewed or modified the fields to be sent, click Send IPN. The results of the
operation are displayed at the top of the page.
Testing IPN Messages in the Sandbox
After you use the IPN simulator, you should test actual notifications in the Sandbox as well.
The only difference between a test IPN message and a live IPN message is that PayPal
includes a test_ipn variable in the IPN message. To set up your Sandbox account to handle
IPNs outside of the test tool, click Enter Sandbox Test Site from your test account and
proceed as if you are using a live account. See Instant Payment Notification Guide for more
information.
Sandbox User Guide
October 2009
45
Sandbox Test Tools
Instant Payment Notification Simulator
46
October 2009
Sandbox User Guide
7
Testing Error Conditions
In default operation, the Sandbox mimics the live PayPal site as closely as possible, which
means that an error can be replicated only by creating the exact conditions and sequence of
events to raise an error. This positive test environment is well-suited for testing logic that
follows the typical error-free path; however, it can be difficult to raise error conditions and test
logic to handle errors.
The Sandbox can be set to allow negative testing, which enables you to simulate an error. You
can test against the following kinds of errors:
z
z
errors that result from calling a PayPal API
address verification and credit card validation errors that occur when using Virtual
Terminal or calling DoDirectPayment.
IMPO RTANT: Negative
testing is only available for Version 2.4 and later of PayPal APIs.
You raise an error condition by setting a value in a field passed to an API or setting a value in
a field submitted to Virtual Terminal. The value triggers a specific error condition. Negative
testing is available only in the Sandbox; you cannot force or simulate an error on the live site.
You must create a Business test account and enable negative testing; otherwise, setting a value
in the API or transaction will not raise an error unless the error would be raised in the default
positive test environment. To enable negative testing, set Test Mode to Enabled. The
following screen shows two Business accounts. The first test account enables negative testing;
the second account disables negative testing.
To test Virtual Terminal, you must set risk controls for address verification and credit card
security, respectively, to Decline or Accept and Report depending on the kind of negative
testing you want to perform. If you do not set the appropriate risk controls, default processing
occurs, which is to accept the transaction.
Severe error conditions, such as bad arguments or invalid login, preempt negative testing
because the error cannot be handled by either negative testing or positive testing. In these
Sandbox User Guide
October 2009
47
Testing Error Conditions
API Testing
cases, the error condition for positive testing is raised, regardless of whether the account was
enabled for negative testing.
API Testing
For APIs, you trigger an error condition by setting a field to the value of the error you want to
trigger. The value you specify depends on the kind of field:
z
z
for amount-related fields, specify a value as a number with two digits to the right of the
decimal point; for example, 107.55 triggers PP API error 10755
for other kinds of fields, specify the actual PP API error; for example, 10755 triggers PP
API error 10755
The following table identifies the API, the NVP name or SOAP element of the field that
triggers the error, and a description of how to set the value in the field:
TABLE 7.1 API Fields That Trigger Error Conditions
48
API Name
NVP Field Name
SOAP Element
Description
RefundTransaction
AMT
Amount
Specify the error code to trigger as all
digits in a number with two digits to the
right of the decimal point; for example,
107.55 triggers PP API error code
10755.
GetTransaction
Details
TRANSACTIONID
TransactionID
Specify the error code to trigger as all
digits in the field; for example, an ID of
10755 triggers PP API error code
10755.
TransactionSearch
INVNUM
InvoiceID
Specify the error code to trigger as all
digits in the field; for example, an ID of
10755 triggers PP API error code
10755.
DoDirectPayment
AMT
OrderTotal
Specify the error code to trigger as all
digits in a number with two digits to the
right of the decimal point; for example,
107.55 triggers PP API error code
10755.
SetExpressCheckout
MAXAMT
MaxAmount
Specify the error code to trigger as all
digits in a number with two digits to the
right of the decimal point; for example,
107.55 triggers PP API error code
10755.
October 2009
Sandbox User Guide
Testing Error Conditions
API Testing
TABLE 7.1 API Fields That Trigger Error Conditions (Continued)
API Name
NVP Field Name
SOAP Element
Description
GetExpressCheckout
Details
TOKEN
Token
Specify the error code to trigger as all
digits in the field; for example, a token
value of 10755 triggers PP API error
code 10755.
DoExpressCheckout
TOKEN
Token
Specify the error code to trigger as all
digits in the field; for example, a token
value of 10755 triggers PP API error
code 10755.
DoCapture
AMT
Amount
Specify the error code to trigger as all
digits in a number with two digits to the
right of the decimal point; for example,
106.23 triggers PP API error code
10623.
DoVoid
AUTHORIZATIONID
AuthorizationID
Specify the error code to trigger as all
digits in the field; for example, an ID of
10623 triggers PP API error code
10623.
DoReauthorization
AMT
Amount
Specify the error code to trigger as all
digits in a number with two digits to the
right of the decimal point; for example,
106.23 triggers PP API error code
10623.
DoAuthorization
AMT
Amount
Specify the error code to trigger as all
digits in a number with two digits to the
right of the decimal point; for example,
106.23 triggers PP API error code
10623.
MassPay
EMAILSUBJECT
EmailSubject
Specify the error code to trigger as all
digits in the field; for example, a
subject of 10755 triggers PP API error
code 10755.
BillUser
AMT
Amount
Specify the error code to trigger as all
digits in a number with two digits to the
right of the decimal point; for example,
107.55 triggers PP API error code
10755.
BAUpdate
Version 2.4
MPID
MpID
Specify the error code to trigger as all
digits in the field; for example, an ID of
10755 triggers PP API error code
10755.
Sandbox User Guide
October 2009
49
Testing Error Conditions
API Testing
TABLE 7.1 API Fields That Trigger Error Conditions (Continued)
API Name
NVP Field Name
SOAP Element
Description
BAUpdate
Version 3.0
REFERENCEID
ReferenceID
Specify the error code to trigger as all
digits in the field; for example, an ID of
10755 triggers PP API error code
10755.
AddressVerify
—
—
Not supported for negative testing.
N O T E : If
the trigger value is not a valid error code for the API being tested, positive testing
occurs for the request, which might result in another error occurring.
Negative Testing Using an Amount-Related Trigger Field
Consider an example that sets up testing for error 10623 for DoAuthorization, in which the
error code is specified in the AMT field:
METHOD=DoAuthorization
&TRANSACTIONID=O-1GU0288989807143B&
AMT=106.23&
TRANSACTIONENTITY=Order&
VERSION=2.4&
USER=username&
PWD=password&
SIGNATURE=signature
The request invokes the following response:
TIMESTAMP=2007%2d04%2d04T03%3a10%3a19Z&
CORRELATIONID=447d121150529&
ACK=Failure&
L_ERRORCODE0=10623&
L_SHORTMESSAGE0=Maximum%20number%20of%20authorization%20allowed%20for%20the
%20order%20is%20reached%2e&
L_LONGMESSAGE0=Maximum%20number%20of%20authorization%20allowed%20for%20the%
20order%20is%20reached%2e&
L_SEVERITYCODE0=Error&
VERSION=2%2e400000&
BUILD=1%2e0006
Negative Testing Using a Non-Amount Trigger Field
Consider an example that sets up testing for error 10603 for DoVoid, in which the error code
is specified in the AUTHORIZATIONID field:
50
October 2009
Sandbox User Guide
Testing Error Conditions
API Testing
METHOD=DoVoid&
AUTHORIZATIONID=10603&
VERSION=2.4&
USER=username&
PWD=password&
SIGNATURE=signature
The request invokes the following response:
TIMESTAMP=2007%2d04%2d04T03%3a10%3a22Z&
CORRELATIONID=51b0c5054dee6&
ACK=Failure&
L_ERRORCODE0=10603&
L_SHORTMESSAGE0=The%20buyer%20is%20restricted%2e&
L_LONGMESSAGE0=The%20buyer%20account%20is%20restricted%2e&
L_SEVERITYCODE0=Error
&VERSION=2%2e400000&
BUILD=1%2e0006
Negative Testing With Multiple Messages
Consider an example that sets up testing for error 10009 for RefundTransaction, which
returns 14 possible error message sets:
METHOD=RefundTransaction&
TRANSACTIONID=asdf&
REFUNDTYPE=Partial&
AMT=100.09&
VERSION=2.4&
USER=username&
PWD=password&
SIGNATURE=signature
The request invokes the following response:
Sandbox User Guide
October 2009
51
Testing Error Conditions
Testing Using AVS Codes
TIMESTAMP=2007%2d04%2d04T03%3a10%3a23Z&
CORRELATIONID=81ccc18eaec49&
ACK=Failure&
L_ERRORCODE0=10009&
L_SHORTMESSAGE0=Transaction%20refused&
L_LONGMESSAGE0=You%20can%20not%20refund%20this%20type%20of%20transaction&
L_SEVERITYCODE0=Error&
L_ERRORCODE1=10009&
L_SHORTMESSAGE1=Transaction%20refused&
L_LONGMESSAGE1=You%20are%20over%20the%20time%20limit%20to%20perform%20a%20r
efund%20on%20this%20transaction&
L_SEVERITYCODE1=Error&
L_ERRORCODE2=10009&
L_SHORTMESSAGE2=Transaction%20refused&
L_LONGMESSAGE2=Account%20is%20restricted&
L_SEVERITYCODE2=Error&
...
L_ERRORCODE13=10009&
L_SHORTMESSAGE13=Transaction%20refused&
L_LONGMESSAGE13=The%20partial%20refund%20amount%20must%20be%20less%20than%2
0or%20equal%20to%20the%20remaining%20amount&
L_SEVERITYCODE13=Error&
VERSION=2%2e400000&
BUILD=1%2e0006
Testing Using AVS Codes
You can simulate address verification by triggering an AVS error code when you call
DoDirectPayment or use Virtual Terminal. To specify a code, place AVS_code in the NVP
STREET field or the Street1 SOAP element when you call DoDirectPayment, where code
is an AVS code, or enter AVS_code in Address Line 1 when using Virtual Terminal. For
example, if you set 123 AVS_A Street in the NVP STREET field, AVS code A is set.
is case sensitive; all characters must be uppercase. For example, AVS_A is
valid trigger; avs_a is not.
N O T E : AVS_code
The following table identifies valid AVS codes, corresponding triggers, and a description of
each error condition:
TABLE 7.2 AVS Error Conditions and Triggers
52
AVS Code
Trigger
Description of Error
A
AVS_A
The address matches but no zip code is specified; results in an error if the “Partial
Address Match” risk control is set.
B
AVS_B
The international address matches but no zip code is specified; results in an error if the
“Partial Address Match” risk control is set.
D
AVS_D
Exact match (no error). The international address and postal code matches.
October 2009
Sandbox User Guide
Testing Error Conditions
Testing Using AVS Codes
TABLE 7.2 AVS Error Conditions and Triggers (Continued)
AVS Code
Trigger
Description of Error
F
AVS_F
Exact match (no error). The UK address and postal code matches.
P
AVS_P
The postal code matches but no address is specified; results in an error if the “Partial
Address Match” risk control is set.
W
AVS_W
The 9-digit zip code matches but no address is specified; results in an error if the “Partial
Address Match” risk control is set.
X
AVS_X
Exact match (no error). The complete address and 9-digit zip code matches.
Y
AVS_Y
Exact match (no error). The complete address and 5-digit zip code matches.
Z
AVS_Z
The 5-digit zip code matches but no address is specified; results in an error if the “Partial
Address Match” risk control is set.
N
AVS_N
No address information; results in an error if the “No Address Match” risk control is set.
C
AVS_C
No address information for an international address; results in an error if the “No
Address Match” risk control is set.
E
AVS_E
Not allowed for MOTO (internet/phone) transactions.
I
AVS_I
Service unavailable internationally; results in an error if the “Service
Unavailable/Unsupported” risk control is set.
G
AVS_G
Service globally unavailable; results in an error if the “Service
Unavailable/Unsupported” risk control is set.
R
AVS_R
Retry; results in an error if the “Service Unavailable/Unsupported” risk control is set.
S
AVS_S
Service not supported; results in an error if the “Service Unavailable/Unsupported” risk
control is set.
U
AVS_U
Service unavailable; results in an error if the “Service Unavailable/Unsupported” risk
control is set.
N O T E : The
specified AVS code is set, regardless of whether a PP API error code is set. If no
AVS code is specified or the AVS risk control is not specified, AVS code X is returned.
Testing an AVS Code Using Virtual Terminal
Consider an example of testing for AVS code A using Virtual Terminal. You enter AVS_A in the
Address Line 1 field:
Sandbox User Guide
October 2009
53
Testing Error Conditions
Testing Using AVS Codes
FIGURE 7.1 Entering an AVS code in the Address Line 1 field
When you attempt to process the transaction, the following message appears:
FIGURE 7.2 AVS error message from Virtual Terminal
Testing an AVS Code Using DoDirectPayment
Consider an example that sets up testing for AVS code A and error code 10755 in
DoDirectPayment, for which AVS code A indicates no zip code is specified and results in an
error if the “Partial Address Match” risk control is set, whether or not other errors occur:
54
October 2009
Sandbox User Guide
Testing Error Conditions
Testing Using AVS Codes
METHOD=DoDirectPayment&
CREDITCARDTYPE=VISA&
ACCT=4683075410516684&
EXPDATE=112007&
CVV2=808&
AMT=107.55&
FIRSTNAME=Designer&
LASTNAME=Fotos&
IPADDRESS=255.55.167.002&
STREET=1234%20AVS_A%20Street&
CITY=San%20Jose&
STATE=CA&
COUNTRY=United%20States&
ZIP=95110&
COUNTRYCODE=US&
SHIPTONAME=Louise%20P.%20Flowerchild&
SHIPTOSTREET=1234%20Easy%20Street&
SHIPTOSTREET2=Apt%2022%20bis&
SHIPTOCITY=New%20Orleans&
SHIPTOSTATE=LA&
SHIPTOCOUNTRY=US&
SHIPTOZIP=70114&
PAYMENTACTION=Authorization&
FIZBIN=foo&
VERSION=2.4&
USER=username&
PWD=password&
SIGNATURE=Aq9tJJ3ndj7r32JgX.qAzqOoC1JJAM7erWun-CUZYFDtxffpKWU4ERQG
The request invokes the following response:
TIMESTAMP=2007%2d04%2d04T03%3a35%3a10Z&
CORRELATIONID=a7cbf2d4d83dc&
ACK=Failure&
L_ERRORCODE0=10555&
L_SHORTMESSAGE0=Filter%20Decline&
L_LONGMESSAGE0=This%20transaction%20cannot%20be%20processed%2e&
L_SEVERITYCODE0=Error&
L_ERRORCODE1=10755&
L_SHORTMESSAGE1=Unsupported%20Currency%2e&
L_LONGMESSAGE1=This%20transaction%20cannot%20be%20processed%20due%20to%20an
%20unsupported%20currency%2e&
L_SEVERITYCODE1=Error&
VERSION=2%2e400000&
BUILD=1%2e0006
Sandbox User Guide
October 2009
55
Testing Error Conditions
Testing Using CVV Codes
Testing Using CVV Codes
You can simulate credit card validation by triggering a CVV error code when you call
DoDirectPayment or use Virtual Terminal. To specify a CVV code, place a trigger value in
the NVP CVV2 field or the CVV2 SOAP element when you call DoDirectPayment, or enter
the trigger in Card Security Code when using Virtual Terminal.
The following table identifies valid CVV codes, corresponding triggers, and a description of
each error condition:
TABLE 7.3 CVV Error Conditions and Triggers
CVV Code
Trigger
Description of Error
M
115
CVV2 matches (no error).
N
116
CVV2 does not match.
U
125
Service unavailable.
S
123
Service not supported.
P
120
Transaction not processed.
X
130
No response.
N O T E : The specified CVV2 code is set, regardless of whether a PP API error code is set. If no
CVV2 code is specified, M is returned.Virtual Terminal only displays the CVV2 error if
the risk control blocks the payment.
Testing a CVV Code Using Virtual Terminal
Consider an example of testing for CVV code N using Virtual Terminal. You enter 116 in the
Card Security Code field:
56
October 2009
Sandbox User Guide
Testing Error Conditions
Testing Using CVV Codes
FIGURE 7.3 Entering a CVV code in the Card Security Code field
When you attempt to process the transaction, the following message appears:
FIGURE 7.4 CVV error message from Virtual Terminal
N O T E : Other
errors are also reported in addition to CVV code N.
Testing a CVV Code Using DoDirectPayment
Consider an example that sets up testing for CCV code N in DoDirectPayment, which
indicates a mismatch in the card validation code:
Sandbox User Guide
October 2009
57
Testing Error Conditions
Testing Using CVV Codes
METHOD=DoDirectPayment&
CREDITCARDTYPE=VISA&
ACCT=4683075410516684&
EXPDATE=112007&
CVV2=116&
AMT=1.55&
FIRSTNAME=Designer&
LASTNAME=Fotos&
IPADDRESS=255.55.167.002&
STREET=1234%20Easy%20Street&
CITY=San%20Jose&
STATE=CA&
COUNTRY=United%20States&
ZIP=95110&
COUNTRYCODE=US&
SHIPTONAME=Louise%20P.%20Flowerchild&
SHIPTOSTREET=1234%20Easy%20Street&
SHIPTOSTREET2=Apt%2022%20bis&
SHIPTOCITY=New%20Orleans&
SHIPTOSTATE=LA&
SHIPTOCOUNTRY=US&
SHIPTOZIP=70114&
PAYMENTACTION=Authorization&
FIZBIN=foo&
VERSION=2.4&
USER=username&
PWD=password&
SIGNATURE=signature
The request invokes the following response:
TIMESTAMP=2007%2d04%2d04T03%3a35%3a12Z&
CORRELATIONID=2499856319532&
ACK=Failure&
L_ERRORCODE0=15004&
L_SHORTMESSAGE0=Gateway%20Decline&
L_LONGMESSAGE0=This%20transaction%20cannot%20be%20processed%2e%20Please%20e
nter%20a%20valid%20Credit%20Card%20Verification%20Number%2e&
L_SEVERITYCODE0=Error&
VERSION=2%2e400000&
BUILD=1%2e0006
58
October 2009
Sandbox User Guide
8
Testing Payment Review
On the live site, payment reveiw is always active, which means that PayPal reviews payments
automatically for various risk factors. In the Sanbox, all transactions pass payment review by
default. If you want to simulate payment review, you can enable it from the Test Accounts
page, as shown on the following screen:
Sandbox User Guide
October 2009
59
Testing Payment Review
When payment review is enabled, all transactions become pending, as shown below:
60
October 2009
Sandbox User Guide
9
Technical Support
Depending on the PayPal product you need assistance with, contact either Customer Service or
Developer Technical Support.
Contacting Customer Service for Live PayPal Website Help
Use PayPal Help to find an answer to any problem you might encounter with live products
such as Website Payments or Instant Payment Notification.
To contact Customer Service about issues with the Live PayPal website:
1. Go to https://www.paypal.com/
2. Click Help in the upper right corner of the page.
3. Click Contact Us in the lower left of the page.
4. Chose either Help by Email or Help by Phone.
5. Follow the remaining instructions.
Contacting Developer Technical Support for API Help
For information about PayPal Web Services API, Developer Central, and using the Sandbox,
refer to the following resources:
z
z
z
Help Center: In Developer Central, click Help Center to access developer manuals and
links.
Forums: In Developer Central, click Forums to share information with the PayPal
developer community.
Online Developer Support Portal at https://paypal.com/mts
Use the Forums first to find answers about any questions or problems you might have.
Another developer might have already posted information about your question or problem.
To contact Developer Technical Support about the PayPal Web Services API:
1. Log in to your account at https://developer.paypal.com/ by entering your email address and
password in the Member Log In box
2. Click Help Center at the bottom of the box on the right side of the page.
3. Click Email PayPal Support.
Sandbox User Guide
October 2009
61
Technical Support
Contacting Developer Technical Support for API Help
4. Complete the form.
62
October 2009
Sandbox User Guide
Index
A
G
account status 22
adding a bank account 28
address verification testing 52
API server for Sandbox 10
API testing 48
German bank account info 28
B
bank account
adding 28
for Canadian test accounts 28
for German test accounts 28
for UK test accounts 28
Bank Account Number 28
billing a customer 36
BSB Number 28
Buy Now 31
C
I
instant payment notification simulator 43
Institution Number 28
Integration Center 9
M
manually created test accounts 18, 26
N
name-value pair (NVP) APIs 39
negative testing 47
P
delete test account 18
paying 36
payment review, testing 59
PayPal Developer Network 9
PDN 9
pending transactions 33
positive test 47
preconfigured test accounts 18
E
R
eCheck 35
email in Sandbox 16
errors, testing 47
Request Money testing 36
reset test account 18
reset test accounts 22
F
S
fraud detection in Sandbox 10
Sandbox
API server for 10
email 16
SDKs 9
Canadian bank account info 28
credit card validation testing 56
D
Sandbox User Guide
October 2009
63
Index
Send Money 36
simulator, instant payment notification 43
Social Security Number for Website Payments Pro 27
sort code for Canada, Germany, and UK 28
T
test accounts 17
test email 16
test tools 43
testing
address verification 52
APIs 39, 48
billing a customer 36
Buy Now 32
credit card validation 56
eCheck 35
negative 47
NVP 39
paying 36
Send Money 36
verifying a payment 32
verifying a refund 34
Website Payments 31
testing payment review features 59
Transit Number 28
U
UK bank account info 28
W
Website Payments 31
Website Payments Pro 17, 27
Website Payments Pro test accounts 27
64
October 2009
Sandbox User Guide