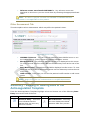
1
Vision 3 Anticoagulation User Guide Copyright © INPS Ltd 2014 The Bread Factory, 1A Broughton Street, Battersea, London, SW8 3QJ T: +44 (0) 207 501700 F:+44 (0) 207 5017100 W: www.inps.co.uk Copyright Notice © 2014 INPS All Rights Reserved. No part of this document may be photocopied, reproduced, stored in a retrieval system or transmitted in any form or by any means, whether electronic, mechanical, or otherwise, without the prior written permission of INPS. No warranty of accuracy is given concerning the contents of the information contained in this publication. To the extent permitted by law, no liability (including liability to any person by reason of negligence) will be accepted by INPS, its subsidiaries or employees for any direct or indirect loss or damage caused by omissions from or inaccuracies in this document. INPS reserves the right to change without notice the contents of this publication and the software to which it relates. Product and company names herein may be the trademarks of their respective owners. INPS Ltd. The Bread Factory 1a Broughton Street London SW8 3QJ Website: www.inps.co.uk Contents ANTICOAGULATION PATHWAY 5 Overview 5 Getting Started 5 Accessing the Anticoagulation Pathway 6 An Overview of the Anticoagulation Pathway Screen Toolbar and Data Entry Tools Viewing or Adding Data to the Anticoagulation Template Care Pathway Indicator Logic 8 9 10 10 11 The Anticoagulation Pathway Tabs Anticoagulation Pathway Tab Warfarin Tab Warfarin/INR Diagnosis To add a new Diagnosis Indication from an existing Diagnosis Read code: To add a New Diagnosis Read code and related Diagnosis Indication: Warfarin Dosing Tool INR Tab 11 12 14 15 15 17 17 24 New Oral Anticoagulant drugs (NOACs) Tab Other Assessment Tab 24 25 Summary - Viewing or Adding Data to the Anticoagulation Template 25 Anticoagulation Pathway Reports 26 INDEX 28 iii Anticoagulation Pathway Overview As you may be aware, Warfarin is the main Anticoagulation treatment for the prevention of stroke and thromboembolic conditions in certain patients with Atrial Fibrillation (AF). Recently published NICE (National Institute for Health and Clinical Excellence) draft guidelines permit the use of new oral anticoagulation drugs (NOACs), along with other risk factors their use is likely to be based on INR (International Normalised Ratio) control. The Vision+ Anticoagulation Management Pathway contains tools for managing all aspects of anticoagulation regardless of the patient's drug regime. It includes Adverse Event Reporting, advice on Dosing regimes and presents supporting materials for structured Education and Reviews. When you select a patient in Consultation Manager an alert window will warn if the patient is missing essential anticoagulation information that will assist in the management of their care. There is also an easy to use Clinical Pathway where you can quickly record relevant information. In addition, a suite of reports will capture data and provide a comprehensive reporting tool. In all the Anticoagulation pathway comprises: Alerts for missing/due data Anticoagulation Templates which include: - Anticoagulation Therapy management screen - Warfarin management and dosing tool - Diagnosis Indication screen - INR monitoring screen - Management screen for New Oral Anticoagulant Drugs - Other Assessment screen showing other factors that may affect the patient's anticoagulant treatment Reporting facility which allows you to work on patient lists or create a mail merge This guide explains how to access the alert window and record data in the Pathway. It also provides details of the reports that can be used to monitor your patients. Getting Started The following topics provide useful information regarding setting up the Anticoagulation Pathway: Identify patients on Warfarin using the Anticoagulation Report - You can quickly identify patients who are on Warfarin by running an Anticoagulation Report. From the Vision front screen, go to Reporting Practice Reports and select the Other icon. Choose the Anticoagulation 5 Pathways Report. A suite of reports are listed. The first report shows the number of patients on Warfarin. For more information see Anticoagulation Pathway Reports (page 26). Alert Popup Window - By default QOF alerts appear when you select a patient in Consultation Manager. To amalgamate non QOF alerts eg the Anticoagulation popup window with the QOF window see Accessing the Anticoagulation Pathway (page 6). Add Diagnosis Indication - Before patients can have their INR monitored and Warfarin dose adjustment calculated, they must first have a current Diagnosis Indication. See Warfarin/INR Diagnosis (page 15). Entering Past INR and Warfarin Dose Values - INR and Warfarin dose historical data must be available in the Pathway in order for the correct recall period calculations to be performed. If the patient has more than five INR and five Warfarin readings then only the last five of each are used. This information is populated from Vision and is available on the History tab within the Warfarin Dosing Tool screen. See Warfarin Dosing Tool (page 17). Patient Settings - To assist in managing the patient's Warfarin dosing regime you can set the patient's INR Target range and choose the tablet strengths that are available to the patient. In addition, you can specify if the patient is under hospital care, which will place a marker alongside the patient. For more information on Patients Settings, see Warfarin/INR Diagnosis (page 15). Accessing the Anticoagulation Pathway To access the anticoagulation pathway functionality, the patient must meet the following criteria: The patient must: (check this is correct took it from a website??) Be taking Anticoagulant medication Have one of the following indications: - Atrial fibrillation - A mechanical heart valve - Endocarditis - Mitral stenosis - Certain blood disorders - Had surgery to replace a hip or knee - Warfarin is indicate - Pulmonary Embolism - Inherited Thrombophilia - PNH - Paroxysmal Nocturnal Haemoglobinuria - Cardioversion - Coronary Angioplasty or Stents - Coronary Artery Grafts - Dilated Cariomyopathy - DVT 6 If the patient meets the above criteria, the following options become available: Alert Popup window - A prompt will show missing or incomplete data. Anticoagulation Pathway- You can access the Anticoagulation Pathway clinical template. Alert Popup To see the Anticoagulation popup alert window, select the patient in Consultation Manager and choose the icon Show Other Indicators from the Vision Toolbar. The Anticoagulation Pathway category is displayed in the alert box with any outstanding/missing anticoagulation data listed below. Anticoagulation Alert Window By double clicking on any line on the alert window or choosing the Template the Toolbar, you are automatically taken to the Anticoagulation Pathway. icon from Amalgamating QOF Alerts with Non-QOF Alerts By default QOF alerts appear when you select a patient in Consultation Manager. To amalgamate non QOF alerts eg the Anticoagulation popup window with the QOF window: 1. Click the Vision+ icon and select Settings. 2. From Options, tick the box Combine Triggers and click OK. 3. The alert window will automatically show both QOF and other indicators when you select a patient. You also see a new Combined popup icon on the Vision Toolbar. Note - This is a user specific setting. Anticoagulation Pathway Alternatively, you can access the Anticoagulation Pathway from the Vision+ menu or the Vision+ Pathway. icon on the Toolbar. Select Clinical Templates - Anticoagulation Clinical Templates - Anticoagulation Pathway 7 An Overview of the Anticoagulation Pathway Screen The Anticoagulation Pathway displays the following screen: Below is an overview of the functions available. Training Tip - Print this page and circulate it to anyone using the Anticoagulation Pathway. An Overview of the Anticoagulation Pathway 8 Toolbar and Data Entry Tools Overview of the Toolbar The Toolbar at the top of the Anticoagulation Pathway is used to access different functions within the screen, some of which vary depending on the line you have highlighted. It also provides links to local and national Care Pathways and the Indicator Logic tool can be used to review Pathway criteria. Toolbar Toolbar Move, Resize, Minimise or Close Print Preview or Print - To view or print the information on the Pathway. Save & Close - This saves the data to the patient's record. Codeset - The Codeset icon takes you to the Codeset data entry screen where Read codes can be chosen from a pre-defined list. Show Indicators - This activates the Alert Indicator popup window. Indicator Logic - You can use the Indicator Logic tool to view the rule set logic behind the pathway. Care Pathways - This icon launches local/national Care Pathway. Default Date - The date defaults to today, but can be changed by entering a new or by choosing from the calendar. Previous and Next Tab - The previous and next tab toggle you through the tabs eg Anticoagulation, Warfarin. Note - If you right click on any line within a pathway you can access the same Toolbar functions. 9 Viewing or Adding Data to the Anticoagulation Template 1. In Consultation Manager, select a patient and choose the Anticoagulation Pathway from the Alert Popup window or Vision+ from the Toolbar. 2. Select Clinical Templates. 3. To add data to a Pathway, highlight the line and choose one of the Data Entry icons at the end of the line . A summary of their function can be found here Summary - Viewing or Adding data to the Anticoagulation Template (page 25). IMPORTANT - All entries made to the Pathway should be saved by choosing the Save and Close icon. If you do not choose save and close your data will be lost. Care Pathway Care Pathways are built into the Anticoagulation Template. When you select the Care Pathway icon from the Toolbar a flow chart is launched. Care Pathways provide extra guidance on how to manage the patient's care. The Pathway option is available from all screens apart from History and Other Assessments. Care Pathway 10 To view further guidance on a specific area of the pathway, click on any of the information boxes on the flow chart and a panel will appear on the right hand side of the screen displaying additional guidance. Some HB's/CCG's have requested their local Care Pathways be incorporated into the Anticoagulation screen, so you may see local guidelines displayed with details of their source. The pathways are managed centrally ensuring that everyone in your local CCG/HB is using the latest guidance. Print or Save To print the Care Pathway click the Print Preview the Pathway as a PDF file, click the Save icon. icon and choose your printer. To save Note - What you print is what you see (check this) Indicator Logic Indicator Logic provides direct access to the conventions required to manage a patient on anticoagulation therapy. You can view a graphical representation of the criteria behind the Anticoagulation Pathway by selecting the Indicator Logic icon. Indicator Logic Training Tip - The Indicator Logic is displayed for the specific line highlighted. The Anticoagulation Pathway Tabs Below is an explanation of each of the tabs within the Anticoagulation Pathway. To add or view data to any of the screens use the Toolbar at the top of the Template or select the data entry tool at the end of each line, a summary of which can be found at here - Summary Viewing or Adding data to the Anticoagulation Template (page 25). Anticoagulation Tabs 11 Reminder - To check what criteria is used select the Indicator Logic icons on the toolbar. See Indicator Logic (page 11). Check node message and why the indicator logic does not appear on the INR line? Anticoagulation Pathway Tab The Anticoagulation Pathway tab shows the patient's current therapy and medication history. From here you can record patient knowledge and annual review information, as well as any hospital admission details. Note - The Anticoagulation Pathway can be printed by choosing the Print or Print Preview icon. On Anticoagulation Pathway This area of the screen shows you when the patient was placed on the Anticoagulation Pathway or you can record the fact that the patient is part of the Anticoagulation Pathway. On Anticoagulation Pathway On Anticoagulation Pathway - This displays the date the patient was placed on the anticoagulation pathway. To add the patient to the Pathway choose the Read code from the Codeset date entry icon. Anticoagulant Therapy This part of the screen shows the patient's current anticoagulation medication and therapy history. Anticoagulation Therapy 12 Prescribed Anticoagulants - This shows the patient's latest anticoagulant medication. The drug information is taken from the patient's therapy screen and includes all acutes and active/inactive repeats, provided the repeat has been issued. You can also add a drug from this screen, either as an acute or a repeat, however, it is not printed until you select print (F9) from the Repeat Therapy screen. For more information on adding a drug, please refer to the Vision+ on-screen help. Planned duration of treatment - Specify the planned duration of treatment by choosing the appropriate Read code from the codeset screen. The Read codes do not include a planned date so it is recommended that you add the planned duration of treatment or the stop date in the Comments box. The stop date will not automatically inactive the medication, this should still be done on the Repeat Therapy screen. Training Tip - You may want to use the Patient Warning icon on the Vision toolbar to record the planned duration of treatment. Alternatively, you could enter a Repeat Until Date when prescribing the anticoagulation medication. For more information press F1 whilst in Consultation Manager. Anticoagulation therapy record issues/updated - This is where you can view or record if the patient holds an anticoagulation therapy record. Education and Review Education and Review This section of the screen is where you can record education and review information. It also includes a link to the Patient.co.uk website where you can print the Patient Advice Leaflet on Anticoagulants, because you are accessing an external website the leaflet is not recorded in the patient’s record. Anticoagulation Education - This is where you can view and record when patient education is discussed. To add a new Read code, click the Codeset icon and select the appropriate code from the data entry screen. Annual Anticoagulation Review - This is where you can view and record a patient's annual review. To add a Review code, click the Codeset select the appropriate Read code from the data entry screen. icon and Note - The Annual Anticoagulation Review is recorded as a History entry and not as a Recall. Hospital Episodes Hospital Episodes Emergency admissions for anticoagulation - This box displays any anticoagulation emergency admissions. To record new admissions select the appropriate Read code. 13 Warfarin Tab This Warfarin tab shows the patient's current Warfarin dose history and Therapy information. Embedded within the screen is a warfarin dose screen where you can record and calculate the patient's new INR regime. In addition, there is a link to the INR Star dosing tool. Warfarin Therapy This section of the screen shows the patient's current Warfarin medication, their warfarin indication and any adverse events. Warfarin Therapy (need to change screenshot Warfarin spelt incorrectly) Prescribed Warfarin - This displays the patient's Warfarin medication. You can add a new drug from this screen or a Read code indicating they are starting warfarin medication. To record that the patient has stopped Warfarin click the Red flag icon. Note - If you record that warfarin has been stopped this does not inactivate the medication on the Therapy screen. Indication for Warfarin - You can see the patient's latest diagnosis indication and the date the entry was made. (check that this is now picked up by a diagnosis) Adverse events associated with Warfarin - Any adverse events are displayed on this line or you can record new Adverse Events by choosing the appropriate Read code. Note - If you record an Adverse event or Allergy you are prompted to enter the drug when you save and close the Pathway. 14 Current weekly dose (reported by patient) - This displays the patient's currently weekly dose. (Need to check what Read codes are used.) Adheres to medication regimen - Select this box to record that the patient is adhering to their medication regime. (Check what is written back to Vision.) Warfarin Dosage Warfarin Dosage Warfarin dose (using the integrated dosing tool) - From here you can see the patient's current Warfarin dose and view the previous dosing history. The previous INR results are displayed in a list or as a graph. You can Read code the patient's warfarin dosage by selecting the appropriate Read code or view the Warfarin dose screen by clicking the Warfarin Dosing Tool (page 17). icon. See Warfarin Patient advised about new dose - Record any new dosage advice given to the patient in this section. Warfarin/INR Diagnosis Before patients can have their INR monitored and Warfarin dose adjustment calculated, they must first have a current Diagnosis Indication. This is done on the INR/Warfarin Diagnosis screen. A prompt will appear when you select the Warfarin dose icon if an indication does not exist. INR/Warfarin Diagnosis Any diagnosis Read codes on the patient's record are displayed in the History column on the line of the relevant Indication. The Read codes displayed can be selected and used as the Diagnosis Indication. If a Diagnosis Read code does not exist in the patient's clinical record then this column will be empty, and a Diagnosis Read code can be added very easily. To add a new Diagnosis Indication from an existing Diagnosis Read code: 1. Click on the History use. icon alongside the chosen Diagnosis Read code you wish to 2. Double click on the relevant Read code in the box that is presented. 15 Note - You can only select one Read code. 3. The corresponding indicator will then appear in the Indication section at the bottom of the screen with the Start Date set to that of the Diagnosis Read code. 4. Where the treatment period is known, an end date can be entered onto the End Date box by clicking on the down arrow and selecting it from the calendar. If there is no End Date then it can be left blank (this will be the case for the majority of patients). (Check as this End date is not shown anywhere in Vision). 5. Click OK. Warfarin/INR Diagnosis 16 If a Diagnosis Read code does not exist in the patients clinical record the History column will be empty. However, a new Diagnosis Read code can be added at this point to allow a Diagnosis Indication to be used. To add a New Diagnosis Read code and related Diagnosis Indication: 1. Double click on the line of the relevant Indication or click the Codeset Read Code Data Entry screen is displayed. icon. The Read Codeset 2. Place a tick in the Apply column. If necessary change the Priority, Episode Type and Date Recorded. 3. Click OK to save. 4. The relevant Indication is placed in the Indication area which is at the base of the screen. 5. The Start Date will default to the date of the Read code entered but can be backdated if necessary by clicking in the down arrow and selecting it from the calendar. 6. Where the treatment period is known, an end date can be entered onto the End Date box by clicking the down arrow and selecting it from the calendar. If there is no End Date then it can be left blank. 7. Click OK. Note - Left click on the expand details of each indication. icon to view the description and Current INR/Warfarin Diagnosis Screen Need a section in here about how to change the diagnosis - check with BB as cannot find an easy way. Warfarin Dosing Tool From the Warfarin dose screen clinicians can easily monitor and calculate INR and Warfarin dosing respectively. It can only be accessed when a New Diagnosis has been entered through the Warfarin screen - See Warfarin/INR Diagnosis (page 15). It looks at the previous INR and dose history and calculates the new weekly dose. It is split into four tabs. The main INR and Dose tab is the one from where the calculation is performed. Note - You must have five INR results in order for the dose to calculate correctly. (Is this correct?) 17 Viewing Current INR Dose This area of the Warfarin Dose screen gives details of the current diagnosis indication, previous INR value and previous weekly dosing regime, along with relevant dates. The information in this section is for reference purposes only and cannot be changed. Any data that is recorded into the patient's record is automatically populated on this screen. Current INR and Dose Start Date - This section shows the patients start date eg earliest diagnosis date (check), the indication and their INR target. INR Date - The patient's last INR result is displayed alongside the date Dose Date - This shows the patient's current daily dose over a week. Recall Date - This is the date when the patient should next be seen. It is setup in the New INR and dose section. Adding New INR and Dose The information in this section is for the new INR details and dose. To record a New INR value and allow Warfarin Management to recommend a dosing regime do the following: 1. Type directly into the INR box the new INR value, or if you receive lab results directly into Vision, the results are automatically populated and show the latest entry. 2. The Advised Warfarin Adjustment is shown. If correct, click on the Use button to allow the regime to be calculated. Select either Round Up or Round Down if displayed. (If the dose cannot be achieved with the tablet strengths available then the option to round the weekly dose Up or Down will become available and must be selected before clicking on Use.) Check if this works. 3. To prescribe the same Warfarin dose for each of the days make sure a tick is placed in the Same Daily Dose box. Clearing this will allow Vision+ to calculate a Warfarin dose that may be different from day to day in order to allow the exact weekly Warfarin dose to be prescribed. This check box will affect the Round Up and/or Round Down warfarin dose values. 4. The weekly dosing regime will then be shown, and can be printed out and given/posted to the patient by clicking on Print A4 Report. 5. The recommended Recall date is shown or can be recorded or by choosing a date from the calendar. Where is this setup? 6. Additional information can be recorded on the Treatment and Advice Tab, if necessary. 7. Optionally, the INR and Warfarin Dose data can be viewed on the History and Trends Tab. 18 8. Click OK to save the changes to the Warfarin Dosing Tool screen. New INR and Dose Treatment and Advice Tab You can record the following on this screen: Treatment and Advice Locus of care - This area of the screen shows the locus of care or you can add a new entry by selecting the appropriate Read code from Codeset icon. Patient informed of result - This displays when the patient was last informed of their result, or you can add a new entry by choosing the appropriate Read code from the Codeset icon. Home visit by Healthcare professional - If the patient is attended by a healthcare professional it is shown in here, provided the Read code of #9NFM - Home visit planned by HCP has been used. Alternatively, you can add this entry by selecting the Read code. Booklet/Warfarin Card Given - The Information section provides an area where details of whether a Warfarin booklet and/or card have been given to the patient, along with the date they were provided. The possible options are Yes, No, Declined or Unknown. 19 Note - Booklet given and Warfarin card given are not recorded in the patient's journal. Prescriptions - The most recent prescription for Warfarin is displayed along with the date prescribed. A full history of Warfarin prescriptions issued can be viewed by using the drop down history arrow icon. History Tab The History tab shows Diagnosis Indications along with their start and end date, if applicable. You also see the patient's INR history with dates and values and the patient's weekly Warfarin dose values shown in mg's per week. Warfarin Dose - History 20 Trends Tab The Trends tab is a good visual aid for looking at a history of diagnostic indications along with their dates; it also shows the patients INR history and plots the weekly Warfarin dose with respect to time. Warfarin Dose - Trends Note - By default the data shown in the INR and Warfarin graphs are relevant to the current diagnosis. To see a graph for other diagnosis indications highlight the relevant indication at the top of the screen. 21 Settings Tab The Patient INR/Warfarin Settings can be accessed from the Settings option on the Warfarin Dose screen. Patient INR/Warfarin Settings INR - This section of the Settings screen specifies the INR target This INR Target range has a default value of 2 to 3 but can be altered if necessary. Tablet Strength - The tablet strengths that are available to the patient can be selected under the Tablet strength area, so consideration can be taken to enable the daily dosing value to be achieved from the tablet combinations available. Where the weekly dosing regime is not possible, you have a choice to round up or down. The 1mg tablet strength cannot be made unavailable to the practice as this is a most unlikely scenario. Hospital - The Hospital Managed box should be checked if the patient is under hospital care eg admitted. A marker is placed alongside the patient, which can be seen on the Current INR and Dose screen in the Warfarin Dosing Tool. Managed by the Hospital Print, Print Preview and Print A4 You can print a report which contains information on the patients dosing regime, including which colour tablets they need to take on which days. The weekly Warfarin dose history is also displayed for the previous 5 values. Contained within the report is general information 22 regarding taking Warfarin. The report is designed to be printed out so that it can be given to the patient or any other clinician who may potentially need an overview eg If the patient changes practice. 1. From the Warfarin Dose screen, select Print Preview, Print or Print A4 Report. Print Options 2. If you choose Print Preview the report is sent to screen where it can be viewed and printed. Print Report 3. If you choose Print the report is sent directly to the prescription printer. Select Print A4 to send the document to the Report printer. Note -You can only print this dosing regime report from the INR and Dose screen. It is not available if you select Treatment Advice, History or Trends. 23 INR Tab The INR tab has been specifically designed for monitoring a patient's INR. INR Monitoring INR Results - This information is automatically populated with the patient's INR results received from the lab. Optionally, the new INR value can be recorded by entering it into the INR measurement screen by selecting the INR value icon. Target INR - Select this box to specify the patient's target INR. Patient Informed of latest INR result - This shows the last time the patient was informed of their INR result, or you can add this information by selecting the appropriate Read code. Next INR test date - This displays the patient's next planned INR date or select the date from the calendar (or type the date). (What does the next box display?) New Oral Anticoagulant drugs (NOACs) Tab The NOAC tab is for new oral anticoagulation medication. NOAC Tab 24 Prescribed NOAC's - From this area of the screen you can see what medication the patient is on and their NOAC history. Indication for NOAC's - You can see the patient's latest diagnosis indication and the date the entry was made. If there is no data recorded you can choose the Read code from the Data Entry screen. (Check what are the differences in the management of patient care - the Read codes here are more operation specific and AF is shown but PE is not?) Adverse events associated with NOAC's - Any adverse events are displayed on this line or you can record them by choosing the appropriate Read code. Note - If a box is "greyed" out and not available it indicates that this information is not applicable to this patient. Other Assessment Tab This tab explains other assessments which may affect the patient's dose. Other Assessment Tab CHADS2 risk Score - You can view the patient's latest CHADS score or use the CHADS icon to quickly access the CHADS calculator screen. Blood Pressure - The patient's last blood pressure is displayed on this screen. To view historical entries or add a BP use the data entry tools at the end of the line. Body Mass Index - The patient's last BMI is displayed on this screen. To view historical entries or add a BMI measurement use the data entry tools at the end of the line. eGFR results - From here you can see the patient's eGFR results or add a new result. Note - A Q in front of a line indicates that it is a QOF requirement. Summary - Viewing or Adding Data to the Anticoagulation Template From the Anticoagulation Template highlight a line and choose one of the following Data Entry icons at the end of the line. Icon Function Previous Entry - This blue icon indicates that the patient does not have any previous records. Icon Function Blood Pressure - Selecting this icon displays the blood pressure data entry screen. 25 Previous Entries - When the row contains more than one relevant Read code, a drop down arrow appears in red to alert you that more Read codes are available than the one currently being displayed. Where numeric data is recorded a graph is also visible. BMI - Choosing this icon displays the BMI data entry screen and allows you to record the patient's BMI. Undo - The Undo Last Entry icon deletes the Read code previously entered on that line during the current session. CHADS - This icon provides quick access to the CHADS calculator screen. Codeset - The codeset icon takes you to the Read code data entry screen, where Read codes can be chosen from pre-defined list. Smoking - Selecting this icon launches the smoking data entry screen and allows you to record the patient's smoking status. INR - This icon allows you to add an INR result. Warfarin - This icon launches the Warfarin dosing tool. IMPORTANT - You must select Save and Close if you have entered any information. Anticoagulation Pathway Reports There is a comprehensive suite of pre-defined Anticoagulation Reports built within the Vision+ Reporting Module. From here you can work on patient lists or use the integrated mail merge facility. 1. From the front screen on Vision, go to Reporting - Practice Reports and select the Other icon. Practice Reports - Other 2. Click Anticoagulation Pathway Reports. Other - Anticoagulation Pathway 26 3. The Reports are listed. Anticoagulation Pathway For more information on how to work on Patient lists or perform a mail merge, press F1 in the Vision+ Reporting module to display the on-screen help. Training Tip - Select the Last Run option if you have closed the Anticoagulation Report down but now want to view it again. 27 Index A Accessing the Anticoagulation Pathway • 6 An Overview of the Anticoagulation Pathway Screen • 8 Anticoagulation Pathway • 5 Anticoagulation Pathway Reports • 6, 26 Anticoagulation Pathway Tab • 12 C Care Pathway • 10 Copyright Notice • ii G Getting Started • 5 I Indicator Logic • 11, 12 INR Tab • 24 N New Oral Anticoagulant drugs (NOACs) Tab • 24 O Other Assessment Tab • 25 Overview • 5 S Summary - Viewing or Adding Data to the Anticoagulation Template • 10, 11, 25 T The Anticoagulation Pathway Tabs • 11 Toolbar and Data Entry Tools • 9 28 W Warfarin Dosing Tool • 6, 15, 17 Warfarin Tab • 14 Warfarin/INR Diagnosis • 6, 15, 17