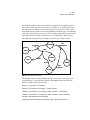
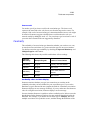
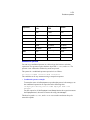
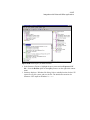
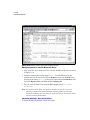
1
Sentences User’s Guide Sentences™ Version 3.5 Volume 1 A publication of: Lazy Software Ltd Gemini House, Mercury Park Wycombe Lane Wooburn Town Bucks HP10 0TT UK http://www.lazysoft.com Email: [email protected] Phone: 01628 642300 Fax: 01628 642301 Copyright © 2000-2003 Lazy Software Ltd. All rights reserved. The information in this document is subject to change without notice and does not represent a commitment on the part of Lazy Software Ltd. No part of this document may be reproduced, stored or transmitted in any form or by any means, electronic or mechanical, for any purpose, without the express written permission of Lazy Software Ltd. The software described in this document is supplied subject to a License Agreement and all use of the software is subject to the terms of the agreement. Lazy Software Ltd. accepts no liability for any damages incurred, directly or indirectly, from any errors, omissions or discrepancies between the software and the information contained in this document. Sentences, Lazy Analytics, LazyView, and the Associative Model of Data are trademarks of Lazy Software Ltd. Microsoft Windows, Windows 95, Windows 98, Windows Me, Windows 2000, Windows NT, Windws XP, Internet Information Server (IIS), Internet Explorer, Microsoft Office, Microsoft Word, Microsoft Excel, Microsoft Outlook, and Microsoft Access are trademarks or registered trademarks of Microsoft Corporation. Netscape and Netscape Navigator are registered trademarks of Netscape Communications Corporation in the United States and other countries. Sun, Sun Microsystems, Solaris, Java, JavaSoft, Javadoc, JavaHelp, Java 2 Runtime Environment, Java Software Development Kit, JavaServer Web Development Kit, and JavaServer Pages are trademarks or registered trademarks of Sun Microsystems, Inc. The Tomcat Web server redistributed with Sentences, and the Xalan XSLT Stylesheet Processor and the Xerces XML Parser, incorporated in Sentences, were developed by the Apache Software Foundation (http://www.apache.org). Copyright © 1999-2000 The Apache Software Foundation. All rights reserved. Please see the accompanying text files in the Licenses subdirectory for full details of the copyright and warranty limitations for Apache Software Foundation products. ServletExec is a trademark of New Atlanta Communications LLC. InstallAnywhere is a registered trademark of ZeroG Software, Incorporated. Linux is a registered trademark of Linus Torvalds. Red Hat is a registered trademark of Red Hat, Inc. JRun is a trademark of Macromedia, Inc. Macintosh and iMac are registered trademarks of Apple Computer, Inc. AIX is a registered trademark and iSeries and pSeries are trademarks of International Business Machines Corporation. Oracle is a registered trademark of Oracle Corporation. All other product names used may be trademarks or registered trademarks of their respective owners. Document Information Ref: SNT/USR/3.5/01, Volume 1 Group: User Documentation Edition: 01 Date: April 2003 Table of Contents Volume 1 Overview......................................................................................... 1-23 Introducing Sentences .................................................................................. 1-23 Key features................................................................................................... 1-23 What’s new in Sentences Version 3.5.......................................................... 1-24 Component installation and product licensing .......................................... 1-24 Password-protected chapter files ............................................................... 1-25 Transitive closure ...................................................................................... 1-25 Automatic generation of entity instances .................................................. 1-25 Improvements to XSL Stylesheet generation ............................................ 1-25 Association instance retrieval control........................................................ 1-25 Diagram Editor .......................................................................................... 1-25 Using metatypes ........................................................................................ 1-26 Symmetric property for association types ................................................. 1-26 Export of schema as XML ......................................................................... 1-26 Lazy Analytics OLAP tool ........................................................................ 1-26 Enhancements to the LazyView tool ......................................................... 1-26 How to use this guide .................................................................................... 1-26 Document conventions.................................................................................. 1-27 Your comments ............................................................................................. 1-29 Chapter 1, Configuring Sentences ............................................... 1-31 Sentences editions and components............................................................. 1-31 Sentences licensing........................................................................................ 1-32 Configuring Sentences.................................................................................. 1-33 Sentences installation directories............................................................... 1-33 Configuring Sentences with non-J2EE Web servers ................................. 1-39 File system permissions............................................................................. 1-40 Virtual directories ...................................................................................... 1-40 About the ImageURLBase parameter........................................................ 1-41 Port numbers.............................................................................................. 1-41 Changing port numbers ....................................................................... 1-42 Support for configuring environments for Sentences................................ 1-42 Sentences configuration files........................................................................ 1-43 The Server.properties file .......................................................................... 1-43 1-4 Standard Server.properties settings...................................................... 1-43 Servlet access properties...................................................................... 1-47 Statistics properties.............................................................................. 1-47 The lazystart script file............................................................................... 1-48 Using the classpath argument .............................................................. 1-49 The LaunchSentences.html page ............................................................... 1-50 The Sentences.html start page.................................................................... 1-50 HTML code using the OBJECT tag .................................................... 1-51 HTML code using the EMBED tag ..................................................... 1-52 Sentences applet parameters ................................................................ 1-53 Additional optional parameters............................................................ 1-56 Using applets for access to Sentences........................................................ 1-58 User-defined parameters .............................................................................. 1-58 Format of user-defined parameters ............................................................ 1-58 Pre-defined names................................................................................ 1-59 User Parameters ................................................................................... 1-59 Referring to user-defined parameters......................................................... 1-59 User-defined parameters in the Client API.......................................... 1-59 User-defined parameters in triggers..................................................... 1-59 User-defined parameters in query expressions .................................... 1-60 Monitoring server activity ............................................................................ 1-60 Shutting down and restarting the Sentences server................................... 1-60 Backing up and restoring your data............................................................ 1-61 Online backup ............................................................................................ 1-61 Preparing to run online backup............................................................ 1-62 Using the online backup command...................................................... 1-62 Restoring your data from an online backup......................................... 1-63 Exporting the database for backup............................................................. 1-64 Copying chapters for backup ..................................................................... 1-64 Using trace files ............................................................................................. 1-64 Sentences log files .......................................................................................... 1-65 Running the Enterprise Edition on a single computer .............................. 1-66 Sentences server and client communications.............................................. 1-66 Running the Sentences client........................................................................ 1-68 Starting the Sentences client ...................................................................... 1-68 Java Runtime Environment Plug-in ........................................................... 1-69 Sentences certificate acceptance ................................................................ 1-69 Using the Java Console tool....................................................................... 1-70 Activating the Java Console on Windows systems ............................. 1-70 1-5 Activating the Java Console on Solaris, Linux, or AIX systems......... 1-70 Errors reported at the Sentences client....................................................... 1-70 Error 1222: Your server connection has expired ................................. 1-70 Error 1265: The Sentences server has not been found......................... 1-71 Error 1266: The Sentences server has not been found......................... 1-71 Error 1267: The Sentences database is not available........................... 1-71 Error 1268: The Sentences database is not available........................... 1-73 Error 1272: A connection error has occurred ...................................... 1-73 Contacting Technical Support ............................................................. 1-74 Security considerations................................................................................. 1-74 Automatic check of HTML page host ....................................................... 1-74 Error 1403: The Sentences client must be loaded from the same host as its HTML page.......................................................................................... 1-74 Using database views for enhanced security ............................................. 1-75 Servlet access to Sentences ........................................................................... 1-75 URL patterns and Servlets available in Sentences..................................... 1-75 Sentences servlets and web server security ............................................... 1-76 Enabling and disabling servlet access........................................................ 1-77 Uninstalling Sentences .................................................................................. 1-77 Chapter 2, Introducing the associative model ............................ 1-79 Entities and associations ............................................................................... 1-79 Entities and values......................................................................................... 1-82 Types and instances....................................................................................... 1-82 Comparing the relational model and the associative model...................... 1-84 Structural comparisons............................................................................... 1-85 Relational databases and LazyView ............................................................ 1-86 Chapter 3, Sentences database design ......................................... 1-87 Database modelling in Sentences ................................................................. 1-87 Database design skills ................................................................................ 1-87 Choosing entity, association or value types ............................................... 1-87 Creating verbs for association types .......................................................... 1-88 Modelling one-to-many association types ................................................. 1-88 Iterative design and prototyping ................................................................ 1-88 Designing for change ................................................................................. 1-89 Modelling behaviour common to multiple types ....................................... 1-89 Using instance-specific association types .................................................. 1-90 1-6 Using chapters and profiles........................................................................ 1-90 Sentences user interface design options ...................................................... 1-90 Using the Sentences Explorer and Dataform interface .............................. 1-91 Using custom Dataforms............................................................................ 1-91 Using applets in HTML pages, and using JSPs ......................................... 1-92 Using an XML-based user interface .......................................................... 1-92 Using the Sentences client API.................................................................. 1-93 Chapter 4, The Sentences Quick Tour ........................................ 1-95 About tree displays in Sentences.................................................................. 1-95 The Sentences Explorer quick tour ............................................................. 1-96 The Explorer Menu bar .............................................................................. 1-97 The Explorer Toolbar................................................................................. 1-98 Copying and Pasting ............................................................................ 1-99 Finding data ......................................................................................... 1-99 Sentences Explorer tooltips ............................................................... 1-100 Tree displays in the Sentences Explorer .................................................. 1-100 Nodes and icons ................................................................................. 1-101 Schema and data pane features ................................................................ 1-101 Schema and data pane icons .............................................................. 1-102 Expand node and collapse node buttons............................................ 1-103 Sentences Explorer drill-down........................................................... 1-104 Sentences Explorer tabs..................................................................... 1-104 The schema pane...................................................................................... 1-105 The Core types folder ........................................................................ 1-106 The Core queries folder ..................................................................... 1-107 The All types folder ........................................................................... 1-107 The All queries folder ........................................................................ 1-107 The Set queries folder ........................................................................ 1-107 The data pane ........................................................................................... 1-108 Scroll bars ................................................................................................ 1-108 The Status bar .......................................................................................... 1-108 Divider bar ............................................................................................... 1-109 Shortcut keys............................................................................................ 1-109 Display Options ....................................................................................... 1-110 Support information ................................................................................. 1-111 Explorer shortcut menus .......................................................................... 1-114 The Dataform quick tour............................................................................ 1-115 1-7 Different kinds of Dataform..................................................................... 1-115 Title bar .................................................................................................... 1-116 Dataform tabbed pages ............................................................................ 1-116 Labels and fields ...................................................................................... 1-117 Ellipsis button and picker lists ................................................................. 1-117 Dataform shortcut menus ......................................................................... 1-119 The Query Editor quick tour ..................................................................... 1-120 Query Editor menu bar............................................................................. 1-121 Query Editor toolbar ................................................................................ 1-121 Query Editor icons ................................................................................... 1-122 Query pane ............................................................................................... 1-124 Schema pane ............................................................................................ 1-124 Results pane ............................................................................................. 1-124 Query Editor status bar ............................................................................ 1-124 Query Editor divider bars......................................................................... 1-125 The Message Log ......................................................................................... 1-125 Chapter 5, Working with Sentences .......................................... 1-127 Profiles and chapters................................................................................... 1-127 Data and schema updates ......................................................................... 1-128 Chapter file locations ............................................................................... 1-128 System chapters ....................................................................................... 1-129 The Profiles database and the Profiles profile ................................... 1-129 Using multiple profiles ............................................................................ 1-130 Profile and chapter commands................................................................. 1-130 Profile and chapter constraints........................................................... 1-130 The Open Profile dialog..................................................................... 1-131 Creating a new profile........................................................................ 1-131 The Edit Profile dialog....................................................................... 1-132 Using the Edit Profile dialog ............................................................. 1-132 Chapters ............................................................................................. 1-133 Changes chapters ............................................................................... 1-133 Generate Core types automatically .................................................... 1-134 Show Set Queries............................................................................... 1-134 Saving a profile.................................................................................. 1-134 Deleting a profile ............................................................................... 1-134 Working with chapters ............................................................................. 1-135 Add chapter........................................................................................ 1-135 1-8 New chapter ....................................................................................... 1-136 Naming chapter files.......................................................................... 1-136 Rename .............................................................................................. 1-137 Properties ........................................................................................... 1-137 Checking chapters used for changes.................................................. 1-137 Deleting a chapter .............................................................................. 1-137 Password-protected chapter files ............................................................. 1-138 To set a password............................................................................... 1-138 To change a password........................................................................ 1-138 To delete a password.......................................................................... 1-139 To enter a password ........................................................................... 1-139 Password-protected files and the Personal Edition............................ 1-140 Deploying profiles and chapters ................................................................ 1-140 Schema and data visibility ....................................................................... 1-141 Exporting and importing databases.......................................................... 1-141 Benefits of exporting a database........................................................ 1-141 Database export and internal identifiers ............................................ 1-142 Default export behaviour ................................................................... 1-142 To export a database .......................................................................... 1-142 Export command option switch ......................................................... 1-143 To import a set of chapters ................................................................ 1-143 Import command option switches...................................................... 1-145 Visibility of imported profiles ........................................................... 1-146 Visibility of imported profiles using the -renumber option............... 1-147 Limitation on parameters with Import command on Windows......... 1-147 Importing a database export file from a previous version ................. 1-147 Transferring the profiles database...................................................... 1-147 Export command troubleshooting...................................................... 1-149 Copying chapter files ............................................................................... 1-150 Restrictions on copying chapter files................................................. 1-150 Chapter format ................................................................................... 1-150 Changing chapter file block size (single chapter export and import) ...... 1-151 ExportChapter command ................................................................... 1-151 ImportChapter command ................................................................... 1-151 Using the Sentences Explorer..................................................................... 1-152 Resizing the applet window ..................................................................... 1-152 Delayed display of inverse associations .................................................. 1-152 Display order of instances........................................................................ 1-152 Refreshing the display.............................................................................. 1-153 1-9 Database components.................................................................................. 1-153 Entity types and entities ........................................................................... 1-153 Creating entity types ................................................................................ 1-154 Creating entities ................................................................................. 1-155 Size of entity and value instances ...................................................... 1-155 Value types and datatypes........................................................................ 1-155 Defining value types with datatypes.................................................. 1-155 Impact of changing a datatype ........................................................... 1-156 Visibility of value instances............................................................... 1-157 Behaviour of value types and values ................................................. 1-157 Creating value instances .................................................................... 1-158 Association types and associations .......................................................... 1-158 Creating association types........................................................................ 1-158 Schema and data change visibility..................................................... 1-159 Source, verb, and target ........................................................................... 1-159 Source ................................................................................................ 1-160 Verb ................................................................................................... 1-160 Target................................................................................................. 1-160 Inverse verb........................................................................................ 1-161 Cardinality................................................................................................ 1-161 Cardinality rules and data display...................................................... 1-161 Other association type options ................................................................. 1-162 Singular inverse ................................................................................. 1-162 Symmetric.......................................................................................... 1-162 Display ordering ................................................................................ 1-163 Instance options ................................................................................. 1-163 Metatypes ................................................................................................. 1-163 Using metatypes................................................................................. 1-163 Creating associations ............................................................................... 1-164 Deleting types and instances .................................................................... 1-164 Impact of deleting dialog ................................................................... 1-164 Implicit deletion................................................................................. 1-165 Renaming types and instances ................................................................. 1-166 Locating data in the Sentences Explorer .................................................. 1-166 Demand loading of data ........................................................................... 1-167 The More... prompt........................................................................... 1-167 The Positioner and Filter tools................................................................. 1-168 The Positioner tool............................................................................. 1-169 The Filter tool .................................................................................... 1-170 1-10 Pattern matching with the Filter tool ................................................. 1-171 Using Filtering and Positioning tools together .................................. 1-172 Reloading data ................................................................................... 1-173 Stopping data retrieval ............................................................................. 1-173 The Stop button.................................................................................. 1-174 Sorting and sequencing............................................................................... 1-175 Sequencing association types................................................................... 1-175 Sequencing multiple instances........................................................... 1-175 Properties ..................................................................................................... 1-176 General properties page ........................................................................... 1-177 Display in Core types folder .............................................................. 1-178 Instance options ................................................................................. 1-178 Datatype properties page.......................................................................... 1-179 Instances are values ........................................................................... 1-181 Assigning datatypes ........................................................................... 1-181 String datatypes.................................................................................. 1-181 Numeric datatypes ............................................................................. 1-183 International considerations for the currency datatype...................... 1-186 Date and time datatypes..................................................................... 1-186 International considerations for date and time datatypes................... 1-186 Format properties page ............................................................................ 1-188 Presentation........................................................................................ 1-189 Picker ................................................................................................. 1-191 Style ................................................................................................... 1-191 Display width..................................................................................... 1-193 Table column width ........................................................................... 1-194 Display height.................................................................................... 1-194 Format options ................................................................................... 1-194 Presentation of date formats .............................................................. 1-195 Presentation of time formats.............................................................. 1-195 Restore Default settings button.......................................................... 1-195 Subsets properties page............................................................................ 1-196 Comparison of subsets and supertypes .............................................. 1-198 Dataform behaviour with subsets and supertypes.............................. 1-199 Subsets of association types............................................................... 1-199 Viewing subset type instances ........................................................... 1-199 Supertypes properties page ...................................................................... 1-200 Using supertypes with association types ........................................... 1-201 Equivalence properties page .................................................................... 1-202 1-11 Triggers properties page .......................................................................... 1-203 Description properties page ..................................................................... 1-205 Custom Dataform properties page ........................................................... 1-206 Association type properties page ............................................................. 1-207 Target Parameters properties page........................................................... 1-208 Default target properties page .................................................................. 1-209 Mapping properties page.......................................................................... 1-211 Retrieval Methods properties page .......................................................... 1-212 Operations on instances.............................................................................. 1-213 Supersedes................................................................................................ 1-214 Instance equivalence ................................................................................ 1-215 Instance-specific association types .......................................................... 1-217 The Sentences Dataform............................................................................. 1-218 Tabbed pages in the Dataform ................................................................. 1-219 The base Dataform and the default Dataform.......................................... 1-219 Create and update Dataforms................................................................... 1-219 The create Dataform .......................................................................... 1-220 The update Dataform ......................................................................... 1-221 Parent Dataforms and child Dataforms.................................................... 1-222 Creating an association in the Dataform .................................................. 1-223 Association type targets and metatype targets................................... 1-223 Dataform shortcut menu .......................................................................... 1-224 Selecting targets in the Dataform............................................................. 1-225 Creating an entity instance in the Dataform ............................................ 1-225 Targets with duplicate names ............................................................ 1-226 Targets that are subsets...................................................................... 1-226 Changing the target in a Dataform........................................................... 1-226 Instance specific Dataforms..................................................................... 1-227 Picker list initial selection ........................................................................ 1-227 Creating a custom Dataform...................................................................... 1-227 Refresh button on custom Dataforms ...................................................... 1-229 Custom Dataform restrictions .................................................................. 1-229 Selecting a custom Dataform ................................................................... 1-230 Custom Dataforms with subsets and supertypes................................ 1-230 The Dataform applet................................................................................... 1-231 Dataform applet code example ................................................................ 1-232 Applet parameters for the Dataform applet ............................................. 1-235 The Picker applet ........................................................................................ 1-239 Picker applet code example ..................................................................... 1-241 1-12 Applet parameters for the Picker applet................................................... 1-242 The Query applet......................................................................................... 1-244 Query applet code example...................................................................... 1-245 Applet parameters for the Query applet................................................... 1-247 Using colours in Sentences applets ............................................................ 1-247 Sentences and external formats ................................................................. 1-250 Using triggers when you import data....................................................... 1-250 CSV Import.............................................................................................. 1-250 CSV Import and supertypes and subsets............................................ 1-251 Structure of CSV files........................................................................ 1-252 CSV Import rules............................................................................... 1-252 Cardinality rules and triggers with CSV import ................................ 1-253 Running CSV Import ............................................................................... 1-253 To import a CSV file on Windows platforms.................................... 1-253 To import a CSV file on Solaris, Linux, or AIX platforms............... 1-254 CSV Export.............................................................................................. 1-254 Chapter 6, Advanced techniques ............................................... 1-255 Sentences and Java technology .................................................................. 1-255 Transaction processing in Sentences ......................................................... 1-257 Sentences Explorer based updates .......................................................... 1-257 Dataform based updates ........................................................................... 1-257 Updates in parent and child Dataforms.............................................. 1-258 Dataform tabbed pages with subsets and supertypes .............................. 1-259 Dataform appearance with Supertypes .................................................... 1-260 Dataform example with Subsets .............................................................. 1-263 Target parameters....................................................................................... 1-266 Conference room example ....................................................................... 1-266 Allowed products example ...................................................................... 1-271 Limitations of the Target Parameters mechanism ................................... 1-272 Creating database views using profiles and chapters .............................. 1-273 Database views example .......................................................................... 1-274 Index ............................................................................................. 1-279 1-13 Volume 2 Chapter 7, Sentences queries........................................................ 2-23 Introducing the Query Editor ...................................................................... 2-23 Starting the Query Editor ........................................................................... 2-24 Availability of the Query Editor .......................................................... 2-24 Creating a new query ........................................................................... 2-24 Editing an existing query ..................................................................... 2-24 Saving a query ..................................................................................... 2-24 The Query Editor window ......................................................................... 2-25 General query properties dialog................................................................. 2-26 Description........................................................................................... 2-26 Database queries............................................................................................ 2-26 Building the request tree ............................................................................ 2-27 Creating the data request node............................................................. 2-27 Adding Forward and Inverse Nodes .................................................... 2-28 Using drag and drop and cut, copy, and paste in the Query Editor ..... 2-31 Result Trees ......................................................................................... 2-32 Displaying query results ...................................................................... 2-32 Stopping data retrieval......................................................................... 2-33 Displaying query results in the Sentences Explorer ............................ 2-34 Expanding and Collapsing ................................................................... 2-34 Binding Nodes ........................................................................................... 2-34 Binding to an instance.......................................................................... 2-35 Binding to a Request Node .................................................................. 2-36 Binding to a Parameter ........................................................................ 2-37 Selection, Sort, and Derived type nodes .................................................... 2-37 Selection nodes .................................................................................... 2-38 Sort nodes ............................................................................................ 2-39 Derived types and derivations.................................................................... 2-40 Derived type nodes .............................................................................. 2-40 To create a derived type node .............................................................. 2-40 Derived type node properties dialog.................................................... 2-41 Derivations........................................................................................... 2-42 Recalculation rules for derivations ...................................................... 2-42 Derivation properties ........................................................................... 2-43 Setting a derivation .............................................................................. 2-45 Using expressions in queries...................................................................... 2-45 1-14 Expression syntax for queries.............................................................. 2-46 Arithmetic and Concatenation operators ............................................. 2-48 Comparison operators .......................................................................... 2-49 Wildcards............................................................................................. 2-50 Logical connectives ............................................................................. 2-51 Logical connectives behaviour with missing values............................ 2-52 Conditional operator ............................................................................ 2-53 Using Void in an expression................................................................ 2-54 Exists Conditional function ................................................................. 2-54 Default value........................................................................................ 2-55 Using parameters in query expressions ............................................... 2-55 Using user-defined parameters ............................................................ 2-55 Using conditionals to check for parameter values ............................... 2-56 Group functions ................................................................................... 2-56 Datatype methods ................................................................................ 2-58 Type constructors................................................................................. 2-62 Identifiers in operator request node expressions.................................. 2-62 Expression results ................................................................................ 2-63 Missing values in expressions.............................................................. 2-63 Expressions that give the zero token as their result ............................. 2-63 Required nodes........................................................................................... 2-64 Renaming request nodes ............................................................................ 2-65 Hidden Nodes............................................................................................. 2-66 Transitive closure and recursive closure.................................................... 2-68 Transitive closure................................................................................. 2-69 Recursive closure................................................................................. 2-72 Query Parameters....................................................................................... 2-75 Naming parameters .............................................................................. 2-76 Creating parameters ............................................................................. 2-76 Defining a parameter’s type................................................................. 2-77 Defining a parameter’s value............................................................... 2-77 Making a parameter mandatory ........................................................... 2-77 Executing a query which has parameters............................................. 2-78 Showing parameters in the Explorer.................................................... 2-78 Attaching Subset Queries........................................................................... 2-78 Using parameters in subset queries............................................................ 2-79 Sentences query execution process............................................................ 2-79 The Query Editor and Dataforms ............................................................... 2-79 Page Nodes................................................................................................. 2-80 1-15 Adding a page node ............................................................................. 2-80 Page nodes added automatically .......................................................... 2-81 Using page nodes................................................................................. 2-81 Rules for page nodes display on the Dataform .................................... 2-81 Query node Properties dialog..................................................................... 2-82 Query node Format properties page..................................................... 2-84 Effects of using the Restore Default Settings button........................... 2-85 Query node XSL Stylesheet properties page ....................................... 2-85 Query node Dataform properties page................................................. 2-90 Can create <target> checkbox ............................................................. 2-91 Navigation............................................................................................ 2-92 <target> Dataform is read only checkbox ........................................... 2-92 Interaction between properties............................................................. 2-92 Transitive Closure node properties page ............................................. 2-92 The Query Editor and XML ........................................................................ 2-93 XML properties dialog............................................................................... 2-94 Output options...................................................................................... 2-94 XSL Stylesheet options........................................................................ 2-95 DTD reference ..................................................................................... 2-96 Cascading stylesheet ............................................................................ 2-96 Node name considerations for XML output .............................................. 2-97 Create an XML DTD from a query............................................................ 2-98 Export query results as XML ..................................................................... 2-99 Export XSL stylesheet ............................................................................... 2-99 View query results as XML ..................................................................... 2-100 Example stylesheets ................................................................................. 2-101 Master.xsl example stylesheet ........................................................... 2-102 Table.xsl example stylesheet ............................................................. 2-103 Exporting query results as CSV data ........................................................ 2-103 Running CSV Export ............................................................................... 2-103 CSV Export and multiple associations .............................................. 2-104 Chapter 8, Sentences and XML ................................................. 2-105 Introducing XML ........................................................................................ 2-105 XML Terminology................................................................................... 2-105 Well-formed XML............................................................................. 2-105 The DTD ............................................................................................ 2-105 Valid XML......................................................................................... 2-106 1-16 Elements in XML............................................................................... 2-106 Attributes in XML ............................................................................. 2-106 Extensible Stylesheet Language (XSL) ............................................. 2-106 XML Support in Sentences ........................................................................ 2-107 Export Sentences schema to XML............................................................. 2-107 Output options for XML export of schema ....................................... 2-108 XSL Stylesheet options for XML export of schema.......................... 2-109 XML data input and output methods........................................................ 2-110 Importing XML data.......................................................................... 2-110 Using the Query Editor ............................................................................ 2-111 Using Servlets .......................................................................................... 2-111 Using a servlet to access a generated DTD........................................ 2-111 Using a servlet to access XML .......................................................... 2-112 Adding parameter values to servlet requests ..................................... 2-113 XML import using a servlet............................................................... 2-116 Stylesheet Processing......................................................................... 2-117 XML Import and triggers................................................................... 2-118 XML Import in multi-user environments .......................................... 2-118 XML Import and derivations ............................................................. 2-118 Mapping XML Data........................................................................... 2-118 Action attributes................................................................................. 2-119 Using command line tools ....................................................................... 2-120 XML Export using the command line ............................................... 2-120 XML import using the command line................................................ 2-121 Online importing................................................................................ 2-122 Using the Sentences API.......................................................................... 2-122 Using alternative parsers and stylesheet processors .......................... 2-123 Sentences XML conventions....................................................................... 2-123 Use content, not attributes........................................................................ 2-123 Associations appear as child elements..................................................... 2-124 Mixed content is not allowed ................................................................... 2-124 Derived element type names .................................................................... 2-125 Split multiple lines ................................................................................... 2-125 Allow the action attribute......................................................................... 2-126 Include Sentences IDs.............................................................................. 2-126 Combining simple elements..................................................................... 2-126 Using Element IDs................................................................................... 2-127 Setting XML options in the Query Editor ................................................ 2-127 1-17 Chapter 9, Sentences diagrams .................................................. 2-129 The Diagram Editor .................................................................................... 2-129 Starting the Diagram Editor ..................................................................... 2-129 Diagram Editor components .................................................................... 2-130 Toolbar............................................................................................... 2-131 Schema tree........................................................................................ 2-132 Canvas................................................................................................ 2-132 Diagram Editor preferences ..................................................................... 2-132 Diagram elements........................................................................................ 2-134 Diagram element types ...................................................................... 2-134 Adding diagram elements .................................................................. 2-135 Adding annotations, titles and legends .............................................. 2-135 Selecting diagram elements ............................................................... 2-136 Deleting diagram elements ................................................................ 2-136 Moving diagram elements ................................................................. 2-137 Consistency with Sentences Explorer................................................ 2-137 Adding Query Results................................................................................. 2-137 Exporting and importing diagrams........................................................... 2-138 Export................................................................................................. 2-138 Import................................................................................................. 2-138 Saving as a GIF file ........................................................................... 2-138 Printing......................................................................................................... 2-138 Chapter 10, Customising Sentences........................................... 2-141 Sentences API overview .............................................................................. 2-141 Comparing the Sentences Client API and Server API............................. 2-142 Example code and online documentation ................................................ 2-142 Program build and execution ................................................................... 2-143 API packages ........................................................................................... 2-143 Class hierarchy......................................................................................... 2-144 Triggers ........................................................................................................ 2-145 Server-side triggers .................................................................................. 2-145 Trigger examples ............................................................................... 2-146 Triggers and the Sentences API ............................................................... 2-147 Installing a trigger .................................................................................... 2-147 Attaching a trigger ................................................................................... 2-147 Trigger threading issues ........................................................................... 2-150 Trigger invocation.................................................................................... 2-151 1-18 Trigger actions ......................................................................................... 2-152 Customised validation (rules) .................................................................. 2-152 Customised actions .................................................................................. 2-152 Using triggers with import and export ..................................................... 2-153 Custom datatypes API ................................................................................ 2-153 Installing a custom datatype..................................................................... 2-154 Custom datatypes and import and export................................................. 2-155 Removing custom datatypes .................................................................... 2-155 Adding custom Help topic pages................................................................ 2-156 Help button display .................................................................................. 2-156 Precedence of Help pages.................................................................. 2-157 Updating Help topic mappings .......................................................... 2-157 Creating Help topic pages ........................................................................ 2-157 Creating a Help topic mapping file .......................................................... 2-157 Name and location of the Help mapping file..................................... 2-157 Mapping Sentences elements to a Help topic .................................... 2-158 Localisation notes ........................................................................................ 2-160 Localising Sentences system text............................................................. 2-160 Extracting the Messages.properties file ............................................. 2-160 Naming the translated messages file.................................................. 2-161 Example translated messages file ...................................................... 2-161 Directory location for the translated messages file............................ 2-161 Translating Sentences application text..................................................... 2-161 Chapter 11, Worked examples................................................... 2-163 The Human resources example application.............................................. 2-163 The Employee entity type ........................................................................ 2-164 The Group company entity type .............................................................. 2-165 The Project entity type ............................................................................. 2-165 CSV Import example .................................................................................. 2-165 Preparing a profile for the example CSV Import..................................... 2-166 Importing the example CSV files ............................................................ 2-167 Importing data for associations targeted on associations................... 2-168 Viewing the imported data....................................................................... 2-168 Adding image data ................................................................................... 2-170 Viewing additional data ........................................................................... 2-171 Restoring the original Human Resources profile..................................... 2-173 Repeating the CSV Import example ........................................................ 2-173 1-19 Derivations example.................................................................................... 2-173 Setting up the Order Entry example application...................................... 2-174 Importing the Order Entry example application ................................ 2-174 Making the RenameInstance trigger available................................... 2-174 Starting the Order Entry example application ......................................... 2-174 Order Entry base Dataform and custom Dataform .................................. 2-175 Base Dataform behaviour .................................................................. 2-177 Custom Dataform behaviour.............................................................. 2-179 The Order Entry query ............................................................................. 2-181 Page Nodes ........................................................................................ 2-182 Derivations......................................................................................... 2-183 Dataform Navigation ......................................................................... 2-184 The Picker applet for the Order Entry example ....................................... 2-187 Using the Picker applet to enter and update orders.................................. 2-187 Design assumptions used in the Order Entry example application.......... 2-189 Restoring the original Human Resources profile..................................... 2-190 Trigger examples......................................................................................... 2-190 Example trigger classes............................................................................ 2-191 Loading the example triggers................................................................... 2-191 Viewing enabled triggers ......................................................................... 2-192 Attaching triggers and editing trigger assignments ................................. 2-193 Refuse Update trigger example................................................................ 2-194 Refuse Update on deleting an Employee........................................... 2-195 The Refuse Update trigger with subsets and subtypes ...................... 2-198 Restoring the original Human Resources example application ......... 2-199 Email Address trigger example................................................................ 2-199 Rejecting incorrect values for email addresses.................................. 2-200 Restoring the original Human Resources example application ......... 2-203 Auto Number trigger example ................................................................. 2-203 Setting up the schema to use the Auto Number trigger ..................... 2-204 Demonstrating the Auto Number trigger........................................... 2-208 Cases in which the Auto Number trigger is not invoked................... 2-211 Using the Auto Number trigger when user entries are allowed......... 2-212 Restoring the original Human Resources example application ......... 2-213 Disabling the example triggers ................................................................ 2-213 Custom datatype example .......................................................................... 2-214 About datatype classes ............................................................................. 2-214 Loading the custom datatype example..................................................... 2-214 Checking the example custom datatype............................................. 2-214 1-20 Unloading the example custom datatype........................................... 2-215 Custom datatype example: TelecomsNumber ......................................... 2-216 Using the example custom datatype ........................................................ 2-216 Restoring the original Human resources example application .......... 2-221 Client API example ..................................................................................... 2-222 Preparing to run the demonstration.......................................................... 2-222 Using the Salary Update example............................................................ 2-222 Enabling Sentences Client API connections............................................ 2-223 Setting up the demonstration profile........................................................ 2-223 Creating a command file .......................................................................... 2-224 Demonstrating the Salary Update example.............................................. 2-225 Restoring the original Human Resources example application ............... 2-226 Integration with Microsoft Office applications ........................................ 2-226 Creating Mail merge letters from Sentences data .................................... 2-227 Exporting address data from Sentences ............................................. 2-227 Importing address data into Microsoft Word..................................... 2-229 Creating Mail merge emails from Sentences data ................................... 2-230 Exporting email data from Sentences ................................................ 2-230 Modifying the email data CSV file in Microsoft Excel..................... 2-232 Importing email data into Microsoft Word........................................ 2-232 Creating Microsoft Outlook Contacts from Sentences data .................... 2-234 Exporting Contacts data from Sentences........................................... 2-234 Modifying Contacts data in Microsoft Excel..................................... 2-236 Importing Contacts data into Outlook ............................................... 2-236 Configuring the new folder as an address book folder ...................... 2-238 Creating Sentences data from an Outlook Contacts folder ...................... 2-238 Creating a CSV file from Microsoft Outlook .................................... 2-239 Editing the Outlook CSV file for import into Sentences................... 2-239 Appendix A, Menus and Commands summary........................ 2-241 Sentences Explorer menus.......................................................................... 2-241 Sentences Explorer function keys .............................................................. 2-244 Dataform function keys .............................................................................. 2-244 Query Editor menus.................................................................................... 2-246 Query Editor function keys ........................................................................ 2-249 Diagram Editor menus ............................................................................... 2-249 Diagram Editor function keys.................................................................... 2-252 1-21 Appendix B, Statistics and analysis ........................................... 2-253 Viewing Sentences statistics ....................................................................... 2-253 Message statistics......................................................................................... 2-253 Open profile statistics ................................................................................. 2-254 Chapters statistics ....................................................................................... 2-256 Detailed chapter statistics ........................................................................ 2-257 Summary page ................................................................................... 2-257 Spatial view........................................................................................ 2-257 Block statistics ................................................................................... 2-258 Triple counts ...................................................................................... 2-260 Memory usage summary ............................................................................ 2-261 Chapter file analysis.................................................................................... 2-262 Server request statistics .............................................................................. 2-263 Glossary........................................................................................ 2-265 Index ............................................................................................. 2-275 1-22 Overview Welcome to the Sentences User’s Guide. This Overview chapter describes: • the key features of Sentences • new features introduced in this version • how to use the rest of this guide Unless otherwise noted in the text, this User’s Guide describes the Sentences Enterprise Edition. If you are using the Sentences Personal Edition, please refer to the Personal Edition Supplement which describes the differences between the Personal and Enterprise editions of Sentences. You can find a copy of the Personal Edition Supplement in the Doc\UserDocuments folder of your Sentences installation. Introducing Sentences Sentences™, produced by Lazy Software, is a database management system offering rapid Web-based business solutions. Sentences is based on the associative model of data, developed in Java and is optimised for intranet and Internet use. Sentences is available in the following editions: • Sentences Enterprise Edition, a commercial multi-user edition • Sentences Personal Edition, a non-commercial single-user edition for evaluation purposes only Sentences offers unparalleled ease of development and speed of deployment for Web based business solutions. The Sentences Enterprise Edition runs on a Web server as a Java servlet with client access through a conventional Web browser running a Java applet. Alternative client access is possible using XML, for example from HTML forms. The Sentences Personal Edition runs as a stand-alone Java application that does not require a separate server process. Key features The main features of Sentences include: • the associative database engine which provides a multi-user transactional capability for the Sentences database (see Chapter 2, “Introducing the associative model”, and Chapter 6, “Advanced techniques”) • configurable chapters and profiles allowing the flexible configuration of schema and data (see Chapter 5, “Working with Sentences”) 1-24 Overview • support for XML as a means of exchanging data with other systems (see Chapter 8, “Sentences and XML”) • the Sentences Explorer for the creation and maintenance of associative schemas and for browsing, searching and selecting data (see Chapter 5, “Working with Sentences”) • the Sentences Dataform user interface for the entry and maintenance of data (see Chapter 5, “Working with Sentences”) • a powerful associative query capability (see Chapter 7, “Sentences queries”) • Java APIs for the creation of custom-code Java applications (see Chapter 10, “Customising Sentences”) What’s new in Sentences Version 3.5 Sentences Version 3.5 includes a number of enhancements and improvements, which are listed below. Information on migrating your existing Sentences applications to Version 3.5 is given in the Sentences Installation Guide. Component installation and product licensing Sentences now ships with associated products for which separate license terms apply. Details of theses products, LazyView and Lazy Analytics, are given below. In addition, the Sentences Application Suite of example database applications is also shipped with Sentences. During installation, you can select which of these associated products you wish to install. Successful operation of Sentences and its associated products is dependent on the presence of a suitable License file. The License file is supplied to customers on payment of the appropriate license fee. The License file lists the licensed components and includes a digital key for verification. In the case of evaluation versions of Sentences the digital key also verifies the evaluation expiry date. If you choose to purchase additional components, Lazy Software supplies you with an updated License file. If you have any question regarding your License file, please contact Lazy Software Sales Administration (mailto:[email protected]). Please see the Sentences Installation Guide for more information about the License file and how to install Sentences optional components. 1-25 What’s new in Sentences Version 3.5 Password-protected chapter files You can define a password to protect a chapter file. Once you have assigned a password to a chapter file it can only be accessed when the password is entered. For more information see “Password-protected chapter files” on page 1-138. Transitive closure You can add a transitive closure operation to a query. This allows you to find all the instances of a transitive relation, such as the association type (Person, parent of, Person). For more information see “Transitive closure” on page 2-69. Automatic generation of entity instances You can define an entity type that has the names of its instances generated automatically by a trigger. For more information see “Instance name created by trigger” on page 1-178. Improvements to XSL Stylesheet generation There are more choices available for the automatic formatting of query results using XML stylesheets. For more information see “Query node XSL Stylesheet properties page” on page 285. Association instance retrieval control There is more control over the way association instances are retrieved from the database. For more information see “Retrieval Methods properties page” on page 1-212. Diagram Editor Sentences Version 3.5 introduces a diagram editor which enables graphical representations of Sentences schema and data. For more information see Chapter 9, “Sentences diagrams”. 1-26 Overview Using metatypes You can now select a metatype as the target of an association type. For more information see “Metatypes” on page 1-163 Symmetric property for association types There is a new property, Symmetric, for association types. This property indicates that the relationship between the source and the target of an association is exactly the same as the relationship between the target and the source. For more details see “Symmetric” on page 1-162. Export of schema as XML You can export a Sentences schema to XML. For more details see “Export Sentences schema to XML” on page 2-107. Lazy Analytics OLAP tool Sentences Version 3.5 includes an online analytical processing (OLAP) interface, Lazy Analytics, as an optional additional component. Lazy Analytics requires the payment of an additional license fee. Please see the Lazy Analytics Guide for full details of how to use this tool. Enhancements to the LazyView tool An enhanced version of the database aggregation tool LazyView is available with Sentences Version 3.5. LazyView requires the payment of an additional license fee. Please see the LazyView Guide for full details of how to use this tool. How to use this guide The Sentences User’s Guide is published in two volumes. Chapters 1 to 6 are in Volume 1 and chapters 7 to 11 and the Appendices are in Volume 2. The Table of Contents and the Index appear in both volumes. For a rapid introduction to Sentences see the Sentences Tutorial, which is available as a printed book, a PDF file, and directly from the Help menu. 1-27 Document conventions If you are responsible for installing Sentences, please see the Sentences Installation Guide. If you are responsible for configuring and deploying Sentences, read Chapter 1, “Configuring Sentences”. If you are new to Sentences and the associative model of data, you should start by reading Chapter 2, “Introducing the associative model”. If you have worked with other database products you should find the first part of Chapter 3, “Database modelling in Sentences” useful as well. Continue with Chapter 4, “The Sentences Quick Tour” and Chapter 5, “Working with Sentences”. Refer to other chapters as necessary. If you have used earlier versions of Sentences, you should first look at the section “What’s new in Sentences Version 3.5” on page 1-24 in this chapter. If you have not used Sentences Version 3.0 you should also read Chapter 5, “Working with Sentences”, Chapter 7, “Sentences queries”, and Chapter 8, “Sentences and XML”. Chapter 9, “Sentences diagrams” is a new addition for Sentences 3.5. If you are an experienced application developer read the second part of Chapter 3, “Sentences user interface design options” on page 1-90. You should then look at Chapter 6, “Advanced techniques”, Chapter 10, “Customising Sentences”, and Chapter 11, “Worked examples”. You may also want to consult the \Doc and \Examples directories of your Sentences installation for additional online information for developers. At the end of this guide there is an Appendices section which contains lists of menus and commands, information on server statistics, and a Sentences glossary. A copy of this User’s Guide and of the Sentences Tutorial are available as Adobe Acrobat PDF files in the \Doc\User Documents directory of your Sentences installation. An online Help system and an online copy of the Tutorial are accessible from the Sentences Help menu. Document conventions Lazy Software product documentation uses the following phrases: • Type in means to enter data with your keyboard • Press means press a key on your keyboard • Click means move your mouse pointer over a button or other item on the screen and press once on the primary button on your mouse (usually the left button if you are right-handed). 1-28 Overview • Double-click means move your mouse pointer over a button or other item on the screen and press twice rapidly on the primary button on your mouse (usually the left button if you are right-handed). • Right-click means move your mouse pointer over a button or other item on the screen and press once on the secondary button on your mouse (usually the right button if you are right-handed). • Shortcut menu means the pop-up context menu displayed when you right-click (click with the secondary button) on an object. This document uses the following typographical conventions: • Names of menus, commands, dialogs, and fixed elements in Sentences are shown in boldface font. For example: the All Types folder the Expand node command on the View menu the Properties toolbar button. • Names of actual files and directories are shown in monospaced font. For example: the Human resources data.chap file. The monospaced font is also used for examples of batch file, HTML and Java code, and for commands to be entered at a command prompt. • When a command line, or a line of code in a batch file, HTML file or Java file cannot be displayed on one line in this book, the symbol § is used to indicate that the line has been split for display in this book only. You should type in the lines of code in this book as one line in the file or command. • All user-created schema and data elements in examples of the Sentences database (association types, entity types, associations, and entities) are shown in a sans serif font. The verb of an association type or association is shown in sans serif italics. Nested associations are enclosed in parentheses for greater clarity. For example: Person Project Person, assigned to, project (Louise East, assigned to, Pisces), starting date, 25th March 2000 The sans serif font is used for the data and schema items you create in examples of the Sentences database and for error messages that are displayed in the Message Log. 1-29 Your comments Your comments We welcome your comments on this User’s Guide. Please let us know how it has helped your work with Sentences or how you would like to see it improved in the future. Please email your comments to: [email protected] or write to: The Documentation Group Lazy Software Ltd. Mercury Park Wycombe Lane Wooburn Green Buckinghamshire HP10 0HH United Kingdom 1-30 Overview Chapter 1 Configuring Sentences This chapter explains how to set-up and configure a Sentences installation. It is designed primarily for system administrators. The topics covered in this chapter include: • licensing • configuring Sentences • shutting down and restarting the Sentences server • backing up and restoring your data • security considerations • servlet access to Sentences • uninstalling Sentences For information on system requirements and installation procedures, please see the Sentences Installation Guide. Sentences editions and components Sentences is available in an Enterprise Edition and in a Personal Edition. The Enterprise Edition has two software components, a server and a client. The server component (the “Sentences server”) runs as a Java servlet under a Web server. The Web server must be running a compatible servlet container (previously known as a servlet engine) in order to run the Sentences server. You need to have the appropriate level of authorisation for your system in order to install Sentences. The client component (the “Sentences client” or “Sentences applet”) runs as a Java applet in a Web browser and communicates with the server using HTTP over TCP/ IP. It is also possible to configure Sentences to use the secure HTTPS protocol. More information is available from Lazy Software Technical Support (mailto:[email protected] ). You must install an appropriate version of the Java runtime Plug-in for your browser either before running the Sentences client, or when it is first run on each machine, but apart from this there is no installation on the client. 1-32 Configuring Sentences You can run the Enterprise Edition in Web mode with the server and client on different machines, or in local mode, with the server and client on the same physical machine (see “Running the Enterprise Edition on a single computer” on page 1-66). The Personal Edition is a stand-alone Java application that does not require a separate server process. The Personal Edition cannot communicate with other clients or servers and is designed for evaluation use on one computer only. It is not licensed for commercial use of any kind. The Personal Edition can be downloaded from the Lazy Software Web site. If you are using the Personal Edition, please make sure you read the Personal Edition Supplement, which can be found in the \Doc\UserDocuments folder of your Sentences installation. A range of additional components are available with Sentences Version 3.5. • LazyView The Sentences LazyView tool enables you to view data in one or more relational databases alongside data from Sentences chapters in one integrated view. • Lazy Analytics The Lazy Analytics OLAP engine allows you to dynamically retrieve data from your Sentences database and analyse it using the PivotTable feature in Microsoft Excel 2000 or Microsoft Excel XP. • Application Suite The Sentences Application Suite is a set of modular applications that introduce Sentences’ features and showcase its potential. The applications within the suite centre on core business functions, and use both the native Sentences Explorer interface and additional custom HTML and applet interfaces. For information about the requirements and installation of each of these additional components, please see the Sentences Installation Guide. For information about using each of these components, please see the separate guides provided in the <Sentences_home>/Doc/UserDocuments directory. Sentences licensing Sentences Enterprise Edition is supplied in accordance with a license agreement which governs your use of the product. Please see your license agreement for further details. 1-33 Configuring Sentences Sentences Personal Edition is distributed free of charge for evaluation purposes only. The Personal Edition is not licensed for any commercial use whatsoever. You must have a License file to run Sentences. For more details see the Sentences Installation Guide. Personal Edition users should refer to the Personal Edition Supplement. Please see the Lazy Software Web site (http://www.lazysoft.com) for more details about obtaining the Sentences Personal Edition. Configuring Sentences The Sentences Version 3.5 installer installs the Tomcat Web server to host Sentences as a Web application, according to the guidelines of the Java 2 Platform Enterprise Edition (J2EE) specification. On Windows platforms, the Sentences installer creates an HTML page LaunchSentences.html, with a shortcut from your Windows desktop, which can be used to start and stop Tomcat and to run Sentences client in local mode. On all platforms the Tomcat Web server installed by Sentences can be started and stopped by running the StartTom and StopTom commands in the <Sentences_home> directory. If you wish to run Sentences with any Web server other than the default Tomcat installation you must configure your environment before running Sentences. If you are using a J2EE compliant Web server you can install Sentences using the Web archive (WAR) file sentences.war supplied in the Sentences installation. With other servers you may need to set up your directory structure manually. Depending on the particular circumstances of your installation you may need to set up virtual directories on your Web server and edit the start-up properties in the Server.properties file and the Sentences.html file. For detailed information please see the Sentences Installation Guide. The Sentences Personal Edition runs as a Java application and does not require a separate Web server. The start-up properties for the Personal Edition are set in the Server.properties and Application.properties files. For further information please see the Personal Edition Supplement. Sentences installation directories The following list shows the directories created by the installation procedure for the Sentences Enterprise Edition, with descriptions of the directories and files which are 1-34 Configuring Sentences important for Sentences users. The initial installation of Sentences includes all the directories and files required for Tomcat 4.1, a J2EE compliant Web server. An exhaustive description of the directories and files required by Tomcat is beyond the scope of this User’s Guide. In this guide the term <Sentences_home> refers to the main Sentences server installation directory. This is the directory selected during installation and specified in the InstallPath parameter in the Server.properties file. The default location for the Sentences server installation directory on Windows platforms is C:\Program Files\Lazy\Sentences35 The default location for the Sentences server installation directory on Solaris, Linux, and AIX systems is /usr/local/Lazy/Sentences35 All the data files required by a default installation of Sentences, including the files required by optional components, are in the <Sentences_data> directory and its subdirectories. This directory is also specified during installation. The default location for <Sentences_data> on Windows platforms is C:\SentencesData35 The default location for <Sentences_data> on Solaris, Linux, and AIX systems is /usr/local/Lazy/SentencesData35 The default locations for Sentences chapters (referred to in this guide as <Sentences_chapters>) and for Sentences images (referred to in this guide as <Sentences_images>) are subdirectories of <Sentences_data>. The <Sentences_chapters> location is the first directory listed in the ChapterPathList parameter in the Server.properties file. • <Sentences_chapters> The default location for the Sentences chapters directory on Windows platforms is: C:\SentencesData35\Chapters The default location for the Sentences chapters directory on Solaris, Linux, and AIX platforms is: /usr/local/Lazy/SentencesData35/Chapters During the installation procedure you can choose a different location for the chapters directory. You can specify additional directories for chapters in the ChapterPathList and choose different directories for the 1-35 Configuring Sentences SystemChapterPath and TempChapterPath properties in the Server.properties file (see “The Server.properties file” on page 1-43). This directory is used by the Sentences server and is not accessed directly by Web users. Make sure that the file system security permissions for this directory are set so that the Java process running the Sentences server is able to create, read and write files within the Chapters directory. • Default contents of the chapters directory By default, the chapters directory contains the system chapters, Metaschema.chap and Profiles.chap, which are used internally by Sentences and which must not be changed. The system chapter Profiles.chap has a special status in all Sentences sessions as it is used to store profiles and other configuration data. It must not be used as a changes chapter for user updates. If you have installed Lazy Analytics, this directory includes the system chapter Lazy Analytics.chap The Examples subdirectory of the chapters directory contains the chapter files for the Human resources example application, and further subdirectories containing chapter files for Lazy Analytics and for the Application Suite examples, if these are installed. • <Sentences_images> The default location for the Sentences images directory on Windows is: C:\SentencesData35\Images The default location for the Sentences images directory on Solaris, Linux, and AIX platforms is: /usr/local/Lazy/SentencesData35/Images During the installation procedure you can choose a different location for this directory. This is the physical location in which any images referenced in your Sentences database can be stored. This directory is used by the Web server to deliver images to clients and for this reason it has a virtual directory mapping in Tomcat (ImagesforSentences). • <Sentences_home> This is the main Sentences installation directory. This directory contains the batch files for starting and stopping Tomcat, running import and export, backup and restore and other procedures, the LaunchSentences.html file and the release notes file (ReleaseNotes.html), and the Server.properties file. 1-36 Configuring Sentences The Sentences License file SentencesLicense.txt is also placed in this directory. • <Sentences_home>\Datatypes This directory is the default location for any custom datatypes. It is referenced by the DatatypePath property in the Server.properties file. Any custom datatypes that are compiled into Java archive (JAR) files which are placed in this directory are automatically available to Sentences. • <Sentences_home>\Doc This directory contains extensive Sentences documentation for application developers and users. You can access detailed information on the Sentences API, and also access the Sentences Tutorial and Sentences User’s Guide, by opening the file index.html in your Web browser. • <Sentences_home>\Examples\Chapters This directory contains backup copies of the system chapter Profiles.chap and the chapter files for the Human resources example application. It also contains an additional file used in the AutoNumber trigger example in Chapter 11, “Worked examples”, and backup copies of chapter files used by the Application Suite. • <Sentences_home>\Examples\com <Sentences_home>\Examples\CSVImport <Sentences_home>\Examples\Derivations <Sentences_home>\Examples\ExistingDatatypes <Sentences_home>\Examples\HTML <Sentences_home>\Examples\Jars This group of subdirectories contains various files that are referred to in Chapter 11, “Worked examples”. The Examples\ExistingDatatypes subdirectory contains the source code for the datatypes included in Sentences. The Examples\HTML directory contains examples of HTML pages for the Dataform applet (see “The Dataform applet” on page 1-231), the Picker applet (see “The Picker applet” on page 1-239), and the Query applet (see “The Query applet” on page 1-244). The Examples\HTML directory also contains two example HTML files (named Java_1.3.1_Sentences.html and Java_1.4.1_Sentences.html) that can be used to start Sentences with specified versions of the Java runtime 1-37 Configuring Sentences environment. These files may be used instead of the default Sentences.html file. These files are useful when users have more than one copy of the JRE installed and wish to run Sentences with a version of the JRE which is not the default version for their system. For more information please see the Sentences Installation Guide. • <Sentences_home>\Licences This directory contains the text of the Sentences License Agreement (SentencesLicenseAgreement.txt) and the text of the license agreements pertaining to software produced by the Apache Software Foundation and included with Sentences. The Sentences License file that is needed to activate Sentences is not placed in this directory, but in <Sentences_home> . • <Sentences_home>\resources This directory contains the images used by Sentences to display the LaunchSentences.html page and other HTML pages. This directory also contains the lazystart.bat file and lazystart.sh file (for Windows and Solaris, Linux, or AIX platforms respectively). These files contain scripts for invoking the Sentences server-side utilities. For more information see “The lazystart script file” on page 1-48. This directory also contains script files that can be used to import the chapter and profile definitions for the optional Sentences components, Lazy Analytics and the Application Suite. Usually these chapter and profile definitions are created as part of the installation process. However, if you install the Sentences server on the IBM iSeries you need to run these scripts. You can also run these scripts if you have restored the default profiles database by copying the Profiles.chap file from <Sentences_home>\Examples\Chapters. • <Sentences_home>\Stylesheets This directory contains sample XSL stylesheets used to transform XML data exported from Sentences. Additional XSL and XSLT files required for your Sentences applications should be added to this location, or to a sub-directory of it. If you change the location of the files in this directory you must update the StylesheetURLBase property in the Server.properties file. For more information about XSL stylesheets in Sentences, see Chapter 8, “Sentences and XML”. 1-38 Configuring Sentences If you have installed the Application Suite, this directory also includes a subdirectory named \ApplicationSuite which contains the stylesheets used by the Application Suite examples. • <Sentences_home>\Tomcat4 This directory contains all the files and directories required for the Tomcat Web server, which conforms to the J2EE specifications. Sentences and the Sentences Application Suite examples are installed as web applications under this Tomcat server. • <Sentences_home>\Tomcat4\webapps This directory includes Web archive (WAR) files for Sentences and for the Application Suite example programs. If you wish to run Sentences with any other J2EE compliant Web server you can use the WAR files from this directory. The following paragraphs describe the sub-directory structure for Sentences. The pattern of sub-directories for each of the Application Suite examples are similar. • <Sentences_home>\Tomcat4\webapps\Sentences This is the top-level directory for Sentences. It contains all the files that need to be accessed by the Sentences client, such as the Sentences.jar archive file, and Sentences.html start page. If you create any customised message files they must be put into this directory as well as into the WEB-INF\classes subdirectory. This directory contains the example Swiss German messages file, Messages_de_CH.properties (see “Localisation notes” on page 2-160). If you create any customised Help topic HTML pages you must place them, along with the Help topics mapping file, in this directory (see “Adding custom Help topic pages” on page 2-156). This is also the parent directory for Sentences online Help and online Tutorial. • <Sentences_home>\Tomcat4\webapps\Sentences\WEB-INF This is the directory for all the files that need to be accessed by the Sentences server. This directory has two sub-directories, classes for individual Java files, and lib for Java archive files. • <Sentences_home>\Tomcat4\webapps\Sentences\WEB-INF\classes This directory contains individual Java code class files that need to be accessed by the Sentences server. If you create any customised message files they must be put into this directory as well as into the webapps\Sentences parent directory. This directory contains 1-39 Configuring Sentences the example Swiss German messages file, Messages_de_CH.properties (see “Localisation notes” on page 2-160). • <Sentences_home>\Tomcat4\webapps\Sentences\WEB-INF\lib This directory contains compiled Java code archive files (JAR files) that need to be accessed by the Sentences server. These include the SentencesServer.jar file, as well as xalan.jar, xerces.jar and xml-apis.jar. • <Sentences_home>\Trace This directory is the default location for any Sentences server trace files. It is referenced by the TracePath property in the Server.properties file. The file system security permissions for this directory must allow the servlet container process create, read and write access to files within the directory. If the trace directory does not exist, the Sentences servlet attempts to create it. You must either create the directory manually, or set the file system security permissions for the directory containing the trace directory to allow the servlet process to create it. A trace file is created each time the Sentences server starts. You can delete these files manually when they are no longer required. • <Sentences_home>\Triggers This directory is the default location for any triggers. It is referenced by the TriggerPath property in the Server.properties file. Any triggers that are compiled into Java archive (JAR) files which are placed in this directory are automatically available to Sentences. • <Sentences_home>\Uninstaller This directory contains files used for uninstalling Sentences. Configuring Sentences with non-J2EE Web servers If you wish to install Sentences with a non-J2EE Web server you will need to create a directory structure that includes a WebApplication directory and a Server directory under your <Sentences_home> location. The web server needs to define a virtual directory that is set to this WebApplication directory. We recommend using the mapping name /Sentences. The WebApplication directory needs to contain all the files that are accessed by the Sentences client, including those listed above under the webapps\Sentences directory. 1-40 Configuring Sentences The Server directory needs to contain all the files that are accessed by the Sentences server, including those listed above under the webapps\Sentences\WEB-INF directory. File system permissions The following table summarises the file system permissions required for the component directories of a Sentences installation: Component directory Permissions required <Sentences_chapters> The Java process running Sentences server must have permission to create, read and write files in this directory. If you have more than one location for chapter files the Java process must have permissions for all the locations. <Sentences_home>\Trace The Java process running the Sentences server must have permission to create, read and write files in this directory. If this directory does not exist, the Java process running the Sentences server must have permission to create it. Virtual directories When you install Sentences with the default Tomcat Web server, Tomcat creates virtual directories for two specific locations, <Sentences_images> (by default this is SentencesData35\Images) and for the Web application directory (by default this is <Sentences_home>\Tomcat4\webapps\Sentences). The Sentences.html file refers to the <Sentences_images> location by using the ImageURLBase parameter with the name the name ImagesForSentences (see “About the ImageURLBase parameter” on page 1-41). If you use Sentences with any Web server other than the default Tomcat Web server you must create virtual directories on your Web server for these two locations. Please refer to the documentation for your Web server for instructions on how to do this. Note The documentation for some Web servers (for example the Apache HTTP server) refer to virtual directories as aliases. 1-41 Configuring Sentences If you want to allow users to access the Sentences User’s Guide and Sentences Tutorial you can also create a virtual directory for their location on the server which is <Sentences_home>\Doc\UserDocuments. About the ImageURLBase parameter The Sentences Enterprise Edition client is a Web-based application that does not use the local file system. This means that references to external files such as image files need to be resolved to fully qualified (absolute) URLs. Image instances are defined in the Sentences database using a string representation of the appropriate file name or URL. Any full URL entered is referenced independently of the ImageURLBase parameter. Any non-URL file name entered is combined with the value of ImageURLBase to create a full URL. As part of the Sentences initial installation, the Images subdirectory, created in the <Sentences_data> location you chose, is automatically configured as a virtual directory named ImagesForSentences. The ImageURLBase parameter is set to refer to this virtual directory. In general for the Enterprise Edition when the value of ImageURLBase starts with / images from the default location must be served by the same Web server which is serving Sentences. That Web server must serve the images in response to a request of the form http://<hostname:portnumber>/<ImageURLBase>/<image name>, where hostname and portnumber are derived from the codebase from which the Sentences applet JAR file is loaded. Where ImageURLBase does not start with / the default image location can be served by any URL. In this case images must be readable on the client using a URL of the form ImageURLBase/image name. For the Enterprise Edition this kind of configuration typically uses a second web server as the default image source and ImageURLBase takes the form http://imageWebHost/ imageVirtualDirectory, where imageWebHost is the host, with optional port specifier, and imageVirtualDirectory is a logical name mapped by the web server to the images directory. Port numbers The Sentences server is configured to listen for server requests (from the Sentences applet to the Sentences servlet) on a specific port number, and to listen for shutdown requests on a different specific port number. By default these port numbers are 8090 and 8095 respectively. During installation, users who select the Custom 1-42 Configuring Sentences installation option can specify alternative port numbers to be used by the Sentences server. Changing port numbers If you need to change the port numbers used by the Sentences server you must edit the references to port numbers in specific files, listed below. If you have installed the Applications Suite or Lazy Analytics there are additional references that must be edited. You must always shut down the Sentences server before making any changes to the port numbers and restart it afterwards for the changes to have effect. • References to the shut-down port, for all installations References to the shut-down port number are in: <Sentences_home>/Tomcat4/conf/server.xml • References to the request listener port, for all installations References to the request listener port number are in: <Sentences_home>/LaunchSentences.html <Sentences_home>/Tomcat4/conf/server.xml • Additional references to the request listener port, for installations with the Application Suite Additional references to the request listener port number are in: <Sentences_home>/resources/createAppSuiteChapters.xml <Sentences_home>/resources/createAppSuite.xml <Sentences_home>/Tomcat4/webapps/Ideas/WEB-INF/web.xml <Sentences_home>/Tomcat4/webapps/CAS/WEB-INF/web.xml • Additional references to the request listener port, for installations with Lazy Analytics Additional references to the request listener port number are in: <Sentences_home>/resources/createLazyAnalyticsChapters.xml <Sentences_home>/resources/createLazyAnalytics.xml <Sentences_home>/Tomcat4/webapps/Analytics/WEB-INF/web.xml <Sentences_home>/Tomcat4/webapps/Analytics/ AsmodXMLAProvider.jsp Support for configuring environments for Sentences Lazy Software Technical Support maintains the list of currently supported configurations for Sentences and can advise you on setting up your environment. 1-43 Sentences configuration files For further information, please contact Lazy Software Technical Support (mailto:[email protected]). Sentences configuration files This section describes the files that you can edit to configure Sentences Enterprise Edition. They are Server.properties, lazystart.bat (or lazystart.sh), Sentences.html, and LaunchSentences.html. The Server.properties file The Server.properties file defines start-up conditions for the Sentences Enterprise Edition. Some of the initial settings of these conditions are based on the responses you give to prompts during installation. If you change the locations of directories and files referenced in this file you must edit the Server.properties file to change the references. Always use a plain text editor to edit the Server.properties file and always save the file as plain text. Windows users should note that the directory paths in the Server.properties must use two backslashes ‘\\’ instead of a single backslash as a delimiter in directory paths on Windows systems. This is because these directory paths are interpreted by a Java program. The settings for the installation directory and the Chapter and Image directories, are taken from your responses to the installation prompts. If you later move these directories you should edit these settings, as well as adjusting your Web server settings. If you make changes to the Server.properties file while the Sentences server is running your changes take effect only after you stop and restart the server. Standard Server.properties settings You can set the following properties in the Server.properties file: • InstallPath This property stores the location of your Sentences directory. The InstallPath property is set from your response to the installation prompts. This location is known as <Sentences_home>. • ChapterPathList This property stores a list of locations for your Sentences chapters as fullyqualified directory pathnames. The entries in this list refer to the location you selected for <Sentences_data> during Sentences installation. The default 1-44 Configuring Sentences entries in this list are as follows: <Sentences_data>\Chapters (for user-created chapters) <Sentences_data>\Chapters\Examples (for the Human resources example chapters) <Sentences_data>\Chapters\Examples\ApplicationSuite (for the Application Suite example files - not listed if the Application Suite is not installed) <Sentences_data>\Chapters\Examples\LazyAnalytics (for Lazy Analytics example files - not listed if Lazy Analytics is not installed) You can add additional locations for chapter files to this property setting by entering fully-qualified pathnames. Separate the entries with the appropriate delimiter character for your system (a colon “:” for Solaris, Linux, or AIX and a semi-colon “;” for Windows). If you type in more than one location for this property, then Sentences uses the first entry as the default location. • SystemChapterPath This is an optional property that stores the location of your system chapters Profile.Chap and Metaschema.Chap as a fully-qualified pathname. If the SystemChapterPath property is not set, Sentences uses the default location from the ChapterPathList property. • TempChapterPath This is an optional property that stores the location for your temporary chapter files as a fully-qualified pathname. If the TempChapterPath property is not set, Sentences uses the default location from the ChapterPathList property. • BackupPath This property stores the location of the directory for any backup files created by the Online Backup procedure (see “Online backup” on page 1-61). • TracePath This property stores the location of the directory for any server trace files. The TracePath property is set by default as a subdirectory of the installation directory. • TraceLevel Use the TraceLevel property to select the kinds of events you wish to record in your trace file (see “Using trace files” on page 1-64). 1-45 Sentences configuration files • DefaultImageURLBase This property specifies a default URL base for images which is used when no other URL base is specified by the client. In particular this image URL base is used by the XML Export process when automatically generating an XSL stylesheet. In the Sentences Enterprise Edition this parameter is set to / ImagesforSentences. For more information see “About the ImageURLBase parameter” on page 1-41. • ProfileTimeout This property sets the inactive timeout period, in seconds, for opened profiles. The default setting for the ProfileTimeout property is 3600 (1 hour). This property may affect whether data changes at the client can be saved. If a user changes data at the client and does not save the changes to the server and the client remains inactive for this amount of time then the data change on the client may be lost, as it cannot be saved once the profile has timed out. • PendingTimeout This property sets the inactive timeout period, in seconds, for opened pending data results. The default setting for the PendingTimeout property is 600 (10 minutes). The PendingTimeout property is used for example with the More… prompt in the Sentences Explorer and for temporary XML results. • ChapterTimeout This property sets the inactive timeout period, in seconds, for an update waiting to lock a chapter. The default setting for the ChapterTimeout property is 20 seconds. • BackupTimeout This property sets the inactive timeout period, in seconds, for a backup waiting to lock a chapter. The default setting for the BackupTimeout property is 20 seconds. • CacheSize This property sets the maximum amount of memory, in megabytes, used to cache data for all chapter files using a shared memory buffer. The default setting for the CacheSize property is 20 megabytes. 1-46 Configuring Sentences • BlockSize This property defines the default block size that is used for new Sentences chapter files. For best performance, the Sentences block size should be a multiple or submultiple of the underlying operating system block or cluster size. The default value for this parameter is 64Kb which is the recommended value for Windows systems. The BlockSize parameter can be adjusted for an individual chapter by exporting and importing the chapter and specifying a value for the -blocksize option switch when importing (see “Server request statistics” on page 2-263). • TempBlockSize This property defines the default block size that is used for temporary query result chapters. The default value for this parameter is 16Kb • TriggerPath This property specifies the directory which holds the JAR (Java archive) files containing trigger classes. • DatatypePath This property specifies the directory which holds the JAR (Java archive) files containing custom datatype classes. • StylesheetURLBase This property sets the location for XSL and XSLT stylesheets used by Sentences. This property must refer to a URL which may be local or external. • XMLParserClass This property sets the class name of the XML parser used by Sentences when importing XML documents whenever a parser other than the default is required. The default parser is org.apache.xerces.parser.SAXParser. • MaxLogSize This property defines the maximum size for the log files that Sentences creates for open chapter files (see “Sentences log files” on page 1-65). The default value is 20MB. This could be reduced if disk space is limited, but very small values may adversely affect performance. This property is optional. • Class names for possible JDBC drivers If LazyView is installed and licensed, you may use this property to list class names for possible JDBC drivers The driver names listed here appear as prompts 1-47 Sentences configuration files on the Connection properties dialog for a LazyView chapter. Separate multiple entries with a semi-colon (“;”). For example: JdbcDrivers=oracle.jdbc.OracleDriver For more information about LazyView see the LazyView User’s Guide. • Example JDBC connection strings If LazyView is installed and licensed, you may use this property to list connection strings for possible JDBC-compatible databases. The connection string names listed here appear as prompts on the Connection properties dialog for a LazyView chapter. For example: JdbcConnection1=jdbc:oracle:thin:@<host>:<port1521>:<sid> For more information about LazyView see the LazyView User’s Guide. • LazyViewCacheTime If LazyView is installed and licensed, you may use this property to specify a default cache timeout for all LazyView connections. The time is defined in seconds and the default value is 10. LazyView always checks for data in the cache before retrieving information from the database. If this parameter is set to 10, then if a requested data item is in the cache and is less than 10 seconds old the cached data is used and new data for this item is not retrieved. For more information about LazyView see the LazyView User’s Guide. Servlet access properties The Server.properties file includes a series of properties which grant access to different Sentences servlets. If access to any of these servlets is granted in the Server.properties file, the servlet is available to all users. If you need to provide additional restrictions on servlet access you must use the security features of your Web server. For more information about servlet access to Sentences see “Servlet access to Sentences” on page 1-75. Statistics properties There are two optional properties which you may add to the Server.properties file for recording the number of requests made to the Sentences server (see “Server request statistics” on page 2-263). These properties are: 1-48 Configuring Sentences • StatisticsPath This property specifies the directory location in which statistics files are placed. Statistics files have the name format Statisticsxxx.txt (where xxx represents a timestamp). There is no default setting for this property. If this property is not set, statistics files are not created. • StatisticsPoll This property specifies the time interval, in seconds, for which the number of server requests is recorded. The default setting for this property is 300. The lazystart script file The <Sentences_home>\resources directory contains the lazystart script file (named lazystart.bat on Windows systems and lazystart.sh on Linux, Solaris and AIX systems). This file contains a script used for starting various Sentences server-side utilities such as Import and Export, which require explicitly specified Java classpaths. The lazystart script file uses variables to simplify the specification and modification of Java classpaths. If you want to change any of these variables you may edit the lazystart script file. Always use a plain text editor to edit the file and always save the file as plain text. The commands and variables listed in the file are as follows: • SENTENCES_HOME This variable stores the location of your Sentences home directory. The default value is taken from the location you selected when you installed Sentences. • LAZY_JAVA_HOME This variable stores the location of the Java home directory used by Sentences. The default value is taken from the Java Virtual Machine location you selected when you installed Sentences. • Java Execution command This section defines the Java execution command. • Classpath elements This property is used to set the classpath used in the Java execution command. Please see the section “Using the classpath argument” on page 1-49 for more detailed information. 1-49 Sentences configuration files The classpath setting includes the JAR files used by Sentences Enterprise Edition, which in the default installation of Sentences are in the <Sentences_home>\Tomcat4\webapps\Sentences\WEB-INF\classes directory and they are: SentencesServer.jar xalan.jar xerces.jar xml-apis.jar The JAR files used by Sentences Personal Edition are all in the <Sentences_home> directory and they are: SentencesPE.jar xalan.jar xerces.jar xml-apis.jar If you move or delete any of these JAR files from the default installation of Sentences with Tomcat you must edit this section of the lazystart script file to use the changed paths. • JVM_OPTS This property sets Java Virtual Machine options for server-side utilities, such as the Java memory parameters. The memory parameters are in the format: -Xmx128m -Xms64m where -Xmx specifies the maximum system memory that can eventually be used, (shown here with the example value 128m meaning 128MB), and -Xms specifies the initial amount of memory to be allocated (shown here with the example value 64m meaning 64MB). For more information refer to the appropriate Java documentation from Sun Microsystems. If you chose the Custom installation option, the default settings are taken from the values you specified during installation. Using the classpath argument The term classpath has two uses, and this may cause some confusion. CLASSPATH is an operating system environment variable, and -classpath (abbreviated -cp) is a command-line argument for Java. • -classpath (or -cp) Whenever a Java program is run the Java Virtual Machine must find all the classes which are required, or the program fails. Classes are found using the classpath which specifies a list of JAR files and directories to be searched for class definitions. 1-50 Configuring Sentences Sun Microsystems recommend setting a classpath on the Java command line, using the -cp or -classpath arguments, and this recommendation is followed in the lazystart program. • CLASSPATH If a classpath is not supplied on the command line Java programs use the environment variable CLASSPATH instead. In some cases start programs for Java may include this setting on the classpath used to run Sentences. Loading some publicly available JAR files can lead to the Sentences server failing to start, depending on the installed JAR files and on how the CLASSPATH for Sentences is determined (typically this is controlled by your servlet container configuration). To avoid these problems Lazy Software recommends that the you should not set the system wide variable CLASSPATH for users who run the Sentences server. The LaunchSentences.html page The Sentences installation directory contains an HTML file named LaunchSentences.html. On Windows systems, this file can be used to stop and start the Tomcat server for Sentences. On all systems, this file can be used to run a local Sentences client, and to access user documentation. This page also contains a link that can be used to launch example applications for the optional components Application Suite and Lazy Analytics (if these are installed). You can customise the LaunchSentences.html page to create a suitable starting point for the users on your system. The Sentences.html start page The Sentences.html file contains the HTML code that invokes the Sentences applet. In the default installation of Sentences this file is located in the <Sentences_home>\Tomcat4\webapps\Sentences directory. The Sentences.html file specifies the version of the Java Plug-in that is used to run Sentences applets. If you wish to run Sentences applets with a specific Java Plug-in you need to specify it in this file. The files Java_1.3.1_Sentences.html and Java_1.4.1_Sentences.html which are in the <Sentences_home>\Examples\HTML directory are examples of how a specific Java Plug-in may be specified. You can configure the parameters on the Sentences.html page to customise user access to Sentences. The page can be accessed directly by a Web browser or you can start it indirectly by using the JavaScript code in the LaunchSentences.html file. 1-51 Sentences configuration files The Microsoft Internet Explorer browser uses the HTML OBJECT tag while Netscape Navigator browser (version 4) uses the HTML EMBED tag. Netscape Navigator version 6 may use either the OBJECT or the EMBED tag. Each of these tags requires a different format for the code required to run the Sentences applet. The code for both of these tags should be included in a single HTML file, as is done in Sentences.html. You must make sure that all the parameters you need are specified correctly in your HTML file for the browsers that you expect your users to be working with. Note A full description of the Java Plug-in is available on the Internet at: http://java.sun.com/j2se/1.4.1/docs/guide/plugin/ developer_guide/contents.html HTML code using the OBJECT tag The Microsoft Internet Explorer browser version 4, 5 or 6, and Netscape Navigator browser version 6, use the OBJECT tag. Note The symbol § indicates that a line of code has been split to allow display in this book only. You should type in the code as one line. 1-52 Configuring Sentences Use the following HTML code, which uses the OBJECT tag, to launch Sentences using Microsoft Internet Explorer and the default servlet context for Sentences: <OBJECT classid="clsid:8AD9C840-044E-11D1-B3E9-00805F499D93" codebase="http://java.sun.com/products/plugin/autodl/jinstall-1_4windows-i586.cab#Version=1,3,1,0" width="100%" height="100%"> <PARAM NAME="code" VALUE="com.sentences.main.Sentences.class"> <PARAM NAME="type" VALUE="application/x-java-applet;version=1.3.1"> <PARAM NAME="cache_option" VALUE="Plugin"> <PARAM NAME="cache_archive" VALUE="Sentences.jar"> <PARAM NAME="progressbar" VALUE="true"> <PARAM NAME="boxmessage" VALUE="Loading Sentences..."> <PARAM NAME="boxbgcolor" VALUE="white"> <PARAM NAME="boxfgcolor" VALUE="black"> <PARAM NAME="progresscolor" VALUE="cyan"> <PARAM NAME="Profile" VALUE="Human resources"> <PARAM NAME="FixedProfile" VALUE="no"> <PARAM NAME="EditOption" VALUE="Schema"> <PARAM NAME="ImageURLBase" VALUE="/ImagesForSentences"> Client applet load failed.Sentences Explorer Client requires a Java 2 plugin.The minimum acceptable version is J2RE 1.3.1. We recommend J2RE 1.4.1 or better. Please contact your Sentences administrator. </OBJECT> Explanations for all the parameters in this HTML code are in the section “Sentences applet parameters” on page 1-53. HTML code using the EMBED tag The Netscape Navigator browser version 4 uses the EMBED tag. Note The symbol § indicates that a line of code has been split to allow display in this book only. You should type in the code as one line. 1-53 Sentences configuration files Use the following HTML code, which uses the EMBED tag, to launch Sentences using Netscape Navigator 4 or above: <EMBED type="application/x-java-applet;version=1.3.1" pluginspage="http://java.sun.com/products/plugin" alt="Failed to load Sentences Client - Java Plug-in version 1.3.1 or better required." width="100%" height="100%" code="com.sentences.main.Sentences.class" cache_option="Plugin" cache_archive="Sentences.jar" progressbar="true" boxmessage="Loading Sentences..." boxbgcolor="white" boxfgcolor="black" progresscolor="cyan" Profile="Human resources" FixedProfile="no" EditOption="Schema" ImageURLBase="/ImagesForSentences" <NOEMBED> Netscape Navigator 4 uses the EMBED tag to load the Java Plug-in. The embed tag includes a number of parameters and the text of an error message. The closing tag </EMBED> appears after all the parameters and messages. Netscape Navigator 6 may use either the OBJECT tag or the EMBED tag. All the parameters used for Netscape Navigator are parallels of those used for Microsoft Internet Explorer (see “HTML code using the OBJECT tag” on page 151). Sentences applet parameters The following parameters are always used in the HTML start page for the Sentences applet. • OBJECT Microsoft Internet Explorer uses the OBJECT tag to load the Java Plug-in. The OBJECT tag includes attributes, parameter-value pairs, and the text of an error message. The closing tag </OBJECT> appears after all the parameters and messages. 1-54 Configuring Sentences • codebase The codebase attribute within the OBJECT tag gives the location from which the Java plug-in can be downloaded if it is not already installed. If you are deploying Sentences on an Intranet and you have a local copy of the Java plug-in you can substitute your local location for this address. • width, height The width and height attributes determine the display size of the applet in your browser window. You can set any suitable absolute or percentage value for these settings. • PARAM NAME="code", PARAM NAME="type" These are standard Java applet parameters. "Code" defines the class that is run when the applet has been loaded. "Type" identifies the Sentences applet as a Java applet. It must not be changed. • PARAM NAME="cache_option" This parameter specifies where the Java Plug-in caches the JAR files for the Sentences applet. • PARAM NAME="cache_archive" This parameter specifies which Sentences JAR files the Java Plug-in should cache, by default Sentences.jar. • <PARAM <PARAM <PARAM <PARAM <PARAM NAME="progressbar" NAME="boxmessage" NAME="boxbgcolor" NAME="boxfgcolor" NAME="progresscolor" These parameters control the display of a progress bar in the Web browser window while the Sentences JAR file is being downloaded. The progress bar is only visible on the first occasion on which you download the Sentences JAR file, or after the JAR file has been amended. Note These special applet attributes were introduced at version 1.4 of Java. For a full description see: http://java.sun.com/j2se/1.4.1/docs/guide/plugin/ developer_guide/special_attributes.html 1-55 Sentences configuration files • PARAM NAME="Profile" The Profile parameter defines the default profile opened when the Sentences applet is started. You can change the value of this parameter to the name of the default profile for your installation. The name of the profile must not contain any special characters that need to be represented by escape sequences in HTML. If the Profile parameter is not specified then Sentences starts running and displays a series of error messages until the user creates a new profile to work with. • PARAM NAME="FixedProfile" The FixedProfile parameter can have the values yes or no. When the FixedProfile parameter is set to yes the Open Profile, Delete Profile, and Edit Profile options in the Explorer File menu are not available. This creates a profile with limited database access for end-users. Note You can restrict a user’s ability to change parts of the database by using a combination of the FixedProfile and EditOption parameters and by specifying changes chapters in the Edit Profile dialog (see “Using the Edit Profile dialog” on page 1-132). • PARAM NAME="EditOption" The EditOption parameter specifies what parts of the database can be edited by users. The possible values are schema, query, data and none. Parameter value Editing actions allowed schema allows the user to edit schema, queries, and data query allows the user to edit queries and data data allows the user to edit data none no editing actions allowed The settings for this parameter are not case-sensitive. If no setting is given for this parameter the default setting is none. The setting in the Sentences.html supplied with Sentences is schema. If the EditOption parameter is set to data or none, users can create, edit, and execute queries, but they cannot save any changes they make to queries. 1-56 Configuring Sentences • PARAM NAME="ImageURLBase" The ImageURLBase parameter specifies the URL base for the location of image files. This can either be a full format URL (for example http://www.anywebsiteaddress.com/Images) or a relative URL. Whatever is specified in this parameter is prefixed to the image file names to allow Sentences to locate and display images. By default this is /ImagesForSentences, which is a relative URL referring to the Images subdirectory you chose during installation. For further details about this parameter see “About the ImageURLBase parameter” on page 1-41. Note You can add further parameters at this point in the code (see “Additional optional parameters” on page 1-56). • Message text The Sentences.html file includes message text that is displayed if the Java Plug-in cannot be activated for some reason. The message is: Client applet load failed. Sentences Explorer Client requires a Java 2 Plug-in. The minimum acceptable version is J2RE 1.3.1. We recommend J2RE 1.4.1 or better. Please contact your Sentences administrator. You can change this text to any message you require. Additional optional parameters You can add any of the following parameters to your HTML script. The parameter statement must be given in the correct format for your browser, as shown in the examples for the OBJECT tag or the EMBED tag as shown above. • PARAM NAME="ServletPort" The Sentences applet attempts to connect to the Sentences servlet using the host name and port from which it was downloaded. If the applet was downloaded from a URL that included an explicit port number, that port number is used for the servlet port. If the applet was downloaded from a URL that did not include an explicit port number, the servlet port defaults to 80, which is the default port for HTTP. If the applet needs to access the Sentences servlet on a different port you must specify that port number with the ServletPort parameter. See also “Starting the Sentences client” on page 1-68. 1-57 Sentences configuration files • PARAM NAME="ServletContext" The Sentences applet requires a servlet context to connect to the Sentences servlet. The servlet context is the part of the URL after the host name and port. The default value is "/Sentences". If the Sentences servlet is configured on a different context this must be specified using the ServletContext parameter, for example: PARAM NAME="ServletContext" VALUE="/servlet". See also “Starting the Sentences client” on page 1-68. • PARAM NAME="RequestSize" Sets the number of data items retrieved from the Sentences database for each request. If more items exist, Sentences displays the More… prompt in the data pane. The default value for RequestSize is 50. For example, when using Microsoft Internet Explorer, you can change the number of items retrieved for each data request to 100, by adding the following line to the applet parameters section of the Sentences.html file: PARAM NAME="RequestSize" VALUE="100". When using Netscape you would add the following line: RequestSize="100". • PARAM NAME="LookandFeel" Sets the appearance of the Sentences client applet. The possible settings are Default, Windows, Metal, and Motif. Not all of these possible settings are supported on all platforms. The supported settings depend on those supported by the version of Java installed. • PARAM NAME="codebase" Note This parameter is different from the "codebase" attribute in the OBJECT tag This parameter specifies the servlet context from which the Sentences.jar file is to be loaded. You must set this parameter if the JAR file is to be loaded from a different servlet context from the Web page. Otherwise it is not required. • PARAM NAME=”UserText” This parameter specifies an optional text string that is added to transactions as userText. This can be referred to by triggers. 1-58 Configuring Sentences • PARAM NAME=”ProfilesProfileVisible” This parameter determines whether the system profile Profiles is visible to users in the Open Profiles dialog. The possible values are Yes and No. The default setting is No (see “The Profiles database and the Profiles profile” on page 1-129). Using applets for access to Sentences In addition to the standard Sentences client applet (the Sentences Explorer) you can access the Sentences database with other applets. You can deploy a Sentences Dataform, a Sentences Picker, and a Sentences Query using Java applets. Each of these applets makes use of some of the same parameters as the Sentences applet, as well as some specific additional parameters. In each case you need to use separate HTML files to configure the applet and its parameters. For more information see “The Dataform applet” on page 1-231, “The Picker applet” on page 1-239 and “The Query applet” on page 1-244. User-defined parameters You can add your own parameters to the HTML startup pages for Sentences applets and for servlet access. These parameters can be referred to using the Client API, triggers, and query expressions. These parameters can be added to the Application.properties file for use with Sentences Personal Edition. Format of user-defined parameters The name and value of a user-defined parameter are nested within the value part of a parameter with a pre-defined name. When using the HTML OBJECT tag, as used by Microsoft Internet Explorer, a userdefined parameter is defined as follows: <PARAM NAME=”ClientParameter1” VALUE=”UserParamName=UserParamValue”> When using the HTML EMBED tag, as used by Netscape, a user-defined parameter is defined as follows: ClientParameter1=”UserParamName=UserParamValue” In the Sentences Personal Edition user-defined parameter is defined in the Application.properties file as follows: ClientParameter1=UserParamName=UserParamValue 1-59 User-defined parameters Pre-defined names User-defined parameters use pre-defined names, which must be in the form ClientParameter1, ClientParameter2 and so on. These names are not casesensitive and there is no practical limit to the number of parameters that can be added. The pre-defined parameter names must be used in sequence with no omissions. For example if you used the sequence of names ClientParameter1, ClientParameter2, ClientParameter4, only the first two entries would be recognised, as ClientParameter3 is missing from this sequence. User Parameters The name part of the user parameter (UserParamName in the example above) is not case sensitive. Any characters except the equals sign (=) and the double quote (”) may be used in parameter names. Sentences ignores any leading or trailing spaces in parameter names. If any duplicate parameter names are used Sentences processes the first one and ignores all the others. Missing values in user parameters are treated as null values. Referring to user-defined parameters You can refer to the user-defined parameters using the Sentences Client API, triggers, or query expressions. User-defined parameters in the Client API The Sentences Client API includes getClientParameter and setClientParameter methods. For more information on using the Sentences API see “Sentences API overview” on page 2-141. Note Detailed information for programmers about the Sentences API is available in the online documentation installed with Sentences, starting in the file <Sentences_home>\Doc\api.html. The Javadoc files for the Sentences API can be found in <Sentences_home>\Doc\javadoc. User-defined parameters in triggers A getClientParameter method is available to Sentences triggers. For more information on triggers see “Triggers” on page 2-145. 1-60 Configuring Sentences User-defined parameters in query expressions You can use the GetClientParameter method in query expressions. For more details see “Using user-defined parameters” on page 2-55. Monitoring server activity You can use the Sentences statistics servlet to monitor server activity. For more information see Appendix B, ‘Statistics and analysis’. Shutting down and restarting the Sentences server Certain processes require exclusive access to the Sentences database. You must shut down the Sentences server before performing any of the following actions, and restart the server when the action is complete: • • • • • import a CSV file export a profile import a set of chapters install a trigger or custom datatype make changes to the Server.properties file or Application.properties file • install a new SentencesLicense.txt license file The steps required for shutting down and restarting the Sentences server vary with the Sentences edition you are using, as described in the table below: When you are using… restart the server as follows… Sentences Personal Edition shut down and restart the Sentences Personal Edition. Sentences Enterprise Edition, local mode shut down and restart your servlet container. If you are using Tomcat you can use the commands on the LaunchSentences.html start up page. You do not need to close the Sentences client, but if you do not you must refresh the profile after you restart the server. Sentences Enterprise Edition, Web mode make sure no users are connected to the Web server, and then restart the Sentences servlet container. Users should either close and restart the Sentences client or refresh the profile. 1-61 Backing up and restoring your data Backing up and restoring your data It is always good practice to keep a backup copy of all your data. The data in your Sentences database is stored in chapter files, which can be backed up in a number of ways. You should also back up the system chapter Profiles.chap which records information about the profiles in your database. It is good practice to keep an independent record of the profiles in your database and of the chapters used in each profile. Sentences offers you a number of ways to back up your Sentences database, which are explained in the following sections. Online backup Online backup is not available in the Sentences Personal Edition. Online backup is a command line procedure that creates a backup file from all your chapter files and profiles and uses journalling to maintain data integrity during the backup procedure. You can run online backup without the need to shut down the Sentences server. Online backup may be initiated by automated procedures. Online backup preserves the complete record of all the updates made to your chapters. When you restore your data from an online backup, the resulting chapters are exact duplicates of the original chapters. You can run online backup from any system that can communicate with your Sentences server using HTTP. If you wish to limit access to running the backup program you must use the security mechanisms of your Web server to do so. The backup client communicates with a Backup servlet on the server. With the default installation of Sentences, using Tomcat, this servlet has the servlet name Backup and is accessed locally using the URL http://localhost:8090/ Sentences/Backup (see “Servlet access to Sentences” on page 1-75). When using any other Web server installation the administrator must configure the Backup servlet in the same way as all other sentences servlets. The classname of the backup servlet is com.sentences.backup.BackupServlet. The backup command script file (Backup.bat on Windows or Backup.sh on Linux or Solaris) in the Sentences installation directory assumes that the command is being executed on the same machine as the server and that the default Sentences configuration is being used and uses the URL http://localhost:8090/ Sentences/Backup to connect to the servlet. 1-62 Configuring Sentences Note If you chose Custom installation when you installed Sentences and specified a different port number for Tomcat HTTP access, then that port number is used rather than 8090. If you have installed Sentences into another Web server you need to edit the Backup.bat or Backup shell script to set the -url parameter to the appropriate value. Preparing to run online backup Before you can run online backup you must verify or edit two settings in the Server.properties file: • You must define the destination for the backup files in the BackupPath parameter. This path cannot be changed when the procedure is run. By default this parameter is not set. • You must ensure that access has been granted to the Backup servlet; in the servlets section the appropriate entry must read: BackupAccess=true This is the default setting. For more details see “The Server.properties file” on page 1-43. Using the online backup command The Sentences server must be running when you run the online backup command. To perform an online backup, open a command prompt, navigate to the Sentences installation directory and run the supplied script file. On Windows systems this file is named Backup.bat, and on Linux and Solaris systems the file is named Backup.sh. You may specify a name for the backup by entering it after the command, as follows: Backup [-name backupname] where backupname is an optional name used for the two files created by the backup operation, the backup file (with the extension bkp) and the journal file (with the extension jnl). For example, if you specify the name mybackup, the files created are named mybackup.bkp and mybackup.jnl. If you do not specify a name, the backup files are identified by a name indicating the date and time of the backup. For example, if you started a back up on 15th March 1-63 Backing up and restoring your data 2002 at 11:30:23 the files created are named 20020315113023.bkp and 20020315113023.jnl. The backup operation copies all the Sentences chapter files including the system file Profiles.chap. The backup process copies each file in turn to the backup file and records any changes to files that take place during the backup process to the journal file. This ensures that the combination of the backup file and the journal file represent an accurate record of your database at the end of the backup process. Restoring your data from an online backup You need to have exclusive access to the Sentences server when you restore from an online backup. To restore from an online backup, open a command prompt, navigate to the Sentences installation directory and run the supplied script file. On Windows systems this file is named Restore.bat, and on Linux and Solaris systems the file is named Restore.sh. The following commands are available: • Restore -display This produces a summary of the backup file sets that are available • Restore -display [backupname] This displays the details of the backup file set with the name you specify, including the name of the server, the date when the backup was made, and a list of chapters and their locations. • Restore [-overwrite] backupname This starts the restore process with the given backup name. If the restore involves overwriting any existing chapters (other than the profile chapter) then the procedure displays a list of the affected files and does not perform the restore. You must use the -overwrite switch to force the procedure to overwrite files. If your installation uses multiple locations for chapter files, all the locations must be available when you run the restore process. If the original locations for some files are not available during restore, copies of these files are created in available locations. The resulting files are exact duplicates of existing chapter files. When all your locations later become available, Sentences is unable to start because of these duplicate chapter files (see “Error 1267: The Sentences database is not available” on page 1-71). 1-64 Configuring Sentences Exporting the database for backup You can back up your data by exporting the database. An exported database can later be imported into Sentences. For further details and restrictions on using export for backup see the section “Exporting and importing databases” on page 1-141. The Sentences server must be shut down before you can export the database. Copying chapters for backup You can back up your data by copying chapter files. If you want to use a copied chapter file in a different Sentences installation you need to create or edit a profile to use the chapter. Chapter files should not be copied while the Sentences server is running. If the server is not shut down the integrity of the copied files is not guaranteed. For further details and restrictions on copying chapters for backup see the section “Deploying profiles and chapters” on page 1-140. Using trace files Sentences trace files store server activity information. They often contain valuable diagnostic information that can be used to establish where an error occurred, particularly where a problem exists in client-server communication (see “Errors reported at the Sentences client” on page 1-70). The TraceLevel variable in the Server.properties file determines which activities generate messages to the trace file. The basic settings are shown below. Value Meaning 0 Only major events are traced 1 Profile operations are traced 2 A one-line summary of every request is logged 4 Requests from clients to update data are logged, without the prior request/result pairs, but including the results 8 Requests from clients to update data are logged, including both prior request/result pairs, and full results 1-65 Sentences log files Value Meaning 16 All server update actions are logged, whether they came directly from a client or from some other server function, provided that triggers are being run 32 Requests from clients to read data are logged, without their results 64 Data returned to clients is logged 128 Association checks made by the standard system rule are logged 256 A one-line summary of Client Parameters is logged. This is only available if a one-line summary of every request is logged (trace level 2) The trace levels can be used independently or in combination simply by adding together their numeric values for use as the server trace level. The default setting for TraceLevel is 0 (zero) which is appropriate for general use. An effective setting for monitoring server activity in more detail is 23. When TraceLevel is set above zero, the size of the trace files can grow rapidly so you must ensure that there is always enough disk space for trace file usage. Every time you start the server a new trace file is created. Trace files are named trace_nnnnn.txt where nnnnn is a positive integer, 12 or 13 digits in length, for example: trace_938079391280.txt The integer value used is the elapsed time in milliseconds since the Java system epoch (midnight GMT, 1st January 1970). Sentences log files Sentences creates a log file for every open chapter, in the same directory as the chapter file. Sentences writes information about changes in a chapter file to the log file before data changes are made to the chapter file. This allows Sentences to maintain the integrity of the chapter file. You must not delete Sentences log files. Every time that a sequence of chapter actions that makes up a transaction is completed, Sentences ensures that the chapter file is written to disk, which enables 1-66 Configuring Sentences the size of the log file to be reduced. If the size of the log file reaches the limit set by the optional MaxLogSize property in the Server.properties file, the chapter file is immediately written to disk and the log file is truncated. This means that very long transactions such as those created by the CSV Import program can be handled without requiring excessive amounts of disk space for the log file. When the chapter file is closed normally the log file is removed. If Sentences terminates unexpectedly, then the next time that Sentences is started the log file is used to ensure the integrity of the chapter file contents. If Sentences terminated unexpectedly because of a lack of disk space, you must make more disk space available so that the chapter file can be recovered correctly. The log file name is generated by removing the chap suffix from the chapter file name and adding a log suffix instead. Log files are binary files and cannot be read directly. The Sentences administrator must make sure that there is enough disk space available for these files. Running the Enterprise Edition on a single computer You can run the Enterprise Edition of Sentences with the Tomcat Web server in local mode, that is with the server and client running on a single computer. In this configuration Sentences makes use of the standard TCP/IP address alias localhost (which uses the IP address 127.0.0.1) to allow the server and client components on the same machine to communicate with each other using TCP/IP. This is sometimes known as a loopback connection. On some systems, particularly on non-networked PCs running Windows 98, TCP/IP may not be enabled. In this case the Tomcat Web server may not run correctly, and you may see an error message similar to this: Internet Explorer cannot open the Internet site http:// localhost:8090/Sentences/Sentences.html. An internal error occurred in the Windows Internet extensions If you see this error you need to install and configure TCP/IP support and define localhost. For notes on doing this on Windows platforms please contact Lazy Software Technical Support (mailto:[email protected]). Sentences server and client communications The Sentences client and server communicate using the Hypertext Transfer Protocol (HTTP) which is used on the World Wide Web. The Sentences server and client use 1-67 Sentences server and client communications HTTP communications even when they are both located on the same computer (that is, when you are running the Sentences Enterprise Edition in local mode). To set up successful communication between the server and client the following steps have to be completed successfully. 1. The Web browser at the client requests the Sentences HTML page by specifying a URL. The HTTP server must recognise the URL used as referencing a HTML page, which must use a Sentences applet. The server then returns the page. 2. To execute the page (that is, to display it to the user) the browser must have access to the Java Plug-in. The Java Plug-in is the part of the J2SE JRE which controls the way the Web browser handles Java. If the Plug-in is not present the browser may download it. This download uses the codebase attribute in the plug-in loading tag, which for Microsoft Internet Explorer browsers is the OBJECT tag and for other browsers is the EMBED tag. 3. When the Java Plug-in has started it tries to run the Sentences applet using the Sentences.jar client archive file. If this file is not present, the Plug-in downloads it from the Sentences server. To ensure security, Sentences 3.5 requires that the Sentences.jar file is downloaded from the same server machine from which the start page HTML was downloaded. You can define the URL context from which this file is downloaded by setting the optional codebase parameter in the HTML page. By default this is assumed to be the context from which the start page was downloaded. The context is used to generate a URL to access the Sentences.jar file. The HTTP server must find the file at this URL and return it. 4. After the Sentences applet starts in the Java Plug-in it must successfully connect back to the Sentences servlet in order to access the database. To do this it uses a URL which is generated from the fixed Sentences class name, the download host name and port and the optional ServletContext parameter. If this access request is intercepted by a Servlet container or Application Server, the URL requested must be recognised as referencing the Sentences servlet. If the URL is processed by the HTTP server it must be recognised as requiring processing by the appropriate Servlet container or Application Server. The Servlet container or Application Server must recognise the URL as referencing the Sentences servlet. The Sentences servlet can then respond to the applet's requests. 1-68 Configuring Sentences For more information on configuring supported Web server and servlet containers to host Sentences please see the Technical Support pages of the Lazy Software Web site (http://www.lazysoft.com) contact Lazy Software Technical support (mailto:[email protected]). Running the Sentences client The Sentences client runs as a Java applet in a Web browser. No installation is required on a client computer other than the Java Plug-in which is part of the Java Runtime Environment, as detailed below. Starting the Sentences client To run Sentences client, start your Web browser and open the Sentences start page from your server using HTTP. By default this page is named Sentences.html. The address of your server depends on your configuration. If you are running Sentences Enterprise Edition in local mode (with the client and server running on the same computer) the default address for the start page is: http://localhost:8090/Sentences/Sentences.html If you are running the Sentences Enterprise Edition in Web mode (with the client and server running on different computers) the default address depends on your system configuration. You need to know the following details of how your system’s Web server has been configured: • the port your Web server is listening on for Sentences HTTP connections • the servlet context for Sentences on your Web server • a way of identifying the server machine (either the machine’s IP address, or a local or networked server name) For example, the Tomcat Web server, as configured by the Sentences installer, uses the name /Sentences as the servlet context and is configured to listen for Sentences requests on port 8090. If you wish to identify the Sentences server by its IP address you would specify the address in the URL. For example, if the IP address is 123.123.123.123, the URL for accessing Sentences would be: http://123.123.123.123:8090/Sentences/Sentences.html If the Sentences server you wish to specify is a computer named myserver on a local network, the URL for accessing Sentences would be: http://myserver:8090/Sentences/Sentences.html 1-69 Running the Sentences client If the Sentences server you wish to specify is a computer named server.myisp.com on a distant network, the URL for accessing Sentences would be: http://server.myisp.com:8090/Sentences/Sentences.html All of the above assumes that the Web server for Sentences is listening on port 8090, which is the default port with which Tomcat is installed. If the default HTTP port of 80 is used the port number (8090 in the examples above) does not need to be specified. See also ServletPort on page 1-56 and ServletContext on page 157 for details of configuring different ports and servlet contexts for Sentences client. Java Runtime Environment Plug-in Before you can run Sentences client, you must have the Java™ 2 Standard Edition Runtime Environment Version (J2SE JRE) Plug-in installed available for use by your browser. When you connect to a Sentences server for the first time, the program searches your system for this Plug-in. If you do not have the Plug-in, your browser prompts you to download and install it directly from the Sun Microsystems Web site. Sentences certificate acceptance The first time you access the Sentences applet, you must accept the verification certificate for Sentences. The J2RE 1.4.1 Java Plug-in displays a warning dialog with the title Warning - Security. (The wording of this warning is slightly different with earlier versions of the Java Plug-in). The warning dialog offers two acceptance options for the Sentences certificate, Yes (in earlier versions Grant this session) and Always (in earlier versions Grant always). We recommend that you select Always. If you select Yes you can run Sentences normally, but the Java Plug-in displays the warning dialog again each time you start the Sentences client. If you select Always, the Plug-in Warning is displayed only when you upgrade or change your Java Plug-in, or make changes to your operating system which affect the Java Plug-in. If you do not accept the certificate, by selecting No (in earlier versions Deny), you can run Sentences but you cannot use any commands that require write access to your local file system, for example Export to CSV file, XML Export Results and Export XML DTD. In addition, some windows may display a message text in the status bar such as “Java Applet Window”. 1-70 Configuring Sentences Using the Java Console tool Useful debugging information is displayed in the Java console tool. Activating the Java Console on Windows systems To display the Java console tool each time you start Sentences, start the Java Plugin icon from the Windows Control Panel. The Java Plug-in Properties dialog is displayed. On the Basic tab, check (select) the options Enable Java Plug-in, and Show Java Console, and click Apply, then close the control panel. The next time you start Sentences in a browser, the separate Java Console messages window is displayed. Activating the Java Console on Solaris, Linux, or AIX systems You can display the Java Console on Solaris, Linux, or AIX systems by entering a command at a shell prompt, or by entering a URL in a Web browser. Using a shell prompt, type in the following command: /usr/java/bin/ControlPanel where /usr/java is the directory in which the JRE is installed. With a web browser, use the following URL: file:/usr/java/ControlPanel.html where /usr/java is the directory in which the JRE is installed. Errors reported at the Sentences client If the connection between the Sentences server and the Sentences client is temporarily interrupted, or if the Sentences server is not readily available, the client cannot communicate properly with the server, and Sentences displays an error message in the client Message Log. The most common messages are described below. Error 1222: Your server connection has expired This error message continues: Please select the Refresh command from the File menu to continue. Sentences displays this message when the ProfileTimeout or PendingTimeout limit configured in the Server.properties file has been passed, or when the Sentences server has been stopped and restarted while a Dataform remained open on a client and an attempt to save the data on an open Dataform fails. 1-71 Running the Sentences client After you select the Refresh command, you must re-enter any data that was on an open Dataform. Error 1265: The Sentences server has not been found This error message continues: Please contact your administrator. If you receive this message at a Sentences client you should contact the person in your organisation who is responsible for running the Sentences server and report this error. This message is displayed when the Sentences server cannot be found. It usually means that the server has been shutdown. If this message is displayed you must restart the Sentences server and select the Refresh before continuing to work with Sentences (see “Shutting down and restarting the Sentences server” on page 1-60). Error 1266: The Sentences server has not been found This error message continues: Please contact your administrator. If you receive this message at a Sentences client you should contact the person in your organisation who is responsible for running the Sentences server and report this error. This message is displayed when the Sentences Servlet has not been configured correctly, for example an entry for /MainServer does not exist in the web.xml file. If this message is displayed you must check your servlet configuration settings (see “Sentences servlets and web server security” on page 1-76) and then restart the Sentences server (see “Shutting down and restarting the Sentences server” on page 1-60). Occasionally if you are using Java 1.3.1 and the functionality being requested has been disabled in the Server.properties file, it is not possible for Sentences to determine what the HTTP response code is, and error message 1266 is used in place of error message 1272. This problem is corrected by using Java 1.3.1_02. Error 1267: The Sentences database is not available This error message continues: Please contact your administrator. If you receive this message at a Sentences client you should contact the person in your organisation who is responsible for running the Sentences server and report this error. This message is displayed when the Sentences servlet cannot start correctly. The most common causes of this error are that the Sentences servlet has stopped without 1-72 Configuring Sentences shutting down correctly, or that the Sentences server has detected two or more chapter files with the same internal identifier. In both of these cases you cannot start Sentences and you must check the trace file for more details. • Sentences not shut down correctly When a user opens a profile that uses one or more chapters on a particular file server Sentences creates a database.lock file in each Chapters directory. This file is deleted automatically only when the Sentences server that created it is shut down. If the server is not shut down correctly the database.lock file remains and you cannot start the server. If the Sentences server has detected a database.lock file the trace file displays information similar to the following: >>>>> Servlet initialization error <<<<< com.sentences.api.exceptions.LazyServerConflictException: 10016: A lock file (database.lock) already exists in the Chapters directory C:\SentencesData35. Another Sentences server process or stand-alone process may be using this database. Check for other running processes. If there are none, remove the lock file from your Chapters directory and re-start. If you see this trace file message you should shut down the Sentences server and then check the chapters directory to see if a file named database.lock is present. If you have specified more than one location for your chapter files you must make sure that you search all of the possible locations. Note A file named database.lock is always present while the Sentences server is running. The Sentences backup command may also report the error 10016 shown above. This means that the backup process has found a database.lock file, in the chapters directory specified in the error message. This error may occur even if the database.lock file is in a chapters directory not used for the applications you are backing up. If you find one or more database.lock files present when the Sentences server is not running, you should delete them and then restart the Sentences servlet (see (see “Shutting down and restarting the Sentences server” on page 1-60). You may also need to consult the documentation for your Web server and your servlet container. You must not delete a database.lock file while the Sentences server is running. 1-73 Running the Sentences client You can determine the validity of a database.lock file by checking the timestamp indicating when the file was created. If the file’s timestamp shows that it was created before the last time you re-started Sentences then it can safely be deleted. • Duplicate chapter files This error is also displayed when the Sentences server detects duplicate chapter files. Duplicate files usually have different system names, but are recognised as duplicates because they have the same internal identifier. If the Sentences server has detected two or more chapter files with the same internal identifier these files are listed in the trace file. The trace file displays information similar to the following: >>>>> Servlet initialization error <<<<< com.sentences.api.exceptions.LazyDBException: 10189: The chapters "C:\SentencesData35\Human resources data.chap" and "C:\SentencesData35\Human resources datab.chap" are duplicates. Error 1268: The Sentences database is not available This error message continues: Please contact your administrator. If you receive this message you should contact the person in your organisation who is responsible for running the Sentences server and report this error. This message is displayed when there has been an attempt to access functionality that has been disabled in the Server.properties file. For example if you have disabled access to XML output by setting XMLAccess=false in the Server.properties file, this message is returned if you attempt XML access. In addition the trace file contains a message such as Access to /XML is forbidden. Error 1272: A connection error has occurred This error message continues: Please contact your administrator quoting the code [codenumber]. If you receive this message at a Sentences client you should contact the person in your organisation who is responsible for running the Sentences server and report this error, quoting the code number displayed. This message is displayed when a client-server connection problem other than those specified by errors 1265, 1266, 1267, or 1268 occurs. The code quoted is a HTTP response code that describes the error that has occurred. HTTP error codes are 1-74 Configuring Sentences widely documented, including on a number of Web sites, and administrators should check this documentation for help in identifying the cause of the problem. This error is also displayed at the client if the SentencesLicense.txt file is missing or corrupted. Contacting Technical Support If the recovery information given for the error messages listed above does not resolve your problem, or if you receive a different error message, you should contact Lazy Software Technical Support (mailto:[email protected]). More information is available on the Lazy Software Web site. Before contacting Technical Support, please review the configuration information in this chapter and make sure you have access to the following files: Server.properties Sentences.html LaunchSentences.html and that you also have access to any trace files. Security considerations You should be aware of the security implications of running applications over the Web, or over internal systems using Web communications protocols. There are a number of ways in which Sentences helps you to minimise any security risks. These include an automatic check of the HTML page host, using different profiles for different users, and limiting access to Sentences servlets. Security considerations for servlets are discussed in “Sentences servlets and web server security” on page 1-76. You can also set passwords to protect chapter files (see “Password-protected chapter files” on page 1-138). Automatic check of HTML page host To enhance the security of Web-based access to the Sentences server, Sentences automatically checks that the Sentences.html start page has been loaded from the same server as the Sentences applet used by the client. Error 1403: The Sentences client must be loaded from the same host as its HTML page This error message is displayed if Sentences finds that the Sentences.html start page has not been loaded from the server on which the Sentences servlet is running. 1-75 Servlet access to Sentences Using database views for enhanced security An additional level of security is afforded by changing the combination of chapters in different profiles as described in “Creating database views using profiles and chapters” on page 1-273. You can create different *.html start pages for different users or groups of users to open different profiles, and each would have the FixedProfile parameter set to True. This would prevent users from accessing a profile they were not entitled to use. In addition, you can use the security features of your operating system or web server (or both) to limit user access to each of these *.html files by granting or denying permissions or by requiring a password. Servlet access to Sentences In many situations the best way for users to access the Sentences server is by running the Sentences client applet in a Web browser. It is also possible to access the Sentences server directly using a servlet. A number of different servlets are supplied with Sentences which are listed below. Because of security considerations, some of these servlets are disabled when you install Sentences. Security considerations are discussed in “Sentences servlets and web server security” on page 1-76. URL patterns and Servlets available in Sentences The following table lists of the URL patterns that correspond to various Sentences features and shows the status of each servlet on installation. The URL patterns marked as always enabled are essential to Sentences and cannot be changed. All the other URL patterns are listed in the Server.properties file and you can change their status, by changing the corresponding access parameter from false to true or from true to false. 1-76 Configuring Sentences You should always check the Server.properties file for an up-to-date list of the URL patterns and servlets currently available. URL pattern Servlet name Enabled by default? Sentences feature /MainServer Main Always Access to Sentences from the Sentences client applet /SavedXML/* XmlSavedRes ponse Always XML export requested by the Sentences client applet /ApiServer Main Yes Access to Sentences from user-written programs using the Sentences client API /Statistics Stats Yes Sentences server statistics /Chapter ChapterStats No Sentences chapter statistics /Spatial Spatial Yes Data for the spatial view of a Sentences chapter /DTD/* XmlDtd Yes Export of XML DTDs generated by Sentences /XML/* XmlOutput Yes Export of XML documents generated by Sentences /ImportXML XmlInput Yes Import of XML documents /Backup Backup Yes Enables online backup Sentences servlets and web server security The Sentences client applet is loaded from an HTML page, which means that the administrator of a Sentences Web site can apply security constraints to the relevant HTML page to make sure that only authorized users can access Sentences data and that each user is restricted to appropriate profiles. Users who access Sentences data using the Sentences API or the XML import and export features do so directly by communicating with a servlet, and so any security controls applied to an HTML access page does not apply to them. 1-77 Uninstalling Sentences Sentences addresses these security problems by introducing distinct URLs for different kinds of database access. The effects of this approach are: • Individual features can be enabled or disabled by setting the corresponding access parameter in the Server.properties file. • Web site administrators can use the security features of their web servers to place security constraints independently on each feature, in some cases down to the level of a profile, or even an individual query within a profile. • Web site administrators can use web server security features to control access to the URL patterns used by the servlets listed above. In some cases, such as XML export, the full URL includes a profile name and a query name, which allows the administrator even more detailed control by restricting access to specific URLs. For information on how to restrict access to a specific URL on your web server using security constraints please consult your web server’s documentation. Enabling and disabling servlet access A full list of servlet access features, showing which ones are enabled and which ones are disabled on installation, is given above (see “URL patterns and Servlets available in Sentences” on page 1-75). To enable or disable servlet access for a particular feature you must edit the Server.properties file. For each servlet that you want to enable you must change the corresponding access parameter from false to true. For each servlet that you want to disable you must change the corresponding access parameter from true to false. Uninstalling Sentences To uninstall Sentences on Windows platforms, and the Tomcat Web server installed with it, use the Add/Remove Programs option in the Windows Control Panel. After running the uninstall procedure you must make sure that you delete the <Sentences_home> directory using the Windows Explorer. You can uninstall Sentences on Linux or Solaris platforms by running the UninstallSentences script which can be found in <Sentences_home>/ Uninstaller, or by deleting the <Sentences_home> directory. 1-78 Configuring Sentences Chapter 2 Introducing the associative model This chapter is an introduction to the associative model for database designers who want to work with Sentences. More detailed information is available in the book The Associative Model of Data by Simon Williams, available from the Lazy Software Web site at http:// www.lazysoft.com. Sentences is the first database product to implement the associative model of data, which is radically different from the relational model of data which currently dominates the database market. This chapter looks at some of the basic concepts of the associative model including: • entities and associations • values • types and instances • contrasts with the relational model Entities and associations The associative model of data allows you to record information about independent things in the real world (entities) and about their interactions (associations). An entity represents a thing in the real world that has a discrete independent existence. In contrast, an association represents a link or interaction between two other things, each of which may be an entity or an association. An association represents a thing in the real world which does not have an independent existence, but is always dependent on other things. Some examples of entities and associations may help you understand the differences between them. Houses, people, bicycles and buildings are all examples of entities. Customers, husbands, and headquarters are all examples of associations. A person may fulfil the role of being a customer, or of being a husband, but even if that role comes to an end the person remains a person. Take an imaginary company called Medway Furniture that has its main offices in Riverbank House. Riverbank House could be designated as the headquarters of Medway Furniture. But should Medway Furniture move away, or go out of business, Riverbank House would not necessarily cease to exist. It would merely cease to be the headquarters of Medway Furniture. The associative model sees Riverbank 1-80 Introducing the associative model House as a “building” entity and Medway Furniture as a “company” entity, but it sees Medway Furniture’s use of Riverbank House as its headquarters as an association. It would be incorrect in the associative model to represent “headquarters” as an entity, because it does not have the necessary quality of independent existence. Any thing in the real world that can be described in terms of a link between two other things can be represented in the associative model as an association. The sentence “John Smith is a customer of Medway Furniture” describes the interaction between a person entity called “John Smith” and a company entity called “Medway Furniture”. The phrase “is a customer of” describes the nature of the interaction and in the terms of the associative model defines an association. John Smith Is a customer of Medway Furniture Figure 2-1 A simple association In Figure 2-1 entities are shown as ellipses and associations as arrows. The diagram illustrates that in the associative model an association has three parts. The first part is referred to as its source, here “John Smith”, and the third part is referred to as its target, here “Medway Furniture”. The middle part of the association, here “is a customer of”, is referred to as the verb of an association. Every association in the associative model must have this “source, verb, target” structure. It is the similarity between this structure and the “subject, verb, object” structure of a common English sentence that gives the product Sentences its name. Similarly, when John Smith orders a table from Medway Furniture this too can be described in an association. 1-81 Entities and associations John Smith is a customer of Medway Furniture orders 6ft mahogany dining table Figure 2-2 A more complex association The diagram in Figure 2-2 shows a more complex association and illustrates one of the strongest features of the associative model. Associations are not only links between objects in the associative database, they are objects in their own right. The “is a customer of” association had an entity as its source and an entity as its target, while the “orders” association has another association as its source. In the associative model, an association may be used as the source or the target of an association as easily as an entity. Since the source or target of an association may be an association, the associative model can have many associations nested within each other to whatever depth is necessary. We can write out a list of associations of increasing complexity to illustrate this. For greater clarity, subordinate associations in nested groups are enclosed in parentheses; there are commas separating the source from the verb and the verb from the target; and each verb is in italics, for example: (source, verb, target). • John Smith, is a customer of, Medway Furniture • (John Smith, is a customer of, Medway Furniture), orders, 6ft mahogany dining table • ((John Smith, is a customer of, Medway Furniture), orders, 6ft mahogany dining table), on, 14th June 1999 • (((John Smith, is a customer of, Medway Furniture), orders, 6ft mahogany dining table), on, 14th June 1999), at price, £350 1-82 Introducing the associative model Sources and targets in the associative model are reusable. This means that one association or entity can be the source of many associations, or can be the target of many associations. Entities and values Entities and associations are the two kinds of real world things that we want to record information about in a database. There are other things in the real world that we do not need to record additional information about. Data items of this kind are known as values. Numbers, dates, and times in the real world do not have any qualifying attributes of their own, and so in the associative model they are treated as values. Look again at the last two examples of nested associations given above: • ((John Smith, is a customer of, Medway Furniture), orders, 6ft mahogany dining table), on, 14th June 1999 • (((John Smith, is a customer of, Medway Furniture), orders, 6ft mahogany dining table), on, 14th June 1999), at price, £350 The date “14th June 1999” and the price “£350” are examples of things that you do not need to record any data about apart from the fact that they exist, and so may be treated as values. Since values by definition do not need to be defined or described by associations, values can only be used as the targets of associations and never as their sources. Apart from this restriction the behaviour of values is very much the same as the behaviour of entities. The distinction between entities and values is implemented in Sentences, using the datatypes mechanism. Defining a group of data items as values in Sentences has farreaching consequences, and in many cases the majority of data items in a database are not values. Types and instances So far this chapter has looked at examples of individual entities, values, and associations. The associative model generalises entities, values, and associations to entity types, value types, and association types. Entity, value, and association types are used to develop the schema for an associative database. They are the main building blocks of associative database schema design. 1-83 Types and instances Any individual entity, value or association is an instance of its respective type. If you create an entity type that is the source of a number of association types, then any entity that is an instance of that entity type may be the source of one or more associations that are instances of the corresponding association types. An individual entity does not need to have all or any of the associations implied by the association types, but if they do exist they conform to the association type’s characteristics. The following diagram shows an example of an associative schema design. orders Person Date has headquarters at Company is a customer of Product on date at price Building pays monthly rent Amount Figure 2-3 An associative schema This diagram shows a schema design made up of entity types, value types, and association types. Using the same (source, verb, target) notation as before this schema could be written out as follows: Person, is a customer of, Company (Person, is a customer of, Company), orders, Product ((Person, is a customer of, Company), orders, Product), on date, Date ((Person, is a customer of, Company), orders, Product), at price, Amount Company, has headquarters at, Building (Company, has headquarters at, Building), pays monthly rent, Amount 1-84 Introducing the associative model This schema conforms to the principles of the associative model. It has six association types, two value types (Date and Amount), and four entity types. Some association types in this schema have an entity type for their source and others that have an association type for their source. The Amount value type is the target of more than one association and the Company entity type is the source of one association type and the target of another. Comparing the relational model and the associative model The associative model offers a different set of building blocks for schema design from that offered by the relational model. The principal building blocks of the relational model are relations and domains, while the building blocks of the associative model are entities types, value types and association types. Relations (also referred to as tables) are sets of rows that behave in accordance with the rules of the database model. For example, each row in a relation must be unique and every column must have a distinct name. Domains are sets of values from which the values in a column may be drawn. An example of a domain is “days of the week”. In a relational database every table must have a defined primary key and may include foreign keys. A primary key is one or more columns whose values are such that each row can be uniquely identified. A foreign key is one or more columns that serve as a primary key in another table. Foreign keys are used as a method of linking rows together to implement many-to-one associations. If you want to model manyto-many and one-to-many associations in the relational model you must provide additional linking tables as these types of association cannot be modelled directly. The associative model does not use keys. In the associative database every entity or association has a hidden surrogate that is assigned when it is created. This is a unique internal identifier which is never changed. You can even change an entity’s visible name without affecting its underlying hidden surrogate. Because the use of surrogates has done away with the need for keys, it is easy to implement many-to-many and one-to-many associations as well as many-to-one associations in the associative model, narrowing the gap between the business model and its implementation. 1-85 Comparing the relational model and the associative Structural comparisons The following statements are an attempt at a simple mapping of relational building blocks to their associative counterparts. These statements are generally true, but there may be exceptions in certain cases. • A relational table that has no foreign keys among its primary keys can be modelled in an associative database as an entity type that is the source of one or more association types. In other words, an entity type that is the source of one or more association types is equivalent to a table that has no foreign keys as primary keys. It is likely that some parts of the relations that would have appeared in columns in that table can be modelled as association types having this entity type as their source. • A relational table that has one or more foreign keys among its primary keys can be modelled in an associative database as an association type. In other words, an association type is equivalent to a table that has one or more foreign keys as primary keys. In a relational database data about customers would be recorded in a Customer Table and data about shops in a Shop Table. To combine data about shops and customers in one table in the relational model you need to construct a Shop:Customer Link Table. This link table would use two foreign keys, the primary keys from each of the source tables, as its own primary keys. In an associative database, an association type with the (source, verb, target) of (Person, is a customer of, Shop) achieves the same result. • A domain in a relational database can be modelled in an associative database as a value type, which by definition has no association types. Alternatively, an entity type that is the source of no association types is also equivalent to a domain. An associative database can use the same value type in many situations, where a relational database would require separate columns in different tables. The simplest example of this would be the use of dates. One single Date value type can be used as the target for associations indicating start date, end date, invoice date, or date of birth, which would all require separate representations in the relational model. Furthermore, a single instance of a date value such as 25th January 2001 would only be recorded once as associations based on different association types could all make use of the same data. • A column heading in a relational table can be modelled as the verb of an association type. 1-86 Introducing the associative model In other words, the verb of an association type is equivalent to a column heading in a relational table. This restates what we have seen about the use of dates. Column headings in relational tables do not necessarily define the domain of the permitted values in the column but often do give an indication of what the domain is. An associative database could easily contain a series of association types with verbs such as Start Date and End Date, all pointing to the same Date value type as their target. • Both the relational and associative models use datatypes as part of the definition of a domain. Datatypes are used in relational databases to determine the kinds of entries permitted in a domain. The associative database uses a similar mechanism for similar purposes, although the internal implementation of datatypes in Sentences is very different. Relational databases and LazyView The LazyView tool enables you to view data from one or more relational databases alongside data from Sentences chapters in one integrated view. For more information about LazyView, and for practical information about the way in which relational data structures are mapped to Sentences schema elements, please see the LazyView User’s Guide. Chapter 3 Sentences database design This chapter looks at database design on a more practical level and shows some of the ways in which Sentences implements the concepts of the associative model. It follows on from Chapter 2, “Introducing the associative model” which described the concepts of the associative model of data and listed some points of comparison between the relational model and the associative model. This chapter also introduces the range of user interface design possibilities that are available in Sentences. Database modelling in Sentences In the schema design stage a database designer must decide which of the database building blocks should be used to represent each element in the real-world system. If you have experience of relational database design and you are now approaching database design in Sentences for the first time, the theoretical points for comparison given in Chapter 2, “Introducing the associative model” should help you choose the most suitable associative model building blocks. Database design skills Database design involves two activities: problem analysis and schema design. In the analysis phase the structure of data in the real-world system under review - the “problem domain” - is studied and recorded. The analyst discovers how different data elements relate to each other and how they may be dependent on each other. If the analysis stage is carried out accurately and thoroughly, the schema design stage is usually straightforward. A thorough understanding of the real-world system is as important in the associative model as it is in the relational model. Someone skilled in relational schema design should find that their analytical skills are equally relevant to the associative model. Choosing entity, association or value types Something modelled as an entity type must have an existence independent of other types in the problem domain. In contrast elements modelled as association types are dependent on their sources and targets. As you cannot create association types until you have first created a number of entity types to be used as sources and targets there is a tendency to model too many elements as entity types. 1-88 Sentences database design As a practical test, remember that every entity instance must have a name, but an association instance does not have a name. If you cannot easily name instances of a given type this suggests that this type should be modelled as an association. Take care not to model too many elements as entity types. If you are unsure about which entity type should be the source for a particular association type, it is useful to remember that associations are dependent on their source. This means that if the source entity type is deleted, the association type is also deleted. Value types are a special kind of entity type. Value types are used for numerical values and similar data. Any type that is configured as a value type cannot be the source of an association type, but can only be used as the target type. As with any other type of software design it is important that your schema design is a faithful model of the real-world activities you wish to describe. Creating verbs for association types The verb of an association type is used as its name and appears as its field label in the Dataform. It is important that wherever possible you use an active form of the verb rather than a passive form. You should also take care to use the singular form of the verb in an association type name. It can be useful to include the source type name when you create an inverse verb as this prevents ambiguity. For example, the association type Course, start date, Date could have the inverse association Date, course start date, Course. If you have associations with duplicate names (duplicate verbs), either you need to revise your structure, or you need to use more precise verbs (verbs based on the target, not on the English language verb). Modelling one-to-many association types You can easily model one-to-many association types in Sentences. When you want to create a one-to-many data structure, model the “one” element as the source, and the “many” element as the target. Iterative design and prototyping Although detailed data modelling is essential for the design of quality applications Sentences is a very effective prototyping and iterative development tool. You can easily design a small scale application schema as a prototype for testing and 1-89 Database modelling in Sentences improvement. It is good practice to type in small amounts of test data to verify your structure as you build. Sentences associations can be optional or mandatory. It is generally more convenient at the design stage to create all associations as optional. After you have verified your design you can convert optional associations to mandatory ones as required. Designing for change You should create a schema that takes account of changes that take place in the realworld system. For example a business unit always requires a manager, irrespective of the name of the person fulfilling the role of manager. Your schema should reflect this fact and take account of possible changes of personnel. Schema A (shown below) makes the role dependent on the person fulfilling it. Schema A: Person, fulfills, Role Business Unit, utilises, (Person, fulfills, Role) Schema B (shown below) gives an alternative structure in which the role is not dependent on the person fulfilling it. Schema B: (Business Unit, utilises, Role) fulfilled by, Person Modelling behaviour common to multiple types The associative model has two mechanisms that can be used to support the abstraction of behaviour common to more than one type in a schema, and to support the simultaneous grouping and separation of instances of related types. • Supertypes are used for permanent groupings and indicate that all instances of the type are implicitly instances of the supertype. The reverse is not true. An example of the use of a supertype would be modelling Mammal as a supertype of Primate. • Subsets are used to describe a group whose membership is transitory. An example is customers with negative credit, which is a subset of customers that depends on the customer’s account balance. 1-90 Sentences database design There is more information about using subsets and supertypes in Chapter 5, “Working with Sentences” and in Chapter 6, “Advanced techniques”. Using instance-specific association types You can define an association type that has an instance rather than a type as its source. This allows you to add an additional piece of information relating to only one instance, rather than to all the instances of a type. For example, in a customer relationship management system you may wish to record the golf handicap of only one customer. You can do this in Sentences by adding an instance-specific association type, for example Bill Smith, golf handicap of, golf handicap. For more information see “Instance-specific association types” on page 1-217. This association type does not exist for other customers in your database. If you later decide that an instance-specific association type is relevant for other instances of the same type you can change the association’s source to the type, for example to Customer, golf handicap of, golf handicap. In this case Sentences preserves the original data you entered. Using chapters and profiles A user’s view of an associative database is defined by the profile that they are using. A profile defines a set of chapters and the sum of their contents is the user’s view. A user may have multiple profiles and a chapter may appear in zero, one or many profiles. As a result of this, division of a database into chapters can be used to support modular database design. Profiles also define the chapters to which updates are applied (see “Profiles and chapters” on page 1-127 and “Creating database views using profiles and chapters” on page 1-273). Sentences user interface design options When you develop your database application using Sentences you have a number of different user interface design options, each of which has its own advantages and drawbacks. In general, if you are able to devote more time to development you can achieve a greater degree of control over the user interface. It is possible that you may want to use more than one type of interface for your Sentences application. The range of available options include: • using the standard Sentences Explorer and Dataform interface • using custom Dataforms 1-91 Sentences user interface design options • using the Dataform, Query or Picker applets in HTML pages, and using JSPs • using an XML-based interface • using the Sentences client API A range of user interface options are presented in the Application Suite examples supplied with Sentences Enterprise Edition. These are described in detail in the Application Suite Guide. Using the Sentences Explorer and Dataform interface The simplest user interface method for a Sentences application is to use the Sentences Explorer (see “Using the Sentences Explorer” on page 1-152) and the base Dataform (see “The Sentences Dataform” on page 1-218). You can restrict user access to the schema by changing the options in the Sentences start-up page (see “The Sentences.html start page” on page 1-50). The advantage of this method is that it requires very little effort as you are using Sentences as supplied. The base Dataform is available as soon as you have designed your schema, and always keeps up with schema changes. The drawback of this method is that you have little or no opportunity to customise the user interface. Even so, this method is suitable for many applications. Using custom Dataforms If you want to restrict the associations presented to your application users you can use the Query Editor to define a custom Dataform (see “Creating a custom Dataform” on page 1-227). You can also define a custom Dataform as the default Dataform for a type (see “The base Dataform and the default Dataform” on page 1219). You can give different groups of users different default Dataforms, by using different schema chapters for the profiles of each group (see “Creating database views using profiles and chapters” on page 1-273). Although this method of interface design does give you a little more control than using only the Sentences Explorer and the base Dataform, using custom Dataforms does require maintenance of your application to ensure that your custom Dataforms keep up with schema changes. 1-92 Sentences database design Using applets in HTML pages, and using JSPs You can deploy a Sentences Dataform, a Sentences Picker, and a Sentences Query using Java applets. For more information see “The Dataform applet” on page 1-231, “The Picker applet” on page 1-239 and “The Query applet” on page 1-244. Each applet appears on an HTML page, and you have control over the appearance of the applet and the page. Deploying an applet in this way to allows your users to view or create or edit data in your Sentences database, without giving them access to Sentences Explorer features. You can customise your Web page interface even further by using Java Server Pages (JSPs). JSPs allow the combination of static HTML content with dynamic information retrieved from a Web server that differs with each page request. The Sentences Application Suite contains examples of user interfaces developed with JSPs. Developing applets and the Web pages used for their deployment does give you much more control over user access, but requires additional time and effort for creation and maintenance. Using an XML-based user interface Sentences includes extensive support for data interchange using XML. This means that you can add and retrieve Sentences data without using the standard Sentences user interface (see “Sentences and XML” on page 2-105). You can use the query editor to define XML documents and XML DTDs (see “The Query Editor and XML” on page 2-93) and add and retrieve data using servlets (see “Servlet access to Sentences” on page 1-75). If you export data from Sentences in the form of XML documents you can format it with a stylesheet and display the data on an HTML page. There are a variety of commercial tools available to make this task easier. This method of developing a user interface clearly gives you much more detailed control over presentation, but at the same time demands a much greater effort on your part and involves the use of third-party tools. You should be aware that the XML Standard is still evolving and therefore some of the tools and technologies used with XML are still under development. 1-93 Sentences user interface design options Using the Sentences client API If you are an experienced Java programmer you can create programs to submit queries and receive data using the Sentences client API. Using the API allows you to use any available presentation technology such as Java Server Pages (JSPs) or servlets. For more information see Chapter 10, “Customising Sentences”, and also refer to the Javadoc documentation in the Doc directory of your Sentences installation. This approach gives you complete control over presentation and over update logic for your Sentences data, but entails some development effort. 1-94 Sentences database design Chapter 4 The Sentences Quick Tour This chapter explains the basic layout and appearance of the principal parts of the Sentences client user interface, the Sentences Explorer, the Dataform, and the Query Editor. Detailed information about using these Sentences features can be found in Chapter 5, “Working with Sentences”, Chapter 6, “Advanced techniques”, and Chapter 7, “Sentences queries”. The topics covered in this chapter include: • tree displays • the Sentences Explorer user interface • the Dataform user interface • the Query Editor user interface About tree displays in Sentences Tree structures are a common representation of hierarchical relationships in computing. They generally comprise a number of elements or nodes that are linked together in such a way that any node may have no more than one predecessor and any number of successors. The predecessor of a node is called its parent, and successor nodes are called children. The node that is the origin of a particular tree, and as such has no parent, is known as the root. It is customary to place the root at the top of a tree diagram. In Sentences both the schema and the data of the database are represented in the Explorer as tree structures. Tree structures are also used in the Query Editor. The tree structure is a useful graphical metaphor of the relationships between entities and associations even though the Sentences database is not hierarchical. The structure of the Sentences database actually resembles a net more than a tree as its component elements can be linked to each other in multiple ways. In addition, associations in Sentences are not links between different nodes in a hierarchical tree, they are nodes in their own right. For more clarification on the use of entities and associations in Sentences, see the section “Entities and associations” on page 1-79. 1-96 The Sentences Quick Tour The Sentences Explorer quick tour Figure 4-1 The Sentences Explorer With the Sentences Enterprise Edition, the Sentences Explorer runs as a Java applet in a web browser, and depending on the way that the HTML start page for Sentences has been configured on the server, you may see the browser’s toolbar and menubar (see “Running the Sentences client” on page 1-68). In the Sentences Personal Edition the Sentences Explorer runs as a stand-alone application. The Sentences Explorer has its own toolbar, menubar and status bar, and is divided into two panes, with the schema displayed on the left and data displayed on the right. The information in each of the panes is shown in a tree display. The following sections look at the various parts of the Sentences Explorer. 1-97 The Sentences Explorer quick tour The Explorer Menu bar The Sentences Explorer menu bar provides access to a number of pull-down menus. The menu names and the groups of commands on each menu are listed below. menu name… has commands about… File Create a new profile, or open, edit, delete, and refresh existing profiles; reload data based on Positioner and Filter settings Edit Edit data and view Properties View Change the current Explorer display; display additional database information; open the Diagram Editor Schema Edit and build your schema Query Use queries, and work with query results Help Help topics, Tutorial, and support information Some menu commands are only available when certain items are selected in the Explorer. Some menu commands are not available in certain Sentences editions, or may be disabled for certain users. For example, if the FixedProfile parameter in the Sentences.html start page has been set to yes, the profile commands are not available. A full list of menu commands is given in Appendix A, ‘Menus and Commands summary’. 1-98 The Sentences Quick Tour The Explorer Toolbar The Sentences Explorer toolbar is located beneath the menu bar. The toolbar buttons give rapid access to some frequently used commands. Button Description Action open profile use the Open Profile dialog to open a profile refresh profile refresh the data in the current profile stop stop retrieving data from the server create entity type create a new entity type create association type create a new association type properties open the properties dialog for the selected entity or association; open the Query Editor for the selected query cut cut the selected item copy copy the selected item paste paste the selected item delete delete the selected item; displays the delete impact dialog Dataform open the Dataform for the selected entity type or entity instance or association instance 1-99 The Sentences Explorer quick tour Button Description Action new tab opens a new Sentences Explorer tab on the selected item new tab on target opens a new Sentences Explorer tab on the target of the selected association close tab closes the current tab Positioner value field data entry field for the Positioner tool Filter value field data entry field for the Filter tool reload data reloads data using current Positioner and Filter conditions; displays the results of a selected query help displays help Copying and Pasting Any items you cut or copy from the Sentences Explorer, Dataform or Query Editor, are held on the operating system clipboard and can be pasted into Sentences or other applications. However, you can only paste a Sentences object into the same instance of Sentences from which it was cut or copied. If you paste a Sentences object into another application or into another instance of Sentences, you are only pasting the text representation of the Sentences object, without its unique internal identifiers. Finding data For more information about locating data in the Sentences Explorer and using the Positioner and Filter tools, see the section “Locating data in the Sentences Explorer” on page 1-166. 1-100 The Sentences Quick Tour Sentences Explorer tooltips The Sentences Explorer includes tooltips in a number of places. If you position your mouse pointer over the objects listed below you can see a brief explanation of the object as follows: Position of mouse pointer Tooltip displays… over the toolbar icons a brief explanation of the tool command represented by the icon over an association type in the schema pane the association type’s name, its cardinality settings (see “Cardinality” on page 1-161), and where appropriate, the LazyView connection name and mapped column or key over an entity type in the schema pane the entity type’s name and its datatype, and where appropriate, the LazyView connection name and mapped column or key over an entity instance in the data pane the name of the type and name of the instance, and the datatype of the instance (the instance datatype is not shown if it is identical to the name of the entity type, or if it is <None>) over the profile schema tab list of the chapters used for schema, data, and query changes in the current profile. over a query in the schema pane a list of the query’s parameters and any default parameter settings. Tree displays in the Sentences Explorer The Sentences schema tree, shown in the Explorer schema pane, is made up of all the entity types, association types and values types in the current profile. For convenience these are displayed in the All types folder and Core types folder. The name of the profile is displayed on the schema pane tab. Although it is not displayed as the root node in the schema pane, the profile is the parent of all the entity and value types in the profile. Subsequent levels open up below and to the right. Moving “down” the schema means moving away from the root. 1-101 The Sentences Explorer quick tour The data pane displays all the available instances for the association or entity type selected in the schema pane. Each instance functions as the parent node for the display of all the associations that it takes part in as either source or target. Nodes and icons Any instance or type displayed in the Explorer is a node in the tree display and can be the parent of other nodes. For example, a node representing an entity type is the parent of all the associations that it takes part in as either source or target. Each kind of node has its own distinctive icon. In the schema pane entity types are represented by magenta cubes, value types by magenta discs, and association types by magenta arrows. Yellow cubes, discs and arrows represent subsets. Arrows pointing down and to the right represent forward association types in which the parent node is the source. Arrows pointing up and to the left represent inverse association types where the parent node is the target. The shapes of the icons used in the data pane match the shapes used for the corresponding types, however they are all coloured cyan rather than magenta. Any association or association type is automatically the parent of its source and target. Source and target nodes are displayed when you double click an association type or instance, or when you select Show source and target from the shortcut menu. Yellow folders in the schema and data pane are used for collections of multiple instances of the same type of things, such as subset and supertype relations between entity types, or multiple associations. Schema and data pane features The schema and data pane in the Sentences Explorer share a number of common features such as icons and tabs. 1-102 The Sentences Quick Tour Schema and data pane icons The schema and data pane icons are shown in the following list. Icon Description folder for groups of similar items , , has subset or subtype of; used for multiple associations , superset of or supertype of; used for subset query; used for multiple inverse associations has subset or subtype of; also shows equivalence; also shows custom datatypes subset of or supertype of; also indicates subset query entity type (magenta) value type (magenta) association type (magenta) inverse association type (magenta) metatype (magenta) subset entity type (yellow) subset value type (yellow) subset association type (yellow) inverse subset association type (yellow) 1-103 The Sentences Explorer quick tour Icon Description entity instance (cyan) value instance (cyan) association instance (cyan) inverse association instance (cyan) icon with a mark to the right, indicates source of association type or instance icon with a mark to the left, indicates target of association type or instance query Expand node and collapse node buttons The tree display in both panes of the Sentences Explorer is nested. For example, association types are displayed beneath the entity type which is their source. An expand node button [plus sign (+)] is used to show that there are more nested nodes that can be viewed. The expand node button changes to a collapse node button [minus sign(-)] when you expand the node. The expand node button is displayed in the Sentences Explorer schema pane next to type nodes that are the sources of any association, and in the data pane next to an instance that has an association instance, or an instance-specific association, or where the entity type of which it is an instance is not the source of any association type but only a target. You can double-click a type or instance to display all the associations that it is used in either as a source or as a target. An association type that is not the source of a further association type does not show the expand or contract symbol. However, you can double-click on an association type name to display its source and target, or select Show source and target from the shortcut menu. 1-104 The Sentences Quick Tour Sentences Explorer drill-down The tree display in both panes of the Sentences Explorer is recursive. This means that you can start navigating at any node and follow any chain of entities and associations through the schema and data. The practice of navigating through the schema and data by selectively expanding nodes is known as “drill-down”. Drilling down gives you unrestricted access to data by alternative routes, as you can follow chains of entities and associations by clicking on successive source or target nodes. There is no limit to the depth that you can drill down, although the data displayed becomes repetitive at some point. Sentences Explorer tabs Explorer tabs appear at the top of the data and schema pane. The default tab for the schema pane is the current profile which is the parent node for all the types in the schema. The name of this tab is fixed. When you position your mouse pointer over the profile schema tab Sentences displays a list of the chapters used for schema, data, and query changes in the current profile. The default tab in the data pane displays the name of the type that is currently selected in the schema pane, and therefore changes with each selection. If no type is selected in the schema pane, the data pane default tab displays the profile name. You can modify the display in the schema pane and the data pane by selecting a different object to be the temporary root of the current display. This can aid viewing when working with a large database. You can highlight any object and create a new view based on it, or in the case of associations and association types, based on the target. Each view is displayed on a separate tab page in the schema or data pane. These views are temporary and are not saved. 1-105 The Sentences Explorer quick tour Figure 4-2 Example of Sentences Explorer tabs You can use the blue arrows on the toolbar or the Create Tab commands on the View menu to create and remove tabs. The root tab in the schema pane always shows the name of the current profile. Any schema type can be made the root of a new tab. If the selected item is an association or an association type you can open a new explorer tab on the items target. You can open as many tabs as you need. The data pane always shows the instance data for the active schema pane selected type. When you switch between schema tabs open data pane tabs are closed and are not saved. Tabs can also be removed using the Remove Tab command, which is on the tab shortcut menu, and on the View menu, or by clicking the Remove Tab toolbar button. You cannot remove the original default tabs. The schema pane The schema pane is used to develop and display the structure or schema of your Sentences database. This pane displays entity, value, and association types. The data 1-106 The Sentences Quick Tour pane is used to display specific information about the entity, value and association instances in your database. Figure 4-3 The Sentences Explorer Schema pane The left-hand schema pane always shows the schema folders, Core types, Core queries, All types, and All queries. If you have selected the Show Set Queries option in the Edit Profile dialog the Set queries folder is also shown in the schema pane. All the types queries in your schema are always listed in the All types and All queries folders respectively. The Core types and Core queries folders are convenient ways of displaying the most frequently used types and queries. The Core types folder The Core types folder displays a selection of entity types most central to your schema. When you create a new profile you can choose to select the types for the Core types folder yourself or you can allow Sentences to select the types automatically. If you allow Sentences to select types automatically, then any entity type which is the source of an association which is itself the source of a further association is displayed in the Core types folder. When you allow automatic selection for the 1-107 The Sentences Explorer quick tour Core types folder, if there are no association types in the current schema that are sourced from association types then nothing is displayed in the Core types folder. If you choose to make the selection for the Core types folder manually, you can select an entity type by checking the Display in core types folder check box on the General page of the Properties dialog. Alternatively, right-click on an entity type and select Display in Core types folder from the shortcut menu. The Core queries folder The Core queries folder displays a selection of queries most central to your schema. There is no automatic selection option for the Core queries folder. You must always choose the queries that you want to display in the Core queries folder. To display a query in the Core queries folder, right-click on a query name in the schema pane and select Display in Core queries folder from the shortcut menu. You cannot display a Set query in the Core queries folder. The All types folder The All types folder contains all the entity and value types in the current profile, including those in the Core types folder. You can build your database schema by adding entity types and association types in the All types folder. Association types are displayed beneath their source entity types, and inverse associations are displayed beneath their target entity types. You can use the expand node buttons to drill-down through the schema. The All queries folder The All Queries folder displays a list of all the queries in the current profile. You can also execute a query in the Sentences Explorer. Select a query name and choose Execute Query from the shortcut menu or from the Query menu. The results are displayed in the Explorer data pane. The Set queries folder If you have selected the Show Set Queries option in the Edit Profile dialog the Set queries folder is shown in the schema pane. This folder lists all the Set queries in your schema. If you use a set query to define a subset, Sentences displays the query in a sub-folder named Subset set queries. 1-108 The Sentences Quick Tour The data pane Figure 4-4 The Sentences Explorer Data Pane The data pane displays the entity, value, and association instances that make up the data in the database. The characteristics of the entities and associations are determined by the properties of the corresponding association types and entity types. The display of data is always nested allowing easy movement from entities to associations. In the data pane you can drill down from an entity to an association, and from there to another associated entity without any practical limit. The data displayed becomes repetitive at some point. Scroll bars The Sentences Explorer displays horizontal and vertical scroll bars automatically whenever the amount of data to be displayed in either pane is too large for the space available. The Status bar The status bar is at the bottom of the Sentences Explorer window. On the left-hand side is a status indicator, which displays either Working… or Ready. 1-109 The Sentences Explorer quick tour In the centre is a display of the number of instances displayed. This display does not appear if there are more instances on the server which have not yet been loaded on to the client. In this case, the More… prompt is displayed at the end of the list of instances in the data pane. On the right-hand side of the status bar is a server connection indicator. The indicator next to the server name is green when you have a valid server connection. Divider bar The schema pane and data pane are separated by a divider bar. You can drag the divider bar to any convenient position in the Sentences Explorer. Click the upper, left facing arrow to hide the schema pane and display only the data pane. Click the lower, right facing arrow to hide the data pane and display only the schema pane. You may also use F8 to select the divider bar, and then use the left and right arrows to move it. Use the Tab key to deselect the divider bar. Shortcut keys Sentences windows, menus and dialogs support keyboard shortcuts and accelerators. The shortcut key character is indicated with an underscore in menu listings. Press Alt and the shortcut key to use the accelerator. Sentences also uses standard shortcuts for copy (Ctrl+C), paste (Ctrl+V), and cut (Ctrl+X). Sentences specific shortcuts are: Ctrl+D default Dataform Ctrl+P Properties dialog Ctrl+N New Profile dialog Ctrl+C Open Profile dialog F6 toggle between schema and data panes You can press the Tab key to move between fields in any Sentences window or dialog. You can use the up and down arrow keys to select menu items, and you can use the Esc key to close a menu. You can use the left and right arrow keys to move the cursor in editable fields, and you can use the Home and End keys to go to the top and bottom of lists of data. Using the Page Up and Page Down keys to page through the displayed data. If there is more data in the database than Sentences can display in the current pane, the More… prompt is shown. Double-clicking the More… prompt, or pressing the Page Down when the More… prompt is highlighted, retrieves more data items (see “Demand loading of data” on page 1167). 1-110 The Sentences Quick Tour All the available shortcut keys are listed in Appendix A, ‘Menus and Commands summary’. Display Options You may want to see which objects in your Sentences database are stored in which of your profile chapters, and you may want to be able to distinguish between different objects that have the same display name. You can do this by displaying the internal identifiers that Sentences uses for chapters and other objects. You can use the Options command on the View menu to set the display of chapter and object identifiers. Selecting the Options command displays the Options dialog. Figure 4-5 The Options dialog There are three possible settings for the Options dialog: None (the default); Chapter numbers; and Chapter numbers and Object IDs. If you select Chapter numbers, Sentences displays a number next to each item displayed in the Sentences Explorer representing the database chapter in which that object exists, for example [2]. The number corresponds to the position of that chapter in the available chapters list in the Edit Profile dialog. If you select Chapter numbers and Object IDs, Sentences displays, next to each item displayed in the Sentences Explorer, a number representing the chapter file followed by a number representing the object in the chapter files (its surrogate), for example, [2/2097]. 1-111 The Sentences Explorer quick tour The storage chapter location is significant for entities and associations, but not for values, as they are stored in all the chapters in a profile. For this reason Sentences displays a large number, above 32,000, as the chapter number for values. Figure 4-6 Sentences Explorer view with Chapter numbers and Object IDs option selected Support information You can view a list of currently set parameters, and other information useful for technical support and diagnostic purposes, in the Support Information pages. To view this information, select About from the Help menu, and then click Support Information. The information is divided into three sections, as shown in Figure 4-7, Figure 4-8, and Figure 4-9. 1-112 The Sentences Quick Tour Figure 4-7 General support information page Figure 4-8 Client parameters information page 1-113 The Sentences Explorer quick tour Figure 4-9 License information page In the Enterprise Edition, the Support Information display shows the Chapter Version and Communications Version numbers (which are internal references for support purposes only), a list of any client parameters that have been set (see “Userdefined parameters” on page 1-58), and a list of certain applet parameters if they have been set (see “Sentences applet parameters” on page 1-53). In the Personal Edition application parameters are shown instead of applet parameters (see the Personal Edition Supplement for details). 1-114 The Sentences Quick Tour Explorer shortcut menus Figure 4-10 An example of a shortcut menu When an object is selected, you can display a shortcut menu by clicking the secondary button on your mouse, or by pressing Shift + F10 on your keyboard. Entity types, association types, entities, associations, queries and parameters displayed in the Sentences Explorer all have shortcut menus associated with them. The command options on these menus are taken from the Schema menu, the View menu and the Edit menu. The keyboard shortcuts available with each command are also displayed on the shortcut menu. The commands available differ from time to time according to the circumstances. If the selected item is a hyperlink in the data pane the shortcut menu includes a Follow Hyperlink option. There are separate shortcut menus available for each of the system folders and for queries. 1-115 The Dataform quick tour The Dataform quick tour The Dataform is Sentences’ unique dynamic format for creating, editing, and browsing data. Dataforms are created automatically from the Sentences schema and display the associations sourced from a type. A typical Dataform is shown in Figure 4-11. You can open the Dataform for an object by selecting Default Dataform from the shortcut menu, or by pressing Ctrl + D, or by clicking the Dataform button the toolbar. on Figure 4-11 A typical Dataform Different kinds of Dataform Sentences can create a Dataform which automatically displays all the associations sourced from a specified type. This is known as the base Dataform. You can use the Query Editor to design and save a custom Dataform, that may only display a selection of the available associations for that type. A custom Dataform can include 1-116 The Sentences Quick Tour associations that use the specified type as their target. You may define either the base Dataform or a custom Dataform as the default Dataform for a type. For more details see “The base Dataform and the default Dataform” on page 1-219. You can open a Dataform on an entity type and use it to create new associations. This is known as a Create Dataform. You can also open a Dataform on any instance which can be used to update existing associations. This is known as an Update Dataform. For more details about Create Dataforms and Update Dataforms, see “Create and update Dataforms” on page 1-219. You can often open a new Dataform from a field on an open Dataform, using the shortcut menu for the field. In most cases, changes you make in these Dataforms do not effect the original Dataform. For more details see “Parent Dataforms and child Dataforms” on page 1-222. You can display a Dataform from the Explorer, or from another Dataform, and you can also configure a Dataform to run in its own Java applet so that it can be displayed on its own or as part of some other suitable web page. For more details, see “The Dataform applet” on page 1-231. Title bar The Dataform title bar always displays the name of the source object of the associations being displayed. This source object may be an entity or an association. On a Create Dataform the title bar is always New xxx, where xxx is the name of the entity or association type. Dataform tabbed pages The associations displayed on a Dataform may be distributed on two or more tabbed pages, as illustrated in Figure 4-11. If the type or instance for the Dataform has subsets or supertypes, or has an equivalent type, the base Dataform has multiple pages, one for each of these related types. If you create instance-specific associations they are displayed on a separate tab when the Dataform for that instance is displayed. For more information see “Subsets properties page” on page 1-196, “Supertypes properties page” on page 1-200, and “Equivalence properties page” on page 1-202. The base Dataform displays the source object as an instance of its own type, an instance of any of its supertypes, an instance of its superset type, an instance of any of its superset's subset types, or an instance of its equivalent types simultaneously. The base Dataform creates a tabbed page for each of these types for which one or 1-117 The Dataform quick tour more associations exist. A custom Dataform creates tabbed pages as required for the association types selected for it. You can also add Page nodes in the Query Editor to create additional tabbed pages on a custom Dataform (see “Page Nodes” on page 280). For example, the Dataform shown in Figure 4-11 above is from the Human resources example application in which Employee is a subtype of Person, and Resource is a subset of Employee. Employee, Resource and Person are each the source of association types. The result is that these three related source types are each represented by tabs on the Dataform. Further examples of the way using subsets and supertypes affects the display of the Dataform are given in Chapter 6, “Advanced techniques” (see “Dataform tabbed pages with subsets and supertypes” on page 1-259). Labels and fields The Dataform displays two objects, a label and a field, for each of the source object’s associations. The label is based on the verb of the association, and the field is where you can create or update the target for the association. The presentation format of the target field is based on the Format settings in the Properties dialog for the target object. For example, a multiple association (an association that permits more than one target for the same source) is displayed on the Dataform with a multiple line entry field. The labels of mandatory associations are marked with an asterisk (*) on the Dataform. Sentences does not allow you to save a Dataform if you do not supply a value for a mandatory association. Ellipsis button and picker lists Some Dataform fields have an ellipsis button to their right. You can use this button to select a target from a list of existing target type instances. 1-118 The Sentences Quick Tour Figure 4-12 A picker list from a Dataform ellipsis button When you click the ellipsis button, Sentences displays a picker list showing all the available instances of the association’s target. Every picker dialog includes the Positioner and Filter tools to help you select the target you need. If there are more target items than can be displayed the picker list includes the More… prompt. 1-119 The Dataform quick tour Dataform shortcut menus Figure 4-13 A Dataform shortcut menu The options in the shortcut menu from a Dataform field allow you to open additional Dataforms to view or create instances. Sentences uses the association verb and target type names, and the current target instance name, as the names of the shortcut menu options The available options include: viewing a Dataform for the current association; viewing a Dataform for the current target instance; creating a new association; creating or selecting a new target; and deleting the current association. If the target is a hyperlink, the shortcut menu includes a Follow Hyperlink option. 1-120 The Sentences Quick Tour The Query Editor quick tour Figure 4-14 The Query Editor A full description of the Query Editor, including details of how to create and edit queries, is given in Chapter 7, “Sentences queries”. This current section describes the main features of the Query Editor window. Note The Query Editor used in Sentences version 1 is now referred to as the Set Query Editor. If you need information about using set queries and the Set Query Editor, please contact Lazy Software Technical support (mailto:[email protected]). 1-121 The Query Editor quick tour Query Editor menu bar The Query Editor menu bar contains the following menus: Menu name… has commands about Query saving a query and query properties Edit adding request nodes, derived type nodes, and sort and selection nodes; closing, binding, and hiding nodes, editing expressions; standard editing actions; query node properties View expanding and collapsing the request or result tree Parameter creating and using parameters Results execute a query; export a CSV file; export DTD, export or view XML results, export XSL stylesheet Dataform testing a custom Dataform Help accessing help information. Query Editor toolbar The Query Editor has the following buttons: Button Description Action execute execute (run) the query stop stop retrieving data from the server save save the query 1-122 The Sentences Quick Tour Button Description Action properties view or edit the properties for the selected node cut cut the selected item copy copy the selected item paste paste the selected item delete delete the selected item; displays the delete impact dialog Dataform display the default Dataform for the selected item Custom Dataform display the custom Dataform for the selected item expand tree expand all the nodes in the tree collapse tree collapse all the nodes in the tree expand node expand the current node collapse node collapse the current node Query Editor icons The icons used in the query request tree for nodes are similar to those used in the schema pane for association, entity and value types. 1-123 The Query Editor quick tour Similar icons are used in the query result, both in the query results pane of the Query Editor and in the Sentences Explorer. Query result icons are always displayed in green to distinguish them from database instances. Icon name query name entity type node (magenta) association type node (magenta) value type node (magenta) forward or inverse request node in a recursive closure loop derived type node page node result entity (green) result value (green) result association (green) expression selection node sort node 1-124 The Sentences Quick Tour Icon name transitive closure node Error When a node is bound to instance, the icon for that node is displayed in cyan (light blue). When a branch in a query is hidden, all the icons for nodes in that branch are displayed in grey. When an icon represents a subset entity, association or value instance or type, the icon for that node is displayed in yellow. Query pane The query pane occupies the top left hand side of the Query Editor window. This is where you build your query by creating a query request tree. Schema pane The schema pane occupies the right hand side of the Query Editor window. This pane contains a copy of the contents of the All types folder from the Sentences Explorer schema pane. After you start building your query, the Query Editor schema pane displays only those types that could be used at the currently selected query node. You can drag and drop, or copy and paste, the entity and association types you need to use in your query from here. Results pane The results pane occupies the bottom left hand side of the Query Editor window. When you execute your query the results are displayed here. Query Editor status bar The status bar is at the bottom of the Query Editor window, and has two parts: the status indicator, which usually says Ready and an item counter. The item counter indicates the number of items in the query results set currently loaded in the data pane, which may be less than the total number in the database (see “Demand loading of data” on page 1-167). 1-125 The Message Log Query Editor divider bars There are two divider bars in the Query Editor window, a horizontal bar between the query pane and the results pane, and a vertical bar between these two panes and the schema pane. You can drag the divider bar to any convenient position in the Query Editor. Click the arrows on the divider bars to snap them to the appropriate edges of the Query Editor window. The Message Log Sentences displays a message in the Message Log whenever it is unable to complete an action you requested. The message that Sentences displays should help you identify and resolve the problem. For example, if you try and save a Dataform without giving a value for a mandatory association field, Sentences displays the Message Log with a message reminding you to complete the mandatory field. Sentences displays the Message Log when an error occurs anywhere in Sentences including the Explorer, the Dataform and the Query Editor. You can view the Message Log at any time by selecting Messages from the View menu. Sentences messages are classified in three groups, Errors, Warnings, and Information, and you can use the check boxes on the message log display to select which kinds of messages you wish to see. Figure 4-15 The message log You can copy the text of messages from the message log by using the Copy command on the shortcut menu for the message log. You can then paste the message text into another application using the appropriate commands for your system. 1-126 The Sentences Quick Tour Chapter 5 Working with Sentences This chapter describes how to work with Sentences to design, create, and use a database. The topics discussed in this chapter include: • working with profiles and chapters • using the Sentences Explorer • locating data in the Explorer • properties, datatypes, and formatting • working with the Dataform • working with the Dataform, Picker, and Query applets • data exchange with external formats Profiles and chapters A Sentences database is highly flexible, being made up of chapters, which are files in which data is stored, and profiles that define which chapters are visible to users. This flexibility means that you can control access to certain kinds of data in your database by excluding or including the chapter containing that data in a particular profile. Both the structural schema information and the data content of a Sentences database are stored in chapter files. User access to the database is through a profile which is a selection of one or more of the database chapters. Different users may use different profiles, with a different selection of chapters to access the same database (see “Creating database views using profiles and chapters” on page 1-273). Updates and changes to the schema or data information in a database are stored in chapters that you specify when you create or edit a profile (see “Using the Edit Profile dialog” on page 1-132). Using separate chapters for schema, data, and query changes allows you to separate schema information from data information in your database, and to create different views for different users, and therefore this is strongly recommended. For more details see “Using multiple profiles” on page 1130 and “Creating database views using profiles and chapters” on page 1-273. In addition to the chapters defined as changes chapters, a profile may contain other chapters. The schema and data information in these chapters is available to 1-128 Working with Sentences Sentences, and is displayed and used in the profile, but any updates and changes are made only to the defined changes chapters. All the commands concerned with managing chapters in a profile, including creating, adding, removing, and defining changes chapters, are accessed through the Edit Profile dialog. Data and schema updates All data or schema changes made using the Sentences client are updated to the database as soon as they are executed. This means that when you select Save, or Delete in any Sentences Explorer dialog, or select Save, Save & Reset, or Save & Edit, in the Dataform, your changes are applied to the database immediately. You must select the Save command to save queries when you are using the Query Editor. Changes to Set queries are saved automatically. Any Dataform that has an Apply or an Apply & Reset button is known as a child Dataform. Changes you make in a child Dataform are only saved to the Sentences database when the parent Dataform is saved (see “Parent Dataforms and child Dataforms” on page 1-222). In some circumstances, the server may not accept the update (see “Transaction processing in Sentences” on page 1-257). If you make changes in the Dataform and close the Dataform without clicking on Save the changes you made are not saved. Sentences displays a warning message if you close a Dataform that contains unsaved selections. Chapter file locations You can place your database chapters in one or more defined locations. The possible locations must be listed in the Server.properties file under the ChapterPathList property (see “The Server.properties file” on page 1-43). The first location listed for this property is the location you selected for chapter files when you installed Sentences. This is the default location for all chapter files, including the system chapters. The defined locations may be on one or more computers, which can be accessed as local or network drives. When you create a new chapter you must specify the location from the drop-down list in the New Chapters dialog. The directory path names that appear in this list are based on the paths as viewed from the computer running the Sentences server. 1-129 Profiles and chapters System chapters Sentences uses two system chapters, Metaschema.chap and Profiles.chap. When you install Sentences, these chapters are placed in the location you specify for chapter files. You can move these files to another location, but if you do so you must specify the new location under the SystemChapterPath property in the Server.properties file. You must shut down the Sentences server before you move the system chapters. Metaschema.chap contains information that is internal to Sentences. It does not contain any user-visible or user-modifiable data. You should not delete this file or attempt to modify it in any way. If this file is deleted accidentally, Sentences creates a new copy of this file when the Sentences server starts up. The Profiles database and the Profiles profile The system chapter Profiles.chap contains information about all the profiles in your Sentences installation. Do not delete this file or attempt to modify it in any way. If this chapter file is deleted accidentally, Sentences creates a new copy of it when the Sentences server starts up. A new copy of profiles.chap created by Sentences does not contain any information about your profiles. In this situation, use the Edit Profile dialog to create all the profiles you need including the example profiles included in a default Sentences installation. Sentences includes a system profile named Profiles that is hidden from users by default. This profile contains one chapter, Profiles.chap , and constitutes a profiles database. This profile can be addressed using the Sentences API. To make this profile visible to users, and to view the profiles database in the Sentences Explorer, you can set the optional applet parameter ProfileProfileVisible to Yes (see “PARAM NAME=”ProfilesProfileVisible”” on page 1-58). You cannot give the name Profiles to a profile that you create, and you cannot delete the Profiles profile if it is visible. Warning Do not make any schema or data changes to the Profiles profile. Changes to this profile may make your Sentences installation unusable. 1-130 Working with Sentences Using multiple profiles You can create multiple profiles that use different selections of chapters from the same database. A user’s view of the database is defined by the sum of all data and schema updates in the chapters of their profile and therefore different users can have different views of a single database. You can use the profile mechanism to customise different Sentences views for different users. For more details see “Creating database views using profiles and chapters” on page 1-273. Profile and chapter commands The Sentences Explorer File menu includes commands for creating, opening, editing and deleting profiles. Command name Action New Profile displays an empty Edit Profile dialog (see page 1-132) Open Profile displays the Open Profile dialog (see page 1-131) Edit Profile displays the Edit Profile dialog with details of the current profile (see page 1-132) Delete Profile displays the Delete Profile dialog (see page 1-134) Refresh Profile closes and reopens the current profile You can export a database and the profiles it contains, and import the chapters that make up the database, using server commands. For more details see “Exporting and importing databases” on page 1-141. Profile and chapter constraints You must be aware of the following constraints in the use of profiles and chapters: • A schema definition specifies separate changes chapters for schema, data and query information. Users can only save updates to the database if the definition of the current profile includes an appropriate changes chapter. For example, if the profile definition does not specify a query changes chapter, users cannot save any changes they make to queries (see “Changes chapters” on page 1-133). • When the FixedProfile parameter in the Sentences.html file is set to “yes” the profile commands on the File menu are not available and users cannot 1-131 Profiles and chapters change their Sentences profile (see “PARAM NAME="FixedProfile"” on page 1-55). • The EditOption parameter in the Sentences.html file can restrict a user’s ability to change parts of the database. For example, when the EditOption parameter is set to data users cannot save changes to the schema, even if a Schema changes chapter is specified in the Edit Profile dialog (see “PARAM NAME="EditOption"” on page 1-55). • You cannot open or edit a profile if one or more of the chapter files used in the profile is no longer available, for example, if it has been deleted from disk. In this case you can create a new profile with valid chapter files and give it the same name as the profile that is no longer valid, and this overwrites the previous invalid profile information. The Open Profile dialog [ Figure 5-1 The open profile dialog All the profiles available are shown in the Open Profile dialog. The list of available profiles is controlled by the Profiles.chap file on the Sentences server. You can only use one profile in any Sentences session at any time. Opening a profile closes any previous profiles. However, you can run more than one Sentences session at a time. You can open the Open Profile dialog by selecting the Open Profile command on the File menu, or the Open Profile button on the Sentences Explorer toolbar. Creating a new profile To create a new profile, select New Profile from the File menu. Sentences displays an empty copy of the Edit Profile dialog. 1-132 Working with Sentences The following section explains the use of the Edit Profile dialog. The Edit Profile dialog Figure 5-2 The edit profile dialog The Edit Profile dialog is displayed when you select either New Profile or Edit Profile from the File menu. When you select New Profile, the Edit Profile dialog is displayed with no information. When you select Edit Profile, the Edit Profile dialog is displayed with the settings for the current profile. Using the Edit Profile dialog The Edit Profile dialog is shown in Figure 5-2. • Profile name Enter a name for the profile in the profile name field. You can refer to a named profile in the HTML start up page for the Sentences client applet (Sentences.html), in the start up pages for other Sentences applets, and when using the Sentences API. Because of this you should make sure that profile names do not include any special characters that need to be represented by escape sequences in HTML which may not be interpreted correctly by Sentences. 1-133 Profiles and chapters Note The name Profiles is reserved for the system profiles database, and cannot be used for user-created profiles (see “The Profiles database and the Profiles profile” on page 1-129). • Renaming a profile You can change the displayed name of a profile by entering a new name in the Profile name field. Sentences does not actually rename the profile, but creates a new profile with the new name you have entered. If the new name is the same as that of an existing profile, the existing profile is overwritten. If you only change the case of a profile name when you edit it this does not create a new profile. You can reset the profile definition used on a client to be the same as the current saved version of the profile by selecting the Refresh command on the File menu or by clicking the Refresh button on the toolbar. Chapters The chapters field lists all the chapters that are available in a profile (the available chapters). The schema and data information in all the available chapters is displayed and used in the profile. Changes to schema, data or query information are saved in the specific chapters defined for schema, data, and query changes. Changes chapters Use the Edit Profile dialog to set the active chapters which Sentences uses for updating changes to the schema, data, and queries of your database. These are known as the Schema changes, Query changes and Data changes chapters. Although you may use the same chapter for more than one of these change chapters, using separate chapters makes it easier to create different profiles for different users. A user may save changes to the database only if the appropriate changes chapter is defined in the Edit Profile dialog. This means that if a Schema changes chapter is not specified, users cannot save changes to the database schema, and if a Data changes chapter is not specified, users cannot save changes to database data. If a Query changes chapter is not specified, users can create new temporary queries and run them in the Query Editor, and make temporary changes to existing queries, but they cannot save any of these changes. 1-134 Working with Sentences Generate Core types automatically The Core types folder displays a selection of the types in your schema (see “The Core types folder” on page 1-106). The selection of types for this folder can be manual or automatic. To choose automatic selection, check the Generate core types automatically checkbox. To choose manual selection, leave this checkbox unselected. Show Set Queries When you create a profile you can determine whether set queries (the queries used in Sentences version 1) should be available to users of this profile. To allow access to set queries, check the Show Set Queries check box. To prevent access, clear this box. If you check the Show Set Queries check box, Sentences displays the Set Queries folder in the schema pane and commands relating to Set Queries are added to menus. Saving a profile When you make any changes to a profile you can either save the changed profile, or modify the current profile to use the changed settings for your current Sentences session only, or discard all your changes. After you make any changes, the OK button is available. Click OK if you wish to save your changes or use your changed setting for the current session only. Sentences displays three options in a confirmation dialog: • Yes confirms and saves all your changes to the profile • No modifies the profile to use the changed settings for the current session only but does not update the saved profile • Cancel returns you to the Edit profile dialog To discard your changes click Cancel in the Edit Profile dialog. Deleting a profile To delete a profile, select the Delete Profile command from the File menu. Sentences displays the Delete Profile dialog. Highlight the profile you want to delete and click the Delete button. Sentences displays a confirmation dialog. Click Yes to delete the profile. 1-135 Profiles and chapters Deleting a profile does not affect the chapter files used in that profile in any way. The chapter files still exist on your hard disk, and can still be used in other profiles. Working with chapters Add chapter Figure 5-3 The Add Chapter dialog To add a new or existing chapter to the profile, click the Add button to open the Add Chapter dialog, shown in Figure 5-3. To add an existing chapter to a profile, highlight the chapter name in the Add Chapter dialog. You can use standard Windows selection techniques to select more than one chapter from this list. Click OK to add the selected chapter or chapters to the list of available chapters for the profile. To return to the Edit Profile dialog without adding chapters, click the Cancel button. The first chapter added to a profile is set as the default changes chapter for schema, data, and queries. Apart from this, the order in which chapters are listed in a profile has no significance. To create a new chapter, click the New button. This opens the New Chapter dialog shown in Figure 5-4. 1-136 Working with Sentences New chapter Figure 5-4 The new chapter dialog To create a new chapter, type in the name in the New Chapter dialog and click OK. This adds the new chapter to the list shown in the Add Chapter dialog. You must repeat this action for each chapter you want to create. To return to the Add Chapter dialog without adding a new chapter, click the Cancel button. You can select the physical location for your new chapter from the Location dropdown list. Locations for chapter files are only listed here if you have defined them in the ChapterPathList parameter of the Sentences.properties file (see “ChapterPathList” on page 1-43). If the paths defined for your chapters are very long you may not be able to view the complete path in this dialog. In this case you can resize the dialog window by clicking on its right edge and dragging to the right. To create a chapter for use by the LazyView tool to view data from a relational database, click the LazyView Chapter checkbox on the New Chapter dialog. For more information see the LazyView Guide. Naming chapter files When you create a new chapter the name you assign to it in the New Chapter dialog is generally used as the basis of the chapter’s file name on disk. Chapter files on disk have the extension *.chap. Sentences chapter names are case sensitive. There are no restrictions on the characters that can be used in Chapter names. However, if you use a character that has a special meaning in your computer’s file system, Sentences automatically maps that character to an alternative character when it creates the disk file for that chapter. The Edit Profile dialog displays a chapter’s logical name, which is stored in the system chapter Profiles.chap. All profiles use this chapter to look up chapter 1-137 Profiles and chapters names so when a chapter is renamed in one profile it is subsequently visible in other profiles using its new logical name. Rename To rename a chapter, click Rename in the Edit Profile dialog and enter the new name. Like other elements in Sentences, all chapter files have a unique hidden internal identifier which never changes. Sentences identifies chapter files using these internal identifiers, so chapter files can be renamed and still be visible to Sentences. When you rename a chapter in the Edit profile dialog you only change the visible (logical) name of the chapter. Both the internal identifier and the disk file name of the chapter remain unchanged. Properties Click Properties in the Edit Profile dialog to display the properties for a chapter. For all chapters, Sentences displays the following information: • Name: the chapter file name • Chapter UID: the unique internal identifier for the chapter • Block Size: the chapter block size • Read-only: whether or not the physical file is editable All these fields are read only. When LazyView is installed and licensed, there is an additional tabbed page which is used to set the connection properties for the chapter. For more information about the LazyView tool, which is used for viewing data from relational database tables, see the LazyView User’s Guide. Checking chapters used for changes If you position your mouse pointer over the profile schema tab in the Explorer Sentences displays the profile name and the names of the chapters used for schema data, and query changes. This is an alternative way of checking which chapters are used for changes. Deleting a chapter If you need to delete a chapter you must first make sure that it is not used in any profile. We recommend keeping a backup copy of any chapter before you delete it. You can then delete the chapter from your disk. If you delete the chapter while 1-138 Working with Sentences Sentences is still running the chapter name is still visible in the Add Chapters dialog until you restart Sentences. Password-protected chapter files You can define a password to protect a chapter file. Once you have assigned a password to a chapter file it can only be accessed when the password is entered. Sentences provides a command line procedure only for setting, changing and deleting passwords. This mechanism is supported by a dedicated Sentences servlet. When users wish to access a profile that includes password-protected chapter files they must first access a specific HTML page and enter the necessary passwords, before accessing the profile. System administrators should note that the password entry HTML page is not in itself secure, and therefore server-based security measures are recommended. When you use a command line procedure that references password protected chapter files, Sentences displays a prompt requesting the password for each protected file. The Sentences API includes an interface and methods for use with passwordprotected chapter files. To set a password 1. Make sure the Sentences server is shut down. 2. Open a command prompt and navigate to the <Sentences_home> directory, and enter the command ChapterPassword <chapter.name> where <chapter.name> is the name of an existing chapter in any one of the locations listed in the Server.properties file under the ChapterPathList property. 3. Sentences prompts you to type in a password for the chapter, and then prompts you to type in the password a second time for confirmation. 4. Sentences confirms that the password has been set with the following message: The password for chapter <chapter.name> has been changed. To change a password 1. Make sure the Sentences server is shut down. 1-139 Profiles and chapters 2. Open a command prompt and navigate to the <Sentences_home> directory, and enter the command ChapterPassword <chapter.name> where <chapter.name> is the name of an existing chapter in any one of the locations listed in the Server.properties file under the ChapterPathList property. 3. Sentences prompts you to type in the existing password for the chapter. 4. Sentences prompts you to type in a new password for the chapter, and then prompts you to type in the new password a second time for confirmation. 5. Sentences confirms that the password has been set with the following message: The password for chapter <chapter.name> has been changed. To delete a password 1. Make sure the Sentences server is shut down. 2. Open a command prompt and navigate to the <Sentences_home> directory, and enter the command ChapterPassword <chapter.name> where <chapter.name> is the name of an existing chapter in any one of the locations listed in the Server.properties file under the ChapterPathList property. 3. Sentences prompts you to type in the existing password for the chapter. 4. When Sentences prompts you to type in a new password for the chapter, press Enter without typing in anything. Repeat this action when Sentences prompts you to type in the new password a second time for confirmation. 5. Sentences displays a message asking you to confirm that this action removes the password from the specified chapter. Type in y (for yes) to confirm, or n for no to retain the password. To enter a password 1. Start the Sentences server. 2. Using a Web browser, access the following URL: <hostname>:<portnumber>/Sentences/PasswordEntry where <hostname> and <portnumber> are the hostname and port number respectively for the Sentences server. 1-140 Working with Sentences 3. Sentences displays an HTML password entry page listing the files that have passwords. Type in the correct password for each file and click the Submit passwords button. The password entry page displays the names of all the chapters that have passwords. You only need to enter passwords for the chapters in a profile you wish to access. 4. Sentences responds with either Password accepted or Incorrect password for each chapter file password you enter. 5. After entering the correct passwords, start the Sentences Explorer and access the profiles in the normal way. Password-protected files and the Personal Edition The Personal Edition cannot access any Sentences chapter file that currently has a password assigned to it. Deploying profiles and chapters You can deploy a Sentences database by moving all the chapters and profiles that make up your database from your development environment to your deployment environment. For example you may choose to develop a Sentences database by running the Enterprise Edition in local mode (with the server and client running on a single machine) and then deploy your database on a live intranet or Web server. Important You must have a separate license for each server running Sentences. The two possible methods for deploying your database are exporting the database or copying chapters. Exporting the database requires using a profile which includes all your chapters, and then reconstructing the profiles on the target system after import. This method is explained fully in the section “Exporting and importing databases” on page 1-141. Alternatively, you can copy all your chapter files (*.chap files) from the SentencesChapters directory on your development server to the SentencesChapters directory on your deployment server. You can then reconstruct all the profiles for your database, using the Edit Profile dialog. There are some limitations and restrictions on using this method. This method is explained fully in the section “Copying chapter files” on page 1-150. 1-141 Deploying profiles and chapters Schema and data visibility You can create multiple profiles in a single database. A user’s view of the database is defined by the sum of all data and schema updates in the chapters of their profile and therefore different users can have different views of a single database. You can use the profile mechanism and the delete mechanism to customise different Sentences views for different users (see “Creating database views using profiles and chapters” on page 1-273). Exporting and importing databases You can export your Sentences database using the Export command, which creates a database export file. You can import the set of chapters from a database export file using the Import command. By default, the Import command does not automatically recreate the profile definitions for a database. Export and import operations are command line procedures and are normally carried out by the administrator of the Sentences database. The administrator must have at least read/write access to the computer running the Sentences Web server in order to carry out export and import operations. A database export file contains all the schema and data information contained in a single export profile, including the chapter configuration. We recommend using the file extension *.lze to identify database export files. Export and import require exclusive access to the Sentences server, and therefore you must close down the Sentences server before you perform an import or an export operation. If you try to export or import a profile while the server is in use, Sentences displays an error message Database in use. Benefits of exporting a database In Sentences, all schema and data changes, including delete actions, are treated as additions to the chapter files. This can have certain advantages, as discussed in the section “Creating database views using profiles and chapters” on page 1-273. However it is possible that after a time the quantity of changes applied to a database may make the chapter files very large, and may possibly result in poorer performance. The export procedure consolidates data and schema updates and therefore exporting a database and then importing it may enhance the performance of large databases. 1-142 Working with Sentences Database export and internal identifiers Sentences uses unique internal identifiers for every schema and data element in the database. These identifiers are used in any links between chapters. When you export and import a database Sentences consolidates the details of schema and data updates, creating a new version of your database. By default, this new version of your database maintains the existing internal identifiers and preserves cross-chapter links. Note In earlier versions of Sentences, up to Version 2.1, Sentences automatically renumbered all the internal identifiers when performing an import operation, which meant that cross-chapter links were not maintained. In later versions from Sentences Version 2.2 you can force Sentences to renumber by specifying the -renumber switch. To export a database you must specify a profile that includes all the schema and data chapters that are relevant for an application. You may use an existing profile if a suitable one exists, or create a new profile for this purpose. Default export behaviour When you use the Export command Sentences checks cross-chapter references to make sure all required chapters are included in the export profile, and displays an error message if a required chapter is not found. By default, if Sentences finds that any required chapters are missing the export operation fails. You can change the default behaviour and run the export command even if some chapters referenced by other chapters are not included by using the -force switch with the Export command. The result of using the -force switch may be that some of the data from the original database is missing from the database export file. To export a database Note The following command line examples use Windows system conventions. You must have write access to all the chapter files used in the database you wish to export. To export a database: 1. Choose a profile that includes all the schema and data files that are relevant to the application database you wish to export. The profile to be exported must meet these conditions: • the profile must contain all of the chapters holding your data or schema; 1-143 Deploying profiles and chapters • the profile must not include the system chapters Profiles.chap or Metaschema.chap • the profile should not include any other chapters supplied with Sentences such as the Human resources chapters, New chapter.chap, or any of the Application Suite chapters, except under special circumstances You may use an existing profile if a suitable one exists, or create a new profile for this purpose. You may find it helpful to keep a note of the names of the chapter files used in the profile you export. 2. Shut down the Sentences server. 3. Open a command prompt and navigate to the <Sentences_home> directory. Run the following command at the command prompt: c:\> Export [-force] <profile name> <path>\<export file name> where <profile name> is the name of a profile recognised in the current login.chap file and <path>\<export file name> is the full path and the name of the database export file you want to create, and [-force] is an option switch. If the profile name includes spaces some operating systems require the name to be enclosed in quotation marks. Note If the profile you are referencing with this command includes passwordprotected chapters, Sentences prompts you for the password for each chapter concerned (see “Password-protected chapter files” on page 1-138). Export command option switch The Export command may include the following option switch: option switch meaning -force The -force switch exports a profile even if Sentences finds that some chapters referred to by other chapters in the profile are missing. To import a set of chapters Carry out the following steps to import a set of chapters: 1. Shut down the Sentences server. 1-144 Working with Sentences 2. Make sure that no copies of any of the chapters being imported exist in any of the chapter locations specified in the Server.properties file. If Sentences finds a chapter with either the same name or the same internal identifier as a chapter being imported the Import command fails. 3. Open a command prompt and navigate to the Sentences server directory. At the command line prompt run the following command: c:\> Import [-renumber] [-overwrite] <path>\<export file name> [- location chapterNo=location ...] where <path>\<export file name> is the full path and file name for the database export file you want to import, and [-renumber], [-location], and [-overwrite] are option switches, as explained in the section “Import command option switches” on page 1-145. During the import and export procedures Sentences displays a row of asterisks on the command line screen. Each asterisk represents 1000 lines of data that have been processed. If the Import command fails for any reason, any incomplete information is deleted. If an export or import program is interrupted by a user action, the Sentences database may be locked. If you find you cannot run Sentences after a failed export or import operation check the SentencesChapters directory to see if a file named database.lock is present in any of your chapter file locations. If you find this file, delete it and then restart the Sentences server (see “Shutting down and restarting the Sentences server” on page 1-60). 4. When the import operation ends restart the Sentences server and open a Sentences client. Note If the profile you are referencing with this command includes passwordprotected chapters, Sentences prompts you for the password for each chapter concerned (see “Password-protected chapter files” on page 1-138). 1-145 Deploying profiles and chapters Import command option switches You may specify any of the following options by adding the appropriate switch to the Import command. If you do not specify any switch, the default behaviour is as described for the -preserve option. option switch meaning -preserve Use the -preserve switch to import the set of chapters without changing the existing internal identifiers for chapters and objects, and to maintain links between chapters. (default) You may not use this switch with -overwrite or with -renumber. -renumber Use the -renumber switch to import the set of chapters and change all the internal identifiers for chapters and objects. This means that links to chapters outside the imported set of chapters are not maintained. Import with the -renumber switch adds the definition of the exported profile to the Profiles database so that it is automatically listed in the Open Profiles dialog. You may use this switch with -overwrite but not with -preserve. -overwite The -overwrite switch instructs the import program to overwrite any existing profile with the same name as the profile being imported. If you do not specify the -overwrite switch, and a profile with the same names as the imported profile already exists, Sentences adds a numeral to the end of the name of the imported profile. The -overwrite switch does not have any effect on existing chapters, and Sentences always adds a numeral to the names of any imported chapters that have the same names as existing chapters. You may use this switch with -renumber but not with -preserve. 1-146 Working with Sentences option switch meaning -location The -location switch allows you to specify the chapter directory for the chapter files in the profile being imported. You may specify different locations for each chapter in the profile by giving a different location for each chapter number. All the locations must already be designated in the ChapterPathList property of the Server.Properties file. You can check the chapter number of the chapters in the profile being imported by opening the .lze file in a text editor. On Windows systems you should enclose the location specification in quotation marks, for example “1=F:\chapters”. You may use this switch with any other switch. Visibility of imported profiles When you import a set of chapters using the default setting (the -preserve option) the exported profile may not be visible in the Open Profile dialog when you restart Sentences. This is because Sentences does not add the profile to the profiles database in Profiles.chap when you use the -preserve option. If the imported profile is a new version of an existing profile, the previous profile definition is still available in the Open Profile dialog and can still be used. This occurs when you have exported a database to re-import it to the same system, or to move an application from a development system to a deployment system where it had previously been deployed. If the imported profile is not a new version of an existing profile, you must create the profile definition. You may do this using the Edit Profile dialog and selecting the chapters belonging to the imported profile. If the imported profile is complex, for example, if you created a single profile to export all the profiles and chapters of a large Sentences application, it may be easier to use an XML Import procedure to create the profile or profiles you need. This procedure is described in the section “Transferring the profiles database” on page 1147. 1-147 Deploying profiles and chapters Visibility of imported profiles using the -renumber option If you import a set of chapters using the -renumber option switch, Sentences adds the exported profile to the profiles database in Profiles.chap, and the profile is visible in the Open Profile dialog when you restart Sentences. If a profile being imported with the -renumber switch, or a chapter in the profile, has the same name as an existing profile or chapter Sentences appends a numeral to the name of the imported profile or chapter, for example, My Data Chapter 1. Sentences recognises that the old and new profiles and chapters are different as they have different internal identifiers, due to the use of the -renumber switch. Limitation on parameters with Import command on Windows If you are running the Sentences server on Windows, and the command you use to import a profile needs to include a more than eight parameters, for example if you wish to specify a large number of chapter locations, you cannot use the supplied Import.bat file. This is because of a limitation on the number of parameters that can be included in Windows batch files. In this case you must enter the Java command with all the necessary parameters at a command line. There is no restriction in the number of parameters when using Linux, Solaris or AIX. Importing a database export file from a previous version Database export files from Sentences Version 2.2 and Sentences Version 3.0 may be imported into Sentences Version 3.5. However, you must ensure that you are using the current releases of these versions before creating your export files (build 2.2.32 or later or build 3.0.43 or later, respectively). Please refer to the Sentences Installation Guide for further details. If you need to import a database from any other version of Sentences, please contact Lazy Software Technical Support (mailto:[email protected]). Transferring the profiles database When you deploy a Sentences application for the first time on a system other than the one it was developed on, you may wish to transfer the profiles database, particularly if you need to replicate the profile and chapter structure of a complex Sentences application. The procedures in this section explain how to do this. You do not need to use these procedures to update an application that already exists on the deployment system. 1-148 Working with Sentences These procedures involve using Sentences’ built-in XML Export and XML Import commands to export the Sentences profiles database from one system, and import it on another system. To export the profiles database, follow these steps: 1. On the source (development) system make sure that the system profile, Profiles, is visible in the Open Profile dialog. If this profile is not available, you must set the optional parameter ProfilesProfileVisible in the Sentences.html startup page to yes (see “Additional optional parameters” on page 1-56). Note that if you make any changes to the Sentences.html start page you must restart the Sentences server before the changes become effective. 2. Create a database export file as described in “To export a database” on page 1142. 3. In the Sentences Explorer select the Profiles profile 4. Open the All queries folder and highlight the query Export profiles. 5. Select Results, then Export XML Results from the Query menu. 6. Select External for the DTD Reference option. 7. Save the output to a file named, for example, profiles.xml. As an alternative to these last three steps you can create an XML export file using the following command line, after stopping the Sentences server: ExportXML -doctype external -file <file.name> Profiles “Export profiles” You now have two files on the source (development) system, the database export file, and the XML file of profile definitions. To import the profiles database, follow these steps: 1. Copy the two files (the database export file, and the XML file of profile definitions) from the source (development) system to the target (deployment) system, or make them available across a network. 2. Make sure that none of the chapters in database export file exist on the target (deployment) system, in any directory that is on the chapter path list. 3. Stop the Sentences server on the target system and import the database export file using the default setting for the Import command as described in “To import a set of chapters” on page 1-143. You may optionally use the -location switch to place these chapters in different directories. 1-149 Deploying profiles and chapters 4. Start the Sentences server and use the Edit Profile dialog to create a new profile named, for example, Profiles. This must be the same name as the profile you used to create the database export file. This profile must contain only the system chapter Profiles.chap. 5. Use the Edit Profile dialog to create a second new profile. This may have any name you wish. This profile must include all the chapters imported from the database export file. This makes sure that details of all the chapters are recorded properly in the profiles database. After you have created and saved this new profile once, it can be deleted. 6. Stop the Sentences server. 7. Copy the exported Profiles.xml file from the source system to the target system. 8. Open a command prompt and navigate to the <Sentences_home> directory. 9. Run the following command: ImportXML -file Profiles.xml 10.Re-start the Sentences server. The set of profiles exported from the source system is now visible in the Open Profile dialog. Export command troubleshooting The Export command checks that all referenced chapters are included in an exported database, unless you use the -force switch with the command. Sentences always checks the internal identifiers of the chapters in a profile, rather than the chapter names, and an export command may fail even though a chapter with the correct name is in the profile. Sentences display an error message similar to the following: 1734: Chapter “<chapter_name_A>”contains a reference to chapter “<chapter_name_B>”, which is not in profile “<profile_name>” If this error occurs it is likely that the original chapter referenced in the profile has been replaced by a different chapter with the same name. You can check the list of other chapters referenced by a chapter, and their internal identifiers, by using the InspectChapter command with the header option (see “Chapter file analysis” on page 2-262). 1-150 Working with Sentences Copying chapter files You can copy chapter files (*.chap files) from the <Sentences_chapters> directory on your development server to the <Sentences_chapters> directory on your deployment server, provided that both installations are using the same version of Sentences. You can then reconstruct all the profiles for your database, using the Edit Profile dialog. You do not need to reconstruct the profiles if you copy the Profiles.chap file as well as your application chapter files, but the effect of copying the Profiles.chap file is to delete any existing profile definitions on the deployment server. You must shut down the Sentences server on both the source and target Sentences installations before copying any chapter files. After you restart the Sentences server on the target installation all the copied chapters are visible in the Add Chapters list of the Edit Profile dialog. If you copy the Profiles.chap file the copied profiles are also visible in the Open Profile dialog. If you do not copy the Profiles.chap file you can reconstruct your profiles using the Edit Profile dialog. Restrictions on copying chapter files If the Sentences server detects two or more chapter files that are duplicates Sentences does not start and instead displays an error message (see “Errors reported at the Sentences client” on page 1-70). The Sentences server does not identify chapter files as duplicates by their file system names, but by their internal identifiers. When you copy a Sentences chapter file the copy has the same internal identifier as the original. This means that you must take great care when copying chapter files never to allow two copies of the same file to be accessed by the same server at the same time. Chapter format From time to time, as improvements are made to Sentences, there are changes to the internal format of the chapter files used by Sentences. You can check the chapter format used by your version of Sentences by selecting the About command in the Help menu. Click the Support Information button for a display of additional information including details of the current chapter format. You can copy chapter files from one version of Sentences to another as long as the chapter format is the same in both versions. If the chapter format has changed, you cannot use copied chapter files. You must export a profile from the earlier version of 1-151 Deploying profiles and chapters Sentences and import the profile into the later version. For more information see “Exporting and importing databases” on page 1-141. Changing chapter file block size (single chapter export and import) If you wish to change the block size of a specific chapter file you can use the ExportChapter and ImportChapter commands. Both of these commands are run from a command line. For further information about block size see “BlockSize” on page 1-46. Both of these commands are run on a single file. The commands do not use the ChapterPathList setting from the Server.properties file or check for the existence of the database.lock file. You must therefore use the fully-qualified path and file name, for example: D:\SentencesData35\Chapters\MyChapter.chap It is strongly recommended that you shut down the Sentences server before running these commands. ExportChapter command To export a single chapter file, open a command prompt, navigate to your <Sentences_home> directory and enter the following command: ExportChapter <chapter file> <export file> where: <chapter file> is the file name of a Sentences chapter file to be exported, and <export file> is the file name of the export file to be created. After you export a single chapter file in order to change the file’s block size you must remove the original file from any directory that is listed in the chapter file list. ImportChapter command To import a single chapter file, open a command prompt, navigate to your <Sentences_home> directory and enter the following command: ImportChapter [-blocksize <block size>] <export file> <chapter file> where: <block size> is an optional number, representing the block size in KB to be used when creating the new chapter file, <export file> is the file name of an export file created by the ExportChapter 1-152 Working with Sentences command, and <chapter file> is the file name of a Sentences chapter file to be created. The ImportChapter command creates a Sentences chapter file that has the same internal identifier as the original chapter file, so that references to it from other files can be retained. If you wish to use the same file name as that of the chapter file that you originally exported, you must make sure that the original chapter file is removed from the directories in the chapter path list before running the ImportChapter command. Using the Sentences Explorer You can use the Sentences Explorer to create your schema, and to browse schema and data. You can launch the Dataform to type in data, and the Query Editor to create and run a query. Resizing the applet window If you are using Microsoft Internet Explorer you can resize the Sentences Explorer applet window by dragging the border of the browser window to a larger or smaller size, or by clicking the window’s maximize button. If you are using a version of Netscape Navigator earlier than version 6 on a Windows computer, changing the size of the browser window does not automatically change the size of the applet window. You must refresh your browser window to allow the Sentences applet to resize itself. Delayed display of inverse associations In order to speed up the display of data in the Sentences Explorer, Sentences postpones the download and display of inverse association data. When you expand an entity instance node that is the target of one or more association types, Sentences displays a folder for each association type. Sentences does not retrieve the instances contained in these folders until you expand the folder itself. Display order of instances When you select an entity type or association type in the schema pane the corresponding entity or associations are displayed in the data pane. For all entity types that are not subsets, the display order of instances in the data pane is determined by the sort algorithm of their type’s datatype. If not all the visible instance data has the same datatype, instances of the same datatype are grouped together, and then ordered by the sort algorithm of their type’s datatype. 1-153 Database components For all association types that are not subsets, the display order of instances in the data pane is determined first by the sort order of their sources, and then by the sort order, or if it exists, by the defined sequence, of their targets. Inverse associations are sorted by target first. For all entity and association types that are subsets, the display order of instances in the data pane is determined by settings of any sort nodes in the subset query. If no sort nodes exist in the subset query the display order is determined by the sort algorithm of the type’s datatype. All of the display rules given above apply to the top level display in the data pane. When you expand a node in the data pane the data displayed is ordered automatically by Sentences and this ordering cannot be changed. Refreshing the display To refresh the display of the Sentences schema, click the Refresh button on the Sentences Explorer toolbar, or select the Refresh command from the File menu. Refreshing the display also resets the client’s definition of the current profile. To refresh the display of data in the Sentences Explorer data pane, click the Reload Data button on the toolbar, or select Reload data from the File menu. Database components The Sentences database includes both schema and data information. The Sentences database schema is built up of entity types and association types, referred to collectively as types. The data in a Sentences database is built up of entities and associations which are referred to collectively as instances. Types and instances are introduced and explained in Chapter 2, “Introducing the associative model”. You can work with types and instances in the Sentences Explorer and the Dataform, and also in the Query Editor. These three mechanisms for viewing and working with information are introduced in Chapter 4, “The Sentences Quick Tour”. The next part of this chapter describes in more detail how you can work with types and instances in the Sentences Explorer and the Dataform. Working with the Query Editor is described in Chapter 7, “Sentences queries”. Entity types and entities The least complex data items in a Sentences database are entities which are instances of entity types. Entity types are created and managed in the Sentences 1-154 Working with Sentences Explorer, and entity instances are created in the Dataform. Entity types and association types are displayed in the schema pane, and entities and associations are displayed in the data pane. For more information see “Entities and associations” on page 1-79. Creating entity types To create an entity type, you can either: • click the Create Entity Type button on the toolbar; or • right-click the All types folder and select the Create Entity Type command from the shortcut menu; or • select the Create Entity Type command on the Schema menu You can also create entity types from the Create Association type dialog. Figure 5-5 The Create Entity type dialog Each of these actions opens the Create Entity Type dialog. Type in a name for the entity type and click create. The new entity type is added to the All types folder. You can create another entity type or click Close to dismiss the dialog box. Entity types always appear under the All types folder, in the schema pane. Entity types may also appear in the Core types folder (see “The Core types folder” on page 1-106). Entity type names can contain any standard alphanumeric characters including blanks. They should not contain any special characters as this may cause errors when evaluating expressions in queries. Make sure that the first character after a blank space is alphabetic not numeric. Entity type names are not case-sensitive. Sentences uses unique hidden identifiers for entity types (and for many other elements). This means that you can rename an entity type, or create an entity type with a duplicate name, without compromising the data in your database. Sentences always prompts you to confirm that you want to create a duplicate entity type when an entity type with the name you are using already exists. 1-155 Database components Creating entities Entity instances can only be created through the Dataform (see “Creating an entity instance in the Dataform” on page 1-225). Size of entity and value instances Sentences has no specific limit on the size of items that can be stored as entity or value instances, although some datatypes do impose limitations (see, for example the “Number”datatype on page 1-184). You should be aware of the memory usage capabilities of your own system when deciding to store large data items in a Sentences database. It may be more practical to store items, such as large images, outside the database and to create references to them using the “Hyperlink” datatype (see page 1-182). Value types and datatypes Value types in Sentences represent things in the real world that you do not need to record additional information about. This includes, for example, dates, times and numbers. Value types are created by assigning datatypes (see “Datatype properties page” on page 1-179). The distinction between value and non-value entity types is very important and is discussed in the section “Entities and values” on page 1-82. You should understand this distinction fully before you make extensive use of datatypes in your database. In certain cases you may wish to record additional information about entities that are defined as dates, times or numbers. Some data may be recorded in a numerical form because you wish it to have a numerical presentation or to be sorted in numerical order, even though you do not need to perform any calculations on the data. This happens when you use a numerical format as the label of an entity, for example as an order number or an employee number. Value types and values are distinguished in the Sentences Explorer by disc-shaped icons. Because value types cannot be the source of an association you must not define any entity type that you want to use as the source of an association as a value type. In most cases the majority of entity types can and should use the undefined datatype <None>. Defining value types with datatypes Some display formatting characteristics in Sentences are associated with datatypes that may be assigned to a type. When new entity types are created they do not have a datatype assigned to them and their datatype property is set as <None>. 1-156 Working with Sentences Datatypes are assigned using the Datatypes tab on the Properties dialog (see “Datatype properties page” on page 1-179). For example, in order to display a number with decimal places, you must assign the Number datatype. Assigning a datatype may also determine certain behaviour characteristics, for example, whether or not you can perform arithmetic calculations with the instances of a type. When you assign one of the Sentences-supplied datatypes to an entity type you can decide whether the type should be a value type or not, using the Instances are values property. If you choose to make the type a value type, instances of the type have both the formatting and the behaviour characteristics associated with value types, which are described in more detail in the following section. If you choose not to make the type a value type, instances of the type have only the formatting characteristics of the datatype, and not its behaviour characteristics. When you assign a datatype to a type, you should check or clear the Instances are values checkbox according to whether or not you wish to make the type a value type (see “Instances are values” on page 1-181). If you create an entity type with the same name as one of Sentences’ own datatypes, for example Date, or Time, Sentences automatically assigns that datatype to the type and converts it to a value type (see “Datatype properties page” on page 1-179). This does not apply to the Currency datatype. You can clear the Instances are values checkbox if you do not wish the type to be a value type. Note It is possible to create a custom datatype that is not a value datatype (see “Custom datatypes API” on page 2-153). Impact of changing a datatype Changing the datatype of an entity type, or changing the setting for the Instances are values property (see “Instances are values” on page 1-181), has a serious impact on the visibility of your data. Any change you make to the datatype, or to the value status of instances of any entity type is not applied to existing instances which may no longer be visible after you make a change. • If you change from any datatype to <None> existing instances remain visible. • If you change between Number and Percentage existing instances remain visible. • If you make any other change between datatypes existing instances are no longer visible. 1-157 Database components • If you change the state of the Instances are values checkbox existing instances are no longer visible. • Instances with different datatypes are not sorted together, hence a list of such instances may not be sorted as expected. • Calculations in queries, for example for custom dataforms, may rely on the type and instance datatypes matching and be broken by instances with different datatypes. If you do need to change a datatype where a considerable amount of data exists, you may wish to recreate the effected data, and all data depending on it. One method of doing this would be to export the effected data to a CSV file, and then delete the data from your database and set the correct datatype before importing the CSV file. However this method is not always reliable and should be used with great caution. Visibility of value instances When an entity type has <None> as its datatype, all the instances of that type are visible in the data pane when the entity type is selected in the schema pane. When you have created a value type by assigning a datatype, only instances with the same datatype are visible. This means that if you change the datatype of a type after you create entity instances those instances may no longer be visible, depending on the new datatype. In addition, instances of value types are only displayed in the data pane when they are used as targets of associations in the database. Behaviour of value types and values In general, value types and value instances behave in the same way as entity types and entity instances, with the following important exceptions: • Two instances of a value type with the same name cannot exist; they are the same instance. For non-value types, it is possible to have duplicate instances, that is, two distinct instances with the same name. • Value types and value instances can only be used as the targets of association types and associations, and they can never be the source of association types or associations. • Value instances are only visible when they are used as the targets of associations. • Non-value instances are associated with a particular Sentences chapter, but value instances are not. A value instance exists wherever there are associations that use it as their target. 1-158 Working with Sentences • Although the Rename command is not available on the shortcut menu for value instances you can replace one value with another in the Dataform. • Value types and instances are displayed in the Sentences Explorer with a discshaped icon. Creating value instances You can only create a value instance as the target of an association in a dataform. You cannot open a dataform on a value type to create value instances. Association types and associations Association types are more complex than entity types as they require three components: source, verb, and target. The sources and targets of association types are typically entity or association types but the source of an association can be an entity or association instance. For more information see “Entities and associations” on page 1-79. Creating association types To create an association type, you can either: • click the Create Association Type button on the toolbar; or • right-click the All types folder and select the Create Association Type command from the shortcut menu; or • right-click an existing entity or association type and select the Create Association Type command from the shortcut menu; or • right-click an existing entity or association instance and select the Create Association Type command from the shortcut menu; or • select the Create Association Type command on the Schema menu Each of these actions opens the Create Association Type dialog. 1-159 Database components Figure 5-6 Create Association Type dialog When you create an association type you must define its source, verb and target, and its cardinality properties (see “Cardinality” on page 1-161). After you have created the association type you can alter some of these properties and define some additional properties in the Properties dialog (see “Properties” on page 1-176). Schema and data change visibility Some changes to schema and data, such as the addition of instances to a new association type, may not be automatically reflected in the data pane of the Explorer if entities of the source type are being displayed. As soon as you reselect the entity type or refresh the display all changes are displayed correctly in the data pane. Source, verb, and target You must define a source, a verb and a target for any association type you want to create. The source of the association type must be an entity or association type or an entity or association instance. The target of the association type must be an entity or 1-160 Working with Sentences association type. The verb defines the nature of the association between the source and the target. Source If you select an existing type or instance before you open the Create Association Type dialog, Sentences displays the selected type or instance as the source for the new association type. You can use the displayed source, or select another source from the Valid source types folder, or type in the name of a new entity type. If you type in a new entity type name Sentences prompts you to confirm that you want to create a new entity type. You cannot type in a new association type as the source. The Valid source types folder displays all the types that may be used as the source of an association type. This means that value types are not displayed in this folder. Selecting an entity instance or an association instance as the source of an association type creates an instance-specific association type, which is discussed in the section “Instance-specific association types” on page 1-217. Verb The verb defines the association type and describes the nature of the association between the source and the target. A precisely named verb can be very useful in schema design. You may use the same word to name the verb and the target of an association type. It is helpful to use an upper case (capitalised) name for the target, and a lower case name for the verb, for example Actor, award, Award. When you create association instances the name of the association type verb is preserved, for example David Garrick, award, Best Actor. The verb name is capitalised when it is used as a field label in the Dataform. Target You can select a target for the association type from the All types folder or you can type in the name of a new entity type. Alternatively, you may select an existing metatype from the Metatypes folder, which is a subfolder of the All types folder. You cannot type in the name of a new metatype (see “Metatypes” on page 1-163). You must always select, not type in, the name of an existing type. If you type in a new entity type name Sentences prompts you to confirm that you want to create a new entity type. You cannot type in a new association type as the target. 1-161 Database components Inverse verb You need to specify an inverse verb for the association type. The inverse verb expresses the same link as the verb, but as seen from the target to the source. For example, if the verb of an association type is has colour then the inverse verb might be colour of. Sentences suggests a default inverse verb based on the verb you entered, usually by adding the word “of”. You can always type in an inverse verb of your own choice instead of the one suggested by Sentences. Cardinality The cardinality of an association type determines whether you can have zero, one, or more than one associations of a given association type for one source instance. You define association type cardinality by checking the Optional/Mandatory and Multiple/Singular radio buttons. The following table shows the possible combinations of these settings: Optional/ Mandatory Multiple/Singular Number of associations Mandatory Singular one only; zero not allowed Optional Singular zero or one Mandatory Multiple one or more; zero not allowed Optional Multiple zero or more Cardinality rules and data display Sentences monitors the data you type in to ensure that you conform to the cardinality rules that you have defined for your association types. If you use the Dataform to type in data and do not complete the field for a mandatory association Sentences displays an error message. Similarly, if you try and create more than one value for a singular association, Sentences displays an error message. In some situations Sentences is unable to enforce cardinality rules. In these cases the data displayed in the Sentences Explorer does not match the data displayed in the Dataform. For example, if you define an association type as Multiple, and create multiple associations for a particular source, and then change the definition of the 1-162 Working with Sentences association type to Singular, the database has more targets for the association than its current definition allows. When you view this association in the Sentences Explorer all the targets in the database are displayed because the Sentences Explorer uses an open tree structure to display data. (In this situation, the Explorer does not use the associations folder normally used to group multiple associations.) If you try and view this association using the Dataform, Sentences displays an error message: Error 1710: Singular AT (association type name) has multiple instances This is because the Dataform has a rigid structure determined by the schema and the schema rules. If the schema rules allow only one value, then only one value can be displayed in the Dataform. Other association type options You can also set the following options on the Create Association type dialog: Singular inverse When you define a new association type you can also determine whether to limit the association from the target to the source using the inverse verb (the inverse association) in some way. Use the Singular Inverse check box to ensure that the inverse association must be singular. That means that any entity or association instance may be the target for only one association of this type. The Singular Inverse property is not available for Symmetric association types. Symmetric An association type is symmetric if the relationship between source and target is always the same in both directions. The source and target must be of the same type, and the target may not be a value type. For example, the association type Person, is married to, Person is symmetric. However, the association type Person, is employed by, Person is not symmetric. The Symmetric check box is only available if the source and target of an association are of the same type. When the Symmetric property is selected the inverse verb is not used and the inverse verb field is not editable. 1-163 Database components Display ordering If you select the multiple option when you choose the cardinality of the association type you can choose to display associations as sorted or as sequenced (see “Sorting and sequencing” on page 1-175). Instance options • Instances may not be created You can create an association type that does not have any instances of its own, but that may be a supertype for other related association subtypes, by checking the Instances may not be created checkbox. The related association subtypes may themselves have instances (see “Subsets properties page” on page 1-196). You can create some association instances and then select the Instances may not be created checkbox on the Association type properties dialog. This forces users to choose from a limited range of instances. • Instances may not be deleted Check the Instances may not be deleted checkbox to prevent users from deleting any of the instances that are created for this type. • Duplicate instances are not allowed Check the Duplicate instances are not allowed checkbox to prevent the creation of duplicate instances and to ensure that all instances are unique. Metatypes Metatypes are the categories of data that appear in the schema pane. You can create an association type that uses a metatype as its target. The available metatypes are: Entity type; Association type; Query; Set query; and Custom Dataform. The instances of a metatype are the types that are defined in the current schema. Metatypes may only be used as the target of an association, and not as the source. An association type that has a metatype as its target behaves in the same way as any other association type and may be used in queries and custom Dataforms. Using metatypes To use a metaschema type as the target of an association, select a type from the Metatypes folder. The Metatypes folder is a subfolder of the All types folder in the target area of the Create Association Type dialog. You cannot type in the name of a new metatype. 1-164 Working with Sentences Creating associations Associations can only be created through the Dataform (see “Creating an association in the Dataform” on page 1-223). Deleting types and instances You can use the Delete button on the toolbar, or the Delete command on the Edit toolbar to delete any entity or association type or instance. You can delete a value type but you cannot delete a value instance. Figure 5-7 Impact of deleting... dialog for a data item Impact of deleting dialog Sentences displays an Impact of deleting… dialog which displays the items that are affected by the delete action and prompts you for confirmation. The name of the dialog shows the name of the item you want to delete. Figure 5-7 shows an example of an Impact of deleting… dialog for a data item and Figure 5-8 shows an example of an Impact of deleting… dialog for a schema item which includes a display of the relevant part of the schema tree. 1-165 Database components Figure 5-8 Impact of deleting… dialog for a schema item Internally, Sentences does not physically delete any element but instead makes the particular element invisible. The delete action is recorded in the relevant changes chapter defined in the current profile. This means that you could devise an arrangement of chapters and profiles in such a way that certain information was available in one profile and was not available in another profile. You cannot undo Delete actions. You can recreate any item that you have deleted, but as every item in Sentences has a unique internal identifier, the recreated items are not identical to the items they replace, even if they share the original deleted item’s name and attributes. Implicit deletion Sentences automatically enforces referential integrity constraints when any item is deleted. If you delete an entity instance you also delete any association that uses that entity as its source or target, and these associations are listed in the Impact of deleting… window. If you delete an entity type you also delete all its instances along with any association types that use it as a source or as a target, along with all the associations that are instances of those association types. When you delete an item, any other items that are dependent on it are also deleted. The following list summarises the dependencies in Sentences that are affected by a delete action: 1-166 Working with Sentences • An association type is dependent on its source and target, whether they are types or instances. • An entity or association instance is dependent on its type. • An association instance is dependent on its source and target instances. • Instances of a subset type are dependent on the existence of the superset type. • A schema type is dependent on another type that you have defined as its equivalent. There is no dependency in the following cases: • A subset type is not considered dependent on the existence of the superset type, even though instances of it are. This means that you can use a type, originally defined as a subset, after its superset is deleted. If you delete a superset type the subset type becomes a normal type and you can create instances of it. You cannot re-establish a subset-superset link after you delete the superset. • Subtypes and supertypes are not considered to be dependent on one another. Renaming types and instances You can rename any entity type or instance, or any association type, that appears in the Sentences Explorer. You can rename a value type, but you cannot rename a value instance. Renaming an association type changes the verb of the association, not the source or target. The unique internal identifier of the type or instance is not affected by renaming, and the new name appears automatically wherever the type or instance is used. To rename a type or instance, highlight it in the Sentences Explorer and select the Rename command from the Edit menu or the shortcut menu. Sentences displays an editing box around the existing name. You can now type in the new name. When you move to another field or press Enter your changes are saved. The Rename command is not available for value instances in the Sentences Explorer. If you need to change a value instance you must use the Dataform. Locating data in the Sentences Explorer When you select a type in the Explorer schema pane, you send a data request from your Sentences client to the Sentences server. In response, the Sentences server loads and displays data from your database in the Explorer data pane. Whenever you 1-167 Locating data in the Sentences Explorer execute a query, or use the Positioner and Filter tools you are also making a data request. Sentences does not automatically load all the available data for a type from the server and display it in the data pane each time you make a request. This is to reduce unnecessary network traffic between the Sentences server and client. Sentences provides a number of tools to help you locate data in the Explorer which are described in this section. Demand loading of data The number of data items loaded at each data request can be configured using the optional applet parameter RequestSize. The default value for this parameter is 50 data items. You can change this value by adding the RequestSize parameter to the Sentences.html file (see “Additional optional parameters” on page 1-56). The More... prompt Whenever more data than that already displayed in the data pane is available in the database, Sentences displays a special prompt in the data pane (the More… prompt) to indicate that more data items exist in the database, as shown in Figure 5-9. The More… prompt appears in the Explorer data pane and in the Query Editor results pane for the top level data request (the type selected in the Explorer schema pane, or the root node of the query) and for forward and inverse associations. The More… prompt also appears in multiple association fields in the Dataform such as list boxes, tables and tree displays. When derived types or derivations are used in queries Sentences needs to calculate all values before displaying the derived type or derivation result. For this reason the More… prompt is not displayed for nodes used in calculating derived types or derivations. The More… prompt is also not displayed for any node that includes the type referenced in the derived type or derivation, apart from those nodes directly between the derived type or derivation and the root node of the query. 1-168 Working with Sentences Figure 5-9 An example of the More… prompt To load more data, double-click on the More… prompt displayed at the bottom of the data pane, or press the Page Down key on your keyboard. Each time you click the icon or press Page Down Sentences loads more data items, according to the number of items specified by the RequestSize parameter, until all the available data items are displayed at the client. The Positioner and Filter tools The Sentences Explorer has two tools to help you locate data more quickly: the Positioner and the Filter. These tools are located on the right hand side of the toolbar. They are also available on Picker dialogs in the Dataform. Figure 5-10 The Positioner and Filter tools The Positioner and Filter tools each have a value entry field on the toolbar. On the far right there is the data reload button. The Positioner and Filter both work only on 1-169 Locating data in the Sentences Explorer the top level of displayed data, that is the data level that matches the type currently selected in the schema pane. The Positioner tool The Positioner tool locates the first data item that matches the value you entered in the entry field. Sentences clears the data display and then displays data items starting at the first matching data item. This is not the same as the “Find” feature found in some other applications. To use the Positioner tool, type in a value in the entry field and press Enter or click the Reload Data button. The value you choose must be a valid value for an instance of the current type but it does not have to be a value that exists in the database. For example, if the current type allows character strings for names, you can type in the value P in the Positioner field and press Enter or click the data reload button. Sentences displays names beginning with the first item that begins with that letter as shown in Figure 5-11. The Positioner tool does not use wildcards. Figure 5-11 Sentences Explorer display with Positioner value P 1-170 Working with Sentences If you type in a value that does not exist, the Positioner displays data starting with the first available item after the value you entered. Figure 5-12 shows the result of entering the value Ps in the Positioner field. Figure 5-12 Sentences Explorer display with Positioner value Ps For associations, Sentences applies the same rule to the original source entity type. For example, if the current association type is ((Person, customer of, Store), visited on, Date), then the Position field needs a Person value, since the list is ordered by Person. The Filter tool The Filter tool locates all the data items that match the value you entered in the entry field. To use the Filter tool, type in a value in the entry field and press Enter or click the Reload Data button. Sentences clears the data display and then displays the filtered data items. If there are more items available than there is room in the data pane Sentences displays the More… prompt. 1-171 Locating data in the Sentences Explorer Pattern matching with the Filter tool The Filter tool is case insensitive but it does supports pattern matching with wildcards. Filter tool wildcard meaning ? matches any single character * matches from zero to any number of characters | or If you want to use any of the wildcard characters as part of your pattern you need to “escape” the character with a backslash, as follows: Escape characters meaning \? represents a literal? character \* represents a literal * character \\ represents a literal \ character \| represents a literal | character \ single backslashes are ignored The Filter tool searches from the start of the value stored. This means that if you want to filter using partial string that is not at the start of the stored value you should use the asterisk wildcard before the filter term. Similarly, if you want to filter using partial string that is not at the end of the stored value you should use the asterisk wildcard after the filter term. For example, ?and would return band, hand, sand and so on, and *and would also return and, grand and brand. The filter argument *profile*|*chapter* would return any string that contained the word profile or the word chapter. By contrast, the filter argument *profile*chapter* would only return a string that contained both the word profile and the word chapter. Figure 5-13 shows the result of using the filter *Ven*. 1-172 Working with Sentences Figure 5-13 Sentences Explorer display with Filter value *Ven* Using Filtering and Positioning tools together You can use the Positioner and the Filter tools together. If you type in values in both entry fields, Sentences displays entities or associations matching the Filter value, starting at the point specified by the Positioner value. Figure 5-14 shows the result of using the Positioner value M with the Filter value *Ven*. Compare this result to that shown in Figure 5-13 which showed the Filter being used on its own. 1-173 Locating data in the Sentences Explorer Figure 5-14 Sentences Explorer display with Positioner value M and Filter value *Ven* Reloading data To restore your view to all the available data, clear any values from the Positioner entry field and the Filter entry field and click the Data Reload button. If there is more data available than can be shown, Sentences displays the More… prompt. If you highlight the name of a query in the schema pane, you can use the Data Reload button to display the results of the query in the data pane. Stopping data retrieval When you request data from the Sentences server Sentences returns a number of data items up to the limit specified in the RequestSize parameter (see “Additional optional parameters” on page 1-56). Occasionally this data retrieval action may take a long time, for example because the RequestSize parameter is set to an inappropriately high value. 1-174 Working with Sentences The Stop button You can stop the retrieval of data by clicking the Stop button on the toolbar. This button is only available while a data retrieval action is taking place, and the message Retrieving data is displayed in the data pane. This is shown in Figure 5-15. Figure 5-15 Using the Stop button When you click the Stop button, the data retrieval action stops on the server and Sentences displays a message in the data pane. The Stop button is available in the Sentences Explorer, the Diagram Editor, and the Query Editor. You can only stop a data retrieval action by using the Stop button in the same window that started it. You cannot, for example, use the Stop button in the Explorer to stop a data retrieval action started in the Query Editor. 1-175 Sorting and sequencing Sorting and sequencing You can sort data and schema items in Sentences. The Sentences default sort algorithm, which is alphanumeric and case insensitive, applies to instances of types that do not have a defined datatype (their datatype is displayed as <None>). Defined datatypes each have their own specialised sorting algorithm, which are described in the datatypes section beginning on page 1-181. The Sentences sequencing feature lets you define explicit data sequences in the Sentences Explorer and Dataform. You can use sequencing with a series of association types sourced from a particular type and with a set of instances of a multiple association type. If you change the sequence of association types in the schema pane the corresponding data items appear in the sequence you defined when the display is refreshed. Sequencing association types The order in which associations appear in the Default Dataform is the same as the order in which they appear in the schema pane. A change in the order of association types in the Sentences Explorer schema pane is always reflected in the Default Dataform. The default order of association types is the order in which they were created. To change this order you can cut and paste or drag and drop an association type to a new position in the schema pane, with either the same or with a different source. If you change the source of an association type any associations of that type which exist are no longer visible. When you use the shortcut menu command Create Association Type, or use the Create Association Type toolbar button, new association types are added to the end of the set of existing association types for their source. You can create a new association type in a specific position, by using the shortcut menu command Insert Association Type Above. This command creates a new association type and positions it above an existing selected association type from the same source. Sequencing multiple instances You can apply an explicit sequence to the instances of a multiple association type. When you create an association type or set its properties you can select the Multiple option, which means that you can create many instances of the association for each source. By default Sentences displays multiple association instances as sorted by their targets, according to the sort algorithm of the target type. 1-176 Working with Sentences If you select the Sequenced option in the Association Type Properties dialog the instances of the association type are always displayed in their defined sequence, which by default is the order in which they were created. You can change this sequence in the Sentences Explorer data pane using the cut and paste options. This is similar to the way you can change the sequence of association types, as described earlier. The sorting algorithm applied to a set of target entities is determined by the datatype of their entity type (see “Datatype properties page” on page 1-179). Properties You can define a number of properties for entity types and association types in the Sentences database by using the entity type and association type Properties dialogs. These dialogs have a number of tabbed pages, some of which are common to both entity types and association types as shown in the following list: Property page appears for entity types appears for association types General Yes No Datatype Yes No Format Yes Yes Subsets Yes Yes Supertypes Yes Yes Equivalence Yes Yes Triggers Yes Yes Description Yes Yes Custom Dataform Yes Yes Association type No Yes Target parameters No Yes 1-177 Properties Property page appears for entity types appears for association types Default target No Yes Mapping Yes Yes Retrieval Methods No Yes General properties page Figure 5-16 The General properties page The General properties page applies only to entity types. 1-178 Working with Sentences Display in Core types folder If you have not chosen the Generate Core types automatically option in the Edit Profile dialog, you can select an entity type to be displayed in the Core types folder by selecting the Display in Core types folder checkbox (see “The Core types folder” on page 1-106). Instance options The following options apply to instances of this type. When a type is defined as a Value type, all of these properties are disabled and cannot be changed. • Instances may not be created You can define an entity type that does not have any instances of its own, but that may be a supertype for other related association subtypes, by checking the Instances may not be created checkbox. The related entity subtypes may themselves have entity instances (see “Supertypes properties page” on page 1-200). You can create some entity instances and then select the Instances may not be created checkbox. This forces users to choose from a limited range of instances. For example, you could define an entity type Boolean with instances True and False, and then select the Instances may not be created checkbox. • Instance name created by trigger You can define an entity type that has the names of its instances generated automatically by a trigger. This may be used, for example, to automatically create invoice numbers or order numbers in a business application. If you select this option for an entity type you cannot create new entity instances by typing into a Dataform field. You must open a Create Dataform from the entity type. An entity type that uses the Instance name created by trigger option may be the source of association types in the same way as any other entity type. When the Instances may not be created option is selected, the Instance name created by trigger option is disabled. When the Instance name created by trigger option is selected, then the Instances may not be renamed option is unavailable. For general information on triggers, see the section “Triggers” on page 2-145. There is a worked example of an Order Entry application which uses a trigger to create instance names for orders in the section “Derivations example” on page 2-173. This worked example uses a trigger named RenameInstance which is included in the ExampleTriggers.jar file in the directory Examples/Jars. 1-179 Properties If you use XML Import to add data instances for entity types which use the Instance name created by trigger option you must make provision for the trigger action in your XML data structure (see “XML Import and triggers” on page 2-118). Note Instance name created by trigger does not apply to association types, and does not appear on the Properties dialog for association types. • Instances may not be deleted Check the Instances may not be deleted checkbox to prevent users from deleting any of the instances that are created for this type. • Instances may not be renamed Check the Instances may not be renamed checkbox to prevent users from renaming any of the instances that are created for this type. Note Instances may not be renamed does not apply to association types, and does not appear on the Properties dialog for association types. • Duplicate instances are not allowed Check the Duplicate instances are not allowed checkbox to prevent the creation of duplicate instances and to ensure that all instances are unique. Note The Instance Options check-boxes for association types are on the Association type properties page. The options Instances may not be renamed and Instances created by trigger do not apply to association types. Datatype properties page The Datatype properties page applies only to entity types. 1-180 Working with Sentences Figure 5-17 Selecting a datatype Use the Datatype page of the Properties dialog to set the datatype for an entity type. Using datatypes allows, for example, input values to be checked for validity, and determine the range of formatting and presentation options that are available for instances of a type, and how instances are sorted. The use of datatypes also affects instance behaviour and visibility, in that instances of types that have datatypes assigned to them generally behave as values (see “Value types and datatypes” on page 1-155). You can prevent instances behaving as values by clearing the Instances are values check box when you assign a datatype (see “Instances are values” on page 1-181). This allows you to make use of the formatting and presentation options associated with the datatype without creating a value type. 1-181 Properties Value types and value instances are distinguished in the Sentences Explorer by discshaped icons. Because value types cannot be the source of association types you must not define an entity type that you want to use as the source of an association type as a value type. For more information about values and value types, and their relation to datatypes see “Value types and datatypes” on page 1-155 and “Impact of changing a datatype” on page 1-156. Instances are values Check or clear the Instances are values checkbox to determine whether or not the type is a value type and its instances are values. This checkbox is selected by default for all Sentences-supplied datatypes. Clearing this checkbox means that instances have the formatting and sorting characteristics associated with the datatype, but the instances are not values and the type is not a value type. You may can also create your own custom datatypes (see Chapter 10, “Customising Sentences”). For more information about values, value types, and datatypes see “Value types and datatypes” on page 1-155 and “Impact of changing a datatype” on page 1-156. Assigning datatypes To assign a datatype, select a datatype from the drop down list on this page. Depending on the datatype selected, other fields may be displayed on this page such as the Maximum Decimal Places field for number datatypes. The characteristics of each datatype are described in the following sections. • Undefined (displayed as <None>) If you do not assign a datatype, the Datatype page displays <None> as the datatype. The only presentation formats allowed are single-line or multi-line edit fields (using Tab and Return characters). Entity instances for types that do not have a defined datatype are limited to strings of standard printable ASCII characters, with a maximum string length of 64,000 characters. Instances of types that do not have a defined datatype are sorted in a case-insensitive alphanumeric order (that is, 0… 9, Aa, Bb, …Zz,). String datatypes The string datatypes are Text, Image, and Hyperlink. String datatypes are value types but they do not support arithmetic operations. 1-182 Working with Sentences • Text In the Text datatype, Tab and Return characters are allowed and therefore multiline values can be created if the multiple line presentation method has also been selected. Multiple line values are only displayed as multiple lines in the Dataform. In the Sentences Explorer multiple line values are displayed all in one line, and a semi-colon character is used to mark the position of line breaks. You can only use the multiple line presentation method for singular associations, and not for multiple associations. Instances of types that are defined with the Text datatype are sorted in a casesensitive alphanumeric order (that is, 0… 9, A, B, …Z, a, b, …z). Using the Hidden style for the Text datatype results in the display of asterisks on the dataform instead of the actual text entered. • Image Sentences supports the display of JPEG and GIF image file formats. When you type in the location of an image file in a target field defined with the Image datatype the Dataform displays the image. The Sentences Explorer displays the file name or URL. Sentences can display any image hosted on any web server that it can access if the image file is referenced by a full URL, such as http://lazysv04/databases/ images/Jane.jpg. You cannot specify an image location using a file path. You can reference images more easily if you specify a location for all your image files using the ImageURLBase parameter in your Sentences.html start page (see “About the ImageURLBase parameter” on page 1-41). You could then use the file name on its own or a partial URL. For example, if the ImageURLBase parameter was set to http://lazysv04/databases,you could refer to an image file simply as images/Jane.jpg. Instances of types that are defined with the Image datatype are sorted in a casesensitive alphanumeric order (that is, 0… 9, A, B, …Z, a, b, …z). • Hyperlink When you use the Hyperlink datatype the entered value is treated as a World Wide Web Uniform Resource Locator (URL). When such a value is opened (by double clicking, or by selecting Follow Hyperlink from the shortcut menu) the Web page or file to which the URL refers is displayed. 1-183 Properties The Hyperlink datatype allows Sentences to link to a variety of electronic documents. You can use any kind of URL for the Hyperlink datatype, including http:// for Web page addresses, mailto: for email addresses, and file:// for host-specific file names. If you are using Microsoft Outlook, you can use the outlook: prefix to create a URL that links to a Microsoft Outlook folder. Instances of types that are defined with the Hyperlink datatype are sorted in a casesensitive alphanumeric order (that is, 0… 9, A, B, …Z, a, b, …z). Numeric datatypes The numeric datatypes are Number, Currency, MixedCurrency and Percentage. All of these datatypes support standard arithmetic and comparisons. Any two Number or Percentage instances can be used in arithmetic or compared. Two Currency instances can only be used in arithmetic or compared if they represent values in the same currency. When you select Number, MixedCurrency or Percentage you must define the maximum number of decimal places, as shown in Figure 5-19. 1-184 Working with Sentences Figure 5-18 Defining decimal places for a number datatype • Number The Number datatype supports storage to 17 significant digits with an optional sign character (+/-) of both floating point and integer values. This datatype does not support “exponent and mantissa” style inputs (for example 1.23e+10). Magnitudes smaller than 1e-16 are rounded to zero. Magnitudes larger than 1e+17 are rounded to 17 significant digits. Numbers which cannot be stored exactly are rounded up or down to the nearest exactly storable value. Instances of types that are defined with the Number datatype are sorted in numerical order. 1-185 Properties Figure 5-19 Selecting the currency for a Currency datatype • Currency The Currency datatype supports the use of monetary values. A standard international set of three character currency codes is used, for example USD, GBP, and EUR. The currency datatype ensures that arithmetic can only be conducted between monetary values in the same currency. For example monetary values in queries must be of the same currency in order to be compared. When you select the Currency datatype you need to select the currency, as shown in Figure 5-19. Instances of types that are defined with the Currency datatype are sorted in numerical order. 1-186 Working with Sentences International considerations for the currency datatype The way currency values are displayed on your system depends on your computer’s settings and on the locale settings used by the Java Runtime Environment installed on your computer. • MixedCurrency The MixedCurrency datatype supports monetary values in more than one currency. Each value entry has two parts specifying the currency and the monetary value. The only arithmetical operations that are available with the MixedCurrency datatype are either multiplication and division by a Number datatype, or an arithmetical operation with another value that has the MixedCurrency datatype. Instances of types that are defined with the MixedCurrency datatype are sorted by currency type and then in numerical order. • Percentage Value instances defined with the Percentage datatype are floating-point numeric values. Instances of types that are defined with the Percentage datatype are sorted in numerical order. Date and time datatypes The date and time datatypes are Date, Time and Timestamp. Each of them has an internal numeric representation, allowing arithmetic and comparisons to be performed correctly. For arithmetic, none of them supports the multiply, divide, or remainder operators. For comparisons, earlier dates or times are considered to be less than later ones. International considerations for date and time datatypes The way dates and times are displayed on your system depends on your computer’s settings and on the locale settings used by the Java Runtime Environment installed on your computer. The Sentences date and time datatypes are based on the Java formats. Date and time formats for locales other than the US are only supported by the International version of the Java Runtime Environment. • Date The Date datatype represents an individual date, such as September 14th, 1998. The stored value is a whole number of days since a starting date. This makes it 1-187 Properties independent of time zones and ensures that comparisons for equality can be done correctly. Sentences does allow you to enter a year using only two digits, although this is not recommended. Sentences calculates the century for two digit years by assuming a century that begins 80 years before the current date and ends 20 years after the current date. If you enter a year using only one digit, or using three, or four, or more than four digits Sentences accepts the year value exactly as entered. Sentences does not allow negative values for years. Sentences does not accept invalid month and day of month values, including leap year calculation. For details of arithmetic operations that are supported with the Date datatype please see “Arithmetic operations with Date and Time datatypes” on page 2-59. Instances of types that are defined with the Date datatype are sorted in chronological order. • Time The Time datatype represents a time of day, such as 11:43:05. The stored value is a whole number of milliseconds since midnight. Sentences stores and displays time without any reference to time zones or time schemes. This means that a value entered as 11:00AM is always displayed as 11:00AM, regardless of the time zone it is displayed in. When you perform arithmetic with time values additions and subtractions wrap around 24:00. For example, 23:00 plus two hours gives 01:00, not 25:00. For details of arithmetic operations that are supported with the Time datatype please see “Arithmetic operations with Date and Time datatypes” on page 2-59. Instances of types that are defined with the Time datatype are sorted in chronological order. • Timestamp The Timestamp datatype represents single point in time with millisecond precision, such as 1998 September 14th at 11:43:05 BST. Timestamp values are displayed in the context of the current time zone. However, this affects only the display, not the stored value. 1-188 Working with Sentences For details of arithmetic operations that are supported with the Timestamp datatype please see “Arithmetic operations with Date and Time datatypes” on page 2-59. Instances of types that are defined with the Timestamp datatype are sorted in chronological order. Format properties page Figure 5-20 (The Format properties page The Format properties page is available on the Properties dialog for both entity types and association types. This page allows you to define the input and output formats displayed on the Dataform. The options available vary according to the datatype selected, and according to whether the association type is singular or multiple. 1-189 Properties The default format of association types is inherited from the datatype of the association type’s target. You can use settings on the Format page to override the default settings. Presentation Presentation options define the display of fields on the Dataform. The first field in a dataform represents instances of the source type, and the label for this field is the name of that type. All the other fields on the Dataform represent the targets of associations sharing the same source, and the labels for these fields are the association verbs. You can define presentation options using the Properties dialog opened on an entity type or an association type. Presentation options defined for an entity type are inherited by any association in which the entity type is a target, but can be overridden by options set for the association type. The following table shows the presentation options that are available for the different datatypes in Sentences: Presentations for Singular Association Types Presentations for Multiple Association Types Currency Date Hyperlink Image MixedCurrency Number Percentage Time Timestamp Single Line Combo Radio Button Tree Table for targets Table for associations List Checkbox Tree Table for targets Table for associations <None> Text Single Line Multiple Line Combo Radio Button Tree Checkbox Table for targets Table for associations List Checkbox Tree Table for targets Table for associations Datatype of Target 1-190 Working with Sentences The appearance of each of these presentation methods is as follows: • Single Line The association target is represented on the Dataform by a single line editable field. • Multiple Line The association target is represented on the Dataform by a multiple line editable field. • Combo The association target is represented on the Dataform by a single line field with a drop-down arrow that can be used to display a list of existing target instances. • List The association target is represented on the Dataform by a list of existing target instances. • Tree The association target is represented on the Dataform by a list of existing target instances displayed as an expandable tree, similar to the display used in the Explorer data pane. • Checkbox The association target is represented on the Dataform by a series of targets, each indicated by a small box and a text label. More than one target may be selected. • Radio Button The association target is represented on the Dataform by a series of targets, each indicated by a small circle and a text label. Only one target may be selected. In the following definitions, the term primary association refers to an association whose source is the entity or association instance for which the Dataform is opened. • Table for Associations Table for Associations displays a primary association and all singular associations whose source is the primary association. The columns display the targets of the associations concerned and the headings are the associations types. The first column heading is the type of the target of the primary association. 1-191 Properties • Table for Targets Table for Targets displays a primary association and all singular associations whose source is the target of the primary association. The columns display the targets of the associations concerned and the headings are the associations types. The first column heading is the type of the target of the primary association. • Disable in-place editing When the presentation option is set as either Table for Associations or Table for Targets you can edit the target value directly in the Dataform table, without the need to open a child Dataform. You can disable this feature by checking the Disable in-place editing checkbox. Picker Some Dataform fields allow you to select target instances from a list, known as a Picker, launched from the ellipsis button next to the field. The Picker field allows you to choose either the List picker or the Tree picker for selecting values. A List picker displays a simple list of instances, while a Tree picker displays a list of instances that can be expanded to display associations, as in the Explorer data pane. You can also select a special Calendar picker for types defined with the Date datatype. To disable the display of a picker, select None as the Picker type. Style The table below shows the different styles (for output) that are available for different datatypes in Sentences. 1-192 Working with Sentences In the formats for Currency and MixedCurrency, the letter C represents the currency symbol, for example £ or $, and the letter I represents the three letter ISO currency code, for example GBP or USD. Datatype Styles <None> <Default> Currency <Default> C0;C-0 C0.00;C-0.00 C#,##0;C-#,##0 C#,##0.00;C-#,##0.00 0C 0.00C #,##0C #,##0.00C I 0;I -0 I 0.00;I -0.00 I #,##0;I -#,##0 I #,##0.00;I -#,##0.00 MixedCurrency <Default> C0;C-0 C0.00;C-0.00 C#,##0;C-#,##0 C#,##0.00;C-#,##0.00 0C 0.00C #,##0C #,##0.00C I 0;I -0 I 0.00;I -0.00 I #,##0;I -#,##0 I #,##0.00;I -#,##0.00 Date <Default> Short Medium Long Full 1-193 Properties Datatype Styles Number <Default> 0 0.00 #,##0 #,##0.00 Percentage <Default> 0% 0.00% #,##0% #,##0.00% Text <Default> Hidden Time <Default> Short Medium Long Full Timestamp <Default> Short Medium Long Full SDateSTime (Short Date and Short Time) SDateMTime (Short Date and Medium Time) SDateLTime (Short Date and Long Time) SDateFTime (Short Date and Full Time) Display width The Display width parameter specifies the width of the display field for an instance in characters. The unit for this setting is based on the width of a lower-case “w” character, and the default setting is twenty-five characters. You can only use positive numeric values. This parameter is disabled if the Presentation method is set to Radio Button or Check box. 1-194 Working with Sentences Table column width The Table column width field allows you to set the width for the association or entity when it appears in a table on the Dataform. The unit for this setting is based on the width of a lower-case “w” character. The default setting, if no value is specified, is two-thirds of the length specified for Display width. Display height The Display Height parameter specifies the height of the display field, in rows, for multi-line entries. The default setting is six rows. Format options The following options can be selected by checking the check-boxes on the Properties dialog Format page for association types and entity types: • Read only on Dataform The Read only on Dataform option defines an association or entity that cannot be altered by the user through the Dataform. This setting is useful for association types whose values are generated automatically by customised triggers. For more information, see Chapter 10, “Customising Sentences”. • Hidden on Dataform The Hidden on Dataform option defines an association or entity that is not displayed on the Dataform. If you select this property there is no label or field for this type on the Dataform, and therefore no access from the Dataform for this type. If you select Hidden on Dataform then Hidden in Dataform tables is also selected automatically. • Hidden in Dataform tables The Hidden in Dataform tables option defines an association or entity that is not displayed in a Dataform table. If you select this property there is no column for this type in a Dataform table. If you select Hidden on Dataform then Hidden in Dataform tables is also selected automatically. • Right-align in Dataform fields The Right-align in Dataform fields option defines associations or entities which are to be displayed as right-aligned in Dataform fields. 1-195 Properties • Right-align in Dataform tables The Right-align in Dataform tables option defines associations or entities which are to be displayed as right-aligned in Dataform tables. • Allow multi-line label on Dataform The Allow multi-line label on Dataform option allows the label of a Dataform field (the name of the source type or the verb of an association type) to be displayed over multiple lines. Presentation of date formats The presentation of Date formats depends on the version of the Java runtime environment installed on your computer. The US version of Java only supports the US date format (month/day/year). The Internationalised version of Java supports the European date format (day/month/year). If you only use two digits for the year Sentences assumes a century that begins 80 years before the current date and ends 20 years after the current date. Presentation of time formats The presentation of Time formats depends on the version of the Java runtime environment installed on your computer. The US version of Java only supports a 12hour clock format with AM or PM. The Internationalised version of Java supports the 24-hour clock format. If you are using the US version of Java you can input times as, for example, 1:30PM, and if you are using the Internationalized version you need to enter 13:30. Restore Default settings button The Restore Default settings button on the Format properties page allows you to reset all the values to the defaults for the current datatype. For association types the Restore Default settings button resets all the values to the current Format settings for the association’s target, which may differ from the defaults for the datatype. 1-196 Working with Sentences Subsets properties page Figure 5-21 The subsets properties page • The subsets mechanism Subsets are one of the two mechanisms that allow different types in a database to share common features. The other mechanism is Supertypes. The subset mechanism allows you to define a group of instances of a given type that match a particular condition. You may create a subset that contains all the instances of its superset. The supertype mechanism allows you to define a hierarchy of types with certain associations common to more than one subtype. Association types sourced on supersets and supertypes are shared by the respective subsets and subtypes. 1-197 Properties • Subsets properties The subsets mechanism in Sentences allows you to define a set of instances of an existing type as a new type. You cannot select instances to be members of a subset, as subset membership is defined by a condition that is implemented as a query. You can create a new instance which is a member of a subset by opening a create Dataform on a subset type. When you save the Dataform, Sentences checks that subset instances created in this way meet the conditions for the subset. The subset properties page includes command buttons for creating a new subset query or for attaching an existing query to a subset definition. Whenever a subset is used its membership is determined by evaluating the condition against the membership of the superset. You can use the subset mechanism for association types as well as entity types. A subset type has all the source and target behaviour of its superset type. This means that all association types that have the superset as their source or their target exist in the same form for the subset. A subset can be a subset of only one superset type. A subset cannot be the superset of another subset which means that Sentences does not allow subsets of subsets. Also, a subset cannot behave as a subtype (see “Supertypes properties page” on page 1-200). If subtype behaviour is required, you must define the superset type as a subtype. Sentences displays the existing subsets for a type using an expandable tree display. To create a subset definition: 1. Click Create to open a dialog box in which you can name the subset, and then click OK. 2. Click Edit Query to open the Query Editor (see Chapter 7, “Sentences queries”) and define the subset query. The subset query can include a condition that restricts membership of the subset to items that meet the condition. If you do not create a subset query all the members of the superset are members of the subset. A subset that contains all the members of its superset can be a useful tool in defining the appearance of a Dataform (see “Dataform tabbed pages with subsets and supertypes” on page 1-259). 3. Use the Query Editor to create a query and then attach it to a subset using the Attach Query command (or the Attach Set Query command if available) on the Schema menu. Using the Attach Query command replaces any existing subset query. 1-198 Working with Sentences The result of a subset query must be a set of instances of the same type as the superset type. For example, a subset query to define the type Married Person as a subset of Person must return a set of instances of the type Person. A subset query must always use the superset type as its root node. You cannot use another subset of the same superset type as the root node. The subset query can be edited from the Subset properties page. Subset queries appear with other queries in the All Queries folder of the schema pane and can be edited from there in the same way as any other query. (Subset set queries appear in the Subset Queries sub-folder under the Set queries folder of the schema pane.) Sentences displays an expand button next to subset queries in the schema pane. Clicking the expand button displays details of the type to which the subset query applies. After you define the subset query, the subset type appears with all the other defined types in the All types folder of the schema pane. The superset and subset are both marked as such in the schema pane by the addition of the system associations has subset and subset of. Examples of the use of subsets and supertypes are given in Chapter 6, “Advanced techniques”. Comparison of subsets and supertypes In general, a supertype should be used when the relationship between the instances of the type and the parent supertype is a permanent one. As an example of a permanent relationship consider a schema which defined the entity types domestic dogs, wild dogs and wolves as subtypes of a supertype called canines. In this case the status of an entity instance is unlikely to change. A subset relationship is suitable where the status of entity instance is likely to change. As an example of this consider a schema in which the entity type customers with overdue accounts is defined as a subset of the entity type customers. In this case it is expected that an entity instance’s membership of the subset customers with overdue accounts is temporary. There are some relationships that are less easy to define as being either permanent or temporary, and these need to be considered on a case-by-case basis, bearing in mind the requirements of the Sentences application you are developing. The relationship between the entity types Employee and Person is an example of this. An Employee is clearly a Person but may be an Employee for as long as 40 years or for as little as 4 weeks. In a business application you may need to record significant information for an Employee, and for a former Employee, but not for any 1-199 Properties other Person. It is possible that some individuals entered in the database as Persons may go on to become Employees. In these circumstances it is appropriate to create a schema in which the Person entity type is a supertype of the Employee entity type. This has been done in the Human resources example application (see “The Human resources example application” on page 2-163). Dataform behaviour with subsets and supertypes There are important differences between the behaviour of Dataforms when using supertypes and subsets. For a description of the differences for the base Dataform see the section “Dataform tabbed pages with subsets and supertypes” on page 1259. Where custom Dataforms have been defined a type and its supertypes may have different custom Dataforms selected as their default Dataform. However, where subsets are used all the subsets will use the default Dataform set for the base type. For more information on custom Dataforms see the sections “Creating a custom Dataform” on page 1-227 and “Custom Dataforms with subsets and supertypes” on page 1-230. Subsets of association types You can define subsets of association types in the same way you define them for entity types, using the Subsets tabbed page of the Properties dialog. The name that you enter when you create the association subset is its verb name. The subset association type uses the same source and target types as its superset type. Subset association types are displayed in the Explorer schema pane with yellow arrows. Where a subset association type is the source of one or more further association types the base dataform for the superset association type has an additional tabbed page, named for the subset association type, to display those associations. Viewing subset type instances When instances of subset types are displayed in the data pane of the Sentences Explorer they are identical in appearance to the instances of any other types. If the subset includes all the instances of its superset then the list of instances displayed for the subset and the superset is identical. You must remember that such listings are not duplicates. They are the result of the same instance being valid for display as an instance of a type and as an instance of a subset type. 1-200 Working with Sentences Supertypes properties page Figure 5-22 The Supertypes properties page Supertypes are one of the two mechanisms that allow multiple types in a database to share common behaviour. The other mechanism is Subsets. The supertype mechanism allows you to define a hierarchy of types with certain associations common to more than one subtype. Supertypes should be used when the correspondence between a type and its parent is permanent, and subsets should be used where the correspondence is temporary. Association types sourced on supersets and supertypes are shared by the respective subsets and subtypes. 1-201 Properties An entity type can be a subset or a supertype of another entity type, and an association type can be a subset or a supertype of another association type. Supersets and subtypes are created in the database schema, and are stored in the schema changes chapter. Subset entity types are displayed in the Sentences Explorer schema pane with yellow icons. The Supertypes properties page allows you to associate a type with another existing type in a hierarchical relationship. A type that is defined as a subtype implements all the source and target behaviour of its supertype. This means that all association types that have the supertype as their source or their target exist in the same form for the subtype. A type may be a subtype of more than one Supertypes. A subtype may be the supertype for further subtypes. To define a supertype: 1. Click the Add… button to select an existing type as the supertype. After you define the supertype, the supertype and subtype are both marked as such in the schema pane by the addition of the system associations supertype of and subtype of. You can create instances of a subtype directly. These instances are also members of the set of instances for the supertype. Using supertypes with association types You can define supertypes for association types as well as for entity types. Both the source and the target of the subordinate association type must be either the same as, or a subtype of, or a subset of, or a subset of a subtype of, the source or target respectively of the supertype association type. Examples of the use of subsets and supertypes are given in Chapter 6, “Advanced techniques”. 1-202 Working with Sentences Equivalence properties page Figure 5-23 The Equivalence properties page You can use the Equivalence properties page to define two or more types as the same. This can be useful if you wish to merge databases, and for example one database uses a type named Clients and the other uses a type named Customers. The types being linked in this way must either be both association types or both entity types. If they are value types (entity types with defined datatypes) they must both have the same datatype. If you wish to make two association types equivalent they must share the same source and the same target. The result of creating an equivalence between two types is similar to the result of creating a supertype-subtype link between two types. Instances of each of the two 1-203 Properties types share all the associations of both types. A Dataform display for either type or any instance of either type shows a page for each of the equivalent types. To make two types equivalent: 1. Open the Equivalence page of the Properties dialog for one type, and click Add. 2. Select the equivalent type from the picker list. To cancel an equivalence, highlight the equivalent type and click Remove. You can also define equivalent instances (see “Instance equivalence” on page 1215). Triggers properties page Figure 5-24 The Triggers properties page 1-204 Working with Sentences Triggers are elements of custom Java classes and methods that users can add to Sentences. A trigger generally performs an action in the database whenever a specified action, called a trigger event, takes place. You can view a list of available triggers by selecting Triggers from the View menu. To use a trigger, you must write your own Java code, compile the code into a Java archive (JAR) file, and place the JAR file in the directory listed in the TriggerPath property in the Server.properties file. You can then use the Triggers properties page to assign the trigger to a particular entity or association type. The detailed steps for attaching a trigger to an entity or association type, and how to edit trigger assignments are given in the section “Attaching a trigger” on page 2-147. There are examples of how triggers may be used in Chapter 11, “Worked examples”. 1-205 Properties Description properties page Figure 5-25 The Description properties page The Description properties page allows you to add a free text description to any entity or association type. 1-206 Working with Sentences Custom Dataform properties page Figure 5-26 The Custom Dataform properties page You can use the Query Editor to design a custom Dataform (see “Creating a custom Dataform” on page 1-227). You can use the Custom Dataform properties page to delete or rename an existing custom Dataform, and to create a new custom Dataform. Sentences displays the existing custom Dataforms for a type using an expandable tree display. When you create a custom Dataform you can either attach an existing query or launch the Query Editor to create a new query. 1-207 Properties You can also choose which Dataform should be used as the default Dataform for the type. Association type properties page Figure 5-27 The association type properties page The association type properties page resembles Create Association Type dialog. You can change the properties you set when you created the association type. Changing the properties of an association type may affect the properties, appearance or visibility of association instances based on it. For example, changing the cardinality of an association type from Singular to Multiple allows you to use a list input field instead of a single line input. If you change the cardinality of an association type from Multiple to Singular after creating multiple associations for a source entity only the last association you created can be seen in the Dataform. All the created associations remain visible in the Explorer data pane. 1-208 Working with Sentences If you change the cardinality of an association type you should always click OK on the Association Type properties page before you make any other changes on any of the other tabbed pages in this dialog. For more details on association type properties please see the section “Creating association types” on page 1-158. Target Parameters properties page Figure 5-28 The Target Parameters properties page The Target Parameters properties page allows you to restrict the targets for an association type. This properties page is not displayed on an entity type properties dialog. This mechanism is only available when the target of an association type is a subset. This properties page displays a list of the possible common source associations. You can define the association from which the target for the current association type may be chosen. 1-209 Properties For an explanation of the use of Target Parameters see “Target parameters” on page 1-266. Default target properties page Figure 5-29 The default target properties page The Default target properties page is available for association types only. As an aid to data entry you can define a default target for an association type. When you open a create Dataform, any default targets defined for the associations on that Dataform are displayed. The default target may be an instance or an expression. • Instance Select an instance of the target type. 1-210 Working with Sentences • Expression Enter a valid expression. The expression may use a datatype method, a user-defined parameter or a constant string or value, but may not reference an entity instance. The expression is only evaluated once, when the create Dataform it appears on is displayed for the first time. For further information on expressions, see (see “Using expressions in queries” on page 2-45) Default targets are only displayed on create Dataforms, and not on update Dataforms. Default targets are only displayed on child Dataforms if they are also create Dataforms. Defining a default target does not by itself create association instances. You can always change a default target to a different specific target. If you do not select a different target, the default target is recorded in the Sentences database in the same way as any other target specified in a Dataform. 1-211 Properties Mapping properties page Figure 5-30 The Mapping properties page The Mapping properties page allows you to map Sentences entity and association types to columns in relational database tables, when working with the LazyView tool. This properties page is only enabled when LazyView is available. For more information, please refer to the LazyView Guide. 1-212 Working with Sentences Retrieval Methods properties page Figure 5-31 The Retrieval Methods property page The Retrieval Methods properties page allows you to specify the way in which association instances are retrieved from the database. These settings can influence server response times. This page is only available for association types. This property determines the default behaviour when an association type is selected in the schema pane and when a folder is expanded in the data pane. You can override this default behaviour by selecting a different option from the association type shortcut menu or the View menu. The shortcut menu is also available on data pane folders for multiple instances. You can define different settings for forward and inverse instances. The available options are: 1-213 Operations on instances • By source (forward associations), By target (inverse associations) (default) When you select the association type in the schema pane Sentences finds all the instances of the source or target type and then searches for associations. This option provides a good response where most source or target instances have associations. If only a few source or target instances have associations this option can provide a slow response. • Sorted When you select the association type in the schema pane Sentences finds all suitable instances of the association type and then sorts them by their source or target type, and displays the first 50 instances. If there are a large number of associations this can be very slow. If there are a large number of source or target instances but only a small number of associations, this option can provide the fastest response. • Unsorted When you select the association type in the schema pane Sentences finds the first 50 suitable instances of the association type and displays them without sorting. This option can be used to display a sample of the available associations relatively quickly, or where neither of the other options provides a good response. Operations on instances There are a number of operations that can be carried out directly on instances in the data pane of the Sentences Explorer. These operations allow you to make one instance supersede another, and to define one instance as the equivalent of another. It is also possible to create an association type which has an instance, rather than a type, as its source. 1-214 Working with Sentences Supersedes Figure 5-32 The supersedes dialog in the data pane You can replace an instance with another instance of the same type using the supersedes command. Both instances must exist in the database before you use this command. After using this command the instance that has been superseded no longer exists in the database. Supersedes is not available for value instances. To supersede one instance by another, follow these steps: 1. Highlight the instance to be superseded and select Superseded by from the shortcut menu. Sentences displays the Superseded by dialog box for the instance. 2. Select the name of the superseding instance from the picker list and click OK. Sentences displays the Impact of supersession dialog listing the associations in which the instance being superseded is involved. 1-215 Operations on instances 3. Click Supersede to continue or click Close to cancel the supersedes action. When you use Supersedes with a singular association type you may create a situation in which a singular association has multiple instances. If this occurs, Sentences displays an error message when you open the Dataform. To remedy this error you must view the association in the Sentences Explorer, and delete the additional instances that are no longer required. When you use Supersedes with a multiple association type, the lists of associations from the superseding and superseded associations are merged. After a supersedes action the original instance no longer exists in the database, in contrast to instance equivalence where both equivalent instances persist in the database. A Supersedes action cannot be undone. Instance equivalence You can define two entity or two association instances as being equivalent. For example, you can make the instance International Business Machines equivalent to the instance IBM. The instances must be of the same or equivalent entity type or association type, but may be from different data chapters. Equivalent instances have identical behaviour, that is all the associations of either instance are displayed as associations of both. Equivalent instances are displayed in the Explorer data pane in an instance subfolder labelled equivalent to, Instance. Where an instance is equivalent to more than one other instance, then the same behaviour is displayed by all the equivalent instances. Equivalent instances persist in the database, in contrast to superseded instances which do not. Equivalence is not available for value instances. 1-216 Working with Sentences Figure 5-33 Instance equivalence dialog To make one instance equivalent to another, follow these steps: 1. Highlight an instance that you wish to make equivalent and select Equivalents from the shortcut menu. Sentences displays the Instances equivalent to dialog box for the instance. If any equivalent instances are already defined they are displayed in the list box. 2. Click Add to display a picker showing suitable instances (instances of the same or of an equivalent type), select an instance, and click OK. Repeat this step if necessary to make more instances equivalent to the selected instance. 3. Click OK to close the dialog. 1-217 Operations on instances The following table lists the buttons on the Instances equivalent to dialog box and their meanings. Button Action Add Displays a picker so that you can select an existing instance to be added to the list. Remove Removes a selected instance from the list. (The selected instance is no longer equivalent to any of the other instances shown.) Remove All Clears the list. This has the same effect as using the Remove button on the current instance in the dialog for another instance. OK Implements the selected changes and closes the dialog. Cancel Discards the selected changes and closes the dialog. You can also define equivalent types (see “Equivalence properties page” on page 1202). Instance-specific association types If you select an existing entity instance or association instance as the source of an association type, that association type applies only to that instance. This allows you to add information that is specific to a particular instance. For example, in a customer relationship management system you may wish to record the golf handicap of only one customer. You can do this in Sentences by adding an instance-specific association type, for example Bill Smith, golf handicap, golf handicap. This association type does not exist for other customers in your database. If you later decide that an instance-specific association type is relevant for other instances of the same type you can change the association’s source to the type, for example to Customer, golf handicap, golf handicap. When you make this change Sentences preserves the original data you entered. 1-218 Working with Sentences The Dataform for an instance that has instance-specific association types includes an additional tabbed page for the instance-specific associations. The title of the tab is the name of the instance. To create an instance-specific association type, highlight an instance in the explorer data pane and select Create Association Type from the shortcut menu or click the Create Association Type button on the Toolbar. The Sentences Dataform The Sentences Dataform is a dynamically generated data viewing and data entry window. In the Sentences client, all entity, value and association instances are created using a Dataform. You can open a Dataform either on an association or entity type to create new instances and optionally create the associations for those instances (see “The create Dataform” on page 1-220), or on an association or entity instance to edit or update the associations for that instance (see “The update Dataform” on page 1-221). The base Dataform for an entity or an association displays associations which have that entity or association type as their source. Each association is represented by a labelled field. The field label is the same as the verb of the association type, and the field itself allows you to view or define a target. Each target defined in the Dataform represents an association instance. Custom Dataforms can also display inverse associations. If you defined an association type as singular, then the Dataform field for that type only allows a single entry. If you defined an association type as multiple, then the Dataform field for that type allows multiple entries. You can control the display of Dataform fields using the Properties dialog for each entity and association type, as described in the section “Properties” on page 1-176. The order in which the fields are displayed in the Dataform depends on the order in which they appear in the schema pane. The way fields are displayed in the Dataform is defined in the properties for the association type concerned. For example, an association that has been defined as multiple has, by default, a list-box display in the Dataform. Mandatory association types are marked with an asterisk (*) on the Dataform. You cannot save a Dataform unless you supply a value for every mandatory association. 1-219 The Sentences Dataform Tabbed pages in the Dataform The Dataform for an entity or association type can be made up of one or more tabbed pages, with each page displaying one or more labelled fields. Sentences automatically creates a page in the Dataform for any subset or supertype associated with the selected type. If there are any association types sourced on instances of a type, the instances are displayed on their own tabbed pages as well. For further information see “Dataform tabbed pages with subsets and supertypes” on page 1-259. The base Dataform and the default Dataform Sentences can always create a Dataform which automatically displays all the associations belonging to a particular source type. This is known as the base Dataform. You can use the Query Editor to design and save a custom Dataform, that may only display a selection of the available associations or inverse associations. For information see “Creating a custom Dataform” on page 1-227. You may define either the base Dataform or a custom Dataform as the default Dataform for a source type. Sentences displays the default Dataform whenever you select the Dataform for a type, either from the Explorer or from another Dataform. If you do not define a default Dataform Sentences uses the base Dataform. To define a Dataform as the default Dataform, follow these steps. 1. In the Sentences Explorer, highlight the entity or association type 2. Select Properties from the shortcut menu or click the Properties button on the Toolbar 3. Select the Custom Dataforms tab 4. Highlight the Dataform that you want to use as the default and click Set as Default Create and update Dataforms You can open a Dataform on a source entity type and use it to create new associations. This is known as a create Dataform. You can also open a Dataform on any source type or instance which can be used to update existing associations. This is known as an update Dataform. 1-220 Working with Sentences The create Dataform You can display a create Dataform from the shortcut menu on an entity type in the schema pane, or by highlighting an entity type and clicking the Dataform button on the toolbar. An example of a create Dataform is shown in Figure 5-34. If you open a create Dataform on a subset entity type, Sentences displays the create Dataform for the subset’s superset type. Create Dataforms always show the words New xxx in their title bar, (where xxx is the name of the entity type). You can use this Dataform to create an entity and its associations, and optionally create new entities to be the targets for its associations, all in one operation. Figure 5-34 A Create Dataform The first field on the Dataform has the name of the entity type as its label. Type in the name of the new entity you want to create in this field. You can type in new names in other fields to create additional new entities as targets of the associations shown on the Dataform, as long as those new names are valid for the target type. Alternatively, you can select the association targets from existing instances of the appropriate type. Some of the association target fields on the create Dataform include an ellipsis button which you can click to display a picker list showing the existing instances. If the display format of the association target field does not include an ellipsis button, you can right-click on the field and choose the Select Existing Instance command from the shortcut menu. 1-221 The Sentences Dataform The buttons on a parent create Dataform are Save & Reset, which updates the Dataform contents to the database and displays a new blank Dataform; Save & Edit, which updates the Dataform contents to the database and allows you to continue to update the same Dataform; and Close, which closes the Dataform. If you make changes to the Dataform, the label for this button changes to Cancel. Selecting Cancel closes the Dataform without updating the database. Sentences displays a warning message that any new information in the Dataform is not saved. A child Dataform has an Apply command button which temporarily saves the Dataform contents and allows you to continue to update the same Dataform, and an Apply & Reset button which allows you to add additional child associations before returning to the parent dataform. Changes made on a child Dataform are only saved to the Sentences database when you select a Save button on the parent Dataform from which it was called (see “Parent Dataforms and child Dataforms” on page 1222). When you open a create Dataform that includes any association type defined as mandatory you cannot save the Dataform if you do not supply a target for that association. The update Dataform The update Dataform is displayed when you select Dataform from the shortcut menu on an entity or association instance in the data pane. An example of an update Dataform is shown in Figure 5-35. Figure 5-35 An entity instance update Dataform 1-222 Working with Sentences When you open a Dataform on an entity instance, the name of the entity is shown as the first field in the window. The only shortcut menu options for that field are Rename, and in the case of a Hyperlink, Follow Hyperlink. When you open a Dataform on an association instance the identifying source, verb and target of the subject are shown in the window title bar. You can use the Dataform to rename the entity that appears in the first Dataform field. This field has the entity type name as its label. To change the name of an entity, select Rename from the shortcut menu on this field. The Rename command is not available for value instances. To change a value instance, either select a different instance from the picker list or delete the current instance and type in a new one. Some association target fields on the update Dataform include an ellipsis button which allows you to choose an existing entity as the target for each association. Alternatively you can create a new target entity by typing in a valid value (depending on the datatype selected for this entity type). The buttons on the update Dataform are Save, (or Apply on a child Dataform) which updates the Dataform contents to the database and allows you to continue to update the same Dataform; and Close, which closes the Dataform. If you make changes to the Dataform, the label for this button changes to Cancel. Selecting Cancel closes the Dataform without updating the database. Parent Dataforms and child Dataforms A Dataform can be a parent or a child, depending on how it was opened. Any Dataform opened from the Explorer is a parent Dataform. A parent Dataform is modeless. Any Dataform opened from another Dataform is a child Dataform, except in two specific cases, listed below. A child Dataform is modal with respect to its own parent Dataform, but modeless with respect to any other parent Dataform, the Explorer, or the Query Editor. The only cases in which a Dataform opened from another Dataform is a new parent Dataform are: • if the target of an association shown on the Dataform is an association, and you open a Dataform on the source of the target association; • if the target of an association shown on the Dataform is displayed as a tree, and you open a Dataform on any level of that tree below the top level. 1-223 The Sentences Dataform Creating an association in the Dataform To create an association instance using the Dataform you must first select an instance of the required association’s source, and then open the Dataform for that instance. To open the Dataform, you can either: • highlight an entity type, entity instance or association instance in the Sentences Explorer and select Default Dataform from the shortcut menu; or • highlight an entity type, entity instance or association instance in the Sentences Explorer and select the Default Dataform command on the View menu; or • highlight an entity type, entity instance or association instance in the Sentences Explorer and select the Dataform button on the toolbar You create an association in the Dataform by entering data in the target field. As an alternative to typing in a new value, you can select from existing instances of the appropriate type. To select an existing instance, click the ellipsis button to the right of the entry field. Sentences displays a picker list from which you can select the target. You can also display the picker list by right-clicking on the entry field and selecting Select <target type> from the shortcut menu, or by pressing Alt + down arrow on the keyboard. If you select an entity or value instance from the picker list for a multiple association, Sentences first places the value in the edit field, where you can edit it. When you press Enter or move to another field Sentences moves the value to the main list. If you select an association, Sentences places it directly in the main list. Association type targets and metatype targets If the target of an association type is an association type you cannot create a new instance of the target by typing into the target field on a Dataform. You can only create a new instance by clicking the ellipsis button and selecting a target from the list displayed. Similarly, if the target of an association type is a metatype you cannot create a new instance of the target by typing into the target field on a Dataform. You can only create a new instance by clicking the ellipsis button and selecting a target from the list displayed. 1-224 Working with Sentences Dataform shortcut menu When you right-click on a field in the Dataform Sentences displays a shortcut menu. The text of the shortcut menu commands includes the name of the association or the target concerned. This is indicated by the text in square brackets in the table below. Not all commands are available at all times, for example the Create, Select, and Delete options are not available if the presentation format is Radio Button or Check box. Command When available Action Follow Hyperlink If the target is a hyperlink Opens browser or mail program, as required by Hyperlink View [association with this target] Always Displays a child Dataform for the association. If no association exists, the displayed Dataform shows the target only. View [target] Always Displays a child Dataform for the target View [source] When target is an association type Displays a parent Dataform on the source of the target association Create [new association] If this association is the source of a further association Displays a child create Dataform for the association Create [new target] If this target is an entity type Displays a child create Dataform for the target Select [existing target] Always Displays a picker list Delete [association] When an association exists Deletes the association Note The options Create [new target], Select [existing target], and Delete [association] may be restricted or disabled by the query defining a custom Dataform. 1-225 The Sentences Dataform Selecting targets in the Dataform The display of an association target in the Dataform varies according to the datatype of the target type and the Format and Presentation options defined for the association type and the target type. If an association target in a Dataform field is underlined this means either that the target is a Hyperlink, or that the association is itself the source of one or more further associations. If you double click a Hyperlink, Sentences displays the target page for that Hyperlink in your Web browser, mail program, or other application, depending on the protocol being used. If you double click an underlined target that is not a Hyperlink, Sentences displays a Dataform that has that association as its source. Double-clicking a word in a multi-line edit field selects that word. When association targets are displayed in a Table for target or Table for associations format, each field may be edited directly in the table. This property can be disabled by selecting the Disable in-place editing checkbox on the Format page of the Properties dialog. To open a child Dataform for the row displayed in a Dataform table double-click any cell in the row. The source of the child Dataform is the instance displayed first column of the table. Creating an entity instance in the Dataform Entity instances are always created in a Dataform. When you are working in the Sentences Explorer and want to create an entity instance, follow these steps: 1. Highlight an entity type name in the All types folder and select Dataform from the shortcut menu. Note You cannot open a Dataform for a value type. Sentences displays a create Dataform (see “Create and update Dataforms” on page 1-219) which has the selected entity type as its source. 2. Enter the entity instance name in the first Dataform field. This field has the entity type name as its label. 3. If there are any association types defined for the entity type, the appropriate association fields are displayed on the dataform and you can create the corresponding associations at the same time as you create the entity. To create an association, either select an existing instance from a Picker list or type in a new 1-226 Working with Sentences entity name. Sentences automatically creates a new entity instance of the appropriate type with the name you have used. Note Only the base Dataform contains all the associations for a type. If you have defined a custom Dataform as the default for the entity type it is possible that some associations may not be displayed. 4. Click Save & Edit or Save & Reset. Targets with duplicate names Sentences uses unique hidden identifiers for entities (and for many other elements). This means that you can create entities with duplicate names and rename entities as needed. Sentences always prompts you to confirm that you want to create a duplicate entity when an entity with the name you are using already exists. If you type in a target name for which duplicate instances already exist, Sentences prompts you to select the correct instance by displaying the Resolve Instances dialog. This dialog displays all the identically named instances in a tree picker window, which allows you to expand the names and view their associations, so that you can select the correct instance. Highlight the correct instance and click OK to make your selection. The Resolve Instances dialog is not displayed if you select a target instance from a picker list. Targets that are subsets The target of an association type may be a subset. If you enter a new target instance for an association type whose target is a subset, Sentences checks that the instance you have entered is a valid member of the subset. If the instance is not a valid member of the subset Sentences displays an error message. For more information on subsets see “Subsets properties page” on page 1196. Changing the target in a Dataform You can change the target of an association in a Dataform, either by selecting an existing instance from a picker list, or by typing in a new entity name. When you change a target, Sentences checks whether the association you are changing is the source of further associations. If it is, then Sentences treats changing the target in the same way as it treats deleting a target. Sentences may display a 1-227 Creating a custom Dataform Delete Impact dialog listing showing what else is deleted when the target is changed. If you change the target in an association, and that target is the source of a mandatory association you must provide a value for the mandatory association before you save your changes to the database. Sentences displays an error message if you try and save without completing all the mandatory associations. When you save a changed target on a dataform, Sentences automatically checks whether the change has affected membership of subsets. Instance specific Dataforms When you open a Dataform on an instance that has instance specific association types sourced on it, the Dataform includes additional fields for those association types (see “Instance-specific association types” on page 1-217). Picker list initial selection Whenever you open a picker on a field in which you have started to type a new value, the picker puts the text that you have already entered into the Positioner field, and performs a positioning operation on that text. Creating a custom Dataform The base Dataform for an entity or association type automatically includes all the associations that have that type as their source. A custom Dataform displays only those associations you choose to display, and include inverse associations which are not displayed automatically on the base dataform. Creating a custom Dataform involves two steps: • defining the custom Dataform on the Custom Dataform page of the Properties dialog for the type • developing a query in the Query Editor which defines the associations to be displayed on the custom Dataform, and attaching it to the custom Dataform definition. You may also attach an existing query to a custom Dataform definition. Full details about using the Query Editor are given in Chapter 7, “Sentences queries”. To create a custom Dataform, follow these steps: 1-228 Working with Sentences 1. Open the Properties dialog for the entity or association type, and select the Custom Dataforms tab. All the dataforms for the current type are listed, including the base dataform which always has the name of the type inside angle brackets. The default dataform is marked <default>. 2. Click Create… and name the custom Dataform. Figure 5-36 Selecting a query to attach to a subset 3. If you have not created a query, click Edit Query. Sentences creates a new query with the current type is automatically selected as its data request node, saves it with the name you gave to the custom Dataform, attaches the query to the custom Dataform definition, and opens it in the Query Editor for you to customise. 4. Use the Query Editor to customise the query that includes the associations you want on your Dataform as nodes in the request tree. You can use forward and 1-229 Creating a custom Dataform inverse associations in the query tree. Hidden nodes in the query tree are not shown in a custom Dataform. The Query Editor offers a number of options that are not suitable for use in custom Dataforms. For example, select and sort nodes would generally not be appropriate for custom Dataforms. Similarly, the use of parameters or the use of required nodes in the query would not be appropriate for custom Dataform use. In addition, derived type nodes are displayed as a read-only fields. Sentences displays an error message if you try to create a custom Dataform using an unsuitable query. 5. Save the query, and close the Query Editor. 6. If you have already created a query to use for the custom Dataform definition, click Attach Query. Sentences displays a list of suitable queries for the current type, as shown in Figure 5-36. For details of how Sentences determines which queries are suitable see “Custom Dataform restrictions” on page 1-229. Select the saved query you created from the list and click OK. 7. If you want the custom Dataform to be used as the default Dataform, click Set as Default. Refresh button on custom Dataforms If a custom Dataform is based on a query that includes a derived type or a derivation, an additional button, Refresh, appears on the dataform (see “Derived types and derivations” on page 2-40). When this button is selected, Sentences calculates the values for the derived types or derivations shown on the Dataform. The recalculation of a derivation is dependent on the setting of its calculation option in the Derivation properties dialog (see “Derivation properties” on page 2-43). Custom Dataform restrictions You can only use a query as the basis for a custom Dataform if it conforms to certain rules. The following conditions apply to any query that you want to use as the basis of a custom Dataform: • the query must have a data request node • the query’s data request node must have a type • the type of the query’s data request node must be related to the type that the custom Dataform is intended for 1-230 Working with Sentences • the query’s data request node must not be hidden • the query’s data request node must not be bound to an instance • the query may not have any parameters • the query may not use recursive closure or transitive closure Triggers are not invoked when you click the Refresh button on a custom Dataform. They are invoked as normal when you click the Save button (see “Trigger invocation” on page 2-151). Selecting a custom Dataform You can select a custom Dataform instead of the Default Dataform from the Dataform sub-menu of the Explorer shortcut menu. Sentences uses the first character of the custom Dataform’s name as a keyboard shortcut key for the custom Dataform. If the names of two or more custom Dataforms begin with the same letter you cannot use the keyboard shortcut key to select the second or subsequent custom Dataform, as the key sequence always selects the first custom Dataform. Where one or more custom Dataforms are defined for a type, or for any of its supertypes, there is a choice of Dataforms that may be used to view and to create instances. Define the Dataform to be used as the default for a type using the Custom Dataforms page on the Properties dialog. Custom Dataforms with subsets and supertypes You cannot define a default Dataform for a subset type independently of its base type. The pages that appear on a dataform for a subset are always the same as those that appear on the Dataform for the base type, and all the criteria for the subset must be met before the Dataform and its data can be saved. You can define different custom Dataforms for an entity type and its related supertype, and select different default Dataforms. The pages displayed on these Dataforms may vary. If a Dataform includes an association that is not relevant for the selected type the field remains blank. For more information about subsets and supertypes see the section “Comparison of subsets and supertypes” on page 1-198. 1-231 The Dataform applet The Dataform applet You can display a Sentences Dataform as a stand-alone Java applet. This is known as the Dataform applet. You can embed the Dataform applet in an HTML page on a Web server to create a customised user interface for your Sentences database. When you use the Dataform applet you can specify the Dataform you want to use, which may be either the base Dataform or a custom Dataform for a named entity type. The dataform applet is controlled by an HTML page that supplies parameters to the applet specifying the host and profile to use, the type to open a Dataform on, and (optionally) the specific Dataform to display. An example of the Dataform applet is distributed with Sentences and can be found in the <Sentences_home>\Examples\HTML directory. To run this example with the Sentences Enterprise Edition copy the file DataformApplet.html to your Sentences Web application directory, <Sentences_home>\Tomcat4\webapps\Sentences, and open it using your Web browser. If you are using the default installation of Sentences with Tomcat, the URL is as follows: http://localhost:8090/Sentences/DataformApplet.html 1-232 Working with Sentences Figure 5-37 Example of a Dataform applet in a browser page The Dataform is displayed as part of the HTML page as shown in Figure 5-37 and behaves like any other Dataform. If you open other Dataforms from a Dataform applet they are displayed in separate windows. Dataform applet code example When you create an HTML page to launch a Sentences applet such as the Dataform applet you must take account of the browser in which the HTML page is run. 1-233 The Dataform applet The Microsoft Internet Explorer browser uses the HTML OBJECT tag while Netscape Navigator browser (version 4) uses the HTML EMBED tag. Netscape Navigator version 6 may use either the OBJECT or the EMBED tag or the APPLET tag. Each of these tags requires a different format for the code required to run the Sentences applet. 1-234 Working with Sentences The code listing in Figure 5-38 shows part of the HTML code, using the OBJECT tag, used to display the Dataform applet shown in Figure 5-37: <OBJECT classid="clsid:8AD9C840-044E-11D1-B3E9-00805F499D93" codebase="http://java.sun.com/products/plugin/autodl/ jinstall-1_4_0-win.cab#Version=1,3,1,0" width="80%" height="500"> <PARAM NAME="code" VALUE="com.sentences.dataform.DataformApplet.class"> <PARAM NAME="type" VALUE="application/x-javaapplet;version=1.3.1"> <PARAM NAME="cache_option" VALUE="Plugin"> <PARAM NAME="cache_archive" VALUE="Sentences.jar"> <PARAM NAME="progressbar" VALUE="true"> <PARAM NAME="boxmessage" VALUE="Loading Dataform..."> <PARAM NAME="boxbgcolor" VALUE="white"> <PARAM NAME="boxfgcolor" VALUE="black"> <PARAM NAME="progresscolor" VALUE="cyan"> <PARAM NAME="Profile" VALUE="Human resources"> <PARAM NAME="EditOption" VALUE="data"> <PARAM NAME="LazyType" VALUE="Employee"> <PARAM NAME="LazyInstance" VALUE="Barney Norris"> <PARAM NAME="EnablePickers" VALUE="yes"> <PARAM NAME="SaveButtonText" VALUE="Submit changes"> <PARAM NAME="FixedProfile" VALUE="no"> <PARAM NAME="ImageURLBase" VALUE="/ImagesForSentences"> <PARAM NAME="Border" VALUE="none"> <PARAM NAME="Colour.window" VALUE="#FFFFEE"> <PARAM NAME="Colour.menu" VALUE="#FFFFEE"> <PARAM NAME="Colour.menuText" VALUE="#000000"> <PARAM NAME="Colour.textText" VALUE="#000000"> <PARAM NAME="Colour.textHighlight" VALUE="#6666AA"> <PARAM NAME="Colour.textHighlightText" VALUE="#FFFFFF"> <PARAM NAME="Colour.control" VALUE="#DDEEFF"> <PARAM NAME="Colour.controlText" VALUE="#000000"> <PARAM NAME="Colour.controlHighlight" VALUE="#FFFFFF"> <PARAM NAME="Colour.controlLtHighlight" VALUE="#AAAAAA"> <PARAM NAME="Colour.controlShadow" VALUE="#DDDDDD"> <PARAM NAME="Colour.controlDkShadow" VALUE="#555555"> <PARAM NAME="Colour.scrollbar" VALUE="#EEEEEE"> </OBJECT> Figure 5-38 Partial HTML code listing for the Dataform applet example 1-235 The Dataform applet Applet parameters for the Dataform applet The following parameters are used by the Dataform applet. Some of them are identical to those used by the standard Sentences applet (see “The Sentences.html start page” on page 1-50). In addition to the parameters listed here, the Dataform applet uses the following standard applet parameters: • • • • • cache_option and cache_archive described on page 1-54 code described on page 1-54 type described on page 1-54 codebase described on page 1-57 the five progress bar parameters described on page 1-54 Note that the value of the code parameter is different for each applet. • ServletPort The Dataform applet attempts to connect to the Sentences servlet using the host name and port from which it was downloaded. If the applet was downloaded from a URL that included an explicit port number, that port number is used for the servlet port. If the applet was downloaded from a URL that did not include an explicit port number, the servlet port defaults to 80, which is the default port for HTTP. If the applet needs to access the Sentences servlet on a different port you must specify that port number with the ServletPort parameter. • ServletContext The first part of the URL required to access the servlet. The default is "/Sentences". This parameter depends on the configuration of the servlet container being used. For example, with ServletExec you would normally use “/servlet”. This parameter is optional. • Profile The Profile parameter defines the default profile opened when the Dataform applet is started. The name of your profile must not contain any special characters that need to be represented by escape sequences in HTML. This parameter is mandatory. 1-236 Working with Sentences • EditOption The EditOption parameter specifies what parts of the database can be edited by users. The possible values for the Dataform applet are schema, data and none. Parameter value Editing actions allowed schema allows the user to edit schema, queries, and data data allows the user to edit data none no editing actions allowed If this parameter is set to none, the Dataform is read-only. This optional parameter is case-sensitive and the default is schema. • LazyType This parameter specifies which entity or association type to open the Dataform on. The parameter is mandatory. All of the following examples are valid uses of the LazyType parameter: <PARAM name="LazyType" value="Employee"> <PARAM name="LazyType" value="(Employee, salary, Money)"> <PARAM name="LazyType" value="((Person, bought, Car), on Date)"> Note The LazyType parameter replaces the EntityType parameter used in Sentences Version 2.0 • LazyInstance This is an optional parameter which specifies an instance of the specified LazyType to open the Dataform on. If it is not specified the Dataform opens as a blank create Dataform based on the specified LazyType. All of the following examples are valid uses of the LazyInstance parameter: <PARAM name="LazyInstance" value="Bill Jupiter"> <PARAM name="LazyInstance" value="(Bill Jupiter, salary, 20000)"> The LazyInstance parameter is locale-sensitive so care must be taken when using it with locale-sensitive value datatypes such as Date or Time. The HTML which gives the value of the LazyInstance parameter must be stated in a format which is valid for that datatype in the locale of the Sentences client. For 1-237 The Dataform applet example, on a client running with en_GB locale the format for a Date datatype is as follows: <PARAM name=" LazyInstance" value="((Bill Jupiter, bought,pizza), on 22/01/2000)"> In contrast, on a client running with en_US the format for a Date datatype is as follows: <PARAM name=" LazyInstance" value="((Bill Jupiter, bought,pizza), on Jan 22,2000)"> Failure to use the correct format results in an error stating that the instance cannot be found. Note The LazyInstance parameter replaces the Entity parameter used in Sentences Version 2.0 • LazyId This is an optional parameter which may be used instead of the LazyInstance parameter. The LazyId parameter specifies the internal identifier of a Sentences element. The internal identifier may be useful in identifying distinct instances which share the same name (for example where a customer list includes more than one instance named John Smith). The format for the LazyId parameter is: <PARAM name="LazyId" value="1/2012"> You can retrieve the internal identifiers when you run an XML Export command (see “Include Sentences IDs” on page 2-126). Do not use the LazyInstance parameter and the LazyId parameter together, as this causes an error. • EnablePickers This parameter disables the display of picker lists in the Dataform. This prevents a user from viewing data entered by a previous user. The possible values for this parameter are Yes which allows the display of picker lists, and No which disables the use of picker lists. This parameter is optional and the default value is No. If you set this parameter to No to disable the use of picker lists you can still make use of the combo box presentation method to allow users to select from an existing list. • SaveButtonText This is an optional parameter that allows you to set the text on the Dataform’s save button. The default value for this parameter is Save (language dependent). 1-238 Working with Sentences • ImageURLBase The ImageURLBase parameter specifies the URL base for the location of image files. This can either be a full format URL (for example http://www.anywebsiteaddress.com/Images) or a relative URL. Whatever is specified in this parameter is prefixed to the image file names to allow Sentences to locate and display images. By default this is the Images subdirectory created in the <Sentences_data> location you chose during installation. For more information see “About the ImageURLBase parameter” on page 1-41. • RequestSize This optional parameter sets the number of data items retrieved from the Sentences database for each request. If more items exist, Sentences displays the More… prompt in the relevant multiple association field in the Dataform. If this parameter is not set, the dataform applet uses the value for the RequestSize parameter that has been set for the Sentences client (see “PARAM NAME="RequestSize"” on page 1-57). The default value is 50. • Dataform This is an optional parameter that instructs the applet to use a specific custom Dataform for the entity type or entity specified. If this parameter is not specified, the applet uses the default Dataform. If the value given for this parameter is the entity type name enclosed in angle brackets, for example <Person>, the applet uses the base Dataform for the type. • DisplayStatus This parameter determines whether a status bar is shown when the applet is displayed. Possible values are yes, and no. The default value is yes. • Border This is an optional parameter which specifies a border decoration style on the Dataform. Possible values are line, bevel, etch and none. The default value is none. • BackgroundColour ForegroundColour These two optional parameters allow you to specify the foreground and background colours of the Dataform panel, using the standard HTML hexadecimal coding for colours. The dataform controls are not affected. If these parameters are not set the applet uses the default system colours. 1-239 The Picker applet Note Sentences accepts the American spelling of these parameters (BackgroundColor and ForegroundColor) as well as the British spelling shown above. As an alternative to using only the BackgroundColour and ForegroundColour parameters you can specify colours for a number of system features, as demonstrated in the example HTML code in Figure 5-40. See “Using colours in Sentences applets” on page 1-247. The Picker applet You can display a Sentences picker as an individual Java applet. This is known as the Picker applet, and is illustrated in Figure 5-39. You can embed the Picker applet in an HTML page on a Web server to create a customised user interface for your Sentences database. An example of the picker applet is distributed with Sentences and can be found in the <Sentences_home>\Examples\HTML directory. To run this example with the Sentences Enterprise Edition copy the file PickerApplet.html to your Sentences Web application directory, <Sentences_home>\Tomcat4\webapps\Sentences, and open it using your Web browser. If you are using the default installation of Sentences with Tomcat, the URL is as follows: http://localhost:8090/Sentences/PickerApplet.html The Picker applet displays a list of instances of a specified entity type or association type, from a specified profile, as defined in the applet’s parameters. 1-240 Working with Sentences Figure 5-39 Example of Picker applet in a browser page The picker applet is controlled by an HTML page that supplies parameters to the applet specifying the host and profile to use, and the entity or association type to open a picker on. When you double-click on an item from the Picker applet or highlight the item and click the Edit or the View button, Sentences opens a Dataform for the selected item. The Dataform opened is a standard client dataform, and not a Dataform applet. If the picker applet cannot find the profile you specify, or if you specify a LazyType for the applet that does not exist or has a duplicate in the database, the applet displays an error in the Message Log and does not run. 1-241 The Picker applet Picker applet code example When you create an HTML page to launch a Sentences applet such as the Picker applet you must take account of the browser in which the HTML page is run. The Microsoft Internet Explorer browser uses the HTML OBJECT tag while Netscape Navigator browser (version 4) uses the HTML EMBED tag. Netscape Navigator version 6 may use either the OBJECT or the EMBED tag or the APPLET tag. Each of these tags requires a different format for the code required to run the Sentences applet. The code listing, using the OBJECT tag, in Figure 5-40 shows part of the HTML code used to display the Picker applet shown in Figure 5-39: <OBJECTclassid="clsid:8AD9C840-044E-11D1-B3E9-00805F499D93" codebase="http://java.sun.com/products/plugin/autodl/jinstall1_4_0-win.cab#Version=1,3,1,0" width="50%" height="300"> <PARAM NAME="code" VALUE="com.sentences.gui.picker.PickerApplet.class"> <PARAM NAME="type" VALUE="application/x-javaapplet;version=1.3.1"> <PARAM NAME="cache_option" VALUE="Plugin"> <PARAM NAME="cache_archive" VALUE="Sentences.jar"> <PARAM NAME="progressbar" VALUE="true"> <PARAM NAME="boxmessage" VALUE="Loading Picker..."> <PARAM NAME="boxbgcolor" VALUE="white"> <PARAM NAME="boxfgcolor" VALUE="black"> <PARAM NAME="progresscolor" VALUE="cyan"> <PARAM NAME="Profile" VALUE="Human resources"> <PARAM NAME="EditOption" VALUE="data"> <PARAM NAME="LazyType" VALUE="Employee"> <PARAM NAME="CreateButton" VALUE="yes"> <PARAM NAME="ImageURLBase" VALUE="/ImagesForSentences"> <PARAM NAME="Border" VALUE="etch"> </OBJECT> Figure 5-40 Partial HTML code listing for the Picker applet example In this HTML code example, the instances displayed in the picker are defined by these parameters: PARAM name="LazyType" value="Employee" PARAM name="Profile" value="Human resources" 1-242 Working with Sentences This means the picker displays instances of the Person entity type from the Human resources profile. Applet parameters for the Picker applet In some cases the parameters used by the Picker applet are identical to those supported by the Dataform applet (see “Applet parameters for the Dataform applet” on page 1-235). In other cases, there are variations in the way the parameters are used, and there are also some parameters that are unique to the Picker applet. In addition to the parameters listed here, the Picker applet uses the following standard applet parameters: • • • • • cache_option and cache_archive described on page 1-54 code described on page 1-54 type described on page 1-54 codebase described on page 1-57 the five progress bar parameters described on page 1-54 Note that the value of the code parameter is different for each applet. All the parameters used by the Picker applet are case-insensitive for both the parameter name and the parameter value, except for the value of the LazyType parameter which is case-sensitive. The following parameters are used by the Picker applet in exactly the same way as they are used by the Dataform applet: • ServletPort • ServletContext • Profile • ImageURLBase • LazyType • Dataform • DisplayStatus • Border • BackgroundColour ForegroundColour The following parameters are used by the Picker applet with variations from the way they are used for the Dataform applet: 1-243 The Picker applet • EditOption The EditOption parameter specifies what parts of the database can be edited by users. The possible values for the Picker applet are data and none. Parameter value Editing actions allowed data allows the user to edit data none no editing actions allowed If this parameter is set to none, users may only view existing values from the Picker applet. The default setting for this parameter is none. The setting of this parameter affects the display of pickers in any Dataform opened from the Picker applet, and the display of buttons on the Picker applet. If the EditOption parameter is set to none, the Picker applet displays a View button, and the Create and Edit buttons are not displayed. • EnablePickers This parameter determines the display of picker lists in any Dataform launched from the Picker applet. The possible values for this parameter are Yes which allows the display of picker lists, and No which disables the use of picker lists. The default value is Yes, unless the EditOption parameter is set to none, in which case picker list use is disabled irrespective of the setting for this parameter. The following parameters used by the Dataform applet are not supported by the Picker applet: • LazyInstance • LazyId • SaveButtonText The following parameters are unique to the Picker applet: • Picker This parameter defines the style of picker displayed. It has a similar function to the Picker options on the Format properties page. The possible values for this parameter are Tree and List. The Calendar picker is not available. If this parameter is not specified, the style of picker defined for the type is used. 1-244 Working with Sentences • ShowTitle This parameter defines whether or not there is a title embedded at the top of the applet. The possible values are yes or no. If this parameter is not supplied the default value is yes. The title displayed is the name of the type on which the Picker applet is opened. • CreateButton This parameter determines whether a Create button is displayed in the Picker applet, which allows users to create new instances of the displayed type. The possible values for this parameter are Yes and No. The default value is Yes. The Create button is not displayed if any of the following conditions are met, irrespective of the setting of this parameter: • • • • • the Profile opened by the Picker applet does not allow data changes the EditOption parameter is set to none the Picker applet is used on an association type the Picker applet is used on a type which has Prohibit New Instances set the Picker applet is used on a type which is a subset. • DeleteButton This parameter determines whether a Delete button is displayed in the Picker applet, which allows users to delete existing instances of the displayed type. The possible values for this parameter are Yes and No. The default value is No. The Delete button is not displayed if the Profile opened by the Picker applet does not allow data changes. The Query applet You can access query results using a Java applet, known as the Query applet. When you use the Query applet with a query that makes use of query parameters, the applet display, which is illustrated in Figure 5-41, resembles the Query parameters dialog (see “Executing a query which has parameters” on page 2-78). If the query does not makes use of query parameters, Sentences displays a dialog, similar to the Query parameters dialog, which does not have any fields. The Query applet cannot be used with Set Queries. An example of the Query applet is distributed with Sentences and can be found in the <Sentences_home>\Examples\HTML directory. To run this example with the Sentences Enterprise Edition copy the file QueryApplet.html to your Sentences Web application directory, 1-245 The Query applet <Sentences_home>\Tomcat4\webapps\Sentences, and open it using your Web browser. If you are using the default installation of Sentences with Tomcat, the URL is as follows: http://localhost:8090/Sentences/QueryApplet.html Figure 5-41 Example of the Query applet display for a query with parameters You can embed the Query applet in an HTML page on a Web server to create a customised user interface for query results from your Sentences database. To run the query, select the appropriate parameter values and click OK. While Sentences executes the query it displays a Cancel button. This button may not be visible if the query is executed very quickly. By default, the query results are displayed in the same way as they are if you select the View XML results option for the same query, using the XML parameters attached to the query. You cannot specify different XML parameters when running the Query Applet. The resulting data may be either XML or HTML data, depending on whether the XML parameters specify a stylesheet to be used, and which kind of data such a stylesheet generates (see “View query results as XML” on page 2-100). Query applet code example When you create an HTML page to launch a Sentences applet such as the Query applet you must take account of the browser in which the HTML page is run. 1-246 Working with Sentences The Microsoft Internet Explorer browser uses the HTML OBJECT tag while Netscape Navigator browser (version 4) uses the HTML EMBED tag. Netscape Navigator version 6 may use either the OBJECT or the EMBED tag or the APPLET tag. Each of these tags requires a different format for the code required to run the Sentences applet. The following code listing, using the OBJECT tag, in Figure 5-42 shows part of the HTML code used to display the query applet shown in Figure 5-41: <OBJECT classid="clsid:8AD9C840-044E-11D1-B3E9-00805F499D93" codebase="http://java.sun.com/products/plugin/autodl/jinstall1_4_0-win.cab#Version=1,3,1,0" width="60%" height="160"> <PARAM NAME="code" VALUE="com.sentences.dataform.QueryParameterApplet.class"> <PARAM NAME="type" VALUE="application/x-javaapplet;version=1.3.1"> <PARAM NAME="cache_option" VALUE="Plugin"> <PARAM NAME="cache_archive" VALUE="Sentences.jar"> <PARAM NAME="progressbar" VALUE="true"> <PARAM NAME="boxmessage" VALUE="Loading Query applet..."> <PARAM NAME="boxbgcolor" VALUE="white"> <PARAM NAME="boxfgcolor" VALUE="black"> <PARAM NAME="progresscolor" VALUE="cyan"> <PARAM NAME="Profile" VALUE="Human resources"> <PARAM NAME="LazyQuery" VALUE="Project resources"> <PARAM NAME="Border" VALUE="none"> <PARAM NAME="Colour.window" VALUE="#FFFFEE"> <PARAM NAME="Colour.menu" VALUE="#FFFFEE"> <PARAM NAME="Colour.menuText" VALUE="#000000"> <PARAM NAME="Colour.textText" VALUE="#000000"> <PARAM NAME="Colour.textHighlight" VALUE="#6666AA"> <PARAM NAME="Colour.textHighlightText" VALUE="#FFFFFF"> <PARAM NAME="Colour.control" VALUE="#DDEEFF"> <PARAM NAME="Colour.controlText" VALUE="#000000"> <PARAM NAME="Colour.controlHighlight" VALUE="#FFFFFF"> <PARAM NAME="Colour.controlLtHighlight" VALUE="#AAAAAA"> <PARAM NAME="Colour.controlShadow" VALUE="#DDDDDD"> <PARAM NAME="Colour.controlDkShadow" VALUE="#555555"> <PARAM NAME="Colour.scrollbar" VALUE="#EEEEEE"> </OBJECT> Figure 5-42 Partial HTML code listing for the Query applet example In this HTML code example, the query referenced by the applet are defined by these parameters: 1-247 Using colours in Sentences applets PARAM name="Profile” value="Human resources" PARAM name="LazyQuery" value="My_query" This means the applet displays the results of the query named My_query from the Human resources profile. Applet parameters for the Query applet The following parameters used by the Dataform and Picker applets are also used by the Query applet. For more details see “Applet parameters for the Dataform applet” on page 1-235: • Profile • Border • ServletPort • ServletContext • DisplayStatus The following parameter is unique to the query applet: • LazyQuery This parameter defines the name of the query to use. This parameter is mandatory. The query referred to must not be a Set Query. • Target This optional parameter defines the name of the browser window in which to display the query results. This parameter supports the standard HTML values for the target attribute, which are: _blank (which opens a new browser window), _self (which loads the results window into the same frame or window as the applet was in), _parent (which loads the results window into a window or frame one level above in a frame hierarchy), _top (which loads the results window into the top level window), or <name> for a named window. In addition to these parameters the query applet also makes use of the colour parameters described in “Using colours in Sentences applets” on page 1-247. Using colours in Sentences applets When you create the HTML pages for use with Sentences applets you may use either a simple colour scheme using the BackgroundColour and ForegroundColour parameters only, or an advanced colour scheme which allows you to specify colours for a number of different system features. There is an 1-248 Working with Sentences example of the use of the advanced colour scheme in the partial HTML code listing for the Dataform applet example in Figure 5-40. You must use either the BackgroundColour and ForegroundColour parameters only, or the advanced colour scheme. If Sentences detects the BackgroundColour and ForegroundColour parameters all other colour parameters are ignored. In both schemes you need to define colours using standard HTML hexadecimal coding. If your Web page is going to be viewed by users who have only 256-colour monitors, it is recommended that you restrict your choice of colours to the 216 nondithering colours which are common to all browsers (the so-called “Web-safe palette”). Sentences automatically maps the colours of certain system features to your BackgroundColour and ForegroundColour settings. Sentences also calculates values for “darker” and “brighter” versions of these colours, which are used for the highlights that create a three-dimensional effect. The system features mapped by Sentences are shown in the following table: System Colour Usage Mapped to window The interior of text fields and lists BackgroundColour menu The backgrounds of menus. BackgroundColour menuText The text in menus. ForegroundColour textText Text inside text fields and lists ForegroundColour textHighlight The background of selected text (for example, in a text field) Brighter BackgroundColour textHighlightText The colour of selected text (for example, in a text field) Darker ForegroundColour control The backgrounds of controls such as buttons, labels, panels, and sliders BackgroundColour controlText The text in controls such as buttons and labels ForegroundColour 1-249 Using colours in Sentences applets System Colour Usage Mapped to controlHighlight The bright edge of controls such as buttons (used to give 3D appearance) Brighter Background controlLtHighlight Even brighter edge of controls. Even Brighter Background controlShadow The dark edge of controls such as buttons (used to give 3D appearance) Darker Background controlDkShadow Even darker edge of controls. Even Darker Background scrollbar The background of a scrollbar (outside the slider). Brighter Background If you wish to implement an advanced colour scheme you can create individual parameters for each of these features. The name of the parameter is the same as the entries in the Colour column with the addition of the prefix “Colour.”, in the pattern: <PARAM name="Colour.control" value="#FFFFFF"> Any colours not specified retain their default values. The case of the parameter name is not significant. If any of the highlight colours such as textHighlight are not specified then its value is derived automatically as shown in the table above. The following are examples of colour specifications for individual features: <PARAM name="Colour.window" value="#33CCFF"> <PARAM name="Colour.menu" value="#CC3399"> <PARAM name="Colour.textText" value="#FFCC00"> Note Sentences accepts American spellings for these parameters (such as Color.window and Color.menu) as well as the British spellings shown above. 1-250 Working with Sentences Sentences and external formats Sentences provides extensive support for XML which is emerging as the new industry standard for data exchange. The procedures you must use to export data from a Sentences database in XML format involve the Query Editor and details are given in “The Query Editor and XML” on page 2-93. You can export a Sentences schema to XML. For more information see “Export Sentences schema to XML” on page 2-107. Further details about the use of XML with Sentences are given in Chapter 8, “Sentences and XML”. For security reasons, some XML features are only available when you have enabled an appropriate servlet. For more details see “Servlet access to Sentences” on page 1-75. You can also import comma separated value (CSV) files into a Sentences database and export Sentences data to a CSV files. CSV files are “flat” data files that can be created or read by many applications. Details of the CSV Import command are given in this section, and details of CSV Export are on page 2-103. Some examples of using CSV Import and CSV Export to integrate data from Sentences with other applications are shown in “Integration with Microsoft Office applications” on page 2-226. Using triggers when you import data Trigger information is part of the Sentences schema which is read by the import programs. When you import XML data any triggers attached to any of the types for which data is being imported are run. This means that it is possible for a trigger to interrupt an import operation. When you import CSV files you can control whether or not triggers are executed by specifying a command line switch. In order for the import program to use a trigger, the JAR files containing the triggers must be in the directory listed in the TriggerPath property in the Server.properties file, and the triggers must be attached to types in your schema. You can use switches with the Import command to determine whether or not triggers are run. CSV Import CSV Import is a command line program which is run on the Sentences server when Sentences is not running. 1-251 Sentences and external formats CSV Import allows you to add data derived from other systems to a Sentences database. You can also take data from one Sentences database and import it into a different database using a combination of the Export to CSV command and CSV Import. CSV Import only deals with data and cannot be used to create or alter a database schema. You must have your database schema in place before importing data. The schema must be saved as named profile, because you need to use the profile name when you run CSV Import. If you want to import data into a complex database schema you may need to divide your data into a number of CSV files which should each be imported separately. In this case the order in which the files are imported becomes significant. There is a detailed example of using CSV Import in Chapter 11, “Worked examples”. CSV Import cannot distinguish between existing and new instances that have identical names, and treats the new instance as an update of an existing instance. In cases where new instances may have the same names as existing instances you should use Sentences’ XML Import procedure (see “Importing XML data” on page 2-110). CSV Import and supertypes and subsets If your database uses supertypes and subtypes you must import the subtype instances before you import the supertype instances, to avoid the possibility of creating duplicates. This is because every subtype instance is also an instance of the corresponding supertype. You cannot import subset instances directly, as the membership of a subset is always determined by the result of a subset query. All the relevant instances must be imported as instances of the corresponding superset. Those instances which meet the criteria for membership of the subset are displayed when the subset type is selected. The problem of duplicate instances may occur when you import a CSV export file which was based on a subset query. If you create one CSV export file for a query which selects all the instances of a superset entity type and a separate CSV export file which selects all instances of the Subset entity type and then import both of these files into a new profile you may create duplicates in your new database. 1-252 Working with Sentences This is because an instance of a Subset entity type is also an instance of the superset entity type. To avoid this problem you must import the CSV export file from the subset query first. Structure of CSV files When you import a CSV file, Sentences treats the first line of the file as a series of column headings, and tries to match the column heading to an existing entity type. Column headings must match existing entity types, and may optionally contain an association verb to specify an association type. The rules that Sentences uses a for this matching are explained below. The order of the columns in the CSV file is also significant, because of the way in which CSV Import determines the association type to which column data corresponds. CSV Import can create association instances only where an instance of the source type for the equivalent association type has been created as a result of a preceding column in the file. CSV Import rules For each column in the CSV file, Sentences identifies an entity type and looks for the relevant association types according to the following rules: • The association type can be sourced on any entity type or association type identified for an earlier column, or a subset or supertype of such a type. • The association type can be targeted on another association type provided that the last column which contributes to the identification of the target association type is preceded by all columns which contribute to the identification of the source type. • The target of the association type for a column can be a subset or supertype of the entity type identified for that column. • You can specify an association type by including its name as part of the column heading, delimited by a colon (:). The association type specified must still meet the other criteria above. • Because the colon (:) character is used as a delimiter between entity type names and association type names, you cannot use a colon character in an entity type name. • If more than one association type is suitable, and you do not specify which one to use, the program produces an error message and stops. 1-253 Sentences and external formats • If a line in a CSV file ends with one or more empty fields which are not marked by a delimiter character, Sentences assumes that these fields are empty. Cardinality rules and triggers with CSV import The CSV Import program does, by default, implement Sentences’ usual checks and constraints on association type cardinality (see “Cardinality” on page 1-161), and does run triggers associated with types included in an import. However, you can add the [-notriggers] switch to the CSV import command line to force the import program to ignore triggers and cardinality checks (see “Running CSV Import”in this chapter). If you choose to use the [-notriggers] switch it is possible that after running CSV Import your Sentences database may contain multiple associations for an association type defined as singular. Running CSV Import To import a CSV file you need to run an external command while the Sentences server is shut down. You must run the command separately for each file you want to import. You must have write access to the chapter files to which you wish to add data in order to run CSVImport. The command you run varies according to the platform you are working on. In all cases the command relates to the Java class that controls the import procedure, com.sentences.export.ImportCSV To import a CSV file on Windows platforms The Sentences installation directory on Windows platforms includes a batch file CSVImport.bat. Use this batch file to run the CSV Import procedure. 1. Shut down the Sentences server and open a command window (MS-DOS window). 2. Navigate to your Sentences installation directory. 3. Type in the import procedure command in the format: CSVImport [-notriggers] [-nolog] <profilename> <filename> where: <profilename> is the name of the profile you are importing into, and <filename> is the path and name of the CSV file you want to import. 1-254 Working with Sentences [-notriggers] is an optional switch to stop CSV Import from running any triggers that are attached to types included in the import. By default, Sentences runs the triggers, and if you include the -notriggers switch Sentences ignores the triggers. [-nolog] is an optional switch which stops the creation of a recovery log file. Using the -nolog switch may speed up the import process. An example of CSV Import is as follows: CSVImport "HR CSV Example""Developer\Examples\§ CSVImport\Employees.csv" While CSV Import is running Sentences displays a row of asterisks. Each asterisk represents 100 lines of data. If you know the number of lines of data in your CSV file, the row of asterisks can indicate the progress of the import. To import a CSV file on Solaris, Linux, or AIX platforms The Sentences installation directory on Solaris, Linux and AIX platforms includes a shell script CSVImport.sh. Use this shell script to run the CSV Import procedure. You can run the CSV Import procedure either from the command line or from a script file using a command, for example: ./CSVImport "HR CSV Example""/Developer/Examples/§ CSVImport/Employees.csv" Note If the profile you are referencing with this command includes passwordprotected chapters, Sentences prompts you for the password for each chapter concerned (see “Password-protected chapter files” on page 1-138). CSV Export You can export the results of a Sentences query as a CSV file, using the Export to CSV file… command in the Query Editor or the Sentences Explorer. You do not need to stop the Sentences server in order to run the Export to CSV file… command. By making the Export to CSV file… command part of the query system Sentences allows you to sort and select data from the Sentences database before you export it. The behaviour and procedures for exporting query results are different for queries and for set queries. For more information about using the Export to CSV file… command see “Exporting query results as CSV data” on page 2-103. Chapter 6 Advanced techniques This chapter looks at techniques for getting the best out of Sentences and is designed for more advanced users. The topics described in this chapter are: • Sentences and Java technology • transaction processing in Sentences • Dataform tabbed pages with subsets and supertypes • target parameters • creating database views using profiles and chapters Sentences and Java technology Sentences makes use of Java technology and the Java Virtual Machine to achieve platform independent operability. This section is a brief introduction to the architecture of Java programs for users who may be unfamiliar with Java. More information on Java can be obtained from the Sun Microsystems Java website: http://java.sun.com. The Java Runtime Environment provides a plug-in for popular Web browsers such as Microsoft Internet Explorer and Netscape Navigator. The plug-in contains both the necessary Java libraries and the Java Virtual Machine (JVM) that interprets the Java byte-code. You must have the Java plug-in installed before you can use your Web browser as a Sentences client. Java programs for client machines are known as applets, and Java programs that run on servers are known as servlets. Sentences has both a client applet and a number of server servlets. More information about servlets can be obtained from: http://java.sun.com/products/servlets and http://www.servlets.com Figure 6-1 shows a diagrammatic representation of how the Sentences applet and servlets communicate in the Sentences Enterprise Edition. The right-hand side of the diagram represents a client machine running a Web browser, (for example Microsoft Internet Explorer) with the Java plug-in, running the Java Virtual Machine. The Sentences applet runs in a Web browser window. 1-256 Advanced techniques The left-hand side of the diagram represents a server machine, which is running a Web server (for example Microsoft IIS which is part of the Microsoft Windows NT Server). The Web server requires a servlet container (for example ServletExec) for Java servlets. Some Web server programs, such as Tomcat, do not require a separate servlet container. The servlet container runs the Sentences servlet, called SentencesServer using the Java Virtual Machine. Server machine Client machine Web server Servlet container Web browser Java Virtual Machine Java Virtual Machine Applet Servlet request Sentences Server response Sentences applet J2RE Java Plug-in ServletExec Internet Explorer Microsoft IIS Figure 6-1 Diagram of client and server interaction in Sentences The Sentences applet sends requests to the SentencesServer servlet running on the server. The servlet then sends a response to the applet. The communication between server and client uses the Internet communication protocol TCP/IP. The setup described here applies to the Enterprise Edition even when it has been set up in local mode, with the client and server parts of the programme actually residing on the same physical computer. The Personal Edition of Sentences however does not use a client-server configuration and the whole program is bundled as a single application. 1-257 Transaction processing in Sentences Transaction processing in Sentences A database transaction is generally considered to be an action or series of actions that changes one or more items of data stored in the database. Sometimes a number of related units of information need to be changed together. The method for updating data in Sentences is divided between the client and the server. All data resides on the server, and the server handles data requests from the client. Sentences is designed to work over the Internet and therefore the communication between client and server uses Web-based protocols. This means there are no persistent connections between server and client. Each client request is handled and replied to and the connection is then closed. There is no record locking on the server side. Every time a user updates information to the database the new information must be available immediately to all other users so as to support real time applications. Sentences does not use any of the data locking or file locking techniques commonly used in relational databases to maintain data integrity. Instead, requests to change the database include a copy of the unchanged data, which is used to verify that no other changes have been made since the data being changed was sent to the client. Sentences Explorer based updates If you change data in the explorer, for example adding or deleting an entity type, your change is sent to the server as soon as you click the Create button or the Delete button. When you rename any item your change is sent to the server as soon as you press the Enter key. All changes received by the server are processed immediately. If for any reason your change cannot be updated to the database, for example if the entity type you selected as the target for a new association type has been deleted by another user, Sentences displays an error message. Dataform based updates In order to display a Dataform, the Sentences client sends a data request to the server. The server searches the database, and returns the requested values to the client. These values represent the state of the data on the server at that moment in time. The data returned is displayed in the Dataform. When you change data on the Dataform, the Sentences client stores your changes in an update package. All the 1-258 Advanced techniques changes in a Dataform and any related child Dataforms are stored in the same package. Child Dataforms are defined in the next section. When you click the Save button, all your changes are passed to the server, along with the original data request and the original set of returned values. All changes in your package are processed by the server as soon as they are received. The first action taken by the server is to reprocess the original data request and to compare the current returned values with the stored set of returned values from the original request. Messages from multiple users are queued and are processed by the server one at a time. Any difference between these two sets of values indicates that data has been changed by another user after your original data request was made. In this case, your update package is not processed and none of your changes are updated to the database. If for any reason any one change in your package cannot be updated to the database then none of the changes in your package are updated, and Sentences displays an error message. Updates in parent and child Dataforms The Dataform that relates to an object shows all the associations that have that object as their source. Each association is represented by a label based on the verb of the association, and a data entry field for entering or displaying the target. Dataforms opened from the Explorer are parent Dataforms. You can display a shortcut menu on the target field, and then display another Dataform by selecting one of the View… options from the shortcut menu. Dataforms opened from other Dataforms are almost always child Dataforms (see “Parent Dataforms and child Dataforms” on page 1-222). Any changes made on a child Dataform are regarded as part of the same transaction to which the original parent Dataform belongs. This means that changes made in a child Dataform are not saved to the Sentences server until the original Dataform is saved. You can check whether a Dataform is a child or a parent by looking at the text on the command buttons. A child Dataform has an Apply command button. On a parent Dataform, the command buttons are Save & Reset, Save & Edit, or Save. 1-259 Dataform tabbed pages with subsets and supertypes If the Sentences server does not accept a change you want to make you must refresh your view of the server before you try and save your changes again. Dataform tabbed pages with subsets and supertypes You can use the Sentences Query Editor to create custom Dataforms. Custom Dataforms may include tabbed pages based on Page nodes that you add to your query (see “Page Nodes” on page 2-80).Sentences also adds a tabbed page for any instance-specific association types (see “Instance-specific association types” on page 1-217). Sentences automatically displays Dataform tabbed pages for subset or supertype associations in any base Dataform and in any custom Dataform you create, in addition to the tabbed pages you specify using Page Nodes. The order in which these automatically created tabbed pages appear on the base Dataform is the same as the order of the subsets in the entity type’s has subsets folder in the Sentences Explorer schema pane. You can change the order of the subsets in this folder by using drag-and-drop, and this changes the order in which the Dataform subset tabs are displayed. The following sections show some examples of how using subsets and supertypes affects the appearance of your Dataform. 1-260 Advanced techniques Figure 6-2 The Fivestar Garage application Sentences Explorer view Figure 6-2 shows the Sentences Explorer schema and data panes for a fictional garage application. The database for this application uses a number of examples of supertypes and subsets. The entity types Employee and Customer both use the entity type Person as their supertype. Dataform appearance with Supertypes In this fictional garage application, the entity type Person is the source of a number of association types. The Prohibit new instances property has been set for Person so you cannot create new instances of this type. However, all the instances of Employee and of Customer are also instances of Person. All the instances of Employee and of Customer are displayed in the data pane when you select Person in the schema pane. 1-261 Dataform tabbed pages with subsets and supertypes Figure 6-3 Dataform on instance of customer, showing Person page Figure 6-4 Dataform on instance of employee, showing Person page Figure 6-3 shows a Dataform on an instance of Customer, showing the Person page, and Figure 6-4 shows a Dataform on an instance of Employee, also showing the Person page. The associations types displayed in each case are identical, as both Dataforms are showing the association types that have Person as their source. 1-262 Advanced techniques Figure 6-5 Dataform on instance of Customer, showing Customer page Figure 6-6 Dataform on instance of Employee, showing Employee page Figure 6-5 and Figure 6-6 are not the same, as Figure 6-5 shows only the association types that have Customer as their source, and Figure 6-6 shows only the association types that have Employee as their source. The Fivestar Garage application uses an entity type called Job. This is the supertype for Bodyshop and Workshop entity types. Figure 6-7 and Figure 6-8 show the Dataform tabs for Workshop and Bodyshop, which reflect the different arrangements of data for jobs 1001 and 1004 displayed in Figure 6-2. 1-263 Dataform tabbed pages with subsets and supertypes Figure 6-7 Dataform on instance of a Job showing Workshop page Figure 6-8 Dataform on instance of a Job showing Bodyshop page Dataform example with Subsets One of the association types that is sourced on Job refers to the job’s status. The possible values for this association are A = Waiting, B = Started, and C = Finished. The application includes three subset entity types named Waiting jobs, Started jobs, and Finished jobs. Subset entity types are shown with yellow icons in the schema pane. These types have been modelled as subsets of Job because they represent the 1-264 Advanced techniques status of a particular job which changes from time to time. The subset query for each subset checks the value of the Status association. In each query the association node is bound to the appropriate instance. Figure 6-9 shows the subset query for the Waiting jobs subset. For more information on using queries see Chapter 7, “Sentences queries”. Figure 6-9 The subset query for the Waiting jobs subset The Finished jobs entity type is the source of an association type invoice, which only applies to finished jobs. As Finished jobs is the source of an association type the Dataform creates a separate tabbed page with the subset name as its title, which can be seen in the Dataform for Job 1004. 1-265 Dataform tabbed pages with subsets and supertypes Figure 6-10 Dataform for job 1004 showing the Finished Job page There are no tabs for Waiting jobs and Started jobs as neither of these is the source of an association type. However, when you open a Dataform for a job with a different status, and which therefore belongs to a different subset, the Finished jobs page is still present on the Dataform. This is because Waiting jobs and Started jobs are subsets of the same entity type that Finished jobs is a subset of. Figure 6-11 Dataform for job 1001 showing the Finished Job page in background Any mandatory associations that have a subset as their source are considered optional when an entity is not a member of the subset. 1-266 Advanced techniques Target parameters When you create an association in the Dataform you can select a target from a picker list. Generally, the picker list displays all the available instances of the target association or entity type. The Target Parameters feature allows you to constrain the available targets for a particular association to a subset of the target, relative to the association’s source. If the association’s source is itself an association the constraining subset may be relative to its source. Conference room example The following conference room example uses a constraining parameter based on a subset of an association’s source. It demonstrates how an events organiser who is planning a number of conferences simultaneously might restrict the picker list for conference session rooms to those rooms belonging to the conference hotel. Rather than setting up individual static queries for each conference or each hotel, the Target Parameters feature allows the creation of a single dynamic solution. Figure 6-12 Part of a conference planning application 1-267 Target parameters Figure 6-12 shows part of conference planning application, displaying associations of the type Hotel, has room, Room for two hotels each with three rooms. In order to use the Target Parameters feature, the database for this application also includes a subset of Room called Hotel has room. The association type that defines the room allocation for each session uses the subset as its target: Session name, in room, Hotel has room. Figure 6-13 Subset query for Hotel has room Figure 6-13 shows the subset query for Hotel has room. The association (room of, Hotel) has been added and has been marked as Required (shown with an asterisk). Hotel has been added to the Parameters folder so that it can be used to restrict the results of the query to those rooms in a particular hotel. Note In Set queries there is an additional parameter which appears first in the parameters list. This parameter, (in this example it would be named Room), is the automatically created subset parameter query which must not be altered or removed. 1-268 Advanced techniques Figure 6-14 Hotel selected, but unrestricted choices Figure 6-14 shows the picker list on the Dataform for selecting a hotel room for a session, before setting Target Parameters. All six rooms are shown in the picker list, even though some of them are not in the Hotel that has been selected. 1-269 Target parameters Figure 6-15 Setting the Target parameter restrictions To restrict the available targets for this association type, open the Properties dialog and select the Target Parameters tabbed page. All the parameters of the subset query are displayed. Sentences looks for other association types that share the same source (in this case Session name), and that have targets of the same type as the restricting parameter already added to the subset query (in this case Hotel). In our example, shown in Figure 6-15, the association type Session name, in hotel, Hotel is displayed. To enforce the restriction, select this association type in the Values taken from field. To clear the restriction select (not bound). 1-270 Advanced techniques Figure 6-16 Hotel selected, restricted choices Figure 6-16 shows the picker list on the Dataform for selecting a hotel room for a session, after setting Target Parameters. Only the three rooms that belong to the hotel named in the in hotel association are shown in the picker list. 1-271 Target parameters Allowed products example You could construct a database schema that allowed you to select a constraining parameter from an association that was a second or third level parent of the association you wished to restrict. The following allowed products example uses a constraining parameter based on as subset of the source of the source of an association. In the allowed products schema shown in the diagram in Figure 6-17 represents a situation in which a customer of a store may only buy products of a certain food type. This could be due, for example, to dietary restriction based on medical grounds. customer of Person Product Target Parameter eats only of type Store has subset Food type buys Allowed product Figure 6-17 Allowed products schema The constrained association is a nested one (Person, customer of, Store) buys, Allowed product). The constraint on the target is shown in the diagram by a thick arrow and is based on an association with the source Person. 1-272 Advanced techniques Figure 6-18 Target parameters dialog for the buys, Allowed product association The Target parameters page of the Properties dialog for the buys, Allowed product association is shown in Figure 6-18. It would be possible to construct a schema in which the constraint is based on an association source at a more distant level of nesting. Limitations of the Target Parameters mechanism As illustrated by the above examples the Target Parameters mechanism can constrain the allowed instances of an association type for a particular source. This is achieved by selecting a subset as the target type for the association type to be constrained and binding a parameter for that subset to a schema node associated with the source. To be useful with the Target Parameters mechanism the subset's membership must be defined by a query. The query must have a parameter which, when an instance is assigned to it, limits the results of the subset. All parameters have a defined type. To apply the constraint the parameter must be associated with a schema node of the same type, which becomes the constraining node. That node must be associated with the source of the constrained association type by a single valued path through 1-273 Creating database views using profiles and chapters the schema. This association is the target parameter binding created on the Target Parameters page of the association type's properties. The following restrictions apply to the Target Parameters mechanism. When attempting to use the mechanism these restrictions may be manifested either by the desired constraining node not being available in the Values taken from selection list or by the available association targets being unconstrained. There are limitations on the possible paths through the schema which can link the source of the constrained association type to the constraining node. The potential constraining nodes are defined as a set of source types contributing to the definition of the constrained association type's source and the set of targets of singular association types sourced from those source types. Specifically they are: • the source itself; • if the source is an association type then its source and, iteratively, all types along the path of source types through the schema including but limited to when an entity type is reached; • the target of any association which has any of the above sources as its source, provided that the association's type is defined as singular. In addition: • the subset parameter and the constraining node must have the same base type; • target parameters do not work where the constrained association type uses the Combo, Checkbox or Radio button presentations; • as queries are evaluated on the server when data has been changed on a Dataform but not saved that change cannot affect the result of a subset evaluation, including for a target parameters constraint. This is the case even where the changed data and constrained association are on the same dataform. Creating database views using profiles and chapters There are many situations in which it is useful to allow different groups of users access to different parts of a database. For example, in a Human Resources application you might want to enable all users on an Intranet to find the department, phone number, and physical location of their co-workers, while making sure that sensitive salary information was only available to the small number of staff who dealt with payroll matters. 1-274 Advanced techniques In Sentences you can achieve this result by creating one profile for payroll staff and a separate profile for all other staff. These profiles would share some but not all their chapters. The following example illustrates how this is done. Database views example A Sentences profile includes one or more chapter files which contain the schema, query, and data information that make up a database. However Sentences only displays entity and association instances if their entity types and association types are present in the profile. Two further rules about the use of profiles are important in this context: • Users can only change those parts of the database for which a changes chapter is defined in their profile (see “Using the Edit Profile dialog” on page 1-132). • Users are unable to change their profiles, and therefore unable to change what they can view, if the FixedProfile parameter is set to yes (see “PARAM NAME="FixedProfile"” on page 1-55). The following table shows the combination of chapters for the two profiles Staff list and Staff Salaries. Profile Available chapters Changes chapter? Staff list Staff schema No Staff data Yes - data changes Staff queries Yes - query changes Staff salaries schema Yes - schema changes Staff schema No Staff data Yes - data changes Staff queries Yes - query changes Staff Salaries The Edit profile dialog for the Staff list profile is shown in Figure 6-19. 1-275 Creating database views using profiles and chapters Figure 6-19 The Edit profile dialog for the Staff list profile Users of the Staff list profile may change data and change queries, but they may not change the schema as there is no Schema changes chapter defined in this profile. The Edit profile dialog for the Staff salaries profile is shown in Figure 6-20. 1-276 Advanced techniques Figure 6-20 The Edit profile dialog for the Staff Salaries profile Users of the Staff salaries profile may make changes to schema, data, and queries, as there are three changes chapters defined in their profile. One of the chapters in the Staff salaries profile is staff salaries schema, which includes the association type Person, salary, Salary. Users of the Staff salaries profile see a Dataform that includes a Salary field, as shown in Figure 6-21. Figure 6-21 Dataform in the Staff salaries profile 1-277 Creating database views using profiles and chapters The file staff salaries schema is not present in the Staff list profile, and as a result, the salary association type is not visible to users of Staff list profile. Users of the Staff List profile see a Dataform that does not include a Salary field, as shown in Figure 6-22. Figure 6-22 Dataform in the Staff list profile 1-278 Advanced techniques Index A action attribute 2-119 allowing in XML 2-126 add chapter 1-135 all queries folder 1-107 all types folder 1-107 API 2-142 and triggers 2-147 and user-defined parameters 1-59 building and running programs 2-143 class hierarchy 2-144 class hierarchy diagram 2-144 custom datatypes 2-153 example code 2-142 example program 2-222 introduction to 2-141 online documentation 2-142 packages 2-143 triggers 2-145 use of 2-122 applet applet parameters, see parameters Dataform applet 1-231 Picker applet 1-239 Query applet 1-244 Sentences applet 1-31, 1-50, 1-67, 1-255 Sentences applet parameters 1-53 Sentences applet window 1-152 using applets 1-58, 1-92 using colour in applets 1-247 application suite 1-35, 1-38, 1-46 arithmetic operations with date and time datatypes 2-59 arithmetic operators 2-48 arithmetic operators example 2-48, 2-49 assigning datatypes 1-181 association types 1-158 cardinality 1-161 creating verbs 1-88 defining source, verb, and target in 1-159 instance-specific 1-90, 1-217 inverse verb 1-161 metatype target 1-223 options 1-162 properties 1-176 properties page 1-207 renaming 1-166 retrieval options 1-25, 1-212 sequencing 1-175 singular inverse property 1-162 sorting and sequencing 1-175 subsets 1-199 targets 1-223 associations creating 1-164, 1-223 display order 1-163 introduction to 1-79 sorting and sequencing 1-175 associative databases comparison with relational databases 1-85 associative model comparison with relational model 1-84 further reading 1-79 available chapters 1-133 B background colour XSL background colour option 2-89 BackgroundColour parameter 1-238, 1-242 backup backing up and restoring data 1-61 backing up data 1-61 copying chapters for backup 1-64 exporting a profile for backup 1-64 online backup 1-61 BackupPath parameter 1-44 BackupTimeout parameter 1-45 base Dataform 1-219 batch files parameter limit 1-147 binding nodes 2-34 to instances 2-35 to other nodes 2-36 1-280 Index to parameters 2-37 block size 1-137 changing 1-151, 2-263 default block size 1-46 block statistics 2-258 BlockSize parameter 1-46 Border parameter 1-238, 1-242, 1-247 boxbgcolor parameter 1-54 boxfgcolor parameter 1-54 boxmessage parameter 1-54 C cache_archive parameter 1-54 cache_option parameter 1-54 CacheSize parameter 1-45 can create target 2-91 can select target 2-91 canvas 2-132 cardinality 1-161 and data display 1-161 cascading stylesheet 2-96 certificate 1-69 changes chapters 1-133 changing block size 1-151 changing port numbers 1-41 chapter files analysis 2-262 checking 1-137 deleting 1-137 design considerations 1-90 duplicate chapter files 1-73 format 1-150 locations 1-128 naming 1-136 passwords 1-25, 1-138 properties 1-137 statistics 2-256, 2-257 system chapters 1-129 ChapterPathList parameter 1-43 chapters 1-127 adding to a profile 1-135 and internal identifiers 1-150 available chapters 1-133 changes chapters 1-133 chapter properties 1-137 commands 1-130 copying 1-150 deployment 1-140, 1-150 duplicate chapter files 1-150 export and import single chapter 1-151 importing 1-143 and profile visibility 1-147 new chapter 1-136 rename a chapter 1-137 restriction on copying chapter files 1-150 use in database design 1-90 working with chapters 1-135 ChapterTimeout parameter 1-45 checkbox presentation option 1-190 child dataform opening from a table row 1-225 child dataforms 1-258 choosing entity, association or value types 1-87 CLASSPATH 1-50 classpath 1-49 classpath argument 1-49 Classpath elements 1-48 client Sentences client 1-68 client API 2-142 use of 1-93 client API example 2-222 client parameters 1-58 client server interaction diagram 1-256 closure recursive 2-72 transitive 1-25, 2-69 code example Dataform applet 1-234 HTML for Sentences start page MS Internet Explorer 1-52 HTML for Sentences start page Netscape Navigator 1-52 Picker applet 1-241 Query applet 1-246 code parameter 1-54 codebase parameter 1-54, 1-57 collapse view 2-34 colours applet colour features 1-248 1-281 Index using in Sentences applets 1-247 combo presentation option 1-190 commands ExportChapter 1-151 ImportChapter 1-151 communications between Sentences server and client 1-66 comparison operators 2-49 comparison operators example 2-50 components Sentences components 1-24 concatenation operator 2-48 conditional operator 2-53 configuration 1-33 configuration parameters 1-51 optional parameters 1-56 configuration files 1-43 LaunchSentences.html file 1-50 lazystart script file 1-48 Sentences.html start page 1-50 Server.properties file 1-43 configuring Sentences 1-43 support 1-42 configuring with non-J2EE Web servers 1-39 contacting technical support 1-74 context menu see shortcut menu 1-114 copy and paste actions 1-99 core queries 1-107 core queries folder 1-107 core types 1-106 generate automatically option 1-134 core types folder 1-106 behaviour 1-134 setting display in 1-178 cp see classpath create Dataform 1-219 CreateButton parameter 1-244 creating association types 1-158 custom Dataforms 1-227 custom Help 2-157 entity types 1-154 new profile 1-131 parameters 2-76 CSS 2-96 CSV 1-250 exporting query results as 2-103 file structure 1-252 CSV Export 1-254, 2-103 CSV export with multiple associations 2-104 CSV Import 1-250 and cardinality rules 1-253 example 2-165 on Solaris, Linux or AIX 1-254 on Windows 1-253 rules 1-252 running command 1-253 with supertypes and subsets 1-251 CSV Import example adding image data 2-170 data targeted on associations 2-168 importing example files 2-167 preparing a profile 2-166 repeating the demonstration 2-173 viewing additional data 2-171 viewing imported data 2-168 currency 1-185 currency datatype 1-185 international considerations 1-186 custom Dataform 1-91, 1-227 design see Query Editor and Dataforms properties dialog page 1-206 refresh button 1-229 restrictions 1-229 selecting 1-230 custom datatype example 2-214 TelecomsNumber 2-216 custom datatypes 2-153 and import and export 2-155 installing 2-154 loading custom datatypes 2-214 removing 2-155 unloading custom datatypes 2-215 custom Help adding custom Help 2-156 creating 2-157 file name and location 2-157 Help button display 2-156 Help mapping file 2-157 1-282 Index mapping to Help topics 2-158 precedence of Help pages 2-157 updating Help mapping 2-157 custom Help example association type mapping 2-158 custom Dataform mapping 2-159 entity type mapping 2-158 D data demand loading 1-167 data changes 1-128 data changes chapter 1-133 data exchange 1-250 data items size of 1-155 data models associative 1-79 comparing relational and associative 1-84 data pane 1-108 features 1-101 icons 1-102 data request node 2-27 data request nodes creating 2-27 data visibility 1-141 database benefits of exporting 1-141 class hierarchy in 2-144 components 1-153 database lock file 1-72 default export behaviour 1-142 design 1-79 assumptions for Order Entry example 2-189 creating verbs for association types 1-88 design guidelines 1-87 design skills 1-87 export and internal identifiers 1-142 export and import 1-141 export file 1-141 exporting 1-142 importing 1-143 modelling 1-87 queries 2-26 views creating using profiles and chapters 1-273 example 1-274 database lock file 1-72 Dataform 1-115, 1-218 appearance 1-259 appearance with Supertypes 1-260 base Dataform 1-219 changing targets in 1-226 create Dataform 1-219, 1-220 custom Dataform 1-227 default Dataform 1-219 example with Subsets 1-263 instance specific Dataforms 1-227 labels and fields 1-117 parent and child Dataforms 1-222 parent and child dataforms 1-258 shortcut menu 1-224 shortcut menus 1-119 tabbed pages 1-116, 1-219 tabbed pages with subsets and supertypes 1-259 targets that are subsets 1-226 targets with duplicate names 1-226 title bar 1-116 update Dataform 1-221 use of 1-91 Dataform applet 1-58, 1-231 colours 1-247 parameters 1-235 Dataform based updates 1-257 Dataform is read only 2-92 Dataform navigation in derivations example 2-184 Dataform parameter 1-238, 1-242 Dataform quick tour 1-115 Dataform updates parent and child Dataforms 1-258 Dataforms different kinds of 1-115 underlined targets 1-225 datatype classes 2-214 datatype methods example 2-60 datatypes 1-179 <None> 1-181 and value types 1-155 assigning 1-181 1-283 Index changing 1-156 currency 1-185 date 1-186 default directory 1-36 hyperlink 1-182 image 1-182 methods 2-58 mixedcurrency 1-186 number 1-184 numeric datatypes 1-183 output style 1-192 percentage 1-186 presentation methods 1-189 properties 1-179 string types 1-181 text 1-182 time 1-187 timestamp 1-187 undefined 1-181 Datatypes parameter 1-46 date and time datatypes 1-186 and arithmetic operations 2-59 international considerations 1-186 date datatype 1-186 date formats presentation 1-195 default Dataform 1-219 default target 1-209 using expression 1-210 using instance 1-209 default value 2-55 DefaultImageURLBase parameter 1-45 DeleteButton parameter 1-244 deleting 1-164, 1-165 chapter files 1-137 impact of deleting dialog 1-164 profiles 1-134 deletion implicit deletion 1-165 deployment copying chapter files 1-150 exporting and importing profiles 1-140 derivation properties dialog 2-43 derivations 2-42 and XML import 2-118 calculation settings 2-44 example 2-173 in derivations example 2-183 recalculation rules 2-42 setting 2-45 derivations example base and custom Dataform 2-175 design assumptions for Order Entry profile 2-189 importing Order Entry profile 2-174 Order Entry query 2-181 page nodes 2-182 setting Dataform navigation 2-184 derived type node properties dialog 2-41 derived type nodes 2-40 and expressions 2-45 derived type properties 2-41 derived types and derivations 2-40 description 1-205 design associative database 1-79 database design 1-79, 1-87 design for change 1-89 skills 1-87 Diagram Editor menus 2-249 diagram editor 1-25, 2-129 adding query results 2-137 canvas 2-132 components 2-130 consistency with Explorer 2-137 preferences 2-132 starting 2-129 toolbar 2-131 diagram element deleting 2-136 diagram elements adding 2-135 selecting 2-136 diagrams 1-25, 2-129 export and import 2-138 printing 2-138 saving as GIF file 2-138 disable in-place editing 1-191 display refreshing 1-153 display height 1-194 1-284 Index display options 1-110 display order of instances 1-152 display status parameter 1-238, 1-242, 1-247 display width 1-193 divider bar 1-109 in Query Editor 1-125 document conventions 1-27 documentation directory 1-36 drill-down 1-104 DTD 2-105 creating a DTD from a query 2-98 DTD parameter 2-115 servlet access 2-111 DTD parameter 2-115 DTD reference 2-96 duplicate instances are not allowed 1-163, 1-179 E edit profile dialog 1-132 editions 1-31 EditOption parameter 1-55, 1-236, 1-243 element identifiers 2-95 element IDs parameter 2-116 elements in XML 2-106 ellipsis button 1-117 EMBED tag 1-52 EnablePickers parameter 1-237, 1-243 Enterprise Edition running on a single computer 1-66 enterprise edition 1-31 entities 1-153 creating 1-155 introduction to 1-79 size of 1-155 entities and associations 1-79 entities and values 1-82 entity types 1-153 creating 1-154 naming rules 1-154 properties 1-176 renaming 1-166 equivalence 1-202, 1-215 defining 1-203 error messages A connection error has occurred 1-73 Error 10016, see error messages Error 1267 Error 1222 1-70 Error 1265 1-71 Error 1266 1-71 Error 1267 1-71 Error 1268 1-73 Error 1272 1-73 Error 1403 1-74 errors reported at Sentences client 1-70 The Sentences client must be loaded from the same host as its HTML page 1-74 The Sentences database is not available 1-71, 1-73 The Sentences server has not been found 1-71 Your server connection has expired 1-70 example custom datatype use of 2-216 example trigger classes 2-191 example triggers disabling 2-213 examples client API example 2-222 CSV Import example 2-165 custom datatype example 2-214 examples chapters directory 1-36 examples directories 1-36 integration with Microsoft Office examples 2-226 trigger examples 2-190 worked examples 2-163 exists() conditional function 2-54 exists() conditional function example 2-54 expand and collapse buttons 1-103 expand view 2-34 Explorer 1-96 data pane 1-108 deleting in 1-164 display options 1-110 divider bar 1-109 drill down 1-104 menu bar 1-97 shortcut keys 1-109 shortcut menus 1-114 status bar 1-108 tabs 1-104 toolbar 1-98 1-285 Index tooltips 1-100 export and triggers 2-153 databases 1-141 diagrams 2-138 options 1-143 single chapter 1-151, 2-263 troubleshooting 1-149 export and import and custom datatypes 2-155 ExportChapter command 1-151 expression syntax for queries 2-46 expressions arithmetic operators 2-48 comparison operators 2-49 concatenation operator 2-48 datatype methods 2-58 exists() function 2-54 group functions 2-56 in queries 2-45 logical connectives 2-51 results 2-63 syntax 2-46 type constructors 2-62 wildcards 2-50 Extensible Stylesheet Language (XSL) 2-106 external formats 1-250 F feedback 1-29 file system permissions 1-40 file URL prefix 1-183 filter tool 1-170 pattern matching 1-171 finding data 1-99, 1-166 FixedProfile parameter 1-55 ForegroundColour parameter 1-238, 1-242 format display height 1-194 display width 1-193 format options 1-194 picker 1-191 presentation 1-189 read-only on Dataform 1-194 style 1-191 table column width 1-194 XML query output options 2-94, 2-108 function keys Dataform 2-244 Diagram Editor 2-252 Explorer 2-244 Query Editor 2-249 G generate core types automatically 1-134 group functions 2-56 group functions example 2-57 H height parameter 1-54 Help see also custom Help hidden in Dataform tables 1-194 hidden on Dataform 1-194 hide hide nodes in queries 2-66 how to use this guide 1-26 HTML for Sentences start page MS Internet Explorer 1-52 Netscape Navigator 1-52 http URL prefix 1-183 Human resources example application 2-163 employee entity type 2-164 group company entity type 2-165 project entity type 2-165 hyperlink datatype 1-182 I icons 1-101 in Query Editor 1-122 identifiers in query expressions 2-62 image datatype 1-182 ImageURLBase parameter 1-41, 1-56, 1-238, 1-242 impact of deleting dialog 1-164 implicit deletion 1-165 import and triggers 2-153 1-286 Index database 1-141 diagrams 2-138 from earlier versions 1-147 options 1-145 single chapter 1-151, 2-263 XML data 2-110 ImportChapter command 1-151 installation 1-24 installation directories 1-33 InstallPath parameter 1-43 instance equivalence 1-215 instance options 1-163, 1-178 instances creating in the Dataform 1-225 deleting 1-164 display order of 1-152 introduction to 1-82 names created by trigger 1-25, 1-178 operations on 1-213 visibility 1-157 instances are values 1-181 instances may not be created 1-163, 1-178 instances may not be deleted 1-163, 1-179 instances may not be renamed 1-179 instance-specific association types 1-90, 1-217 integration with Microsoft Office creating Mail Merge emails 2-230 creating Mail Merge letters 2-227 creating Outlook contacts 2-234 creating Sentences data from Outlook folder 2-238 internal identifiers 1-142, 1-150, 2-95 and renaming 1-166 chapter UID 1-137 displaying 1-110 inverse associations delayed display 1-152 inverse verb 1-161 iterative design 1-88 J J2SE JRE 1-69 Java J2SE JRE 1-69 Java console tool 1-70 on Solaris and Linux systems 1-70 on Windows systems 1-70 runtime environment 1-69 Sentences and Java 1-255 Java Execution command 1-48 Java Plug-in security warning 1-69 Java Server Pages 1-92 JAVA_HOME parameter 1-48 JDBC connection strings 1-47 JDBC driver class names 1-46 JSPs 1-92 JVM_OPTS parameter 1-49 K key features 1-23 keys not used in Sentences 1-84 L labels and fields 1-117 LaunchSentences.html 1-50 layout XSL layout options 2-86 Lazy Analytics 1-26 LazyID parameter 1-237, 1-243 LazyInstance parameter 1-236, 1-243 LazyQuery parameter 1-247 lazystart 1-48 lazystart script file 1-48 LazyType parameter 1-236, 1-242 LazyView 1-26, 1-86, 1-211 connection cache timeout 1-47 JDBC connection strings 1-47 JDBC driver class names 1-46 licences directory 1-37 license file 1-24 licensing 1-24, 1-32 list presentation option 1-190 local mode 1-66 localisation 2-160 application text 2-161 example messages file 2-161 messages file location 2-161 messages file name 2-161 system text 2-160 1-287 Index the messages.properties file 2-160 locating data 1-166 positioner and filter tools 1-168 log files 1-65 logical connectives 2-51 behaviour with missing values 2-52 logical connectives example 2-51 LookandFeel parameter 1-57 M mailto URL prefix 1-183 mandatory (association type property) see cardinality mapping 1-211 mapping XML Data 2-118 MaxLogSize parameter 1-46 memory usage summary 2-261 menu bars Query Editor 1-121 menus Diagram Editor 2-249 Explorer menu 1-97 Explorer menus summary 2-241 Query Editor menus summary 2-246 shortcut menus 1-114 message log 1-125 message statistics 2-253 message text in Sentences.html start page 1-56 messages 1-125 messages.properties 2-160 Metaschema.chap 1-35 metatypes 1-26, 1-163, 1-223 mixedcurrency datatype 1-186 modelling 1-87 common behaviours 1-89 one-to-many association types 1-88 More prompt 1-167 see PendingTimeout see RequestSize multi-line edit presentation option 1-190 multi-line label on Dataform 1-195 multiple (association type property) see cardinality multiple instances sequencing 1-175 multiple profiles 1-273 multi-user environments and XML import 2-118 N naming parameters 2-76 new chapter 1-136 new features 1-24 new profile creating 1-131 nodes 1-101 and icons 1-101 binding 2-34 node names for XML output 2-97 <None> datatype 1-155, 1-181 number datatype 1-184 O OBJECT parameter 1-53 OBJECT tag 1-52 OLAP 1-26 online backup 1-61 preparation 1-62 restoring data from 1-63 using online backup command 1-62 open profile dialog 1-131 operations on instances 1-213 operator request nodes 2-37 optional (association type property) see cardinality options dialog 1-110 order entry example picker applet 2-187 outlook URL prefix 1-183 output style for datatypes 1-192 overview 1-23 P page nodes 2-80 added automatically 2-81 adding 2-80 Dataform display rules 2-81 used in derivations example 2-182 using 2-81 1-288 Index parameters BackgroundColour 1-238, 1-242 BackupPath parameter 1-44 BackupTimeout parameter 1-45 BlockSize 1-46 Border parameter 1-238, 1-242, 1-247 boxbgcolor parameter 1-54 boxfgcolor parameter 1-54 boxmessage parameter 1-54 cache_archive parameter 1-54 cache_option parameter 1-54 CacheSize parameter 1-45 ChapterPathList parameter 1-43 ChapterTimeout parameter 1-45 client parameters 1-58 code parameter 1-54 codebase parameter 1-54, 1-57 CreateButton parameter 1-244 creating 2-76 Dataform parameter 1-238, 1-242 Datatypes parameter 1-46 DefaultImageURLBase parameter 1-45 defining 2-77 defining type of 2-77 defining value of 2-77 DeleteButton parameter 1-244 display status 1-238, 1-242, 1-247 EditOption parameter 1-55, 1-236, 1-243 EnablePickers parameter 1-237, 1-243 FixedProfile parameter 1-55 ForegroundColour parameter 1-238, 1-242 height parameter 1-54 ImageURLBase parameter 1-41, 1-56, 1-238, 1242 InstallPath parameter 1-43 JAVA_HOME parameter 1-48 JDBC connection strings 1-47 JDBC driver class names 1-46 JVM_OPTS parameter 1-49 LazyID 1-237, 1-243 LazyInstance parameter 1-236, 1-243 LazyQuery parameter 1-247 LazyType parameter 1-236, 1-242 LazyView connection cache timeout 1-47 LookandFeel parameter 1-57 making mandatory 2-77 mandatory 2-77 maximum number in Windows batch files 1-147 MaxLogSize 1-46 naming 2-76 OBJECT parameter 1-53 PendingTimeout parameter 1-45 Picker applet parameters 1-242 Picker parameter 1-243 Profile parameter 1-55, 1-235, 1-242, 1-247 ProfilesProfileVisible 1-57 ProfileTimeout parameter 1-45 progressbar parameter 1-54 progresscolor parameter 1-54 Query applet parameters 1-247 query parameters 2-75 RequestSize 1-238 RequestSize parameter 1-57 SaveButtonText parameter 1-237, 1-243 SENTENCES_HOME parameter 1-48 ServletContext parameter 1-57, 1-235, 1-242, 1247 ServletPort parameter 1-56, 1-235, 1-242, 1-247 ShowTitle parameter 1-244 StatisticsPath parameter 1-48 StatisticsPoll parameter 1-48 StylesheetURLBase parameter 1-46 SystemChapterPath parameter 1-44 target 1-247 TempBlockSize 1-46 TempChapterPath parameter 1-44 TraceLevel parameter 1-44 TracePath parameter 1-44 Triggers parameter 1-46 type parameter 1-54 use in query expressions 2-55 use in subset queries 2-79 user-defined parameters 1-58 UserText parameter 1-57 viewing in Explorer 2-78 width parameter 1-54 XMLParserClass parameter 1-46 parent and child Dataforms 1-222 parent dataforms 1-258 passwords for chapter files 1-25, 1-138 PendingTimeout parameter 1-45 1-289 Index percentage datatype 1-186 permissions file system permissions 1-40 personal edition 1-31 Picker applet 1-58, 1-239 code example 1-241 colours 1-247 parameters 1-242 Picker applet example use of 2-187 picker lists 1-117, 1-227 displaying from the dataform 1-223 picker type selection 1-191 Picker parameter 1-243 port numbers 1-41 changing 1-42 positioner and filter tools 1-168 using together 1-172 Positioner tool 1-169 preferences diagram editor 2-132 presentation 1-189 presentation methods for datatypes 1-189 presentation options checkbox 1-190 combo 1-190 disable in-place editing 1-191 list 1-190 multi-line edit 1-190 radio button 1-190 single line edit 1-190 table for associations 1-190 table for targets 1-191 tree 1-190 printing diagrams 2-138 printing page breaks XSL printing page breaks option 2-90 Profile parameter 1-55, 1-235, 1-242, 1-247 profiles 1-127 commands 1-130 deleting 1-134 deployment 1-140 design considerations 1-90 edit a profile 1-132 edit profile dialog 1-132 export command option 1-143 export troubleshooting 1-149 import command switches 1-145 naming 1-132 open a profile 1-131 renaming 1-133 saving 1-134 the Profiles profile 1-129 using multiple profiles 1-130 visibility of imported profiles 1-146 profiles and chapters constraints 1-130 profiles database 1-129 export using XML 1-148 import using XML 1-148 transferring 1-147 Profiles.chap 1-35 ProfilesProfileVisible parameter 1-57 ProfileTimeout parameter 1-45 progressbar parameter 1-54 progresscolor parameter 1-54 properties 1-176 association type 1-207 chapter properties 1-137 custom Dataform 1-206 datatype properties 1-179 default target 1-209 description 1-205 equivalence 1-202 general 1-177 mapping 1-211 query properties Dataform properties 2-90 derivation properties 2-43 derived type properties 2-41 general properties 2-26 query node properties 2-82 XML properties 2-94 XSL Stylesheet properties 2-85 retrieval methods 1-212 servlet access properties 1-47 statistics properties 1-47 subsets 1-196, 1-197 target parameters 1-208 transitive closure node properties 2-92 triggers 1-203 1-290 Index properties dialog 1-176 association type page 1-207 datatypes properties page 1-179 default target properties page 1-209 description properties page 1-205 equivalence properties page 1-202 format properties page 1-188 general properties page 1-177 subsets properties page 1-196 supertypes properties page 1-200 target parameters properties page 1-208 triggers properties page 1-203 prototyping 1-88 Q queries 2-23 binding nodes 2-34 creating 2-24 creating a new query 2-24 derived type nodes 2-40 description 2-26 displaying results 2-32 editing 2-24 executing queries with parameters 2-78 execution process 2-79 expression syntax 2-46 general properties dialog 2-26 hidden nodes 2-66 navigation 2-92 no results message 2-33 operator request nodes 2-37 output format 2-94 parameters 2-75 recursive closure 2-68 renaming nodes 2-65 request tree 2-27 required nodes 2-64 result trees 2-32 saving 2-24 selection nodes 2-38 sort nodes 2-39 transitive closure 2-68 XML properties 2-94 Query applet 1-58, 1-244 code example 1-245, 1-246 colours 1-247 parameters 1-247 query changes chapter 1-133 Query Editor and Dataforms 2-79 see also custom Dataform and XML 2-93 availability 2-24 divider bars 1-125 drag and drop and cut, copy, and paste 2-31 icons 1-122 introduction to 2-23 menu bar 1-121 menus 2-246 query pane 1-124 quick tour 1-120 results pane 1-124 schema pane 1-124 starting 2-24 status bar 1-124 stop button 2-34 toolbar 1-121 use with XML 2-111 user interface 1-120, 2-25 window 2-25 XML options 2-127 query expression examples arithmetic operators 2-48 comparison operators 2-50 concatenate operator 2-49 conditional operator 2-53 datatype methods currency and mixed currency 2-60 date and time 2-60 text string methods 2-61 default value 2-55 exists conditional function 2-54 group functions 2-57 logical connectives 2-51 type constructors 2-62 user-defined parameters 2-56 void 2-54 wildcards 2-51 query expressions and user-defined parameters 1-60 conditional operator 2-53 1-291 Index default value 2-55 identifiers 2-62 missing values 2-63 syntax 2-46 using conditionals to check parameter values 2-56 using parameters 2-55 using void 2-54 zero token given as result 2-63 query node Dataform properties can create target 2-91 can select target 2-91 Dataform is read only 2-92 interaction between properties 2-92 query node properties dialog format page 2-84 query nodes adding 2-28 query pane 1-124 query properties see properties, query properties query results adding to diagram editor 2-137 displaying 2-32 displaying in the Explorer 2-34 export as XML 2-99 exporting as CSV data 2-103 viewing as XML 2-100 query shortcut menu add options 2-29 R radio button presentation option 1-190 read-only on Dataform 1-194 recalculation rules for derivations 2-42 recursive closure 2-68, 2-72 referential integrity 1-165 refresh button on custom Dataform 1-229 refreshing the display 1-153 relational and associative models comparison 1-84 relational databases access using LazyView 1-86 structural comparison with associative databases 1-85 relational model compared to associative model 1-84 rename rename a chapter 1-137 renaming 1-166 nodes 2-65 renaming profiles 1-133 request tree 2-27 request trees in queries 2-27 RequestSize parameter 1-57, 1-167, 1-238 required nodes 2-64 resources directory 1-37 restarting the Sentences server 1-60 restore backing up and restoring data 1-61 Restore Default settings 1-195 restoring data 1-61 result trees 2-32 results pane 1-124 retrieval options 1-25, 1-212 right-align in Dataform fields 1-194 right-align in Dataform tables 1-195 running CSV Import 1-253 S Salary Update example use of 2-222 SaveButtonText parameter 1-237, 1-243 saving saving a profile 1-134 schema export as XML 2-107, 2-108 schema changes 1-128 schema changes chapter 1-133 schema diagram an associative schema 1-83 complex association 1-81 simple association 1-80 target parameters schema 1-271 schema export as XML 1-26 schema pane description 1-105 features 1-101 1-292 Index icons 1-102 in the Query Editor 1-124 schema visibility 1-141 scroll bars 1-108 searching for data 1-166 security 1-74 checking HTML page host 1-74 using database views 1-75 selection nodes 2-38 and expressions 2-45 Sentences and Java technology 1-255 and XML 2-105 components 1-24 configuration 1-33 configuration files 1-43 database design 1-87 diagrams 2-129 licensing 1-24, 1-32 log files 1-65 queries 2-23 quick tour 1-95 security 1-74 transactions 1-257 uninstall 1-77 user interface design options 1-90 user interface options 1-90 XML conventions 2-123 Sentences API 2-142 Sentences applet 1-31, 1-50, 1-67, 1-255 parameters 1-53 Sentences client 1-31, 1-68 starting 1-68 Sentences editions 1-31 Sentences Explorer 1-152 drill-down 1-104 quick tour 1-96 tabs 1-104 tooltips 1-100 updates 1-257 use of 1-91 Sentences IDs parameter 2-116 Sentences server 1-31 shutting down and restarting 1-60 stopping data retrieval 1-173 Sentences.html start page 1-50 Sentences_chapters 1-34 Sentences_home 1-34, 1-35 SENTENCES_HOME parameter 1-48 Sentences_images 1-35 sequencing 1-175 association types 1-175 multiple instances 1-175 server statistics 2-253 server activity monitoring 1-60 server and client communications 1-66 server API 2-142 server request statistics statistics server requests 2-263 Server.properties file 1-43 server-side triggers 2-145 servlet access 1-47 servlet access to Sentences 1-75 ServletContext parameter 1-57, 1-235, 1-242, 1-247 ServletPort parameter 1-56, 1-235, 1-242, 1-247 Servlets use with XML 2-111 servlets access to Sentences features using 1-75 available in Sentences 1-75 enabling and disabling access 1-77 for access to a DTD 2-111 for access to XML 2-112 set queries 2-23 visibility 1-134 set queries folder 1-107 shortcut keys 1-109 shortcut menus 1-114 Dataform 1-119 show grid XSL show grid option 2-90 show separator XSL show separator option 2-90 show set queries 1-134 ShowTitle parameter 1-244 Shutting down and restarting the Sentences server 1-60 single line edit presentation option 1-190 singular (association type property) see cardinality singular inverse 1-162 1-293 Index size of entity and value instances 1-155 sort nodes 2-39 sorting 1-175 display order of instances 1-152 source 1-159, 1-160 spatial view 2-257 statistics 1-47 chapter file analysis 2-262 chapters statistics 2-256 memory usage 2-261 message statistics 2-253 open profile statistics 2-254 open profiles 2-254 server 2-253 summary page 2-257 viewing 2-253 StatisticsPath parameter 1-48 StatisticsPoll parameter 1-48 status bar 1-108 in Query Editor 1-124 Stop button 1-173 stop button in the Query Editor 2-34 stopping data retrieval 1-173 in the Query Editor 2-33 string datatypes 1-181 strings 2-61 style 1-191 stylesheet parameter 2-114 stylesheet processing 2-117 stylesheets directory 1-37 StylesheetURLBase parameter 1-46 subset queries 2-78 attaching to subsets 2-78 subsets 1-89, 1-196 and Dataform 1-259 association types 1-199 creating 1-197 ordering 1-259 properties 1-197 properties dialog page 1-196 properties page 1-197 subset queries 2-78 used as targets 1-226 viewing subset instances 1-199 subsets and supertypes comparison 1-198 Dataform behaviour 1-199 ordering 1-259 using to design dataform 1-259 supersedes 1-214 supertypes 1-89 and Dataform 1-259 defining 1-201 properties dialog page 1-200 using with association types 1-201 support information 1-111 symmetric 1-26, 1-162 system chapters 1-35, 1-129 system configuration see Sentences, configuration SystemChapterPath parameter 1-44 T tabbed pages on Dataform 1-116 table column width 1-194 table for associations presentation option 1-190 table for targets presentation option 1-191 target 1-159, 1-160 target parameter 1-247 target parameters 1-266 allowed products example 1-271 conference room example 1-266 limitations 1-272 properties dialog page 1-208 targets and subsets 1-226 with duplicate names 1-226 technical support contacting 1-74 TempBlockSize parameter 1-46 TempChapterPath parameter 1-44 text datatype 1-182 time datatype 1-187 time formats presentation 1-195 timestamp datatype 1-187 Tomcat Tomcat home directory 1-38 Tomcat Sentences directory 1-38 1-294 Index Tomcat web applications directory 1-38 toolbar diagram editor 2-131 Explorer 1-98 toolbars Query Editor toolbar 1-121 tooltips 1-100 trace directory 1-39 trace files 1-64 trace level settings 1-64 TraceLevel parameter 1-44 TracePath parameter 1-44 transaction processing 1-257 transactions Dataform based updates 1-257 Explorer based updates 1-257 in Sentences 1-257 transitive closure 1-25, 2-68, 2-69, 2-92 translation see localisation tree displays 1-100 tree displays in Sentences 1-95 tree presentation option 1-190 trigger examples auto numbering 2-203 email address trigger 2-199 refuse update trigger 2-194 triggers 1-203, 2-145 and the Sentences API 2-147 and user-defined parameters 1-59 and XML import 2-118 attaching 2-147 attaching and editing (example) 2-193 calling 2-151 creating instance names 1-25, 1-178 customised actions 2-152 customised validation 2-152 examples 2-190 installing 2-147 invoking 2-151 loading example triggers 2-191 properties dialog page 1-203 rules 2-152 threading 2-150 trigger actions 2-152 using with import 1-250 using with import and export 2-153 viewing enabled triggers 2-192 triggers default directory 1-39 Triggers parameter 1-46 triple counts 2-260 type constructors 2-62 type constructors example 2-62 type parameter 1-54 type properties 1-176 types and instances 1-82 deleting 1-164 introduction to 1-82 typographical conventions 1-28 U undefined datatype 1-181 underlined targets 1-225 uninstalling Sentences 1-77 update Dataform 1-219 updating changes 1-128 URL using a URL with the Hyperlink datatype 1-183 user interface Explorer 1-96 introduction 1-95 options 1-90 Query Editor 1-120 schema pane 1-105 the Dataform 1-115 user-defined parameters 1-58 and query expressions 1-60 and the client API 1-59 and triggers 1-59 format 1-58 how to refer to 1-59 pre-defined names 1-59 use in query expressions 2-55 user parameters 1-59 UserText parameter 1-57 V valid XML 2-106 value types 1-155 and datatypes 1-155 1-295 Index behaviour 1-157 creating 1-155 values behaviour 1-157 creating 1-158 introduction to 1-82 size of 1-155 visibility 1-157 verb 1-159, 1-160 virtual directories 1-40 visibility of instances 1-157 of schema and data 1-141 W Web security 1-74, 1-76 what’s new 1-24 width parameter 1-54 wildcards 2-50 wildcards example 2-51 X XML 2-107 action attribute 2-119 action attributes 2-119 allowing the action attribute 2-126 associations as child elements 2-124 attributes 2-106 client import 2-122 combining simple elements 2-126 command line tools 2-120 conventions 2-123 create DTD from query 2-98 data input and output methods 2-110 derived names for element types 2-125 DTD 2-105 DTD parameter 2-115 element IDs parameter 2-116 export Sentences schema as 2-107, 2-108 export using command line 2-120 exported from queries 2-99 import and derivations 2-118 import and multi-user environments 2-118 import and triggers 2-118 import, using a servlet 2-116 import, using command line 2-121 importing from 2-110 include Sentences IDs 2-95, 2-126 introduction to 2-105 mixed content not allowed 2-124 online import 2-122 output format parameter 2-116 output options 2-94 for schema export 2-108 properties dialog 2-94 query properties 2-94 schema export 1-26 Sentences IDs parameter 2-116 servlet access 2-112 servlet parameters 2-113 setting options in the Query Editor 2-127 split multiple lines 2-125 stylesheet parameter 2-114 stylesheet processing 2-117 terminology 2-105 using alternative parsers 2-123 using content, not attributes 2-123 using element IDs 2-127 using servlets 2-111 using stylesheet processors 2-123 using the API 2-122 using the command line 2-120 using the Query Editor 2-111 valid XML 2-106 view query results as 2-100 well-formed XML 2-105 XML-based user interface 1-92 XMLParserClass parameter 1-46 XSL 2-106 background colour option 2-89 example stylesheets 2-101 export stylesheet 2-99 generated stylesheet 2-96 layout options 2-86 master.xsl example 2-102 no stylesheet (none) 2-96, 2-109 printing page breaks option 2-90 show grid option 2-90 show separator option 2-90 stylesheet 2-85 1-296 Index stylesheet from server 2-97, 2-109 stylesheet from URL 2-97, 2-110 stylesheet options 1-25, 2-95 for schema export 2-109 stylesheet properties 2-85 table.xsl example 2-103 XSLT 2-107 Y Your comments 1-29 Sentences User’s Guide Sentences™ Version 3.5 Volume 2 A publication of: Lazy Software Ltd Gemini House, Mercury Park Wycombe Lane Wooburn Town Bucks HP10 0TT UK http://www.lazysoft.com Email: [email protected] Phone: 01628 642300 Fax: 01628 642301 Copyright © 2000-2003 Lazy Software Ltd. All rights reserved. The information in this document is subject to change without notice and does not represent a commitment on the part of Lazy Software Ltd. No part of this document may be reproduced, stored or transmitted in any form or by any means, electronic or mechanical, for any purpose, without the express written permission of Lazy Software Ltd. The software described in this document is supplied subject to a License Agreement and all use of the software is subject to the terms of the agreement. Lazy Software Ltd. accepts no liability for any damages incurred, directly or indirectly, from any errors, omissions or discrepancies between the software and the information contained in this document. Sentences, Lazy Analytics, LazyView, and the Associative Model of Data are trademarks of Lazy Software Ltd. Microsoft Windows, Windows 95, Windows 98, Windows Me, Windows 2000, Windows NT, Windws XP, Internet Information Server (IIS), Internet Explorer, Microsoft Office, Microsoft Word, Microsoft Excel, Microsoft Outlook, and Microsoft Access are trademarks or registered trademarks of Microsoft Corporation. Netscape and Netscape Navigator are registered trademarks of Netscape Communications Corporation in the United States and other countries. Sun, Sun Microsystems, Solaris, Java, JavaSoft, Javadoc, JavaHelp, Java 2 Runtime Environment, Java Software Development Kit, JavaServer Web Development Kit, and JavaServer Pages are trademarks or registered trademarks of Sun Microsystems, Inc. The Tomcat Web server redistributed with Sentences, and the Xalan XSLT Stylesheet Processor and the Xerces XML Parser, incorporated in Sentences, were developed by the Apache Software Foundation (http://www.apache.org). Copyright © 1999-2000 The Apache Software Foundation. All rights reserved. Please see the accompanying text files in the Licenses subdirectory for full details of the copyright and warranty limitations for Apache Software Foundation products. ServletExec is a trademark of New Atlanta Communications LLC. InstallAnywhere is a registered trademark of ZeroG Software, Incorporated. Linux is a registered trademark of Linus Torvalds. Red Hat is a registered trademark of Red Hat, Inc. JRun is a trademark of Macromedia, Inc. Macintosh and iMac are registered trademarks of Apple Computer, Inc. AIX is a registered trademark and iSeries and pSeries are trademarks of International Business Machines Corporation. Oracle is a registered trademark of Oracle Corporation. All other product names used may be trademarks or registered trademarks of their respective owners. Document Information Ref: SNT/USR/3.5/01, Volume 2 Group: User Documentation Edition: 01 Date: April 2003 Table of Contents Volume 1 Overview......................................................................................... 1-23 Introducing Sentences .................................................................................. 1-23 Key features................................................................................................... 1-23 What’s new in Sentences Version 3.5.......................................................... 1-24 Component installation and product licensing .......................................... 1-24 Password-protected chapter files ............................................................... 1-25 Transitive closure ...................................................................................... 1-25 Automatic generation of entity instances .................................................. 1-25 Improvements to XSL Stylesheet generation ............................................ 1-25 Association instance retrieval control........................................................ 1-25 Diagram Editor .......................................................................................... 1-25 Using metatypes ........................................................................................ 1-26 Symmetric property for association types ................................................. 1-26 Export of schema as XML ......................................................................... 1-26 Lazy Analytics OLAP tool ........................................................................ 1-26 Enhancements to the LazyView tool ......................................................... 1-26 How to use this guide .................................................................................... 1-26 Document conventions.................................................................................. 1-27 Your comments ............................................................................................. 1-29 Chapter 1, Configuring Sentences ............................................... 1-31 Sentences editions and components............................................................. 1-31 Sentences licensing........................................................................................ 1-32 Configuring Sentences.................................................................................. 1-33 Sentences installation directories............................................................... 1-33 Configuring Sentences with non-J2EE Web servers ................................. 1-39 File system permissions............................................................................. 1-40 Virtual directories ...................................................................................... 1-40 About the ImageURLBase parameter........................................................ 1-41 Port numbers.............................................................................................. 1-41 Changing port numbers ....................................................................... 1-42 Support for configuring environments for Sentences................................ 1-42 Sentences configuration files........................................................................ 1-43 The Server.properties file .......................................................................... 1-43 2-4 Standard Server.properties settings...................................................... 1-43 Servlet access properties...................................................................... 1-47 Statistics properties.............................................................................. 1-47 The lazystart script file............................................................................... 1-48 Using the classpath argument .............................................................. 1-49 The LaunchSentences.html page ............................................................... 1-50 The Sentences.html start page.................................................................... 1-50 HTML code using the OBJECT tag .................................................... 1-51 HTML code using the EMBED tag ..................................................... 1-52 Sentences applet parameters ................................................................ 1-53 Additional optional parameters............................................................ 1-56 Using applets for access to Sentences........................................................ 1-58 User-defined parameters .............................................................................. 1-58 Format of user-defined parameters ............................................................ 1-58 Pre-defined names................................................................................ 1-59 User Parameters ................................................................................... 1-59 Referring to user-defined parameters......................................................... 1-59 User-defined parameters in the Client API.......................................... 1-59 User-defined parameters in triggers..................................................... 1-59 User-defined parameters in query expressions .................................... 1-60 Monitoring server activity ............................................................................ 1-60 Shutting down and restarting the Sentences server................................... 1-60 Backing up and restoring your data............................................................ 1-61 Online backup ............................................................................................ 1-61 Preparing to run online backup............................................................ 1-62 Using the online backup command...................................................... 1-62 Restoring your data from an online backup......................................... 1-63 Exporting the database for backup............................................................. 1-64 Copying chapters for backup ..................................................................... 1-64 Using trace files ............................................................................................. 1-64 Sentences log files .......................................................................................... 1-65 Running the Enterprise Edition on a single computer .............................. 1-66 Sentences server and client communications.............................................. 1-66 Running the Sentences client........................................................................ 1-68 Starting the Sentences client ...................................................................... 1-68 Java Runtime Environment Plug-in ........................................................... 1-69 Sentences certificate acceptance ................................................................ 1-69 Using the Java Console tool....................................................................... 1-70 Activating the Java Console on Windows systems ............................. 1-70 2-5 Activating the Java Console on Solaris, Linux, or AIX systems......... 1-70 Errors reported at the Sentences client....................................................... 1-70 Error 1222: Your server connection has expired ................................. 1-70 Error 1265: The Sentences server has not been found......................... 1-71 Error 1266: The Sentences server has not been found......................... 1-71 Error 1267: The Sentences database is not available........................... 1-71 Error 1268: The Sentences database is not available........................... 1-73 Error 1272: A connection error has occurred ...................................... 1-73 Contacting Technical Support ............................................................. 1-74 Security considerations................................................................................. 1-74 Automatic check of HTML page host ....................................................... 1-74 Error 1403: The Sentences client must be loaded from the same host as its HTML page.......................................................................................... 1-74 Using database views for enhanced security ............................................. 1-75 Servlet access to Sentences ........................................................................... 1-75 URL patterns and Servlets available in Sentences..................................... 1-75 Sentences servlets and web server security ............................................... 1-76 Enabling and disabling servlet access........................................................ 1-77 Uninstalling Sentences .................................................................................. 1-77 Chapter 2, Introducing the associative model ............................ 1-79 Entities and associations ............................................................................... 1-79 Entities and values......................................................................................... 1-82 Types and instances....................................................................................... 1-82 Comparing the relational model and the associative model...................... 1-84 Structural comparisons............................................................................... 1-85 Relational databases and LazyView ............................................................ 1-86 Chapter 3, Sentences database design ......................................... 1-87 Database modelling in Sentences ................................................................. 1-87 Database design skills ................................................................................ 1-87 Choosing entity, association or value types ............................................... 1-87 Creating verbs for association types .......................................................... 1-88 Modelling one-to-many association types ................................................. 1-88 Iterative design and prototyping ................................................................ 1-88 Designing for change ................................................................................. 1-89 Modelling behaviour common to multiple types ....................................... 1-89 Using instance-specific association types .................................................. 1-90 2-6 Using chapters and profiles........................................................................ 1-90 Sentences user interface design options ...................................................... 1-90 Using the Sentences Explorer and Dataform interface .............................. 1-91 Using custom Dataforms............................................................................ 1-91 Using applets in HTML pages, and using JSPs ......................................... 1-92 Using an XML-based user interface .......................................................... 1-92 Using the Sentences client API.................................................................. 1-93 Chapter 4, The Sentences Quick Tour ........................................ 1-95 About tree displays in Sentences.................................................................. 1-95 The Sentences Explorer quick tour ............................................................. 1-96 The Explorer Menu bar .............................................................................. 1-97 The Explorer Toolbar................................................................................. 1-98 Copying and Pasting ............................................................................ 1-99 Finding data ......................................................................................... 1-99 Sentences Explorer tooltips ............................................................... 1-100 Tree displays in the Sentences Explorer .................................................. 1-100 Nodes and icons ................................................................................. 1-101 Schema and data pane features ................................................................ 1-101 Schema and data pane icons .............................................................. 1-102 Expand node and collapse node buttons............................................ 1-103 Sentences Explorer drill-down........................................................... 1-104 Sentences Explorer tabs..................................................................... 1-104 The schema pane...................................................................................... 1-105 The Core types folder ........................................................................ 1-106 The Core queries folder ..................................................................... 1-107 The All types folder ........................................................................... 1-107 The All queries folder ........................................................................ 1-107 The Set queries folder ........................................................................ 1-107 The data pane ........................................................................................... 1-108 Scroll bars ................................................................................................ 1-108 The Status bar .......................................................................................... 1-108 Divider bar ............................................................................................... 1-109 Shortcut keys............................................................................................ 1-109 Display Options ....................................................................................... 1-110 Support information ................................................................................. 1-111 Explorer shortcut menus .......................................................................... 1-114 The Dataform quick tour............................................................................ 1-115 2-7 Different kinds of Dataform..................................................................... 1-115 Title bar .................................................................................................... 1-116 Dataform tabbed pages ............................................................................ 1-116 Labels and fields ...................................................................................... 1-117 Ellipsis button and picker lists ................................................................. 1-117 Dataform shortcut menus ......................................................................... 1-119 The Query Editor quick tour ..................................................................... 1-120 Query Editor menu bar............................................................................. 1-121 Query Editor toolbar ................................................................................ 1-121 Query Editor icons ................................................................................... 1-122 Query pane ............................................................................................... 1-124 Schema pane ............................................................................................ 1-124 Results pane ............................................................................................. 1-124 Query Editor status bar ............................................................................ 1-124 Query Editor divider bars......................................................................... 1-125 The Message Log ......................................................................................... 1-125 Chapter 5, Working with Sentences .......................................... 1-127 Profiles and chapters................................................................................... 1-127 Data and schema updates ......................................................................... 1-128 Chapter file locations ............................................................................... 1-128 System chapters ....................................................................................... 1-129 The Profiles database and the Profiles profile ................................... 1-129 Using multiple profiles ............................................................................ 1-130 Profile and chapter commands................................................................. 1-130 Profile and chapter constraints........................................................... 1-130 The Open Profile dialog..................................................................... 1-131 Creating a new profile........................................................................ 1-131 The Edit Profile dialog....................................................................... 1-132 Using the Edit Profile dialog ............................................................. 1-132 Chapters ............................................................................................. 1-133 Changes chapters ............................................................................... 1-133 Generate Core types automatically .................................................... 1-134 Show Set Queries............................................................................... 1-134 Saving a profile.................................................................................. 1-134 Deleting a profile ............................................................................... 1-134 Working with chapters ............................................................................. 1-135 Add chapter........................................................................................ 1-135 2-8 New chapter ....................................................................................... 1-136 Naming chapter files.......................................................................... 1-136 Rename .............................................................................................. 1-137 Properties ........................................................................................... 1-137 Checking chapters used for changes.................................................. 1-137 Deleting a chapter .............................................................................. 1-137 Password-protected chapter files ............................................................. 1-138 To set a password............................................................................... 1-138 To change a password........................................................................ 1-138 To delete a password.......................................................................... 1-139 To enter a password ........................................................................... 1-139 Password-protected files and the Personal Edition............................ 1-140 Deploying profiles and chapters ................................................................ 1-140 Schema and data visibility ....................................................................... 1-141 Exporting and importing databases.......................................................... 1-141 Benefits of exporting a database........................................................ 1-141 Database export and internal identifiers ............................................ 1-142 Default export behaviour ................................................................... 1-142 To export a database .......................................................................... 1-142 Export command option switch ......................................................... 1-143 To import a set of chapters ................................................................ 1-143 Import command option switches...................................................... 1-145 Visibility of imported profiles ........................................................... 1-146 Visibility of imported profiles using the -renumber option............... 1-147 Limitation on parameters with Import command on Windows......... 1-147 Importing a database export file from a previous version ................. 1-147 Transferring the profiles database...................................................... 1-147 Export command troubleshooting...................................................... 1-149 Copying chapter files ............................................................................... 1-150 Restrictions on copying chapter files................................................. 1-150 Chapter format ................................................................................... 1-150 Changing chapter file block size (single chapter export and import) ...... 1-151 ExportChapter command ................................................................... 1-151 ImportChapter command ................................................................... 1-151 Using the Sentences Explorer..................................................................... 1-152 Resizing the applet window ..................................................................... 1-152 Delayed display of inverse associations .................................................. 1-152 Display order of instances........................................................................ 1-152 Refreshing the display.............................................................................. 1-153 2-9 Database components.................................................................................. 1-153 Entity types and entities ........................................................................... 1-153 Creating entity types ................................................................................ 1-154 Creating entities ................................................................................. 1-155 Size of entity and value instances ...................................................... 1-155 Value types and datatypes........................................................................ 1-155 Defining value types with datatypes.................................................. 1-155 Impact of changing a datatype ........................................................... 1-156 Visibility of value instances............................................................... 1-157 Behaviour of value types and values ................................................. 1-157 Creating value instances .................................................................... 1-158 Association types and associations .......................................................... 1-158 Creating association types........................................................................ 1-158 Schema and data change visibility..................................................... 1-159 Source, verb, and target ........................................................................... 1-159 Source ................................................................................................ 1-160 Verb ................................................................................................... 1-160 Target................................................................................................. 1-160 Inverse verb........................................................................................ 1-161 Cardinality................................................................................................ 1-161 Cardinality rules and data display...................................................... 1-161 Other association type options ................................................................. 1-162 Singular inverse ................................................................................. 1-162 Symmetric.......................................................................................... 1-162 Display ordering ................................................................................ 1-163 Instance options ................................................................................. 1-163 Metatypes ................................................................................................. 1-163 Using metatypes................................................................................. 1-163 Creating associations ............................................................................... 1-164 Deleting types and instances .................................................................... 1-164 Impact of deleting dialog ................................................................... 1-164 Implicit deletion................................................................................. 1-165 Renaming types and instances ................................................................. 1-166 Locating data in the Sentences Explorer .................................................. 1-166 Demand loading of data ........................................................................... 1-167 The More... prompt........................................................................... 1-167 The Positioner and Filter tools................................................................. 1-168 The Positioner tool............................................................................. 1-169 The Filter tool .................................................................................... 1-170 2-10 Pattern matching with the Filter tool ................................................. 1-171 Using Filtering and Positioning tools together .................................. 1-172 Reloading data ................................................................................... 1-173 Stopping data retrieval ............................................................................. 1-173 The Stop button.................................................................................. 1-174 Sorting and sequencing............................................................................... 1-175 Sequencing association types................................................................... 1-175 Sequencing multiple instances........................................................... 1-175 Properties ..................................................................................................... 1-176 General properties page ........................................................................... 1-177 Display in Core types folder .............................................................. 1-178 Instance options ................................................................................. 1-178 Datatype properties page.......................................................................... 1-179 Instances are values ........................................................................... 1-181 Assigning datatypes ........................................................................... 1-181 String datatypes.................................................................................. 1-181 Numeric datatypes ............................................................................. 1-183 International considerations for the currency datatype...................... 1-186 Date and time datatypes..................................................................... 1-186 International considerations for date and time datatypes................... 1-186 Format properties page ............................................................................ 1-188 Presentation........................................................................................ 1-189 Picker ................................................................................................. 1-191 Style ................................................................................................... 1-191 Display width..................................................................................... 1-193 Table column width ........................................................................... 1-194 Display height.................................................................................... 1-194 Format options ................................................................................... 1-194 Presentation of date formats .............................................................. 1-195 Presentation of time formats.............................................................. 1-195 Restore Default settings button.......................................................... 1-195 Subsets properties page............................................................................ 1-196 Comparison of subsets and supertypes .............................................. 1-198 Dataform behaviour with subsets and supertypes.............................. 1-199 Subsets of association types............................................................... 1-199 Viewing subset type instances ........................................................... 1-199 Supertypes properties page ...................................................................... 1-200 Using supertypes with association types ........................................... 1-201 Equivalence properties page .................................................................... 1-202 2-11 Triggers properties page .......................................................................... 1-203 Description properties page ..................................................................... 1-205 Custom Dataform properties page ........................................................... 1-206 Association type properties page ............................................................. 1-207 Target Parameters properties page........................................................... 1-208 Default target properties page .................................................................. 1-209 Mapping properties page.......................................................................... 1-211 Retrieval Methods properties page .......................................................... 1-212 Operations on instances.............................................................................. 1-213 Supersedes................................................................................................ 1-214 Instance equivalence ................................................................................ 1-215 Instance-specific association types .......................................................... 1-217 The Sentences Dataform............................................................................. 1-218 Tabbed pages in the Dataform ................................................................. 1-219 The base Dataform and the default Dataform.......................................... 1-219 Create and update Dataforms................................................................... 1-219 The create Dataform .......................................................................... 1-220 The update Dataform ......................................................................... 1-221 Parent Dataforms and child Dataforms.................................................... 1-222 Creating an association in the Dataform .................................................. 1-223 Association type targets and metatype targets................................... 1-223 Dataform shortcut menu .......................................................................... 1-224 Selecting targets in the Dataform............................................................. 1-225 Creating an entity instance in the Dataform ............................................ 1-225 Targets with duplicate names ............................................................ 1-226 Targets that are subsets...................................................................... 1-226 Changing the target in a Dataform........................................................... 1-226 Instance specific Dataforms..................................................................... 1-227 Picker list initial selection ........................................................................ 1-227 Creating a custom Dataform...................................................................... 1-227 Refresh button on custom Dataforms ...................................................... 1-229 Custom Dataform restrictions .................................................................. 1-229 Selecting a custom Dataform ................................................................... 1-230 Custom Dataforms with subsets and supertypes................................ 1-230 The Dataform applet................................................................................... 1-231 Dataform applet code example ................................................................ 1-232 Applet parameters for the Dataform applet ............................................. 1-235 The Picker applet ........................................................................................ 1-239 Picker applet code example ..................................................................... 1-241 2-12 Applet parameters for the Picker applet................................................... 1-242 The Query applet......................................................................................... 1-244 Query applet code example...................................................................... 1-245 Applet parameters for the Query applet................................................... 1-247 Using colours in Sentences applets ............................................................ 1-247 Sentences and external formats ................................................................. 1-250 Using triggers when you import data....................................................... 1-250 CSV Import.............................................................................................. 1-250 CSV Import and supertypes and subsets............................................ 1-251 Structure of CSV files........................................................................ 1-252 CSV Import rules............................................................................... 1-252 Cardinality rules and triggers with CSV import ................................ 1-253 Running CSV Import ............................................................................... 1-253 To import a CSV file on Windows platforms.................................... 1-253 To import a CSV file on Solaris, Linux, or AIX platforms............... 1-254 CSV Export.............................................................................................. 1-254 Chapter 6, Advanced techniques ............................................... 1-255 Sentences and Java technology .................................................................. 1-255 Transaction processing in Sentences ......................................................... 1-257 Sentences Explorer based updates .......................................................... 1-257 Dataform based updates ........................................................................... 1-257 Updates in parent and child Dataforms.............................................. 1-258 Dataform tabbed pages with subsets and supertypes .............................. 1-259 Dataform appearance with Supertypes .................................................... 1-260 Dataform example with Subsets .............................................................. 1-263 Target parameters....................................................................................... 1-266 Conference room example ....................................................................... 1-266 Allowed products example ...................................................................... 1-271 Limitations of the Target Parameters mechanism ................................... 1-272 Creating database views using profiles and chapters .............................. 1-273 Database views example .......................................................................... 1-274 Index ............................................................................................. 1-279 2-13 Volume 2 Chapter 7, Sentences queries........................................................ 2-23 Introducing the Query Editor ...................................................................... 2-23 Starting the Query Editor ........................................................................... 2-24 Availability of the Query Editor .......................................................... 2-24 Creating a new query ........................................................................... 2-24 Editing an existing query ..................................................................... 2-24 Saving a query ..................................................................................... 2-24 The Query Editor window ......................................................................... 2-25 General query properties dialog................................................................. 2-26 Description........................................................................................... 2-26 Database queries............................................................................................ 2-26 Building the request tree ............................................................................ 2-27 Creating the data request node............................................................. 2-27 Adding Forward and Inverse Nodes .................................................... 2-28 Using drag and drop and cut, copy, and paste in the Query Editor ..... 2-31 Result Trees ......................................................................................... 2-32 Displaying query results ...................................................................... 2-32 Stopping data retrieval......................................................................... 2-33 Displaying query results in the Sentences Explorer ............................ 2-34 Expanding and Collapsing ................................................................... 2-34 Binding Nodes ........................................................................................... 2-34 Binding to an instance.......................................................................... 2-35 Binding to a Request Node .................................................................. 2-36 Binding to a Parameter ........................................................................ 2-37 Selection, Sort, and Derived type nodes .................................................... 2-37 Selection nodes .................................................................................... 2-38 Sort nodes ............................................................................................ 2-39 Derived types and derivations.................................................................... 2-40 Derived type nodes .............................................................................. 2-40 To create a derived type node .............................................................. 2-40 Derived type node properties dialog.................................................... 2-41 Derivations........................................................................................... 2-42 Recalculation rules for derivations ...................................................... 2-42 Derivation properties ........................................................................... 2-43 Setting a derivation .............................................................................. 2-45 Using expressions in queries...................................................................... 2-45 2-14 Expression syntax for queries.............................................................. 2-46 Arithmetic and Concatenation operators ............................................. 2-48 Comparison operators .......................................................................... 2-49 Wildcards............................................................................................. 2-50 Logical connectives ............................................................................. 2-51 Logical connectives behaviour with missing values............................ 2-52 Conditional operator ............................................................................ 2-53 Using Void in an expression................................................................ 2-54 Exists Conditional function ................................................................. 2-54 Default value........................................................................................ 2-55 Using parameters in query expressions ............................................... 2-55 Using user-defined parameters ............................................................ 2-55 Using conditionals to check for parameter values ............................... 2-56 Group functions ................................................................................... 2-56 Datatype methods ................................................................................ 2-58 Type constructors................................................................................. 2-62 Identifiers in operator request node expressions.................................. 2-62 Expression results ................................................................................ 2-63 Missing values in expressions.............................................................. 2-63 Expressions that give the zero token as their result ............................. 2-63 Required nodes........................................................................................... 2-64 Renaming request nodes ............................................................................ 2-65 Hidden Nodes............................................................................................. 2-66 Transitive closure and recursive closure.................................................... 2-68 Transitive closure................................................................................. 2-69 Recursive closure................................................................................. 2-72 Query Parameters....................................................................................... 2-75 Naming parameters .............................................................................. 2-76 Creating parameters ............................................................................. 2-76 Defining a parameter’s type................................................................. 2-77 Defining a parameter’s value............................................................... 2-77 Making a parameter mandatory ........................................................... 2-77 Executing a query which has parameters............................................. 2-78 Showing parameters in the Explorer.................................................... 2-78 Attaching Subset Queries........................................................................... 2-78 Using parameters in subset queries............................................................ 2-79 Sentences query execution process............................................................ 2-79 The Query Editor and Dataforms ............................................................... 2-79 Page Nodes................................................................................................. 2-80 2-15 Adding a page node ............................................................................. 2-80 Page nodes added automatically .......................................................... 2-81 Using page nodes................................................................................. 2-81 Rules for page nodes display on the Dataform .................................... 2-81 Query node Properties dialog..................................................................... 2-82 Query node Format properties page..................................................... 2-84 Effects of using the Restore Default Settings button........................... 2-85 Query node XSL Stylesheet properties page ....................................... 2-85 Query node Dataform properties page................................................. 2-90 Can create <target> checkbox ............................................................. 2-91 Navigation............................................................................................ 2-92 <target> Dataform is read only checkbox ........................................... 2-92 Interaction between properties............................................................. 2-92 Transitive Closure node properties page ............................................. 2-92 The Query Editor and XML ........................................................................ 2-93 XML properties dialog............................................................................... 2-94 Output options...................................................................................... 2-94 XSL Stylesheet options........................................................................ 2-95 DTD reference ..................................................................................... 2-96 Cascading stylesheet ............................................................................ 2-96 Node name considerations for XML output .............................................. 2-97 Create an XML DTD from a query............................................................ 2-98 Export query results as XML ..................................................................... 2-99 Export XSL stylesheet ............................................................................... 2-99 View query results as XML ..................................................................... 2-100 Example stylesheets ................................................................................. 2-101 Master.xsl example stylesheet ........................................................... 2-102 Table.xsl example stylesheet ............................................................. 2-103 Exporting query results as CSV data ........................................................ 2-103 Running CSV Export ............................................................................... 2-103 CSV Export and multiple associations .............................................. 2-104 Chapter 8, Sentences and XML ................................................. 2-105 Introducing XML ........................................................................................ 2-105 XML Terminology................................................................................... 2-105 Well-formed XML............................................................................. 2-105 The DTD ............................................................................................ 2-105 Valid XML......................................................................................... 2-106 2-16 Elements in XML............................................................................... 2-106 Attributes in XML ............................................................................. 2-106 Extensible Stylesheet Language (XSL) ............................................. 2-106 XML Support in Sentences ........................................................................ 2-107 Export Sentences schema to XML............................................................. 2-107 Output options for XML export of schema ....................................... 2-108 XSL Stylesheet options for XML export of schema.......................... 2-109 XML data input and output methods........................................................ 2-110 Importing XML data.......................................................................... 2-110 Using the Query Editor ............................................................................ 2-111 Using Servlets .......................................................................................... 2-111 Using a servlet to access a generated DTD........................................ 2-111 Using a servlet to access XML .......................................................... 2-112 Adding parameter values to servlet requests ..................................... 2-113 XML import using a servlet............................................................... 2-116 Stylesheet Processing......................................................................... 2-117 XML Import and triggers................................................................... 2-118 XML Import in multi-user environments .......................................... 2-118 XML Import and derivations ............................................................. 2-118 Mapping XML Data........................................................................... 2-118 Action attributes................................................................................. 2-119 Using command line tools ....................................................................... 2-120 XML Export using the command line ............................................... 2-120 XML import using the command line................................................ 2-121 Online importing................................................................................ 2-122 Using the Sentences API.......................................................................... 2-122 Using alternative parsers and stylesheet processors .......................... 2-123 Sentences XML conventions....................................................................... 2-123 Use content, not attributes........................................................................ 2-123 Associations appear as child elements..................................................... 2-124 Mixed content is not allowed ................................................................... 2-124 Derived element type names .................................................................... 2-125 Split multiple lines ................................................................................... 2-125 Allow the action attribute......................................................................... 2-126 Include Sentences IDs.............................................................................. 2-126 Combining simple elements..................................................................... 2-126 Using Element IDs................................................................................... 2-127 Setting XML options in the Query Editor ................................................ 2-127 2-17 Chapter 9, Sentences diagrams .................................................. 2-129 The Diagram Editor .................................................................................... 2-129 Starting the Diagram Editor ..................................................................... 2-129 Diagram Editor components .................................................................... 2-130 Toolbar............................................................................................... 2-131 Schema tree........................................................................................ 2-132 Canvas................................................................................................ 2-132 Diagram Editor preferences ..................................................................... 2-132 Diagram elements........................................................................................ 2-134 Diagram element types ...................................................................... 2-134 Adding diagram elements .................................................................. 2-135 Adding annotations, titles and legends .............................................. 2-135 Selecting diagram elements ............................................................... 2-136 Deleting diagram elements ................................................................ 2-136 Moving diagram elements ................................................................. 2-137 Consistency with Sentences Explorer................................................ 2-137 Adding Query Results................................................................................. 2-137 Exporting and importing diagrams........................................................... 2-138 Export................................................................................................. 2-138 Import................................................................................................. 2-138 Saving as a GIF file ........................................................................... 2-138 Printing......................................................................................................... 2-138 Chapter 10, Customising Sentences........................................... 2-141 Sentences API overview .............................................................................. 2-141 Comparing the Sentences Client API and Server API............................. 2-142 Example code and online documentation ................................................ 2-142 Program build and execution ................................................................... 2-143 API packages ........................................................................................... 2-143 Class hierarchy......................................................................................... 2-144 Triggers ........................................................................................................ 2-145 Server-side triggers .................................................................................. 2-145 Trigger examples ............................................................................... 2-146 Triggers and the Sentences API ............................................................... 2-147 Installing a trigger .................................................................................... 2-147 Attaching a trigger ................................................................................... 2-147 Trigger threading issues ........................................................................... 2-150 Trigger invocation.................................................................................... 2-151 2-18 Trigger actions ......................................................................................... 2-152 Customised validation (rules) .................................................................. 2-152 Customised actions .................................................................................. 2-152 Using triggers with import and export ..................................................... 2-153 Custom datatypes API ................................................................................ 2-153 Installing a custom datatype..................................................................... 2-154 Custom datatypes and import and export................................................. 2-155 Removing custom datatypes .................................................................... 2-155 Adding custom Help topic pages................................................................ 2-156 Help button display .................................................................................. 2-156 Precedence of Help pages.................................................................. 2-157 Updating Help topic mappings .......................................................... 2-157 Creating Help topic pages ........................................................................ 2-157 Creating a Help topic mapping file .......................................................... 2-157 Name and location of the Help mapping file..................................... 2-157 Mapping Sentences elements to a Help topic .................................... 2-158 Localisation notes ........................................................................................ 2-160 Localising Sentences system text............................................................. 2-160 Extracting the Messages.properties file ............................................. 2-160 Naming the translated messages file.................................................. 2-161 Example translated messages file ...................................................... 2-161 Directory location for the translated messages file............................ 2-161 Translating Sentences application text..................................................... 2-161 Chapter 11, Worked examples................................................... 2-163 The Human resources example application.............................................. 2-163 The Employee entity type ........................................................................ 2-164 The Group company entity type .............................................................. 2-165 The Project entity type ............................................................................. 2-165 CSV Import example .................................................................................. 2-165 Preparing a profile for the example CSV Import..................................... 2-166 Importing the example CSV files ............................................................ 2-167 Importing data for associations targeted on associations................... 2-168 Viewing the imported data....................................................................... 2-168 Adding image data ................................................................................... 2-170 Viewing additional data ........................................................................... 2-171 Restoring the original Human Resources profile..................................... 2-173 Repeating the CSV Import example ........................................................ 2-173 2-19 Derivations example.................................................................................... 2-173 Setting up the Order Entry example application...................................... 2-174 Importing the Order Entry example application ................................ 2-174 Making the RenameInstance trigger available................................... 2-174 Starting the Order Entry example application ......................................... 2-174 Order Entry base Dataform and custom Dataform .................................. 2-175 Base Dataform behaviour .................................................................. 2-177 Custom Dataform behaviour.............................................................. 2-179 The Order Entry query ............................................................................. 2-181 Page Nodes ........................................................................................ 2-182 Derivations......................................................................................... 2-183 Dataform Navigation ......................................................................... 2-184 The Picker applet for the Order Entry example ....................................... 2-187 Using the Picker applet to enter and update orders.................................. 2-187 Design assumptions used in the Order Entry example application.......... 2-189 Restoring the original Human Resources profile..................................... 2-190 Trigger examples......................................................................................... 2-190 Example trigger classes............................................................................ 2-191 Loading the example triggers................................................................... 2-191 Viewing enabled triggers ......................................................................... 2-192 Attaching triggers and editing trigger assignments ................................. 2-193 Refuse Update trigger example................................................................ 2-194 Refuse Update on deleting an Employee........................................... 2-195 The Refuse Update trigger with subsets and subtypes ...................... 2-198 Restoring the original Human Resources example application ......... 2-199 Email Address trigger example................................................................ 2-199 Rejecting incorrect values for email addresses.................................. 2-200 Restoring the original Human Resources example application ......... 2-203 Auto Number trigger example ................................................................. 2-203 Setting up the schema to use the Auto Number trigger ..................... 2-204 Demonstrating the Auto Number trigger........................................... 2-208 Cases in which the Auto Number trigger is not invoked................... 2-211 Using the Auto Number trigger when user entries are allowed......... 2-212 Restoring the original Human Resources example application ......... 2-213 Disabling the example triggers ................................................................ 2-213 Custom datatype example .......................................................................... 2-214 About datatype classes ............................................................................. 2-214 Loading the custom datatype example..................................................... 2-214 Checking the example custom datatype............................................. 2-214 2-20 Unloading the example custom datatype........................................... 2-215 Custom datatype example: TelecomsNumber ......................................... 2-216 Using the example custom datatype ........................................................ 2-216 Restoring the original Human resources example application .......... 2-221 Client API example ..................................................................................... 2-222 Preparing to run the demonstration.......................................................... 2-222 Using the Salary Update example............................................................ 2-222 Enabling Sentences Client API connections............................................ 2-223 Setting up the demonstration profile........................................................ 2-223 Creating a command file .......................................................................... 2-224 Demonstrating the Salary Update example.............................................. 2-225 Restoring the original Human Resources example application ............... 2-226 Integration with Microsoft Office applications ........................................ 2-226 Creating Mail merge letters from Sentences data .................................... 2-227 Exporting address data from Sentences ............................................. 2-227 Importing address data into Microsoft Word..................................... 2-229 Creating Mail merge emails from Sentences data ................................... 2-230 Exporting email data from Sentences ................................................ 2-230 Modifying the email data CSV file in Microsoft Excel..................... 2-232 Importing email data into Microsoft Word........................................ 2-232 Creating Microsoft Outlook Contacts from Sentences data .................... 2-234 Exporting Contacts data from Sentences........................................... 2-234 Modifying Contacts data in Microsoft Excel..................................... 2-236 Importing Contacts data into Outlook ............................................... 2-236 Configuring the new folder as an address book folder ...................... 2-238 Creating Sentences data from an Outlook Contacts folder ...................... 2-238 Creating a CSV file from Microsoft Outlook .................................... 2-239 Editing the Outlook CSV file for import into Sentences................... 2-239 Appendix A, Menus and Commands summary........................ 2-241 Sentences Explorer menus.......................................................................... 2-241 Sentences Explorer function keys .............................................................. 2-244 Dataform function keys .............................................................................. 2-244 Query Editor menus.................................................................................... 2-246 Query Editor function keys ........................................................................ 2-249 Diagram Editor menus ............................................................................... 2-249 Diagram Editor function keys.................................................................... 2-252 2-21 Appendix B, Statistics and analysis ........................................... 2-253 Viewing Sentences statistics ....................................................................... 2-253 Message statistics......................................................................................... 2-253 Open profile statistics ................................................................................. 2-254 Chapters statistics ....................................................................................... 2-256 Detailed chapter statistics ........................................................................ 2-257 Summary page ................................................................................... 2-257 Spatial view........................................................................................ 2-257 Block statistics ................................................................................... 2-258 Triple counts ...................................................................................... 2-260 Memory usage summary ............................................................................ 2-261 Chapter file analysis.................................................................................... 2-262 Server request statistics .............................................................................. 2-263 Glossary........................................................................................ 2-265 Index ............................................................................................. 2-275 2-22 Chapter 7 Sentences queries This chapter describes how to work with the Sentences Query Editor which is based on the associative model of data. The user interface for the Query Editor is described in Chapter 4, “The Sentences Quick Tour”. Note The Query Editor used in Sentences Version 1 is now referred to as the Set Query Editor. If you need information about using set queries and the Set Query Editor, please contact Lazy Software Technical support (mailto:[email protected]). The topics described in this chapter are as follows: • creating database queries, including the use of expressions • the Query Editor and Dataforms • the Query Editor and XML • exporting query results Introducing the Query Editor Relational databases are based on tables, and relational query processors such as SQL are based on tables and operations on tables. Associative databases such as Sentences use trees rather than tables to display their schema and data, as described in the section “Tree displays in the Sentences Explorer” on page 1-100. The Sentences Query Editor is based on the Associative Model of data and uses trees and operations on trees. The Sentences Query Editor can be used to interrogate the database and also allows you to make calculations based on the data in your results. Another use of the Query Editor is to create customised dataforms from your queries. The custom Dataform displays only those associations that are present in the query (see “The Query Editor and Dataforms” on page 2-79). The Query Editor is also central to Sentences’ XML strategy. The structure of a Sentences query can be saved as an XML document type definition (DTD), and the results of a Sentences query can be exported as an XML document. You can use the DTD you create from a query to build XML structures that can be used to format data, created by external applications, for import into Sentences (see “The Query Editor and XML” on page 2-93). You can use XSL Stylesheets to format XML 2-24 Sentences queries output for presentation as HTML in a Web browser. Sentences can generate an XSL stylesheet from a query according to options you select (see “XSL Stylesheet options” on page 2-95). More information on the ways in which you can use XML, including how to use XML to import data into a Sentences database is given in Chapter 8, “Sentences and XML”. Starting the Query Editor You can start the Query Editor to create a new query or to edit an existing query. Availability of the Query Editor You can edit an existing query or create a new query in any profile. When you create a query you can change any of the elements in it, execute the query and view the results, and export the query and the query structure. Creating a new query To create a new query, select Create Query from the Query menu or highlight the Queries folder and select Create Query from the shortcut menu. In the Create Query dialog, type in a name for your query and click Create. Sentences displays the Query Editor. Editing an existing query To edit an existing query, highlight the name of the query in the Queries folder in the Sentences Explorer and select Edit Query from the shortcut menu or from the Query menu, or click the Properties button on the toolbar. Sentences displays the Query Editor. If a profile is available to more than one user any user may edit a query. It is possible that two users may edit the same query independently, and changes made by another user might be overwritten when the query is saved. Saving a query Sentences does not save queries automatically. If you want to keep your query you must save it before you close the Query Editor. You can save a query only if the current profile has a chapter defined as the Query changes chapter in the Edit Profile dialog. For more information see “The Edit Profile dialog” on page 1-132. 2-25 Introducing the Query Editor The setting of the EditOption parameter also controls whether or not you may save a query. If this parameter is set to schema or query you may save queries, but if it is set to data or none you may not save queries. To save a query, select Save Query from the Query menu or click the Save button on the toolbar. When you close the Query Editor Sentences prompts you to save any unsaved changes in your query. The Query Editor window The Query Editor window is shown in Figure 7-1. The Query Editor window has three panes. The right-hand pane is the schema pane and displays schema elements. When you start a new query, the whole of the schema tree is displayed. After you start building your query, the Query Editor schema pane displays only those types that could be used at the currently selected query node. The top left-hand pane shows the nodes in the query data request tree, and the lower left-hand pane shows the query results. Figure 7-1 The Query Editor 2-26 Sentences queries General query properties dialog The General query Properties dialog applies to the query as a whole. This dialog shares a display with the XML Properties dialog, described in the section “XML properties dialog” on page 2-94. Values set for the XML Properties dialog are defaults for the query and can be over-ridden when a query is executed. To view the dialog select Properties from the Query menu. Figure 7-2 The Query General properties dialog Description You can enter a text description for the query. Database queries The Sentences Query Editor, like the Sentences Explorer, uses a tree-shaped structure. A Sentences query takes the form of a request tree, made up of request nodes which represent associations and entities you choose, as well as sorting and selection nodes, and derived type nodes and derivations, used for calculations. 2-27 Database queries Building the request tree When you create a new query Sentences displays a blank Query Editor. You must select a suitable starting point for your query, which is known as the data request node. You then select other nodes, one step at a time, and build a “path” through the schema until you have all the data needed for your query. Figure 7-3 An empty Query Editor for a new query Creating the data request node When you create a new query, Sentences displays an empty Query Editor as shown in Figure 7-3. To create the data request node, select an entity type or association type, and drag it over the <Empty Query> placeholder to form the root of the request tree as shown in Figure 7-4. Alternatively, you may use Copy and Paste commands (with the toolbar buttons, or menu commands, or standard shortcut keys). 2-28 Sentences queries Figure 7-4 Adding the data request node The data request node is the starting point of the query and all the other information in the query is relative to it. The data request node can be an entity type or a forward or an inverse association type. The direction of the association type (forward or inverse) is maintained in the data request node. Adding Forward and Inverse Nodes You can add any number of forward and inverse nodes to the data request node as long as the source (or target) of the association type is equivalent to the data request node. You can add associations that relate to the data request node, or to subsets or supertypes of the data request node, or to equivalent types. You can add more forward or inverse nodes to the data request node or to any other node, and you are only limited by the available schema. You may add child nodes based on superset or subtype associations as if they were associations of the current parent node. If you add an inverse node where its source is itself an association type, then all nodes required for that association type are added to the request tree. 2-29 Database queries To add a node, drag the node from the schema pane and drop it on a node in the query. If the source or target of the new node matches the existing node, then the new node is added as a child of the existing node. To add multiple nodes, highlight a node in the request tree and select Associations from the Add submenu of the Edit menu, or from the shortcut menu as shown in Figure 7-5. Figure 7-5 Using the shortcut menu to add associations The following options are available for adding associations: • Associations displays the Add Associations dialog • Instance Specific Associations adds all the instance specific associations. This option is only enabled if the current node is bound to an instance. If no instance-specific associations exist for an instance Sentences displays an error message if this option is selected. The Add Associations dialog, shown in Figure 7-6, lists all the possible associations that may be linked to the node selected in the Query Editor. 2-30 Sentences queries You can control the associations displayed in this dialog by selecting one or both of the Forward and Inverse check boxes. To select an association, click on it with your mouse. You can use Shift+click and Ctrl+click to select multiple adjacent or non-adjacent associations. You may automatically add page nodes for the selected associations by selecting the Add page nodes checkbox. If this box is checked a page node is added whenever the association to be added has a source type that is different from the selected node. After selecting the associations you wish to add to the query node, click Add. To return to the Query Editor without adding associations, click Cancel. Figure 7-6 The Add Associations dialog An illustration of the result of adding Associations is shown in Figure 7-7. 2-31 Database queries Figure 7-7 A data request node with forward Associations added The associations added in the example shown in Figure 7-7 are grouped into pages for each supertype, equivalent type and subset. Associations from the data request node type are not put on a page (see “Page Nodes” on page 2-80). Using drag and drop and cut, copy, and paste in the Query Editor You can use the standard drag and drop and copy and paste mechanisms in the Query Editor to create forward and inverse nodes, to create Parameters, to copy or move nodes, to bind nodes, and to place nodes for display purposes on defined page nodes. If you drag and drop a request node onto one of its siblings (another node in the query that has the same parent node), the order of the siblings is changed to place the dragged node before the node it was dropped onto. This also applies when you drag a Page node and drop it onto another Page node. If you drag a request node that is not a Page node, and drop it onto a sibling Page node, the dragged node is placed on that Page. If you drag and drop an association type onto an existing request node, Sentences creates a forward or inverse request node, if its source or target matches. 2-32 Sentences queries If you drag and drop an entity or association type onto the Parameters folder, then a new Parameter of that type is created with the type name. If you drag and drop a data instance onto the Parameters folder, then it is used as the default value. You can use the standard drag and drop and copy and paste to reorder nodes at the same level in the tree, or to copy or move them to another part of the tree. If you drag and drop an existing request node onto another request node of a related type (such as a superset or subtype) the branches of the request nodes are merged. This means that the child nodes of the dragged node are copied iteratively onto the request node onto which it was dropped. Only one Sort node is allowed at any one level of the data request tree. If the merging of branches were to result in a duplication of Sort nodes, then the Sort node being dragged is ignored and not copied. Result Trees The result of a Sentences query is a tree of entity and association instances. When you execute a query the Sentences query processor retrieves instances of the entity type or association type corresponding to the data request, and processes each one. For each instance it processes the query processor looks at the immediate child nodes of the data request, and uses each one to retrieve a set of association instances which it adds to the growing result tree. For each instance that it adds, it looks at the children of the corresponding request nodes, and adds further sets of association instances. This recursive process is carried out to any depth required. The result is a tree of data whose shape is derived from, but not identical to, the request tree. The root node of the result tree is not shown in the query result tree. Each request node generates one or more sets of result nodes; each result node is derived from one and only one request node. The result tree can be displayed in the Sentences Explorer or in the Query Editor. Displaying query results To display the results in the Query Editor click the Execute button on the toolbar or select Execute Query from the Results menu. When query results are displayed in the Query Editor results pane the instances are shown with green icons, rather than with the cyan icons used for data instances in the Explorer. 2-33 Database queries Figure 7-8 Results displayed in the Query Editor In the example shown in Figure 7-8, the data request has the root node Employee, and the child nodes address, home telephone, and work telephone. The results pane shows a list of employees, and the corresponding association instances for address and home telephone for each employee. If there are no results that match the query request Sentences displays the message No results match your query. You can display a Dataform for a query result instance in the Query Editor. Highlight the instance and click the Default Dataform button on the tool bar, or select Default Dataform from the shortcut menu. Stopping data retrieval When you execute a query you request data from the Sentences server, and after evaluating the query Sentences returns a number of data items up to the limit specified in the RequestSize parameter (see “Additional optional parameters” on page 1-56). Occasionally this data retrieval action may take a long time, for example because the query is very complex, or because the RequestSize parameter is set to a high value. 2-34 Sentences queries You can stop the retrieval of data by clicking the Stop button on the toolbar. When you click the Stop button, the data retrieval action stops on the server and Sentences displays a message in the data pane. The Stop button is available in the Sentences Explorer and in the Query Editor. You can only stop a data retrieval action by using the Stop button in the same window that started it. You cannot, for example, use the Stop button in the Explorer to stop a data retrieval action started in the Query Editor. Displaying query results in the Sentences Explorer You can execute a query in the Sentences Explorer by highlighting the query name and selecting Execute Query from the Query menu or from the shortcut menu. The query results are displayed in the data pane. You can also execute a selected query by selecting Reload Data from the File menu or clicking the Reload Data button on the toolbar, or by pressing F5. Although the top level of the displayed query results may resemble a list of entity or association instances, remember that the only nodes shown in the query result tree are those that correspond to nodes in the data request tree. The query may include conditions that result in only certain instances being displayed in the query result. This means that the results tree of instances is likely to be different from the data tree of instances for the same schema type. When query results are displayed in the Sentences Explorer data pane the instances are shown with green icons, rather than with the cyan icons used for data instances. You can display a Dataform for a query result instance in the Sentences Explorer. Highlight the instance and click the Default Dataform button on the tool bar, or select Default Dataform from the shortcut menu. Expanding and Collapsing The query result tree includes expand node and collapse node buttons which act in the same way as the equivalent menu commands in the Sentences Explorer. Binding Nodes The Sentences Query processor returns all the instances of the type that the data request node refers to, and builds a branch of the result tree from each one. 2-35 Database queries You can limit the amount of data returned by the query processor by defining a restriction on a particular node. The restriction you define limits the results returned for the node to one specified instance and is known as binding a node. If you have a multiple association and bind the results to a particular instance Sentences still regards the association as multiple for the purposes of calculations in expressions. There are three ways to bind a request node. You can bind a node: • to an entity or association instance • to another request node • to a parameter Binding to an instance You may bind any type node in your request tree to an instance, which limits your results to those that refer to that instance. If you bind the data request node Sentences builds a result tree with only a single main branch, based on the instance specified. If you bind any other request node the results for that node are limited to the specified instance. The results for the immediate parent node are also limited to that instance, if the bound request node is a source or target request. If you want to display only those nodes that are bound to the instance you specify, define the parent node of that instance as Required. If a source or target request node is bound to an instance its parent request may still produce more than one result, as there may be more than one association between the same source and target. To bind a node to an instance To bind a node to an instance, highlight the node and select Bind to instance from the Edit menu. You can also open the shortcut menu, select the Edit submenu, and then select Bind to instance. Sentences displays a picker list showing the available instances. Alternatively you may use drag and drop to bind a query node to an instance. If you drag an instance from the Query Editor results pane or from the Explorer data pane and drop it onto a request node of the same type, Sentences binds the request node to that instance. 2-36 Sentences queries To cancel binding to an instance, highlight the node and select Clear instance binding from the Edit menu. You can also open the shortcut menu, select the Edit submenu, and then select Clear instance binding. The example shown in Figure 7-9 shows the node Hyperlink bound to the instance [email protected]. The parent node is also designated as a required node (indicated by an asterisk). The results pane shows the only instance of employee that has the specified Hyperlink. Figure 7-9 Request node bound to an instance Binding to a Request Node In some queries a parent node may have a child or descendant node that is an inverse association type that has a source that is of the same type as the parent node. The result tree for this query would have a separate branch for each instance of the parent node, but the inverse association type node would return instances relevant to all the instances of the type, not just those for the current instance of the parent node. To prevent this from happening you can bind the later occurrence of the type to the first occurrence in the parent or ancestor node. This ensures that the results in 2-37 Database queries a specific branch are related only to the defining instance of the parent node for that branch. To bind a node to a request node To bind a node to a request node, highlight the node and select Bind to node from the Edit menu. You can also open the shortcut menu, select the Edit submenu, and then select Bind to node. Sentences displays a picker tree and only allows you to select one of the appropriate nodes for the binding action. To cancel binding to a node, highlight the node and select Clear node binding from the Edit menu. You can also open the shortcut menu, select the Edit submenu, and then select Clear node binding. Binding to a Parameter If you create a parameter that has the same name as one of the nodes in your query request tree the node is automatically bound to the parameter. When you execute the query, the effect of binding to a parameter is the same as binding to an instance. For more details on using parameters in queries see “Query Parameters” on page 2-75. If two or more nodes have the same name they are all bound to the parameter, and therefore you may want to rename one or more of the nodes before binding to a parameter. Selection, Sort, and Derived type nodes You can modify the results returned by a query by adding additional nodes to the query tree. These nodes can: • specify calculations to be carried out using the query results (a derived type node or a derivation). These are discussed separately in the section “Derived types and derivations” on page 2-40. • restrict the results returned by another request node, by applying a filter condition (a selection node). • cause the results returned by another request node to be sorted (a sort node). Every operator request has an expression associated with it, which defines the calculation or filtering to be carried out. An operator request affects the results generated by its immediate parent. 2-38 Sentences queries Figure 7-10 Query showing sort, selection, and derived type nodes Selection nodes A selection node acts as a filter on its parent node. The selection node has an expression associated with it, which represents a condition that must be true for each instance to be returned. As shown above, you can also select data in a query by binding one or more nodes (see “Binding Nodes” on page 2-34). When using a large database, if you expect the majority of instances being filtered to match your selection criteria, using a selection node should produce faster results. If you expect only a minority of instances to match your criteria then binding to a node with the Required property set should produce faster results. You may need to experiment to find the best solution for your requirements. To create a selection node 1. Highlight the node and select Selection from the Add submenu of the Edit menu or the shortcut menu. Sentences adds a Selection node with an attached expression node as shown in Figure 7-10. 2-39 Database queries 2. The selection node is automatically selected and available for editing. Add the the expression for your selection criteria. For more details about expressions see “Using expressions in queries” on page 2-45. To edit the selection expression on other occasions, select Edit Expression from the shortcut menu for the expression node. Note Selection nodes do not appear in results and cannot be referenced, and therefore they do not have names and cannot be named or renamed. To delete a selection node 1. Highlight the node and select Delete from the Edit menu, or click the Delete button on the toolbar. An example of a Selection node is the “Selection:Date<=Date.Now()” node shown in Figure 7-10. This is part of the Latest Salaries query in the Human resources example application. In this example, salaries are selected by dates in the expression Date<=Date.Now() which uses a Date datatype method Now(). There is more information on expressions and datatype methods later in this chapter (see “Using expressions in queries” on page 2-45). This expression selects those salaries that are associated with dates that are less than or equal to today’s date. Sort nodes By default, a request node returns results in the order that they are returned by the database. Entity instances are sorted, and association instances are either sorted or sequenced, depending on the properties of the association type. You can override this behaviour by adding a sort node to the request tree. Each node can have one sort node which acts on its parent node. Sort nodes cannot be named. To create a sort node 1. Highlight the node that you wish to sort and select Sort from the Add submenu of the Edit menu or the shortcut menu. You can specify the sort direction by adding an A (for ascending) or a D (for descending) to the sort expression. You must use a comma to separate the direction indicator from the identifier in the expression. You can use multiple sort identifiers, separated by semi-colons (;). 2-40 Sentences queries An example of a Sort node is the “Sort:Date, D” node shown in Figure 7-10. This is part of the Latest Salaries query in the Human resources example application. In this example, salaries are sorted in descending order (D) of date. To delete a sort node 1. To delete a sort node, highlight the sort node and select Delete from the Edit menu, or click the Delete button on the toolbar. Derived types and derivations You can add the results of calculations to your query results by adding calculated nodes and targets. Nodes that contain calculated results are known as derived types, and targets that contain calculated results are known as derivations. In Chapter 11, Worked examples there is an example of the use of derived types and derivations and their affect on a custom Dataform. For more details see “Derivations example” on page 2-173. Derived type nodes At any node you can add one or more derived type nodes. A derived type request causes new values to be generated according to an expression that you define. You can rename the derived type to give it a meaningful name. This name is used as the “verb” of the association that is created to hold the result of the derived types’ expression. You can add one or more derived type nodes to the query node itself. These derived type nodes apply to the whole query and therefore must have group type expressions that apply to the query as a whole. A derived type node is evaluated once for each result instance that its parent node returns, and just once if its parent is the query node. To create a derived type node 1. Highlight the node and select Derived type from the Add submenu of the Edit menu or the shortcut menu. Sentences adds a Derived type node with an attached expression node. 2. The Derived type node is automatically selected and available for editing. Add the expression for your derived type. For more details about expressions see “Using expressions in queries” on page 2-45. To edit the derived type expression on other occasions, select Edit Expression from the shortcut menu for the expression node. 2-41 Database queries An example of a derived type node is the latest salary node shown in Figure 7-10. This is part of the Latest Salaries query in the Human resources example application. In this example, salaries have been selected by date and sorted in descending date order. The derived type node uses the group function First() to select the first salary in the ordered list of salaries produced by the selection and sort nodes. Derived type node properties dialog The Properties dialog for a derived type node is shown in Figure 7-11. More information about the Format page is in the section “Query node Format properties page” on page 2-84, and full details are in the section “Format properties page” on page 1-188. For details of the settings on the Datatype page see the section “Datatype properties page” on page 1-179. The Read-only on dataform property on the Format properties page is always checked for derived types. You can use this Properties dialog to set a datatype and the corresponding format options, and these are saved with the query. Data values returned by the derived type are displayed using the datatype and format options that you define. 2-42 Sentences queries Figure 7-11 The derived type node Properties dialog To view the derived type properties dialog, highlight the derived type node and select Properties from the shortcut menu. Note Checking or clearing the Instances are values checkbox on the derived type node Properties dialog has no effect on the output of the query. Derivations Derivations allow you to add calculated result fields to your query. Derivations are displayed on custom Dataforms. A calculated derivation replaces the original target of the association on which it is set. For a detailed example of the use of derived types and derivations and their affect on a custom Dataform please see the “Derivations example” on page 2-173. Recalculation rules for derivations When you create a derivation you can define when its value is recalculated. The recalculation options are given in the section “Derivation properties” on page 2-43. The available options are determined by whether or not the association type to 2-43 Database queries which the derivation is attached is read-only and whether or not the derivation itself is editable or not. The Read-only property of the association type is set on the Format page of the parent node’s Properties dialog. The Editable property of the derivation is set on the Derivations page of the Query node properties dialog. If an association is Read-only it cannot be Editable. Derivation properties A Properties dialog that includes a Derivation properties page is available for forward nodes in a query whose targets are calculated as derivations (see “Derivations” on page 2-42). The targets must be value types. The properties dialog also includes the Dataform navigation page, as described in (see “Query node Dataform properties page” on page 2-90), and the Format page. To view the Derivation properties page select Properties from the Edit menu or from the shortcut menu on the node. Figure 7-12 The Query derivation properties dialog 2-44 Sentences queries • If the association type is multiple, the only available calculation option is Calculate once. In this case the derivation is effective only when no instances of the association type exist for this source. When one or more instances already exist the derivation does not create new instances. • If the association type is singular and read-only, the derivation editable property is always Not Editable. In this case the calculation options are: • Calculate once, for example, to set the date the invoice was created • Only calculate on “Save”, for example, to calculate an account balance or to set the date last saved • Calculate always, for example, to calculate an invoice line total In all these cases the derivation field cannot be edited by the user. • A derivation with the recalculation option Only calculate on “Save” is only recalculated if it appears on a parent Dataform, or on a child Dataform whose parent is a custom Dataform. • If a derivation is shown on a child Dataform whose parent is a base Dataform, do not use the Only calculate on “Save” option. Use Calculate once or Calculate always. • If the association type is not defined as read-only, the derivation Editable property can be set to either Editable or Not Editable. If it is set to Not Editable, the calculation options are identical to those given above. However if the derivation property is Editable, the calculation setting is: • Calculate once In this case the derivation field is always editable by the user. The following table summarises the permissible combinations for singular association types (for multiple association types the only setting allowed is Calculate once): Association type read-only property Derivation editable property Calculation setting read-only=yes not editable Calculate once read-only=yes not editable Calculate on “Save” only 2-45 Database queries Association type read-only property Derivation editable property Calculation setting read-only=yes not editable Calculate always read-only=no not editable Calculate once read-only=no not editable Calculate on “Save” only read-only=no not editable Calculate always read-only=no editable Calculate once Setting a derivation To set a derivation, highlight a node in the Query Editor, and choose Set derivation from the Edit menu. Sentences adds an expression field to the query node, in which you can add an expression. Using expressions is described in detail in the section “Using expressions in queries” on page 2-45. To clear a derivation, highlight a node in the Query Editor, and choose Clear derivation from the Edit menu. Using expressions in queries You can use expressions in derived types, derivations, and selection operator statements in Sentences queries. The calculations in a derived type node can use identifiers, based on node or parameter names (the equivalent of variables), constants which may be a string or a numeric value, arithmetic operators, comparison operators, wildcards, and logical connectives (all listed in the tables below). Calculation expressions may also make use of Datatype methods and type constructors. In addition, the derived type node can use a number of group expressions, and the selection operator can use the special conditional function Exists(). Expressions are always evaluated from left to right, so you should take care to place the most specific datatype (such as Currency, a specialised type of Number) on the left hand side of any expression, before any general datatype (such as Number). 2-46 Sentences queries Expression syntax for queries The following BNF grammar shows how expressions in Sentences queries are parsed. FilterExpression ::= ConditionalExpression <EOF> RequestQueryExpression ::= ScalarExpression <EOF> Assignment ::= Id "=" ScalarExpression ConditionalExpression ::= ConditionalInclusiveOr ConditionalInclusiveOr ::= ConditionalExculsiveOr ( ( "|" | <OR> ) ConditionalExculsiveOr )* ConditionalExculsiveOr ::= ConditionalAnd ( "^" ConditionalAnd )* ConditionalAnd ::= UnaryConditional ( ( "&" | <AND> ) UnaryConditional )* UnaryConditional ::= ( "!" | <NOT> ) "(" ConditionalExpression ")" ConditionalPrimary | ConditionalPrimary | <EXISTS> "(" Id ")" ::= | ComparisonCondition ::= "(" ConditionalExpression ")" ScalarExpression ComparisonCondition "=" ScalarExpression | "==" ScalarExpression | "!=" ScalarExpression | "<>" ScalarExpression | "<" ScalarExpression | ">" ScalarExpression | "<=" ScalarExpression | ">=" ScalarExpression | LikePredicate LikePredicate ::= ( <NOT> )? <LIKE> ScalarExpression ScalarExpression ::= IfStatement | ConcatPart ( ( "||" | <CONCAT> ) ConcatPart )* IfStatement ::= <IF> ConditionalExpression <THEN> ScalarExpression <ELSE> ScalarExpression ConcatPart ::= ScalarTerm ( "+" ScalarTerm | "-" ScalarTerm )* 2-47 Database queries ScalarTerm ::= ScalarFactor ( "*" ScalarFactor | "/" ScalarFactor )* ScalarFactor ::= "-" ScalarPrimary | ScalarPrimary ::= ScalarPrimary FunctionCall | MethodCall | Default | Literal | Id | <VOID> | "(" ScalarExpression ")" FunctionCall ::= <IDENTIFIER> "(" ( ScalarExpression )? ")" MethodCall ::= <IDENTIFIER> "." <IDENTIFIER> "(" ( ScalarExpression ( "," ScalarExpression )* )? ")" Default ::= <DEFAULT_VALUE> "(" ScalarExpression "," DefaultLiteralValue ")" DefaultLiteralValue ::= FunctionCall Id ::= <IDENTIFIER> ( <IDENTIFIER> )* Literal ::= ( <INTEGER_LITERAL> ) | Literal | ( <FLOATING_POINT_LITERAL> ) | ( <STRING_LITERAL> ) In this BNF grammar listing, FilterExpression is the starting point for Selection expressions, and RequestQueryExpression is the starting point for derived type and derivation expressions. FunctionCall indicates either one of the group functions, for example Sum(x), or a datatype constructor, for example MixedCurrency(“GBP100”), and MethodCall indicates a Datatype method, for example Date.Now() 2-48 Sentences queries Arithmetic and Concatenation operators The arithmetic and concatenation operators that are supported in derived type and selection node expressions are: Precedence Operator Meaning Highest - Unary minus * Multiply / Divide + Add - Subtract || Concatenate Lowest If either side of an add, subtract, multiply, or divide operator has no value, the operator returns no value. If either side of add or subtract operator has the zero token output from a Sum() method it is treated as a zero with the datatype of the other side of the operator. If both sides of the operator have the zero token, the operator returns the zero token. If either side of the multiply operator has the zero token, the operator returns the zero token. With the divide operator, any value divided by the zero token returns no value, and the zero token divide by any value returns the zero token. If the input to the singular negate operator (the unary minus) has no value, the operator returns no value. If the input to the singular negate operator (the unary minus) is the zero token, the operator returns the zero token. If either side of the concatenate operator has no value, the operator returns no value. • Arithmetic operators example The following example illustrates the precedence of the arithmetic operators. An expression in the format: -4 + 6 / 2 returns the result: -1 as the divide operation is evaluated before the add operation. The use of parentheses can change the order of evaluation. An expression in the format: 2-49 Database queries (-4 + 6) / 2 returns the result: 1 • Concatenate operator example In a schema with entity types FirstName and LastName, and with entity instances Mary and Jones respectively, an expression in the format: FirstName || “ ” || LastName returns results of the type: Mary Jones The expression includes a blank space in inverted commas which appears between the FirstName and LastName instances. Further operations on strings can be performed using the string methods on the Text datatype (see “Datatype methods examples: Text datatype string methods” on page 2-61). Comparison operators The comparison operators that are supported in selection node expressions are Operator Meaning = Equals == Equals != Not equals <> Not equals < Less than <= Less than or equal to > Greater than >= Greater than or equal to LIKE Pattern match NOT LIKE Negative pattern match If either side of a comparison operator has no value, then the comparison operator expression returns no value. If either side of a comparison operator is the zero token 2-50 Sentences queries output from a Sum() method, the token it taken as being a zero (0) in the datatype on the other side of the comparison operator. If both sides of the comparison operator have the zero token, the values are assumed to be equal. • Comparison operators example: NOT LIKE Given a schema with an entity type LastName, and entity instances of various names, an expression in the format: LastName NOT LIKE “Jones” returns results that include all names that do not match Jones. Used in this way, the LIKE and NOT LIKE operators return the same results as = (equals) and != (not equals). The LIKE and NOT LIKE operators may also be used with wildcards, as shown below. The LIKE and NOT LIKE operators are not case-sensitive. Wildcards The wildcards that are supported in selection node expressions are Wildcard character meaning ? matches any single character * matches from zero to any number of characters If you want to use either of the wildcard characters as part of your pattern you need to “escape” the character with a backslash, as follows: Escape characters meaning \? represents a literal? character \* represents a literal * character \\ represents a literal \ character \ a single backslash causes an error in query expressions You can use these wildcards with comparison operators such as LIKE and NOT LIKE, and in the Sentences Explorer Filter tool. 2-51 Database queries • Wildcards example: LIKE with * In a schema with an entity type LastName, and entity instances of various names, an expression in the format: LastName LIKE “Jon*s” returns results that include names such as Jonas, Jones, Jonsons, and so on. • Wildcards example: using an escaped wildcard character In a schema with an entity type Description, and entity instances of text strings that may end in a question mark (?) character, an expression in the format: Description LIKE “*\?” returns any instance of Description that ends in a question mark (?) character. Logical connectives The logical connectives that are supported in selection node expressions are listed below. You can either use the special character shown or the English alternative for each connective: Character Alternative Meaning & AND and | OR or (inclusive) ^ XOR or (exclusive) ! NOT not II CONCAT concatenate • Inclusive or The inclusive or is represented by “|”. The expression “A|B” means “either A, or B, or both”. • Exlusive or The exclusive or is represented by “^”. The expression “A^B” means “either A, or B, but not both”. • Logical connectives example: & In a schema with entity types FirstName and LastName, and with entity instances David and Jones respectively, an expression in the format: FirstName = “David” & LastName = “Jones” 2-52 Sentences queries returns only those results for which both conditions apply, that is where the FirstName is David and the LastName is Jones. The operators AND, OR, and XOR are case-sensitive and must always be entered in capitals. The operators NOT and CONCAT are not case-sensitive. Logical connectives behaviour with missing values The following list shows the output of the logical operators if one side of the operator has no value: Operator Left-hand side Right-hand side OR True True, False or no value True False True True False False False False no value no value no value True True no value False no value no value no value no value True True True True False False True no value no value False True, False, no value False no value True no value no value False False no value no value no value True True False AND XOR Result 2-53 Database queries Operator NOT Left-hand side Right-hand side Result True False True True no value no value False True True False False False False no value no value no value True no value True - False False - True no value - no value Conditional operator You can use a conditional operator in a derived type, derivation or selection expression. The operator requires the three keywords IF, THEN, and ELSE. The operator is not valid unless all three keywords are present. The syntax for a conditional operator expression is as follows: IF Condition THEN trueValue ELSE falseValue The condition can be any statement using a comparison operator. • Conditional operator example To return the name of an Employee except when that person is the manager, use the conditional operator in an expression in the following form: IF Employee!=“Barney Norris” THEN Employee ELSE “the manager” For this expression, if the Employee is not Barney Norris, the expression returns the Employee name, otherwise it returns the string “the manager”. The three keywords IF, THEN, and ELSE are case sensitive and must always be entered in capitals. 2-54 Sentences queries The conditional operator cannot be used as the only term in a Selection expression, as Selection expressions require a Boolean result (true or false), which the conditional operator does not return. Selection conditions can be created using one of the comparison operators (see “Comparison operators” on page 2-49). To create a Selection expression which is conditional, use the conditional operator in a derived type expression followed by a Selection expression that refers tot the derived type, for example: Derived Type(IF(Exists(Phrase)) THEN("*" || Phrase || "*") ELSE("*")) Selection(Title LIKE Derived Type) Using Void in an expression You can instruct Sentences not to create an association in a query result if a particular result is not found, by using the token VOID in a conditional expression. • Void example If you only want to output an association that represents the number of employees when that number is greater than 3, use the following expression: IF Count(Employee)<3 THEN VOID ELSE Count(Employee) The VOID token is case-sensitive and must always be entered in capitals. Exists Conditional function The Exists() conditional function can be used to restrict results of a parent request based on whether a child request has any results. This function is used to limit the display of results in the results tree to those branches where an instance of the specified node exists. The argument of the Exists() conditional function must be an identifier. It may not be a complex expression. You should compare the result of using this function result with the result of defining a node as Required (see “Required nodes” on page 2-64). You can combine the Not operator “!” with the Exists() conditional function, in the format !(Exists()), to restrict results of a parent request based on whether a child request does not have any results. This is useful as there is no negative equivalent of the Set Required function. • Exists conditional function example In a schema with the association type Person, visits, store, adding a Selection node to Person, with an expression in the format: 2-55 Database queries Exists (Store) returns only those Person instances for which the Person, visits, Store association exists. The Exists operator is not case-sensitive. Default value You can set a default value for a type that you wish to use in an expression. The default value must be an instance of the selected type. Setting a default is the equivalent of using the Exists() conditional function in a conditional expression. • Default value example In a schema with the entity type Employee and a number of Employee instances, you can define Barney Norris as the default Employee with either of the following expressions: IF Exists(Employee) THEN Employee ELSE “Barney Norris” or DEFAULT(Employee, “Barney Norris”) The DEFAULT operator is case-sensitive and must always be entered in capitals. Using parameters in query expressions You can use a parameter in a query expression (see “Query Parameters” on page 275). In many cases you may use the parameter name directly in an expression. However if you use a parameter name and there is a query node with the same name the value returned is the value of the query node and not that of the parameter. To make sure that you get the value of the parameter, use the GetParameter function. This function takes the name of a parameter as its argument. The parameter name must be a string inside quotation marks. For example, GetParameter(“Person”) returns the value of the query parameter Person. Using user-defined parameters You can add your own parameters to the HTML startup pages for Sentences applets and for servlet access, and refer to them in query expressions. For details of how to use these parameters see “User-defined parameters” on page 1-58. 2-56 Sentences queries To refer to a user-defined parameter use the GetClientParameter method with the name of the parameter in the query expression. Optionally you may add a default value to the query expression, which is used if no value is defined for the parameter. • User-defined parameters example If your HTML startup page includes a user-defined parameter in the format: <PARAM NAME="ClientParameter1" VALUE="CP1=Barney Norris"> then a query expression in the format: GetClientParameter("CP1") returns the value Barney Norris. If your HTML startup page includes a user-defined parameter in the format: <PARAM NAME="ClientParameter2" VALUE="CP2="> then a query expression, which includes a default value, in the format: GetClientParameter("CP2","Mary Venice") returns the value Mary Venice. The default value you specify in the query expression is returned whenever Sentences cannot return the value from the user-defined parameter, for example when the specification is missing or incomplete. Using conditionals to check for parameter values If either side of a comparison operator has no value, the expression returns no value. If either side of one of these operators uses a parameter, and that parameter has no value, the expression returns no value. You can use a conditional expression, or use the Exists() conditional function, to check for the existence of parameter values, and to substitute a value if none exists. Group functions The group functions that are supported in derived type and selection node expressions are: Function meaning Count() Returns the number of values CountDistinct() Returns the number of distinct values. Sum() Returns a sum of the values Average() Returns the average of the values 2-57 Database queries Function meaning Min() Returns the lowest value Max() Returns the highest value First() Returns the first value Last() Returns the last value Group functions can take an expression as their argument. If the Sum() or Count() group function has no input values it returns a special zero token (see “Expressions that give the zero token as their result” on page 2-63). If the Average() group function has no input values it returns no value. The CountDistinct() function is similar to the Count() function, except that it counts the number of distinct values rather than the number of values. Repeated values are counted many times by Count(), but are counted only once by CountDistinct(). Note that CountDistinct() compares values by name, not by their internal identifiers. For example, if you are counting instances of the entity type Person, and there are two Persons named John Smith, they are counted as one instance. • Group functions example: Max() In a schema with an association type ((Company, orders, Product) on, Date) you could construct a query to return the date of the latest order, using a Derived type named LastOrderDate with an expression in the format: Max(Date) 2-58 Sentences queries Datatype methods The following datatype methods can be used in derived type and selection node expressions: Datatype Methods Date Now() AddDays(date, num) AddMonths(date, num) AddYears(date, num) GetYear(date) GetMonth(date) GetDay(date) GetDayofWeek(date) Time Now() AddSeconds(time, num) AddMinutes(time, num) AddHours(time, num) Timestamp Now() AddSeconds(ts, num) AddMinutes(ts, num) AddHours(ts, num) AddDays(ts, num) AddMonths(ts, num) AddYears(ts, num) Currency Convert(source iso code, source cur, factor, target iso code) GetISOCode(value) GetValue(value) 2-59 Database queries Datatype Methods MixedCurrency Convert(source iso code, source cur, factor, target iso code) GetISOCode(value) GetValue(value) Text IndexOf(string, “substring”) IndexOf(string, “substring”, fromIndex) Length(string) Replace(string, “oldSubstring”, “newSubstring”) SubString(string, beginIndex) SubString(string, beginIndex, endIndex) ToLowerCase(string) ToUpperCase(string) • Arithmetic operations with Date and Time datatypes The following arithmetic operations are supported with the Date datatype: date + number adds number of days to the date of date date - number subtracts number of days from the date of date date1 - date2 computes the number of days that date2 is earlier or later than date1. The following arithmetic operations are supported with the Time datatype: time + number adds number of seconds to the time of time time - number subtracts number of seconds from the time of time The following arithmetic operations are supported with the Timestamp datatype: timestamp + number adds number of seconds to the time of timestamp timestamp - number subtracts number of seconds from the time of timestamp 2-60 Sentences queries • Datatype methods examples: Date, Time, and Timestamp datatypes The following expression is an example of the method GetDayofWeek(date). The (date) part of this expression shown in the example is a type constructor for the Date type (see “Type constructors” on page 2-62). You may also use a variable of the type Date. Date.GetDayofWeek(Date(“15/03/02”) ) returns a numeric value representing the day of the week for 15th March 2002, (where Monday=1, Tuesday=2, and so on.) The value returned in this example is 5 representing Friday. The other Date.Get methods also return numeric values: Date.GetYear(date) returns a numeric value equal to the year Date.GetMonth(date) returns a numeric value representing the month (where January=1) Date.GetDay(date) returns a numeric value equal to the day of the month The following examples of expressions use the Date datatype, and may be applied equally to expressions using the Time or Timestamp datatype as well. These examples use an entity type LastDate. The following expression is an example of the method AddDays(date, num): Date.AddDays(LastDate, 5) returns a new date that is 5 days after LastDate without altering the value of LastDate. The following expression is an example of the method AddMonths(date, num): Date.AddMonths(LastDate, 5) returns a new date that is 5 months after LastDate without altering the value of LastDate. The following expression is an example of the method AddYears(date, num): Date.AddYears(LastDate, 5) returns a new date that is 5 years after LastDate without altering the value of LastDate. The Now() method for the Date, Time, and Timestamp datatypes takes its value from the time clock on the machine running the Sentences server. • Datatype methods examples: Currency and MixedCurrency datatypes The following examples use an entity type MyCurrency which is a number with the Currency datatype assigned. 2-61 Database queries The following expression is an example of the method Convert(source iso code, source cur, factor, target iso code) for Currency: MixedCurrency.Convert(“GBP”,MyCurrency,1.61, “EUR”) converts an amount of MyCurrency in pounds (GBP) to Euros (EUR) using the exchange rate 1.61, and the result has the Currency datatype. The following expression is an example of the method GetISOCode(value): Currency.GetISOCode(MyCurrency) returns the ISO code for MyCurrency. The following expression is an example of the method GetValue(value): Currency.GetValue(MyCurrency) returns the amount of MyCurrency as a number with the Number datatype. The following expression is an example of the method Convert(source iso code, source cur, factor, target iso code) for MixedCurrency: Currency.Convert(“GBP”,MyCurrency,1.61, “EUR”) converts an amount of MyCurrency in pounds (GBP) to Euros (EUR) using the exchange rate 1.61, and the result has the MixedCurrency datatype. Note The Convert method for the MixedCurrency datatype does not currently support conditional access to multiple conversion factors. As a result this method can only process input data in a single currency. Input values with a currency other than that specified as the source ISO code do not produce valid output (the output value is zero). • Datatype methods examples: Text datatype string methods The following string methods can be applied in query expressions to Text datatypes. In the following examples string represents the type name. IndexOf(string, substring) returns the index position of the first occurence of the substring. IndexOf(string, substring, fromIndex) returns the index position of the first occurence of the substring after the specified fromIndex index position. Length(string) returns the length of the string. Replace(string, oldSubstring, newSubstring) replaces the oldSubstring text with the newSubstring text. 2-62 Sentences queries SubString(string, beginIndex) returns the substring beginning at the specified beginIndex index position and ending at the end of the string. SubString(string, beginIndex, endIndex) returns the substring beginning at the specified beginIndex index position and ending at the specified endIndex index position. ToLowerCase(string) returns the entire string in lower case characters. ToUpperCase(string) returns the entire string in upper case characters. Type constructors To create an instance of a Currency, MixedCurrency, Percentage, Time, Date or Timestamp value in an expression you must use the appropriate constructor method for the datatype. You cannot use a string such as “100” on its own. Instances of Number and Text do not require type constructors. This type constructor consists of the name of a datatype, followed by a value in parentheses, which is used to construct a suitable value. Note The date format used must match the date format supported by the version of Java installed on the machine running your Sentences server. • Type constructors examples The following are examples of type constructors for their respective datatypes: Currency (“100”) MixedCurrency (“GBP100”) Percentage (“10%”) Time (“23:59”) Date (“31/12/1999”) Timestamp (“1999-12-31 23:59:00”) Identifiers in operator request node expressions You can use a parameter name or any request node name as an identifier in a derived type or selection expression The following restrictions apply to the use of identifiers in expressions: • node names used in expressions must be unique. You may rename a node to make sure its name is unique without affecting the nodes link to its original type. 2-63 Database queries • parameters used in expressions must be based on entity types, not association types • request node names used in expressions must be those of entity types, not association types • if you want to use a node name which contains a character that is also an operator character (such as * / - or +) you must rename the node before you can use it, as these characters would cause an error You should take care to avoid circular references in your queries. Expression results The number of possible results from a request node determines where the node may be used in an expression. If more than one result can be produced then that node name can only be used is as part of an expression that is the argument to a group function. The result from an expression that is an argument to a group function can be multiple or singular. The rules that determine whether a particular request node can generate a singular result or multiple results is as follows: • Any request node that is a direct parent node of the expression or selection node is singular. • Any other request node whose results have been generated before this depends on the singularity of any forward or inverse association type request nodes between the expression or selection request node and request that the identifier comes from. Any forward or inverse requests that are direct parent requests are considered to be singular. Missing values in expressions The way Sentences behaves when it finds missing values in expressions depends on the operator being used. The descriptions of each of the types of expression operator, elsewhere in this chapter, give details of the way missing values are dealt with. Expressions that give the zero token as their result If the Sum() or Count() group operator has no input values, it generates a special zero token that may be the input for other expressions. If the result of a complete expression for a derived type is the zero token, Sentences converts the result into a zero value for the datatype for the derived type request. If 2-64 Sentences queries the datatype for the derived type request has not been set and this is the first value found for this expression, then the returned value is 0 with the Number datatype. Required nodes You can restrict the results of a node by defining the node as Required. If a node is defined as required, then the query results for the parent level of that node are restricted to those instances for which the child node exists. If you need to restrict the returned instances of the node above the parent you must also define the parent node as Required. To restrict the instances of an ultimate parent node to only those where a child instance exists, all associations in the branch to the child must be defined as Required. Figure 7-13 shows a simple query listing four garage customers. By defining the (…, owns, vehicle registration no.) node as required, only the three customers who own vehicles are listed in the results as shown in Figure 7-14. Figure 7-13 Query results before setting the Required node property 2-65 Database queries Figure 7-14 Query results after setting the Required node property Another use of the Required node property is shown in the example of a node bound to an instance (see “Binding to an instance” on page 2-35). When used with bound nodes, the Required node property may be used as an alternative to the Exists() conditional function as a selection mechanism (see “Exists Conditional function” on page 2-54). To set the Required node property, highlight a node and select Set Required from the Edit menu or the shortcut menu. To clear the Required node property, select Set Optional from the Edit menu or the shortcut menu. Renaming request nodes You can rename any request node in the query tree, with the exception of Sort and Selection nodes. This allows you to make node names unique, which simplifies references between one node and another, and can make your query easier to read. Sentences uses the new names you assign to query nodes when you display the query results in the Query Editor or in the Explorer, or when you export the query results using XML, or when you display a custom Dataform based on the query. 2-66 Sentences queries The default name of any node in the request tree is the same as its association or entity type name in the Sentences Explorer. If you change the name of an association or entity type in the Explorer, the Query editor retains the original name and treats the node as if it had been renamed. The reference to the entity or association type remains intact. Except for node names used in derived type expressions, which must be unique to prevent ambiguity, Sentences does not require you to use unique node names. Ambiguous names in expressions may cause the query to be executed incorrectly or not at all. To rename a node To rename a node, follow these steps: 1. Highlight the node you want to rename. You can rename both association type and entity type nodes. If you want to rename the entity type that is the target of an association, make sure you expand the node and select the target. 2. Select Rename from the Edit menu or the shortcut menu, or press Ctrl+R, or press F2. 3. Type in the new name for the node. Press Enter, or click outside the text edit box, or use the up or down arrow cursor keys, to complete the renaming. You may wish to save your query after renaming a node. Hidden Nodes The expression used by a derived type or a selection request can only use data that is retrieved as part of the query. This means that you may need to including certain data in your query so that an expression can use it, and you may not want to display the data. You can suppress the display of selected branches by marking them as Hidden. Hidden nodes are displayed in grey. If you hide a node, all its children are hidden as well. To hide a node To hide a node, highlight the node and select Hide Branch from the Edit menu. You can also open the shortcut menu, select the Edit submenu, and then select Hide Branch. To make a hidden node visible in the results tree, select Show Branch. 2-67 Database queries Figure 7-15 shows a query result (from the latest salaries query in the Human Resources example application) which does not have any of its nodes hidden. In the result tree you can see details of all the Event associations that the query needed to select from and sort in order to derive the latest salary. These branches detract from the results you want to display. Figure 7-15 Query results before hiding a branch 2-68 Sentences queries Figure 7-16 shows the same query and results after the Events branch has been hidden. The results pane only shows the relevant salary details, and not the intervening nodes. Figure 7-16 Query results after hiding nodes Transitive closure and recursive closure Some relationships between real-world entities are transitive and carry over from one entity to another. An example is ancestor of. If Henry is an ancestor of Clare, and Clare is an ancestor of Edward, then Henry is also an ancestor of Edward. Database systems use recursive mechanisms to find instances of this kind of relationship. For example, instead of locating only a Person who is an ancestor of Clare, the system also looks for any Person who is an ancestor of an ancestor of Clare, and so on. Sentences offers two query operations to deal with these kinds of relationships, Transitive closure and Recursive closure. 2-69 Database queries Transitive closure A transitive closure operation allows you to find all the instances of a transitive relation, such as the association type (Person, parent of, Person). The result of a transitive closure operation is a simple list of instances, all at the same level. The node selected as the target for transitive closure must be a child node of the selected node, and it must be of the same type or of an equivalent type (supertype, subset type, or equivalent type) as the selected node. To define transitive closure for a node Figure 7-17 Parents query before applying transitive closure Figure 7-17 shows a query before adding transitive closure. To define transitive closure for a node, highlight the node and select Add transitive closure from the Edit menu. You can also open the shortcut menu, select the Edit submenu, and then select Add transitive closure. Note To make a closure using transitive closure select the start of the chain of query nodes.To make a closure using recursive closure select the end of the chain of query nodes. 2-70 Sentences queries When you select Add transitive closure Sentences displays a special Picker that displays the whole request tree but only allows you to select appropriate nodes, as shown in Figure 7-18. Figure 7-18 The node picker for the add transitive closure operation When you select a node for transitive closure, Sentences adds a new node to the query, as shown in Figure 7-19. The original branch to the selected target node is hidden by default. This branch cannot be modified in any way, except for renaming to avoid duplicate names referred to in expressions. 2-71 Database queries Figure 7-19 The transitive closure node ready to be renamed The transitive closure node is created with the name Transitive Closure, which changes to the name of the selected target node. This should be renamed to a unique name. If you do not rename it, Sentences warns that there is a node with a duplicate name in your query. Figure 7-20 shows the results of the same query shown in Figure 7-17, after adding a transitive closure node and changing the name of the node to Ancestors. 2-72 Sentences queries Figure 7-20 Parents query after adding a transitive closure node You may add further query nodes from the target of a transitive closure to define the information shown for each result (in this case, for each ancestor). A query that includes a transitive closure node cannot be used for a custom Dataform. If you associate a custom Dataform with a query that includes a transitive closure node Sentences displays an error message. To cancel recursive closure for a node, select Remove transitive closure. Recursive closure If your database contains associations which have the same entity or association type, or a related entity or association type as both the source and the target (for example Person, parent of, Person), then you can use a recursive closure operation to find all the instances in a chain (for example, all the known ancestors of a given individual). Recursive closure requires a linked chain of association instances (for example a is parent of b, b is parent of c, c is parent of d, and so on) and the result of a recursive 2-73 Database queries closure operation is always a linked tree of nodes. Figure 7-21 shows an Ancestors query without using recursive closure. Figure 7-21 Ancestors query without recursive closure The recursive closure operation creates a loop in the request tree, by automatically adding the child nodes of the parent to the child node. This loop generates a new level of the result tree with each turn. However, if there is a loop in the data (which may happen in a case such as Person, sibling of, Person) then the recursion could repeat itself forever. To prevent this Sentences checks each entity to make sure that it has not already been processed. If it has, then it is not processed again. 2-74 Sentences queries Figure 7-22 shows the same query after recursive closure has been applied. Figure 7-22 Ancestors query with recursive closure To define recursive closure for a node To define recursive closure for a node, highlight the node, which must be a source or a target. Select Make recursive closure from the Edit menu. Alternatively, select the Edit submenu, and then select Make recursive closure. Note To make a closure using recursive closure select the end of the chain of query nodes. To make a closure using transitive closure select the start of the chain of query nodes. Sentences displays a special Picker (shown in Figure 7-23) that displays the whole request tree but only allows you to select appropriate nodes. 2-75 Database queries Figure 7-23 Recursive closure target picker The node you choose for recursive closure must be of a related type, which includes the same type, a supertype, a subtype or a subset. The node chosen for recursive closure must be higher up the tree than the selected node, on the path between that node and the data request node. It may be a source, a target, or a data request. A query that includes a recursive closure node cannot be used for a custom Dataform. If you start a custom Dataform on a query that includes a recursive closure node, Sentences displays an error message. You cannot add any further query nodes from the target of a recursive closure. To cancel recursive closure for a node, highlight the node and select Break recursive closure from the Edit menu. Alternatively, select the Edit submenu, and then select Break recursive closure. Query Parameters You can use parameters in a query to restrict the results to a specific instance of a type rather than all the instances. You can use a parameter directly to replace an entity type, or indirectly in an expression (see “Using parameters in query expressions” on page 2-55). An example of a query with parameters is the Resource Data query which is part of the Human Resources example application, as shown in Figure 7-24. 2-76 Sentences queries Figure 7-24 A query with parameters Using a parameter makes running a query interactive. Each time you execute the query Sentences asks you to select the value for your parameter, by displaying a parameters dialog as shown in Figure 7-25 (below). Naming parameters If you want to create a parameter to bind an entity type request node in your query you must give it exactly the same name as the request node. Using the same name automatically binds the node to the parameter (see “Binding Nodes” on page 2-34). If you want to create a parameter to be used in an expression you may give it any name you like. Try to use only alphabetic characters in parameter names. You may use numerals and spaces in parameter names as long as a space is followed by a character and not a numeral. You may not use special characters in parameter names. Parameters may also be renamed in the same way as a node (see “To rename a node” on page 2-66). Creating parameters Every query includes a Parameters folder in the Query Editor. To create a parameter, highlight the Parameters folder and select Create Parameter from the 2-77 Database queries shortcut menu, or select Create Parameter from the Parameters menu. Type a name for the parameter in the dialog box and click OK. To define a parameter, highlight the parameter name and use the options on the shortcut menu or the Parameters menu. Defining a parameter’s type When you create a parameter you may specify the entity or association type that it replaces. To specify the parameter’s type, highlight the parameter’s name and select Set Type from the shortcut menu or the Parameters menu. Sentences displays a picker list of entity or association types from which you can select the type. Defining a parameter’s value When you create a parameter you may specify a default value for the parameter. The default value is used unless you specify a different value when you execute the query. To specify the parameter’s default value, highlight the parameter’s name and select Set Default Value from the shortcut menu or the Parameters menu. You may clear the default value by selecting Clear Default Value from the shortcut menu or the Parameters menu If the parameter is based on an association type or an entity type Sentences displays a picker list of entity or association instances from which you can select the default value. If the parameter is based on an value type Sentences displays a Dataform from which you can either select an existing value instance or create a new value instance to be used as the default value. Making a parameter mandatory All parameters are optional when you create them. If a parameter is mandatory you must supply a value for it when you execute the query. To make a parameter mandatory, highlight the parameter’s name and select Set Mandatory from the shortcut menu or the Parameters menu. To make a mandatory parameter optional, highlight the parameter’s name and select Set Optional from the shortcut menu or the Parameters menu. 2-78 Sentences queries Executing a query which has parameters When you execute a query that includes one or more parameters Sentences displays the Parameters dialog, which allows you to type in values, or to select them from a picker list. Figure 7-25 The Parameters dialog The example in Figure 7-25 shows the Parameters dialog. Showing parameters in the Explorer When you hold your mouse pointer over the name of a query in the Explorer schema pane Sentences displays a Tooltip message listing the parameters for that query and their current settings. Attaching Subset Queries You can attach a query to a subset, using the entity type Properties dialog, available from the Sentences Explorer. You need to initiate the attach action from the Properties dialog, or from the Explorer subsets shortcut menu, not from the Query Editor (see “Subsets properties page” on page 1-196). 2-79 The Query Editor and Dataforms Using parameters in subset queries You may use parameters in subset queries, but you must make sure that the query can run in all cases. When you view the subset in the Sentences Explorer, Sentences uses the default value for the parameter to select instances for display. If there is no default value, the parameter is not given a value. If the query parameter is used to bind a node to an instance and there is no value given for the parameter, Sentences runs the query as if there were no binding, and returns all possible instances. If the parameter is used in an expression, and there is no value, Sentences cannot run the query. In particular it is recommended that you set a default value for parameters used in expressions in subset queries. Sentences query execution process The order in which Sentences processes query nodes when it executes a query is not necessarily the same as the sequence in which the nodes appear in the query structure. This is because Sentences first optimises the query, based on the dependencies between the nodes, in order to enhance the execution speed. When there is a problem with query execution Sentences may report the following error: Error 10199: The order in which the execution of requests occurs cannot be determined due to circular references. When this error is reported, Sentences displays the node expression which caused the error. When you construct a query you should bear in mind that all nodes in the query tree are visible to all other nodes. Therefore any node name that is used more than once must not be used in an expression, as it is not possible for Sentences to distinguish which occurrence of the node name should be used to evaluate the expression. The Query Editor and Dataforms Custom Dataforms display a selection of associations, defined by a query. This is in contrast to a base Dataform which automatically displays all the associations which have the same source type. You can use the Query Editor to define a query structure specifically for use as the basis of a custom Dataform, and you can display a custom Dataform based on a query that you have created. 2-80 Sentences queries To display the custom Dataform from the Query Editor, select Custom Dataform from the Dataform menu or click the Custom Dataform button on the Query Editor toolbar. To display custom Dataforms from the Sentences Explorer, highlight an entity type and select Dataforms from the shortcut menu, and choose the specific Dataform you wish to use from the sub-menu. To select or use a custom Dataform in the Explorer, open the Properties dialog and select the Custom Dataforms page. For more information on selecting and using a custom Dataform, see “Creating a custom Dataform” on page 1-227. Custom Dataforms can also be used with the Dataform applet (see “The Dataform applet” on page 1-231). In Chapter 11, Worked examples there is an example of the use of derived types and derivations and their affect on a custom Dataform. For more details see “Derivations example” on page 2-173. You cannot use a query that includes a recursive or a transitive closure node for a custom Dataform. If you start a custom Dataform on a query that includes a recursive or a transitive closure node, Sentences displays an error message. Page Nodes You can enhance the design of custom Dataforms by adding page nodes to your query. Page nodes do not have any effect on query results displayed in the Query Editor or the Sentences Explorer or on CSV export. You can define separate XSL Stylesheet options for page nodes in a query which can effect the display of query results exported or viewed as XML (see “The Query Editor and XML” on page 293). Adding page nodes to your query allows you to group the query nodes. When you display a custom Dataform, associations are displayed on tabbed pages according to the groups you created in the query. Page nodes can only display associations from the current level of a query. You cannot display a child association on a page node that is at a level above that of its immediate parent, unless it is part of a table display. Adding a page node To add a page node, highlight the data request node and select Add then Page from the Edit menu. You can type in a name for the page node when you create it. You can also rename a page node. The name of the page node in the Query Editor becomes the name of the tabbed page in the custom Dataform. 2-81 The Query Editor and Dataforms Page nodes added automatically The base dataform uses the following processes to create page nodes automatically. Associations that have the original selected type as their source are grouped beneath it and not beneath a page node. When you use the Add, Associations option on the Edit menu, Sentences automatically adds page nodes for any superset, subset, or equivalent types that are related to the selected type and that are the source of one or more associations. Sentences also adds a page node for any instance specific associations. All the associations which have one of these related types as their source are grouped beneath the appropriate page node. Using page nodes To ensure that a query node is displayed on a specific page, drag the query node and drop it onto the page node. Only page nodes that are immediately subsidiary to the data request node are used in the Custom Dataform for the query. Page nodes created at lower levels in the query are used in child dataforms opened from the custom Dataform. Child Dataforms opened on targets or sources use the default Dataform for that type or the custom Dataform specified on the Dataform page of the Query node properties dialog (see “Query node Dataform properties page” on page 2-90). Rules for page nodes display on the Dataform The general rule for the display of page nodes in the dataform is that Sentences creates a tabbed page in the dataform for each page node that has child nodes, and displays the tabbed pages in a left-to-right order that matches the top-to-bottom order of the page nodes in the query. If the data request node of the query has any child nodes that are not allocated to page nodes, Sentences creates a tabbed page for the data request node. This is known as the default page. The top-to-bottom order position of the first child node that is not allocated to a page node in the Query Editor determines the left-to-right position of the default page on the custom Dataform. If the data request node of the query does not have any child nodes that are not allocated to page nodes then the default page displays only the name field for the type, or the target name if the data request is an association type. If you do not add page nodes to your query all the child nodes are displayed on the default page. If there is a page node with the same name as the data request node then the children of the page node and the unallocated children of the data request node are displayed 2-82 Sentences queries on the same page in the custom Dataform. This page is either a page created by the page node, or a page created by the unallocated child (or children) of the data request node, depending on which comes first in the top-to-bottom order of nodes in the Query Editor. The order of associations on the Dataform matches the top-tobottom order of nodes in the Query Editor When a custom Dataform is displayed, the tabbed page displayed to the user is known as the active page. On a create Dataform, the active page is always the first page, which contains the instance name. On an edit Dataform, the active page is the one containing data about the schema type selected in the schema pane. On a child Dataform, the active page is the one with data about the instance’s type. On a Dataform opened from the picker Applet the active page is the one containing data about the schema type specified in the LazyType=<type> parameter. Query node Properties dialog You can display the query node Properties dialog for the root node of a query, for other data nodes, and for page nodes. Source and target data nodes do not have properties. To display the Properties dialog, highlight the node and select Properties from the shortcut menu, or select Properties from the Edit menu, or press Ctrl + p. • Properties dialog for root nodes The Properties dialog for the root node contains the Format properties page (see “Query node Format properties page” on page 2-84) and the XSL Stylesheet properties page (see “Query node XSL Stylesheet properties page” on page 2-85). If the root node is an association type the dialog also includes the Dataform navigation properties page (see “Query node Dataform properties page” on page 290). • Properties dialog for data nodes The Properties dialog for data nodes contains the Format properties page and the Dataform properties page. If the node has a derivation set for it, the Properties dialog includes the Derivations properties page (see “Derivation properties” on page 2-43). • Properties dialog for page nodes The Properties dialog for a page node contains the XSL Stylesheet properties page only. 2-83 The Query Editor and Dataforms • Properties dialog for derived type nodes The properties dialog for a derived type node contains the Format properties page (see “Query node Format properties page” on page 2-84) and the Datatype properties page (see “Derived type node properties dialog” on page 2-41). The Read-only on Dataform property is always selected on the Format page for a derived type and cannot be changed. • Properties dialog for transitive closure nodes The properties dialog for a transitive closure node contains the Format properties page (see “Query node Format properties page” on page 2-84) and the Transitive Closure properties page (see “Transitive Closure node properties page” on page 292). 2-84 Sentences queries Query node Format properties page Figure 7-26 Query node properties dialog Format page The Format page is available for the root node and other nodes in the query, including derived type nodes. This page is identical to the Format page which is available from the Sentences Explorer for entity types and association types. Format options chosen in the Query Editor apply to the display of query results, and to custom Dataforms based on queries. The choices made in the Query Editor override any choices made in the Explorer.In the same way that you can override the format properties of an entity type on an association type that targets the entity type, you can also override the format properties for a query node based on an entity or association type. 2-85 The Query Editor and Dataforms Sentences uses the formatting options you define for a node if the Output option chosen for exporting or viewing XML results is Formatted. If the Output option for XML results is Unformatted, the formatting options for the node are ignored. For details of each of the settings on the Format page see “Format properties page” on page 1-188. Effects of using the Restore Default Settings button The effects of using the Restore Default Settings button vary according to the type of node concerned: • Entity type Pressing the Restore Default Settings button for an entity type restores the format properties to the defaults for the selected datatype (including the <None> datatype). • Association type Pressing the Restore Default Settings button for an association type restores the format properties to the settings chosen for the target entity or association type. If the target is an association type, the settings for its target are used (iteratively until there is a target which is an entity type). • Query request node Pressing the Restore Default Settings button for an query request node restores the format properties to the settings chosen for the type that the request node is based on. • Query derived type Pressing the Restore Default Settings button for an query derived type restores the format properties to the defaults for the datatype chosen on the Derived Type Datatype Properties page. Query node XSL Stylesheet properties page The XSL Stylesheet page on the properties dialog is available for the query root node and for page nodes. When you select View XML Results or Export XML Results and also choose Generate as the XSL Stylesheet option, Sentences uses the options defined on the XSL Stylesheet properties page to create the stylesheet used for transforming the query output (see “XSL Stylesheet options” on page 295). The options selected for the query root node apply to the entire query output, unless there are page nodes which have their own XSL stylesheet properties defined. 2-86 Sentences queries Where page nodes exist, the settings defined for the page node only apply to the output of the associations which are children of the page node, and the settings for the query root node apply to all the associations which are not children of page nodes. Figure 7-27 Query node properties dialog XSL stylesheet page • Layout There are three options for the stylesheet layout. Horizontal layout (the default) gives a presentation in a simple table with multiple associations shown as extra rows. The first column of the table represents the root node or page node, with the node name as the column heading, and the subsequent columns represent the child associations of the root node or page node, with the association names (the verb names) used as the column headings. Where the query results include multiple associations, each instance of the multiple association is 2-87 The Query Editor and Dataforms shown on a separate row. An example of the Horizontal layout, with the Show Grid option selected, is given in Figure 7-28. Figure 7-28 Example of the Horizontal layout Vertical (multiples in columns) gives a table presentation with multiple associations instances shown as columns. The first line of the table shows the name of the root node or page node instance, and subsequent lines show the child associations of the root node or page node, with separate columns for each instance of a multiple association. An example of the Vertical (multiples in columns) layout, with the Show Grid option selected, is given in Figure 7-29. Please note that when you select Generate as the XSL Stylesheet option, the width of individual 2-88 Sentences queries columns cannot be controlled. To control column width you need to create your own stylesheet. Figure 7-29 Example of the Vertical (multiples in columns) layout Vertical (multiples in rows) gives a table presentation with multiple associations instances shown as additional rows. The first line of the table shows the name of the root node or page node instance, and subsequent lines show the child associations of the root node or page node, with additional rows for each instance of a multiple association. An example of the Vertical (multiples in rows) layout, with the Show Grid option selected, is given in Figure 7-30. Please note that when you select Generate as the XSL Stylesheet option, the width of individual columns cannot be controlled. To control column width you need to create your own stylesheet. 2-89 The Query Editor and Dataforms Figure 7-30 Example of the Vertical (multiples in rows) layout When a query contains one or more page nodes you can define separate layout options for each page node. You may wish to experiment with the layout options to find the ideal layout for your query results. • Background colour The background colour option allows you to select a background colour. When you choose the Select colour option the Choose colour button becomes active. Click the Choose colour button to select a colour from the colour palette. 2-90 Sentences queries • Show grid Check the Show grid checkbox to display a table border around each table cell in the query output. • Show separator Check the Show separator checkbox to display a separator line between each set of results in the query output. • Add printing page breaks Check the Add printing page breaks checkbox to add a printing page break to the XSL stylesheet. When a results page based on a generated stylesheet is printed there is a page break before each set of results produced by the node (except for the first set of results produced by the data request node. Query node Dataform properties page The Dataform properties page is available for nodes that are based on association types, and is used to define the behaviour of the association’s target in a custom Dataform. To view the page select Properties from the Edit menu or from the shortcut menu on the node. 2-91 The Query Editor and Dataforms Figure 7-31 The Query node Dataform Properties dialog The example shown in Figure 7-31 is for an association type node Next of kin that has the target Person. You can set the following properties on this dialog: Can select <target> checkbox Select this property to allow users to select a target instance from an appropriate list of instances. Can create <target> checkbox Select this property to allow users to create a target instance of the appropriate type. 2-92 Sentences queries Navigation Select the navigation behaviour for links from the target field. The options are Prohibited; Default Dataform; or, where a custom Dataforms exists for the target type, a Specific custom Dataform. If no custom Dataforms exist for the target type, a message is displayed on the dialog, as illustrated in Figure 7-31. If navigation is Prohibited you cannot open a child dataform for an existing target instance, although you may be able to create a new child instance if the Can create <target> checkbox is selected. <target> Dataform is read only checkbox If the Dataform for the target instance is read only you may view the target Dataform but not alter any of the fields on it. If navigation is Prohibited this option is not available. Interaction between properties If the Navigation property is set to Prohibited then the <target> Dataform is read only checkbox is unavailable. If the association type is read only, or has a derivation that is Not Editable (see “Derivation properties” on page 2-43) then neither the Can select <target> checkbox nor the Can create <target> checkbox is available. Transitive Closure node properties page The Transitive Closure node properties page contains a single option to set the depth that the closure should search to. The default setting is unlimited. 2-93 The Query Editor and XML Figure 7-32 Transitive Closure node properties page The Query Editor and XML Note Access to certain XML features is controlled by settings in the Server.properties file. For information on how to check that the features you want to use are enabled see “Servlet access to Sentences” on page 1-75. This section describes how you can use the Query Editor to create an XML document which you can view or export to a file, and to export an XML Document Type Definition (DTD). More information on the ways in which you can use XML, including how to use XML to import data into a Sentences database is given in Chapter 8, “Sentences and XML”. You can also export a Sentences schema to XML (see “Export Sentences schema to XML” on page 2-107). 2-94 Sentences queries XML properties dialog The XML properties dialog allows you to control the characteristics of XML output from a query. To set the XML properties for a query, select Properties from the Query menu, and select the XML page. The properties set in this way are the default for the query. The XML page shares the Properties dialog with the General properties page (see “General query properties dialog” on page 2-26). Each time you select Export XML Results or View XML Results Sentences displays a version of the XML properties page, which allows you to modify the settings for current execution of the query but does not change the defaults. Figure 7-33 The Query Properties dialog XML page Output options You can use the Output options to control the way Sentences converts database entities into character strings to be placed in XML elements. • Format The options for Output format are Formatted and Unformatted. 2-95 The Query Editor and XML • Formatted output uses the formatting defined for each type in the database schema to control the presentation of results data, with each line of a multi-line presentation represented as a _value element. • Unformatted output does not apply any formatting and each type is shown in its input format For more details on these options see “Output Format parameter” on page 2-116. • Element identifiers Some data request trees include references from one node to another, for example, when you bind a node to another node, or use recursive closure. Select the Use element identifiers property to ensure that each node has its own unique identifier (an ID attribute) to make sure that links between nodes are properly referenced in your XML output. Elements with the ID attribute set can be referred to by other elements using the IDREF attribute. Check the box to select this property. By default this property is not selected. For more details about this parameter see “Element IDs parameter” on page 2-116. • Include Sentences IDs Every type or instance in a Sentences database has a unique internal identifier (surrogate) that is usually hidden. When you rename a type or instance the internal identifier remains unchanged. Setting this property also allows an imported document to include lazy.id attributes where appropriate. For more details see “Include Sentences IDs” on page 2-126. Check the box to select this property. By default this property is not selected. XSL Stylesheet options You can modify the presentation of XML output by using an XSL stylesheet. The stylesheet can format the output as either XML, HTML, or text. Frequently an XSL Stylesheet is used to convert the machine-readable XML data stream output into a human-readable HTML page that can be viewed in a Web browser. If you have specified an XSL stylesheet that configures the data output as HTML most browsers typically open a new window displaying the HTML results. Sentences can automatically generate an XSL stylesheet for use with your query output (see “Query node XSL Stylesheet properties page” on page 2-85). 2-96 Sentences queries Alternatively you can specify the URL of an existing stylesheet, or use one of the example stylesheets supplied with Sentences which can be found in the / Stylesheets directory of your Sentences installation. You may choose one of the following options for XSL Stylesheets from the XML Properties dialog: • None Choose None if you do not wish to apply an XSL stylesheet to your query results. DTD reference You can use the DTD reference property to define the way your XML output is related to a DTD. For more information see “Document Type Declaration parameter” on page 2-115. • Generated If you choose Generated, Sentences automatically creates an XSL stylesheet for your query output which takes account of any formatting rules you have defined, and applies the stylesheet to the query output, before displaying the output on an HTML page. This option is not available if you select Unformatted as your Output option. Sentences takes account of the XSL stylesheet options defined for the query node, and for any page nodes, when it generates a stylesheet. For more details and for examples of output see “Query node XSL Stylesheet properties page” on page 2-85. Cascading stylesheet You can specify a full or relative URL for a cascading stylesheet (CSS file). A cascading stylesheet applies formatting to HTML pages produced when query output is transformed to HTML by an XSL stylesheet. Sentences provides a default CSS file in the <Sentences_home> \Tomcat4 \webapps\Sentences\CSS directory. You may add additional CSS files to this location. The default CSS file is named QueryResultsStylesheet.css. This stylesheet is set automatically for new queries but not for existing queries. You can reference the URL for cascading stylesheets in this location as shown in the following example: Css/QueryResultsStylesheet.css 2-97 The Query Editor and XML • Server Choose Server to specify or select an XSL stylesheet stored on the Sentences server. When you choose Server, you may either type in the name of a stylesheet, or select a stylesheet by clicking the ellipsis button. Sentences displays a file dialog (as shown in Figure 7-34), starting at the directory location indicated for stylesheets in the Server.properties file Stylesheets parameter, and including any subdirectories. Figure 7-34 XSL Stylesheet selection dialog You may select a stylesheet that you have previously exported from Sentences (see “Export XSL stylesheet” on page 2-99), if it is available in the Stylesheets directory location on the server. • URL Choose URL to specify the location of an XSL stylesheet using a URL. You may specify any relative or full URL to which the Sentences server has access. Node name considerations for XML output The name of the XML document is based on the name of the data request node at the root of the query tree. The name of each element defined in the DTD and appearing in the XML document is based on the name of one of the request nodes in the query tree. By default, these names are based on the names of the entity and association types on which they are based. 2-98 Sentences queries By default, both the name of the file containing your XML document, and the name of the root element of the XML document itself are based on the name of the query. You can name your query with this in mind You can determine the name of any of the child elements in the XML document by changing the name of the corresponding request node in your query. Element type names in XML must conform to restrictions not required in Sentences queries. XML element names may contain only letters, numbers, and periods. Spaces in Sentences query node names are converted to periods when they are used as XML element names. Create an XML DTD from a query To export a query definition as an XML DTD, select Export XML DTD definition from the Results menu. Sentences displays the File dialog. Select the directory and file name for your Document Type Definition and click Save. You can view the resulting DTD in a text editor, as shown in Figure 7-35. Figure 7-35 An XML DTD viewed in a text editor 2-99 The Query Editor and XML Export query results as XML To export the results of a query as XML, select Export XML results from the Results menu. Sentences displays a Properties dialog similar to the one illustrated in Figure 7-33. Select the properties you want for your results and click OK. If the query includes any parameters Sentences displays the Parameters dialog. Sentences then displays the File dialog. Select the directory and file name for your XML file and click Save. You can view the resulting XML in a text editor, as shown in Figure 7-36. Figure 7-36 XML results viewed in a text editor Export XSL stylesheet To generate an XSL stylesheet which matches the query definition without exporting the results of the query, select Export XSL stylesheet from the Results menu. 2-100 Sentences queries Sentences displays a file dialog which allows you to specify a location on your client machine for saving an XSL stylesheet based on the query definition, which Sentences generates automatically. View query results as XML To view the results of a query as XML, select View XML results from the Results menu. Sentences displays the XML Properties dialog, as shown in Figure 7-33. Select or modify the properties you want for your results and click OK. If the query includes any parameters Sentences displays the Parameters dialog. When Sentences processes the query it produces the results as a machine-readable XML data stream. You may choose to convert the XML data stream into a more readable format using an XSL stylesheet, as described in “XSL Stylesheet options” on page 2-95. If you do not wish to use an XSL stylesheet, the display of the XML data depends on which browser you are using and on how your browser is configured to handle XML data streams. Some Web browsers can automatically create a human-readable display of an XML data stream. For example, some versions of Internet Explorer display XML data by default as a colour-coded and indented display of both tags and data (as shown in Figure 7-37), while Netscape 6.2 displays XML data by default as an unformatted display of data only. 2-101 The Query Editor and XML Figure 7-37 Example of unformatted XML results viewed in Microsoft Internet Explorer You can greatly improve the readability of the XML output by specifying formatting instructions. You can do this by using either or both of the following methods: • setting formatting properties on query nodes, see the section “Query node Format properties page” on page 2-84 for more details, • specifying an XSL stylesheet, see the section “XSL Stylesheet options” on page 2-95for more details. Example stylesheets Sentences supplies two example stylesheets in the <Sentences_home>\Stylesheets directory. 2-102 Sentences queries Master.xsl example stylesheet The example shown in Figure 7-38 shows XML results formatted with the example stylesheet master.xsl. This stylesheet specifies HTML output. Figure 7-38 XML results formatted with the master.xsl example stylesheet The example shown in Figure 7-39shows XML results formatted with the example stylesheet table.xsl. This stylesheet specifies HTML output. 2-103 Exporting query results as CSV data Table.xsl example stylesheet Figure 7-39 XML results formatted with the table.xsl example stylesheet Exporting query results as CSV data You can export the results of a Sentences query as a CSV file, using the Export to CSV file… command in the Query Editor or the Sentences Explorer. You do not need to stop the Sentences server in order to run the Export to CSV file… command. By making the Export to CSV file… command part of the query system Sentences allows you to sort and select data from the Sentences database before you export it. Running CSV Export The CSV Export mechanism for queries is based on the type structure of the data request. The same data structure is applied to all the results derived from the query, and instances where associations do not exist are represented in the CSV file by empty values (“nulls”). 2-104 Sentences queries Derived type nodes may be included in the exported query result, as long as they are not at the top level of the data request. If there is a top level derived type node, Sentences cannot complete the CSV export operation and displays an error message. Hidden nodes are not included in the data that is exported. Sentences creates column headings in the resulting CSV file which are based on the node names in the query structure. To export the results of a query, open the query in the Query Editor, or select the query in the Sentences Explorer Queries folder. Select the Export to CSV file… command from the Results menu. In the Sentences Explorer this command is on the Results… submenu of the Query menu, and also on the shortcut menu for the query. Sentences displays a standard Open File dialog for your operating system. Navigate to the file location you require, type in a name for your CSV file and click Create. You can view the contents of your CSV file using a text editor or some spreadsheet programs. CSV Export and multiple associations There is a limit on the way Sentences exports the results of queries that include multiple associations. Only one multiple association can be exported in any given query, and it must be the last node of the exported query. If there are two or more multiple association nodes that share the same parent node, Sentences cannot complete the CSV export operation and displays an error message. Similarly if the multiple association node is followed by any other node, Sentences cannot complete the CSV export operation and displays an error message If the data you wish to export includes a number of multiple associations, you must construct a number of separate queries, each containing only one multiple association. For information on how to import multiple CSV files into one Sentences database see “CSV Import” on page 1-250. Chapter 8 Sentences and XML This chapter introduces XML, and explains how Sentences and XML can be used together. The topics described in this chapter are: • Introducing XML • XML Support in Sentences • XML input and output methods • Exporting a Sentences schema to XML • Sentences XML conventions • Setting XML options in the Query Editor Introducing XML XML is the Extensible Markup Language, which is the universal format for structured data and documents on the Web, developed under the auspices of the World Wide Web Consortium (W3C). More information about XML, and the complete XML standard, is available from the W3C Web site, http://www.w3c.org. XML Terminology This section provides an introduction to some of the technical terms used when discussing XML documents and XML processing. Well-formed XML An XML document is well-formed if it meets the well-formedness constraints defined in the XML 1.0 recommendation. A document which is not well-formed cannot truly be said to be an XML document at all. The rules for XML documents include the requirement that every start-tag must be matched by the corresponding end-tag, and that any element started between a pair of start and end tags must also finish between them. The DTD A Document Type Definition (DTD) is a series of statements that define the structure of an XML document. The DTD can be part of the document (an internal 2-106 Sentences and XML DTD) or the document can refer to an external DTD. The DTD lists the elements that are permitted in the document, and the sequences in which elements may occur. Valid XML To be valid, an XML document must meet the validity constraints defined in the XML 1.0 recommendation. It must not only conform to the rules of the XML grammar which make it well formed, but it must also conform to the document structure laid down in a DTD. A valid XML document must contain a document type declaration that refers to the DTD for that document. Elements in XML An XML document contains one or more elements, where an element is either text delimited by a start-tag and an end-tag, or an empty-element tag by itself. Here is an example of a start-tag and an end-tag: <Employee> </Employee> Start-tags and end-tags consist of a name enclosed in angle brackets (less-than and greater-than signs). The name is the name of an element type, and must be identical in both tags. Everything between the start-tag and the end-tag is the content of the element, which may consist of a mixture of text and other elements. Elements can be nested to any depth, but they must not overlap. Attributes in XML A start-tag may also contain attributes, in the form of name=value pairs, as follows: <img src="../images/barney.jpg"/> where img is the element type, src is the attribute name, and ../images/ barney.jpg is the value of the attribute. You can create a well-formed XML document using any names you choose for elements and attributes. For your XML document to be valid, the element and attribute names, and the arrangement of elements, must conform to the declared DTD. Extensible Stylesheet Language (XSL) The Extensible Stylesheet Language (XSL) is a language for expressing stylesheets. It is similar in its conception to the Cascading Style Sheets language (CSS) used in HTML, but it is far more powerful. 2-107 XML Support in Sentences The XSL language consists of two parts: • XSL Transformations (XSLT): a language for transforming XML documents. • An XML vocabulary for specifying formatting semantics (XSL Formatting Objects). Sentences does not use XSL Formatting Objects. All references to XML stylesheets in Sentences and its documentation refer to stylesheets using the XSLT language to express XSL Transformations. XML Support in Sentences The support for XML in Sentences Version 3.5 allows you to: • export a Sentences schema to XML • generate an XML Document Type Definition (DTD) from a query. • generate XML documents from the Sentences database using the structure defined by the DTD, and either save them in files or send them to a browser. • return a generated XML DTD or XML document in response to an HTTP request. • read externally-generated XML documents whose structure matches the DTD, and import the data into Sentences. Some of the detailed instructions for creating XML documents and DTDs are given in the section “The Query Editor and XML” on page 2-93. This chapter introduces some XML concepts and provides guidelines for the use of XML with Sentences. Note When you install Sentences some XML features are disabled. This is because you must apply your own web server security settings before enabling these features. For more information see “Servlet access to Sentences” on page 175. Sentences Version 3.5 does not currently support the proposed XML Schema standard. Export Sentences schema to XML Some of the detailed instructions for creating XML documents and DTDs are given in the section “The Query Editor and XML” on page 2-93. This chapter introduces some XML concepts and provides guidelines for the use of XML with Sentences. 2-108 Sentences and XML Note When you install Sentences some XML features are disabled. This is because you must apply your own web server security settings before enabling these features. For more information see “Servlet access to Sentences” on page 175. Sentences Version 3.5 does not currently support the proposed XML Schema standard. You can export a Sentences database schema to an XML file. This file can be saved or viewed in a browser window. This process is similar to the export of query results to XML (see “The Query Editor and XML” on page 2-93)(see “The Query Editor and XML”). When you select Export Schema to XML or View Schema in XML from the Schema menu Sentences displays the XML Properties page, which allows you to define XML properties. Figure 8-40 The XML properties dialog for schema export Output options for XML export of schema The Output options control the way Sentences converts database entities into character strings to be placed in XML elements. • Format The options for Output format are Formatted and Unformatted. • Formatted Association type names are displayed as source, verb, and target 2-109 Export Sentences schema to XML • Unformatted Association type names are displayed as verbs only. XSL Stylesheet options for XML export of schema You can modify the presentation of XML output by using an XSL stylesheet. The stylesheet can format the output as either XML, HTML, or text. Frequently an XSL Stylesheet is used to convert the machine-readable XML data stream output into a human-readable HTML page that can be viewed in a Web browser. If you have specified an XSL stylesheet that configures the data output as HTML most browsers typically open a new window displaying the HTML results. You can specify the URL of an existing stylesheet, or use one of the example stylesheets supplied with Sentences which can be found in the /Stylesheets directory of your Sentences installation. The option to Generate an XSL stylesheet which is available when you export the results of a Sentences query as XML is not available when you export a Sentences schema as XML. Choose one of the following options for XSL Stylesheets: • None Choose None if you do not wish to apply an XSL stylesheet to your query results. You cannot specify a DTD reference when you export a Sentences schema to XML. • Server Choose Server to specify or select an XSL stylesheet stored on the Sentences server. When you choose Server, you may either type in the name of a stylesheet, or select a stylesheet by clicking the ellipsis button. Sentences displays a file dialog (as shown in Figure 8-41), starting at the directory location indicated for stylesheets in the Server.properties file Stylesheets parameter, and including any subdirectories. 2-110 Sentences and XML Figure 8-41 XSL Stylesheet selection dialog • URL Choose URL to specify the location of an XSL stylesheet using a URL. You may specify any relative or full URL to which the Sentences server has access. XML data input and output methods There are a number of methods for getting data from XML documents into and out of Sentences, as follows: • using the Query Editor • using a servlet • using command-line tools • using the Sentences API Note Only the command-line tools and the Query Editor are available in the Sentences Personal Edition. Importing XML data You can import data from an XML document into a Sentences database when the XML document conforms to a DTD generated from a Sentences query. You cannot import data from arbitrary XML documents into a Sentences database. 2-111 XML data input and output methods Using the Query Editor The Sentences Query Editor is the principal tool for creating XML structures that can be used for exchanging data between Sentences and XML documents. To create an XML document from Sentences you must first create a Sentences query. Sentences uses the data request structure of the query tree to produce a DTD. Sentences produces an XML document from the query which conforms to the DTD produced from the query’s structure. The XML document contains the same data as the result of the query. The Query Editor has commands to: • retrieve the DTD corresponding to a query, and save it to a file • execute the query, convert the results to XML, optionally apply a stylesheet to it, and save the resulting document to a file • execute the query, convert the results to XML, optionally apply a stylesheet to it, and display the results in the user's browser For details of how to use these commands in the Query Editor, see “The Query Editor and XML” on page 2-93. Note XML documents and DTDs cannot be created from Set Queries. Using Servlets It is possible to access the Sentences server directly by using a specific servlet. Sentences supplies a number of different servlets for different features (see “Servlet access to Sentences” on page 1-75). Some of these servlets are deliberately disabled when you install Sentences and need to be enabled on your Web server before you can use them. Using a servlet to access a generated DTD Access to some XML features is available through the servlet mechanism. Sentences generates DTDs as they are required, and does not store them. The Sentences Enterprise Edition includes a special DTD servlet for this purpose. Note In the Sentences Personal Edition, you can only use the DTD servlet URL internally with the XML Import command-line program. 2-112 Sentences and XML You can access a generated DTD by specifying a URL, which defines the profile name and the name of a stored query for which the DTD specification is required. The following is an example of a URL to access a DTD: http://lazyws30:8090/Sentences/DTD/Human%20resources/EmployeeQuery In this example: http indicates the protocol to be used lazyws30:8090 gives the host name and port number Sentences identifies this URL as belonging to the Sentences web application. This is the servlet context defined for the Sentences installation. DTD indicates that a DTD is required, and routes the request to the Sentences DTD servlet Human%20resources is the name of the profile, with “%20” substituted for the space, as required by URL mapping rules EmployeeQuery is the name of the stored query whose DTD is required. When you retrieve a DTD using a servlet there is no provision for specifying parameter values, as they cannot affect the DTD. Using a servlet to access XML It is possible to access the Sentences server directly by using a specific servlet. Sentences supplies a number of different servlets for different features (see “Servlet access to Sentences” on page 1-75). Some of these servlets are deliberately disabled when you install Sentences and need to be enabled on your Web server before you can use them. The Sentences Enterprise Edition includes an XML Export servlet which accepts URLs to generate XML documents from stored queries. An example of this kind of URL is as follows: http://lazyws30:8090/Sentences/XML/Human%20resources/EmployeeQuery 2-113 XML data input and output methods in which: http indicates the protocol to be used lazyws30:8090 gives the host name and port number Sentences identifies this URL as belonging to the Sentences web application. This is the servlet context defined for the Sentences installation. XML indicates that XML output is required, and routes the request to the Sentences XML servlet Human%20resources is the name of the profile, with “%20” substituted for the space, as required by URL mapping rules EmployeeQuery is the name of the stored query whose DTD and XML results are required. You can use an HTTP GET request with this URL to execute the query without supplying any parameter values. This generates an XML document without a document type declaration and without any stylesheet processing. You can add parameter values to generate a document type declaration or stylesheet processing or both. Adding parameter values to servlet requests You can add parameters to servlet requests to supply values for the parameters used in the query and to control the way the output document is generated. There are two ways of supplying parameter values to servlet requests. You can extend an HTTP GET request with a query string, consisting of name=value pairs, like this: http://…/EmployeeQuery?Project=CRM+development&Skill=Java Alternatively, you can supply the name=value pairs using an HTTP POST request, for example from an HTML form. Parameter names are not case sensitive. If parameter names or values contain spaces or other special characters, Sentences uses normal URL encoding. In the example URL shown above the space in the profile name CRM development is replaced by a “+” sign as in CRM+development. 2-114 Sentences and XML Some specific parameter names are used to control the XML generation process, and should not be used for parameters within queries that are to be accessed with this XML mechanism. These parameters, which are described in the following sections, are: stylesheet, doctype, format, elementids, and lazyids. Each of these reserved parameters corresponds to an option that can be set and saved for a Sentences query, using the Query Properties dialog (see “XML properties dialog” on page 2-94). If you supply a parameter value with the HTTP request it overrides the parameter value saved with the query. • Stylesheet parameter Sentences can produce results in XML, HTML, or text format according to the stylesheet specified. The stylesheet parameter specifies the stylesheet processing on the XML results returned from a saved Sentences query. The format of the stylesheet parameter may be one of the following: stylesheet=<stylesheetURL> where <stylesheetURL> represents the full or relative URL from which the stylesheet can be retrieved stylesheet=generated Sentences uses an XSL Stylesheet generated automatically from the query stylesheet=none no XSL stylesheet is used For more information see “Query node XSL Stylesheet properties page” on page 285 and “XSL Stylesheet options” on page 2-95). If you specify a stylesheet URL, you may either specify an absolute URL, or use a URL that is relative to a fixed base, which is defined by the StylesheetURLBase parameter in the Server.properties file. When the stylesheet parameter is used, Sentences retrieves the stylesheet, or generates a stylesheet, and uses it to process the query results, which are then returned as the response from the servlet. Note Stylesheet processing is handled by the Sentences XML servlet, not by the browser. A specified stylesheet must conform to the XSL Transformations specification. The content type of the resulting document is application/xml, unless the stylesheet 2-115 XML data input and output methods includes an xsl-output element defining a method of html or text. For example, a stylesheet used to generate an HTML page from an XML document should start like this: <?xml version="1.0"?> <xsl:stylesheet xmlns:xsl="http://www.w3.org/1999/XSL/Transform" version="1.0"> <xsl:output method="html" /> You can set the content type of your processed XML document to text/html by setting the stylesheet output method to html . You can set the content type of your processed XML document to text/plain by setting the stylesheet output method to text. The Xalan stylesheet processor supplied with Sentences automatically switches the output mode to HTML if the first element generated is <HTML>, but by itself this does not produce a document with a content type of text/html. • Document Type Declaration parameter You can use the doctype parameter to specify the location of the Document Type Declaration which is required for XML results returned from a saved Sentences query. There are three possible values for this parameter: doctype=external The XML file contains a reference to a DTD located by an external URL, for example: <!DOCTYPE root-element SYSTEM "http://..."> doctype=internal The DTD is embedded in the XML document. A simple example would be: <!DOCTYPE people [ <!ELEMENT people (Person*)> <!ELEMENT Person (#PCDATA)> ]> doctype=none The XML file does not refer to a DTD at all. (default) If you wish to export an XML document that you later wish to import into a Sentences database, you must set the doctype parameter to external. 2-116 Sentences and XML • Output Format parameter You can use the format parameter to specify the format of the text included in each element. This may have one of two possible values: formatted (default) unformatted Uses the formatting defined in the schema and query. Entities with multi-line presentation are represented as a list of _value elements. as described in “Split multiple lines” on page 2-125. This setting is recommended if you want to convert the XML into HTML. Formatting is not applied, and each entity is shown in its input format. Each entity maps to a single element, and new lines are included in the text. Use this setting when you want to import your XML output into another application or database. • Element IDs parameter You can use the elementids parameter to specify whether Sentences includes an XML ID attribute on every complex element (see “Using Element IDs” on page 2127). The possible values for this parameter are elementids=true and elementids=false. • Sentences IDs parameter You can use the lazyids parameter to specify whether Sentences includes internal identifiers with every complex element (see “Include Sentences IDs” on page 2126). The possible values for this parameter are lazyids=true and lazyids=false. XML import using a servlet You can import data from an XML document into Sentences if that document references and conforms to the DTD that would be generated from a saved Sentences query. You can then configure the Enterprise Edition of Sentences to accept an XML document using an HTTP POST request. The URL for the XML import is fixed for each Sentences installation, for example: http://lazyws30:8090/Sentences/ImportXML 2-117 XML data input and output methods where http indicates the protocol being used lazyws30:8090 gives the host name and port number Sentences identifies the servlet context defined for the Sentences installation ImportXML routes the request to the Sentences ImportXML servlet Note The host name, port number, and servlet context may vary from one Sentences installation to another The DTD that the imported document refers to must be specified as the URL of the DTD generated from the required Sentences query. This URL must refer to exactly the same host name, port number, and servlet contexts that are used in the URL for the XML Import. Sentences re-generates the DTD and uses it to validate the incoming document. If the query has changed since the DTD used as a template for the import was exported, the import fails. If the incoming document specifies a stylesheet to be applied before the incoming data is parsed the stylesheet must specify the appropriate URL for the DTD. The nature of the imported data, and where it is stored, are determined by the DTD referenced by the imported document, which specifies the Sentences profile and query name which are used. Importing XML does not use parameter values as they cannot affect the import process. Stylesheet Processing An XML document that is imported into Sentences may contain a processing instruction to specify a stylesheet to be applied to the incoming data before it is parsed. For example, it may refer to a stylesheet as follows: <?xml-stylesheet type="text/xsl" href="emplist.xsl"?> The stylesheet name is a URL, which is either absolute or relative to the location defined for StylesheetURLBase property in the Server.properties file. 2-118 Sentences and XML XML Import and triggers Whenever you use the ImportXML command Sentences checks whether there are any triggers in the schema that are attached to the entity types affected by the import. Any triggers found are run on the data that is being imported. This may affect the data that is imported, or may cause the import procedure to stop before it is completed. You can define an entity type in Sentences to have its instances named by a trigger (see “Instance name created by trigger” on page 1-178). When you are using XML Import with data that includes this kind of entity type, you must allow for the creation of the entity name by including an empty value string, in the format: <value><\value> If this value string is not empty, the trigger produces an error message and the import fails. XML Import in multi-user environments Sentences does not check for the possibility of parallel updates when a database is updated using XML Import. It is possible that, in multi-user environments, updates may have been made to the database between the time that an XML Export was performed and the time that a corresponding XML Import was performed. XML Import and derivations Using XML Import has the same effect as selecting an instance and opening a custom Dataform for it and then updating association targets. Amongst other things, this means that any Calculate once derivations that would be shown on a custom Dataform are updated when you use XML Import. If the derivation is part of the target of a multiple association type, then the derivation for each existing target instance is calculated, as well as the derivation for any instance created or updated by XML Import. Mapping XML Data Every element in an imported XML document is mapped to an instance in the Sentences database. By default, Sentences uses an existing instance where one exists. If no suitable instance exists, Sentences creates a new instance. 2-119 XML data input and output methods The following mappings are used: entity instance an existing entity instance with the same name association instance an existing association instance linking the same source and target. Action attributes You can force the XML Import process either to create a new instance or to reuse an existing instance by including an action attribute on the XML element, as follows: <Person action="create"> The default value for the action attribute is reuse. The possible values for the action attribute are as follows: action="create" Creates a new instance for this element, regardless of whether a suitable instance already exists. This can create duplicates, which are not permitted with singular association types, resulting in an error. To avoid this error use set, rather than create, with singular association types. action="set" If no instance exists, set creates an instance. If an instance exists, set overwrites it. Set may only be used with singular association types. action="reuse" Refers to an existing suitable instance if there is one, and create a new instance otherwise. This is the default. action="required" Refers to an existing instance. If a suitable instance does not exist, then the import process fails. You can refer to an instance created earlier in the same import process. action=”delete” Deletes an existing instance. If a suitable instance does not exist, then the import process fails. 2-120 Sentences and XML You can use the action attribute on an element representing an entity which is not a value or on an element representing an association. You cannot use the action attribute on elements representing values. If the XML document being imported is based on a query that uses Sentences IDs, you can require the use of a particular instance, or delete a particular instance, by including its Sentences ID as a lazy.id attribute, as follows: <Person lazy.id="2/23478"> See “Include Sentences IDs” on page 2-126 for more information on using Sentences IDs. Do not use the action="required" attribute with the lazy.id attribute. If the type identified by the given Sentences ID cannot be found, or if it is not an occurrence of the correct Sentences type, then the import fails. You can use the lazy.id attribute on an element representing an entity which is not a value or on an element representing an association. You cannot use the lazy.id attribute on elements representing values. If the XML document being imported is based on a query that uses Element IDs, then any complex element in the imported document can be replaced by a reference element referring to an earlier element of the same type. See “Using Element IDs” on page 2-127 for more details. Using command line tools You can use a command line program to perform an XML export or an XML Import with the Sentences Enterprise Edition or the Sentences Personal Edition. Like the other Sentences command-line tools, these programs require exclusive access to the Sentences database. This means that the Sentences server or the Sentences Personal Edition application must be closed down before you can use this command line procedure. XML Export using the command line The command line for XML export looks like this: ExportXML [options] <profile name> <query name> 2-121 XML data input and output methods where <profile name> is the name of a Sentences profile, and <query name> is the name of a saved query in that profile, and[options] includes any of the following optional settings: -file <output file name> Specifies an output file. By default the results are written to standard output. -stylesheet <stylesheet file name> Specifies stylesheet processing (see “Stylesheet parameter” on page 2-114). -parameter name=value Supplies a value for a query parameter (see “Adding parameter values to servlet requests” on page 2-113). This option can be repeated as many times as necessary. -doctype[external|internal|none] Specifies the type of document type declaration required (see “Document Type Declaration parameter” on page 2115). -format [formatted|unformatted] Specifies a format mode(see “Output Format parameter” on page 2-116). -elementids [true|false] Defines the use of element IDs (see “Element IDs parameter” on page 2116). -lazyids [true|false] Defines the inclusion of Sentences IDs (see “Sentences IDs parameter” on page 2-116). Note that option names and parameter names are not case sensitive. If a parameter name or value includes spaces or an equals sign, the whole name=value pair should be enclosed in quotation marks, for example: -parameter "Customer name=John Smith" XML import using the command line The XML Import command-line procedure can be used for importing data into the Enterprise Edition in batch mode, without the need to configure the XML Import 2-122 Sentences and XML servlet or to set up security for it. The command-line procedure can also be used with the Sentences Personal Edition. The command line for Import XML looks like this: ImportXML -file <input file name> where <input file name> specifies the input file name. Any document that you import must include a reference to a DTD. It may also have a reference to a stylesheet. The DTD reference should refer to a saved Sentences query and should have the following format: http://localhost/Sentences/DTD/Human%20resources/ EmployeeQuery where http://localhost/Sentences/DTD/ is fixed and must appear exactly as shown (except that any port number present is ignored), and /Human%20resources/EmployeeQuery is an example of a profile name and a stored query name. Note that this URL may differ from that in the XML which would be exported from the same query using an external DTD. When you use the command line XML import procedure Sentences generates the DTD from the specified query and passes it to the XML parser to validate the document. There is no actual network access involved. Online importing When you are using the Enterprise Edition you may wish to make occasional data imports from XML documents without stopping the server. If the XML Import servlet is running, you can import data from XML documents by making HTTP POST requests, using any suitable client tool. For more details about the HTTP POST request see“XML import using a servlet” on page 2-116. Using the Sentences API You can use the Sentences API for a number of XML related tasks including: • defining a query • executing a query to return Java objects for use in the program • sending the corresponding DTD to a supplied output stream 2-123 Sentences XML conventions • executing the query and sending the results as an XML document to a supplied output stream • executing the query to generate an XML document, applying a stylesheet to it, and returning a URL which can be used to retrieve the resulting document You cannot use the Sentences API for XML import tasks. For more details about using the Sentences API see Chapter 10, “Customising Sentences”. Using alternative parsers and stylesheet processors Sentences is built with the Xerces XML parser and the Xalan XSL transformation engine, both of which have been developed by the Apache Software Foundation. Sentences accesses the transformation and parsing capabilities by using the Java API for XML Processing (JAXP) standard published by Sun Microsystems Inc. You can use an alternative parser or transformation engine by including the appropriate JAR files on the servlet container's classpath, in place of the JAR files supplied. When using the current version of Xerces with Sentences, you must specify the class name for XML parsing in the XmlParserClass property in the Server.properties file, for example: XmlParserClass= org.apache.xerces.parsers.SAXParser Sentences XML conventions Sentences uses a number of simple rules to generate XML, and XML documents to be imported into Sentences must follow the same rules. If you wish to import data from an XML document that does not conform to these rules you must create your own stylesheets to map data using other conventions. The rules are described in the following sections. Use content, not attributes All data is held as content, not attributes. For example, a person's telephone number must appear as content, like this: <home.telephone>(210) 182 0932</home.telephone> It must not appear as an attribute, like this: <Person ... home.telephone="(210) 182 0932"> Using content results in a slightly longer representation than using attributes, but it allows for the possibility that each data value can have its own attributes. 2-124 Sentences and XML Associations appear as child elements Associations linked to an entity or association appear as child elements of the element corresponding to that entity or association. The sample of XML output in Figure 8-1 is an extract of employee data from the example Human resources example application, and shows associations linked as child elements. <Employee> <_value>Harold Ferny</_value> <email.address>mailto: [email protected]</email.address> <event> <Date>01/01/1997</Date> <event1> <Event>Joined</Event> </event1> <job.title> <Job.title>Junior Systems Administrator</Job.title> </job.title> <salary>$35,000</salary> ... </event> </Employee> Figure 8-1 Example of XML output The employee's e-mail address is held in Sentences as an association, and so it appears as a child element. Similarly, employment events are held as associations of type (Employee, event, Date), which have associations of their own in turn. The event element has a child called Date to hold its target, alongside other child elements such as event1 and job.title representing associations sourced on the association (Harold Ferny, event, 1/1/97). Mixed content is not allowed All element types are declared to have either element content or character data, but not both. This ensures that the validation of imported XML documents provides a useful check against the structure that Sentences is expecting. This rule means that, where a Sentences entity has both its name and associations included in the XML document, then a new element must be created to hold the name. This element is always called _value. The Employee entity in the Figure 8-1 shows this. 2-125 Sentences XML conventions Derived element type names Element type names in an XML document must follow the rules laid down in the XML recommendation. Only a restricted set of characters are allowed, and names must be unique within a document type. Sentences derives element type names from query node names, which are not restricted in this way. Sentences uses a simple mapping algorithm to do this: • if the name does not start with a letter, an X is inserted at the beginning • any characters other than numbers, letters, or spaces are removed • all spaces are replaced by period (“.”) characters • if the resulting name clashes with a name already used in this document type, a number is appended to make it unique. The effects of these rules can be seen in the Figure 8-1, for example event1 which is distinguished from event, and job.title which has a period separating the words instead of a space. Split multiple lines Multiple lines of data may appear as multiple elements. If the format mode (see “Output Format parameter” on page 2-116) is set to formatted, then any entity type whose presentation is multi-line text box has its values split into lines, and each line appears as a separate _value element, as shown in Figure 8-2 <address> <Address> <_value>116, South Alfred Street,</_value> <_value>Brooklyn,</_value> <_value>NY 11217</_value> </Address> </address> Figure 8-2 Example of _value elements in XML output This format makes it possible to display the data in an HTML page with line breaks in appropriate places, which would not be possible just by including line breaks in the data, since these are not significant in HTML. 2-126 Sentences and XML If the data is not intended for mapping into HTML, you may want the address text as a single element. If the format mode is set to unformatted , the same data appears as follows: <address>116, South Alfred Street,
Brooklyn,
NY 11217</address> Line breaks in the data are shown as 
 which is the XML representation of a line-feed character. Allow the action attribute When you import data, you may want to specify whether an element should cause a new Sentences instance to be created, or not. See “Mapping XML Data” on page 2118 for a description of the use of the action attribute to control this. The DTD generated for a Sentences query always allows for the inclusion of an action attribute on every element where it applies, except for those corresponding to value types. Include Sentences IDs You may want to configure an application program to use XML Export to retrieve data from Sentences, and then to use XML Import to make changes to Sentences. For this to work successfully, you must make sure that the import process uses the same specific instances referred to in the exported data. You can do this by including Sentences IDs in the XML document. See “Sentences IDs parameter” on page 2116 and “Mapping XML Data” on page 2-118 for details of how achieve this. The lazy.id attribute is optional for importing data. Combining simple elements Sentences combines simple elements, that is, elements with no child elements, with their parent elements where appropriate. This happens in two types of situation. • If an entity type has no associations included in this query, and it is not being split into multiple lines, Sentences does not use the _value element. The name of each instance appears as the content of the corresponding element. For an example, see the Date entity type which appears as the target of (Employee, event, Date) in the Employee example shown in Figure 8-1. • If an association type has no associations included in this query, and its target is a value, then the target is combined with the association. The email.address element in the example in Figure 8-1 shows this. The full association type is 2-127 Setting XML options in the Query Editor (Employee, email address, Hyperlink), but as there are no dependent association types, Sentences does not use the Hyperlink element. Using Element IDs A deeply-nested query may include information about the same instance more than once, and the XML standard provides a way to avoid repeated data by allowing an element to have an attribute of the type id, which identifies it uniquely within the document, and other elements to refer to it by means of attributes of the type idref. You can ask Sentences to include element IDs, and to refer to them where appropriate, by setting the Use Element IDs option on the query (see “Element IDs parameter” on page 2-116). This option applies to all complex element types, but not to simple element types (see “Combining simple elements” on page 2-126). Including Element IDs has two effects, as follows: • Every element containing data has an id attribute, which is a label generated by Sentences, for example: <Employee id="N1"> <_value>Barney Norris</_value> • Wherever this element type can appear, it may be replaced by a reference element, which contains no data, but uses a ref attribute to refer to an earlier node, for example: <reference.to.Employee ref="N1"/> In most cases, this just serves to reduce the size of the document, but sometimes it is essential to prevent an infinite loop. Whenever an indirect query node occurs, both it and the node it refers to always use element IDs, to avoid the possibility of an infinite loop occurring. When the Include Element IDs option is set on a Sentences query, an XML document to be imported can also include ID attributes, and use reference elements to refer to the earlier elements. Setting XML options in the Query Editor You can use the Query Properties dialog in the Query Editor to set a number of default properties for XML output, including: • setting a default stylesheet • setting the default DTD reference (external, internal or none) • setting the output format 2-128 Sentences and XML • including XML Element IDs • including Sentences IDs These settings apply for XML import and export operations which use the query, unless they include their own settings which would override these. For detailed instructions for these settings, see “XML properties dialog” on page 2-94. You can also rename request nodes in the Query Editor to determine the name for your XML output document and the names of the XML elements in the document. For more details see “Node name considerations for XML output” on page 2-97. Chapter 9 Sentences diagrams This chapter describes how to work with the Sentences Diagram Editor. The topics described in this chapter are as follows: • creating diagrams • printing diagrams • exporting and importing diagrams The Diagram Editor The Sentences Diagram Editor displays entity and association types and other schema and data elements in a graphical layout. For example, an association type’s source and target are displayed as graphical objects with a line connecting them to represent the association type structure. This connecting line is labelled with the association type verb. The Diagram Editor can be used to explore and clarify an existing schema. It is not a tool for editing a schema or for creating new schema elements. Starting the Diagram Editor To start the Diagram Editor select Diagram Editor from the View Menu. 2-130 Sentences diagrams Figure 9-1 The Diagram Editor The Diagram Editor is shown in Figure 9-1. There can only be one Diagram Editor open at any time. While the Diagram Editor is open you cannot change the profile. If you close the Diagram Editor and reopen it without changing your profile, Sentences displays the last diagram you worked on. If you close the Diagram Editor, and change your profile, and then reopen the Diagram Editor, Sentences displays a blank diagram, although your Preferences settings are retained. Diagram Editor components The editor is made up of three components: the toolbar, a schema tree and the canvas. 2-131 The Diagram Editor Toolbar The toolbar gives quick access to frequently used actions. All the actions are available on the Diagram Editor File, Edit, or View menus or the from the Diagram Editor Preferences dialog. The toolbar buttons are described in the following table: Button Description Export - export the diagram Import - import an exported diagram Stops execution of queries Print Delete - deletes selected diagram elements Default Dataform - can be opened on diagram elements that represent instances Preferences - opens the Preferences Dialog Diagram quality - toggles between outline quality and presentation quality Increase and Decrease font size Zoom in and Zoom out Help 2-132 Sentences diagrams Schema tree The schema tree displays the same items as the schema tree in the Sentences Explorer. Canvas The canvas is where diagram elements are displayed. You can move elements freely on the canvas by dragging them with a mouse, or by using the Shift key and an arrow key on the keyboard. For more details see “Diagram elements” on page 2134. Diagram Editor preferences You can control the appearance of the canvas and the Diagram Editor in general by changing settings in the Preferences dialog. These settings are not retained from one session to another. 2-133 The Diagram Editor Figure 9-2 The Diagram Editor Preferences dialog To view the preferences dialog select Preferences from the View menu, or click the Preferences button on the toolbar. The following options can be adjusted on the Preferences dialog: • Font You can specify a font and adjust the size and style. The Preferences dialog displays a sample of the selected font. • Association type and association labels You can specify how association types and associations are labelled in the diagram. The labels may include the association verb, or association verb and target, or association source verb and target. • Zoom factor You can set the zoom factor for your drawing. The available values are from 10%, 25%, 50%, 75% 100% and 200%. You can also adjust the zoom factor directly by 2-134 Sentences diagrams selecting the magnifying glass buttons on the toolbar. The zoom factor controls the presentation of the diagram on the screen, and does not affect the printed output which is scaled automatically. • Diagram quality You can select either Outline Quality or Presentation Quality for the diagram. The Diagram Quality on the toolbar toggles between these two settings. • Results limit You can adjust the limit for the number of query results that can be placed on the diagram. The default value is 100. The Diagram Editor’s response time starts to slow down if there are too many elements on the canvas, and the readability of printed output is also affected. Diagram elements You can display Sentences schema and data items on the canvas. These include entity and association types, custom Dataforms, and queries. You can also display query results. Only one instance of any Sentences element can be displayed on the canvas. Diagram element types There are six types of diagram element that can be shown on the canvas. All diagram elements have their own shortcut menus for adding other relevant diagram elements. • Entity type diagram element An entity type is shown as a purple rectangle. Subset types are shown as yellow rectangles. Value types are shown as ovals. • Association type diagram element Association type diagram elements are lines that join the source and target, with the verb text displayed at a point along the line. In a normal diagram, straight lines are used and curved lines are shown in high quality diagrams. Lines for association types are purple, except for subset association types which are yellow. You can move the point at which the verb text is displayed by moving the verb text. The direction of the association is shown by an arrow. The verb text can have one of four formats, which can be selected on the Preferences dialog (see “Diagram Editor preferences” on page 2-132). 2-135 Diagram elements • Query diagram element The Query diagram element is a blue rectangle. There is a tool tip display to indicate what kind of query it is. You can add query results to a diagram. See “Adding Query Results” on page 2-137. • Custom Dataform diagram element The Custom Dataform Query diagram element is a dark grey rectangle. • Entity diagram element An entity diagram element is a cyan rectangle. A value entity is shown as a cyan oval. • Association diagram element Association diagram elements are lines that join the source and target, with the verb text displayed at a point along the line. In a normal diagram, straight lines are used and curved lines are shown in high quality diagrams. Lines for association diagram elements are cyan. Adding diagram elements To add a Sentences element to the Diagram Editor canvas you can drag it from the schema or data pane of the Sentences Explorer, or from the schema pane of the Diagram Editor or the Query Editor, or from the Query Editor results pane. Sentences places the new element wherever you drop it by releasing the mouse button. If the object you are adding to the canvas is an association type or association, and either the source or the target is already present on the canvas, Sentences creates a visual link to the source or target. You can also use the Edit menu, or the canvas shortcut menu, and select either Add Core Entity Types or Add All Entity Types to add elements to the canvas. Adding annotations, titles and legends You can add annotations, titles, and legends to the diagram on the canvas. • Annotations An annotation is a resizeable text box. You can freely edit the text. The font is the same size and style as defined for diagram elements. Annotation text boxes have a border and a light yellow background. 2-136 Sentences diagrams To add an annotation select Add Annotation from the Edit Menu or from the canvas shortcut menu. After you have created an annotation, you can edit it by selecting it and pressing F2, or by selecting Edit text from the shortcut menu. • Titles A title is a resizeable text box. You can freely edit the text. The font is the same style as defined for diagram elements, but 25% larger. Title text boxes have no border and no background. To add a title select Add Title from the Edit Menu or from the canvas shortcut menu. After you have created a title, you can edit it by selecting it and pressing F2, or by selecting Edit text from the shortcut menu. • Chapter Legends Chapter Legends are read-only. They show the name of the profile and a list of the chapters in it. If the Chapter Number option is set, then the chapter numbers are included in the Legend. You can resize a Chapter Legend box. The font used for Chapter Legends is the same style as defined for diagram elements, but 15% smaller. Chapter Legend text boxes have a light blue background and a border. Selecting diagram elements You can select a diagram element by clicking on it. To select more than one diagram element hold the Ctrl key and click on the elements. You can also select elements by dragging the mouse over them. The Diagram Editor displays a selection area, and all the elements inside the area or intersected by the selection boundary are selected. To select all the elements on the canvas, select Select All from the Edit menu or from the canvas shortcut menu, or press Ctrl+A. Deleting diagram elements To delete a diagram element, select Remove from the Edit menu or from the canvas shortcut menu. To remove all elements select Remove All from the Edit menu or from the canvas shortcut menu. 2-137 Adding Query Results Moving diagram elements To move a diagram element with the mouse, click on it and hold the mouse button while dragging it to a different position. To move a number of selected elements at the same time, press and hold the Ctrl key. You can use the keyboard to move diagram elements. Select an element and hold down the Shift key, and use the up, down, left and right arrow keys to move the element. Consistency with Sentences Explorer Some of the settings in the Sentences Explorer are automatically used in the Diagram Editor. • If Chapter numbers or Lazy IDs are displayed in the Sentences Explorer they are added to the names of the diagram elements on the canvas. • If you delete a schema or data element in the Sentences Explorer then any diagram element representing or depending on that schema or data element is removed. • If you rename a schema or data element in the Sentences Explorer then any diagram element representing or depending on that schema or data element is renamed. Adding Query Results You can display queries and their results on the diagram. To add query results to a selected query on the canvas select Add query results… from the Edit menu or from the shortcut menu. If you select Add query results… from the Edit menu when no query is selected, Sentences displays a picker showing the available queries. The Diagram Editor cursor changes to a precise cursor so that you can select the part of the canvas where the results should be displayed. To cancel placing the query results press Esc. There is a limit to the number of results that can be placed on the diagram. This limit can be set using the Preferences dialog (see “Diagram Editor preferences” on page 2-132). 2-138 Sentences diagrams Exporting and importing diagrams Sentences currently does not store diagrams in the database. However you can export a diagram as a file and then import it later. The export file includes all the diagram elements currently on the canvas, and all your current preferences. The export file contains data in a format that is relative to the current profile. You cannot export a diagram using one profile and import it using a different profile. The export file is also dependent on the current state of schema and data in the profile. If a diagram export file includes references to schema or data elements that have been deleted it cannot be imported into the Diagram Editor. When you import a diagram export file that includes temporary data such as query results based on derived types, only the persistent items are displayed and the temporary items are not displayed. Export To export a diagram, select Export diagram from the File menu. Sentences displays the file dialog for your system. Select a location and enter a file name, and click Export to export the diagram, or select Cancel to return to the Diagram Editor. We recommend using the file extension *.lzd to identify diagram export files. Import To import an exported diagram select Import diagram from the File menu. Sentences displays the file dialog for your system. Select a location and select a file name. Click Import diagram to import the diagram, or select Cancel to return to the Diagram Editor. Saving as a GIF file You may also save the current diagram as a GIF file. You can then work with the GIF file in any suitable graphics editing program, or import the GIF file into any suitable word processing program. To save a diagram as a GIF file, select Save as GIF from the File menu. Sentences displays the file dialog for your system. Select a location and enter a file name, and click Save to export the diagram, or select Cancel to return to the Diagram Editor. Printing You can print a diagram to a printer attached to your system. Printing is only supported for Sun Solaris and Microsoft Windows systems. 2-139 Printing The Diagram Editor automatically includes all the diagram elements that are on the canvas in the printed output. The entire diagram is scaled to fit onto a single page for printing. This means that the greater the number of diagram elements present on your canvas, the smaller the size of each element when you print your diagram. The Diagram Editor displays two paper edge guide lines to showing the right-hand and lower edge of the printed area. You may not place any diagram elements outside the printed area. You can choose either Portrait or Landscape orientation for printing. The position of the paper edge guide lines changes to match your selection. To change the paper orientation, select Page Setup from the File menu. To print your diagram, select Print from the File menu. Sentences displays the standard printing dialog for your system. 2-140 Sentences diagrams Chapter 10 Customising Sentences This chapter looks at some of the techniques you can use to customise Sentences: • you can use the Sentences API • you can create database triggers • you can create custom datatypes As all these techniques involve writing your own Java classes and methods and using parts of the Sentences API the information in this chapter is written for experienced programmers with knowledge of Java. Your Sentences installation includes some code examples that demonstrate the implementation of custom datatypes and triggers, and the client API. These examples are explained in Chapter 11, “Worked examples”. This chapter also describes how to create customised Help pages for your Sentences application, and includes notes on translation and localisation. Sentences API overview Note When you install Sentences some API features are disabled. You are recommended to implement security settings on your web server before you these features. For more information see “Servlet access to Sentences” on page 1-75. The Sentences Application Program Interface (API) is a programmatic interface to the Sentences database. It is a collection of Java classes which can be used to extend the functionality of Sentences. Using the Sentences API, programmers can write their own Java programs to customise and extend the functionality of Sentences. To use the Sentences API effectively you should have some understanding of the associative model of data and of Sentences, as well as experience in software development and thorough knowledge of the Java programming language. Instructions on how to write Java code are not given in this book. This section provides an overview only of the Sentences API, and is designed as an introduction to the more detailed information given in the online documentation. 2-142 Customising Sentences Comparing the Sentences Client API and Server API Sentences provides two different API systems, one for use on the client (the Client API) and one for use on the server (the Server API). Access to these API systems is through one or other of the gateway classes, ClientApi or ServerApi, which are both part of the package com.sentences.api. The Sentences Client API allows Java programs to access the Sentences database alongside other clients, such as the Sentences applet. You must make sure that your server is configured to allow Client API access by verifying the settings in the Server.properties file (see “Servlet access to Sentences” on page 1-75). An example of a client API program is given in the section “Client API example” on page 2-222. The Client API can execute queries. With regard to updates, the Client API, like the Sentences applet, packages transactions and only writes updates to the database when a transaction is committed (this is analogous to a user clicking the Save button on a parent Dataform). The Client API is not available with Sentences Personal Edition. The Sentences Server API is used by standalone Java programs which are executed on the server machine. The Server API cannot execute queries. Java programs that use the gateway class ServerApi require exclusive access to the database. Triggers are also written with the Server API, but they do not use the gateway class ServerAPI. With regard to updates, the Server API writes updates to the database immediately. Even though these updates are not made permanent until the transaction is committed, they are immediately available to the Server API program that made them. This makes the Server API useful for writing programs which must make very large updates to the database. Note Detailed information for programmers about the Sentences API is available in the online documentation installed with Sentences, starting in the file <Sentences_home>\Doc\api.html. The Javadoc files for the Sentences API can be found in <Sentences_home>\Doc\javadoc. Example code and online documentation This User’s Guide does not include code examples, but examples are included in the Sentences distribution. These items of example code can be found at: 2-143 Sentences API overview <Sentences_home>\Examples\com\sentences\examples The publicly-available classes and methods of the Sentences API are described in a series of online documents for programmers, which can be found at: <Sentences_home>Doc\api.html Program build and execution All Sentences API programs must be written in the Java programming language. All the tools and components necessary to build and run Java programs with Sentences are contained either in the standard Sentences Enterprise Edition delivery or in the Java Software Development Kit, which is available from Sun Microsystems. The current version of the Java Software Development Kit can be downloaded from Sun Microsystem’s Web site: http://java.sun.com. Sentences API programs can be built and run using the standard Java compilation (javac) and execution (java) utilities. API packages The Sentences API is divided into nine packages as follows: Package name Area com.sentences.api factory and helper classes for the API com.sentences.api.event interfaces for observing things stored in the Sentences database com.sentences.api.exceptions exception classes used in the API com.sentences.api.object classes and interfaces for Sentences datatypes com.sentences.api.objectui panels for changing the property values of a particular datatype com.sentences.api.request interfaces for creating and executing queries com.sentences.api.session interfaces for accessing the database 2-144 Customising Sentences Package name Area com.sentences.api.things interfaces for manipulating things in the database com.sentences.api.trigger classes and interfaces for triggers Class hierarchy The database class hierarchy, as used by the Sentences API, is shown in Figure 10-1 below. Figure 10-1 Class hierarchy for API Session view of database structure The terms entity, association, entity type and association type used in Figure 10-1 have the same meaning for the API as they have for any user of a Sentences schema or of Sentences data. Within the database they may also refer to, and serve to store, system defined properties, schema definition components, and other components used by Sentences for internal purposes. Anything that is stored in a Sentences database is represented as an object of one of the LazyThing subclasses shown above. The source or target of any association is a LazyThing. This class includes methods that apply to all database items, including deleting the item, retrieving associations involving the item, and many others. 2-145 Triggers The subclasses of LazyInstance represent instance data, rather than schema data. A LazyEntity corresponds to an entity instance. A LazyAssociation corresponds to an association, with a defined source and target. A LazyType is part of the schema. It represents anything that can have instances. The LazyType class includes methods relating to instances, and methods relating to supertypes and subsets. LazyEntityType and LazyAssociationType represent entity types and association types, respectively. Triggers Triggers in Sentences are similar to “stored procedures” in some other databases. To use a trigger, you first create your own Java code for the trigger using the Sentences API. To use a trigger, you must write your own Java code, compile the code into a Java archive (JAR) file, and place the JAR file in the directory listed in the TriggerPath property in the Server.properties file. Trigger code is assigned to an entity or association type in Sentences using the Triggers page of the Properties dialog. You can create generic trigger code that can be attached to more than one Sentences type. For example, you could create a trigger that would reject a delete request, and attach it to one or more entity or association types. Whenever a user tried to delete an instance of a type that had this trigger attached, the delete action would not be allowed. Note It is possible to prevent the deletion of instances in Sentences by selecting the Instances cannot be deleted property in the Properties dialog for the entity type or association type. When you design triggers, remember that one trigger may be used with more than one type and make sure your trigger can handle not only relevant notifications but also any non-relevant notification it may receive. Give your trigger a meaningful name, and make the trigger’s package and class names clear as well. This helps ensure that your trigger is assigned to appropriate cases. Server-side triggers Triggers are instances of Java classes which implement the LazyServerTrigger interface. You can associate a server side trigger with types through the Properties dialog (see “Triggers properties page” on page 1-203). 2-146 Customising Sentences Sentences triggers on relevant entity and association types can be invoked for the following database update events: Event When Fired Create an instance is created Delete an instance is deleted Rename an instance is renamed (only available for entity types) Association Moved a sequenced association is reordered (only available for association types) Attribute Changed an instance of the type has become, or has ceased to be, the source of an association; when an association is re-sequenced, deleted, added or superseded an Attribute Changed event is fired for the source of that association type Supersedes Added an instance is superseded Target Changed the target of an association is changed (only available for association types) Set Equivalent an instance has an equivalent assigned Remove Equivalents an equivalent instance is removed When invoked, a trigger can retrieve information related to the update event which has triggered it. Trigger code usually has dependencies on the Sentences schema it has been designed to work with. If the schema is changed, triggers may not operate correctly until the Sentences server has been stopped and restarted following the changes. The trigger code itself may need to be changed. Trigger examples For examples of how triggers may be used see Chapter 11, “Worked examples”. Java source code and a JAR file for some example triggers can be found in the \Examples directory of your Sentences installation. 2-147 Triggers Triggers and the Sentences API The Sentences API is described in a series of HTML files in the \Doc directory of your Sentences installation. There is an overview of the Sentences API in \Doc\api.html. This document contains links to sections on different aspects of using the Sentences API, including how to create triggers and custom datatypes. Installing a trigger To use a trigger, you must write your own Java code, compile the code into a Java archive (JAR) file, and place the JAR file in the directory listed in the TriggerPath property in the Server.properties file. You can then use the Triggers properties page to assign the trigger to a particular entity or association type. The detailed steps for attaching a trigger to an entity or association type, and how to edit trigger assignments are given in the next section. Attaching a trigger To view the list of triggers available on the Sentences server, select Triggers from the View menu. Sentences displays the Available Triggers list. Figure 10-2 The Available Triggers list 2-148 Customising Sentences You can expand a trigger node in the Available Trigger list to show the Java class name for the trigger, a brief description of the trigger, and a folder listing all the types currently using the trigger. To attach a trigger to an entity or association type, follow these steps: 1. Open the Properties dialog for the type and then open the Triggers page, shown in Figure 10-3. Figure 10-3 The Triggers page before triggers are assigned 2. Click the Add button. Sentences displays the Add Trigger Assignment dialog shown in Figure 10-4. This shows a list of all available triggers in the left hand list box and the set of possible trigger events shown on the right-hand side. Only the trigger events that are relevant to the type selected (entity or association) are available. Choose All to activate the trigger for all update events. If there are no server triggers available Sentences displays an error message. 2-149 Triggers Figure 10-4 The Add Trigger Assignment dialog 3. Select a trigger from the triggers list and select a trigger event, or All trigger events, and click OK. 4. The Triggers page now lists the assigned triggers and trigger events as shown in Figure 10-5. 2-150 Customising Sentences Figure 10-5 The Triggers page showing assigned triggers If you have more than one trigger for the same event you can change the order in which they are activated by highlighting a trigger event row and using the Move Up and Move Down buttons. To remove one or all triggers use the Remove or Remove All button. You can change the trigger event assignment for a trigger by highlighting a trigger event row and clicking the Edit button. Sentences displays the Edit Trigger Assignment dialog. This is similar to the Add Trigger Assignment dialog shown in Figure 10-4, except that the All option is not available. Trigger threading issues The Sentences server ensures that all transactions against a profile, and all updates within each transaction, are processed in series. As chapters may be shared between multiple profiles all chapters in a profile are locked during the processing of a transaction. Trigger code execution is completed within transaction processing and hence trigger code execution is always single-threaded. 2-151 Triggers A single trigger class may be used by multiple profiles, if appropriate. A new instance of the trigger is created for each profile. This means that when you write a Sentences trigger you only need to be concerned with threading issues with regard to class variables in your trigger classes and any shared instances of non-Sentences classes which their trigger code may make use of. Trigger invocation The notify()method of one or more triggers may be invoked one or more times when a given update is applied to the database. It is possible for a given trigger to be invoked more than once for what might appear to the end-user to be a single update. Triggers are only invoked as a result of updates being made to the database using the Sentences user interface, the Sentences API, by other triggers, or by the trigger itself while the trigger is active. Triggers are not invoked on instances of entity or association types which existed prior to the trigger being registered. Details of the update events for which triggers' notify() methods are invoked can be found in the Javadoc for the LazyServerTrigger.notify() method. The notify() method is invoked before the transaction is confirmed as being committed to the database. Transactions may be aborted if any update within it is vetoed, either by data validation rules built in to Sentences, or by a trigger, or if some unexpected failure occurs. For all events other than Delete events, the trigger code in the notify() method sees the content of the database as if the entire transaction had been committed, even though the database has not yet been updated. For Delete events, the trigger code in the notify() method sees the content of the database before the update has been made and so a delete trigger can inspect the database before any changes are made. In general, a trigger needs to inspect the event type that invoked it, the instance which was updated, and possibly also other instances in the Sentences database in order to determine what kind of update caused its invocation and what action should be taken. Triggers are not invoked when you click the Refresh button on a custom Dataform. They are invoked as normal when you click the Save button (see “Custom Dataform restrictions” on page 1-229). 2-152 Customising Sentences Trigger actions When the notify() method of a trigger is invoked, it can either veto the triggering update by throwing a LazyRuleViolation exception, or perform some other action which is appropriate when that update occurs. Trigger code and system validation rules that test for cardinality violations occur together for each distinct update in a transaction. For each update action in the transaction any notify() methods which exist for the affected types are called, followed by the application of the system checks. The updates are processed in series in the order in which they occur in the transaction. Customised validation (rules) A trigger can veto its triggering update by throwing a LazyRuleViolation exception if it considers that the update would be invalid, and this results in the update being aborted. If the aborted update is part of a transaction containing other updates, then all the updates in the transaction are aborted. If a trigger throws a LazyRuleViolation exception, Sentences alerts the user that unacceptable data has been entered. The trigger writer has a choice of constructors for the LazyRuleViolation, and this choice affects how Sentences communicates the error to the user. When an update initiated by a user is vetoed by a trigger, an error message is displayed in the Sentences Message Log. This is either the message returned by the trigger’s getDescription() method or the message encapsulated in the LazyRuleViolation, depending on which LazyRuleViolation constructor was used. In addition, in cases in which the trigger has provided the information, Sentences highlights the data which is invalid. This may not be possible in all cases, for example, where that data was entered on a child Dataform which has already been closed. Customised actions You can design a trigger that can take any action in response to a given update event. For instance, the trigger might make further updates to the Sentences database. To do this, the trigger creates a new child transaction of the transaction which contained the triggering update, so that the further updates are either committed or 2-153 Custom datatypes API aborted along with the triggering update. A trigger should not attempt to add further updates to the transaction which contains the triggering update. When you write a trigger you must make sure that any new child transactions the trigger creates are either committed or aborted prior to the return from the notify() method, because otherwise the parent transaction containing the triggering update, and possibly containing other updates too, is aborted. After a trigger has committed a child transaction, system validation rules and trigger code notify() methods invoked on any following updates see the contents of the database as modified by that child transaction. The notify() method can also take account of Client Parameter settings for determining trigger actions. You can write a trigger that may take some action outside the Sentences database, such as sending an email message. External actions are taken without reference to the success or failure of the trigger’s actions inside the Sentences database. For example, if you write a trigger that sends an email message, the message would be sent even if the triggering update itself was aborted. For more information please refer to the online documentation for the Sentences API in the \Doc directory of your Sentences installation. Using triggers with import and export Trigger code is not invoked when you import or export a Profile (see “Exporting and importing databases” on page 1-141). Triggers are optionally applied to data from CSV files (see “CSV Import” on page 1-250) and to data from XML files (see “Importing XML data” on page 2110). Custom datatypes API The Sentences datatype mechanism controls the format in which entity names are entered by or presented to users, and also controls some aspects of entity behaviour, such as whether an entity can participate in arithmetic or not. Several datatype classes are provided as part of Sentences, including Number, Timestamp, and Text. When you assign any one of the datatypes provided with Sentences to an entity type you may convert it to a value type. The behaviour of value types is described in “Value types and datatypes” on page 1-155. A Java programmer can also create tailored datatypes, known as custom datatypes, by writing Java classes which implement the LazyDatatype interface. It is 2-154 Customising Sentences possible to create a custom datatype that controls the formatting of an entity type but does not make the entity type behave as a value type. There is a detailed example of a custom datatype in Chapter 11, “Worked examples”. Custom datatypes behave in virtually the same way as the Sentences-supplied datatypes and both can control the behaviour of an entity type. Details of the behaviour which can be controlled and how such a class can be programmed can be found in the online documentation for the custom datatypes in the \Doc directory of your Sentences installation (see the document datatypes.html ), and also in the Sentences Javadoc documentation (see the section on the com.sentences.api.object.LazyDatatype interface). A custom datatype class may be produced either by implementing the LazyDatatype interface from scratch, by subclassing LazyAbstractDatatype, or by subclassing another Sentences-supplied datatype. To assist with the subclassing options, the source code of the Sentences-supplied datatypes is supplied in <Sentences_home>\Examples\ExistingDatatypes\*.java. Datatype capabilities are programmed into the Java class which provides the datatype, and cannot be changed by the Sentences end-user. When correctly configured, a custom datatype appears as an available choice in the Datatype page of the Properties dialog for entity types. A schema designer or administrator can set the datatype of any entity type as required, and can choose a suitable output format from those offered by the datatype. When an entity type is created which has the same name (case-sensitive) as a custom datatype, then the datatype of that entity type is by default set to the custom datatype. The Java source code and JAR file for an example custom datatype can be found in the <Sentences_home>\Examples\com\sentences\examples\datatypes subdirectory. Installing a custom datatype To install a custom datatype, you must write your own Java code, compile the code into a Java archive (JAR) file, and place the JAR file in the directory listed in the DatatypePath property in the Server.properties file. By default this directory is <Sentences_home>\Dataypes. The custom datatype appears in the list of datatypes available in the Datatype properties page. The Java class for the custom datatype must implement the LazyDatatype interface, which is part of the Sentences API. 2-155 Custom datatypes API Custom datatypes and import and export Any custom datatype that is installed according to the instructions in the previous section is available for use with the Sentences server’s import and export routines. Removing custom datatypes To unload a custom datatype remove its JAR file from the directory referenced in the DatatypePath parameter of the Server.properties file. When you have done this the custom datatype is no longer available for assignment to any types. However, if you do not delete all the existing references to a custom datatype from the database itself, Sentences displays an error message each time the undefined datatype is referenced. The references that need to be removed are: • all entity type properties specifying the datatype as in use for an entity type • all entity instances created when any datatype specification was in place and all associations to those instances Where the datatype represents a value type, which is the default, complete removal of the value instances can only be achieved by removing the affected chapter from all profiles. If it is not possible to remove the chapter in which the custom datatype was used, you must export your profile and then import it in order to remove references to the custom datatype. 2-156 Customising Sentences Adding custom Help topic pages You can add custom Help for any Sentences Dataform. To do this you need to create Help topic pages and a Help topic mapping file. The Help pages you create are displayed as HTML pages in a Web browser when a user clicks a Help button on a Dataform. Help button display The Dataform Help button is created automatically by Sentences for any Dataform that has a Help page listed for it in the mapping file. An example of a Dataform with a Help button is shown in Figure 10-6. The Dataform can display only one Help button. The Help page called by clicking the Help button is the page mapped to the source type of the Dataform, or in the case of custom Dataforms, the page mapped to the custom Dataform name. Figure 10-6 Example of a Help Button on a Datatform 2-157 Adding custom Help topic pages Precedence of Help pages If a Help page has been mapped for a custom Dataform’s name, that page is displayed when the Help button is selected. For all other Dataforms, and for custom Dataforms for which there is not a specific mapping, the page displayed when the Help button is selected is the page mapped to the Dataform’s source type. Updating Help topic mappings Help topic mappings are only read by Sentences when the Sentences applet is loaded by the Java Plug-in, and therefore any changes made to the mapping file are only effective after the applet is restarted. Creating Help topic pages You can use any suitable HTML editor or text editor to create your Help topic pages. The pages must be formatted as HTML files that can be opened in a Web browser. The Help pages may contain any combination of text, graphics and hyperlinks that is supported by the HTML standard. The Help topic pages should be saved in a format that can be served by a Web server and displayed in a Web browser, for example as HTML pages with the suffix *.html or *.htm. You may choose to create a separate file for each Help topic page you create, or to create one file containing a number of topics, each identified by an HTML anchor tag (<A NAME=”anchor name”>anchor name</A>). Creating a Help topic mapping file The Help topic mapping file is a plain text file which contains a list of name=value pairs. These pairs map the Sentences elements (entity or association types or custom Dataforms) to their associated Help topic pages. Name and location of the Help mapping file The name of the Help mapping file must have the following name: DataformHelpTopics.properties This file must be located in the Web application directory for Sentences. The full path for this directory is: <Sentences_home>\Tomcat4\Webapps\Sentences. In Sentences Personal Edition, this file is in the <Sentences_home> directory. 2-158 Customising Sentences Mapping Sentences elements to a Help topic To map a Sentences element to a Help topic, create a line in the help mapping file, with the Sentences element as the name and the URL for the Help topic file as the value in a name=value pair. When you create a mapping line you must follow these guidelines: • For all the Sentences elements, use the same capitalisation as is used in the schema • Replace any spaces with underscore characters • Enclose all association type names in parentheses characters ( “(” and “)” ), using nested parentheses for nested associations • Separate the source, verb, and target of association types with commas • Do not use a space after a comma, or before or after a parenthesis character The URL for a Help topic file can be relative, in which case the Web application directory for Sentences is the reference base for the URL. For more information about using relative URLs see the sections “File system permissions” on page 1-40 and “Virtual directories” on page 1-40. • Entity type mapping example To map the entity type Employee to a Help topic page named Employee_help.html located in the Web application directory for Sentences use the following line in the mapping file: Employee=Employee_help.html If you use HTML anchor tags in your Help topics file you can append anchor names to the Help topic file URL, for example: Employee=Employee_help.html#anchor • Association type mapping example To map the association type (Employee, next of kin, Person) to a Help topic page named Next_of_kin_person_help.html located in the <Sentences_home>\Tomcat4\Webapps\Sentences directory use the following line in the mapping file: (Employee,next_of_kin,Person)=Next_of_kin_person_help.html To map the nested association type ( (Employee, next of kin, Person), lives in, Town) to a Help topic page named Lives_in_Town_help.html in the <Sentences_home>\Tomcat4\Webapps\Sentences directory use the following line in the mapping file: 2-159 Adding custom Help topic pages ( (Employee,next_of_kin,Person),lives_in, Town)=Lives_in_Town_help.html • Custom Dataform mapping example To map the custom Dataform EmployeeDataform to a Help topic page named EmployeeDataform.html located in the <Sentences_home>\Tomcat4\Webapps\Sentences\CustomHelp directory use the following line in the mapping file: EmployeeDataform=CustomHelp/EmployeeDataform.html You can map child Dataforms opened from the custom Dataform to specific Help files or to named anchors in specific Help files. To map the child Dataform Person opened from the custom Dataform EmployeeDataform to the named anchor Person on a Help topic page named EmployeeDataform.html located in the <Sentences_home>\Tomcat4\Webapps\Sentences directory use the following line in the mapping file: EmployeeDataform#Person=EmployeeDataform.html#Person Child Dataforms other than those opened from custom Dataforms use the Help mapping for their default type, if any exists. 2-160 Customising Sentences Localisation notes Sentences includes native methods for localising both system text and application text which are described in this section. Sentences does not provide an automatic capability for translating texts. You must prepare the translated text independently. Localising Sentences system text Sentences system text includes all menus, buttons, messages, system folder names, and system dialog labels, but not type and instance names or Dataform field labels. All the system text is included in one message file Messages.properties, which is compiled into the Sentences.jar file. Sentences system text can be localised using a customised message file, distinguished by a Java Locale identifier. The Java programming language uses the Locale object to define a user’s language and geographical location, using standard ISO codes. For example the Locale identifier en_US represents United States English, and the identifier fr_CA represents Canadian French. The Locale object is used to make sure that culturedependent items such as language, numbers and dates and times are presented to the user in an understandable way. The Java plug-in that runs the Sentences applets can recognise a client machine’s Locale setting and select messages from the appropriate message file for that Locale, if one exists. You can create multiple versions of the messages file, each for a different Locale, to allow different clients in different Locales to use the same server. All Sentences system text is identified by numeric codes. If a localised text for a specific code is not found the English language text is used. More information on the way Java uses the Locale object can be found on the Sun Microsystems Web site, for example, in the article Java Internationalization: An Overview, available at: http://developer.java.sun.com/developer/technicalArticles/ Intl/IntlIntro/ Extracting the Messages.properties file Translations of Sentences system text should usually be based on the original English messages file, Messages.properties. This is contained in both the client and server Java archive files for Sentences (JAR files). You can extract a copy of the Messages.properties file using any software that can manipulate JAR files, for example the jar program that is part of the Java SDK. 2-161 Localisation notes To extract the Messages.properties file, first make sure that the jar program is on your path for program files and then open a command prompt and navigate to the directory that contains the file SentencesServer.jar. Then run the following command: jar xvf SentencesServer.jar Messages.properties This extracts the file to the current directory. Naming the translated messages file The name of the translated messages file must conform to the following pattern: Messages_<Locale>.properties where <Locale> is the Java Locale identifier, for example: Messages_fr_CA.properties where fr_CA represents Canadian French. Example translated messages file The Sentences installation includes an example translated messages file, Messages_de_CH.properties, with message texts translated into Swiss German. Directory location for the translated messages file In Sentences Enterprise Edition, the translated messages file must be placed in two directories as it is used by both the server and the client. These directories are the Web application directory for Sentences, and the classes sub-directory for the Sentences Web application. The full paths for these directories are: <Sentences_home>\Tomcat4\Webapps\Sentences <Sentences_home>\Tomcat4\Webapps\Sentences\WEB-INF\classes. In Sentences Personal Edition, place the translated message file in the <Sentences_home> directory. There is no need for the translated files to be compiled into the SentencesServer.jar or Sentences.jar archive files. Translating Sentences application text Sentences application text includes the names of entity types and association types. You can use Sentences’ Profile and Chapter features to create localised versions of application text. 2-162 Customising Sentences Sentences allows the creation of separate profiles for different users and groups of users (see “Using multiple profiles” on page 1-130 and “Creating database views using profiles and chapters” on page 1-273). You can localise your application text by applying the Rename command to each entity type or association type for which you wish to have a translated name, using a separate schema changes target chapter for each language, and then making that chapter available only in the profile accessed by users of that language. A suggested procedure would be as follows: 1. Create a new chapter and add it to your profile. 2. Designate the new chapter as the target chapter for schema changes. 3. In your Sentences application apply the Rename command to each entity type or association type for which you wish to have a translated name. 4. To view the application text in the original language, remove the chapter used as target for the Rename actions from the profile. To view the application text in the translated language, include the chapter used as target for the Rename actions from the profile. Chapter 11 Worked examples This chapter contains an introduction to the Human resources example application and step-by-step worked examples of a number of Sentences features, as follows: • CSV Import example • Derivations example • Trigger examples • Custom datatype example • Client API example • Integration with Microsoft Office applications The examples in this chapter refer in general to the Sentences Enterprise Edition, but most of them can also be run with the Sentences Personal Edition. Where this is not possible it is noted in the text. Throughout this chapter, the symbol § indicates that a line in a file has been split to allow display in this book only. You should type in the text as one line. The Human resources example application The Human resources example application, supplied with Sentences, is intended as an uncomplicated introduction to the core features of Sentences and is used to illustrate Sentences features throughout this User's Guide. The example application is designed to illustrate a range of features in Sentences, and it is not intended to be a prototype of a genuine human resources application. Some of the choices made in developing the database for this application might not be appropriate in other circumstances. For example, the Human resources example application uses an Employee entity type. In some situations it might well be preferable to model employment as an association type between a Person and an Organisation. This section is an overview of the example application including notes on some of the features illustrated. More information can be found in the relevant feature specific sections of this guide. You may find it useful to have the Human resources example application available to you as you read this section. 2-164 Worked examples The application domain for the example application is human resources management for the Sleepy Software group of companies. Sleepy Software is a fictional global corporation with multiple subsidiary companies. These companies share resources and projects. The main uses of the application are illustrated by the entries in the Core types folder: Current employee, Employee, Group company and Project. The Employee entity type People are clearly central to any human resources application. The Human resources example application includes a number of related entity types that represent people: Person, Employee, and Current employee. The Person entity type is used to record personal details about any person, not just employees. An Employee is a Person who is or has been an employee of one of the Sleepy Software group of companies and is defined as a subtype of Person. Using Person as a supertype of Employee allows for the personal details of employees and of their next-of-kin to be stored using the same schema elements, while maintaining the important distinction between employees and other persons. A Current employee is a Person who is an employee of one of the Sleepy Software group of companies. Current employee is implemented as a subset of the type Employee. The other subsets of Employee are Resource skills and Project Resource. Only Resource skills is the source of any association types. Dataforms automatically display tabbed pages for any supertypes or subsets of a given type that are the sources of associations (see “Dataform tabbed pages with subsets and supertypes” on page 1-259). Therefore the dataform for an Employee has three tabs: Person (which is the supertype of Employee), Employee and Resource skill (the only subset of Employee that has association types sourced on it). These three tabs present associations showing general personal details, employee information and skill data respectively. Some Employees are also classified as Project resources, who maybe assigned to Projects, based on the Project resource? association. The Event table in the Dataform records employment history including when employees join and leave. This data is used by the query for the Current employee subset, as well as for the Latest Salaries query. The details of an employee's next of kin can be accessed by viewing the Next of Kin target instance. Double-click the next of kin name or use the View… options on the 2-165 CSV Import example Dataform shortcut menu. The Dataform for the Next of Kin selected is either a simple Person Dataform (where the next of kin is not an employee, such as Harold Ferny), or a full Employee Dataform information (where the next of kin is an employee, such as Mary Venice). The Group company entity type All the fictional companies in the Sleepy group are represented using the Group Company entity type. The association types that are sourced on this entity type relate to the company’s location, phone number, and so on. The subsidiary of association type is an illustration of an association type that has the same type as both its source and its target. The Project entity type The Project entity type represents corporate projects. The allocation of people (“human resources”) to projects is recorded using the Resources association type which has the subset Company Resource as its target. The query for the Company Resource subset uses the association type Project resource?, defined on Employee, to determine whether an Employee is currently a valid resource or not. This means that you must define an employee as a Company Resource before you can assign him or her to a Project. The query for the Company Resource subset also takes a Group company as an optional parameter. This allows use of the Target Parameters mechanism to restrict the resources available for assignment to a project to those recorded as employed by the single Group company selected as the Private to company. For more information on using the Target Parameters mechanism see “Target parameters” on page 1266. CSV Import example CSV Import is a server-side procedure, and needs to be run from the command line when the Sentences server is not running. To complete the steps in the example you also need access to the file system to move image files to a new location. The following example uses the CSV Import procedure to import information about five new employees into the Human Resources example application. The example uses a series of example files located in the Sentences installation under the directory: \Examples\CSVImport. 2-166 Worked examples You can find both CSV (Comma Separated Value, *.csv) files and *.jpg image files in this location. The CSV Import procedure can only be used for adding data to an existing database, and it cannot be used to alter or create a database schema. When you use the CSV Import procedure, the order in which you import data is very important, particularly if you use supertypes and subtypes in your database. You must always import subtype instances before you import supertype instances, to avoid creating duplicates. The Human Resources example application uses supertypes, for example, Person is a supertype of Employee. This means that when you want to add data that relates to a Person who is also an Employee you must create the individual as an Employee first, and then add their associations as a Person. In order to do this, you must import the CSV files for this example in the specific order given later in this chapter. Preparing a profile for the example CSV Import Before you import the sample CSV files, create a new profile based on the Human resources profile. This means that the original Human resources profile is not modified and allows you to switch between the original profile and the new profile to see the changes that you make. The new profile has an additional data chapter, which you must add before importing data, as CSV Import files cannot be used to make changes to a database schema. To set up a profile for the example CSV Import procedure, follow these steps: 1. Open the Human resources profile. 2. Open the Edit Profile dialog. Type in a new profile name HR CSV Example. Create a new chapter, HR CSV data and add it to the profile. Do not remove either of the existing chapters. Make the new chapter HR CSV data the Data changes chapter. Set the Schema changes and Query changes chapters to '(none)'. The Edit Profile dialog should look like Figure 11-1. Save the profile. 2-167 CSV Import example Figure 11-1 The Edit Profile dialog for the CSV import example 3. Close Sentences and shut down the Sentences server. If you are running the Sentences Personal Edition you do not have a separate server process and so you only need to close the program. Importing the example CSV files To see the effect of importing CSV files you must import a number of sample files, using the CSV Import procedure for your platform. Details of this procedure are given in “CSV Import” on page 1-250. You need to run the procedure separately for each file you want to import. The sample files are located in the directory: \Examples\CSVImport. The order in which the sample files should be imported is as follows: 1. Employees.csv 2. Persons.csv 3. Next of Kin.csv 4. Resources.csv 5. Employment.csv After each file is imported, Sentences displays a message on the command line display, as follows: 2-168 Worked examples <n> lines read Committing changes… Although you may import any of the sample CSV files more than once without affecting the resulting data, you must take care to import the files the first time in the specific sequence given above, because the HR CSV example application uses subtypes and supertypes, and therefore you must import the subtype data first to avoid duplication. Employees.csv or Employment.csv must be imported before Persons.csv or Next of Kin.csv. This is because Employee is a subtype of Person. Employee instances must be created before any use is made of them as Persons. Importing data for associations targeted on associations If you are interested in seeing how to import associations targeted on associations using CSV import, you can look at the Group company and Location columns of Employment.csv file, using a spreadsheet program or text editor. For each line for which data exists in these columns in the Employment.csv file Sentences creates an association of the type Group company, location, Location. These associations are used as the targets for the association type employed by, (Group company, location, Location). Viewing the imported data After you have imported all the example CSV Import files, start your Sentences server and start or refresh your Sentences client. Open the profile HR CSV Example and select Employee in the schema pane, as shown in Figure 11-2. 2-169 CSV Import example Figure 11-2 New Employee instances displayed You can see that the five new employees created by the CSV import procedure are listed in the data pane: Margaret Pattison, Cynthia James, Tam Dreisbach, Keith Dreisbach and Nancy Williams. 2-170 Worked examples Figure 11-3 Dataform for Cynthia James Highlight the name of Cynthia James and open a Dataform. Look at the values for the associations on the Employee, Person and Resource tabs, as shown in Figure 11-3. Adding image data Look at the value for the Photograph association in the Dataform for Cynthia James shown in Figure 11-3. You can see file path data and not the image itself. This path information was part of the data in the CSV file, but the image file is not yet in the correct location. To view the Photograph images for the new Employees, you must copy the image files to your default image location. You can check what the default image location is for your system by checking the value of the ImageURLbase parameter in the Application.properties file in the Personal Edition or in the Sentences.html file in the Enterprise Edition. For more details see “About the ImageURLBase parameter” on page 1-41. When you know your default image location copy the image files, which all have the suffix *.jpg, from their delivered location, \Examples\CSVImport to the LazyImages subdirectory of the default image location. After you copy the image files, re-open the Dataform for Cynthia James. The Photograph association now displays the correct image, as shown in Figure 11-4. 2-171 CSV Import example Figure 11-4 Dataform showing Photograph image Viewing additional data The files you imported have also added three new Person entities to the application. These represent people who are not Employees, but are used in the application as the targets for Next of kin associations. To see some of this imported data, select the Person entity type and open a Dataform on either David Webb, or Eddie Williams or Michael James. Data related to these individuals comes from the files Person.csv and Next of Kin.csv. The files you imported have also added additional employment history data for the existing employee Mark Goldstone. You can use the Open Profile command on the File menu to switch between the original Human resources profile shown in Figure 11-5, and in the HR CSV example application shown in Figure 11-6, to compare the contents of the Employee, event, Date associations table for this employee before and after the import. 2-172 Worked examples Figure 11-5 Original data for Mark Goldstone Figure 11-6 Data for Mark Goldstone after importing sample CSV files 2-173 Derivations example Restoring the original Human Resources profile As you imported the CSV file data to a new profile, the original Human Resources profile was unaffected. To restore the original Human Resources profile, choose Open Profile from the File menu and select the profile name. Repeating the CSV Import example If you want to repeat this demonstration of CSV data import, remove the HR CSV data chapter from the HR CSV example application in the Edit profile dialog and then create a new chapter with a different name and add it to the profile as the Data Changes target. Derivations example The Order Entry example application demonstrates the use of derivations in the Query Editor, and the resulting appearance and functionality of the custom Dataform. It also demonstrates the use of a trigger to create entity instance names, when the Instance name created by trigger option has been selected for an entity type (see “Instance options” on page 1-178). The example application includes the following features: • • • • • • • • a custom Dataform page nodes derived types derivations derivation calculation properties custom Dataform navigation properties the Picker applet the use of a trigger to generate instance names Note The example application uses a simplified schema that is constructed to highlight these features. It is not intended to represent the way to implementing a real order entry system. You can view all of the features of the Order Entry example application, except the demonstration of the Picker applet, with either the Enterprise Edition or the Personal Edition of Sentences Version 3.5. You must have the Enterprise Edition in order to view the demonstration of the Picker applet. 2-174 Worked examples Setting up the Order Entry example application Before you can start the Order Entry example application, you must import the application and make the RenameInstance trigger available to Sentences. The Sentences server must be closed down before you perform both of these actions. Importing the Order Entry example application To view the Order Entry example application you must import the profile file OrderEntry.lze into Sentences. This file is located in the Examples\Derivations sub-directory of your Sentences installation. Follow the procedure for importing profiles described in “Exporting and importing databases” on page 1-141. An example command line is given below. Remember that the Sentences server must be closed down before you run the Import procedure. Use the -renumber option when you import this file to create a profile automatically. Open a command prompt and navigate to the <Sentences_home> directory, and enter the following command line: <Sentences_home>:\ import -renumber§ Examples\Derivations\OrderEntry.lze Making the RenameInstance trigger available The Order Entry example application uses a trigger named RenameInstance which is included in the ExampleTriggers.jar file. Make sure that this JAR file is located in the Sentences/Triggers directory, so that it is available to Sentences. If necessary, copy the JAR file from the Examples/Jars directory. Starting the Order Entry example application After running the Import procedure and making sure that the RenameInstance trigger is available, start the Sentences server and run Sentences. You can now select the Order Entry example application from the Open Profile dialog box. In the Order Entry example application the entity type Order has the property Instance name created by trigger defined for it. This means that when you create an instance of the Order entity type you do not need to enter an instance name. The name is created automatically by a trigger. The name field on the create Dataform is disabled. The RenameInstance trigger is attached to the Create event for the Order entity type. When this trigger is invoked it renames the instance on which it has been 2-175 Derivations example invoked to a numeric value based on the current time. In the Order Entry example application this is used to assign a unique order number to each order as it is created The Order Entry example application uses a simple schema based on four main entity types: Customer; Order; Stock item and Tax Type as shown in Figure 11-7. Figure 11-7 The Order Entry example application Order Entry base Dataform and custom Dataform The Order Entry example application illustrates the use of Query Editor features to create a powerful custom Dataform, alongside the automatically generated base Dataform. In the following steps you can examine the differences for yourself. 1. Highlight the order 1000000001235 in the data pane and right-click to display the shortcut menu. 2. Select <Order> from the Dataform sub-menu. This displays the base Dataform for the Order entity type as shown in Figure 11-8. 2-176 Worked examples Figure 11-8 The Order Entry base Dataform 3. Close the Dataform. 4. Now select Order Entry from the Dataform sub-menu. This displays the custom Dataform for the Order entity type as shown in Figure 11-9 and Figure 11-10. 2-177 Derivations example Figure 11-9 Order Entry custom Dataform, Order page Figure 11-10 Order Entry custom Dataform, Order details page The custom Dataform was designed using a query. The query includes derivation fields which are used to calculate values. Although these fields can be seen in the base Dataform they cannot be used. Base Dataform behaviour The following steps demonstrate the behaviour of the base Dataform for the Order entity type. 2-178 Worked examples 1. In the Sentences Explorer, highlight the Order entity type and right-click to display the shortcut menu. 2. Select Order <default> from the Dataform sub-menu. This displays the a blank base Dataform. 3. Type in the following data: Customer: Barney Norris 4. The custom Dataform displays the Delivery address for an order, and not the Customer address. When you create a new customer in this example system you must create the customer address in a child dataform. Right-click the customer name you have just entered (Barney Norris), and select View, “Barney Norris” from the shortcut menu. Type in the following data: Address: 123 Main Street, Anytown Click Apply and then Close. 5. The address information is not transferred automatically to the base Dataform, and you need to enter it again manually in the Delivery address field. 6. Right-click in the table for associations display area next to Order lines and select Create (..., order lines, stock item), which opens a child Dataform. 7. In the child Dataform use the picker buttons to select the following data: Stock item: Porsche racing bike Quantity: 1 Price: 2375 The child dataform is shown in Figure 11-11. Figure 11-11 Order line details on the child Dataform 8. Click Apply, then Close to return to the Order Dataform 2-179 Derivations example 9. In the Tax type field use the drop-down button to select National rate 10.Click Save & Edit. Sentences does not accept this update. Some Dataform fields are highlighted in red, and Sentences displays the Message Log, with the message: Error 1682: At least one instance is required of the association type "(Order, Tax amount, Currency)". The Tax Amount association has been defined in the schema as Mandatory, and so the Dataform update is not accepted. However, you cannot edit the Tax Amount field directly as it is an example of a field calculated using a derivation, which has also been defined in the Explorer as Read-only. To verify this highlight the Tax Amount, currency association in the Explorer schema pane and open the Format page of the Properties dialog. The Read-only checkbox has been selected. The Order field is also highlighted in red. This is because the instance name for a new order is created by a trigger, and the trigger is not activated until all the required data has been validated. 11.Close the Dataform without saving the data you entered. Custom Dataform behaviour The following steps demonstrate the behaviour of the custom Dataform. 1. Highlight the Order entity type and right-click to display the shortcut menu. 2. Select Order entry from the Dataform sub-menu. This displays the a blank custom Dataform with two tabbed pages. Notice that the Placed on and Last updated fields have been filled automatically. 3. On the Order page of the Dataform type in the following data as before: Customer: Barney Norris 4. Remember that the custom Dataform displays the Delivery address for an order, and not the Customer address. When you create a new customer in this example system you must create the customer address in a child dataform. Right-click the customer name you have just entered (Barney Norris), and select View, “Barney Norris” from the shortcut menu. Type in the following data: Address: 123 Main Street, Anytown Click Apply and then Close. Sentences copies the customer address details to 2-180 Worked examples the Delivery address field. You may change the delivery address in the custom Dataform. 5. Click the page tab to display the Order details page and use the picker button to select National rate for the Tax type field. 6. Right-click in the table for associations display area next to Order lines and select Create (..., order lines, stock item) to open a child Dataform. 7. In the child Dataform use the picker buttons to select the following data: Stock item: Porsche racing bike Quantity: 1 8. Click Apply. Note that the Price and Line total have been calculated automatically. Close the child Dataform. 9. In the custom Dataform you can see that the Tax Amount and Gross Total fields have been calculated, as shown in Figure 11-12. Figure 11-12 Calculated values on the Order Entry custom Dataform 10.Click Save & Edit. 11.On the Order page the Order field has now been completed with a new order number, as shown in XYZ. This number was generated by the RenameInstance trigger which was invoked when the Dataform was saved. 2-181 Derivations example Figure 11-13 Completed Dataform with Order number generated by the trigger 12.Close the Dataform The Order Entry query This section looks in greater detail at the Order Entry query that was used to create the custom Dataform. The Order Entry profile includes a query which is used to build a custom Dataform. The root of the query is the Order entity type. To view the query, highlight the query named Order custom Dataform in the Explorer schema pane, and select Edit query from the shortcut menu. The query is shown in Figure 11-14. 2-182 Worked examples Figure 11-14 The Order custom Dataform query The query includes request nodes for the associations directly sourced from Order and Order lines, and the additional information needed for Customers, Stock items and Tax rate, which allows the order to be linked to the corresponding address, current price and current Tax rate. The order details section of the query has been placed after the query nodes for the total and the tax amount. This demonstrates that you can place derivations anywhere in a query. In particular, the variables used within the derivation expression can refer to nodes anywhere else within the query. The query includes derivations that have been added to delivery address, price and Tax Rate to copy to corresponding value from the target’s association to the order association. Page Nodes In the Dataform for Order (Figure 11-8) all the associations sourced from Order appear on a single page. In the custom Dataform there is a division between the details of the customer and the actual items ordered and their cost. To do this two Page nodes have been added to the query and given suitable names. The request nodes corresponding to the associations sourced from Order have then been moved 2-183 Derivations example into the appropriate page. The custom Dataform (Figure 11-9 and Figure 11-10) has two pages, with names corresponding to the page node names, and each tabbed page contains the associations as specified in the query. Derivations The Order custom Dataform query uses a large number of derivations. In order to differentiate between different associations with the same target types (such as Currency or Percentage) a number of target nodes in the query have been renamed. Renaming nodes makes them uniquely identifiable but has no other effect. The query contains the following derivations: • delivery address This is calculated by copying the address of the customer. This derivation is set to Calculate once and the Editable property is also set, which means it can be changed by the user. On the custom Dataform, if the field is blank the customer's current address is copied into this field when the Dataform is saved or refreshed. Anything that the user types into this field is retained - a recalculation does not replace it. • placed on This association has the Read-only property set in the schema, which means users cannot enter values into this field. The Editable property is disabled because of this. The derivation expression uses Timestamp.Now(), which obtains the current date and time whenever the expression is evaluated. The request node in the query is set to Calculate once, which means that it is only calculated when an Order instance is first created. • last updated This is similar to the placed on node, except that the derivation is set to Calculate on Save. This causes the value to be recalculated when an order is first created and whenever it is subsequently updated. • price This is similar to the delivery address. This derivation calculates the ordered items’ current price by copying it from the current price association for the item. Users may modify this value. • line total This association has the Read-only property set in the schema, which means users cannot enter values into this field on the Dataform. The Editable property is 2-184 Worked examples disabled because of this. The target is calculated by the derivation expression that multiplies the item price by the quantity ordered. This derivation is set to Calculate always so that if any of the details on the order line are edited, the new total is recalculated. • Net Total In this Order Entry example system there is no requirement to store the net total for an order. Therefore this derivation is attached to a derived type, which is only displayed in the query results or on a custom Dataform. The derived type expression sums all the line totals and always recalculates, which is the standard behaviour for derived types. The properties of the derived type have been set to the Currency datatype with a display style C#,##0.00C-#,##0.00 so that the custom Dataform displays this value as a formatted currency. • Tax Rate This is similar to the delivery address. This derivation calculates the Tax percentage to be applied by copying it from the current rate for the selected Tax type. • Tax amount This association has the Read-only property set in the schema, which means users cannot enter values into this field on the Dataform. The target is calculated by the derivation expression that multiplies the result of the Net Total derivation by the result of the Tax rate derivation to give the amount of tax to be added to the order. This derivation is set to Calculate always, so that if any of the details on the order are edited the Tax amount is recalculated. • Gross Total This association has the Read-only property set in the schema, which means users cannot enter values into this field on the Dataform. This derivation is set to Calculate always and is the sum of the Net Total and Tax Amount derivations. Dataform Navigation Using a custom Dataform gives application designers control of which fields target dataforms can be accessed by users, and so limits the data that users have access to and can change. In the Order Entry example application, the custom Dataform allows users to create new customers or to update customer details when they enter or amend orders. It prevents users from creating or changing Stock items and Tax types. 2-185 Derivations example Figure 11-15 Properties dialog for the Customer node Figure 11-15 shows the Properties dialog for the Customer node in the query. This illustrates settings that allow users to select Customer values (can select Customer); to follow links to child Dataforms (Navigation: Default Dataform for Customer); and to create Customer values (can create Customer). 2-186 Worked examples Figure 11-16 Properties dialog for the Tax Type node In contrast, Figure 11-16 shows the Properties dialog for the Tax type node in the query. This illustrates settings that only allow users to select Tax type values (can select Tax type), but not to follow links to child Dataforms or to create Tax type values (Navigation: Prohibited). 2-187 Derivations example Figure 11-17 Tree style picker for Customer In the profile schema the Picker property for the Customer association is set to Tree. This means that items listed in the Picker for this association appear in a tree format, which enables users to identify customers with similar names by checking their addresses. The Picker applet for the Order Entry example An additional way of restricting access to Sentences data is to use an applet embedded in an HTML page, such as the Picker applet, based on the Picker available on the Sentences Dataform. You can only view the Picker applet if you are using the Sentences Enterprise Edition. To view the Picker applet, copy the file OrderEntry.html from the Examples\Derivations sub-directory of your Sentences installation into the <Sentences_home>\Tomcat4\webapps\Sentences directory. To examine the parameters for the picker applet, open the file OrderEntry.html using a text editor, and compare the settings with the list of parameters in “Applet parameters for the Picker applet” on page 1-242. Using the Picker applet to enter and update orders You can only view the Picker applet if you are using the Sentences Enterprise Edition. 2-188 Worked examples You can view the Picker applet for the Order Entry example file in your browser by entering a suitable URL. If you are using the default installation of Sentences with Tomcat, the URL you need to use is: http://localhost:8090/Sentences/OrderEntry.html You may need to adjust this URL for your installation. Figure 11-18 The Picker applet for the Order Entry example application The Order Entry browser page presents a Picker display that lists all the existing orders. The positioner and filter fields are available as in any Picker, and can be used to locate items in the displayed list. To edit an existing order, double-click on the order, or select it and click Edit. To create a new order, click Create 2-189 Derivations example The picker launches the custom Dataform for Order. This Dataform can be used in exactly the same way as a Dataform launched from the Sentences Explorer. You can now experiment with creating new orders by following the steps given in “Order Entry base Dataform and custom Dataform” on page 2-175. Design assumptions used in the Order Entry example application The Order Entry example application is a simplified Sentences schema for a fictitious Order Entry system. The design assumptions used in creating this profile are given below, as an example of the kind of issues that you need to consider when designing an application. The design assumptions for the Order Entry system are as follows: • Every order has an automatically generated order number assigned to it when it is first placed. • Users can create new orders or select and amend existing orders. • The system automatically records the date and time at which an order was created. This value cannot be changed. • Orders can be amended at any time. The system automatically records the date and time of the last modification. This value is updated every time an order is amended, but cannot be changed by the user. • The system records all customer names and their address. When an order is placed the name of the customer and the delivery address is recorded in the order. The delivery address is normally the same as the customer’s address, but it can be modified on the order. • Users entering orders can select the name of an existing customer or enter the details of a new customer. • There is a fixed list of items in stock that may be ordered. Each stock item has a current price, which may change at any time. The current price of an item is stored with the order when the order is created. Any changes to the current price of an item must not affect orders that have already been placed. • Users entering orders can only select stock items that already exist. They cannot create new items, or view or modify the details of any existing stock items. 2-190 Worked examples • An order is made up of one or more order lines. Each order line details a specific item, the quantity required, the unit price at the time the order is placed, and the line total (quantity * unit price). • The unit price of an item is taken from the stored current price for the item. Users entering or modifying an order can adjust this price, for example for special promotions or discounts. • The net total for all items ordered is displayed on the order’s Dataform, but is not stored in the database. • Tax is added to the net total of an order. The tax rate is selected by category. The actual percentage rate is taken from the current rate when an order is placed. The current rate can change at any time and must not affect any orders already placed. The actual rate applied is stored with the order. • The Tax category selected, and the corresponding percentage rate applied, is stored with the order and added to the net total to create the gross total, which is also stored with the order. The user cannot modify any of these values. Whenever an order is changed (by adding, deleting or amending ordered stock items) these totals are recalculated. Restoring the original Human Resources profile As you imported a separate profile for the Order Entry example, the original Human Resources profile was unaffected. To restore the original Human Resources profile, choose Open Profile from the File menu and select the profile name. You can completely remove the Order Entry example application by choosing Delete Profile from the File menu and selecting the profile name, and then deleting Order Entry profile chapters from your chapters directory. Trigger examples Note The symbol § indicates that a line of text has been split to allow display in this book only. You should type in the text as one line. A number of example Sentences triggers, which can be used with the Human resources example application, are included in the Sentences installation under the \Triggers directory. This section describes how these triggers work with the Human resources example application. The triggers are: 2-191 Trigger examples • Refuse Update trigger, which can check and refuse any update with which it is associated • Email Address trigger, which can test and if necessary refuse updates to email addresses • Auto Number trigger, which can create new associations with uniquely numbered targets for an instance • RenameInstance trigger which is used to demonstrate the automatic generation of entity instance names when the Instance names created by trigger is selected for an entity type (see “Instance options” on page 1-178). This trigger is demonstrated in the “Derivations example” on page 2-173. More details about the function of each of these triggers are given in the relevant examples. The example procedures for demonstrating the trigger examples refer to the Sentences Enterprise Edition. The triggers can also be demonstrated with the Sentences Personal Edition. Example trigger classes The example triggers are implemented as Java classes, as follows: • RefuseUpdateTrigger • EmailAddressTrigger • AutoNumberTrigger • RenameInstanceTrigger These classes, along with other classes located under \com\sentences\examples which they make use of, form a Java package named com.sentences.examples.triggers and are built into a Java archive file ExampleTriggers.jar. Loading the example triggers If you install the Sentences Application Suite the example triggers file ExampleTriggers.jar is copied from its default location in <Sentences_home>\Examples\Jars to the triggers directory <Sentences_home>\Triggers. This directory is listed in the TriggerPath property in the Server.properties file, and therefore the triggers are loaded when you start the Sentences server. 2-192 Worked examples If you did not install the Sentences Application Suite you must copy the example triggers file ExampleTriggers.jar from its default location in <Sentences_home>\Examples\Jars to the triggers directory <Sentences_home>\Triggers, and then restart the Sentences server. The following trigger initialisation messages should be visible along with other Sentences server messages, for example in the Tomcat MS-DOS window: Administrator info: trigger Refuse Update: instantiated. All updates of associated type and event combinations will be refused. Administrator info: trigger Email Address: instantiated. Associated hyperlink instances, must start with the email HTTP protocol, "mailto:". Administrator info: trigger Auto Number: instantiated. Update events for any associated type will generate autonumbering on instances. These messages are not visible when using the Sentences Personal Edition. If you are using the Sentences Enterprise edition and these messages are not visible, check that the Triggers directory is listed in the TriggerPath property in the Server.properties file. Viewing enabled triggers To view a list of triggers currently enabled on the server, select Triggers from the View menu in the Sentences Explorer. Sentences displays the Available triggers list as shown in Figure 11-19. 2-193 Trigger examples Figure 11-19 The Available triggers list Attaching triggers and editing trigger assignments Triggers are attached to entity and association types by using the Triggers page of the Properties dialog for the selected type. An example of the Triggers page is shown in Figure 11-20. 2-194 Worked examples Figure 11-20 The Properties dialog Triggers page Details of how to attach a trigger to an entity or association type, and how to edit trigger assignments are given in the section “Attaching a trigger” on page 2-147. Refuse Update trigger example The Refuse Update trigger simply refuses any update with which it is associated. This action is completely generic and therefore the trigger can be assigned to any Sentences type and any trigger event, and to as many type and event combinations as required. Subsequent transactions which include an occurrence of that event for that type are refused. Schema designers can therefore use this trigger to enforce the refusal of any user updates they wish. 2-195 Trigger examples Refuse Update on deleting an Employee The following procedure shows how the Refuse Update trigger is used to prevent the deletion of any instance of Employee in the Human resources example application. 1. Open the Human Resources example application. You should create a new chapter in the Human Resources profile for this demonstration. This enables you to restore the original profile later. Open the Edit Profile dialog. Click Add and then New, and create a new chapter with the name Refuse Update Example and click OK to add it to the profile. Do not remove either of the existing chapters. Select the new chapter as the target chapter for Schema changes, Data changes, and Query changes. The Edit Profile dialog should look like Figure 11-21. Figure 11-21 Edit Profile dialog for the Refuse Update trigger example 2. Click OK to save the profile. 3. In the Sentences Explorer, highlight the Employee entity type, open the Properties dialog, and select the Triggers page. If there are any existing entries on the Triggers page they need to be deleted for this demonstration. If this is the case you may wish to consult your Sentences administrator before continuing. 2-196 Worked examples 4. Click the Add button. Sentences displays the Add Trigger Assignment dialog. Select Refuse Update from the list of triggers, and Delete from the list of Trigger Events, and click OK. Figure 11-22 The Triggers page with the assigned trigger The triggers page should now look as shown in Figure 11-22. 5. Click OK to save and then click Close to close the Properties dialog. 6. In the Sentences Explorer data pane, and select any of the Employee instances, for example Barney Norris. 7. Try to delete the selected Employee using either the context menu Delete option or the tool bar Delete button. 2-197 Trigger examples Figure 11-23 The Impact of deleting window for the instance Barney Norris 8. Sentences displays the Impact of deleting… window, showing the list of all the data affected by the delete action, as shown in Figure 11-23. Click the Delete button on this window to confirm the delete action. Figure 11-24 The Message Log when the delete action is refused 9. Sentences displays the Message Log window with an error message, as shown in Figure 11-24. This error message text is generated by the trigger code. For the deletion of Barney Norris the full text of the message reads: Delete Instance operation on type Employee is refused for instance Barney Norris by association with trigger: Refuse Update. 2-198 Worked examples If you are using the Sentences Enterprise Edition, you can see a server message in the servlet container window, confirming that the trigger has been assigned. The text of the message is: Administrator info: trigger Refuse Update: trigger initialised for type: Employee This message is only displayed on the first occasion that the trigger is applied to the type. 10.Click Close on the Message Log window. The selected Employee is still displayed in the data pane. This demonstrates that the trigger has successfully refused the Delete action. The Refuse Update trigger with subsets and subtypes Triggers assigned to types automatically apply to subsets of the type. You can demonstrate the application of the trigger to a subset, without changing the trigger assignments, as follows: 1. Highlight the Current employee subset. 2. Select an instance of the subset, for example Barney Norris and try to delete it. The deletion is refused in the same way as trying to delete an instance of Employee. Triggers assigned to types automatically apply to subtypes of the type. If you want to demonstrate the application of a trigger to a subtype you need to change the trigger assignments, as follows: 1. Open the Properties dialog for Employee, and select the Triggers page. 2. Remove the Refuse Update trigger and click OK, then Close. 3. Open the Properties dialog for Person, a supertype of Employee, and select the Triggers page. 4. Add the Refuse Update trigger for Delete events, using the procedures shown in the section “Refuse Update on deleting an Employee” on page 2-195. 5. Select any of the Person instances in the data pane, for example David Quentin, and try to delete it. This action is refused in the same way as the deletion of an Employee previously. The Message Log displays the message: 2-199 Trigger examples Delete Instance operation on type Person is refused for instance David Quentin by association with trigger: Refuse Update. You can see the same result - that is an attempt to delete is refused - if you try to delete an instance of a subtype of Person, for example the Employee instance Barney Norris. The attempt to delete the employee is refused in exactly the same way as previously when the trigger was assigned directly to Employee. This time however the trigger invocation occurred because it was assigned to Person, the supertype of Employee. Restoring the original Human Resources example application If you created a new chapter Refuse Update example as suggested and used it as the target for both schema and data changes in the profile, you can restore the Human Resources profile by simply editing the profile and removing the new chapter. Restore the original schema and data changes chapters, and save the profile. If you did not use a new chapter you must use the Triggers page of the Properties dialog to remove any trigger assignments from the entity types in the profile. Email Address trigger example The Email Address trigger is another example of a validation trigger, which checks and may refuse certain updates. Its purpose is to check that email addresses are entered in the correct format. At the time you assign a trigger to a type Sentences cannot check whether the assignment is valid or logical. This means that the trigger code must be able to check that the assignment is valid each time it is invoked. Email addresses are usually stored in Sentences using the Hyperlink datatype. Values of this type represent email addresses when they commence with the HTTP email protocol designator, which is the string mailto:. However, the Hyperlink datatype is also used for other kinds of hyperlinks, for example Web addresses, which commence with the string http://. The Email Address trigger may be applied either to an association type or to an entity type. The example procedure shows how the Email Address trigger is applied to the association type Employee, email address, Hyperlink, and ensures that all existing and new target values for instances of the association type pass its check. It would not be appropriate to attach the Email Address trigger to the Hyperlink entity type in the Human Resources example application. This is because this entity type, like the Hyperlink datatype, is used for all kinds of hyperlinks and not just for 2-200 Worked examples email addresses. However it is appropriate to restrict Hyperlink instances to those commencing with the string mailto: when they are used as the target of an email address association. Rejecting incorrect values for email addresses Use the following steps to demonstrate the behaviour of the Email Address trigger. 1. Open the Human resources example application. You should create a new chapter in the Human Resources profile for this demonstration. This enables you to restore the original profile later. Open the Edit Profile dialog. Click Add and then New, and create a new chapter with the name Email Address example and add it to the profile. Do not remove either of the existing chapters. Select the new chapter as the target chapter for Schema changes, Data changes, and Query changes. The Edit Profile dialog should look like Figure 11-25. Save the profile. Figure 11-25 Edit Profile dialog for the Email Address trigger example 2. In the Sentences Explorer, highlight the Employee, email address, Hyperlink entity type, open the Properties dialog, and select the Triggers page. If there are any existing entries on the Triggers page they need to be deleted for this demonstration. If this is the case you should check with your Sentences administrator before continuing. 2-201 Trigger examples 3. Click the Add button. Sentences displays the Add Trigger Assignment dialog. Select Email Address from the list of triggers, and Create from the list of Trigger Events, and click OK. 4. Repeat the previous Add step and select Target Changed from the list of Trigger Events, and click OK. Figure 11-26 The triggers page for the Employee, email address, Hyperlink association 5. The assignments are displayed on the Triggers page, as shown in Figure 11-26. Click OK on the Properties dialog to apply the assignments. 6. In the Sentences Explorer data pane, select an instance of Employee, for example Barney Norris, and select Default Dataform from the shortcut menu. 7. Click the ellipsis button for the Email address association, and select a value from the picker list which is not a valid email address, for example, the value http://www.sleepysoft.com. Click Save. 2-202 Worked examples 8. The trigger prevents Sentences from accepting this association instance update, because the association target fails the trigger’s checks. This is indicated in two ways, both shown in Figure 11-27. • the Dataform highlights the incorrect data, and the page it is on, in red; • the Message Log displays an error message: Trigger data error. An instance of the entity type, Hyperlink, has been found with a value of “http://www.sleepysoft.com”. This fails the requirements of the type (Employee, email address, Hyperlink), enforced by the trigger: Email Address. Figure 11-27 Email Address trigger rejects incorrect update 9. If you are using the Sentences Enterprise Edition, an initialisation message is displayed in the servlet container window, as this is the first invocation of the trigger against this type: Administrator info: trigger Email Address: trigger initialised for type: (Employee, email address, Hyperlink) 2-203 Trigger examples 10. Click the ellipsis button for the Email address association again, and select a value from the picker list which is a valid email address, for example, mailto:[email protected]. Click Save. This update is accepted and the fields and text revert to their normal colours. Restoring the original Human Resources example application If you created a new chapter Email Address example as suggested and used it as the target for both schema and data changes in the profile, you can restore the Human resources profile by simply editing the profile and removing the new chapter. Restore the original schema and data changes chapters, and save the profile. If you did not use a new chapter you must use the Triggers page of the Properties dialog to remove any trigger assignments from the entity types in the profile. Auto Number trigger example The Auto Number trigger is an example of a trigger which adds data to an update. It automatically creates positive integer numbering for instances of any type it is associated with, when an instance is updated, provided the requirements detailed below are met. The data generated by this trigger cannot be changed by users. This trigger is an example of how a generically coded trigger can achieve its purpose with a minimum set of fixed dependencies, and can be applied as widely as necessary by the schema designer. Remember that Sentences server triggers act on user updates but not on data that is only viewed. Triggers are not applied to existing data until that data is the subject of a user update. The Auto Number example trigger has the following requirements: • A single entity type named Auto number must be defined by the profile. • The datatype of that entity type must be Number. • Any type to be auto-numbered must be the source type for an association type with Auto number as its target type. • Instances of that association type must obey the Singular inverse cardinality rule (see “Singular inverse” on page 1-162). • Target values for all instances of the association type must be positive and integer. 2-204 Worked examples When the Auto Number trigger is invoked for the first time, it executes an initialisation method which checks these requirements. If the requirements are not met, the trigger does not operate on the assigned type. You can define an association type as Read only by checking the Read only check box on the Format page of the Properties dialog. In this case values cannot be added through the Dataform. If the Auto Number association type is defined as Read only, then the numbering is purely automatic. If the Auto Number association type is not defined as Read only then you can enter numbers on the Dataform, and these number values are checked by the trigger code. Defining the Auto Number association type as Singular inverse guarantees the unique numbering which the trigger checks for when it initialises. The trigger can be applied to many Sentences types simultaneously. The same entity type, Auto Number, must be used as the target type for all the numbering association types. The numbering is applied independently for each Auto Number association type, so each numbered source type is numbered independently in ascending sequence. Auto-numbering always uses the next available increasing positive integer for a new numbering association. If the association type is not defined as Read only you can enter a number value on the Dataform which becomes the new starting value for numbering of a type. Use of the Number datatype for the numbering entity type, Auto number, allows that type to support the trigger’s operation because value instances cannot be deleted or renamed (see “Behaviour of value types and values” on page 1-157). Setting up the schema to use the Auto Number trigger Before you can run the demonstration of the Auto Number trigger you need to make some changes to the schema of the Human resources example application. 1. Copy the file Human resources employee id schema.chap from the Examples\Chapters\ directory to the directory where your chapter files are located. If a copy of this chapter already exists in your chapters directory it is possible that this demonstration has already been run on your installation. In this case, the Auto Number trigger may generate different values from those shown in this text. 2-205 Trigger examples 2. Shutdown and restart the Sentences server so that Sentences recognises the new chapter file. If you are running the Personal Edition, restart Sentences 3. When the server has restarted, open the Sentences client and select the Human resources profile. If this profile is already running in the client, refresh the display. 4. Open the Edit Profile dialog. Click Add and then New, and create a new chapter with the name Auto Number example and add it to the profile. Do not remove either of the existing chapters. Select the new chapter as the target chapter for Schema changes, Data changes, and Query changes. 5. Click Add again, and add the chapter Human resources employee id schema to the profile. The Edit Profile dialog should look like Figure 11-28. Save the profile. Figure 11-28 Edit Profile dialog for the Auto Number trigger example 6. In the Sentences Explorer schema pane select the Employee entity type and then select one of the instances of Employee in the data pane, for example, Barney Norris. Open the Dataform on this instance. The Dataform includes the new Employee ID association type, as shown in Figure 11-29. 2-206 Worked examples Figure 11-29 Employee Dataform showing Employee ID association If the new association type does not appear in the Dataform, check the Edit profile dialog to verify that the additional chapter, Human resources employee id schema, has been added to the profile. If the additional chapter is listed in the Edit profile dialog but the Employee ID field is not shown in the Dataform, it may mean that another user has made changes to your copy of the Human resources profile. You can restore the original Human resources profile chapters by copying the original chapter files from the Examples\chapters directory of your Sentences installation. If the Employee ID association shows a target value for Employee number in the Dataform this means that this trigger has already been demonstrated on your system. You should create a new temporary chapter, for example Auto Number Example 2, and try again. 1. In the All types folder of the Sentences Explorer schema pane select the Auto number entity type. Open the Properties dialog, and select the Datatype page, as shown in Figure 11-30. 2-207 Trigger examples Figure 11-30 The Datatype page for the Auto Number entity type The datatype of Auto number should be defined as Number and the maximum number of decimal places as zero. The code for this example trigger is designed to work when instances of Auto number can be treated as numeric values, and when the Auto number entity type and all its instances use the same datatype. The Number datatype in Sentences defines a value type. Value instances cannot be deleted or renamed. This complements the function of the trigger by ensuring that values, once created, cannot be changed by a user. When these settings are correct, close the Properties dialog. 2. In the All types folder of the Sentences Explorer schema pane, expand Employee and select the association verb employee ID. Open the Properties dialog and select the Format page. Make sure that the Read only on Dataform check box is selected, as shown in Figure 11-31. 2-208 Worked examples Figure 11-31 Format page for the Employee ID association When the Read only on Dataform property for an association type is set Sentences does not allow users to enter association values. When you have checked that this setting is correct, close the Properties dialog. Demonstrating the Auto Number trigger The following procedure shows how the Auto Number trigger creates employee numbering data for the Human resources example application. To do this, each time an Employee instance is the subject of an update the Auto Number trigger checks if there is a target value for the Employee ID association. If no value exists the trigger assigns the next available number to the Employee. If the user has entered a number, the trigger checks its value. When the Auto Number trigger is invoked it finds the highest existing target value of an Employee ID association and uses that number plus one as the starting value for subsequent numbering. If no instances of the association are found the default starting value of 1 is used. 2-209 Trigger examples 1. In the Sentences Explorer, highlight the Employee entity type, open the Properties dialog, and select the Triggers page. If there are any existing entries on the Triggers page they need to be deleted for this demonstration. If this is the case you should check with your Sentences administrator before continuing. 2. Click the Add button. Sentences displays the Add Trigger Assignment dialog. Select Auto Number from the list of triggers, and Create from the list of Trigger Events, and click OK. 3. Click the Add button again and select Auto Number and Attribute Changed in the list of Trigger Events and click OK. 4. The two assignments should be displayed in the trigger assignments table, as shown in Figure 11-32. Click OK on the Properties dialog to apply the assignments. Figure 11-32 The triggers page for the Auto Number trigger on Employee 5. In the Sentences Explorer data pane, select an instance of Employee, for example Barney Norris, and select Default Dataform from the shortcut menu. You should 2-210 Worked examples see Employee ID: <Auto number> as the first association on that Dataform, as shown in Figure 11-29. If a value is already shown for <Auto number> this means that residual data remains in the database from a previous demonstration of this example. 6. In the Sentences Explorer schema pane All types folder select Auto number. At this stage you should not see any values in the data pane. If values are present, they are left over from a previous demonstration of the Auto Number trigger, and you should be able to remove them by removing the temporary chapter in which they were created. If you do not remove this chapter, the values that Sentences displays for Employee ID may be different from those described in the following steps. 7. In the Sentences Explorer schema pane select Employee and open the Dataform to create a new instance. The first page displayed is the Person page. Select the Employee page and check that no data is shown for this new person You cannot type in the Employee ID target field. Although you can place your cursor in this field, and select the field value, Sentences does not accept any keyboard input for this field because the association type has been defined as Read only. This is because the values for this field are to be generated by the trigger code. 8. On the Person page type in a name for a new employee, Steve Meyer. Click Save and Edit. 9. Select the Employee page. The next available Employee number value, 1, has been used as the target for an automatically generated Employee ID association. 10.If you are using the Sentences Enterprise Edition, an initialisation message is displayed in the servlet container window as this is the first invocation of the trigger against this type: Administrator info: trigger Auto Number: trigger initialised for type: Employee. Numbering of instances will begin at 1 11.Click the Yes radio-button for Project resource? and click Save. Steve’s employee ID still shows as 1. Once calculated it should never change. Click Close. 12.Select Barney Norris and open the Dataform. To create an Employee ID value for an existing employee you must update the database in a way that references the 2-211 Trigger examples Employee. An update which results in no net change to the database does not invoke a trigger. 13.Click the Project resource? radio-button again, and click Save. The next available value, 2, should show as the Employee ID for Barney. Click the radiobutton again, to restore its original value, and click Save and then click Close. 14.In the Sentences Explorer schema pane All types folder select Auto number. The values just created (1 and 2) are shown. Cases in which the Auto Number trigger is not invoked The Auto Number trigger is only invoked when the instance to be numbered is either created or updated. The following procedure illustrates an action that can be taken that involves an instance of Employee but does not update the instance. In this case the Auto Number for the Employee ID association is not created. 1. Select the Employee instance Freda Quentin in the data pane and open the Dataform. The Employee ID association has not yet been set for Freda. 2. Select the Resource skills page. Double-click over the table line Java, Novice to open a child Dataform on this association. Click the ellipsis button for Expertise and select the value Competent. Click Apply, and then click Close. 3. Click Save on the Resource page. The changed data is now displayed in the table. 4. Select the Employee page. The employee ID value is still not set. This is because although an update was submitted and committed to the database it did not reference an Employee as its subject or source. Instead the source type for the update was Employee, skill, Skill. 5. Select the Resource skills page. Right-click over the empty table space and select Create (…, skill, Skill)… from the shortcut menu. In the child Dataform that opens use the picker to select a skill of C++ and an expertise of Novice. Click Apply and then click Close, and then click Save on the Resource Skills page. 6. Select the Employee page. The Employee ID value has now been set. The new skill association you created had an Employee as its source. As a result the trigger was invoked and was able to update that Employee and create an Employee ID association for Freda. 2-212 Worked examples Using the Auto Number trigger when user entries are allowed The following steps illustrate how the Auto Number trigger can be used when users are allowed to enter numbers, that is when the association type is not defined as Read only. 1. Select the association type Employee, employee ID, Auto number in the schema pane and open the Properties dialog, and select the Format page. Clear the Read only checkbox and click OK and Close. 2. Select any Employee in the data pane. If you select an Employee who already has a number, for example Barney Norris, you can replace that number with a new value. (This action does not succeed if the Refuse Update trigger is currently loaded.) If you select an Employee who does not yet have a number, for example, John Atkins, you can enter a number for the first time. For the purposes of this demonstration, select an Employee who does not yet have a number, for example, John Atkins. 3. Select and type into the Employee ID target field. This is now enabled as the Read only setting on the association type has been removed. Enter an unacceptable value, for example –1, and click Save. The trigger detects that a value has been entered and checks it. The value entered is not acceptable and hence is rejected. The Message Log displays an error message: Trigger data error. An instance of the autonumber entity type, Auto number, has been found with a value of -1. Values are required to be greater than zero by trigger: Auto Number. 4. Repeat the above step entering a positive but non-integer value, for example 2.5. This value is also not acceptable to the datatype setting of zero decimal places. The datatype check is applied before the user trigger is invoked hence this value is rejected by the datatype. The Dataform highlights the incorrect data, and the page it is on, in red. If Save is clicked the Message Log displays an error message: 1622: Bad value for “Employee ID:” 5. Repeat the above step entering a value which is already in use for this association type for another employee, for example 2. The trigger detects that this value is already in use for this association type and rejects the update with the error message: Trigger data error. An instance (2) of the autonumber entity type, Auto number, has been found to be the target for more than one instance of the numbering AT, 2-213 Trigger examples (Employee, employee ID, Auto number) e.g. (Barney Norris, employee ID, 2). This condition is disallowed by the trigger: Auto Number. Having demonstrated the error detection capabilities of the trigger for data entry we can now illustrate how the auto-numbering uses the highest existing target value for the association type to determine the next number to assign. 1. Select an Employee who does not yet have a number, for example, John Venice and open the dataform. Select and type into the Employee ID target field a new high value, for example 100, and click Save. 2. Now select another Employee who does not yet have a number, for example, Mark Goldstone and open the dataform. Click the Project resource? radiobutton, and click Save. The next available value, 101, should show as the Employee ID for Mark. Restoring the original Human Resources example application To restore the Human resources example application you must first edit the profile and remove the additional schema chapter, Human resources employee id schema.chap, from the profile. If you created a new chapter Auto Number example as suggested and used it as the target for both schema and data changes in the profile, you must remove this chapter as well the new chapter. Restore the original schema and data changes chapters, and save the profile. If you did not use a new chapter you must use the Triggers page of the Properties dialog to remove any trigger assignments from the entity types in the profile. Disabling the example triggers To unload the example triggers you should use the following procedure: 1. Remove all assignments of the triggers to any type in the schema, for example by following the procedures to restore the original Human resources example application, for any of the trigger demonstrations which you have used. 2. Remove the trigger JAR file from the defined location for triggers on the Sentences server. This location is specified by the TriggerPath property in the Server.properties file. The default location is TriggerPath=<Sentences_home>\\Triggers 3. Restart your Sentences server and refresh any open profiles at the running clients. If you are using the Personal Edition, restart Sentences. 2-214 Worked examples Custom datatype example A simple example custom datatype, which can be demonstrated with the Human resources example application, is available in your Sentences installation. The example implements a datatype called TelecomsNumber as the Java class Telecoms which is itself defined in a Java package called com.sentences.examples.datatypes (in the subdirectory com\sentences\examples\datatypes). The example consists of a source code file Telecoms.java and a built Java archive, ExampleDatatype.jar. About datatype classes A Sentences custom datatype can only be created as a Java class which implements the Sentences LazyDatatype interface. An effective way to achieve this is to extend the default implementation of this interface in the class LazyAbstractDatatype. Another way to do this is to sub-class an existing specific Sentences datatype. The directory \Examples\ExistingDatatypes contains the source files for the interface, LazyDatatype, and for its top-level implementations LazyAbstractDatatype, LazyNumber and LazyString, as well as for the other Sentences datatypes. The interface and the listed classes are described within the Javadoc documentation for the API. Loading the custom datatype example If you install the Sentences Application Suite the example datatype file ExampleDatatype.jar is copied from its default location in <Sentences_home>\Examples\Jars to the datatype directory <Sentences_home>\Datatypes. This directory is listed in the DatatypePath property in the Server.properties file, and therefore the datatypes are loaded when you start the Sentences server. If you did not install the Sentences Application Suite you must copy the example datatype file ExampleDatatype.jar from its default location in <Sentences_home>\Examples\Jars to the datatypes directory <Sentences_home>\Datatypes, and then restart the Sentences server. Checking the example custom datatype 1. Select the Telecoms number entity type and open the Triggers page of the Properties dialog to make sure that no trigger has been enabled for it. If a trigger has been enabled you cannot test the custom datatype properly. See the section 2-215 Custom datatype example “Disabling the example triggers” on page 2-213 for instructions on how to remove any of the example triggers if necessary. 2. Restart the Sentences server, and open the Sentences client. Open the Properties dialog for any entity type and select the Datatypes page. TelecomsNumber should now be found in the drop-down Datatype list. If the new datatype is not visible this may be because of the way that data caching is implemented on the computer running the Sentences client. Check your browser and Java Plug-in settings. You may need to shut down and restart your Web browser and servlet container to try and resolve this problem. If Sentences displays an error message at the client check the Sentences trace file at the server for details. If no trace file is present check the configuration changes made to the servlet container configuration, for example, in the tomcat.bat file. References to datatype classes, including custom datatypes, are used at several levels within Sentences. For example, references to datatype classes are stored with any entity instances which were created with their use. Because of this, custom datatypes should be used with caution when only being demonstrated or still under development. Unloading the example custom datatype To unload a custom datatype, remove the custom datatype JAR file from the defined location for datatypes on the Sentences server. This location is specified by the DatatypePath property in the Server.properties file. The default location is DatatypePath=<Sentences_home>\\Datatypes However, if you do not delete all the existing references to a custom datatype from the database itself, Sentences displays an error message each time the undefined datatype is referenced. The references that need to be removed are: • all entity type properties specifying the datatype as in use for an entity type • all entity instances created when any datatype specification was in place and all associations to those instances Where the datatype represents a value type, which is the default, complete removal of the value instances can only be achieved by removing the affected chapter from all profiles, which is why we recommend using a new data chapter specifically for the purpose of demonstrating custom datatypes. 2-216 Worked examples If it is not possible to remove the chapter in which the custom datatype was used, you must export your profile and then import it in order to remove references to the custom datatype. Custom datatype example: TelecomsNumber The TelecomsNumber datatype is a simple example datatype for telephone numbers which extends the base Sentences datatype of LazyString. This datatype only accepts numbers beginning with a plus sign (+) and consisting of digits, parentheses and spaces only. This custom datatype supports two format styles: • Full, which displays the number formatted as entered • Number only, which displays the number as only the leading plus sign and digits This example datatype is provided to illustrate the datatype mechanism, and not as a suggestion of how telecoms numbers should be implemented in Sentences applications. Note The symbol § indicates that a line of code has been split to allow display in this book only. You should type in the code as one line. Using the example custom datatype Use the following steps to try out the behaviour of the TelecomsNumber example custom datatype with the Human resources example application. 1. Open the Human resources example application, and open the Edit Profile dialog. You must add a new chapter to the Human Resources profile for this demonstration and use it as the Data changes chapter. If you do not use a new chapter as the Data changes chapter it may be difficult to remove all references to the custom datatype after you complete this demonstration (see “Unloading the example custom datatype” on page 2-215). 2. In the Edit Profile dialog click Add and then New, and create a new chapter named HR custom datatype test data and add it to the profile. Use this chapter as the target chapter for Data changes, but do not remove either of the existing chapters. Check that the Edit Profile dialog looks like Figure 11-33 and save the profile. 2-217 Custom datatype example Figure 11-33 Edit Profile dialog for the Custom Datatype example 3. Highlight the Telecoms number entity type from the All types folder in the Sentences Explorer schema pane and select Properties from the shortcut menu. Select the Datatype page, and check that the Datatype field is set to <None>. If this field shows any value other than <None> then your database may have already been customised by another user. 2-218 Worked examples Figure 11-34 Selecting the TelecomsNumber datatype 4. Click the down arrow on the Datatypes field and scroll through the list of available datatypes and select the example custom datatype TelecomsNumber as shown in Figure 11-34 and click OK and then Close to close the Properties dialog. 5. Reopen the profile to refresh the schema or select Refresh from the toolbar. 6. Select Telecoms number again. You can see that there are now no values displayed in the data pane. This is because when an entity type has a datatype assigned to it only the instances that have the same datatype are displayed. If you can see instances of Telecoms number at this stage, it means that your database may have already been customised by another user, or that you did not create a completely new chapter as the Data changes chapter for this demonstration. The TelecomsNumber datatype is defined as a value datatype, and Telecoms number is therefore a value type, and can only be used as a target, and not as the source, of association types. 2-219 Custom datatype example The TelecomsNumber datatype requires that all instances start with the + character and only contain numerals and parentheses characters ( ( and ) ). 1. Highlight the Person entity type and open the Default Dataform from the shortcut menu. Create a new instance with the name Arthur Test, and enter the following value in the Home telephone association field: 1 (212) 262 4515 This value is not valid. Click Save & Edit or tab out of the field. Sentences indicates an invalid value by highlighting the Person page and the Home telephone number field in red. Sentences also displays an error message in the Message Log, because the value does not commence with the character +. 2. Enter the value: + 1 [212] 262 4515 the Home telephone number field and tab out of the field. Sentences rejects this value also, because the value contains square bracket characters ( [ and ] ) that the datatype does not allow. The Home telephone number field remains highlighted with a red background and displays the string +12 (345) 678 9123, which is an example of the correct format for a valid value. 3. Enter the value: + 1 (212) 262 4515 the Home telephone number field and click Save & Edit, followed by Close. Sentences accepts this value and display it in the data pane when you select Telecoms number in the schema pane. 4. In the Sentences Explorer schema pane select the Person entity type, and select an instance of Person, for example Barney Norris. Open the Dataform for Barney Norris. 2-220 Worked examples Figure 11-35 Previous data no longer visible in Dataform The Home telephone and Work telephone associations on the Person page of this Dataform are empty, and display the place-holder text <Telecoms number>, as shown in Figure 11-35. This is because these association types use Telecoms number as their target. As you have just changed the datatype for this Telecoms number, any instances created before the change of datatype are no longer visible. 5. Click the ellipsis button on the Home Telephone association field and select the only available value from the picker list. This is the new value you have just created, +1 (212) 262 4515. Click Save. 6. Type in a valid value for the Work telephone association field, for example, +1 (212) 544 6241 and click Save. Sentences accepts the update. Click Close on the Dataform. 7. Select Telecoms number in the Explorer schema pane. Only the newly created valid values for Telecoms number are displayed in the data pane. 2-221 Custom datatype example The default Style for the TelecomsNumber datatype is its Full format. You can select Full or Number only by using the Style field on the Format page of the Properties dialog. Select the Telecoms number entity type in the schema pane and open the Properties dialog and select Number only for the Style field and click OK on the dialog to apply the change, then click Close. 8. Click the Refresh button on the toolbar. The display of values for Telecoms number throughout Sentences now appears in the Number only style, as a leading + followed by digits only. 9. Select Telecoms number and select Properties from the shortcut menu. Select the Datatype page, and set the datatype to <None>. Click OK and Close. 10.Click the Refresh button on the toolbar. The original values for Telecoms number are now visible. Scroll to the end of the list of instances in the data pane, using the More… prompt if necessary. The newly created values are visible and are listed after the original instances. This is because datatype <None> allows visibility of all other datatypes. The new values are in a separate group because values are sorted in independent groups by datatype. These instance are displayed in the default style for their datatype, as they are not of the current datatype for the entity type. Restoring the original Human resources example application To restore the original Human resources example application, follow these steps: 1. Set the datatype of Telecom number back to TelecomsNumber. 2. Open the dataform on the Person you edited (Barney Norris). Delete the instances you created for the Home telephone and Work telephone associations. Click Save and Close. 3. Delete the additional Person instance you created (Arthur Test). 4. Reset the datatype of the entity type Telecom number to <None>. Refresh the data pane display of Telecom number instances. 5. Open the Edit Profile dialog. Highlight the HR custom datatype test data chapter and click remove. Make the existing chapter Human Resources data the Data changes chapter and save the profile. 6. Remove the custom datatype JAR file from the defined location for datatypes on the Sentences server. This location is specified by the DatatypePath property in the Server.properties file. The default location is DatatypePath=<Sentences_home>\\Datatypes 2-222 Worked examples Alternatively, set the datatype of the entity type Telecom number to <None>, and remove the HR custom datatype test data chapter from the profile. Client API example A simple example of using the Sentences Client API is included in the Sentences installation. This is a Java program called SalaryUpdate, implemented in a Java class SalaryUpdate and defined in a Java package called com.sentences.examples.client (under the directory Examples). The example consists of a source code file, SalaryUpdate.java,and a built Java archive SalaryUpdate.jar, in the subdirectory Jars. This section demonstrates the use of SalaryUpdate with the Human resources example application. As this program uses the Client API it can run alongside other client access to the Sentences database. The Sentences server must be running to allow the SalaryUpdate program to access the database. In the Human resources example application Employees have employment history events, including salaries, recorded by date. The SalaryUpdate program takes two arguments on its command line which are the Employee to be updated and the new Salary value to assign. The program first lists all the existing salary events for the Employee, then creates a Raise event assigning the new salary with effect from today’s date. Preparing to run the demonstration This example is a standalone Java program which must be run using a Java 1.3 or higher compliant virtual machine. The following instructions are based on the following assumptions: • You are running the Sentences server on a Microsoft Windows operating system; • Your installation of Sentences is in C:\Progam Files\Lazy\Sentences35. If your copies of Java and Sentences are in different locations, you must modify the path names in these instructions accordingly. Using the Salary Update example The client-side API used by this example program requires that the Sentences servlet is running, and therefore it cannot be used with the Sentences Personal Edition. 2-223 Client API example The following conditions must be met before you can run the example program. All these conditions are met automatically if you are using a default installation of Sentences with Tomcat. The conditions are: • The example program must be run on the machine where the Sentences server is installed. This is because the example code uses a fixed value for the Sentences connection host (localhost). It also guarantees local access to the required Sentences JAR file and Java installation. • The Sentences server must be serviced by a Web server responding to a fixed IP port number, port 8090. This is because the example code uses a fixed value for the port number. • The Web server and servlet container for Sentences must be running and able to start the Sentences servlet. • You must know the location of, and have access to, the Sentences Enterprise Edition installation, and an installation of the Sun Java 2 Runtime Environment (J2SE JRE). In addition to these conditions you must adapt your Sentences installation to enable Client API connections, as described in the following section. Enabling Sentences Client API connections You must make sure that client API access to Sentences is enabled for your installation. Although access is enabled in the default installation of Sentences the default setting may have been changed for some reason. To verify that access is enabled, follow these steps: 1. Using a text editor, open the Server.properties file and locate the section headed Access to the different Sentences Servlets 2. Find the setting for the client API servlet, which is: ClientApiAccess 3. Make sure that this setting is set to true, as follows: to ClientApiAccess=true 4. Save the file, then stop and restart your Sentences server. Setting up the demonstration profile You need to create a new profile to demonstrate the SalaryUpdate program: 2-224 Worked examples 1. Ensure that your Sentences server is running, start the Sentences client and open the Human resources example application. 2. Open the Edit Profile dialog, and create a new profile named Human resources API updates. 3. Use the Add and New options to create a new chapter. The chapter can have any name you like, for example API updates chapter. Use this chapter as the target for Data changes. Set the target for Schema changes to (none). 4. Click OK and Yes to save this new profile. Creating a command file The example SalaryUpdate program must be run from a command line (an MSDOS prompt on a Windows computer). The actual command needed to run this program may be quite long (depending on the actual file paths used on your system) so you must create a batch file to run the program, as follows: 1. Make a copy of the batch file lazystart.bat in the <Sentences_home>\Resources directory and name it SalaryUpdate.bat. Move this file to the <Sentences_home> directory and open it using a text editor. 2. In the CP (classpath) section, add the following two new lines immediately after the line set CP=%SENTENCES_HOME% set CP=%CP%;%SENTENCES_HOME%\Tomcat4\webapps§ \Sentences\Sentences.jar set CP=%CP%;%SENTENCES_HOME%\Examples\Jars\SalaryUpdate.jar 3. In the Java Execution command section, edit the last line of the file to include the path to the Salary Update example classes, as follow: %_RUNJAVA% %JVM_OPTS% -cp "%CP%"§ com.sentences.examples.client.SalaryUpdate§ %1 %2 %3 %4 %5 %6 %7 %8 %9 4. Save the file as plain unformatted text, in the Sentences_home directory. The Salary.bat file you have created invokes the Java interpreter, passes it the example specific and Sentences client Jar files as a classpath argument, then specifies the example specific class as the program entry point and passes it up to nine arguments as entered on the command line. 2-225 Client API example Demonstrating the Salary Update example The following procedure demonstrates how the example client API program can submit updates to the database. It assumes that all the previous procedures within this section have been successfully completed. 1. Ensure that the Sentences server is running, start the Sentences client and open the Human resources API updates profile. 2. Highlight the Employee entity type in the Explorer schema pane, select the Employee instance Barney Norris, and open the Default Dataform. In the dataform for Barney his employment history is shown in the table titled Event:. His last salary change, from 01-May-2000, shows that his latest salary is $76,500. It’s time for Barney to get a raise! Leave the dataform open. 3. On the host where the Sentences server is installed, open an MS-DOS prompt window and navigate to the Sentences installation directory, where you saved the command file SalaryUpdate.bat. 4. At the MS-DOS prompt enter the following command: SalaryUpdate.bat “Barney Norris” USD83500 5. As it is running the salary.bat command should output messages similar to the following: C:\Program Files\Lazy\Sentences2.2>SalaryUpdate.bat "Barney Norris" USD83500 User message: class SalaryUpdate: Sentences Example code started: Human resources API updates User message: class SalaryUpdate: Opening Sentences client session to host "localhost", port 8090 and profile "Human resources API updates" Salary history for Employee "Barney Norris": 01-Jun-1997, Joined, $47,000 01-Feb-1999, Raise, $58,500 01-May-2000, Promoted, $76,500 User message: class SalaryUpdate: Salary update performed. Successful completion. 6. If the final line of the message is not Successful completion there has been an error and you may see the text: User message: ERROR in class SalaryUpdate: ERROR exit. followed by a description of the error. 2-226 Worked examples If the entered Employee was not found the error description is similar to: The requested Employee, Barney Norriss, was not found. If the entered Salary was not valid the error description is similar to: The supplied salary value, USD 83500, was incorrectly formatted. Other possible causes of error include: • mistakes in the SalaryUpdate.bat file • mistakes in the entered arguments • the Sentences server is not running • you have not enabled Client API connections at the server • you are running the Sentences Personal Edition instead of the Enterprise Edition. 7. Return to the open dataform on Barney Norris in your Sentences client. The data displayed is unchanged, as Sentences does not push data changes to clients. 8. Close and re-open the dataform on Barney Norris. The Event: table now shows his updated employment history, including his new salary, $83,500, with today’s date. 9. You can repeat these actions with other inputs to demonstrate the program further. Restoring the original Human Resources example application To restore the database to its original condition, do the following: 1. Delete the profile you created for this demonstration, Human resources API updates. 2. You may wish to disable subsequent client API connections to the Sentences server. To do this, reverse the steps you took to enable client API connections (see “Enabling Sentences Client API connections” on page 2-223). Integration with Microsoft Office applications You can use CSV Export (see “CSV Export” on page 1-254) and CSV Import (see “CSV Import” on page 1-250) to integrate data from Sentences with Microsoft Office applications. 2-227 Integration with Microsoft Office applications For example you can use Sentences data with Microsoft Word to create Mail merge documents and email messages, and with Microsoft Outlook create Contacts data. You can also import data from Microsoft Outlook Contacts into Sentences. In some of the following procedures you can use data exported from Sentences directly in a Microsoft Office application, and in other procedures you need to modify the data using another tool such as Microsoft Excel before it can be used. The procedures in this section have been tested with Microsoft Office 2000 running on Windows 98 and Window NT 4.0 operating systems. Some of the commands used in these examples may be slightly different in other versions of Microsoft Office. These procedures can be used with either the Sentences Enterprise Edition or the Sentences Personal Edition. Creating Mail merge letters from Sentences data You can use information from a Sentences database as a data source when you create a Mail merge letter in Microsoft Word. You must first use a query in Sentences to select the data you want to use, and then export the query result as a CSV file. To generate a Microsoft Word Mail merge letter using names and addresses from a Sentences database, follow these steps: Exporting address data from Sentences 1. In Sentences, create or configure a query to return names and addresses for the intended recipients. This may be either: • using an existing query or create a new query; or • using a parameter to select the correct recipients for each letter; or • adding one or more entity types or association types to define letter types and who should receive them. An example query for this purpose, which returns the names and addresses for Employees from the Human resources example application, is shown in Figure 11-36. 2-228 Worked examples Figure 11-36 Sentences query for Employee mail merge 2. In the Sentences Explorer, highlight the query name and select Export to CSV file… from the Results option on the Query menu or from the shortcut menu. 3. Sentences displays a Windows file dialog. Select a suitable location for the CSV export file on your system, and save the file. The default file extension for Sentences CSV output on Windows is *.csv. 4. Using Microsoft Notepad or a similar text editor, open the CSV file you saved. The file should look like the one shown in Figure 11-37. 2-229 Integration with Microsoft Office applications Figure 11-37 CSV Export output file in a text editor Importing address data into Microsoft Word 1. In Microsoft Word, create your form letter and use place-holders such as name and address where you want merged data to appear. 2. In Microsoft Word, select Mail merge… from the Tools menu. Word displays the Mail Merge Helper dialog. This dialog asks you to make selections in three steps. 3. In step 1, Main document, select Create and then Form letters, and specify the form letter you have prepared. 4. In step 2, Data source, select Get data and then Open data source, and then navigate to the directory where you saved your CSV file. Microsoft Word does not include the *.csv extension in the list of file options, so you need to select All types to select your file. When you have selected your file click OK. Microsoft Word prompts you to return to your main document. 2-230 Worked examples 5. Highlight one of the place-holders in your document and select Insert Merge field from the Mail merge tool bar. If the Mail merge tool bar is not visible select Toolbars and then Mail merge from the View menu. 6. Select the field you want to use from the list of fields, for example Employee. You must repeat this step for every field you want to insert. The merge field names are derived from the first line of the CSV file which is treated as a line of column headings. Second and subsequent columns of the CSV file are named by Sentences with a combination of their entity type and association type verb. As an example the Employee address column from the example application appears as merge field Addressaddress. Do not change the column headings line. 7. Select the Merge... button and in the dialog box select New document and then click Merge. Microsoft Word creates a new document containing one form letter for each set of data in the CSV file. This document can be saved, printed, and also edited, as you require. Creating Mail merge emails from Sentences data You can use information from a Sentences database as a data source when you create a Mail merge electronic mail messages (emails) in Microsoft Word. You must first use a query in Sentences to select the data you want to use, and then export the query result as a CSV file. You must the edit the CSV file in Microsoft Excel before you create your emails. The Mail merge email procedure requires you to have a Messaging Application Programming Interface (MAPI) compliant email package such as Microsoft Exchange installed on your system. To generate a Microsoft Word Mail merge email using names and addresses from a Sentences database, follow these steps: Exporting email data from Sentences 1. In Sentences, create or configure a query to return names and email addresses for the intended recipients. This may be either: • using an existing query or create a new query • using a parameter to select the intended recipients for an email • adding one or more entity types or association types to define email types and who should receive them. 2-231 Integration with Microsoft Office applications An example query for this purpose, which returns the names and email addresses for Employees from the Human resources example application, is shown in Figure 11-38. Figure 11-38 Sentences query for Employee email mail merge 2. In the Sentences Explorer, highlight the query name and select Export to CSV file… from the Results option on the Query menu or from the shortcut menu. 3. Sentences displays a Windows file dialog. Select a suitable location for the CSV export file on your system, and save the file. The default file extension for Sentences CSV output on Windows is *.csv. 2-232 Worked examples Figure 11-39 Email query output in Microsoft Excel Modifying the email data CSV file in Microsoft Excel 1. Open your CSV file in Microsoft Excel. The file should look like the one shown in Figure 11-39. Note that any Employee, who does not have an email address in the Sentences database, is shown without an email address in the CSV file. 2. Sentences requires the protocol string mailto:in email addresses, but the MAPI mail program does not. To remove it select the Replace option from the Edit menu, and type in the string mailto: (with a space at the end) in the Find what: field. Leave the Replace with: field blank and click Replace all. 3. Save the CSV file from Excel using the Save as type option CSV (Comma delimited). Importing email data into Microsoft Word 1. In Microsoft Word, create the text of your email and use a place-holder such as name where you want merged data to appear. The email address does not need to appear in the standard document. 2-233 Integration with Microsoft Office applications 2. If you want your the text from your main document to appear in the body of your email, you should save the document as plain text with no formatting. Use the Word Save as type option Text Only. If you save your document as a formatted Word document it is sent as an email attachment. 3. In Microsoft Word, select Mail merge… from the Tools menu. Word displays the Mail Merge Helper dialog. This dialog asks you to make selections in three steps. 4. In step 1, Main document, select Create and then Form letters, and specify the form email you have prepared. 5. In step 2, Data source, select Get data and then Open data source, and navigate to the directory where you saved your CSV file from Excel. Microsoft Word does not include the *.csv extension in the list of file options, so you need to select All types to select your file. Be sure to select the file with edited email addresses, as saved from Excel, not the file as output from Sentences. When you have selected your file click OK. Microsoft Word prompts you to return to your main document. 6. Highlight one of the place-holders in your document, such as name, and select Insert Merge field from the Mail merge tool bar. If the Mail merge tool bar is not visible select Toolbars and then Mail merge from the View menu. 7. Select the field you want to use from the list of fields, for example Person. You need to repeat this step for every field you want to insert. 8. Select the Merge… button and in the dialog box select Electronic mail and then click Setup. 9. In the field Data field with Mail/Fax addresses select the column name from the CSV file which contains the email addresses. With the Human resources example application this column is named, with a combination of its entity type and association type verb, as Hyperlinkemail_address. 10.Type in some text for the email subject line in the Mail message subject line field. 11.If you have created a formatted document, select the Send document as an attachment checkbox. If you have created a plain text document leave this checkbox clear. Click OK to return to the Merge… dialog box 2-234 Worked examples 12.In the Merge… dialog box click Merge. Microsoft Word creates an email message which is sent to each email address in the CSV file. A copy of each message is placed in your Sent Items folder. Creating Microsoft Outlook Contacts from Sentences data You can export data from Sentences to for use in a Microsoft Outlook Contacts folder. You must first use a query in Sentences to select the data you want to use, and then export the query result as a CSV file. You then need to edit the CSV file in Microsoft Excel before you import it into Microsoft Outlook. After import, you need to configure the Outlook folder for use as an address book. Exporting Contacts data from Sentences To create a CSV file, follow these steps: 1. In Sentences, create or configure a query to return the data you want for each person, such as name, address, phone number, email address and so on. This may be either: • using an existing query or create a new query • using a parameter to select the correct recipients for each letter • adding one or more entity types or association types to define letter types and who should receive them. An example query for this purpose, which returns the name, address, home telephone, work telephone, email address and date or birth for Persons from the Human resources example application, is shown in Figure 11-40. 2-235 Integration with Microsoft Office applications Figure 11-40 Sentences query for Outlook contacts 2. In the Sentences Explorer, highlight the query name and run Export to CSV file… from the Results option on the Query menu or on the right-click context menu. 3. Sentences displays a Windows file dialog. Select a suitable location for the CSV export file on your system, and save the file. The default file extension for Sentences CSV output on Windows is *.csv. 2-236 Worked examples Figure 11-41 Outlook contacts query results in Microsoft Excel Modifying Contacts data in Microsoft Excel 1. Open your CSV file in Microsoft Excel. The file should look like the one shown in Figure 11-41. 2. Sentences requires the protocol string mailto:in email addresses, but the Outlook does not. To remove it select the Replace option from the Edit menu, and type in the string mailto: (with a space at the end) in the Find what: field. Leave the Replace with: field blank and click Replace all. 3. Save the CSV file from Excel using the Save as type option CSV (Comma delimited). Note You do not need to delete any duplicate columns in your file. If you are planning to import data from an Outlook Contacts folder into the same Sentences database, then you can refer to this CSV file to learn what column structure matches the database. Importing Contacts data into Outlook To import the data into Outlook, follow these steps: 2-237 Integration with Microsoft Office applications 1. Open Microsoft Outlook and select the Contacts folder. You may want to create a new contacts folder for the data imported from Sentences. To add a new folder, right click the Contacts folder and select New Folder from the shortcut menu. 2. Highlight the target Contacts folder and select Import and Export on the File menu. This displays the Import and Export wizard. 3. The steps in the Import and Export wizard are as follows: • Select Import from another program or file and click Next. • Select the option Comma separated values (Windows) and click Next. You may be need to install an additional software module if you have never imported this kind of file into Outlook before. • Use the Browse button to navigate to the directory where you saved your CSV file from Excel. Be sure to select the file with edited email addresses, as saved from Excel, not the file as output from Sentences. Choose one of the options for dealing with duplicate data, and click Next. • Select the destination folder and click Next. • In the next screen select the checkbox next to the option Import <filename.csv> into <foldername>. Click Map custom fields…, if the Map custom fields dialog does not open automatically. • In the Map custom fields dialog choose the way you want the columns in your CSV file to map to the fields in the Outlook contacts folder. Mappings can be created by dragging and dropping values from the From: list to the To: list. An example of a finished mapping from the Human resources example to Outlook may look like the list below: Field Mapped from Name Person Home Address Address: address Business Phone Telecoms number: work telephone Home Phone Telecoms number: home telephone 2-238 Worked examples Field Mapped from Birthday Date: date of birth Email Address Hyperlink: email address • At this stage you should ignore duplicate fields in your file. After completing the mapping of your fields, click OK, and then click Finish. • Outlook should now import your data to the target folder and create, or populate, Contact records with the data from Sentences. Configuring the new folder as an address book folder To configure the new contacts folder as an address book folder, follow these steps: 1. Highlight the new contacts folder, right-click and select Properties from the shortcut menu. 2. Select the Outlook Address book page and select the check box Show this folder as an email address book, and click OK. 3. Select the Services command on the Outlook Tools menu. 4. On the Addressing page, below the box marked When sending mail, check names using… click Add. 5. Select the new contacts folder and click Add, then click Close, Apply and OK. 6. Now when you type the contact's name into the address field of an email Outlook can find the corresponding email address. Creating Sentences data from an Outlook Contacts folder Microsoft Outlook allows you to export Contacts data to a CSV file and you can use this feature to take data from Outlook and import it into Sentences. You must make sure that the layout of the data in your CSV file matches the schema of an existing Sentences database. One way to do this is to examine a CSV file exported from a Sentences database, for example one created by the procedure described in “Creating Microsoft Outlook Contacts from Sentences data” on page 2234. You can edit the CSV file derived from Outlook in Microsoft Excel or in a text editor to make sure that it conforms to the structure you need. You may need to 2-239 Integration with Microsoft Office applications divide the data from Microsoft Outlook into two or more CSV files before importing the data into Sentences. Creating a CSV file from Microsoft Outlook 1. In Outlook, select Import and Export from the File menu 2. In the Import and Export wizard, follow these steps • Select Export to a File and click Next • Select Comma separated values (Windows) and click Next • Select the folder you want to export from, in this case a Contacts folder, and click Next • Type in a path and file name for your CSV file, or click Browse to select an existing file, and click Next • Select the check box next to Export Contacts from the Contacts folder. Click Map custom fields…, if the Map custom fields dialog does not open automatically. • In the custom fields dialog select the fields you want to export, and click OK. If you have recently imported a CSV file into Outlook, the field names from that file are shown in the custom fields dialog. • Click Finish. Editing the Outlook CSV file for import into Sentences You need to edit the CSV file that is created by Outlook before you can import the Contact data into Sentences. You can do this in Microsoft Excel or using a text editor. When you edit the file you should note the following points: • The values created by Outlook for Name fields are based on the value stored in the “File as” field. You may want to change this value when you edit the file. • You may need to rename the column headings - the values in the first row of each column - to match the type names required by Sentences. • If you want to import email addresses into Sentences you need to add the string mailto: to the start of each email address. To do this in Excel, follow these steps: 1. Open your CSV file in Microsoft Excel 2. In the first new column paste the string mailto: into every cell 2-240 Worked examples 3. In the second new column give row 1 the value of row 1 in the column containing the email addresses from Outlook, for example “Hyperlink: email address”. 4. In all other cells paste an Excel function to concatenate these values together, if the Outlook email address is not blank, e.g. “=IF(ISBLANK(E2),,CONCATENATE(G2,E2))” 5. Add a new sheet to the Workbook 6. Cut and Paste the original column of email addresses into the first column of the new sheet 7. Repeat for the column of mailto: values into the second column of the new sheet 8. Save the file to a new CSV file. • You should now be able to import these contacts into Sentences using the CSV Import command. Appendix A Menus and Commands summary All the following menu command key combinations and shortcut keys are valid in the Microsoft Windows operating system environment only. Sentences Explorer menus Menu name… contains these commands Keyboard sequence Shortcut File New Profile 1 Alt+f, n Ctrl+n Open Profile 1 Alt+f, o Ctrl+o Edit Profile 1,2 Alt+f, e Delete Profile 1,2 Alt+f, d Refresh Profile Alt+f, r Reload data Alt+f, a Exit (Personal Edition only) Alt+f, x Cut 3 Alt+e, t Ctrl+x Copy 3 Alt+e, c Ctrl+C Paste 3 Alt+e, p Ctrl+v Delete 2,3,4 Alt+e, d Delete Rename 2,3,4 Alt+e, m Ctrl+r Properties 5 Alt+e, r Ctrl+p Default Dataform Alt+ v, f Ctrl+ d Show source and target Alt+ v, s Follow hyperlink Alt+ v, h Retrieve by source Alt+ v, b Retrieve sorted Alt+ v, s Edit View F5 2-242 Menus and Commands summary Menu name… Schema contains these commands Keyboard sequence Retrieve unsorted Alt+ v, u New Explorer Tab Alt+ v, n New Explorer Tab on Target Alt+ v, t Delete Explorer Tab Alt+ v, d Expand All Alt+ v, x Collapse All Alt+ v, c Expand Node Alt+ v, p Collapse Node Alt+ v, l Stop Execution (Q) Alt + v, q Messages Alt+ v, m Triggers Alt+ v, i Options Alt+ v, o Diagram Editor Alt+ v, a Create Entity Type 2 Alt+ s, e Create Association Type 2 Alt+ s, n Insert Association Type Above 2 Alt+ s, a Display in Core types folder 2,7,9 Alt+ s, o Display in Core queries folder 2,7 Alt+ s, o Attach Set Query 6 Alt+ s, u Attach Query 2 Alt+ s, y Tables and Views 8 Alt+ s, l Export Schema to XML Alt+ s, t View Schema in XML Alt+ s, v Shortcut 2-243 Sentences Explorer menus Menu name… contains these commands Keyboard sequence Query Create Set Query 6 Alt+ q, s Create Query 2 Alt+ q, c Edit Query 2 Alt+ q, q Execute Query Alt+ q, x Results: Export to CSV file Alt+ q, r, v Results: Export XML results Alt+ q, r, e Results: Export XML DTD Alt+ q, r, o Results: Export XSL Stylesheet Alt+ q, r, x Results: View XML results Alt+ q, r, i Help Topics Alt+ h, t Tutorial Alt + h, u About Alt+ h, a Help Shortcut Ctrl + q Notes: 1 Not shown when the profile cannot be changed 2 Not shown when user cannot edit schema 3 Not shown when user can delete/rename data but not schema 4 Not shown when user cannot edit schema or data (in addition to 2) 5 Properties are read-only when the schema is read only. 6 Not shown when Set Queries are not selected in the Edit Profile dialog 7 The Display in Core types folder command is only available for types, and the Display in Core queries folder command is only available for queries. 8 The Tables and views command is used only with the LazyView tool. For more information, please refer to the LazyView Guide. 2-244 Menus and Commands summary 9 The Display in Core types folder command is only available if the Core types are not being created automatically. Sentences Explorer function keys Key combination Action F1 Sentences help (in Sentences Personal Edition); Browser help (Sentences Enterprise Edition) F2 Allows in-place renaming F5 Reload data in the Explorer, or execute the selected query in the explorer F6 Toggle between data pane and schema pane F8 Select vertical divider for resizing F10 Select first menu on menu bar Alt+F4 Closes current window Shift F10 Displays browser shortcut menu Tab Moves to next control in sequence (sequence includes Filter and Positioner fields) Alt+Tab Move to next operating system application Shift+Tab Moves to previous control in sequence (Sequence includes toolbar) Dataform function keys Key combination Action F1 Sentences help Alt+F4 Closes current window 2-245 Dataform function keys Key combination Action Alt+F6 Toggle to Java console display Shift F10 Displays browser shortcut menu Tab Moves to next control in sequence Alt+Tab Move to next operating system application Shift+Tab Moves to previous control in sequence Ctrl+Tab Moves to next control in sequence, including fields in Table for targets and Table for association displays, and multiple line text area fields Ctrl+Shift+Tab Moves to previous control in sequence, including fields in Table for targets and Table for association displays, and multiple line text area fields 2-246 Menus and Commands summary Query Editor menus Menu Command Keyboard sequence Query Save Query1 Alt q + s Save as1 Alt q + a Properties Alt q + r Close Alt q + c Add Alt e + a Add submenu Associations Alt e + a, s Add submenu Instance Specific Associations Alt e + a, n Add submenu Derived type Alt e + a, d Add submenu Selection Alt e + a, i Add submenu Sort Alt e + a, o Add submenu Page Alt e + a, p Hide Branch Alt e + h Show Branch Alt e + s Bind to instance Alt e + b Bind to node Alt e + o Make recursive closure 2 Alt e + k Add transitive closure 3 Alt e + n Set Required Alt e + i Set Derivation Alt e + v Edit Shortcut 2-247 Query Editor menus Menu View Parameter Results Command Keyboard sequence Edit Expression Alt e + x Properties Alt e + r Ctrl + p Cut Alt e + t Ctrl + x Copy Alt e + c Ctrl + c Paste Alt e + p Ctrl + v Delete Alt e + d Del Rename Alt e + m Expand All Alt v + x Collapse All Alt v + c Expand Node Alt v + p Collapse Node Alt v + l Create Parameter Alt p + r Set Type Alt p + t Set Default Value Alt p + f Clear Default Value Alt p + c Set Mandatory 3 Alt p + n Execute Query Alt r + x Reload data Alt r + a Stop Execution (Q) Alt r + q Export to CSV file Alt r + v Export XML results Alt r + e Export XML DTD Alt r + o Export XSL Stylesheet Alt r + p View XML Results Alt r + i Shortcut F5 2-248 Menus and Commands summary Menu Command Keyboard sequence Shortcut Dataform Default Dataform Alt d + f Ctrl + d Custom Dataform Alt d + u Help topics Alt+ h, t Tutorial Alt+ h, u About Alt+ h, a Help Menu Notes: 1 Not shown when the user cannot save changed queries. 2 Displays Make recursive closure or Break recursive closure depending on the status of the selected node 3 Displays Add transitive closure or Remove transitive closure depending on the status of the selected node 4 Displays Set mandatory or Set optional depending on the status of the selected parameter 2-249 Query Editor function keys Query Editor function keys Key combination Action F1 Sentences help F2 Allow in place renaming F5 Executes the current query F6 Toggle between data pane and schema pane F8 Select vertical divider for resizing F10 Select first menu on menu bar Alt+F4 Closes current window Alt+F6 Toggle to Java console display Shift F10 Displays browser shortcut menu Tab Moves to next control in sequence Alt+Tab Move to next operating system application Shift+Tab Moves to previous control in sequence Diagram Editor menus Menu Command Keyboard Sequence File Export Diagram Alt f + e Import Diagram Alt f + i Save as GIF Alt f + s Page setup Alt f + u Print Alt f + p Close Alt f + c Shortcut Ctrl-S 2-250 Menus and Commands summary Menu Command Keyboard Sequence Edit Add association types Alt e + a Add query results Alt e + q Copy Alt e + c Ctrl-C Paste Alt e + p Ctrl-V Remove Alt e + r Remove all Alt e + m Select all Alt e + s Add core entity types Alt e + e Add all entity types Alt e + y Add annotation Alt e + n Add Title Alt e + t Add Chapter Legend Alt e + l Refresh Chapter Legend Alt e + f Increase font size Alt e + I Decrease font size Alt e + d Increase zoom Alt e + z Decrease zoom Alt e + o Default dataform Alt v + f Follow Hyperlink Alt v + h Expand all Alt v + x Collapse all Alt v + c Expand node Alt v + p Collapse node Alt v + l View Shortcut Ctrl-D 2-251 Diagram Editor menus Menu Help Command Keyboard Sequence Stop Execution Alt v + q Preferences Alt v + r Draw finished diagram 1 Alt v + g Help Topics Alt h + t Tutorial Alt h + u About Alt h + a Shortcut Ctrl-P Notes 1 Displays Draw finished Diagram or Draw outline diagram depending on the current drawing mode. 2-252 Menus and Commands summary Diagram Editor function keys Key combination Action F1 Sentences help (in Sentences Personal Edition); Browser help (Sentences Enterprise Edition) F6 Toggle between canvas pane and schema pane F8 Select vertical divider for resizing F10 Select first menu on menu bar Alt+F4 Closes current window Shift F10 Displays browser shortcut menu Tab Moves to next control in sequence (sequence does not includes toolbar). Includes individual diagram elements. Alt+Tab Move to next operating system application Shift+Tab Moves to previous control in sequence (Sequence does not includes toolbar). Includes individual diagram elements. Ctrl+Tab Moves to next control in sequence, including out of the diagram canvas. Shift+Ctrl+Tab Moves to previous control in sequence, including out of the diagram canvas. Appendix B Statistics and analysis Viewing Sentences statistics When you install Sentences with Tomcat, a statistics servlet is installed alongside the main Sentences servlet. The statistics servlet has the class name: com.sentences.servlet.StatsServlet. You can control the access to Sentences servlets, including the statistics servlet by setting parameters in the Server.properties file (see “Servlet access to Sentences” on page 1-75). By default, access to server statistics is set to true, and access to chapter statistics is set to false. The Sentences installation links this servlet to the URL path Statistics. If access to the statistics server is allowed, you can access the statistics servlet by entering a URL in your browser, for example: http://localhost:8090/Sentences/Statistics You must substitute the name of your installation’s Sentences host for localhost:8090 in the example. If you are not using Tomcat you need to configure your web server and servlet container to use the statistics servlet. The statistics servlet returns a standard HTML page which can be viewed in any browser without needing an applet. The page is not dynamic, which means that it is not automatically updated as the data changes. Use your browser’s Refresh command to re-load the page with more current data. The page contains three tables, covering messages, profiles and chapters, and a memory usage summary. Message statistics Figure B-1 Server message statistics 2-254 Statistics and analysis Figure B-1 shows the message statistics for the host named in the table heading. The first data line shows total counts since the server was started, and the second line shows counts for a recent one-minute period. The columns in the table are as follows: Column Description Time Period The time period for which counts are shown. Messages In The number of messages received during the time period. Average Delay If messages have been delayed by the throughput limiting mechanism, this column shows the average time, in milliseconds, by which messages have been delayed. Max Delay If messages have been delayed, the maximum time that any message has been delayed, in milliseconds. Messages Out The number of message responses sent during the time period. Average Time The average time, in milliseconds, taken by the server to respond to a message. Max Time The maximum time, in milliseconds, taken by the server to respond to a message. Open profile statistics Figure B-2 Open profile statistics Figure B-2 shows the open profile statistics for the host named in the table heading. There is one data line for each profile that is currently in use on this server. The system profile Profiles is always shown as currently in use. “Currently in use” means that the profile has been opened, and that the server has not yet closed it. The server closes a profile after it has remained inactive (has received no requests) for a 2-255 Open profile statistics period of time determined by the ProfileTimeout value in the Server.properties file. The columns in the table are: Column Description Profile Name The name of the profile. Any profile that is not available to be opened by users, for example one that has been edited but not saved, is marked with an asterisk. Opened Time The time that the profile was opened. Requests The number of requests that this profile has processed since it was opened. Each message from the client is a request, but requests are also generated internally, so that in general the total number of requests is higher than the total number of messages received. Pending Results Whenever a client result includes a continuation marker, shown in the Sentences Explorer as the More… prompt, the server retains data about the request, so that more data can be supplied if requested. These pending result sets are discarded when the client indicates that they no longer required, or after a period of time determined by the “PendingTimeout” parameter in the Server.properties file. This column shows the number of such result sets currently held by each profile. Open Queries Whenever a query is to be executed, it must first be validated. The server keeps a list of validated queries. This column shows how many are held by each profile. Visible, Hidden, Trans These columns show the number of references held in the profile's visibility cache: the number of database items known to be visible, the number known to be hidden, and the number of transactions known to have been validly committed. The visibility cache contributes to the memory requirement of each open profile; these numbers provide an indication of the size of that contribution. 2-256 Statistics and analysis Chapters statistics Figure B-3 Chapters statistics Figure B-3 shows the chapters statistics for the host named in the table heading. There is one data line for each available chapter on this server. The columns in the table are: Column Description Chapter Name The name of the chapter, as shown in the "Edit Profile" dialog. Cache Size The amount of memory currently in use as a database file cache for that chapter. Disk Requests The number of requests made by the profiles for database objects from that chapter file, since it was opened. Cache Hits The number of requests for database objects that were met from the database file cache. Cache Hit Rate The number of cache hits expressed as a percentage of the total number of disk requests. 2-257 Chapters statistics Detailed chapter statistics More detailed statistics on chapter files are available. Before you can view these detailed statistics you must enable the Chapter Statistics servlet. For details of how to enable the Chapter Statistics servlet see “Servlet access to Sentences” on page 175. After you have enabled the Chapter Statistics servlet, each of the chapter names shown in the Chapters statistics table (Figure B-3) is an active hyperlink. Clicking the link displays a summary page for the chapter, as shown in Figure B-4. Summary page Figure B-4 Chapter summary page The summary page heading is the chapter name, as shown in the Edit Profile dialog. The Chapter UID is the internal identifier by which the chapter is known to Sentences. The Path is the pathname of the disk file for the chapter. If the SpatialAccess property in the Server.properties file is set to false, meaning that access to the Spatial view is not allowed, the summary page displays the message Spatial view unavailable. The following sections give more details of the Spatial view, Block statistics, and Triple counts options. Spatial view Access to the spatial view is controlled by a separate servlet listed in the Server.properties file (see “Servlet access to Sentences” on page 1-75). By default, access to the spatial servlet is set to true. 2-258 Statistics and analysis Click the link to the Spatial view to see a three-dimensional graphical representation of the data stored in the file, as shown in Figure B-5. Figure B-5 Spatial view of chapter file The spatial view uses an applet to show a three-dimensional map (a cube shape) of the distribution of triples within the chapter's triple store. The three axes of the cube represent source IDs (red axis), verb IDs (green axis), and target IDs (blue axis). Each triple is represented by a white dot at the point corresponding to its source, verb, and target. The cube is intersected by orange lines, which represent the boundaries of triple pages. The applet allows you to rotate the cube by dragging the mouse pointer over it. You can also zoom in to display a section of the cube at higher magnification, and zoom out to return to the less detailed view. Note Displaying the spatial view or triple counts on a large chapter is a resourceconsuming operation, which may have a noticeable impact on a running server. Block statistics The block statistics page shown in Figure B-6 displays a table of information about the contents of the blocks used by the chapter file. 2-259 Chapters statistics Figure B-6 Block statistics The left-hand column of the Block statistics table, headed Type, lists the various block types that are used within the file. The following table describes the information given for each type: Column Description Blocks The number of blocks of that type in the file. Entries The total number of entries. Each block type has its own specific type of entry; for example, each entry in a triple store block is one association. Bytes free The total amount of free space within the blocks of that type. Bytes available The total amount of usable space within the blocks. Percent free The fraction of the usable space which is currently free, shown as a percentage. The block types used are shown in the following table:: Type Description File Header The header of the file. This holds datatype information and data about other chapters referenced from this one. Entity Types An index to the entity types which have instances held in this chapter. Each entry is an entity type. 2-260 Statistics and analysis Type Description Atom Store Entity instances, both values and non-values, are held in the atom store, which provides access by type and name. Each entry is an entity instance. This includes entities with long names (see Long Atoms below). Long Atoms Entity instances which are too long for the name index structure are held in a separate area of the file. Each entry is one entity instance with a long name. Atom ID Table The index to entity instances by Sentences ID. Each entry is one entity instance. Triple Index An index to the pages of the triple store. Each entry holds information about one triple page. Triple Store The pages holding associations. Each entry is an association. Triple ID Table The index to associations by Sentences ID. Each entry is an association. Triple B-Tree A secondary index to associations by target. Each entry is an association. Triple counts The triple counts page counts the numbers of triples of various kinds in the triple store, and displays the result in a table, as shown in Figure B-7. Figure B-7 File triple counts The information in this table allows you to judge whether exporting and reimporting the data is likely to improve performance.The column headed This 2-261 Memory usage summary chapter refers to triples whose source is in this chapter; the column headed Other chapters refers to triple whose source is in some other chapter. Each row shows the number of triples of specific types: • Stop triples are created when a database item is deleted. Stop triples whose source is in this chapter are removed by exporting and re-importing the data. • Rename triples are created when a type or an entity is renamed. Like stop triples, rename triples whose source is in this chapter are removed by the export process. • A transaction start triple is created for every transaction started in this chapter. • If the transaction has user text associated with it, a transaction text triple is created as well. • When the transaction is successfully committed, a transaction commit triple is created. The export process removes transaction triples of all three types. Memory usage summary At the end of each statistics page there is a summary line showing the server memory usage, in the following format: Server memory 4.19 MB of 5.02 MB The first figure shows the amount of memory currently being used, and the second figure shows the total amount of memory allocated to the server process. These figures are totals for the Java Virtual Machine that the Sentences servlet is running in, and so include other memory than that used by the Sentences server. You can change the amount of memory that the Java Virtual Machine allocates to a process by adjusting the -Xmx or the -Xms parameter on your servlet container. If you select the Custom installation option for Sentences you can set the Java memory parameters during the installation procedure (see the Sentences Installation Guide for more details). You can set the Java memory parameters for server utilities such as Export and Import in the lazystart script file (see “The lazystart script file” on page 148). If you are using Tomcat, you can add the server memory specification to the Catalina.bat file (or Catalina.sh file for Linux, Solaris or AIX) which is in the Tomcat4\bin\ folder of your Sentences installation. If you are not using 2-262 Statistics and analysis Tomcat, the memory parameter should be specifiable in your servlet container. See the documentation for your servlet container for details. If you are using Tomcat you can add the line below in the section headed Verify and Set Required Environment Variables: set JAVA_OPTS=-Xmx128m -Xms64m where -Xmx specifies the maximum of memory that can eventually be used, (shown here with the example value 128m meaning 128MB), and -Xms specifies the initial amount of memory to be allocated at the start (shown here with the example value 64m meaning 64MB). Chapter file analysis You can use the InspectChapter command-line tool to analyse the structure of a chapter file, and create a more detailed listing of its contents. To use this tool, open a command prompt and navigate to your <Sentences_home> directory, and enter the following command: InspectChapter <chapter file> <option> where: <chapter file> is the file name of a Sentences chapter file to be analysed. <option> is a keyword specifying the information to be listed. The available keywords are described below. Keyword Meaning header Lists information from the file header, including its block size, its internal identifier, and the names and internal identifiers of chapters that are referenced from within this chapter. blockstats Lists block statistics. This is the same information as displayed on the block statistics HTML page described on page 2-258 above. atoms Lists all the entity instances in the chapter, by name within entity type. atomIDs Lists all the entity instances in the chapter, by ID. tripleIDs Lists all the associations in the chapter, by ID. 2-263 Server request statistics Keyword Meaning triplepages Lists information about all the triple pages, showing the range of associations held in each one, but without listing the associations themselves. triples Lists all the triple pages in the chapter, including all the associations held in each one. rtree Lists the R*-tree index used to access triple pages. The InspectChapter command does not use the ChapterPathList setting from the Server.properties file, and does not check for the existence of the database.lock file. You must therefore use the fully-qualified path and file name, for example: D:\SentencesData35\Chapters\MyChapter.chap It is strongly recommended that you shut down the Sentences server before running this command. Server request statistics Sentences can record the number of requests received by the Sentences server in a text file. This file is created if you set the optional parameters StatisticsPath and StatisticsPoll in the Server.properties file (see “Statistics properties” on page 1-47). The file created by this setting is named Statisticsxxx.txt (where xxx represents a timestamp, and the file lists the date and time of each record, followed by the number of server requests received in the previous time period. 2-264 Statistics and analysis Glossary This glossary gives definitions of terms as they are used in Sentences. Glossary term Definition All types folder A folder in the Sentences Explorer schema pane where all entity types are displayed. All queries folder A folder in the Sentences Explorer schema pane where all queries are displayed. applet A program written in Java for displaying data in a web browser. The Sentences client for the Enterprise Edition is a Java applet that runs in a Web browser. association An association stores data about the interaction between two other things, which may be entities or associations. An association is an instance of an association type. association type An association type is part of the database schema and is used to define some of the attributes of the associations that are based on it. associative model A new model for the structure of computer databases of which Sentences is an implementation. bind In a query, to force a request node to return only an instance specified in some way, either a fixed instance, a parameter value, or the result of some other node. bound Of a request node in a query, forced to return a specified instance. See bind. branch In a query request tree, a group of request nodes originating with one common parent node. chapter A logical repository within a Sentences database for schema, data, or query information, stored on disk as a chapter file. A chapter may be included in zero, one or many Sentences profiles. child Dataform A second or subsequent Dataform opened from an association on another Dataform 2-266 Glossary Glossary term Definition child node In a schema or query tree, a node other than the root node. A child node always has only one parent node. client A device that displays data and allows user interaction, but does not store data. Core types folder A folder in the Sentences Explorer schema pane used to display selected entity types from your schema. In any profile you can choose between manual or automatic selection of entity types for this folder. If you choose automatic selection, then entity types are shown in the Core types folder when they are the source of an association which is itself the source of further associations. Core queries folder A folder in the Sentences Explorer schema pane used to display selected queries from your schema. Queries in the Core queries folder are always selected manually by the user. custom datatype A datatype defined by a user, using the Sentences API and the Java programming language. data pane The right-hand pane of the Sentences explorer. used primarily for viewing and selecting instances and associations. data request In a query, the request node at the root of the request tree. database All the data and schema information in one or more Sentences chapters that are used in a profile or a in a set of related profiles. Dataform One of the major parts of the Sentences user interface, used for dynamic data viewing and data entry. datatype A way of defining certain attributes of an entity type. Applying a Sentences-supplied datatype or a custom datatype to an entity type may make it a value type. 2-267 Glossary term Definition Diagram Editor An editor for the basic graphical representation of database elements; may also be used for exploring or documenting a schema Diagram element A graphical representation in the Diagram Editor of an element in the Sentences database; also applies to text labels and annotations derivation A calculated value on a forward request query node that may populate or replace the target of its association derived type In a query, an operator request which specifies that new values should be created, based on a calculation or other derivation from other results. drill-down The process of viewing database information by moving through the data pane or schema pane in the Sentences Explorer. DTD A Document Type Definition for an XML document. Enterprise Edition The Sentences configuration that uses a Web server and servlet container, with the Sentences client running on the same machine or on a remote machine, for example, as a Java applet in a Web browser. entity An entity stores data about something that has an independent existence in the real world. An entity is an instance of an entity type. entity type An entity type is part of the database schema and is used to define some of the attributes of the entities that are based on it. equivalent Two types in Sentences that represent the same real world thing may be defined as equivalent types. Two instances in Sentences that represent the same real world thing may be defined as equivalent instances. filter tool A tool for selecting data according to criteria entered by the user. 2-268 Glossary Glossary term Definition forward request In a query, a request for associations in the forward direction. hidden node In a query, a request node whose results are not included in the returned result tree. A hidden node is usually included to provide data for an expression. HTML The HyperText Markup Language, an international standard file format, based on SGML, used for hypertext documents on the World Wide Web. HTTP The Hypertext Transfer Protocol, an Internet protocol based on TCP/IP, used to fetch hypertext documents from remote hosts on the World Wide Web instances A collective term for entities and associations. Internet A global network of computer networks. The World Wide Web is part of the Internet. Intranet A private closed network that uses the same communications protocols as the Internet. inverse association An instance of an association type as referred to from its target to its source. Inverse request In a query, a request for associations in the reverse direction. inverse verb The verb associated with the inverse component of an association type. items A generic term for instances and types. J2EE The Java 2 Enterprise Edition, the Java standard for multi-tier enterprise applications J2SE JRE The Java 2 Standard Edition Runtime Environment, including the Java Virtual Machine, Java core classes, and associated resources Java A programming language developed by Sun Microsystems Inc. Sentences is written in Java. 2-269 Glossary term Definition Java SDK The Java 2 Standard Edition Software Development Kit, a development environment for the Java programming language JAR file A file in the Java Archive file format, typically containing a bundle of Java class files and additional resources associated with a Java applet local mode A method of running the Sentences Enterprise Edition in which the Sentences server and the Web browser client are installed on the same computer. node A named point in a schema or query tree, for example a type or instance. operator request In a query, a request node that modifies the results returned by its parent. parent Dataform A Dataform opened from the Explorer from which one or more child Dataforms may be opened parent node In a schema or query tree, any node that is the parent of one or more child nodes. Personal Edition A special Sentences configuration, intended for evaluation purposes only, that has a Sentences client and server bundled into a single Java application. positioner tool A tool for positioning the data pane display according to criteria entered by the user. profile A selection of one or more of the chapter files which form a Sentences database. A profile also defines a collection of chapter files and how they operate together to produce a view of their combined schema, query, and data information. query A way to specify data to be extracted from the database. A query can be used to return selected data from the database, or to create XML output, or to define a custom Dataform. 2-270 Glossary Glossary term Definition Query Editor One of the major elements of the Sentences user interface, used for creating queries. query parameter In a query, a value which can be supplied to modify the execution of the query in some way. recursive closure A query operation that follows a transitive relationship as far as it goes. request node In a query, one element of a request tree. request tree In a query, a structure of request nodes that a user builds to define a query. result tree In a query, a data structure holding the results of a query. root The point of origin of a schema or query tree. The root is always displayed at the top of the tree. schema The sum of the type and properties information for all data in the database. schema pane The left-hand pane of the Sentences Explorer. Used for building and viewing the database schema. selection request In a query, a request node that filters the results returned by its parent. Sentences An implementation of the Associative Model of Data, written in Java by Lazy Software. Sentences Explorer One of the major elements of the Sentences user interface, Used for browsing and viewing schema and data information. sequenced Arranged in an explicitly assigned order. The order can be changed only by an explicit re-sequencing action. server A device that runs programs and stores data, and supplies data for display on a client in response to a request. 2-271 Glossary term Definition servlet A Web server component written in Java that provides dynamic content. servlet container A Web server component written in Java that provides network services for servlets (previously known as a servlet engine). servlet context A collection of resources associated with a servlet that can be shared, which is often used as part of a URL set query A query based on the Set Query Editor used in Sentences Version 1. Set queries folder A folder in the Sentences Explorer schema pane where all Set queries are displayed. This folder is only available if you have chosen to show Set queries in your profile. sort request In a query, a request node that re-orders the results returned by its parent. sorted Arranged in a value determined order for example, alphabetical. source An item which is the origin of an association or association type. source request In a query, a request node representing the source of an inverse request. subset A subset is defined by a query against a superset. The subset is named and appears as a new type. Its members are all those instances of the superset type which match the criteria of the subset query. Subsets and their supersets must both be either entity types or association types. subtype When defined as a subtype a type automatically assumes all of the association types defined with its supertype as their source or target. Subtypes and their supertypes must both be either entity types or association types. 2-272 Glossary Glossary term Definition supersede The supersedes command is used to replace one instance by another. superset A type from which one or more subsets is derived. supertype A type from which one or more subtypes is derived. target An item which is the forward end-point of an association or association type. target request In a query, a request node representing the target of a forward request. transitive closure A query operation that follows a transitive relationship to a specified depth but displays the results as a single level. tree A graphical representation of a data structure; in Sentences, schemas and query requests and results are displayed as trees. The root is always displayed at the top of the tree. trigger Custom code that enforces rules and takes actions when the database is updated. types A collective term for entity types and association types. URL Abbreviation for Uniform Resource Locator, an address for data on the Internet or an intranet. value An instance of value type, such as a number or a date. value type A representation of a real-world thing about which you do not need to record additional information, such as numbers or dates. verb A name used to define the nature or significance of a particular association type. W3C Abbreviation for the World Wide Web Consortium, an international body that develops and maintains standards for Web technology. WAR file A Web Archive file used by a Web Application Server 2-273 Glossary term Definition Web Abbreviation for the World Wide Web (WWW) a graphical part of the Internet. Web Application Server A Java technology-based application deployment environment for the World Wide Web. Web mode A method of running the Sentences Enterprise Edition in which the Sentences server runs on one computer and the Web browser client is installed on one or more different computers. XML The Extensible Markup Language, a standard for structured data and documents on the Web, developed by the W3C. XSL The XML Stylesheet Language, used for transforming XML documents, including the way in which they are presented to users. 2-274 Glossary Index A action attribute 2-119 allowing in XML 2-126 add chapter 1-135 all queries folder 1-107 all types folder 1-107 API 2-142 and triggers 2-147 and user-defined parameters 1-59 building and running programs 2-143 class hierarchy 2-144 class hierarchy diagram 2-144 custom datatypes 2-153 example code 2-142 example program 2-222 introduction to 2-141 online documentation 2-142 packages 2-143 triggers 2-145 use of 2-122 applet applet parameters, see parameters Dataform applet 1-231 Picker applet 1-239 Query applet 1-244 Sentences applet 1-31, 1-50, 1-67, 1-255 Sentences applet parameters 1-53 Sentences applet window 1-152 using applets 1-58, 1-92 using colour in applets 1-247 application suite 1-35, 1-38, 1-46 arithmetic operations with date and time datatypes 2-59 arithmetic operators 2-48 arithmetic operators example 2-48, 2-49 assigning datatypes 1-181 association types 1-158 cardinality 1-161 creating verbs 1-88 defining source, verb, and target in 1-159 instance-specific 1-90, 1-217 inverse verb 1-161 metatype target 1-223 options 1-162 properties 1-176 properties page 1-207 renaming 1-166 retrieval options 1-25, 1-212 sequencing 1-175 singular inverse property 1-162 sorting and sequencing 1-175 subsets 1-199 targets 1-223 associations creating 1-164, 1-223 display order 1-163 introduction to 1-79 sorting and sequencing 1-175 associative databases comparison with relational databases 1-85 associative model comparison with relational model 1-84 further reading 1-79 available chapters 1-133 B background colour XSL background colour option 2-89 BackgroundColour parameter 1-238, 1-242 backup backing up and restoring data 1-61 backing up data 1-61 copying chapters for backup 1-64 exporting a profile for backup 1-64 online backup 1-61 BackupPath parameter 1-44 BackupTimeout parameter 1-45 base Dataform 1-219 batch files parameter limit 1-147 binding nodes 2-34 to instances 2-35 to other nodes 2-36 2-276 Index to parameters 2-37 block size 1-137 changing 1-151, 2-263 default block size 1-46 block statistics 2-258 BlockSize parameter 1-46 Border parameter 1-238, 1-242, 1-247 boxbgcolor parameter 1-54 boxfgcolor parameter 1-54 boxmessage parameter 1-54 C cache_archive parameter 1-54 cache_option parameter 1-54 CacheSize parameter 1-45 can create target 2-91 can select target 2-91 canvas 2-132 cardinality 1-161 and data display 1-161 cascading stylesheet 2-96 certificate 1-69 changes chapters 1-133 changing block size 1-151 changing port numbers 1-41 chapter files analysis 2-262 checking 1-137 deleting 1-137 design considerations 1-90 duplicate chapter files 1-73 format 1-150 locations 1-128 naming 1-136 passwords 1-25, 1-138 properties 1-137 statistics 2-256, 2-257 system chapters 1-129 ChapterPathList parameter 1-43 chapters 1-127 adding to a profile 1-135 and internal identifiers 1-150 available chapters 1-133 changes chapters 1-133 chapter properties 1-137 commands 1-130 copying 1-150 deployment 1-140, 1-150 duplicate chapter files 1-150 export and import single chapter 1-151 importing 1-143 and profile visibility 1-147 new chapter 1-136 rename a chapter 1-137 restriction on copying chapter files 1-150 use in database design 1-90 working with chapters 1-135 ChapterTimeout parameter 1-45 checkbox presentation option 1-190 child dataform opening from a table row 1-225 child dataforms 1-258 choosing entity, association or value types 1-87 CLASSPATH 1-50 classpath 1-49 classpath argument 1-49 Classpath elements 1-48 client Sentences client 1-68 client API 2-142 use of 1-93 client API example 2-222 client parameters 1-58 client server interaction diagram 1-256 closure recursive 2-72 transitive 1-25, 2-69 code example Dataform applet 1-234 HTML for Sentences start page MS Internet Explorer 1-52 HTML for Sentences start page Netscape Navigator 1-52 Picker applet 1-241 Query applet 1-246 code parameter 1-54 codebase parameter 1-54, 1-57 collapse view 2-34 colours applet colour features 1-248 2-277 Index using in Sentences applets 1-247 combo presentation option 1-190 commands ExportChapter 1-151 ImportChapter 1-151 communications between Sentences server and client 1-66 comparison operators 2-49 comparison operators example 2-50 components Sentences components 1-24 concatenation operator 2-48 conditional operator 2-53 configuration 1-33 configuration parameters 1-51 optional parameters 1-56 configuration files 1-43 LaunchSentences.html file 1-50 lazystart script file 1-48 Sentences.html start page 1-50 Server.properties file 1-43 configuring Sentences 1-43 support 1-42 configuring with non-J2EE Web servers 1-39 contacting technical support 1-74 context menu see shortcut menu 1-114 copy and paste actions 1-99 core queries 1-107 core queries folder 1-107 core types 1-106 generate automatically option 1-134 core types folder 1-106 behaviour 1-134 setting display in 1-178 cp see classpath create Dataform 1-219 CreateButton parameter 1-244 creating association types 1-158 custom Dataforms 1-227 custom Help 2-157 entity types 1-154 new profile 1-131 parameters 2-76 CSS 2-96 CSV 1-250 exporting query results as 2-103 file structure 1-252 CSV Export 1-254, 2-103 CSV export with multiple associations 2-104 CSV Import 1-250 and cardinality rules 1-253 example 2-165 on Solaris, Linux or AIX 1-254 on Windows 1-253 rules 1-252 running command 1-253 with supertypes and subsets 1-251 CSV Import example adding image data 2-170 data targeted on associations 2-168 importing example files 2-167 preparing a profile 2-166 repeating the demonstration 2-173 viewing additional data 2-171 viewing imported data 2-168 currency 1-185 currency datatype 1-185 international considerations 1-186 custom Dataform 1-91, 1-227 design see Query Editor and Dataforms properties dialog page 1-206 refresh button 1-229 restrictions 1-229 selecting 1-230 custom datatype example 2-214 TelecomsNumber 2-216 custom datatypes 2-153 and import and export 2-155 installing 2-154 loading custom datatypes 2-214 removing 2-155 unloading custom datatypes 2-215 custom Help adding custom Help 2-156 creating 2-157 file name and location 2-157 Help button display 2-156 Help mapping file 2-157 2-278 Index mapping to Help topics 2-158 precedence of Help pages 2-157 updating Help mapping 2-157 custom Help example association type mapping 2-158 custom Dataform mapping 2-159 entity type mapping 2-158 D data demand loading 1-167 data changes 1-128 data changes chapter 1-133 data exchange 1-250 data items size of 1-155 data models associative 1-79 comparing relational and associative 1-84 data pane 1-108 features 1-101 icons 1-102 data request node 2-27 data request nodes creating 2-27 data visibility 1-141 database benefits of exporting 1-141 class hierarchy in 2-144 components 1-153 database lock file 1-72 default export behaviour 1-142 design 1-79 assumptions for Order Entry example 2-189 creating verbs for association types 1-88 design guidelines 1-87 design skills 1-87 export and internal identifiers 1-142 export and import 1-141 export file 1-141 exporting 1-142 importing 1-143 modelling 1-87 queries 2-26 views creating using profiles and chapters 1-273 example 1-274 database lock file 1-72 Dataform 1-115, 1-218 appearance 1-259 appearance with Supertypes 1-260 base Dataform 1-219 changing targets in 1-226 create Dataform 1-219, 1-220 custom Dataform 1-227 default Dataform 1-219 example with Subsets 1-263 instance specific Dataforms 1-227 labels and fields 1-117 parent and child Dataforms 1-222 parent and child dataforms 1-258 shortcut menu 1-224 shortcut menus 1-119 tabbed pages 1-116, 1-219 tabbed pages with subsets and supertypes 1-259 targets that are subsets 1-226 targets with duplicate names 1-226 title bar 1-116 update Dataform 1-221 use of 1-91 Dataform applet 1-58, 1-231 colours 1-247 parameters 1-235 Dataform based updates 1-257 Dataform is read only 2-92 Dataform navigation in derivations example 2-184 Dataform parameter 1-238, 1-242 Dataform quick tour 1-115 Dataform updates parent and child Dataforms 1-258 Dataforms different kinds of 1-115 underlined targets 1-225 datatype classes 2-214 datatype methods example 2-60 datatypes 1-179 <None> 1-181 and value types 1-155 assigning 1-181 2-279 Index changing 1-156 currency 1-185 date 1-186 default directory 1-36 hyperlink 1-182 image 1-182 methods 2-58 mixedcurrency 1-186 number 1-184 numeric datatypes 1-183 output style 1-192 percentage 1-186 presentation methods 1-189 properties 1-179 string types 1-181 text 1-182 time 1-187 timestamp 1-187 undefined 1-181 Datatypes parameter 1-46 date and time datatypes 1-186 and arithmetic operations 2-59 international considerations 1-186 date datatype 1-186 date formats presentation 1-195 default Dataform 1-219 default target 1-209 using expression 1-210 using instance 1-209 default value 2-55 DefaultImageURLBase parameter 1-45 DeleteButton parameter 1-244 deleting 1-164, 1-165 chapter files 1-137 impact of deleting dialog 1-164 profiles 1-134 deletion implicit deletion 1-165 deployment copying chapter files 1-150 exporting and importing profiles 1-140 derivation properties dialog 2-43 derivations 2-42 and XML import 2-118 calculation settings 2-44 example 2-173 in derivations example 2-183 recalculation rules 2-42 setting 2-45 derivations example base and custom Dataform 2-175 design assumptions for Order Entry profile 2-189 importing Order Entry profile 2-174 Order Entry query 2-181 page nodes 2-182 setting Dataform navigation 2-184 derived type node properties dialog 2-41 derived type nodes 2-40 and expressions 2-45 derived type properties 2-41 derived types and derivations 2-40 description 1-205 design associative database 1-79 database design 1-79, 1-87 design for change 1-89 skills 1-87 Diagram Editor menus 2-249 diagram editor 1-25, 2-129 adding query results 2-137 canvas 2-132 components 2-130 consistency with Explorer 2-137 preferences 2-132 starting 2-129 toolbar 2-131 diagram element deleting 2-136 diagram elements adding 2-135 selecting 2-136 diagrams 1-25, 2-129 export and import 2-138 printing 2-138 saving as GIF file 2-138 disable in-place editing 1-191 display refreshing 1-153 display height 1-194 2-280 Index display options 1-110 display order of instances 1-152 display status parameter 1-238, 1-242, 1-247 display width 1-193 divider bar 1-109 in Query Editor 1-125 document conventions 1-27 documentation directory 1-36 drill-down 1-104 DTD 2-105 creating a DTD from a query 2-98 DTD parameter 2-115 servlet access 2-111 DTD parameter 2-115 DTD reference 2-96 duplicate instances are not allowed 1-163, 1-179 E edit profile dialog 1-132 editions 1-31 EditOption parameter 1-55, 1-236, 1-243 element identifiers 2-95 element IDs parameter 2-116 elements in XML 2-106 ellipsis button 1-117 EMBED tag 1-52 EnablePickers parameter 1-237, 1-243 Enterprise Edition running on a single computer 1-66 enterprise edition 1-31 entities 1-153 creating 1-155 introduction to 1-79 size of 1-155 entities and associations 1-79 entities and values 1-82 entity types 1-153 creating 1-154 naming rules 1-154 properties 1-176 renaming 1-166 equivalence 1-202, 1-215 defining 1-203 error messages A connection error has occurred 1-73 Error 10016, see error messages Error 1267 Error 1222 1-70 Error 1265 1-71 Error 1266 1-71 Error 1267 1-71 Error 1268 1-73 Error 1272 1-73 Error 1403 1-74 errors reported at Sentences client 1-70 The Sentences client must be loaded from the same host as its HTML page 1-74 The Sentences database is not available 1-71, 1-73 The Sentences server has not been found 1-71 Your server connection has expired 1-70 example custom datatype use of 2-216 example trigger classes 2-191 example triggers disabling 2-213 examples client API example 2-222 CSV Import example 2-165 custom datatype example 2-214 examples chapters directory 1-36 examples directories 1-36 integration with Microsoft Office examples 2-226 trigger examples 2-190 worked examples 2-163 exists() conditional function 2-54 exists() conditional function example 2-54 expand and collapse buttons 1-103 expand view 2-34 Explorer 1-96 data pane 1-108 deleting in 1-164 display options 1-110 divider bar 1-109 drill down 1-104 menu bar 1-97 shortcut keys 1-109 shortcut menus 1-114 status bar 1-108 tabs 1-104 toolbar 1-98 2-281 Index tooltips 1-100 export and triggers 2-153 databases 1-141 diagrams 2-138 options 1-143 single chapter 1-151, 2-263 troubleshooting 1-149 export and import and custom datatypes 2-155 ExportChapter command 1-151 expression syntax for queries 2-46 expressions arithmetic operators 2-48 comparison operators 2-49 concatenation operator 2-48 datatype methods 2-58 exists() function 2-54 group functions 2-56 in queries 2-45 logical connectives 2-51 results 2-63 syntax 2-46 type constructors 2-62 wildcards 2-50 Extensible Stylesheet Language (XSL) 2-106 external formats 1-250 F feedback 1-29 file system permissions 1-40 file URL prefix 1-183 filter tool 1-170 pattern matching 1-171 finding data 1-99, 1-166 FixedProfile parameter 1-55 ForegroundColour parameter 1-238, 1-242 format display height 1-194 display width 1-193 format options 1-194 picker 1-191 presentation 1-189 read-only on Dataform 1-194 style 1-191 table column width 1-194 XML query output options 2-94, 2-108 function keys Dataform 2-244 Diagram Editor 2-252 Explorer 2-244 Query Editor 2-249 G generate core types automatically 1-134 group functions 2-56 group functions example 2-57 H height parameter 1-54 Help see also custom Help hidden in Dataform tables 1-194 hidden on Dataform 1-194 hide hide nodes in queries 2-66 how to use this guide 1-26 HTML for Sentences start page MS Internet Explorer 1-52 Netscape Navigator 1-52 http URL prefix 1-183 Human resources example application 2-163 employee entity type 2-164 group company entity type 2-165 project entity type 2-165 hyperlink datatype 1-182 I icons 1-101 in Query Editor 1-122 identifiers in query expressions 2-62 image datatype 1-182 ImageURLBase parameter 1-41, 1-56, 1-238, 1-242 impact of deleting dialog 1-164 implicit deletion 1-165 import and triggers 2-153 2-282 Index database 1-141 diagrams 2-138 from earlier versions 1-147 options 1-145 single chapter 1-151, 2-263 XML data 2-110 ImportChapter command 1-151 installation 1-24 installation directories 1-33 InstallPath parameter 1-43 instance equivalence 1-215 instance options 1-163, 1-178 instances creating in the Dataform 1-225 deleting 1-164 display order of 1-152 introduction to 1-82 names created by trigger 1-25, 1-178 operations on 1-213 visibility 1-157 instances are values 1-181 instances may not be created 1-163, 1-178 instances may not be deleted 1-163, 1-179 instances may not be renamed 1-179 instance-specific association types 1-90, 1-217 integration with Microsoft Office creating Mail Merge emails 2-230 creating Mail Merge letters 2-227 creating Outlook contacts 2-234 creating Sentences data from Outlook folder 2-238 internal identifiers 1-142, 1-150, 2-95 and renaming 1-166 chapter UID 1-137 displaying 1-110 inverse associations delayed display 1-152 inverse verb 1-161 iterative design 1-88 J J2SE JRE 1-69 Java J2SE JRE 1-69 Java console tool 1-70 on Solaris and Linux systems 1-70 on Windows systems 1-70 runtime environment 1-69 Sentences and Java 1-255 Java Execution command 1-48 Java Plug-in security warning 1-69 Java Server Pages 1-92 JAVA_HOME parameter 1-48 JDBC connection strings 1-47 JDBC driver class names 1-46 JSPs 1-92 JVM_OPTS parameter 1-49 K key features 1-23 keys not used in Sentences 1-84 L labels and fields 1-117 LaunchSentences.html 1-50 layout XSL layout options 2-86 Lazy Analytics 1-26 LazyID parameter 1-237, 1-243 LazyInstance parameter 1-236, 1-243 LazyQuery parameter 1-247 lazystart 1-48 lazystart script file 1-48 LazyType parameter 1-236, 1-242 LazyView 1-26, 1-86, 1-211 connection cache timeout 1-47 JDBC connection strings 1-47 JDBC driver class names 1-46 licences directory 1-37 license file 1-24 licensing 1-24, 1-32 list presentation option 1-190 local mode 1-66 localisation 2-160 application text 2-161 example messages file 2-161 messages file location 2-161 messages file name 2-161 system text 2-160 2-283 Index the messages.properties file 2-160 locating data 1-166 positioner and filter tools 1-168 log files 1-65 logical connectives 2-51 behaviour with missing values 2-52 logical connectives example 2-51 LookandFeel parameter 1-57 M mailto URL prefix 1-183 mandatory (association type property) see cardinality mapping 1-211 mapping XML Data 2-118 MaxLogSize parameter 1-46 memory usage summary 2-261 menu bars Query Editor 1-121 menus Diagram Editor 2-249 Explorer menu 1-97 Explorer menus summary 2-241 Query Editor menus summary 2-246 shortcut menus 1-114 message log 1-125 message statistics 2-253 message text in Sentences.html start page 1-56 messages 1-125 messages.properties 2-160 Metaschema.chap 1-35 metatypes 1-26, 1-163, 1-223 mixedcurrency datatype 1-186 modelling 1-87 common behaviours 1-89 one-to-many association types 1-88 More prompt 1-167 see PendingTimeout see RequestSize multi-line edit presentation option 1-190 multi-line label on Dataform 1-195 multiple (association type property) see cardinality multiple instances sequencing 1-175 multiple profiles 1-273 multi-user environments and XML import 2-118 N naming parameters 2-76 new chapter 1-136 new features 1-24 new profile creating 1-131 nodes 1-101 and icons 1-101 binding 2-34 node names for XML output 2-97 <None> datatype 1-155, 1-181 number datatype 1-184 O OBJECT parameter 1-53 OBJECT tag 1-52 OLAP 1-26 online backup 1-61 preparation 1-62 restoring data from 1-63 using online backup command 1-62 open profile dialog 1-131 operations on instances 1-213 operator request nodes 2-37 optional (association type property) see cardinality options dialog 1-110 order entry example picker applet 2-187 outlook URL prefix 1-183 output style for datatypes 1-192 overview 1-23 P page nodes 2-80 added automatically 2-81 adding 2-80 Dataform display rules 2-81 used in derivations example 2-182 using 2-81 2-284 Index parameters BackgroundColour 1-238, 1-242 BackupPath parameter 1-44 BackupTimeout parameter 1-45 BlockSize 1-46 Border parameter 1-238, 1-242, 1-247 boxbgcolor parameter 1-54 boxfgcolor parameter 1-54 boxmessage parameter 1-54 cache_archive parameter 1-54 cache_option parameter 1-54 CacheSize parameter 1-45 ChapterPathList parameter 1-43 ChapterTimeout parameter 1-45 client parameters 1-58 code parameter 1-54 codebase parameter 1-54, 1-57 CreateButton parameter 1-244 creating 2-76 Dataform parameter 1-238, 1-242 Datatypes parameter 1-46 DefaultImageURLBase parameter 1-45 defining 2-77 defining type of 2-77 defining value of 2-77 DeleteButton parameter 1-244 display status 1-238, 1-242, 1-247 EditOption parameter 1-55, 1-236, 1-243 EnablePickers parameter 1-237, 1-243 FixedProfile parameter 1-55 ForegroundColour parameter 1-238, 1-242 height parameter 1-54 ImageURLBase parameter 1-41, 1-56, 1-238, 1242 InstallPath parameter 1-43 JAVA_HOME parameter 1-48 JDBC connection strings 1-47 JDBC driver class names 1-46 JVM_OPTS parameter 1-49 LazyID 1-237, 1-243 LazyInstance parameter 1-236, 1-243 LazyQuery parameter 1-247 LazyType parameter 1-236, 1-242 LazyView connection cache timeout 1-47 LookandFeel parameter 1-57 making mandatory 2-77 mandatory 2-77 maximum number in Windows batch files 1-147 MaxLogSize 1-46 naming 2-76 OBJECT parameter 1-53 PendingTimeout parameter 1-45 Picker applet parameters 1-242 Picker parameter 1-243 Profile parameter 1-55, 1-235, 1-242, 1-247 ProfilesProfileVisible 1-57 ProfileTimeout parameter 1-45 progressbar parameter 1-54 progresscolor parameter 1-54 Query applet parameters 1-247 query parameters 2-75 RequestSize 1-238 RequestSize parameter 1-57 SaveButtonText parameter 1-237, 1-243 SENTENCES_HOME parameter 1-48 ServletContext parameter 1-57, 1-235, 1-242, 1247 ServletPort parameter 1-56, 1-235, 1-242, 1-247 ShowTitle parameter 1-244 StatisticsPath parameter 1-48 StatisticsPoll parameter 1-48 StylesheetURLBase parameter 1-46 SystemChapterPath parameter 1-44 target 1-247 TempBlockSize 1-46 TempChapterPath parameter 1-44 TraceLevel parameter 1-44 TracePath parameter 1-44 Triggers parameter 1-46 type parameter 1-54 use in query expressions 2-55 use in subset queries 2-79 user-defined parameters 1-58 UserText parameter 1-57 viewing in Explorer 2-78 width parameter 1-54 XMLParserClass parameter 1-46 parent and child Dataforms 1-222 parent dataforms 1-258 passwords for chapter files 1-25, 1-138 PendingTimeout parameter 1-45 2-285 Index percentage datatype 1-186 permissions file system permissions 1-40 personal edition 1-31 Picker applet 1-58, 1-239 code example 1-241 colours 1-247 parameters 1-242 Picker applet example use of 2-187 picker lists 1-117, 1-227 displaying from the dataform 1-223 picker type selection 1-191 Picker parameter 1-243 port numbers 1-41 changing 1-42 positioner and filter tools 1-168 using together 1-172 Positioner tool 1-169 preferences diagram editor 2-132 presentation 1-189 presentation methods for datatypes 1-189 presentation options checkbox 1-190 combo 1-190 disable in-place editing 1-191 list 1-190 multi-line edit 1-190 radio button 1-190 single line edit 1-190 table for associations 1-190 table for targets 1-191 tree 1-190 printing diagrams 2-138 printing page breaks XSL printing page breaks option 2-90 Profile parameter 1-55, 1-235, 1-242, 1-247 profiles 1-127 commands 1-130 deleting 1-134 deployment 1-140 design considerations 1-90 edit a profile 1-132 edit profile dialog 1-132 export command option 1-143 export troubleshooting 1-149 import command switches 1-145 naming 1-132 open a profile 1-131 renaming 1-133 saving 1-134 the Profiles profile 1-129 using multiple profiles 1-130 visibility of imported profiles 1-146 profiles and chapters constraints 1-130 profiles database 1-129 export using XML 1-148 import using XML 1-148 transferring 1-147 Profiles.chap 1-35 ProfilesProfileVisible parameter 1-57 ProfileTimeout parameter 1-45 progressbar parameter 1-54 progresscolor parameter 1-54 properties 1-176 association type 1-207 chapter properties 1-137 custom Dataform 1-206 datatype properties 1-179 default target 1-209 description 1-205 equivalence 1-202 general 1-177 mapping 1-211 query properties Dataform properties 2-90 derivation properties 2-43 derived type properties 2-41 general properties 2-26 query node properties 2-82 XML properties 2-94 XSL Stylesheet properties 2-85 retrieval methods 1-212 servlet access properties 1-47 statistics properties 1-47 subsets 1-196, 1-197 target parameters 1-208 transitive closure node properties 2-92 triggers 1-203 2-286 Index properties dialog 1-176 association type page 1-207 datatypes properties page 1-179 default target properties page 1-209 description properties page 1-205 equivalence properties page 1-202 format properties page 1-188 general properties page 1-177 subsets properties page 1-196 supertypes properties page 1-200 target parameters properties page 1-208 triggers properties page 1-203 prototyping 1-88 Q queries 2-23 binding nodes 2-34 creating 2-24 creating a new query 2-24 derived type nodes 2-40 description 2-26 displaying results 2-32 editing 2-24 executing queries with parameters 2-78 execution process 2-79 expression syntax 2-46 general properties dialog 2-26 hidden nodes 2-66 navigation 2-92 no results message 2-33 operator request nodes 2-37 output format 2-94 parameters 2-75 recursive closure 2-68 renaming nodes 2-65 request tree 2-27 required nodes 2-64 result trees 2-32 saving 2-24 selection nodes 2-38 sort nodes 2-39 transitive closure 2-68 XML properties 2-94 Query applet 1-58, 1-244 code example 1-245, 1-246 colours 1-247 parameters 1-247 query changes chapter 1-133 Query Editor and Dataforms 2-79 see also custom Dataform and XML 2-93 availability 2-24 divider bars 1-125 drag and drop and cut, copy, and paste 2-31 icons 1-122 introduction to 2-23 menu bar 1-121 menus 2-246 query pane 1-124 quick tour 1-120 results pane 1-124 schema pane 1-124 starting 2-24 status bar 1-124 stop button 2-34 toolbar 1-121 use with XML 2-111 user interface 1-120, 2-25 window 2-25 XML options 2-127 query expression examples arithmetic operators 2-48 comparison operators 2-50 concatenate operator 2-49 conditional operator 2-53 datatype methods currency and mixed currency 2-60 date and time 2-60 text string methods 2-61 default value 2-55 exists conditional function 2-54 group functions 2-57 logical connectives 2-51 type constructors 2-62 user-defined parameters 2-56 void 2-54 wildcards 2-51 query expressions and user-defined parameters 1-60 conditional operator 2-53 2-287 Index default value 2-55 identifiers 2-62 missing values 2-63 syntax 2-46 using conditionals to check parameter values 2-56 using parameters 2-55 using void 2-54 zero token given as result 2-63 query node Dataform properties can create target 2-91 can select target 2-91 Dataform is read only 2-92 interaction between properties 2-92 query node properties dialog format page 2-84 query nodes adding 2-28 query pane 1-124 query properties see properties, query properties query results adding to diagram editor 2-137 displaying 2-32 displaying in the Explorer 2-34 export as XML 2-99 exporting as CSV data 2-103 viewing as XML 2-100 query shortcut menu add options 2-29 R radio button presentation option 1-190 read-only on Dataform 1-194 recalculation rules for derivations 2-42 recursive closure 2-68, 2-72 referential integrity 1-165 refresh button on custom Dataform 1-229 refreshing the display 1-153 relational and associative models comparison 1-84 relational databases access using LazyView 1-86 structural comparison with associative databases 1-85 relational model compared to associative model 1-84 rename rename a chapter 1-137 renaming 1-166 nodes 2-65 renaming profiles 1-133 request tree 2-27 request trees in queries 2-27 RequestSize parameter 1-57, 1-167, 1-238 required nodes 2-64 resources directory 1-37 restarting the Sentences server 1-60 restore backing up and restoring data 1-61 Restore Default settings 1-195 restoring data 1-61 result trees 2-32 results pane 1-124 retrieval options 1-25, 1-212 right-align in Dataform fields 1-194 right-align in Dataform tables 1-195 running CSV Import 1-253 S Salary Update example use of 2-222 SaveButtonText parameter 1-237, 1-243 saving saving a profile 1-134 schema export as XML 2-107, 2-108 schema changes 1-128 schema changes chapter 1-133 schema diagram an associative schema 1-83 complex association 1-81 simple association 1-80 target parameters schema 1-271 schema export as XML 1-26 schema pane description 1-105 features 1-101 2-288 Index icons 1-102 in the Query Editor 1-124 schema visibility 1-141 scroll bars 1-108 searching for data 1-166 security 1-74 checking HTML page host 1-74 using database views 1-75 selection nodes 2-38 and expressions 2-45 Sentences and Java technology 1-255 and XML 2-105 components 1-24 configuration 1-33 configuration files 1-43 database design 1-87 diagrams 2-129 licensing 1-24, 1-32 log files 1-65 queries 2-23 quick tour 1-95 security 1-74 transactions 1-257 uninstall 1-77 user interface design options 1-90 user interface options 1-90 XML conventions 2-123 Sentences API 2-142 Sentences applet 1-31, 1-50, 1-67, 1-255 parameters 1-53 Sentences client 1-31, 1-68 starting 1-68 Sentences editions 1-31 Sentences Explorer 1-152 drill-down 1-104 quick tour 1-96 tabs 1-104 tooltips 1-100 updates 1-257 use of 1-91 Sentences IDs parameter 2-116 Sentences server 1-31 shutting down and restarting 1-60 stopping data retrieval 1-173 Sentences.html start page 1-50 Sentences_chapters 1-34 Sentences_home 1-34, 1-35 SENTENCES_HOME parameter 1-48 Sentences_images 1-35 sequencing 1-175 association types 1-175 multiple instances 1-175 server statistics 2-253 server activity monitoring 1-60 server and client communications 1-66 server API 2-142 server request statistics statistics server requests 2-263 Server.properties file 1-43 server-side triggers 2-145 servlet access 1-47 servlet access to Sentences 1-75 ServletContext parameter 1-57, 1-235, 1-242, 1-247 ServletPort parameter 1-56, 1-235, 1-242, 1-247 Servlets use with XML 2-111 servlets access to Sentences features using 1-75 available in Sentences 1-75 enabling and disabling access 1-77 for access to a DTD 2-111 for access to XML 2-112 set queries 2-23 visibility 1-134 set queries folder 1-107 shortcut keys 1-109 shortcut menus 1-114 Dataform 1-119 show grid XSL show grid option 2-90 show separator XSL show separator option 2-90 show set queries 1-134 ShowTitle parameter 1-244 Shutting down and restarting the Sentences server 1-60 single line edit presentation option 1-190 singular (association type property) see cardinality singular inverse 1-162 2-289 Index size of entity and value instances 1-155 sort nodes 2-39 sorting 1-175 display order of instances 1-152 source 1-159, 1-160 spatial view 2-257 statistics 1-47 chapter file analysis 2-262 chapters statistics 2-256 memory usage 2-261 message statistics 2-253 open profile statistics 2-254 open profiles 2-254 server 2-253 summary page 2-257 viewing 2-253 StatisticsPath parameter 1-48 StatisticsPoll parameter 1-48 status bar 1-108 in Query Editor 1-124 Stop button 1-173 stop button in the Query Editor 2-34 stopping data retrieval 1-173 in the Query Editor 2-33 string datatypes 1-181 strings 2-61 style 1-191 stylesheet parameter 2-114 stylesheet processing 2-117 stylesheets directory 1-37 StylesheetURLBase parameter 1-46 subset queries 2-78 attaching to subsets 2-78 subsets 1-89, 1-196 and Dataform 1-259 association types 1-199 creating 1-197 ordering 1-259 properties 1-197 properties dialog page 1-196 properties page 1-197 subset queries 2-78 used as targets 1-226 viewing subset instances 1-199 subsets and supertypes comparison 1-198 Dataform behaviour 1-199 ordering 1-259 using to design dataform 1-259 supersedes 1-214 supertypes 1-89 and Dataform 1-259 defining 1-201 properties dialog page 1-200 using with association types 1-201 support information 1-111 symmetric 1-26, 1-162 system chapters 1-35, 1-129 system configuration see Sentences, configuration SystemChapterPath parameter 1-44 T tabbed pages on Dataform 1-116 table column width 1-194 table for associations presentation option 1-190 table for targets presentation option 1-191 target 1-159, 1-160 target parameter 1-247 target parameters 1-266 allowed products example 1-271 conference room example 1-266 limitations 1-272 properties dialog page 1-208 targets and subsets 1-226 with duplicate names 1-226 technical support contacting 1-74 TempBlockSize parameter 1-46 TempChapterPath parameter 1-44 text datatype 1-182 time datatype 1-187 time formats presentation 1-195 timestamp datatype 1-187 Tomcat Tomcat home directory 1-38 Tomcat Sentences directory 1-38 2-290 Index Tomcat web applications directory 1-38 toolbar diagram editor 2-131 Explorer 1-98 toolbars Query Editor toolbar 1-121 tooltips 1-100 trace directory 1-39 trace files 1-64 trace level settings 1-64 TraceLevel parameter 1-44 TracePath parameter 1-44 transaction processing 1-257 transactions Dataform based updates 1-257 Explorer based updates 1-257 in Sentences 1-257 transitive closure 1-25, 2-68, 2-69, 2-92 translation see localisation tree displays 1-100 tree displays in Sentences 1-95 tree presentation option 1-190 trigger examples auto numbering 2-203 email address trigger 2-199 refuse update trigger 2-194 triggers 1-203, 2-145 and the Sentences API 2-147 and user-defined parameters 1-59 and XML import 2-118 attaching 2-147 attaching and editing (example) 2-193 calling 2-151 creating instance names 1-25, 1-178 customised actions 2-152 customised validation 2-152 examples 2-190 installing 2-147 invoking 2-151 loading example triggers 2-191 properties dialog page 1-203 rules 2-152 threading 2-150 trigger actions 2-152 using with import 1-250 using with import and export 2-153 viewing enabled triggers 2-192 triggers default directory 1-39 Triggers parameter 1-46 triple counts 2-260 type constructors 2-62 type constructors example 2-62 type parameter 1-54 type properties 1-176 types and instances 1-82 deleting 1-164 introduction to 1-82 typographical conventions 1-28 U undefined datatype 1-181 underlined targets 1-225 uninstalling Sentences 1-77 update Dataform 1-219 updating changes 1-128 URL using a URL with the Hyperlink datatype 1-183 user interface Explorer 1-96 introduction 1-95 options 1-90 Query Editor 1-120 schema pane 1-105 the Dataform 1-115 user-defined parameters 1-58 and query expressions 1-60 and the client API 1-59 and triggers 1-59 format 1-58 how to refer to 1-59 pre-defined names 1-59 use in query expressions 2-55 user parameters 1-59 UserText parameter 1-57 V valid XML 2-106 value types 1-155 and datatypes 1-155 2-291 Index behaviour 1-157 creating 1-155 values behaviour 1-157 creating 1-158 introduction to 1-82 size of 1-155 visibility 1-157 verb 1-159, 1-160 virtual directories 1-40 visibility of instances 1-157 of schema and data 1-141 W Web security 1-74, 1-76 what’s new 1-24 width parameter 1-54 wildcards 2-50 wildcards example 2-51 X XML 2-107 action attribute 2-119 action attributes 2-119 allowing the action attribute 2-126 associations as child elements 2-124 attributes 2-106 client import 2-122 combining simple elements 2-126 command line tools 2-120 conventions 2-123 create DTD from query 2-98 data input and output methods 2-110 derived names for element types 2-125 DTD 2-105 DTD parameter 2-115 element IDs parameter 2-116 export Sentences schema as 2-107, 2-108 export using command line 2-120 exported from queries 2-99 import and derivations 2-118 import and multi-user environments 2-118 import and triggers 2-118 import, using a servlet 2-116 import, using command line 2-121 importing from 2-110 include Sentences IDs 2-95, 2-126 introduction to 2-105 mixed content not allowed 2-124 online import 2-122 output format parameter 2-116 output options 2-94 for schema export 2-108 properties dialog 2-94 query properties 2-94 schema export 1-26 Sentences IDs parameter 2-116 servlet access 2-112 servlet parameters 2-113 setting options in the Query Editor 2-127 split multiple lines 2-125 stylesheet parameter 2-114 stylesheet processing 2-117 terminology 2-105 using alternative parsers 2-123 using content, not attributes 2-123 using element IDs 2-127 using servlets 2-111 using stylesheet processors 2-123 using the API 2-122 using the command line 2-120 using the Query Editor 2-111 valid XML 2-106 view query results as 2-100 well-formed XML 2-105 XML-based user interface 1-92 XMLParserClass parameter 1-46 XSL 2-106 background colour option 2-89 example stylesheets 2-101 export stylesheet 2-99 generated stylesheet 2-96 layout options 2-86 master.xsl example 2-102 no stylesheet (none) 2-96, 2-109 printing page breaks option 2-90 show grid option 2-90 show separator option 2-90 stylesheet 2-85 2-292 Index stylesheet from server 2-97, 2-109 stylesheet from URL 2-97, 2-110 stylesheet options 1-25, 2-95 for schema export 2-109 stylesheet properties 2-85 table.xsl example 2-103 XSLT 2-107 Y Your comments 1-29