1
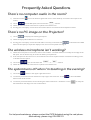
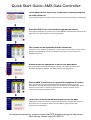
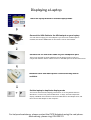
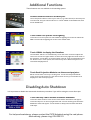
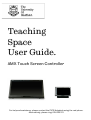
Teaching
Space
User Guide.
AMX Touch Screen Controller
For help and assistance, please contact the CiCS Helpdesk using the red phone.
Alternatively, please ring: 0114 222 1111
Frequently Asked Questions
There’s no computer audio in the room?
1)
Click the Volume
muted.
icon in the bottom right hand corner of the desktop, and ensure the output is not
DATA 2) Touch
on the AMX panel, and increase the
channel.
3) Check all of the AV units in the lectern cupboard are switched on.
4) If using your own laptop, ensure the 3.5mm audio cable is connected to the headphone socket
There’s no PC image on the Projector?
1)
Touch
to display the Teaching Computer.
2) Check the Sympodium Monitor is turned on.
3) If using your own laptop, ensure the VGA cable is securely connected, and
Panel. Put the laptop in duplicate display mode; for more info please see Page 3.
is selected on the AMX
The wireless microphone isn’t working?
1)
Check the microphone is turned on, and not set to ‘Mute’. The Mute button is normally on the edge of the
Mic pack. The On button may be under the battery compartment.
2) If the microphone does not turn on, the batteries need to be replaced. Please contact the building porter,
or AV Services for spares.
LAPEL MIC 3) Touch the
icon, and increase the
or
channel.
4) Check all of the AV units in the lectern cupboard are switched on.
The system turns off when I’m teaching in the evening?
1)
Touch the
button in the upper right hand corner.
2) You will be presented a screen with three ‘Help’ logos, and some text. Touch
hand corner of the screen.
in the TOP RIGHT
3) You will be presented with a screen showing the status of the Auto - Shutdown. Touch
Auto Shutdown. See Page 4 for more information.
to delay the
For help and assistance, please contact the CiCS Helpdesk using the red phone.
Alternatively, please ring: 0114 222 1111
Quick Start Guide: AMX Data Controller
Touch AMX Panel to wake it up. Follow the on screen prompts to
turn the system on.
The teaching computer, located in the lectern, will need to be switched on separately.
Press the ‘DATA’ icon, and touch the appropriate source
If using the teaching PC, log in with your normal (MUSE) username and password. See
Page 3 for more information on connecting a laptop.
The volume can be adjusted from the Volume tab
Touch the + and - buttons to change the volume levels. PC and Laptop volume can be
changed using the DATA controls. If available, microphone volume can also be
adjusted from here.
Access further AV equipment from the Left Hand Menu
This may include a DVD / Blu Ray player, cassette / CD player, AUX input and
Visualiser. Equipment available may differ between teaching spaces.
Use the AMX Touch Screen to operate AV equipment in lectern
After selecting, the appropriate AV equipment (located in lectern) must be
switched on manually. Once switched on, use the buttons on the AMX Panel. These
buttons work just like an ordinary remote control. Further controls can be
accessed by touching the ‘More’ button.
Touch EXIT & choose Shutdown System to turn off AMX
Follow the on screen prompts to confirm the shutdown command. Shut down the
PC as normal. You will not be able to turn the AMX on again until the data
projector has cooled down.
For help and assistance, please contact the CiCS Helpdesk using the red phone.
Alternatively, please ring: 0114 222 1111
Displaying a Laptop
Touch the laptop button to activate laptop mode
Connect the VGA Cable to the VGA output on your laptop
VGA
You will need to supply your own adapter if you don’t have a VGA output. If
available, the thinner HDMI cable on the lectern can be used instead.
HDMI
Connect the 3.5 mm audio cable to your headphone port
This is only required for audio playback. Use the laptop volume control, in
conjunction with the ‘DATA’ volume control on the AMX panel to set the audio levels.
Network cable and mains power connection may also be
available
Set the laptop to duplicate display mode
+
This can be selected in the display preferences, or via a keyboard shortcut.
Windows 7 / 8 users can press the Windows + P Keys, and select duplicate
display. MacBook users should connect the VGA cable to the adapter first, and
then connect the adapter to the computer.
For help and assistance, please contact the CiCS Helpdesk using the red phone.
Alternatively, please ring: 0114 222 1111
Additional Functions
These features are not available in all teaching spaces.
Connect external device to the AUX port
Use a composite cable to connect your device (e.g. video camera) to the AUX port.
Turn the VCR, and your external device on. Touch ‘VIDEO’ on the AMX Panel, then
touch ‘SHOW AUX’.
Touch LIGHTS to operate room lighting
Touch the on screen options to select different lighting environments. When the
AMX is turned off, the lighting will revert to the default state.
Touch VISUAL to display the Visualiser
The Visualiser will turn on automatically. Touch the zoom controls to adjust the
zoom level. Touch the ‘Lights’ button to select how many lights should be used on
the Visualiser. Touch ‘More’ to access further controls, such as white balance and
iris. Please note; in some spaces, the buttons may have a different layout to the
screenshot displayed here.
Touch Dual Projection Mode to use the second projector
Return to the Home screen by Touching ‘Exit’. Touch ‘Dual Projection Mode’.
Touch ‘Turn Dual Projector On’, and choose which source you would like to be
displayed on the second projector.
Disabling Auto Shutdown
It is important to disable the automatic shutdown procedure if you will be using the room after 6pm.
Touch the Help Tab to disable automatic shutdown
Touch the ‘HELP!’ button. A blue screen with contact information will appear.
Touch the Help icon on the top right hand side. A screen showing the Automatic
Shutdown status will appear. Touch ‘Disable’ to delay the automatic shutdown
until 10pm.
For help and assistance, please contact the CiCS Helpdesk using the red phone.
Alternatively, please ring: 0114 222 1111