1
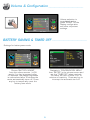
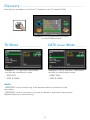
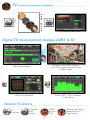
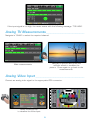
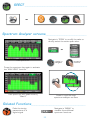
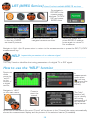
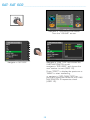
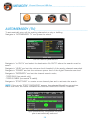
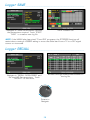
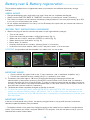
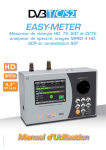
HD Field Meter, T2 TV & SAT,
Spectrum analyzer, MPEG HD pictures,
SCR & SAT constellation.
HD
MPEG4
4.3”
UG-EASYMETERT2-EN V1,2
TFT 16:10
User’s Guide
Index _______________________________________________________________________________
3–Front Panel & Keys
4–‘HOME’ Screen
4–Navigation
5
– Volume & Configuration
5–BATTERY SAVING & TIMER OFF
6–Discovery
7 –SAT
8
– TV
9
– ANALOG TV MEASUREMENTS & VIDEO INPUT
10–CATV
11–SPECT
12–LIST
12– HELP
13 – SAT SCR
14– MEMORY
15 –LOGGER SAVE & RECALL
16 – BATTERY TEST & BATTERY REGENERATION
17 –LI-ION POLIMER BATTERIES & WARNINGS
18 – POWER SUPPLY & BATTERY CHARGE LED STATUS
19
–
METER MAINTENANCE
19 –DISPOSAL of ELECTRONIC EQUIPMENT
2
Front Panel & Keys _____________________________________________________________________
1
16
15
2
14
13
12
11
10
3
9
8
7
4
5 6
no
1
2
3
4
5
6
7
8
9
10
11
12
13
14
15
16
Name
RF SAT Ingress
RF TV Ingress
SPECT Key
HOME Key
PLAN Key
VOLUME Key
DC@RF IN
BATT. CHARGE
MAINS
CATV Key
TV Key
SAT Key
Encoder
Power Supply
USB
VIDEO input
Function
SAT input connector 950/2.150 MHz
TV/CATV input connector 47-1.000 MHz
Press to visualize spectrum
Press to turn on. Keep pressed to turn off.
Press to select SAT, TV & CATV memory plans
Press to regulate the volume and other adjustments
LED on with remote control active
LED on during battery charge
LED on when the meter is connected to the mains power supply
Press to go to CATV measurement screen
Press to go to TV measurement screen
Press to go to SAT measurement screen
Press to confirm, rotate to select
External power supply connector, 12/18 Volt DC
For PC connection
RCA analog video input connector
3
‘HOME’ Screen ______________________________________________________________________________________
Press the ‘HOME’ key to go to the home screen, then rotate the wheel to navigate in the ‘SAT’,
‘TV’ or ‘CATV’ icons and press the wheel to select the measurement mode required:
Press the ‘HOME’ key at any time to return to the home screen.
Navigation _______________________________________________________________________________________________
Use the wheel to navigate across the screen and to change values:
• display ZONES
Tuning parameters
Picture
Measurements
Transport Stream info
Context sensitive menu
• CHANGING Values
Navigate to an item then select,
Rotate the wheel to change the value of the item.
• Drop-down menus
Navigate in a drop-down menu then keep pressed,
Rotate the wheel to highlight a value and press to select.
• NUMERICAL KEYBOARD
Navigate in a numerical value and keep pressed,
Press the key with the value required to insert the numbers.
4
Volume & Configuration __________________________________________________
Volume selection is
immediately active,
press “ENTER” for the
Display configuration
and other important
settings.
BATTERY SAVING & TIMER OFF __________________________________________________
Settings for battery save mode:
Navigate in “CONFIGURATION MENU”
then “METER” in the volume screen and
set the “TIMER OFF” value required.
The meter will turn off after 5 or 10
minutes of inactivity. Press any key to
interrupt the automatic turn-off.
Choose “BATTERY SAVING”
from the volume screen. In ON
mode, if no key is pressed, after
30 seconds, the display brightness
is reduced and after 5 minutes the
meter automatically turns off. Press
any key to temporarily reset the
battery save mode.
5
Discovery __________________________________________________________________________________________
Identifies the modulation of a tuned TV channel in the TV master PLAN:
Navigate in the “CONFIGURATION MENU”
in the VOLUME window.
TV Mode _________________________________
CATV
(Cable)
Mode _______________
Navigate in “TV” and then “DISCOVERY”
and set the identification mode:
Navigate in “CATV” and then “DISCOVERY”
and set the identification mode:
- TERR ONLY,
- CABLE ONLY,
- TERR & CABLE.
- TERR & CABLE.
NOTES:
- DISCOVERY mode is active only if the antenna cable is connected to the
instrument.
- DISCOVERY mode is not active if you use a manual or automatic memory plan
(Manual Memory or Automemory).
6
SAT __________________________________________________________________________
t
h
e
n
o
r
p
r
e
s
s
SAT Channel Plan screen
“Satellite information (mux data) is provided in
cooperation with LyngSat www.lyngsat.com”
Digital SAT measurement displays DVB-S & DVB-S2_________________
Navigate in PICTURES, press to
zoom, press again to return to the
measurement
Main Measurements
8PSK Constellation
If the input signal is too high, the
meter warns with the following
message: “too high”.
Navigate in “ZOOM” and select
the constellation square
window to enlarge.
Related Functions ____________________________________________________________
SAT
Spectrum
MPEG
service
LIST
SAT channel
PLAN
selection
7
Identifies the tuning
parameters of a
digital signal
(all channels received at the Antenna)
TV_____________________________________________________________________________
t
h
e
n
o
r
p
r
e
s
s
TV Channel Plan screen
Digital TV measurement displays DVB-T & T2_____________
Navigate in PICTURES, press to
zoom, press again to return to the
measurement
Main Measurements
Press “SPECT” key to visualize
TV Spectrum
DVB-T2 Constellation
Related Functions ___________________________________________________________
TV
Spectrum
MPEG
service
LIST
TV channel
PLAN
selection
8
Identifies the tuning
parameters of a
digital signal
If the input signal is too high, the meter warns with the following message: “too high”.
Analog TV Measurements ___________________________________________
Navigate in “CHAN” to select the required channel.
Navigate in picture and press the
encoder wheel to visualize the
picture. Press again to go back to the
measurements.
Main measurements
Analog Video Input _______________________________________________________
Connect an analog video signal to the appropriate RCA connector.
Select VIDEO IN. EXT
to visualize the Video Input
9
(All Antenna & S band channels)
CATV ___________________________________________________________________________
t
h
e
n
o
r
p
r
e
s
s
CATV Channel Plan screen
Digital CATV measurement display DVB-C ______________________
Navigate in PICTURES, press to
zoom, press again to return to the
measurement
Main Measurements
Press “SPECT” key to visualize CATV
Spectrum
If the input signal is too high, the
meter warns with the following
message: “too high”.
Related Functions ___________________________________________________________
CATV
Spectrum
MPEG
service
LIST
CATV channel
PLAN
selection
10
Identifies the tuning
parameters of a
digital signal
SPECT ______________________________________________________________________
or
Spectrum Analyzer screens ______________________________________________
Navigate in “SPAN” to modify the value or
directly select the active span value:
or
Fast spectrum
rotate to
navigate
press to
confirm
Press the spectrum key again to activate
the “MAX HOLD” function.
Fast spectrum with peak memory
“Max H”
Press to cycle through
spectrum analyzer screens
Related Functions ____________________________________________________________
Navigate in “MENU” to
visualize the additional
spectrum functions
Finds the tuning
parameters of a
digital signal
11
show & select available MPEG TS services
LIST (MPEG Service) _____________________________________________
Or navigate in
PICTURE in the
measurement
windows TV-CATVSAT and press
ENTER twice.
Press ENTER to access
to the list of MPEG
services & pictures.
Rotate the ENCODER to
navigate between services.
Select the image and
press ENTER to enlarge,
press again to return to
the measures.
Navigate in Vpid - Apid & press enter to return to the measurements or press the SAT/TV/CATV
measurement key.
inspect the parameters of an unknown signal
HELP __________________________________________________________________________
The “help” function identifies the tuning parameters of a digital TV or SAT signal:
How to use the “HELP” function _________________________________
Spectrum
mode
move the
“mrk.Fr”
to the
center of
a digital
carrier,
Navigate in “HELP”
on the main menu,
o
r
Press to
start the
search,
In
measurement
mode when
the lock icon
is open (the
signal is not
locked),
The “help”
function will
try to identify
the tuning
parameters of
the selected
digital carrier.
At the end of the search (the word “Found” will be shown in the 3 boxes) the meter automatically
shows the measurement display and the picture of the selected carrier (if available).
12
SAT: SAT SCR ______________________________________________________________________
Navigate in “CONFIGURATION MENU”
from the “VOLUME” screen.
Navigate in “SAT SCR”:
Navigate in “LNB TYPE” and choose the
LNB/MULTISWITCH model,
navigate in “SCR USER”, and choose the
user number to test (USER 1-8),
Press “SPECT” to display the spectrum or
“MEAS” to start measuring,
or navigate in “SCR CABLE TEST” to
perform in spectrum mode the SCR LNB/
MULTISWITCH 8 frequencies check
(USER 1-8).
13
Channel Plans and LOG files
MEMORY __________________________________________________________________________________
AUTOMEMORY (TV) ___________________________________________________________________________
To automatically store all the existing channels in a city or building.
Navigate in “AUTOMEMORY TV” and press the wheel:
Set the desired parameters:
Navigate in “to FILE N” and select the destination file “AUTO” where the search must be
saved.
Navigate in “LEVEL” and set the minimum level threshold of the analog channels searched.
Navigate in “POWER” and set the minimum power level of the digital channels searched.
Navigate in “DISCOVERY” and set the channel search mode,
- TERR ONLY (terrestrial only),
- TERR & CABLE (terrestrial & cable),
Navigate in “START SAVE” to create a new channel plan and to activate the search.
NOTE: If the words “START OVERWRITE” appear, the selected file will be overwritten,
wait a few mins, the meter indicates the recorded ANALOG & DIGITAL Channels.
Upon automemory completion the new
plan is automatically selected.
14
Logger SAVE __________________________________________________________________
DATA LOGGER run
Navigate in “SAVE DATALOGGER” and set
the parameters required. Touch “START
SAVE” to create a new log file
NOTE: if the MANU plan has mixed TV and SAT programs, the STOP&GO function will
assist when running a LOGGER asking to move the cable lead from a TV to a SAT signal
source or vice-versa.
Logger RECALL _____________________________________________________________
Browse through measurements saved in
the log file,
Navigate in “RECALL DATALOGGER” and
Set the LOG file parameters. Touch
“RECALL?” to see them,
Rotate to
Navigate.
15
Battery test & Battery regeneration __________________
This procedure explains how to regenerate/check your batteries and calibrate the battery charge
indicator.
USEFUL ADVICE:
• Charge the batteries every night after use, even if they are not completely discharged;
• Always use the “BATTERY SAVE” & “TiMER oFF” functions to increase your meter’s autonomy;
• The maximum capacity of the batteries and battery charge indicator’s accuracy improves by up to 20%
if you carry out many battery test cycles;
• Do not replace the batteries: first carry out 3 to 5 battery test cycles until you recover the maximum
capacity of the batteries.
“BATTERY TEST” INSTRUCTIONS & PROCEDURE:
1. Before carrying out the test connect the meter to the original battery charger:
• Turn on the meter;
• Press the volume key and select “configuration menu” (fig. 1);
• Select the word “meter” and press “ENTER” to confirm (fig. 2);
• Select “battery test” and select “on” (fig. 2);
• Press “enter” to confirm;
• Carefully read the various screens, pressing “enter” in succession;
• in the last instructions window, select “start” and press “enter” to start the test.
WARNiNG: the procedure will be cancelled if you select “exit” on any screen.
FIG. 1*
FIG. 2*
FIG. 3*
IMPORTANT ADVICE:
• Do not connect any type of load to the “f” input connector (lnb, tv head-end, amplifiers, etc.).
• Extract the conditional access module (cam), if it is present in your meter.
2. The battery test takes approx. 18 Hours (charging/discharging/recharging activities and
measurement of the battery autonomy), during this time the meter must not be used. At the end of
the test the meter will turn off automatically. in order to make sure that the test has been carried out
correctly, all the meter’s commands are blocked except for the reset function, which remains active so
that the meter can be turned off if necessary.
3. The batteries will be completely charged at the end of the test.
4. To check the battery test results, enter METER SETUP, select BATTERY TEST function and read the
results: for example 130AclY (fig.3) = 130 minutes. The “Y” of YES confirms that the battery is still
good enough, whereas an “N” for No indicates that it could be faulty, too deteriorated or that the cycle
was interrupted.
IMPORTANT NOTES:
if the test is interrupted using “reset”, the battery charge indicator may provide incorrect indications,
therefore repeat the battery test procedure.
* The displays shown in this guide may change according to the model and are subject to change without
notice. If you connect your meter, using the S.M.A.R.T. Pro program, from the usb port to the pc, you can
download the screens shown above.
16
LI-ION Polimer Batteries _____________________________________________________
IMPORTANT:
•
ALWAYS TURN THE INSTRUMENT OFF BEFORE CONNECTING THE BATTERY CHARGER;
•
DO NOT LEAVE THE BATTERIES DISCHARGED FOR LONG PERIODS;
•
AlWAYS cHARGE THE BATTERiES AT NiGHT FoR AT lEAST 7 HoURS, EVEN iF THEY ARE
NoT coMPlETElY DiScHARGED.
USEFUL INFORMATION:
1. The batteries supplied are high quality and tested individually, the autonomy depending on
the following conditions:
• the LNB power consumption: Single, Dual or Quadruple;
• the external temperature: with temperatures of less than 10°C, 20% of the capacity is lost;
• the age of the batteries: a 10% loss in efficiency each year;
• Remember that the TiMER oFF function, that automatically turns off the Meter after
5 o 10 minutes of inactivity saves up to 30%.
2. The battery indicator has a tolerance ( like all battery powered electronic devices ) according
to the following factors:
• the battery’s charging percentage;
• external temperatures;
• battery wear and tear;
• +/– 2%.
ICONS SHOWING THE BATTERY CHARGE STATUS:
BATTERY AUTONOMY:
The battery autonomy of between: 2 hours min. and 4 hours max.
WARNINGS ______________________________________________________
RECHARGEABLE BATTERY _______________________________
This device contains a built-in Li-PO (Lithium polimer) battery that can be recharged many times. The
battery contains chemicals that might wear with time even if not used. Please dispose of batteries
properly.
Do not take the battery pack apart or expose it to extreme temperatures (over 50°C). If the device
has been exposed to very low or high temperatures let it rest at room temperature before use.
RECHARGING THE BATTERY ______________________________
The Battery must be recharged at room temperature (about 20°C) with the device turned off. To
avoid premature failure of the battery never leave the device with an empty battery for prolonged
periods.
17
Power Supply (mains)
and Battery Charge (chrg) LED status ________________________
iNsTRuMENT
CONNECTEd
TO THE MaiNs
pOwER supply
OFF
YES
ON
ON
Batteries in fast charge
OFF
YES
ON
OFF
Battery charge completed
OFF
YES
ON
Flashing
0.5 SECONDS OFF
0.5 SECONDS ON
Abnormal battery temperature.
The recharge cycle has been suspended
temporarily and will automatically reset.
lEd BaTT
CHRG
lEd MaiNs
18
NOTEs
Meter Maintenance ______________________________________________________________________
CLEANING THE METER
cleaning the meter from dust and dirt is easy and helps mantaining it in optimal work conditions
through the years. The cleaning procedure is simple and quick and requires only minor attention.
Never use chemical aggressive products (diluent) and/or abrasive or rough clothes which may
damage plastics and displays.
Always use a soft cloth, damped with a simple water and alcohol solution or a de-greasing not
abrasive liquid soap.
Keyboard and display should be gently cleaned. Rubbing the keyboard and/or the display(s) may
seriously damage their functions.
MAINTENANCE AND CARE OF THE METER
This meter has been designed to withstand severe conditions of use. Even so, its life may be
prolonged by respecting some simple and effective rules:
•
The meter has not been designed to withstand high temperatures (over 60°c or 140° F).
Those temperatures can be easily reached when the meter is left in a car, especially behind the
windshield, or in the trunk. The lcD display and/or other details may easily be damaged by the
extreme temperature.
•
The internal battery may rapidly loose its efficiency if exposed to high or low temperatures. This
will result in reduced autonomy of the meter when powered by internal battery.
•
When recharging the internal battery, do allow a good air circulation around the meter and
the adapter: do not cover it with clothes and do not recharge the battery when the meter is
contained in its transport case
•
The meter is not waterproof, even if it is protected against incidental water drops. in case of
contact with water, electronic circuits may be damaged, allow the meter to dry thoroughly before
trying to turn it on. Do not use hairdryer or other strong heating sources, but just leave the
meter in quiet air. if possible, contact Rover laboratories S.p.A. Technical Assistance.
Disposal of electronic equipment ___________________________________
Disposal of electric/electronic equipment (applicable in all cEE countries and whereever
separate waste collection system is applied).
This symbol on the packaging indicates that the product should not be considered as
domestic waste. The product, at the moment of disposal, should be brought to a waste
collection point with the proper facilities to manage electrical/electronic
appliances.
Electric/electronical appliances, if not disposed of correctly, may have
negative consequences on your health and enivironment.
Furthermore, a proper recycling procedure helps mantaining natural
resources.
For more information about the correct disposal of this product, please
refer to your local waste management offices or the shop where this
product was bought.
19