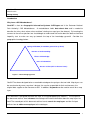
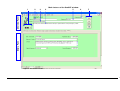
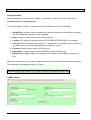
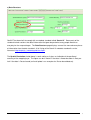
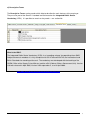
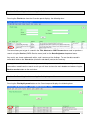
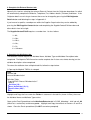
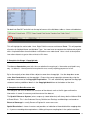
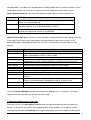
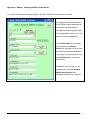
1
GeoCAT
USER Guide v1.0
Produced by
Dartmoor National Park
Information Systems Section
March 2008
Version 1.0
Initial Version
Change history
Introduction
Why have a GIS Metadatabase?
GeoCAT is short for Geographic Information Systems CATalogue and is the Dartmoor National
Park Authority’s GIS Metadatabase.
A metadatabase holds data about data and is needed to
describe the “who, what, where, when and how” relating to a map layer (the dataset). By knowing the
answers to these five questions we should begin to understand a bit more about the data we hold and
hopefully start to make our way up towards the top of the knowledge pyramid!
Consider the
geographical analogy below:
Spring of Wisdom (It would be great to be up here!)
Streams of understanding
Rivers of Knowledge
Seas of information
Oceans of data (this is what we have!)
Figure1 – The knowledge pyramid
GeoCAT has been designed to be a searchable catalogue of map layers that we hold. Map layers can
be searched on by name, overview / abstract, the service responsible for their maintenance, the
original data supplier or the filename on GIS. In addition, Keywords can be used to search for a map
layer.
This document is designed to outline the steps in using and updating the GeoCAT. The first part of
the document outlines how to browse the catalogue to find out information about the map layers we
hold. The second part of this document outlines how to search for map layers and the final part
outlines how to add a new map layer to the catalogue.
T:\GIS\Procedures\PR40 - GeoCAT Metadatabase.doc
2
2
3
4
Main features of the GeoCAT window:
5
6
7
Details Panel
Overview Panel
1
Figure 2: The GeoCAT window
T:\GIS\Procedures\PR40 - GeoCAT Metadatabase.doc
3
Section 1: Browsing the GeoCAT database:
Overview window
GeoCAT opens with the screen shown above. The window is split into two main sections; the
overview panel and the details panel.
The Overview panel is always visible from the main window and contains the following:
1. Button Panel: Includes record navigation and “add new” buttons to move from one record to
the next or add new map layers to the catalogue
2. Name: Contains a short name to refer to the map layer
3. Location: File location of the map layer on GIS (G:\MAPDATA\ECOLOGY\ for example)
4. Overview: A brief summary of the map layer. The overview is searchable so can include any
key words or phrases which other people may include in a search.
5. Filename: Name of the file held on the GIS server.
6. Dataset No: A unique number used by GeoCAT to refer to the map layer.
7. Button Panel: Includes buttons for finding layer information and for viewing a map layer in
GIS.
Below the Overview panel are a series of tabs which contain further information about the map layer.
The information is grouped into themes as shown.
i) DNPA Contact
T:\GIS\Procedures\PR40 - GeoCAT Metadatabase.doc
4
The DNPA Contact form displays the contact details of the best person to contact within DNPA with
regard to a specific map layer. The name, role, section, telephone and email address are displayed,
together with a tick to denote whether the contact is still current within DNPA. This person should be
the first point of contact if you have a particular enquiry about a map layer.
ii) External Contact
The External Contact form displays any notes and contact details of the organisation who supplied
the map layer to DNPA. The telephone number, website and fax number as well as the postal
address (if known) are displayed. The website text is “clickable” and will open a website in a browser
window.
Organisations such as the Environment Agency and Natural England supply lots of different map
layers. If there is a named individual within the organisation their details can be shown as the
Supplier Contact. Check with the DNPA contact first if no specific supplier contact is shown.
iii) Attributes
Many GIS layers have information attached. Examples include planning reference numbers or the
description of an Ancient Monument. These are called the attributes of the map layer.
The attributes screen is a list showing the attribute name, the attribute type (i.e. is the information
stored as a piece of text, a date or a number) and a description of the attribute. It should start to give
an impression of the sort of information a map layer contains.
T:\GIS\Procedures\PR40 - GeoCAT Metadatabase.doc
5
iv) Usage / Copyright
Most map layers have copyright or usage constraints associated with them. Many of the DNPA map
layers are copyright OS because they have been drawn on top of OS Maps, but others include Aerial
Survey companies and Government agencies that also require the correct copyright information
included in any publication.
The Access Constraints panel tells the user whether the map layer is licensed or restricted in any
way. If there are particular restrictions (usually copyright) then these are listed together with who
holds the copyright and the actual wording that needs to be displayed – in the form of the Copyright
Statement.
Any links or relevant information regarding usage or copyright can be shown in the Copyright Details
section at the bottom of the form.
T:\GIS\Procedures\PR40 - GeoCAT Metadatabase.doc
6
v) Data Structure
GeoCAT has been built to comply with a metadata standard called “Gemini II”. Some parts of the
standard include sections that detail information that goes beyond what many people would use
everyday for the map catalogue. The Data Structure page displays some of the more obscure pieces
of information from the data standard. A full listing of the Gemini II metadata standard is on the
Intranet at http://dnp4/gis_metadataguidelines2.pdf .
The Spatial Resolution circled above is worth noting as it gives an indication of the positional
accuracy of the mapping layer. The figure can be in metres if the data is Vector-based or in Dots per
inch if the data is Raster based (an Aerial photo is an example of a Raster based dataset).
T:\GIS\Procedures\PR40 - GeoCAT Metadatabase.doc
7
vi) Descriptive Terms
The Descriptive Terms are key words which help to describe the main features of the map layer.
They are also part of the Gemini II standard and are based on the Integrated Public Sector
Vocabulary (IPSV). It is possible to search on key words – see section 2b.
What is the IPSV?
The Integrated Public Sector Vocabulary (IPSV) is an 'encoding scheme' for populating the e-GMS
Subject element of metadata. It is fully compliant with ISO 2788 and BS 8723, the International and
British Standards for monolingual thesauri. The vocabulary was developed with the backing of the
ODPM (Office of the Deputy Prime Minister) and the eGU (Cabinet Office e-Government Unit). Version
1.00 was released in April 2005; Version 2.00 supersedes it, as of 3 April 2006.
Extract from: http://www.govtalk.gov.uk/schemasstandards/metadata.asp
T:\GIS\Procedures\PR40 - GeoCAT Metadatabase.doc
8
vii) Details
The Details tab includes further information required by the Gemini II metadata standard. The Data
Format is shown (examples include MapInfo file, Access Database or an Excel spreadsheet). The
Dataset language is shown and a Topic Category is required. Gemini II has 19 broad Topic
Categories covering many diverse subjects from Society to Oceans! For more information on each
Topic category press the View Categories button. The definition of the topic category is also shown.
T:\GIS\Procedures\PR40 - GeoCAT Metadatabase.doc
9
viii) History
The History tab groups together information about where the map layer has come from and how up to
date it is. Where the data has come from can help build a picture as to the map layers fitness-forpurpose. The Originator / Creator entry is a chance to review who supplied the dataset (the same
information as that shown on the External Contact tab). The Update Frequency is also shown,
which can range from Continually or Daily (in the case of planning applications) through to Irregular or
Not Planned.
The History tab, rather strangely, contains three different dates! These dates are again part of the
Gemini II standard and are defined as follows:
•
Data Content Date: Date and time for the content of the dataset. This is the date or date
range that identifies the currency of the data. It may refer to the period of collection, or the date
at which it is deemed to be current.
•
Publication Date: A reference date for the dataset. Dataset reference date is an identifying
date for the data resource. It is a notional date of “publication” of the resource. It is different
from Date which is the actual date of the currency of the data. For example, an atlas might
have the reference date ‘2004’, but the data will have been collected over a period prior to this.
•
Date of Metadata: Date on which the metadata was last changed. This is the date at which
the metadata can be considered current (rather than the dataset itself). It may be the date at
which the metadata was reviewed and confirmed as being ‘current’. Note: It should not be
updated when the metadata is only corrected, i.e. there have been no changes to the data
resource itself and the rest of the metadata is not reviewed or confirmed as wholly correct.
T:\GIS\Procedures\PR40 - GeoCAT Metadatabase.doc
10
Lineage contains information about the events or source data used in the construction of the dataset
to give an indication of how the dataset was created. It is useful in determining its fitness for purpose.
Finally, the Further Details section is to record references to relevant information held externally to
GeoCAT, for example a reference (e.g. a URL) to background information. Strictly speaking, it should
not be used to hold the external data more a pointer to a file where further information can be found.
T:\GIS\Procedures\PR40 - GeoCAT Metadatabase.doc
11
Section 2a: Searching for data – using the find form
Pressing the Find button from the Overview panel displays the following form:
The form allows you to type in a word in the Title; Abstract or GIS Filename boxes and / or perform a
search using the Service (DNPA Service name) and / or the Data Originator drop down boxes.
Any results are shown underneath with a small summary of the findings. To see the data record in
more detail click on the View button (circled in red above) next to the summary.
Once you have clicked the View button you are looking at an extract of the database. If you wish to
see another record from the search results you will have to close the main database window using the
Back to results button on the main form.
Section 2b: Searching for data – using the find by keyword form
Pressing the Find by Keyword button on the Overview panel displays the following form:
T:\GIS\Procedures\PR40 - GeoCAT Metadatabase.doc
12
Type in a keyword in the Keyword box and press Find. Keywords are those entered under the
Descriptive Terms tab. If any GIS layers are found, press the View button (circled in red) next to the
dataset you wish to view.
Section 3: Adding new records to GeoCAT
Press the “+” button on the Overview panel
shown circled in red. This will add a new
blank dataset ready to be filled in.
1. Enter the following information in the Overview panel:
Name: Short Name or Other Name to refer to the dataset
Filename: The name of the data files e.g. Bats / SSSI / S3Moor
Location: File location of the dataset on the GIS server followed by a backslash ( \ ) e.g.
G:\MAPDATA\PLANNING\
Overview: A brief narrative summary of the dataset. It should provide a clear and concise statement
that enables the reader to understand the content of the dataset. Tips for filling in this entry are as
follows:
Tips for completing the Overview:
1. State what the ‘things’ are that are recorded.
2. State the key aspects recorded about these things.
3. State what form the data takes.
4. State any other limiting information, such as time period of validity of the data.
5. Add purpose of data resource where relevant (e.g. for survey data).
6. Aim to be understood by non-experts.
7. Do not include general background information.
8. Avoid jargon and unexplained abbreviations.
Example: Sites of Special Scientific Interest in Wales, classified by habitat type, with the limit of
each SSSI recorded as a polygon, as at 2001-06-30.
2. Complete the DNPA Contact tab:
Normally this involves selecting the relevant DNPA contact from the drop down box provided and you
may move on to the next database tab. If a new DNPA contact is required, or the existing details are
wrong press the amend details button and follow the steps in Appendix 1.
T:\GIS\Procedures\PR40 - GeoCAT Metadatabase.doc
13
3. Complete the External Contact tab:
Normally this involves selecting the relevant External Contact from the Originator drop down list which
will automatically complete the Website, Telephone, Fax, Address details (if known) and Notes. If the
Originator details are missing or incorrect these can be changed by pressing the Edit Originator
Details button and following the steps in Appendix 2.
If you know of a specific, named person within the Supplier Organisation they can be added by
pressing the Edit Supplier Contact button and completing the SupplierContactFullName box and
other details from left to right.
The SupplierContactTitleID requires a number from 1 to 6 as follows:
1= Mr;
2 = Mrs;
3 = Miss;
4 = Ms;
5 = Dr;
6 = Unknown
4. Complete the Attributes tab:
The Attributes section requires the Attribute Name, Attribute Type and Attribute Description to be
completed. The MapInfo TAB file can be used to complete the first two sets of data leaving just the
attribute descriptions to be completed.
To extract the attributes from a MapInfo tab file, follow the steps below:
i) Open up the MapInfo TAB file in notepad.
!table
!version 300
!charset WindowsLatin1
Definition Table
Type NATIVE Charset "WindowsLatin1"
Fields 3
Ref Char (10) ;
Area_Ha Decimal (10, 2) ;
Source Char (250) ;
Etc
Highlight and Copy the lines under the Fields ‘n’ statement in the tab file (shown in Blue), these are
the Attribute Name and Attribute Type entries.
Open up the Excel Spreadsheet called AttributeExtractor.xls in S:\GIS_Metadata\ . click into cell A2
(which has a red outline) and choose paste. Highlight and Copy the contents of Columns D and E as
shown. Close the Excel spreadsheet (Do NOT save when prompted).
T:\GIS\Procedures\PR40 - GeoCAT Metadatabase.doc
14
Go back into GeoCAT and click into the top left corner of the Attributes table as shown circled below:
This will highlight the entire table. Next, Right Click the mouse and choose Paste. This will populate
all entries for Attribute Name and Attribute Type. You now have to complete the Attribute description
with a simple definition of each attribute so that others can understand. Have a look at descriptions
from other datasets to get an idea of what to fill in here.
5. Complete the Usage / Copyright tab.
The Access Constraints panel tells the user whether the map layer is licensed or restricted in any
way. Its default is “formal permission required for use, usually requiring payment of a fee”.
By far the majority of our data will be subject to some form of copyright. Use the drop down arrow
under Use Constraints to set the copyright. Choose the correct copyright statement by using the
drop down arrow next to the Copyright Required box. This will automatically populate the copyright
statement and any additional details in the Copyright details box at the bottom of the form.
6. Complete the Data Structure tab.
This tab gives the user an idea of the structure of the dataset such as the file type and how the
information is stored, its accuracy and the extent of the dataset.
The Spatial Reference System (unless expressly stated otherwise) will always be the National Grid
of Great Britain. This is the Ordnance Survey Grid that our Eastings and Northings are based on.
Extent of Coverage is usually Devon or England in some rare cases.
Spatial Resolution is shown in metres and provides an indication of how detailed the mapping data
is. If you are recording data captured on a 100m grid square sampling basis the spatial resolution
T:\GIS\Procedures\PR40 - GeoCAT Metadatabase.doc
15
would be 100m. If the data was recorded against OS MasterMap then the spatial resolution is 0.4m.
Other values can be set – discuss this value with the GIS Officer who will be able to assist.
Spatial Representation will take one of the following values which can be set from the list
Name
Definition
Vector
vector data used to represent geographic data (e.g. Any digital data
drawn on a map background)
Grid
grid data used to represent geographic data (e.g. any Raster map which
has data stored as a series of coloured dots or pixels).
Text/Table
textual or tabular data used to represent geographic data ( e.g. mapping
created from information held as a spreadsheet)
Spatial Presentation details the form in which the data is represented to the user. Identify the entry
in the code list that most closely corresponds to the presentation type of the resource. If the
presentation type is completely different to any in the list, then do not use, and mention it in the
abstract.
Name
document digital
document hardcopy
image digital
image hardcopy
map digital
map hardcopy
model digital
model hardcopy
profile digital
profile hardcopy
table digital
table hardcopy
Definition
digital representation of a primarily textual item (can contain illustrations also)
representation of a primarily textual item (can contain illustrations also) on
paper, photographic material, or other media
likeness of something acquired through sensing and stored in digital format
likeness of something acquired through sensing and reproduced on paper,
photographic material, or other media for use directly by the human user
map represented in raster or vector form
map printed on paper, photographic material, or other media
multi-dimensional digital representation of a feature, process, etc.
3-dimensional, physical model
vertical cross-section in digital form
vertical cross-section printed on paper, etc.
digital representation of facts or figures systematically displayed, especially in
columns
representation of facts or figures systematically displayed, especially in
columns, printed on paper, photographic material, or other media
video digital
digital video recording
video hardcopy
video recording on film
Finally the Dataset Boundary can be selected from the drop down list – usually this is Dartmoor
National Park but some datasets we hold are Devon wide.
7. Complete the Descriptive Terms tab.
Place your cursor in the Descriptive Term box and start typing the word that best describes the
dataset. If the word is one used in the integrated public sector vocabulary it will appear and will
automatically complete the SubjectID. Pressing the drop down arrow to the right of the Descriptive
T:\GIS\Procedures\PR40 - GeoCAT Metadatabase.doc
16
Term box will reveal more terms that could be used. Remember these words are used to search for
datasets so try and be as broad as possible with the descriptive terms. See the following examples:
Conservation Areas
SubjectID:
Descriptive Term
1138 Planning (town and country)
2296 Tree preservation
2298 Tree preservation orders
2631 Tree protection
2652 Conservation areas
Public Rights of way
SubjectID:
Descriptive Term
409 Bridleways
446 Access to countryside
449 Rights of way
1464 Rambling
2634 Public rights of way
2636 Foot paths (rural)
2640 Byways
7146 Access to open country
8. Complete the Details tab.
The details Tab tells the user what format the data is in (it will usually be a MapInfo TAB file) but
others can be set such as access databases and excel spreadsheets.
Next, choose a Topic category from the available list. You can view the categories (by pressing the
View Categories button) to get a better understanding of what each one represents.
Finally ensure that the Language is set – this will default to English, but there are others.
9. Complete the History tab.
Every dataset has three dates connected with it as follows:
The Data Content Date which includes the date and time for the content of the dataset.
The Publication Date which includes when the data was first ready for publication.
The Date of Metadata which includes the date that the Medatadata record was completed.
The Update Frequency (if known) can be filled in from the list.
The Lineage is a free text field to give an indication of how the dataset was created. An example
follows:
T:\GIS\Procedures\PR40 - GeoCAT Metadatabase.doc
17
Original data from English Heritage survey department in Exeter. Updates for Dartmeet and
Throwleigh PALS added in 2008. Attribute SITE_TYPE added to accommodate new information
supplied with the Dartmeet and Throwleigh data. Original data has "Not Supplied" in the SITE_TYPE
field. NAME has a value of "Not Supplied" added where data is blank.
Further Details should include any references to other data sources that give more detailed
information on the dataset. Example see G:\MAPDATA\EN\AncientWoodlandInv\Ancient Woodland
Inventory Readme.doc.
T:\GIS\Procedures\PR40 - GeoCAT Metadatabase.doc
18
Appendix 1 Adding / Amending DNPA contact details
Pressing the Amend details button displays the Add / Edit DNPA Contact form as shown:
Pressing the Amend Details button
on the DNPA contact tab brings up
the currently selected contact.
If any details need amending simply
use the drop down boxes or fill in the
correct text where appropriate.
If the Position/Role of the contact
has changed or the Contact
Section has changed, either choose
the correct one from the drop down
list or create a new one by pressing
the View/Edit buttons next to the
relevant box.
A completely new contact can be
created by pressing the Add New
DNPA Contact button and
completing the details as required.
T:\GIS\Procedures\PR40 - GeoCAT Metadatabase.doc
19
Appendix 2. Edit the Originator Details
Pressing the Edit Originator Details button displays all Originator details in a simple spreadsheet
which allows for simple updates to addresses etc to be completed.
New Originators can be created by clicking into the OriginatorAbb box which will create a new,
sequential OriginatorID – simply fill in all details from left to right. All data is saved when the
spreadsheet is closed.
T:\GIS\Procedures\PR40 - GeoCAT Metadatabase.doc
20