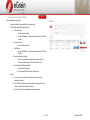
1
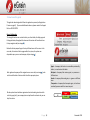
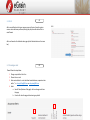
eGrain Passport User Guide Registration and Administration Page |1 November 2014 Table of Contents 1. Introduction ................................................................................................................................................................................................................................ 5 1.1 Scope of pilot ............................................................................................................................................................................................................................ 5 1.2 Basic concept ............................................................................................................................................................................................................................ 6 1.3 eGrain Passport lifecycle……………………………………………………………………………………………………………………………………………………………………………………………………6 1.4 Definitions and abbreviations ................................................................................................................................................................................................... 7 1.5 How to use this guide ............................................................................................................................................................................................................... 8 2 Registration Process.................................................................................................................................................................................................................... 9 2.1 Company Registration............................................................................................................................................................................................................. 10 2.2 Authorising a company ........................................................................................................................................................................................................... 11 2.3 Creation of Company Administrator ....................................................................................................................................................................................... 11 2.4 Alerts ....................................................................................................................................................................................................................................... 12 2.4.1 Creating an alert .............................................................................................................................................................................................................. 12 2.4.2 Managing Alerts ............................................................................................................................................................................................................... 13 2.5 Business Relationships ............................................................................................................................................................................................................ 14 2.5.1 Creating a Business Relationship ..................................................................................................................................................................................... 15 2.5.2 Managing Business Relationships .................................................................................................................................................................................... 16 2.5.3 Agents Accepting/Rejecting Business Relationships........................................................................................................................................................ 16 2.6 Locations ................................................................................................................................................................................................................................. 18 2.6.1 Creating Collection Locations .......................................................................................................................................................................................... 19 2.6.2 Creating Delivery Locations ............................................................................................................................................................................................. 19 2.6.3 Managing Locations ......................................................................................................................................................................................................... 20 Page |2 November 2014 2.6.4 Creating Storage Locations .............................................................................................................................................................................................. 21 2.6.5 Managing Storage Areas .................................................................................................................................................................................................. 22 2.6.6 Creating Sub Storage Locations ....................................................................................................................................................................................... 22 2.6.7 Managing Sub Storage Areas ........................................................................................................................................................................................... 23 2.7 Batches .................................................................................................................................................................................................................................... 24 2.7.1 Create a Batch .................................................................................................................................................................................................................. 25 2.7.2 Managing Batches ............................................................................................................................................................................................................ 25 2.8 Tractors ................................................................................................................................................................................................................................... 25 2.8.1 Create Tractor .................................................................................................................................................................................................................. 26 2.8.2 Managing Tractors ........................................................................................................................................................................................................... 27 2.9 Trailers .................................................................................................................................................................................................................................... 27 2.9.1 Create Trailer ................................................................................................................................................................................................................... 27 2.9.2 Managing Trailers ............................................................................................................................................................................................................ 28 2.10 Product Mapping ............................................................................................................................................................................................................. 29 2.10.1 Create Product Mapping ................................................................................................................................................................................................ 30 2.10.2 Manage product mapping ............................................................................................................................................................................................. 30 2.11 Users ..................................................................................................................................................................................................................................... 31 2.11.1 Creating Users ................................................................................................................................................................................................................ 32 2.11.2 User security .................................................................................................................................................................................................................. 33 3. Logging In .................................................................................................................................................................................................................................. 34 3.1 Forgotten Login details ........................................................................................................................................................................................................... 34 3.2 Resetting your password ........................................................................................................................................................................................................ 35 4. Site Administration ....................................................................................................................................................................................................................... 36 Page |3 November 2014 5 Loads & Passports ..................................................................................................................................................................................................................... 37 5.1.1 Recipients creating a load .................................................................................................................................................................................................... 39 5.1.3 Assign Sender ................................................................................................................................................................................................................... 40 5.1.4 Amend Sender/Collection Details ..................................................................................................................................................................................... 42 5.1.5 Assign Transporter............................................................................................................................................................................................................ 44 5.1.6 Amend Transporter .......................................................................................................................................................................................................... 46 5.1.7 Amend Product ................................................................................................................................................................................................................ 48 5.1.7 Amend Planned Collection Details ................................................................................................................................................................................... 49 5.1.7 Assign Load to Driver/Vehicle ........................................................................................................................................................................................... 50 5.1.7 Amend Driver/Vehicle ...................................................................................................................................................................................................... 51 5.1.8 View Load ......................................................................................................................................................................................................................... 52 5.1.9 Cancel Load ...................................................................................................................................................................................................................... 53 5.1.10 Accept Load .................................................................................................................................................................................................................... 54 5.1.11 Accept Load Under a Different Contract ........................................................................................................................................................................ 56 5.1.12 Reject Load ..................................................................................................................................................................................................................... 58 5.1.13 Enter Quality Data .......................................................................................................................................................................................................... 60 5.1.14 Amend Quality Data ....................................................................................................................................................................................................... 62 5.1.13 View Quality Data ........................................................................................................................................................................................................... 64 5.2 Passports ................................................................................................................................................................................................................................. 66 5.2.1 Sender updating a passport .............................................................................................................................................................................................. 67 5.2.1 Transporter updating a passport on the portal ................................................................................................................................................................ 69 5.2.1 Transporter updating a passport on the mobile application ............................................................................................................................................ 70 5.2.2 Sender updating a passport on the mobile application .................................................................................................................................................... 73 Page |4 November 2014 5.2.3 Updating the Load Status to Collected ............................................................................................................................................................................. 74 6. Contact Information...................................................................................................................................................................................................................... 75 1. Introduction The eGrain passport pilot is a HGCA-funded project looking at the feasibility of moving the current paper-based grain passport online. The pilot project is the result of discussions by the Cereals Liaison Group, which highlighted the need for the UK cereals industry to be able to meet future data requirements, to improve two-way flow of information and strengthen assurance schemes. The pilot is a proof of concept and aims to gain first-hand experience of the practicalities of operating an electronic grain passport (eGrain passport) system, including costs of participation, risks and benefits. It follows a detailed feasibility study which was undertaken by HGCA on behalf of the industry which included consultation with all parts of the supply chain. During the pilot, the eGrain passport system will be tested in the milling wheat and malting barley supply chains. Muntons, Gleadell and Openfield have agreed to become pilot participants for the malting barley supply chain, while Heygates, Glencore and Fengrain will be the pilot participants for the milling wheat supply chain. Evaluation undertaken during the pilot project will enable an evidence based assessment on whether or not the adoption of an eGrain Passport system is appropriate for the industry. The pilot is planned to last for six months starting in Autumn 2014. The pilot is supported by the Agricultural Industries Confederation (AIC), the Maltsters Association of Great Britain (MAGB), the National Association of British and Irish Millers (nabim), the National Farmers Union (NFU), the National Farmers Union of Scotland (NFUS) and the Road Haulage Association (RHA). 1.1 Scope of pilot The pilot aims to test the eGrain Passport system in a real-life commercial situation. The following scope for the pilot has been agreed by the project steering group: Development of an eGrain Passport system, capable of being scaled to national requirements. This includes: o eGrain Passport database o Web portal Page |5 November 2014 o Mobile app portal for use by hauliers System to link with two assurance scheme databases to offer real-time assurance checking (TASCC and Red Tractor) System to allow for two-way flow of information e.g. quality data Live industry trials to be undertaken in two supply chains: malting barley and milling wheat 1.2 Basic concept Central to the eGrain passport system is a database. This database can be accessed by all the relevant parts of the supply chain, namely growers, hauliers, merchants and processors, who can input and access passport information relating to the loads that they are involved in only. Indeed, there are permission settings in place to control access to the passport and load information on the database. As such, people will only be able to access the passports they are involved with and data that they have permission to view. A key feature of the eGrain passport database is that it links with assurance records to offer real-time assurance checking. For the pilot, the database links with the Red Tractor database to offer farm assurance checks and the TASCC database for off-farm stores and haulier assurance checks. It is recognised in any potential national rollout, the eGrain passport system would need to link with the other relevant assurance bodies, including GTAS and SQC. The central eGrain passport database used during the pilot can be accessed in a number of ways: Directly online via an eGrain passport portal Directly via system integration Directly via an eGrain passport Smartphone application for use by hauliers Indirectly via a dedicated eGrain passport Support Desk – ring 02476 478729 or email [email protected] Additional functionality offered by the eGrain passport system is for growers to upload passport information in advance of a collection. This can either be done on an individual passport basis or by batch. A system feature known as ‘batches’ allows senders (e.g. growers and off-farm stores) to record and manage passport information for a particular 'batch' or heap of grain with the same characteristics. Using this feature, senders only need to input passport information relating to the batch once but can then assign the information to multiple passports at a later stage. 1.3 eGrain passport lifecycle The eGrain Passport system works on the premise of starting with a “requirement” for grain from a recipient or end user. The passport then relies on each party in the chain completing their respective parts before the next party can complete theirs. Once a recipient has logged their requirement with their agent, the agent then assigns a sender and a transporter. Once those two parties have completed their information at point of collection, the load moves to Page |6 November 2014 a “collected” status and all parties in the chain can see the passport information. When the load arrives at its destination and is tipped, it will move to an “accepted” status. Weight and quality data may be added by the recipient to be passed down the chain. The pilot aims to test this functionality. For detailed flow diagram of this process, please refer to section 5.1. 1.4 Definitions and abbreviations Term Agent Recipient Sender Transporter Business Relationships Alerts Company Administrator General User Batches Integrated Parties/Integration Definition A company that trades in commodities produced by others, i.e. merchant A company that receives grain, i.e. Processor or Off Farm Store A company that sends grain i.e. Grower or Off Farm Store A company that transports grain, i.e. haulier, merchant/processor with their own transport or self-hauling grower Method to connect with the businesses you work with to enable interaction on the eGrain passport system Notifications that your company users will receive from the system, in the pilot phase all notifications will be sent via email User with administration rights over their company’s eGrain Passport account. This includes the ability to create other users A user without administration rights over their company’s eGrain Passport account Method whereby a sender can assign a set of attributes such as variety and postharvest treatment details to a stated quantity of grain. Companies that have chosen to interact with the eGrain Passport system by sending/receiving data files rather than using the Web Portal Assurance Status Means whether or not a farm, haulier or central store is assured Web Portal A web portal which allows users to interface with the eGrain Passport database via the specified browsers Top navigation bar Located in the top right-hand corner of the screen, it contains the User Details, Help and Logout buttons Menu bar Located below the eGrain passport logo on the top left-hand corner of the screen Page |7 November 2014 1.5 How to use this guide This guide has been designed to follow the registration process (see Registration Process on page 9). If you need additional assistance, please contact the Support Desk on 02476 478729. General Information Thethis top guide right-hand corner contains links to your User details, the Help page and use the Logout button, throughout this document this section will be referred to as the top navigation bar (see image ). Below the eGrain passport logo in the top left-hand corner of the screen is the menu bar, this contains links to pages within the system, the options are dependent upon your user and company role (see image ). Each registered company will be assigned one or more roles (see image ), each role has a defined set of actions within the eGrain passport system. We have placed visual indicators against each section heading to advise which roles they apply to, if your company does not perform the relevant role you can skip this section. Page |8 Agent – A company that trades in commodities produced by others, i.e. merchant or distributor Recipient – A company that receives grain, i.e. processor or off-farm store Sender – A company that sends grain, i.e. grower or off-farm store Transporter – A company that transports grain, i.e. haulier or merchant/processor with their own transport All Agent Recipient Sender Transporter November 2014 2 Registration Process Before you can begin to use the system there are a number of steps you need to perform. Page |9 November 2014 2.1 Company Registration All Sender Sender You will need the following information when registering your company: Main address Company registration number (if applicable) Assurance details: o Scheme o Certifying body o Membership ID Main contact details, i.e. person who will perform administrative tasks o Name o Email address To register, simply complete all fields on the online form http://egrain.adaptris.net/register (see image ). To ensure we have enough information to authorise your company we have made several fields mandatory, these fields are marked with an asterisk. Additional Information Company Roles (see image ): you must select at least one primary role and then indicate all other roles your company may perform (if applicable). Each role has a defined set of actions within the eGrain passport system so it is important you select the correct ones, for example, only Transporters will be able to complete the Vehicle Hygiene section of the passport. Company Roles Agent – A company that trades in commodities produced by others, i.e. merchant or distributor Recipient – A company that receives grain, i.e. processor or off-farm store Sender – A company that sends grain, i.e. grower or off-farm store Transporter – A company that transports grain, i.e. haulier or merchant/processor with their own transport P a g e | 10 November 2014 2.2 Authorising a company Your company details will be reviewed by the system administrator who will check your registered number (if applicable), address and assurance details using inbuilt web checks. Once they have correctly identified your company, your main contact will receive an email containing a link to enable them to log in to the eGrain Passport system, they will be asked to complete a number of administrative tasks. Should there be a discrepancy, the system administrator will call your main contact to discuss. 2.3 Creation of Company Administrator When a company is authorised, the system will automatically create the Company Administrator, using the details of the main contact identified during registration. This person will receive an email containing a link to set their password and three memorable questions (image ). Once set and agreement confirmed, they are able to log in to the system. http://egrain.adaptris.net/login/en P a g e | 11 November 2014 All 2.4 Alerts Sender Alerts are notifications that your company users will receive from the system Sender once an action has been performed, during the pilot phase all alerts will be in email format. Alerts are found on the Administration page (select Administration on the menu bar). 2.4.1 Creating an alert All Please follow the steps below: Sender 1. Change required from No to Yes Sender 2. Choose the user role 3. Enter contact details – enter individual email addresses, separate entries with a ‘,’ i.e. [email protected] or [email protected] 4. Select a. Save & Close (bottom of the page): will save changes and close the page b. Cancel: will close the page without saving any details 2 . 1 3 P a g e | 12 November 2014 2.4.2 Managing Alerts All Alerts can be amended at any time, simply open the alerts page and adjust the relevant setting(s). Sender Alerts Tip Sender Alerts are an excellent way to keep track of your loads, however, it important to note that an alert is sent for each action performed, for example, if you enter 20 loads onto the system and all 20 loads are immediately assigned, users set up to receive ‘Load Assigned’ alerts will receive 20 emails and can quickly become disinterested. So when creating alerts, it’s important to review who is interested in the alert and how this will benefit them, remember they can always log in to the system and view loads, etc. P a g e | 13 November 2014 2.5 Business Relationships All Sender In order to interact with businesses you work with, a current business relationship must exist, this relationships allows you to control who can see your Sender company details. Senders, Recipients and Transporters create business relationships with Agents, they are found on the Administration page (select Administration on the menu bar). Agents accept the business relationship created by the other parties. When selected, the system will open the business relationship list page (see image ), this page allows you to create new business relationships and edit existing ones. Important information Business relationships have been split into two categories: 1. Agents: this category displays all companies whose primary role is trades in commodities produced by others 2. Others who, on occasion, act as an agent: this category displays companies whose main role is a Sender/Transporter or Recipient but, on occasion, do act as an agent, for example, a Sender may use an agent to sell their product however, on occasion, they sell direct to the recipient P a g e | 14 November 2014 2.5.1 Creating a Business Relationship Recipient Sender Please follow the steps below: Sender Sender 1. Select ‘Create New’ on the list page (see image ), this will open the ‘Create Business Relationships’ page below. Sender Sender 2. Select the company(s) you wish to interact with, once selected, the ‘Your ID for this company’ and ‘Your name for this company’ will become editable, these fields are mandatory for integrated parties. Recipients will also see the field ‘Do you want to share your quality data with this company?’ 3. Select: a. Create: will save changes and close the page, then send an email to the other company(s) asking them to accept the new relationship b. Cancel: will close the page without saving any details c. Transporter Sender Sender Business Relationship tips Companies are registered with their official name, however many trade under another name. To facilitate this, the system allows you to enter the alternative name in the ‘Your name for this company’ field. Once entered, the system will display the alternative name for all your users. P a g e | 15 November 2014 2.5.2 Managing Business Relationships All Business relationships can be amended at any time, simply edit the business Sender relationship, adjust the relevant fields and save the changes. If you no longer Sender interact with a company, you can disable the relationship by editing it and changing its status to ‘Inactive’, the company will no longer be able to interact with you and vice versa. 2.5.3 Agents Accepting/Rejecting Business Relationships Agent Please follow the steps below: Sender 1. Filter the business relationship list page by Status = Pending (see image ). Sender 2. Select ‘Edit’ on the relevant business relationship (see image ), this will open the ‘Edit Business Relationships’ page below. 3. Enter the relevant details, the fields ‘Your ID for this company’ and ‘Your name for this company’ are mandatory for integrated parties. If a Sender has created the relationship, the field ‘Do you want to share your quality Data with this company?’ will appear. The ‘Company Locations’ section appears when a Sender or Recipient has created a relationship, this section is only relevant to integrated parties, it allows them to map the Sender/Recipient locations. 4. Select: a. Accept: will save changes, change the status to active and close the page. You can now interact with the company b. Reject: will not save changes, change the status to Rejected and close the page. You will not be able to interact with the company and vice versa c. Close: will not save changes, the pending status will remain and the page will close. You will not be able to interact with the company and vice versa P a g e | 16 November 2014 P a g e | 17 November 2014 2.6 Locations Recipient Sender Sender Sender To ensure loads are collected from and delivered to the correct locations, Senders will need to create collection locations and recipients will need to create Sender Sender delivery locations. Locations are found on the Administration page (select Administration on the menu bar). The option to create locations is driven by your company role. When selected, the system will open the locations list page, this page allows you to create new locations and edit existing ones. Collection Locations During the pilot phase, all collection locations details will pull from the Red Tractors or TASCC database, if a location does not appear on their database you will not be able to create it on the eGrain passport system, similarly, if there are incorrect details on their database they will appear on the eGrain passport system. To amend these you will need to contact your certifying body and ask them to amend. Storage and Sub Storage areas can be created within each collection location. Delivery Locations When creating your delivery location, you will be asked to check the address, to ensure correct address details are entered. Location tips Creating all your locations in advance will ensure loads can be processed efficiently. P a g e | 18 November 2014 2.6.1 Creating Collection Locations Sender Please follow the steps below: Sender Sender 1. Select ‘Create New Collection Location’ on the list page (see image ), this will open the ‘Create Collection Location’ page that contains all locations stored on Red Tractor or TASCC database. 2. Select: a. Confirm against the relevant location: this will save the location in the eGrain passport system and close the page b. Cancel: will close the page without saving any details 2.6.2 Creating Delivery Locations Recipient Sender Please follow the steps below: 1. Select ‘Create New Delivery Location’ on the list page (seeSender image ), this will open the ‘Create Location’ page. 2. Enter the details and select ‘Address Check’, the Postcode Anywhere box will appear listing addresses that fit the criteria, please select the relevant one and press Select. Important: if the correct address does not appear, select Cancel, the system will still allow you to create the location. 3. Select: a. Create: this will save the location and close the page b. Cancel: will close the page without saving the details P a g e | 19 November 2014 2.6.3 Managing Locations Recipient Locations can be amended at any time, simply edit the locations, adjust Senderthe relevant fields and save the changes. If you no longer use a location, simply edit it and change its ‘Is Active’ status to ‘No’, the location will no Sender longer appear as a valid location when creating/editing loads, passport or batches. Sender Sender Sender Important: during the pilot phase, collection location address details cannot be edited as stated above. All changes must be forwarded to the relevant certification body. P a g e | 20 November 2014 2.6.4 Creating Storage Locations Sender Please follow the steps below: Sender Sender 1. Select ‘Create New’ on the relevant Location page (see image ), this will open the ‘Create Storage Area’ page (see below) 2. Enter storage name 3. Select: a. Create: this will save the storage area and close the page b. Cancel: will close the page without saving any details P a g e | 21 November 2014 2.6.5 Managing Storage Areas Sender Sender Storage areas can be amended at any time, simply edit the storage area page, adjust the relevant fields and save the changes. If you no longer Senderuse the storage area, simply edit it and change its ‘Is Active’ status to ‘No’, the storage area will no longer appear when editing passport or batches. 2.6.6 Creating Sub Storage Locations Sender Please follow the steps below Sender 1. Select ‘Create New’ on the relevant Storage Area page (see image ), this Sender will open the ‘Create Sub Storage Area’ page (see below) 2. Enter sub storage name 3. Select: a. Create: this will save the storage area and close the page b. Cancel: will close the page without saving any details P a g e | 22 November 2014 2.6.7 Managing Sub Storage Areas Sender Sender Sub storage areas can be amended at any time, simply edit the sub storage Sender area page, adjust the relevant fields and save the changes. If you no longer use the sub storage area, simply edit it and change its ‘Is Active’ status to ‘No’, the sub storage area will no longer appear when editing passport or batches. P a g e | 23 November 2014 2.7 Batches Sender Batches are by and Sender Batches allow youuser to record manageto passport information forSender a particular 'batch' of grain in advance of a collection. You will be able to assign this Sender information to multiple passports at a later stage. To access Batches, select the option on the menu bar. When selected, the system will open the batches list page (see image ), this page allows you to create new batches and edit existing ones. Important Information Other companies will not be able to view your batch information, however, once you have assigned a batch to a passport they will be able to see the passport that contains these details. P a g e | 24 November 2014 2.7.1 Create a Batch Sender Please follow the steps below: Sender 1. Select ‘Create New’ on the batch list page (see image ), this will open Sender the ‘Create Batch’ page (see below) 2. Enter details 3. Select: a. Create: this will save the batch and close the page b. Cancel: will close the page without saving any details 2.7.2 Managing Batches Sender Sender Batches can be amended at any time, simply edit the batch, adjust the relevant fields and save the changes. If the batch is no longer applicable, Sender you can disable it by editing it and changing its ‘Is Active’ status to ‘No’, the batch will no longer appear when assigning batches to passports. 2.8 Tractors Transporter Sender If you enter your tractors’ details on the system, you can easily assign them to passports. You can also assign a tractor to a driver, then as each load is Sender assigned to a driver the passport will pre-populate with the default tractor details. Tractors are found on the Administration page (select Administration on the menu bar). P a g e | 25 November 2014 When selected, the system will open the tractor list page (see image ), this page allows you to create new batches and edit existing ones. 2.8.1 Create Tractor Transporter Please follow the steps below: Sender 1. Select ‘Create New’ on the tractor list page (see image ), this will open the ‘Create Tractor’ page (see below) Sender 2. Enter details 3. Select: a. Create: this will save the batch and close the page b. Cancel: will close the page without saving any details P a g e | 26 November 2014 2.8.2 Managing Tractors Transporter Tractors can be amended at any time, simply edit the tractor, adjust the Sender relevant fields and save the changes. If the tractor is no longer applicable you can disable it by editing it and changing its ‘Is Active’ status toSender ‘No’, the tractor will no longer appear when editing loads or passports. 2.9 Trailers Transporter If you enter your trailer details on the system, you can easily assign them to Sender passports. You can also assign a trailer to a driver, then as each load is Sender assigned to a driver the passport will pre-populate with the default trailer details. Trailers are found on the Administration page (select Administration on the menu bar). When selected, the system will open the trailer list page (see image ), this page allows you to create new trailers and edit existing ones. 2.9.1 Create Trailer Transporter Please follow the steps below: Sender 1. Select ‘Create New’ on the trailer list page (see image ), this will open the ‘Create Trailer’ page (see below) Sender 2. Enter details 3. Select: a. Create: this will save the batch and close the page. b. Cancel: will close the page without saving any details. P a g e | 27 November 2014 2.9.2 Managing Trailers Transporter Trailers can be amended at any time, simply edit the trailer, adjustSender the relevant fields and save the changes. If the trailer is no longer applicable, you can disable it by editing it and changing its ‘Is Active’ status toSender ‘No’, the trailer will no longer appear when editing loads or passports. P a g e | 28 November 2014 2.10 Product Mapping Agent* Recipient* Integrated parties must match their product codes with the onesSender on the eGrain passport system to ensure all loads sent via the integratedSender route, i.e. XML/CSV, etc. are processed. *Integrated parties only Sender Sender Product mapping can be found on the Administration page (select Administration on the menu bar). When selected, the system will open the product mapping list page (see image ), this page allows you to create new mappings and edit existing ones. P a g e | 29 November 2014 2.10.1 Create Product Mapping Agent* Recipient* Please follow the steps below: 1. Open mapping list page (see below) 2. Enter ‘Your System Code’ 3. Change ‘Active’ status to Yes 4. Select Save Sender Sender Sender Sender 2.10.2 Manage product mapping Agent* Recipient* Product mapping entries can be amended at any time, simply open the Sender product mapping list page, adjust the relevant fields and save the changes. If the mapping is no longer applicable, you can disable it by editingSender it and changing its ‘Is Active’ status to ‘No’, the system will no longer look at this mapping when importing integrated loads. *Integrated parties only *Integrated parties only Sender Sender P a g e | 30 November 2014 2.11 Users All Similar to companies, all users are assigned a role(s) and each roleSender has a defined set of permissions, the roles that can be assigned will be dependent upon the Sender company roles (please see section 1.3 How to use this guide for explanation of company roles). Users can be found on the Administration page (select Administration on the menu bar). When selected, the system will open the user list page (see image allows you to create new users and edit existing ones. ), this page P a g e | 31 November 2014 2.11.1 Creating Users All Sender Please follow the steps below: 1. Select ‘Create New’ on the user list page (see image ), Sender this will open the ‘Create User ’ page (see below) 2. Enter details 3. Select: a. Create: this will save the user, send them the new user email and close the page b. Cancel: will close the page without saving any details P a g e | 32 November 2014 2.11.2 User security All Before logging in to the system, all users will have to set their passwords, three Sender memorable questions (user to verify account when contacting support) and agree to the eGrain Passport terms and conditions of use, this is done by clicking on the Sender link within the new user email sent upon creation of account (see image ). All 2.11.2.1 Setting password, memorable questions and agreeing to the terms and conditions of use Sender Please follow the steps below: Sender 1. Click on link within new user email (see image ), this will open the ‘eGrain Passport Security’ page (see below) To log into the system open a web browser and go to 2. Enter details http://egrain.adaptris.net/login/en 3. Select: Complete the withthis thewill registered address andsecurity password and c. login Savedetails & Close: save theemail details, close the page click Sign In. and open the Login page d. Cancel: will close the page without saving any details P a g e | 33 November 2014 3. Logging In To log in to the system, open a web browser and go to http://egrain.adaptris.net/login/en All Sender Sender Complete the login details, i.e. your registered email address and password, then click ‘Sign In’. 3.1 Forgotten Login details All Senderif they are Forgotten Email Address: please contact your company administrator, not available, please call support. Sender Forgotten Password: please refer to section 3.2 resetting your password, below. P a g e | 34 November 2014 3.2 Resetting your password All Sender If you experience difficulty logging on due to a password problem, there is a link on Sender the login page to assist, i.e. ‘Forgotten Your Password? Click here’ (see image ) When selected, the system will open the ‘Forgotten sign in details’ page. Simply enter your registered email address and click ‘Send’, you will receive an email containing a link to the page where you can set a new password. P a g e | 35 November 2014 4. Site Administration All Sender Once logged in to the eGrain passport system, users with the company administration role are taken to the System Administration homepage, the Sender options available will be dependent upon your company role(s). The Administration homepage can be used to manage: All roles Users: create and manage users, including their roles and access levels Company Information: view and manage company details Business relationships: connect with the businesses you work with to enable interaction on the eGrain passport system Alerts – manage the notifications that your company users will receive from the system Recipients Locations: manage your company’s location details, e.g. collection and delivery addresses Senders Locations: manage your company’s location details, e.g. collection and delivery addresses Assurance Details: manage company assurance details Transporters Assurance Details: manage company assurance details Tractors: create and manage your tractor details Trailers: create and manage your trailer details P a g e | 36 November 2014 5 Loads & Passports Loads A Load is a movement of grain comprising a collection from a source company, i.e. Sender, and delivery to a destination company, i.e. Recipient. A Load will normally have a single passport associated with it, but the eGrain passport system does allow for the possibility of multiple passports on a load to cope with the scenario of ‘mixed loads’. To access Loads, select the option on the menu bar (see image ) or, alternatively, by selecting one of the figures on the dashboard (see image ). When selected, the system will open the load list page (see image ), this page allows you to create new loads and edit existing ones. Passports Grain passports are used to document key information that assists with traceability and assurance status. The new electronic version comprises the same information held on the current paper passport (see image ), plus additional fields such as the unique passport number. The electronic passport contains the assurance details of the relevant companies, eliminating the need for assurance stickers. The eGrain passport system will automatically create a passport when a Sender is assigned to a Load. The system will populate the sender name, address and assurance information only upon creation. P a g e | 37 November 2014 5.1 Loads Only Recipients can create Loads. During the pilot phase, it’s anticipated all Loads will be created by the Recipient. The Recipient will assign the Agent, who will then assign the Sender and Transporter (see image ). The basic flow chart (see image ) identifies key stages that all Loads will achieve: Create Load Assign Sender Assign Transporter Assign Driver/Vehicle Passport completion (include declarations) Accept Load Reject Load Enter Quality Data Other possible scenarios are listed below: Amend Sender Amend Transporter Amend Product Amend planned collection details Cancel Load Accept Load under a different contract Amend Quality Data View Load View Passport View Quality Data During the pilot phase, we will be investigating and enhancing the system to handle the following scenarios: Redirect Load Return Load to Sender String Trades P a g e | 38 November 2014 5.1.1 Recipients creating a load Please follow the steps below: 5. Open the Load list page 6. Click create new 7. Complete the following mandatory fields: Product Details o Requested Crop o Requested Variety o Requested Weight Agent Details o Name Recipient Details o Recipient load ID o Delivery Location o Planned Delivery Date Recipient Sender Sender All other fields are optional 8. Select: a. Create: will save the Load and close the page, then send an alert to the Agent to advise a new Load has been assigned to them. The Load will appear on the Load list page with a ‘New’ status. b. Cancel: will close the page without saving any details. P a g e | 39 November 2014 5.1.3 Assign Sender Agent Please follow the steps below (NB if you are completing this during the Create Load stage, please skip to point 3). 1. 2. 3. 4. 5. Open the load list page and find the load you want Click Edit Load Complete the Agent Load ID Select ‘Add Sender’ within the Sender Details section Complete the following mandatory fields: a. Name b. Collection Location: when chosen, an ‘Assurance Check’ button will appear (see image 1 below). Select, and the system will perform an assurance check, then display the results in a table (see image 2 below). Choose the correct entry and press select: i. Assured: the button will turn green ii. Unassured: the system will display a prompt to advise, then turn the button red (see image ). NB: If the assurance status of the location has been checked the same day, the button will automatically display the correct result c. Planned Collection Date All other fields are optional 1. Select: a. Save: will save the Load, then send an alert to the Sender to advise a new Load has been assigned to them b. Save & Close: will save the Load and close the page, then send an alert to the Sender to advise a new Load has been assigned to them c. Cancel: will close the page without saving any details P a g e | 40 Assurance status Outstanding Failed Assured November 2014 Image 1 Image 2 P a g e | 41 November 2014 5.1.4 Amend Sender/Collection Details Agent Please follow the steps below: 1. Open the Load list page and find the Load you want 2. Click ‘Amend Sender/Collection Details’ a. Amend Sender i. Select ‘Remove Sender’ ii. Select ‘Add Sender’ – follow instructions above (5.1.3 Add Sender) b. Remove Sender i. Select ‘Remove Sender’ c. Add Sender i. Select ‘Add Sender’ – follow instructions above (5.1.3 Add Sender) d. Amend Collection Location i. Select correct location and perform assurance check – follow instructions above (5.1.3 Add Sender, 4. b) e. Amend Planned Collection Details i. Select date (if required) ii. Enter Planned Collection Time (if required) 3. Select: a. Save: will save the details, then send relevant alerts to the Sender(s) to advise b. Save & Close: will save the details and close the page, then send relevant alerts to the Sender(s) to advise c. Cancel: will close the page without saving any details. P a g e | 42 November 2014 P a g e | 43 November 2014 5.1.5 Assign Transporter Agent Please follow the steps below (NB: if you are completing this during the Create Load stage please skip to point 3): Open the Load list page and find the Load you want Click ‘Edit Load’ Select ‘Add Transporter’ within the Transporter Details section Complete the following mandatory fields: a. Name: when chosen, an ‘Assurance Check’ button will appear (see image 1 below), select and the system will perform an assurance check, then display the results in a table (see image 2 below), choose the correct entry and press select i. Assured: the button will turn green ii. Unassured: the system will display a prompt to advise, then turn the button red (see image ). NB: if the assurance status of the location has been checked the same day, the button will automatically display the correct result Select: Assurance status Outstanding Failed Assured d. Save: will save the Load, then send an alert to the Transporter to advise a new Load has been assigned to them. e. Save & Close: will save the Load and close the page, then send an alert to the Transporter to advise a new Load has been assigned to them. f. Cancel: will close the page without saving any details. P a g e | 44 November 2014 Image 1 Image 2 P a g e | 45 November 2014 5.1.6 Amend Transporter Agent Please follow the steps below: 1. Open the Load list page and find the Load you want 2. Click ‘Amend Transporter’ a. Remove Transporter i. Select ‘Remove Transporter’ b. Add Transporter i. Select ‘Add Transporter’ – follow instructions above (5.1.5 Add Transporter) c. Amend Contract ID With Transporter i. Amend 3. Select: a. Save: will save the details, then send relevant alerts to the Transporter(s) to advise b. Save & Close: will save the details and close the page, then send relevant alerts to the Transporter(s) to advise c. Cancel: will close the page without saving any details. P a g e | 46 November 2014 P a g e | 47 November 2014 5.1.7 Amend Product Agent Please follow the steps below: 1. Open the Load list page and find the Load you want 2. Click ‘Amend Product’ a. Amend 3. Select: a. Save: will save the details, then send the relevant alert to the Recipient & Sender to advise b. Save & Close: will save the details and close the page, then send the relevant alert to the Recipient & Sender to advise c. Cancel: will close the page without saving any details. P a g e | 48 November 2014 5.1.7 Amend Planned Collection Details Please follow the steps below: Transporter Sender 1. Open the load list page and find the load you want Sender 2. Click ‘Amend Collection Details’ a. Amend 3. Select: a. Save: will save the details, then send the relevant alert to the other companies to advise b. Save & Close: will save the details and close the page, then send the relevant alert to the other companies to advise c. Cancel: will close the page without saving any details. P a g e | 49 November 2014 5.1.7 Assign Load to Driver/Vehicle Transporter This action is required in order for the Load to appear on the relevant mobile Sender device. Sender Please follow the steps below: 1. Open the Load list page and find the Load you want 2. Click ‘Assign Load to Driver/Vehicle’ 3. Complete the following mandatory field: a. Driver All other fields are optional 4. Select: a. Save: will save the details b. Save & Close: will save the details and close the page c. Cancel: will close the page without saving any details. P a g e | 50 November 2014 5.1.7 Amend Driver/Vehicle Transporter Please follow the steps below: Sender 1. Open the Load list page Sender 2. Click ‘Amend Driver/Vehicle’ a. Amend 3. Select: a. Save: will save the details b. Save & Close: will save the details and close the page c. Cancel: will close the page without saving any details. P a g e | 51 November 2014 5.1.8 View Load Please follow the steps below: 1. Open the Load list page and find the Load you want 2. Click ‘View Load’ a. Amend 3. Select: a. Close: will close the page All Sender Sender P a g e | 52 November 2014 5.1.9 Cancel Load Agent Recipient Please follow the steps below: Sender 1. Open the Load list page Sender 2. Click ‘Cancel Load’ Complete the following mandatory field: a. Please provide an explanation for cancellation 3. Select: a. Save: will save the details, cancel the Load and associated Passport (if applicable), then send an alert to the other companies to advise b. Save & Close: will save the details and close the page, cancel the Load and associated Passport (if applicable), then send an alert to the other companies to advise c. Cancel: will close the page without saving any details. P a g e | 53 November 2014 5.1.10 Accept Load Recipient Important: You can only accept a load with a status equal to ‘Collected’. Sender Sender Please follow the steps below: 1. Open the Load list page and find the Load you want 2. Click ‘Accept Load’ Complete the following mandatory fields: a. Delivery Date b. Gross Weight 3. Select: a. Save: will save the details, then send an alert to the other companies to advise b. Save & Close: will save the details and close the page, then send an alert to the other companies to advise c. Save & Enter Quality Data: will save the details and open the Quality Data page, then send an alert to the other companies to advise d. Cancel: will close the page without saving any details. P a g e | 54 November 2014 P a g e | 55 November 2014 5.1.11 Accept Load Under a Different Contract Recipient Important: You can only accept a Load with a status equal to ‘Collected’ Sender Sender Please follow the steps below: 1. Open the Load list page and find the Load you want 2. Click ‘Accept Load Under Different Contract’ Complete the following mandatory fields: a. Delivery Date b. Gross Weight c. Rejection Reason (First one is mandatory, the others are optional) d. Rejection Explanation (mandatory for each Rejection Reason entered) e. New Contract ID 3. Select: a. Save: will save the details, then send an alert to the other companies to advise b. Save & Close: will save the details and close the page, then send an alert to the other companies to advise c. Save & Enter Quality Data: will save the details and open the Quality Data page, then send an alert to the other companies to advise d. Cancel: will close the page without saving any details P a g e | 56 November 2014 P a g e | 57 November 2014 5.1.12 Reject Load Recipient Important: You can only reject a Load with a status equal to ‘Collected’ Sender Sender Please follow the steps below: 1. Open the Load list page and find the Load you want 2. Click ‘Reject Load’ Complete the following mandatory fields: a. Delivery Date b. Gross Weight c. Rejection Reason (First one is mandatory, the others are optional) d. Rejection Explanation (mandatory for each Rejection Reason entered) 3. Select: a. Save: will save the details, then send an alert to the other companies to advise b. Save & Close: will save the details and close the page, then send an alert to the other companies to advise c. Save & Enter Quality Data: will save the details and open the Quality Data page, then send an alert to the other companies to advise d. Cancel: will close the page without saving any details P a g e | 58 November 2014 P a g e | 59 November 2014 5.1.13 Enter Quality Data Recipient Important: If you choose not to enter quality data at the time ofSender accepting, accepting under a different contract or rejecting the Load, you can do it later by Sender selecting from the ‘Delivered’ list Please follow the steps below: 1. Open the Load list page and find the load you want 2. Click ‘Enter Quality Data’ a. Enter data 3. Select: a. Save: will save the details, then send an alert to the other companies to advise b. Save & Close: will save the details and close the page, then send an alert to the other companies to advise. c. Cancel: will close the page without saving any details. P a g e | 60 November 2014 P a g e | 61 November 2014 5.1.14 Amend Quality Data Recipient Please follow the steps below: Sender 1. Open the Load list page Sender 2. Click ‘Amend Quality Data’ a. Amend 3. Select: a. Save: will save the details, then send an alert to the other companies to advise b. Save & Close: will save the details and close the page, then send an alert to the other companies to advise c. Cancel: will close the page without saving any details. P a g e | 62 November 2014 P a g e | 63 November 2014 5.1.13 View Quality Data Please follow the steps below: 4. Open the Load list page and find the Load you want 5. Click ‘View Quality Data’ 6. Select: a. Back: will close the page Recipient Sender Sender P a g e | 64 November 2014 P a g e | 65 November 2014 5.2 Passports Passports are automatically created when Sender(s) are assigned to a Load. Senders and Transporters are responsible for completing the passport, each role has dedicated sections: Senders are responsible for the following sections: Sender Details Post-Harvest Treatment Fusarium Mycotoxins – All Cereals Collection Details If a Sender has created Batches (see 2.7 Batches), they can assign a batch to a passport. When assigned, the data populates automatically, therefore, reducing the duplication of data entry on successive passports. Transporters are responsible for the following sections: Vehicle Details Information can be entered in advance of collection, however, the declaration will be completed on the day of collection via the mobile application. Passports can be accessed via the load list page (see image ). All parties can view the passport. P a g e | 66 November 2014 5.2.1 Sender updating a passport Sender As mentioned above, there are two ways for a Sender to update a passport: Sender Assign a batch (see 2.7 Batches) Manually update Sender 5.2.1.1 Assigning a Batch to a Passport Please follow the steps below: 1. 2. 3. 4. 5. Open the Load list page and find the Load you want Click ‘Passport’ Select ‘Assign Batch’ (see image ) Assign a batch (see image below ) Select: a. Save: will save the details b. Save & Close: will save the details and close the page c. Cancel: will close the page without saving any details Important Information: declarations are completed on the mobile application P a g e | 67 November 2014 5.2.1.2 Updating a Passport Please follow the steps below: Sender Sender Sender 1. Open the Load list page and find the Load you want 2. Click ‘Passport’ 3. Complete the following mandatory fields and any others that are applicable. a. Actual Crop (defaults to crop on the load) b. Actual Variety (defaults to variety on the load) c. Post-Harvest Treatment (Date and Product if applicable) d. Wheat Only: a risk assessment score for DON. 4. Select: a. Save: will save the details b. Save & Close: will save the details and close the page c. Cancel: will close the page without saving any details Important Information: Declarations are completed on the mobile application P a g e | 68 November 2014 5.2.1 Transporter updating a passport on the portal Please follow the steps below: Transporter Sender 1. Open the Load list page and find the Load you want Sender 2. Click ‘Passport’ 3. Complete the following mandatory fields: a. Registration Number (defaults if selected during Assign Driver/Vehicle – see 5.1.7 Assign Load to Driver/Vehicle) b. Trailer ID (defaults if selected during Assign Driver/Vehicle – see 5.1.7 Assign Load to Driver/Vehicle) c. Previous Load information: 1. 1st Load: Product, Date & Cleaning Method 2. 2nd : Product, Date & Cleaning Method 3. 3rd : Product, Date & Cleaning Method 4. Select: a. Save: will save the details b. Save & Close: will save the details and close the page c. Cancel: will close the page without saving any details Important Information: you are able to input the above information onto the mobile device on the day of collection, prior to confirming the declaration (declarations are always completed on the mobile application) P a g e | 69 November 2014 5.2.1 Transporter updating a passport on the mobile application Please follow the steps below: Transporter Sender 1. Log in to the application – a list of your assigned Loads appears (seeSender image 1 below) 5.2 2. Select the Load, this will open the Load overview page (see images 2 and 3 below) 3. Click ‘View/Edit Passport’ (see image 3 below), this will open the passport page (see image 4 below) Image 1 (Load list) Image 2 (Load details) Image 3 (Load details cont.) P a g e | 70 Image 4 (Passport page) November 2014 Please follow the steps below: 4. Select ‘Transporter Information’. This will open the Transporter Information page (see image 5 below). The transporter page is split into three sections. If the mandatory information within a section has been entered, the button will turn green. The Vehicle Information and Previous Loads sections must have the mandatory fields completed before the Transporter Declaration can be confirmed. Image 4 (Passport page) Image 5 (Transporter page) Image 6 (Vehicle Information) P a g e | 71 Image 7 (Previous Loads) November 2014 Please follow the steps below: 5. Transporter Declaration: select the relevant sections and press ‘Confirm Declaration’. Once selected, you’ll be asked to confirm your PIN, enter and press ‘OK’, the system will then display the following reminder. Image 8 (Transporter declaration) Image 9 (PIN confirmation) Image 10 (Prompt) P a g e | 72 November 2014 5.2.2 Sender updating a passport on the mobile application Please follow the steps below: Sender Sender 1. The transporter will hand you their device with the Passport page Sender open (see image ). 5.2 2. Select Sender Information, this will open the Sender Information page (see image 12 below). The Sender page is split into five sections. If the mandatory information within a section has been entered, the button will turn green. The first four sections must have the mandatory fields completed before the Sender Declaration can be confirmed. Image 12 (Sender page) Image 13 (Sender Details) Image 14 (PHT) P a g e | 73 Image 15 (Mycotoxins) Image 16 (Collection Details) November 2014 Please follow the steps below: 3. Sender declaration: select the relevant sections and press ‘Confirm Declaration’. Once selected, you’ll be asked to confirm your PIN, enter and press ‘OK’, the system will then display the following reminder. Image 17 (Sender Declaration) Image 18 (Sender Declaration cont.) Image 19 (PIN confirmation) 5.2.3 Updating the Load Status to Collected Once both declarations have been confirmed, the application will amend the Load status to ‘Collected’. P a g e | 74 November 2014 6. Contact Information For support issues relating to the eGrain Passport system email Derek Carless (HGCA) using [email protected] or telephone 07817 257471 P a g e | 75 November 2014