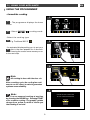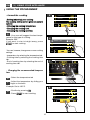
1
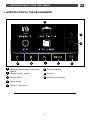
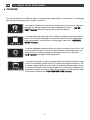
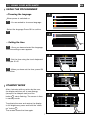
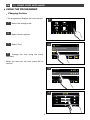
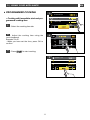
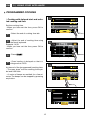
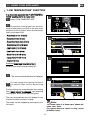
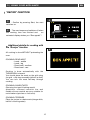
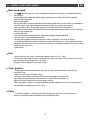
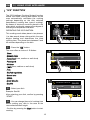
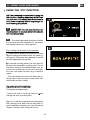
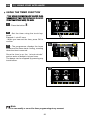
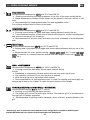
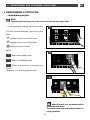
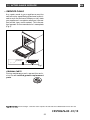
EN USER GUIDE
Oven
Dear Customer,
When you discover De Dietrich products you experience the same feelings that
only objects of value can arouse.
You are immediately attracted as soon as you see them. The quality of the design is illustrated by its timelessness, degree of refinement and elegance, and
high standard of finish, resulting in perfect harmony between different appliances.
Then comes the irresistible urge to touch. De Dietrich design makes the most of
sturdy and noble materials; priority is given to authenticity.
By combining the most advanced technologies with the best materials, De Dietrich makes products of the highest quality for the benefit of all those who love
cooking.
We hope you are extremely satisfied with this new appliance and will be happy
to receive your suggestions and to answer your questions. Please contact our
customer service department or use our Internet site.
We invite you to register your product at www.de-dietrich.com to take advantage of all the benefits the brand has to offer.
Thanking you for your confidence.
De Dietrich
Find further details on the brand at www.de-dietrich.com
Visit La Galerie De Dietrich, 6 rue de la Pépinière in Paris
Open Tuesday to Saturday 10 a.m. to 7 p.m.
De Dietrich Customer Service : 0892 02 88 04
As part of our commitment to constantly improving our products, we reserve the right to make
changes to them based on advances in their technical and functional features and appearance.
Warning:
Before installing and using your appliance, please read this Installation and Use Guide
carefully, which will allow you to quickly familiarise yourself with the appliance’s operation.
2
EN
CONTENTS
1/ DESCRIPTION OF YOUR APPLIANCE
• Introduction to your oven ____________________________________
• Introduction to the programmer ______________________________
4
5
2 /USING YOUR APPLIANCE
• Cooking __________________________________________________
• Using the programmer
º Choosing the language _________________________________
º Resetting the time______________________________________
º How to alter the time ___________________________________
• Using the programmer
º Immediate cooking _____________________________________
º Customising the recommended temperature________________
º Immediate start and set cooking time______________________
º Delayed start and selected end of cooking time _____________
• “LOW TEMPERATURE” function______________________________
• “RECIPE” function _________________________________________
º Advice and tips ________________________________________
• “I.C.S.” function ___________________________________________
º Guide to “ICS” functions ________________________________
º Advice and tips ________________________________________
º Some recipes __________________________________________
• Using the timer function_____________________________________
• Using the search function ___________________________________
• Locking the controls________________________________________
9
10
11
12
13
14
16
18
20
22
23
26
27
28
3 / OVEN COOKING MODES_______________________________________
29
4 / MAINTAINING AND CLEANING YOUR OVEN ______________________
31
5 / AFTER-SALES SERVICE
• Service calls ______________________________________________
• Customer relations _________________________________________
33
33
3
6
7
7
8
EN
1/ DESCRIPTION OF YOUR APPLIANCE
• INTRODUCTION TO YOUR OVEN
A
B
C
5
4
D
3
E
2
1
A
Programmer
D
Wire shelf supports
B
Standby mode exit button
E
Hole for rotisserie
C
Lamp
4
EN
1/ DESCRIPTION OF YOUR APPLIANCE
• INTRODUCTION TO THE PROGRAMMER
H
F
G
A
A
B
C
D
B
Keypad locking symbol (child safety
device).
“Minute minder” symbol
G Settings
C
Recipe search
H Cooking mode display
D
Clock display
E
Return to main menu
F Cleaning indicator
5
E
EN
2 / USING YOUR APPLIANCE
• COOKING
This oven provides four different types of programming depending on the amount of knowledge
you have about preparing the recipe in question:
- A recipe for which you know all the settings (you will choose on your own
the “EXthe type of cooking, temperature and cooking time): select
PERT” function directly be pressing the selection button.
- A recipe where you need the oven to help you (simply choose the type of
food from a list and the weight; the oven will select the most suitable settings: temperature, cooking time, cooking type): select the “COOKING
GUIDE” function.
- A recipe managed automatically by the oven: you select from a list of the
12 most popular dishes, the one you would like to cook (temperature, cooking time and cooking program are defined by the oven): select the
“I.C.S” function (Intelligent Cooking System).
- A recipe by a specific program managed electronically by the oven to give
you an incomparably tender result for meat and exceptional flavour; the
ovenware supplied with the oven to lift the meat and allow an ideal circulation of hot air around it (see recommendations for using this). Guarantee of
tenderness without drying out, easy slicing, edges not overcooked, meat
juices retained. Select the “LOW TEMPERATURE” function.
6
2 / USING YOUR APPLIANCE
EN
• USING THE PROGRAMMER
•Choosing the language
1
FRANCAIS
- When power is switched on
DEUTCH
1 - You are asked to choose a language
PORTUGUES
OK
- Select the language Press OK to confirm.
2
2
FRANCAIS
DEUTCH
PORTUGUES
• Setting the time
ESPANOL
3 - Once you have selected the language,
the time setting screen appears.
3
4
- Set the time using the touch keyboard.
Example: 01:45.
RESET
5 - When you have set the time, press OK
to confirm.
4
RESET
• STANDBY MODE
After 4 minutes with no action by the user,
the display switches off to save energy
(except for a delayed start) and the
5
button
starts flashing. The screen is then
in standby mode.
To activate the oven and restore the display
to full brightness, press and hold the “wake
RESET
up” button
.
The screen shows the time again.
7
EN
2 / USING YOUR APPLIANCE
• USING THE PROGRAMMER
• Changing the time
— The programmer displays the home screen.
1
1
- Select the setting mode.
2 - Select Screen options.
3
2
- Select Time.
AUDIO
DISPLAY OPTIONS
COOKING OPTIONS
4 - Change the time using the touch
HELP
keyboard.
When you have set the time, press OK to
confirm.
3
LANGUAGE
TIME
BRIGHTNESS
ICONS DISPLAY SETTINGS
4
RESET
8
2 / USING YOUR APPLIANCE
EN
• USING THE PROGRAMMER
•Immediate cooking
1
1 — The programmer displays the home
screen.
2 - Select E X P E R T
cooking mode.
- Select the cooking type.
3
E.g. Traditional 200°C
2
conventional
- An animated display asking you to put your
4 dish in the oven appears for 4 seconds.
Pressing the screen once moves you on
to the next step.
3
Note
conventional
combinated heat
variable grill
fan cooking
bread
sole pulse
All cooking is done with the door closed.
After a cooking cycle, the cooling fan continues to run for a time, in order to guarantee
optimum oven reliability.
4
Note:
PLEASE PLACE YOUR PLATE
IN THE OVEN AS INDICATED
You can suspend cooking at any time
by pressing the PAUSE key. Pressing START
once restarts cooking. The graphic guides
change from yellow to white to inform you
that cooking is on hold.
9
EN
2 / USING YOUR APPLIANCE
• USING THE PROGRAMMER
•Immediate cooking
5
TEMPERATURE
DURATION
- Setting (adjusting) your cooking
The cooking setting screen gives you several
options:
- Changing the cooking temperature
- Changing the cooking time
- Changing the cooking end time
FINISH TIME
ON
BOOST
5 - Your oven will suggest the best temperature for this type of cooking.
Example: 200°
If you want to start straight away, press
START to start cooking.
6
TEMPERATURE
TEMPERAT
A URE
DURATION
FINISH TIME
BOOST
- You can, however, change one or more cooking
settings.
- temperature, by selecting the temperature tab.
- Cooking time by selecting the cooking time
tab.
- End of cooking time by selecting the end of
cooking time tab.
ON
7
160
170
190
1
19
9
- Changing the recommended tempera-
ture
6
- Select the temperature tab
- Adjust the temperature by sliding your
7 finger on the knob.
-Example: Set to 180°C.
8
8
TEMPERATURE
- Confirm by pressing OK.
DURATION
- Press START to start cooking.
FINISH TIME
BOOST
10
ON
200
2 / USING YOUR APPLIANCE
EN
• PROGRAMMED COOKING
1
TEMPERATURE
DURATION
DURATIO
A
N
- Cooking with immediate start and programmed cooking time
FINISH TIME
BOOST
1 - Select the cooking time tab.
2
ON
2
- Adjust the cooking time using the
touch keyboard.
Example: 01:45.
- When you have set the time, press OK to
confirm.
RESET
3 - Press START to start cooking.
3
TEMPERATURE
TEMPERAT
A URE
DURATION
FINISH TIME
BOOST
11
ON
EN
2 / USING YOUR APPLIANCE
• PROGRAMMED COOKING
1
- Cooking with delayed start and selected cooking end time
TEMPERATURE
DURATION
Set the cooking time.
- When you have set the time, press OK to
confirm.
1
FINISH TIME
BOOST
ON
- Select the end of cooking time tab.
2 - Adjust the end of cooking time using
2
the touch keyboard.
Example :14:30.
- When you have set the time, press OK to
confirm.
START.
3 - Press
RESET
- Oven heating is delayed so that co-
4 oking ends at 14:30.
3
TEMPERATURE
At the end of the (programmed) cooking time:
- The oven stops and the cooking time symbol and 0:00 flash.
- A series of beeps are emitted for a few minutes. The beeps can be stopped by pressing
any button.
DURATION
FINISH TIME
BOOST
4
12
ON
2 / USING YOUR APPLIANCE
EN
• “LOW TEMPERATURE” FUNCTION
It is absolutely essential that “LOW TEMPERATURE” cooking starts in a cool oven.
1
1 Select “LOW TEMPERATURE”.
2 Choose the cooking type from the following list and place your food on the wire shelf,
except for pots of yoghurt which should be placed in the enamel dish.
· Roast veal (4 hrs 15 mins)
2
- Roast beef rare (3 hrs)
· Roast beef well done (4 hrs)
BISCUIT / COOKIES
ROAST BEEF RARE (3h00)
· Roast pork (4 hrs 15 mins)
LASAGNE
- Lamb rare (1 hr 50 mins)
LARGE FISH (2h10)
- Lamb well done (4hrs)
- Small fish (1 hr 15 mins)
- Large fish (1 hr 35 mins)
3
· Yoghurt (3 hrs)
PLEASE PLACE YOUR PLATE
IN THE OVEN AS INDICATED
Example: Roast beef rare (3 hrs) fig. 2
Confirm your selection by pressing OK.
3
- The recommended shelf level is displayed.
4
DURATION
You can change the cooking end time if
4 you need to then confirm by pressing
START.
FINISH TIME
During cooking, the screen displays: the cooking
time which cannot be changed, the remaining
cooking time and the end of cooking time.
The oven automatically turns off, beeps for two
minutes and tells you that it is ready.
The beeps can be stopped by pressing any touch button.
Note:
For meats, there is a “keep warm” phase (duration: one 1 hour)
For yoghurt, there is a “rapid cooling” phase
(duration 1 hour).
13
EN
2 / USING YOUR APPLIANCE
• “RECIPE” FUNCTION
The “Recipe” function selects the appropriate
cooking parameters for you based on the food
being prepared and its weight.
1
1
- Select “Recipes”
- The oven then suggests different food
categories.
Select from the categories shown:
- White meat
· Red meat
- Fish and seafood
2
· Hors d’oeuvres and vegetables
· Tarts and quiches
white meat
red meat
fish & shellfish
starter & vegetables
tarts & quiches
cakes
· Cakes
2
- Select the category you want
3 - Then choose the specific dish you are
cooking and confirm.
3
Once you have selected the food, the oven will
ask
you
to
enter
its
weight
or the material your cookware is made of
(aluminium, porcelain, etc.) in some cases such
as cakes, quiches, tarts and vegetables or the
size of the food (brioche).
BEEF MEDIUM DONE
TERRINE
DUCK
Once you have confirmed the food, the oven
recommends the height of the shelf on which
you should place the dish. Place your dish in
the oven on the recommended shelf support
level (from 1 at the bottom to 5 at the top).
4
WEIGHT
4
- Enter the weight (or cookware type) and
the oven will automatically calculate and
display the ideal cooking time. If you wish, you
can change the end of cooking time by
selecting the end of cooking time tag and
displaying the new end of cooking time.
TEMPERATURE
ESTIMATED DURATION
FINISH TIME
14
EN
2 / USING YOUR APPLIANCE
• “RECIPE” FUNCTION
5
5
- Confirm by pressing Start; the oven
switches on.
6
- The oven beeps and switches off when
the cooking time has finished and
an
animated display wishes you “Bon appetit”!
Chicken
• Additional details for cooking with
the “Recipe” function
6
All cooking is done WITHOUT preheating the
oven.
COOKING: READ MEAT
- Lamb - saddle
- Lamb - leg
- Roast beef - medium
- Roast beef - rare
Cooking is done automatically with the
TURBO-GRILL element.
You should place the meat on the grid using
the grid + drip tray assembly (without a dish).
You can turn the meat half-way through
cooking.
COOKING: CAKES/TARTS
Choosing the type of baking mould:
Aluminium: coloured non-stick tins and
flexible silicone moulds are very suitable for
moist batters (quiches or fruit tarts).
COOKING: TERRINES
Place the terrine in a bain-marie (a larger dish,
half-full of boiling water).
15
EN
2 / USING YOUR APPLIANCE
No. 4 VEGETABLES:
No. 1
chicory
2
vegetable flans
3
potato gratin
4
lasagne
5
stuffed peppers
6
rice or paella
7
stuffed tomatoes
No. 1 WHITE MEAT:
No.1
quail
2
duck
3
veal ribs
4
whole ham
5
rabbit
6
pork loin
7
duck breast
8
goose
9
turkey drumsticks
10
chicken (dish)
11
chicken (spit)
12
terrine
13
veal roast
No. 2 RED MEAT:
No.1
2
3
4
5
No. 3 FISH:
No.1
2
3
4
5
6
7
8
9
10
11
No. 5 TARTS/QUICHES:
No.1
bread
2
baguette
3
pizza
4
short crust pastry
5
flaky pastry
6
raised pastry
7
quiche
8
soufflé
9
cheese tart
10
fruit tart
11
meat pie
beef well done
beef rare
rack of lamb
leg of lamb
shoulder of lamb
No. 6 CAKES:
No.1
2
3
4
5
6
7
8
9
10
11
12
13
anchovies
bass
pike
bream
lobster
whiting
grilled fish
salmon
fish terrine
whole tuna
trout
biscuits/cookies
cake
crème caramel
melted chocolate
yoghurt cake
sponge cake
kugelopf
madeleines
meringues
bread rolls
baked apples
pound cake
pastries
• ADDITIONAL DETAILS FOR “COOKING GUIDE” COOKING
All cooking is done WITHOUT preheating the oven.
COOKING: CAKES/TARTS
Choosing the type of baking mould:
Aluminium: coloured non-stick tins and flexible silicone moulds are very suitable for moist
batters (quiches or fruit tarts).
COOKING: TERRINES
Place the terrine in a double-boiler (set it in a larger dish that is half-full of boiling water).
16
EN
2 / USING YOUR APPLIANCE
• Beef, pork, lamb
You must take all meat out of the refrigerator well before cooking it: a sudden transition
from cold to
hot temperatures makes the meat tough; this produces roast beef which is golden
outside, red inside and
warm in the middle.
Do not salt before cooking: salt absorbs the blood and dries out the meat. Use spatulas to
turn the meat: if you pierce the meat the blood drips out. Always let meat sit
after cooking for 5 to 10 minutes: wrap it in a sheet of aluminium and place it
just inside a warm oven: this allows the blood drawn toward the outside during cooking to
return to the middle and
moisten the roast.
- Use earthenware roasting dishes: glass encourages grease splashes.
- Do not cook in the enamelled drip tray.
- Avoid sticking garlic cloves into the leg of lamb, otherwise it will lose its blood;
it is preferable to slip the garlic between the meat and the bone or cook unpeeled cloves
alongside the lamb and crush them when cooking is complete to season the sauce; strain
it and serve it very hot in
a gravy boat.
• Fish
- When buying, the odour should be pleasant and not too “fishy”.
- The body should be firm and rigid and the scales should be firmly stuck to the skin;
the eyes should be bright and rounded
and gills should appear shiny and moist.
• Tarts, quiches
- Avoid glass and porcelain dishes: they are too thick and extend the cooking time
resulting in the
bottom of the crust not being crispy.
- With fruit, the bottom of the tart risks becoming soggy: just add a few
spoonfuls of fine semolina, crushed biscuit crumbs, almond powder or
tapioca, which will absorb the juice during cooking.
-With high-water content or frozen vegetables (leeks, spinach, broccoli or tomatoes) you
can sprinkle in a tablespoon of corn flour.
• Pizza
- To prevent cheese or tomato sauce from dripping in the oven, you can place a
piece of parchment paper between the grid and the pizza.
17
EN
2 / USING YOUR APPLIANCE
• “ICS” FUNCTION
The ICS (Intelligent Cooking System) function
makes the entire cooking task easier as the
oven automatically calculates the cooking
settings depending on the dish selected
(temperature, cooking time, type of cooking).
by means of electronic sensors placed in the
oven which continually measure the degree of
humidity and temperature variation.
1
OPERATING THE ICS FUNCTION:
This cooking mode takes place in two phases:
1) a data search phase during which the oven
begins heating and determines the ideal
cooking time. This phase lasts between 5 and
40 minutes depending on the dish.
1 - Press the “IICS” button.
The oven offers a choice of 12 dishes:
2
· Pizza
PIZZA
· Savoury tarts
SAVORY TART
· Roast beef (rare, medium or well done)
· Roast pork
ROAST BEEF (rare, medium or well...
· Chicken
ROAST PORK
· Lamb (rare, medium or well done)
· Fish
· Stuffed vegetables
· Sweet tarts
· Cakes
3
- Small biscuits
ESTIMATED DURATION
- Soufflé
FINISH TIME
2 - Select your dish
Example: Soufflé
After selecting your dish, confirm by pressing
“START”.
3 - You can change the end of cooking time
before putting your dish in the oven at the
recommended shelf height.
- Confirm by pressing the Start button to start
cooking.
18
2 / USING YOUR APPLIANCE
EN
• USING THE “ICS” FUNCTION
N.B.: No preheating is required when using the
ICS function. Cooking absolutely MUST start
in a cool oven. You should wait for the oven to
cool down completely before beginning a second cooking programme.
4
4 IMPORTANT: Do not open the door during this phase or you may disturb the calculation recording of data.
CHICKEN
5 - The oven beeps and switches off when
the cooking time has finished and an animated display wishes you “Bon appetit”!
5
The cooking mode works in two phases:
1. A data search phase during which the oven
begins heating and determines the ideal cooking time. This phase lasts between 5 and 40
minutes depending on the dish.
2. A second cooking phase: the oven has determined the necessary cooking time. The remaining cooking time indicated takes into account the cooking time from the first phase.
You can now open the door (e.g. to baste a
roast).
- The oven beeps and turns off when the cooking time is over and your screen then indicates that the dish is ready.
DELAYED START FUNCTION:
To program a delayed start,
- Select the end of cooking function
change the end of cooking time.
and
Note: If you want to programme a subsequent
ICS cooking cycle, wait until the oven has cooled completely. However, you can still use the
“Expert” function, even if the oven is hot.
19
EN
GUIDE TO THE “I.C.S.” FUNCTIONS
Pizza
• fresh store-bought pizza
• ready-to-use pizza dough
• home-made pizza dough
• frozen pizza
Tarts
• fresh quiches
• frozen quiches
• frozen mini-pastry
(s avo u r y )
Beef
(rare , me di um,
we l l do ne )
• roast beef
(prepared rare)
• place the roast on the grid using the grid + drip tray
.
You can turn it over when the cooking time be comes fixed.
Roast
Pork
• Pork roasts
- loin
- tenderloin
Chicken
• chickens weighing 1 to 1.7 kg
• duck, guinea fowl, etc.
Lamb
(pi nk, wel l
done)
Fish
V e ge tabl e s
stuffed
• leg of lamb weighing 1 to 2.5 kg
• place the leg on the grid using the grid + drip tray
assembly.
You can turn it over when the cooking time becomes
fixed.
• whole fish
(sea bream, pollock, trout, mackerel, etc.)
• roast fish
• tomatoes, stuffed peppers & vegetables
• lasagne (fresh or frozen)
• shepherd’s pie, brandade, etc.
Tarts
(sweet)
• Fresh tarts
• Frozen tarts
Cakes
• Family cakes: cake (sweet or savoury),
pound cake
• Ready-to-mix batters in packets.
Small
Biscuits
• Small individual cakes: cookies, wafers,
croissants, buns, fruit bread in a mould,
croque-monsieur.
Soufflé
• use a tall mould with straight edges and a diameter of
21cm
20
GUIDE TO THE “I.C.S.” FUNCTIONS
EN
• Place it on the grid for a crispy crust
(you can place a sheet of parchment paper between the grid and the pizza to protect the oven from cheese drippings)
• place the pizza on the baking tray for a soft crust.
• use a nonstick aluminium mould: the pastry will be crispier on the bottom
• remove the tray from frozen quiches before placing them on the grid.
• take the roast out of the refrigerator at least one hour before starting the cooking programme:
• your meat will be rare; if you prefer it well done, opt for a traditional cooking function.
• trim away as much fat as possible: it causes smoke.
• at the end of cooking, allow the meat to sit for 7 to 10 minutes wrapped in a sheet of aluminium foil before carving.
• take the meat out of the refrigerator at least one hour before starting the cooking programme: the colder the
meat is going into the oven,
the colder it will be at the end of cooking.
• use an earthenware dish. Add 1 to 2 tablespoons of water.
• at the end of cooking, allow the meat to sit for 7 to 10 minutes wrapped in a sheet of aluminium foil before carving. Add salt when cooking is finished.
• cooking on the spit: do not forget to place the drip tray on the first shelf support to catch drippings.
• cooking in a dish: opt for earthenware dishes to avoid splattering.
• pierce the skin of poultry to avoid splattering.
• take the roast out of the refrigerator at least one hour before starting the cooking programme:
• select a leg of lamb that is round and plump rather than long and lean
• wrap the meat in aluminium and let it sit after cooking.
• use this function only for whole fish cooked with herbs
and white wine.
(grilled fish or papillote preparations require that the oven be preheated).
• properly adjust the dimensions of the dish to the quantity of food to be cooked to avoid juices spilling over.
• Use a non-stick aluminium mould:
• the crust will be crispy on the bottom.
• cakes made in a cake mould, round, square... and always placed on the grid.
It is possible to place two cake moulds side by side.
• small individual cakes made on a pastry tray and placed on the grid.
puff pastry must be cooked on “CAKES” to achieve good results.
• butter the mould and do not touch the inside with your fingers or the soufflé will not rise.
21
EN
TIPS AND HINTS FOR ICS
Pizza
To prevent cheese or tomato sauce from dripping in the oven, you can place a piece of parchment
paper between the grid and the pizza.
Tarts / Quiches:
Avoid glass and porcelain dishes: they are too thick and extend the cooking time resulting in the
bottom of the crust not being crispy. With fruit, the bottom of the tart risks becoming soggy: just add
a few spoonfuls of fine semolina, crushed biscuit crumbs, almond powder or tapioca, which will
absorb the juice during cooking. With high-water content or frozen vegetables (leeks, spinach,
broccoli or tomatoes) you can sprinkle a tablespoon of cornmeal.
Fish:
When buying, the odour should be pleasant and not too “fishy”. The body should be firm and
rigid and the scales should be firmly attached to the skin; the eyes should be bright and rounded
and gills shiny and moist.
Beef/Pork/Lamb
You must take all meat out of the refrigerator well before cooking it: a sudden transition from cold to
hot temperatures makes the meat tough; this produces roast beef which is golden outside, red inside
and warm in the middle. Do not salt before cooking: salt absorbs the blood and dries out the meat.
Use spatulas to turn the meat : if you pierce the meat the blood drips out. Always let meat sit after
cooking for 5 to 10 minutes: wrap it in a sheet of aluminium and place it just inside a warm oven: this
allows the blood drawn toward the outside during cooking to return to the middle and moisten the
roast.
Use earthenware roasting dishes: glass encourages grease splashes.
Do not cook in the enamelled drip tray.
Avoid piercing the leg of lamb with cloves of garlic as the lamb will lose its juices; instead, slide the
garlic in underneath the skin, or bake the unpeeled garlic beside the leg and crush it when it has
finished cooking to flavour the gravy; sieve it and serve very hot in a gravy boat.
22
SOME ICS RECIPES
EN
Pizza Base: 1 pizza crust
*with vegetables : 6 tablespoons tomato sauce + 100 g diced courgettes + 50 g diced bell
peppers + 50 g sliced aubergines + 2 small sliced tomatoes + 50 g shredded gruyere + oregano + salt
+ pepper.
*with roquefort and smoked bacon : 6 tablespoons tomato sauce + 100 g smoked bacon +
100 g roquefort in small chunks + 50 g walnuts + 60 g grated gruyere.
*with sausage and cottage cheese : 200 g drained cottage cheese spread on the crust + 4
sausages, sliced + 150 g ham slivers + 5 olives + 50 g grated gruyere + oregano + salt + pepper.
Quiches: Base: 1 aluminium mould, diameter 27 to 30 cm
1 ready-to-use short crust pastry
3 beaten eggs + 50 cl heavy cream
salt, pepper, nutmeg.
Various garnishes :
200 g precooked larding bacon
or - 1 kg cooked endives + 200 g grated gouda
or - 200 g broccoli + 100 g larding bacon + 50 g blue cheese
or - 200 g salmon + 100 g spinach, cooked and drained
Roast beef PARSLEY SAUTERNES SAUCE WITH ROQUEFORT:
Cook two tablespoons of snipped shallots in butter until translucent. Add 10 cl Sauternes,
let it evaporate. Add 100 g Roquefort, let it melt slowly. Add 20 cl liquid cream, salt, pepper. Bring to
a boil.
Pork roast
Pork with prunes
Ask the butcher to carve a hole through the length of the roast. Stuff 20 prunes inside. Serve sliced with its juices or cold with an endive salad.
Chicken
Stuff it with a good bouquet of fresh tarragon or rub it with a mixture of 6 crushed cloves of
garlic with a pinch of coarse salt, and some peppercorns.
Lamb Anchovy Sauce:
Puree 100 g black olives with 50 g capers and 3 anchovies, 1/2 garlic clove and 10 cl olive oil.
Add 10 cl crème fraîche. Serve with sliced leg of lamb.
23
EN
SOME ICS RECIPES
Fish
Black sea bream with dry cider:
1 bream weighing 1.5 kg.
500 g button mushrooms.
2 sour apples.
2 shallots.
2 tablespoons heavy cream.
100 g butter.
1/2 litre cider. Salt, pepper.
Gut and scale the fish. Place it in a buttered dish on the finely minced shallots and sliced mushrooms.
Add the cider, salt and pepper and a few dollops of butter. Place in the oven. Cut the unpeeled apples
into quarters and simmer them in the butter. When cooking is complete, transfer the fish to a warm
dish, strain the juice and deglaze the dish with the cream. Add the cream to the juice, serve with apples
and mushrooms.
Stuffed vegetables
Leftovers from pot au feu, leg of lamb, pork roasts, and roasted poultry can be finely chopped
for an excellent base.
Flaky praline apple tart:
1 flaky pastry crust rolled and pricked with a fork.
200 ml cream brought to a boil with a vanilla bean.
2 beaten eggs with 30 g sugar, add the cooled cream.
2 apples cut into cubes rolled in 70 g crushed pralines.
Add cream and apples to crust. Place in the oven.
Pound cake with citrus fruits
Caramel: 20 lumps of sugar (200g)
Cake: 4 eggs
200 g granulated sugar
200g flour
200 g good butter
2 teaspoons baking powder
Fruit: 1 small can of citrus fruits in syrup.
Drain the fruit. Prepare a caramel icing. When it has taken on colour, turn it out into a cake pan;
tip it around to distribute the caramel. Let cool. In the bowl of an electric blender, mix the
softened butter with the sugar. Add the whole eggs one at a time, then the sifted flour. Finish
with the baking powder. Place the citrus sections in a flower pattern on the caramel icing. Pour
in the batter. Place in the oven on the “CAKES” setting. Unmould in a pretty dish and serve
cold. Other fruits can be used, such as apples, pears or apricots.
24
SOME ICS RECIPES
EN
Individual chocolate cakes
12 individual aluminium ramekins
60 g butter
200 g bitter chocolate (more than 50% cocoa)
100 g granulated sugar,
4 eggs
1 package baking powder
70 g sifted flour.
Melt the chocolate with the butter over very low heat. Work the egg yolks into the sugar until the
mixture becomes smooth. Add the flour, melted chocolate with butter and finish with the baking
powder. Beat the egg whites into stiff peaks and gently fold them into the mixture. Lightly butter
and flour the aluminium ramekins and pour the batter into them (without dripping any on the
edges). Place the ramekins on the baking tray and choose the “BISCUITS” mode. Unmould and
let cool on a grid. Serve with vanilla crème anglaise or coconut ice cream.
Soufflés
Béchamel sauce base:
1/2 litre milk
60g flour
100g butter
4 egg yolks + whites beaten into stiff peaks
salt, pepper, nutmeg.
Depending on the type of soufflé, you will add 150 g shredded gruyere or 1 kg cooked, chopped
spinach or 1 kg cooked, chopped cauliflower or 150 g shredded leftover cooked fish or 150 g chopped
ham.
25
EN
2 / USING YOUR APPLIANCE
• USING THE TIMER FUNCTION
- Your oven’s programmer can be used as an
independent timer that allows you to count
down time without using the oven.
1 - Press the button
1
.
2
- Set the timer using the touch keyboard.
Example: 1 min 45 secs.
- When you have set the time, press OK to
confirm.
2
3 — The programmer displays the home
screen and the timer starts running, counting
down the time in seconds.
Once the time is up, the “minute minder”
emits a series of beeps to let you know.
The beeps can be stopped by pressing any
touch button.
RAZ
3
Note
You can modify or cancel the timer programming at any moment.
26
2 / USING YOUR APPLIANCE
EN
• USING THE SEARCH FUNCTION
-Your oven has a “search” button which al lows you to access the various oven pro grams by type of food:
1 - Press the button
1
.
2 — The programmer displays the search
screen.
2
3
- Enter the type of food and press OK to
confirm.
X
4
- Different types of program are displayed. Select the type of cooking you want.
E.g. Roast beef (low temperature).
3
BE
58
results
- Adjust the cooking settings, confirm by
pressing the Start button to start cooking.
X
4
BEEF MEDIUM DONE
BEEF RARE
ROAST BEEF RARE (3h00)
ROAST BEEF WELL DONE
27
EN
2 / USING YOUR APPLIANCE
• LOCKING THE CONTROLS (CHILD SAFETY)
OVEN OFF
You have the option of preventing access to
the oven controls by taking the following
steps:
1
1 - when the oven is off, press the “padlock” button for a few seconds.
A beep sounds.
- The padlock display changes to locked mode. Access to your oven’s controls is locked.
- To unlock access, hold down the “pad-
2 lock” button again for a few seconds.
A beep sounds.
The padlock display changes to unlocked
mode.
The oven controls are once again accessible.
2
28
expert
low
température
ICS
recipes
3 / OVEN COOKING MODES
*
EN
FAN COOKING
(recommended temperature 190°C min 35°C max 250°C)
• Cooking controlled by the heating element in the floor of the oven and by the fan.
• Rapid temperature increase: Some dishes can be placed in the oven while it is still
cold.
• Recommended for keeping white meat, fish and vegetables moist.
For cooking multiple items on up to three levels.
COMBINED HEAT
(recommended temperature 180°C min 35°C max 230°C)
• Cooking controlled by the upper and lower heating elements and by the fan.
• Three combined sources of heat: a lot of heat from the bottom, a little circulating heat
and a touch from the grill for browning.
• Recommended for quiches, pies, tarts with juicy fruits, preferably in an earthenware
dish.
*
TRADITIONAL
(recommended temperature 200°C min 35°C max 275°C)
•Cooking heat is provided by the upper and lower heating elements with no use of the
fan.
•Recommended for slow, gentle cooking : tender game meat, etc. To seal red meat
joints. To simmer in a covered stew pan dishes that were begun on the hob (c
coq au vin,
stew, etc...)
GRILL + ROTISSERIE
(recommended temperature 190°C min 100°C max 250°C)
• Cooking controlled, alternately, by the upper element and by
the fan.
• Preheating is unnecessary. Roasts and poultry are juicy and crisp all over.
• The rotisserie continues to run until the door is opened.
• Slide the drip tray on to the bottom shelf support.
• Recommended for all spit-roasted poultry or meat, for sealing and thoroughly cooking a leg of lamb or rib of beef. To retain the moist texture of fish steaks.
VARIABLE MEDIUM and HIGH GRILL + ROTISSERIE
(recommended settings 2 or 4 - min 1 - max 4)
• Cooking is controlled by the upper element.
• The double grill covers the entire grid surface. The medium grill it is as effective as
the high grill for smaller quantities.
• Recommended for grilling cutlets, sausages, slices of bread, prawns placed on the
grill.
*Sequence(s) used to obtain the results indicated on the energy label in compliance with European
standard EN 50304 and in accordance with European Directive 2002/40/EC.
29
EN
3 / OVEN COOKING MODES
KEEP WARM
(recommended temperature 60°C min 35°C max 100°C)
• This position allows you to keep your food warm by spurts of heat from the element
at the back of the oven combined with fan.
• Recommended for letting dough rise for bread, brioche, kugelopf...without exceeding 40° C (plate warming, defrosting).
BREAD
(recommended temperature 205°C min 35°C max 220°C)
• Recommended cooking sequence for bread making.
• After preheating, place the ball of dough on the pastry tin - 2nd shelf.
• Don’t forget to place a dish of water on the base to obtain a golden crispy crust.
DEFROST
(recommended temperature 35°C min 35°C max 75°C)
• Dishes are defrosted using a limited amount of heat and the fan.
• Perfect for delicate dishes (fruit tart, custard pie, etc.).
• Meat, buns, etc. are defrosted at 50 °C (meat should be placed under the grill with a
dish underneath to catch drips from the defrosting which are not edible).
30
4 / MAINTAINING AND CLEANING YOUR OVEN
EN
• PERFORMING A PYROLYSIS
• Immediate pyrolysis
Note
Take the grills and trays out of the oven and clean up any major spills.
— The programmer displays the home screen.
1
You can choose between 3 pyrolysis cycle
times:
pyrolysis time 1 hour 30 minutes.
pyrolysis time 1 hour 45 minutes.
pyrolysis time of 2 hours.
AUTO
2
1 - Select the setting mode.
2
- Select CLEANING mode.
3 - Select the duration of the pyrolysis
cycle.
- Example: 1 hr 45 min pyrolysis cycle.
3
minimum
medium
medium dirty
maximum
auto
When the oven is cool, use a damp cloth to
remove the white ashes.
The oven is clean again and ready for further cooking operations.
31
EN
4 / MAINTAINING AND CLEANING YOUR OVEN
• PERFORMING A PYROLYSIS
• Immediate pyrolysis
4
4 - Confirm by pressing the START button.
If you want to delay the start of the pyrolysis
cycle select the end of cooking tab.
Adjust the end of cooking time using the
touch keyboard.
- When you have set the time, press OK to
confirm.
LAST PYRO
21 january 2010
15:30
PYRO CONTROL
FINISHING TIME
5
- The pyrolysis cycle begins and a moving symbol
is shown in the display. The
cooking time begins to count down immediately it has been set.
During pyrolysis, the symbol
displays on
the programmer to indicate that the door is locked.
5
6
- When pyrolysis has finished, a message tells you your oven is clean
6
OVEN CLEAN
32
5 / AFTER-SALES SERVICE
EN
• SERVICE CALLS
Any repair made to your appliance must be
carried out by a qualified professional, authorised to work on the brand. When you call, state
your appliance’s complete reference information (model, type, serial number). This information appears on the manufacturer’s nameplate
(Fig.1).
BRANDT APPLIANCES SAS
7 rue Henri Becquerel
92500 RUEIL MALMAISON
MADE IN FRANCE
230V ~ 50 Hz
Fig.1
ORIGINAL PARTS
During maintenance work, request the exclusive use of certified genuine replacement
parts.
FagorBrandt SAS, tenant-manager – SAS with share capital of 20 000 000 euros RCS Nanterre 440 303 196.
CZ5700676-00 -01/12
33