1
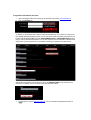
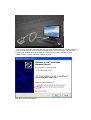
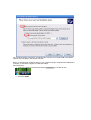
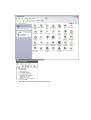
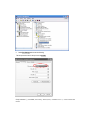
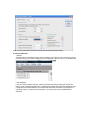
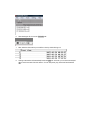
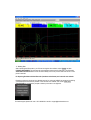
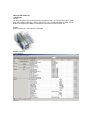
CRecorder User Guide v.2.1
I. Introduction:
Function:
The CRecorder collects real-time engine data such as Ignition Timing, Fuel Trim and Engine Speed, among
many other variables. Additionally, it will also read DTCs for cars compatible with OBDII and EOBD. For an
additional fee, diagnosis is available from technicians via the internet, at www.crecorder.com.
Product:
Hardware consists of a. CRecorder and b. USB cable.
Software consists of:
a. Client Software:
b. CRecorder Website:
Registration and Installation Flow
Purchase a new CRecorder
Log on to the CRecorder website
Register your details
Log on to www.crecorder.com to download
software
Install software and driver
Register and Install completed
II. Registration and Installation Procedure:
1.
2.
Upon purchasing the CRecorder, please log onto the CRecorder website: www.crecorder.com.
Click on the Register link.
To register, you will need the serial number provided with the CRecorder. This is found on a sticker in the
foam backing within the packaging contents. You will also need to create a username and password. PLS.
DO NOT USE SPACES/BLANKS. Click the CHECK NUMBER VALID or CHECK NAME VALID buttons to
help you input a valid username/password. You are also required to fill in the information in the blue fields
and provide a valid email address as it is connected to retracting your password and other services.
After the above information has been filled out, click on the CREATE LOGIN link. This will submit your
information to LAUNCH. You are now ready to download the client software.
3.
The next step is to log onto www.crecorder.com. Fill in your username and password and click on
LOGIN.
4.
Next, select SOFTWARE DOWNLOAD. Save this file on your desktop.
Since this is a .zip file, it will need to be decompressed. Most computers will do this automatically since
WINZIP is now included in most operating systems. Should you need WINZIP, you can download a free
copy at:
http://www.winzip.com/downwz.htm
5.
6.
After completing the download, Save and then Run WINZIP
In the WINZIP program, open the Client software (it is an executable program named
“crecorder_setup.exe” and should be on your desktop.) Once crecorder_setup.exe has been extracted,
it is ready to be run.
7.
After running the set-up program, you should now have an icon on your desktop for the CRecorder.
Double clicking on this icon will launch the program.
Important Notes:
The CRecorder’s client software will work on all Windows 2000, NT, ME, XP, and Vista versions.
8. Connecting the CRecorder to your computer.
If you are using the CRecorder for the first time, you will need to install the driver.
To do so, simply connect the cable to the CRecorder and connect the USB side to your computer’s USB port.
For XP and Vista users, the driver will install automatically and you will see a message in your bottom task
bar stating that “Windows has found new hardware”. Simply follow the prompts of the New Hardware
Installation Wizard. Select the “Advanced” setting as per below.
Click [Next] to enter the next interface:
Tick “Include this location in the search”, and find the route of the diver: C:\Crecorder\ CDM 2.02.04 WHQL
Certified. Then click [Next] to next interface until finish.
Note: If you are still having connectivity issues or if your computer is failing to recognize that the CRecorder is
connected, you will need to configure your USB’s port settings.
Here are the steps:
1. Enter your computer’s control panel by selecting Control Panel on your Start Up menu
2.
then select System
3.
Once inside SYSTEM, select Device Manager.
4.
Next, click on the port that the CRecorder is connected to.
5.
Select Port Settings and ensure the following:
The bits per second rate for the port is set to 921600.
Click [ Advanced… ], once inside, the Latency Timer (msec): should be set to 1, click on the Serial
Printer.
Again, you may be prompted to reboot the computer after having changed these settings.
III. Using the CRecorder:
1. Set time.
The CRecorder is a real-time data logger—hence, its internal clock needs to be set in order to give you the
correct time stamp for your data. To set the time on the CRecorder, connect it to your PC via the USB cable
and run the client software. Enter the TOOLS menu and click SET TIME.
2. Recording Data
Locate your vehicle’s datalink connector. Insert the CRecorder and start the ignition (this must be done
within a minute of inserting the CRecorder). The CRecorder’s indicator light should flash intermittently—this
is a sign that communication between your vehicle and the CRecorder is successful. If the light stays on
consistently, there is a problem with communication, or your vehicle may not be compatible with the
CRecorder.
3. Viewing Data
With the ignition switched OFF, remove the CRecorder and connect it to your PC via the provided USB
cable. Run the client software. Click on the Upload icon and data transfer will begin.
A text box prompting you to import the data will appear, click on the Import Data button to begin the import
process. Once imported, you will have the option of viewing the data as a graph, data stream, or as events
with a time stamp.
4. Once the data has been imported, TAB 1--the REPORT tab--will give you your readiness monitors. To
further view and manipulate the data, begin by selecting the file you would like to view within the REPORT
tab. These files are found under “Historical .x431 file”
Select session:
6.
After selecting the file, click on the TRIP INFO tab.
7.
Next, select the drive session you would like to view by double clicking on it.
8.
Clicking on the session will automatically launch the DATA tab. In this tab, you can view time stamped
data for each 2 seconds of the drive session. You can also pause, play, rewind and fast forward the
data.
9.
To view the data in graph form, select the GRAPH tab. In this screen selection, you can view data in 4
fields on the graph.
The parameters for these fields can also be selected by toggling the drop down menu per field. You can also
choose to make fields visible or not by checking/un-checking the check box.
10. To view the drive session in playback mode, you will need to ZOOM IN on the data. To do so, simply
click on the ZOOM IN Tab and then select PLAY. Again, you can pause the track at any time, as well as
rewind and fast forward.
11. Clicking on certain points on the graph will also bring up the EXACT reading/measurement per field
selected.
12. Deleting Data
After connecting the CRecorder to your PC and running the client software, select TOOLS and then
FORMAT CRECORDER. This will erase all current data that is stored in the CRecorder. The CRecorder
stores data in 24 hour increments. It will also automatically record over previous data once the 24 hr. time
period is reached.
IV. Reporting Problems with the CRecorder (hardware and software) and crecorder.com website
Reporting problems is simple and is a valuable resource for us here at LAUNCH to ensure we are offering
you the best product and service possible. In the crecorder.com website, click on the COMPLAINT
COLLECTION link and follow the prompts to submit your issues to our engineers.
For further support, please call us at 1-877-LAUNCH9 or email to: [email protected]