1
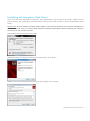
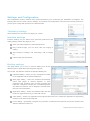
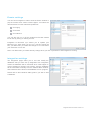
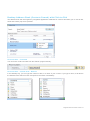
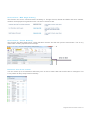
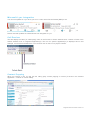
Integrator Soft Client User Guide
Contents
Introduction ................................................................................................................... 3
Installing the Integrator Soft Client .............................................................................. 4
Signing in ........................................................................................................................................ 5
Passwords ...................................................................................................................................... 5
Settings and Configuration .......................................................................................... 6
Telephony settings ......................................................................................................................... 6
Interface settings ............................................................................................................................ 6
Dialling settings .............................................................................................................................. 6
Integration settings ......................................................................................................................... 7
The Basics ..................................................................................................................... 8
Tray menu ...................................................................................................................................... 8
Phone window ................................................................................................................................ 8
Preview window.............................................................................................................................. 9
Making calls .................................................................................................................................... 9
Call control ................................................................................................................................... 10
Active call ................................................................................................................................... 10
Ringing call ................................................................................................................................. 10
Features ....................................................................................................................... 11
Set forward all .............................................................................................................................. 11
Set Do Not Disturb ....................................................................................................................... 11
Presence ...................................................................................................................................... 11
Desktop Address Book (Contacts Search) with Click-to-Dial ...................................................... 12
Click-to-Dial – Outlook ............................................................................................................... 12
Click-to-Dial – Quick Dial / Search ............................................................................................. 12
Click-to-Dial – Recent Calls ....................................................................................................... 13
Click-to-Dial – Call History ......................................................................................................... 13
Click-to-Dial – Clipboard Dialling ............................................................................................... 13
Click to Dial - Web Page Dialling ............................................................................................... 14
Click to Dial – Focus Dialling...................................................................................................... 14
Presence with Click to Dial......................................................................................................... 14
Microsoft Lync Integration ............................................................................................................ 15
Call Preview ................................................................................................................................. 15
Contact Popping ........................................................................................................................... 15
Service limitations ...................................................................................................... 16
3G and 4G networks .................................................................................................................... 16
Wi-Fi Networks ............................................................................................................................. 16
Introduction
Horizon Integrator has been designed to make your desk phone easier and more convenient to use. It can do this
in a number of ways and this document will show you how.
Integrator is designed to be discrete - always running and providing useful information as you need it, yet at the
same time not annoying and interfering when you’re trying to work. So, for most of the time, Integrator sits silently
in your tray menu, waiting for you to click on it.
Note: In Windows 7, some tray icons become hidden and expressly have to be shown. These settings are stored
in the ‘Notification Area Icons’ part of the Windows Control Panel and will need to be updated locally.
Installing the Integrator Soft Client
Once you have been allocated the feature by your Administrator, you will receive an email / emails from the
Horizon system. The confirmation email will contain a link that you need to follow in order to download the client
locally.
Please note: A local install will require admin rights on the relevant machine for the initial installation of
an executable file (.exe). You must check with your network administrator before installing the software,
to ensure you can run the .exe files.
Download the file that is linked in the e-mail.
Before continuing you should close all your programs down. Click "Next>"
Read the end user license agreement and once you're happy, click "I Agree".
Integrator Soft Client User Guide v1.0
Integrator Setup will now run through the setup. Once it has completed you can click "Done".
Signing in
To get up and running with Integrator, you'll need to enter your username and password please note these are different than the Portal login details. Please speak to your Administrator
if you don't have your log in details.
The details can be entered by right clicking the Integrator icon in your taskbar and selecting
'Configuration'.
From there, select 'Telephony' and enter your username and
password. The directory mode will default to group; we'll touch
on this later in the 'Presence' section.
You'll also need to specify your location, select your country
and area code from the drop down list and click 'Save' - you
should now be ready to go.
Passw ords
A single password (that is separate to a user’s Horizon portal password) is generated per user by the system
for use with ALL software clients (Integrator, Integrator CRM, desktop soft client and the mobile soft client). If a
user is using more than one client (Integrator and the mobile soft client, for example) then only the assignment of
the first client will result in a password being generated; this will be received before a confirmation email with
download instructions. For all subsequent clients, only the confirmation email will be sent.
Integrator Soft Client User Guide v1.0
Settings and Configuration
The Configuration section contains many options that allow you to customise your installation of Integrator. The
following will cover the most common settings. If you select the Configuration menu item from the tray menu then
you are given a page with options on the left hand side.
Telephony settings
These settings are covered in the ‘Signing in’ section.
Interface settings
Interface settings let you define some personal preferences and
hotkey settings. Within the page you can;
Set if you'd like Integrator to start with Windows
Play sounds though your PC when calls are ringing or
waiting
Set hot keys for making a call, answering a call or hanging
up
Clear locally cached histories
Dialling settings
This page allows you to turn on and off dialling from all the
different types of application that Integrator supports.
As a review, the different methods of clipboard dialling are;
Clipboard dialling - where you copy a telephone number
to the clipboard and the software detects it
Web page dialling - where the software automatically
scans web pages in Internet Explorer or other
supported web browsers and converts anything that
looks like a telephone number into a clickable hyperlink
and adds new buttons next to telephone number fields
that you have told it about
Application dialling - where the software adds new Dial
buttons to applications that you have told it about
TAPI dialling - where any application that supports Microsoft TAPI (Telephone Application Programming
Interface) can dial through Integrator
Focus dialling - dynamically recognise any numbers in textboxes that looks like the phone numbers and
allows to dial that number out
Integrator Soft Client User Guide v1.0
Events settings
You can force Integrator to either show the Phone window or
pop the contact when certain events happen. Just select the
relevant action from the relevant dropdown list:
On ringing
On answer
On outbound.
You can also turn on or off the unobtrusive Preview window
for all calls by ticking or clearing the box.
Integration to Microsoft Lync allows you to update your
Microsoft Lync state when you are on a call. By ticking the
box, your Microsoft Lync status will change to “In a Call” when
your extension is on a call.
Note: Your Microsoft Lync status will only change when your PC is powered on and Integrator is running.
Integration se ttings
The Integration pages allow you to see and modify the
databases that you have set up integration with. Integration
means the database will be searched when calls happen to
convert telephone numbers into names; and the database
will be searchable manually from the Address Book window;
and contacts that are found in the database can be “popped”.
Please refer to the individual ‘addin guide’ if you wish to add
a database.
Integrator Soft Client User Guide v1.0
The Basics
Tra y menu
Right click on the Integrator icon in your notification area. If you're sitting ‘in
available’ it'll be a green circle, if you're on a call it will be red.
This will open the tray menu, which should look like this. From
the top down we have;
Quick dial box - you can type a number to dial or enter
a name to find a contact
Recent menu - quickly see recently dialled numbers
and click to redial them
Features menu - amend call settings such as do not
disturb and call forwarding
Phone - opens up the phone window, covered in more
detail below
Presence - opens up the presence window, covered in
more detail below
Address book – you can search for a user in your
company directory or one that’s in a connected CRM
Call history - opens the call history window that details
your recent incoming, outgoing and missed calls
Configuration - used to configure which CRM packages
you integrate with
Exit - use this to exit the software
Phone w indow
The phone window can be accessed by either selecting it from the tray menu (as shown above) or by double
clicking the Integrator icon in the bottom right of the screen. The screenshot below shows the window during an
active call.
Integrator Soft Client User Guide v1.0
You can use the Phone window if you want to control calls or show contacts. After you’ve used the software for a
while, though, you’ll probably prefer to use the Preview window as it can be more convenient and less intrusive.
Preview w indow
The preview window will appear when a call is ringing or answered, and will look similar to the below.
Like the Phone window, the actions at the bottom of the
preview window adapt to the state of the call. The example
picture shows the actions that are available when a
connected call is in progress.
Making calls
Integrator offers several ways of making calls using your
PC without the need to pick up your handset and dial.
Below are a few real life scenarios of where you may have
a number stored that you'd like to dial and how Integrator can help make that simpler.
A piece of paper
o From the Integrator tray menu, you can type the number into the text box
at the top and then hit enter. This will initiate a call to that number.
o
If you happen to have the phone window open, you can start to type
the number using your keyboard. Integrator will know that you're
trying to make a call and will switch to the 'Make call' screen. Press
enter or click 'Make call' to initiate a call to that number.
Someone you spoke to on the phone recently
o As long as you spoke to them on your Horizon phone then the
call will be in your call history. From the tray menu, select 'call
history' and you'll see a list of your calls in reverse date order.
Locate the caller from the list and click on their number to
initiate a call to them.
o
Alternatively, if they were one of the last 10 people
you spoke to then they will show in your 'Recent'
list. From the tray menu (or phone window) select
recent and select their number to initiate a call.
Integrator Soft Client User Guide v1.0
Call control
Ac t iv e c al l
The call control screen appears when you make or receive a call, with the same 'Call actions' appearing next to
the Integrator icon in your notifications panel.
The phone window allows you to interact with the current call in a number of ways, including the transfer of calls.
To do this you must be connected to the call you would like to transfer, i.e. it cannot be on hold or ringing.
When you are connected, the actions list looks like it does to the right. To
transfer a call you do not need to place it on hold, instead press either the
consult (if you'd like to speak to the other person first) button or transfer (if
you do not want to speak to the other person first).
You are then presented with a screen similar to the 'Make a call' screen,
but with the word Consult or Transfer to the right of the Number field. Your
call is not on hold at this stage, but when you are ready, enter the number
to transfer to, then click;
'Consult' to place the current call on hold, while you speak to the other party. You can then press
complete or cancel.
'Transfer' to put the call straight through to the other party
Note: all the call actions on the main phone window can also be accessed via the preview window that appears
next to the Integrator icon.
Ring ing ca ll
A ringing call can be either;
Answered - which will answer the call on your Horizon phone
Deflected - which will give you the ability to direct the call to an
alternate number
Integrator Soft Client User Guide v1.0
Features
The Features menu provides you with options to control the behaviour of your phone. There are three options
available from this menu; “Call settings”, “Set Forward All” and “Set Do Not Disturb”.
Set forw ard all
“Set Forward All” allows you to enter a number that will be called when
someone calls your extension. Please remember that that your phone
will not ring when this is set.
Set Do Not Disturb
“Set Do Not Disturb” allows you to set your phone so that a caller will hear the busy tone when they call your
extension.
Presence
Presence provides a simple and quick way for you to check the
status of your colleagues' extension. The window can be
accessed from the tray menu by selecting 'Presence'.
You can customise your list from this window by clicking the green
plus icon, searching for the person you'd like to add and clicking 'OK'.
Under 'Type' you can select either extension, to search by extension
only, or all, to carry out a free text search.
Note: the list is limited to 20 extensions or users
The circle next to each of your monitored contacts will indicate the state of their extension. This key shows each
of the possible states.
Colour
Status
You can right click any of your monitored contacts and will be
presented with appropriate option(s). If you are not on a call, you'll
have an option to initiate a call to that user. If you are currently on an
active call, you'll have the option to consult or transfer to that user as described in the Call Control section.
Solid green
On-hook
Flashing red
Ringing
Solid red
Call connected
Flashing yellow
On hold
Solid grey
Off-line
Note: by default the search will only look for users in the same group
as you. If you want to search companywide, you'll need to go to
Integrator > tray menu > configuration > telephony > and update
the Directory Mode to 'Enterprise'.
Integrator Soft Client User Guide v1.0
Desktop Address Book (Contacts Search) w ith Click -to-Dial
The address book will interrogate any integrated applications database for contacts and allow you to click-to-dial,
email and contact pop where possible.
Cli c k - t o - Di a l – O ut lo ok
You can find a contact and dial from the Outlook program directly.
Cli c k - t o - Di a l – Q ui ck Di al / Se a rc h
In the desktop tray, you can type the number to dial, or a name of your contact. If you type a name, it will launch
the address book search function and perform the search immediately
Integrator Soft Client User Guide v1.0
Cli c k - t o - Di a l – Re c en t C al ls
You can click to dial instantly from a list of recently made/received calls
Cli c k - t o - Di a l – Ca ll H ist or y
This is an extensive list of previously made/received calls. You can click to dial or pop the contact if they are
recognised by the application.
Cli c k - t o - Di a l – Cl ipbo ar d Di al li ng
You can copy a number to your clipboard to make a call.
As soon as the number is copied to the clipboard, a bubble is popped in the tray icon, simply click the bubble to
make the call.
It is best to define the minimum and maximum digits to ensure the soft client matches on probable numbers. The
detail below is suggested for this.
Integrator Soft Client User Guide v1.0
Cli c k t o Di al - W eb P ag e Di al lin g
This function can work in various browsers including i.e. Google Chrome, Mozilla and Safari and when enabled,
numbers are displayed as hyperlinks which can then be clicked to dial.
Cli c k t o Di al – Fo cu s Di al lin g
This function will detect fields which contain dial-able numbers and will then present a dial button. This is very
useful within meeting requests as an example.
P re s en ce w ith Cl ic k t o D ia l
You can monitor up to 20 extensions defined by user as well as make calls and transfer calls to colleagues. This
is very similar to Busy Lamp Field functionality.
Integrator Soft Client User Guide v1.0
Microsoft Lync Integration
You can see updates on Lync when you’re on a call or when Do Not Disturb (DND) is set.
Please note that updates are unidirectional from Integrator to Lync.
Call Preview
This will display the caller (or called party) name in the Preview or Phone window when a match is found in the
shared address book or integrated application(s). The icon for specific application(s) is displayed and in this
example, it is Outlook and Salesforce. You can then click on the icon to pop the Contact.
Contact Popping
When you receive a call, you will see the calling party contact popping on screen (if saved in the relevant
application – Outlook or chosen CRM).
Integrator Soft Client User Guide v1.0
Service limitations
The following service limitations should be carefully considered when using the Horizon soft clients.
3G and 4G netw orks
We cannot guarantee any aspect of setting up and conducting a Horizon call over any mobile network, whether
using a Horizon mobile client or a desktop client on a tethered laptop. Mobile networks provide no prioritisation of
signalling and voice payload packets and some networks will either block or slow down VoIP packets.
Before you report a call quality or availability issue on a desktop or mobile client, please ensure you have
checked that a mobile network is not being used to connect to the platform, as we are unable to provide support
for such incidents.
Using the clients over 3/4G will consume data that may either result in charges being raised by your mobile
operator or be counted against your monthly data allowance. The amount of data transferred during a call will be
dependent on codec used.
Wi-Fi Netw orks
We cannot guarantee the call quality when Horizon calls are made over Wi-Fi, owing to limitations of Wi-Fi as a
transport mechanism for VoIP packets. We also expect the quality of Wi-Fi connections to vary (office Wi-Fi,
home Wi-Fi and public Wi-Fi hotspots) and consequently you need to consider how Horizon is used over Wi-Fi
and your expectations must be set accordingly.
Integrator Soft Client User Guide v1.0