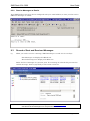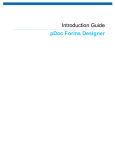
1
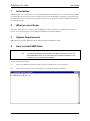
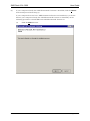
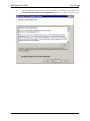
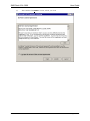
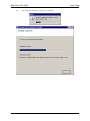
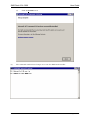
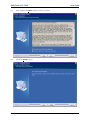
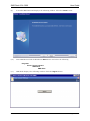
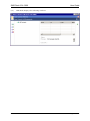
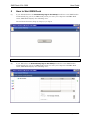
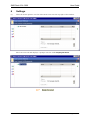
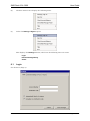
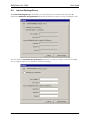
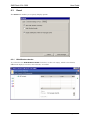
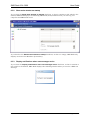
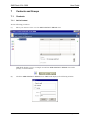
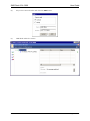
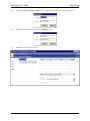
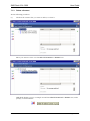
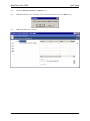
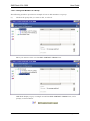
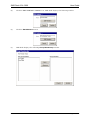
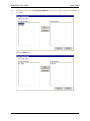
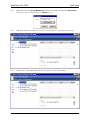
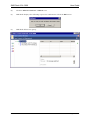
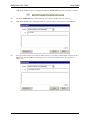
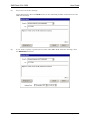
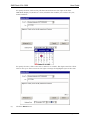
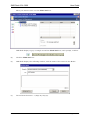
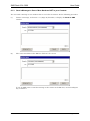
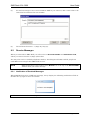
SMS Desk 2.01.0000
User Guide
Issue 1.00 – 13 November 2007
SMS Desk 2.01.0000
User Guide
CONTENTS
1 Introduction ........................................................................................................... 3
2 What you must know ............................................................................................ 3
3 System Requirements .......................................................................................... 3
4 How to Install SMS Desk ...................................................................................... 3
5 How to Start SMS Desk ...................................................................................... 14
6 Settings ............................................................................................................... 15
6.1 Login ............................................................................................................................................ 16
6.2 Internet Settings/Proxy ................................................................................................................ 17
6.3 Visual ........................................................................................................................................... 18
6.3.1 Hide Windows border ............................................................................................................... 18
6.3.2 Show main window on startup .................................................................................................. 20
6.3.3 Display notifications when new messages arrive ..................................................................... 20
7 Contacts and Groups .......................................................................................... 21
7.1 Contacts ....................................................................................................................................... 21
7.1.1 Add a Contact ........................................................................................................................... 21
7.1.2 Edit a Contact ........................................................................................................................... 23
7.1.3 Delete a Contact ....................................................................................................................... 25
7.2 Groups ......................................................................................................................................... 27
7.2.1 Add a Group ............................................................................................................................. 27
7.2.2 Edit a Group .............................................................................................................................. 29
7.2.2.1 Change the Name of a Group ............................................................................................... 29
7.2.2.2 Change the Members of a Group .......................................................................................... 31
7.2.3 Delete a Group ......................................................................................................................... 36
8 Messages ........................................................................................................... 38
8.1 Send Messages ........................................................................................................................... 38
8.1.1 Send a Message to a Number in your Contacts ....................................................................... 38
8.1.2 Send a Message to All Contacts .............................................................................................. 42
8.1.3 Send a Message to One or More Numbers NOT in your Contacts .......................................... 44
8.2 Receive Messages ...................................................................................................................... 46
8.2.1 Notification of Received Messages .......................................................................................... 46
8.2.2 Receive Messages as Emails ................................................................................................... 47
8.3 Record of Sent and Received Messages .................................................................................... 47
Issue 1.00 – 13 November 2007
Page 2 of 48
SMS Desk 2.01.0000
1
User Guide
Introduction
SMS Desk by Voice Connect Ltd. is a small application that enables you to send and receive SMS
text messages directly from and to a computer that runs the Windows operating system and that
has Internet access. It operates in a similar manner to an email client such as Microsoft Outlook
or Outlook Express.
2
What you must know
You must know how to use the version of Windows, under which you run SMS Desk and know
how to use an email client such as Microsoft Outlook or Outlook Express.
3
System Requirements
SMS Desk runs under Windows 2000, Windows XP and Windows Vista.
4
How to Install SMS Desk
IMPORTANT
(1)
You require ADMINISTRATOR rights to run the setup CD.
(2)
The setup CD attempts to install Microsoft .NET Framework Version 2.0,
which SMS Desk uses. If you have this version already installed on your
computer, you can cancel this installation.
Do the following procedure.
(1)
Insert the SMS Desk setup CD into the CD or DVD drive of your computer.
(2)
After a short delay it runs and displays the following command window.
Issue 1.00 – 13 November 2007
Page 3 of 48
SMS Desk 2.01.0000
(3)
User Guide
If your computer already has .NET Framework Version 2.0 installed, click the Cancel
button and proceed from Step (4).
If your computer does not have .NET Framework Version 2.0 installed (or you do not
know if your computer already has .NET Framework Version 2.0 installed), do the
following procedure to install Microsoft .NET Framework Version 2.0.
(a)
Click the Next > button.
Issue 1.00 – 13 November 2007
Page 4 of 48
SMS Desk 2.01.0000
(b)
User Guide
The .NET Framework Version 2.0 installer displays the following view. Select the
I accept the terms of the License Agreement check box, so that it contains a tick.
Issue 1.00 – 13 November 2007
Page 5 of 48
SMS Desk 2.01.0000
(c)
User Guide
This enables the Install > button, which you click.
Issue 1.00 – 13 November 2007
Page 6 of 48
SMS Desk 2.01.0000
(d)
User Guide
The .NET Framework Version 2.0 is installed.
Issue 1.00 – 13 November 2007
Page 7 of 48
SMS Desk 2.01.0000
(e)
(4)
User Guide
Click the Finish button.
The command window then changes as it runs the SMS Desk installer.
Issue 1.00 – 13 November 2007
Page 8 of 48
SMS Desk 2.01.0000
User Guide
(5)
The SMS Desk installer displays the following window. Click the Next > button.
(6)
The SMS Desk installer displays the following window. Click the I accept the terms of
the license agreement radio button.
Issue 1.00 – 13 November 2007
Page 9 of 48
SMS Desk 2.01.0000
(7)
This enables the Next > button, which you click.
(8)
Click the Install button.
Issue 1.00 – 13 November 2007
User Guide
Page 10 of 48
SMS Desk 2.01.0000
User Guide
(9)
It installs SMS Desk and displays the following window. Click the Finish button.
(10)
Start SMS Desk. Click the Windows® Start button and select the following.
Programs
Voice Connect Limited
SMS Desk
SMS Desk
(11)
SMS Desk displays the following window. Click the Sign In button.
Issue 1.00 – 13 November 2007
Page 11 of 48
SMS Desk 2.01.0000
(12)
User Guide
SMS Desk displays the following window.
Enter your Account Number and Verification Code.
NOTES
(1)
SMS Desk remembers your Account Number.
(2)
If you select the Automatically Sign In On Startup check box, so
that it contains a tick, SMS Desk automatically runs and logs you
in when you start up your computer and SMS Desk starts.
If you select this check box, SMS Desk automatically also selects
the Remember my Verification Code check box.
(3)
If you select the Remember my Verification Code check box, so
that it contains a tick, SMS Desk remembers your
Verification Code.
If you deselect this check box, so that it is empty, SMS Desk
automatically also deselects the Automatically Sign In On Startup
check box, so that it is empty.
Click the Save and Login button.
Issue 1.00 – 13 November 2007
Page 12 of 48
SMS Desk 2.01.0000
(13)
User Guide
SMS Desk displays the following windows.
Issue 1.00 – 13 November 2007
Page 13 of 48
SMS Desk 2.01.0000
User Guide
5
How to Start SMS Desk
(1)
If you did NOT select the Automatically Sign In On Startup check box to set SMS Desk to
automatically log you in (to SMS Desk), when you start your computer and SMS Desk
starts, SMS Desk displays the following view.
Proceed from Section 4 (Page 3), Step (11), to log in.
NOTE
(2)
See Section 4 (Page 3) and Section 6.1 (Page 16).
If you DID select the Automatically Sign In On Startup check box to set SMS Desk to
automatically log you in (to SMS Desk), when you start your computer and SMS Desk
starts, SMS Desk displays the following view.
Issue 1.00 – 13 November 2007
Page 14 of 48
SMS Desk 2.01.0000
User Guide
6
Settings
(1)
Place the mouse pointer over the white menu icon near the top right of the window.
The icon turns red and displays a prompt with the words Display the menu.
Issue 1.00 – 13 November 2007
Page 15 of 48
SMS Desk 2.01.0000
(2)
Click the menu icon to display the following menu.
(3)
Select the Settings / Sign In option.
User Guide
This displays the Settings window, which has the following three tab views.
Login
Internet Settings/Proxy
Visual
6.1
Login
See Section 4 (Page 3).
Issue 1.00 – 13 November 2007
Page 16 of 48
SMS Desk 2.01.0000
6.2
User Guide
Internet Settings/Proxy
The Internet Settings/Proxy tab enables you to specify how you connect to the Internet. By
default the Automatic Proxy Detection check box is selected, as below, so that it contains a tick.
You can clear the Automatic Proxy Detection check box, so that it is empty, as below, to enable
you to explicitly specify your Internet connection settings.
Issue 1.00 – 13 November 2007
Page 17 of 48
SMS Desk 2.01.0000
6.3
User Guide
Visual
The Visual tab enables you to specify display options.
6.3.1
Hide Windows border
If you deselect the Hide Windows border check box, so that it is empty, which is the default,
SMS Desk displays as below, with a border, as normal.
Issue 1.00 – 13 November 2007
Page 18 of 48
SMS Desk 2.01.0000
User Guide
If you select the Hide Windows border check box, so that it contains a tick,
SMS Desk displays as below, without a border.
Issue 1.00 – 13 November 2007
Page 19 of 48
SMS Desk 2.01.0000
6.3.2
User Guide
Show main window on startup
If you select the Show main window on startup check box, so that it contains a tick, which is the
default, SMS Desk displays the following SMS Desk (main) window when you start up your
computer and SMS Desk starts.
If you deselect the Show main window on startup check box, so that it is empty, SMS Desk only
displays an icon in the Windows System Tray.
6.3.3
Display notifications when new messages arrive
If you select the Display notifications when new messages arrive check box, so that it contains a
tick, which is the default, SMS Desk displays the following window when you receive a SMS text
message.
Issue 1.00 – 13 November 2007
Page 20 of 48
SMS Desk 2.01.0000
7
Contacts and Groups
7.1
Contacts
7.1.1
Add a Contact
User Guide
Do the following procedure.
(1)
Move your mouse cursor over the ADD CONTACT / GROUP icon.
SMS Desk displays a grey rectangle around the ADD CONTACT / GROUP icon and a
prompt, as shown below.
(2)
Click the ADD CONTACT / GROUP icon. SMS Desk displays the following window.
Issue 1.00 – 13 November 2007
Page 21 of 48
SMS Desk 2.01.0000
(3)
Key in the contact details and click the Add button.
(4)
SMS Desk adds the contact.
Issue 1.00 – 13 November 2007
User Guide
Page 22 of 48
SMS Desk 2.01.0000
7.1.2
User Guide
Edit a Contact
Do the following procedure.
(1)
Click on the contact that you want to edit, to select it.
Move your mouse cursor over the EDIT CONTACT / GROUP icon.
SMS Desk displays a grey rectangle around the EDIT CONTACT / GROUP icon, and a
prompt, as shown below.
Issue 1.00 – 13 November 2007
Page 23 of 48
SMS Desk 2.01.0000
User Guide
(2)
Click the EDIT CONTACT / GROUP icon. SMS Desk displays the following window.
(3)
Edit the contact details and click the Update button.
(4)
SMS Desk changes the contact.
Issue 1.00 – 13 November 2007
Page 24 of 48
SMS Desk 2.01.0000
7.1.3
User Guide
Delete a Contact
Do the following procedure.
(1)
Click on the contact that you want to delete, to select it.
Move your mouse cursor over the DELETE CONTACT / GROUP icon.
SMS Desk displays a grey rectangle around the DELETE CONTACT / GROUP icon, and a
prompt, as shown below.
Issue 1.00 – 13 November 2007
Page 25 of 48
SMS Desk 2.01.0000
User Guide
(2)
Click the DELETE CONTACT / GROUP icon.
(3)
SMS Desk displays the following request for confirmation. Click the OK button.
(4)
SMS Desk deletes the contact.
Issue 1.00 – 13 November 2007
Page 26 of 48
SMS Desk 2.01.0000
7.2
Groups
7.2.1
Add a Group
User Guide
Do the following procedure.
(1)
Move your mouse cursor over the ADD CONTACT / GROUP icon.
SMS Desk displays a grey rectangle around the ADD CONTACT / GROUP icon and a
prompt, as shown below.
(2)
Click the ADD CONTACT / GROUP icon. SMS Desk displays the following window.
Issue 1.00 – 13 November 2007
Page 27 of 48
SMS Desk 2.01.0000
User Guide
Click on the Group button.
(3)
Key in the name of the group and click the Add button.
(4)
SMS Desk adds the group.
Issue 1.00 – 13 November 2007
Page 28 of 48
SMS Desk 2.01.0000
7.2.2
User Guide
Edit a Group
7.2.2.1 Change the Name of a Group
Do the following procedure.
(1)
Click on the group that you want to rename, to select it.
Move your mouse cursor over the EDIT CONTACT / GROUP icon.
SMS Desk displays a grey rectangle around the EDIT CONTACT / GROUP icon, and a
prompt, as shown below.
Issue 1.00 – 13 November 2007
Page 29 of 48
SMS Desk 2.01.0000
User Guide
(2)
Click the EDIT CONTACT / GROUP icon. SMS Desk displays the following window.
(3)
Edit the name of the team and click the Update button.
(4)
SMS Desk changes the name of the group.
Issue 1.00 – 13 November 2007
Page 30 of 48
SMS Desk 2.01.0000
User Guide
7.2.2.2 Change the Members of a Group
The following procedure provides an example of how to add members to a group.
(1)
Click on the group that you want to edit, to select it.
Move your mouse cursor over the EDIT CONTACT / GROUP icon.
SMS Desk displays a grey rectangle around the EDIT CONTACT / GROUP icon, and a
prompt, as shown below.
Issue 1.00 – 13 November 2007
Page 31 of 48
SMS Desk 2.01.0000
User Guide
(2)
Click the EDIT CONTACT / GROUP icon. SMS Desk displays the following window.
(3)
Click the Edit Members button.
(4)
SMS Desk displays the following Group Membership window.
Issue 1.00 – 13 November 2007
Page 32 of 48
SMS Desk 2.01.0000
(5)
User Guide
Click on a contact in the Non group members list that you wish to assign as a member of
the group.
Click the Add button.
Issue 1.00 – 13 November 2007
Page 33 of 48
SMS Desk 2.01.0000
(6)
NOTE
(9)
User Guide
Repeat the previous Step (5) as required.
You can do variations of this procedure the above to add and remove members
using the Add and Remove buttons.
Click the Update button.
Issue 1.00 – 13 November 2007
Page 34 of 48
SMS Desk 2.01.0000
User Guide
(10)
SMS desk closes the Group Membership window and make the following Edit Contact
window the active window. Click the Update button.
(10)
SMS Desk adds the members to the group and displays a + sign against the group.
(11)
Click on the + sign. SMS Desk expands the group to show the members.
Issue 1.00 – 13 November 2007
Page 35 of 48
SMS Desk 2.01.0000
7.2.3
User Guide
Delete a Group
Do the following procedure.
(1)
Click on the group that you want to delete, to select it.
SMS Desk displays a grey rectangle around the DELETE CONTACT / GROUP icon, and a
prompt, as shown below.
Issue 1.00 – 13 November 2007
Page 36 of 48
SMS Desk 2.01.0000
User Guide
(2)
Click the DELETE CONTACT / GROUP icon.
(3)
SMS Desk displays the following request for confirmation. Click the OK button.
(4)
SMS Desk deletes the group.
Issue 1.00 – 13 November 2007
Page 37 of 48
SMS Desk 2.01.0000
8
Messages
8.1
Send Messages
8.1.1
Send a Message to a Number in your Contacts
User Guide
Do the following procedure.
(1)
Click on a contact (to whom you wish to send a message), to select it.
Move your mouse cursor over the SEND SMS icon.
Issue 1.00 – 13 November 2007
Page 38 of 48
SMS Desk 2.01.0000
User Guide
SMS Desk displays a grey rectangle around the SEND SMS icon, and a prompt, as below.
(2)
Click the SEND SMS icon. Alternatively you can just double click the contact.
(3)
SMS Desk displays the following window, with the name of the contact in the To box.
(4)
You can repeat Steps (1) and (2) as many times as you like to add further contacts in the
To box, to send the SMS text message to two or more recipients. [See also Section 8.1
(Page 38).]
Issue 1.00 – 13 November 2007
Page 39 of 48
SMS Desk 2.01.0000
(5)
User Guide
Key in the text of the message.
At the bottom left, above the Send button, is the remaining number of characters for the
SMS text message.
(6)
If you want to specify a specific (future) time when SMS Desk sends the message, click
the Advanced >> button.
Issue 1.00 – 13 November 2007
Page 40 of 48
SMS Desk 2.01.0000
User Guide
To specify the date, click on the pull down menu button at the right of the date.
SMS Desk displays a (month to a view) calendar that enables you to select the year,
month and date.
To specify the time, click on the hours, minutes or seconds. The digits turn blue. Then
click on the up or down arrows at the right to change the highlighted part of the time.
(7)
Click the Send button.
Issue 1.00 – 13 November 2007
Page 41 of 48
SMS Desk 2.01.0000
(8)
NOTES
8.1.2
User Guide
SMS Desk records the details of the sent message.
(1)
There may be a delay after you send a message, before SMS Desk
displays the details of the message.
(2)
SMS Desk records the message was delivered or if it failed.
Send a Message to All Contacts
Do the following procedure.
(1)
Click on All Contacts, to select it.
Issue 1.00 – 13 November 2007
Page 42 of 48
SMS Desk 2.01.0000
User Guide
Move your mouse cursor over the SEND SMS icon.
SMS Desk displays a grey rectangle around the SEND SMS icon, and a prompt, as below.
(2)
Click the SEND SMS icon.
(3)
SMS Desk displays the following window, with the name of the contact in the To box.
(4)
Proceed from Section 8.1.1 (Page 38), Step (5).
Issue 1.00 – 13 November 2007
Page 43 of 48
SMS Desk 2.01.0000
8.1.3
User Guide
Send a Message to One or More Numbers NOT in your Contacts
You can send a message to one number that is not in list of contacts. Do the following procedure.
(1)
Initiate a message, as Section 8.1.1 (Page 38) describes, to display the Send an SMS
window.
(2)
The cursor should be in the To: box. Click in it if it is not.
If you do NOT want to send the message to the contact in the To: box, use the backspace
key to delete it.
Issue 1.00 – 13 November 2007
Page 44 of 48
SMS Desk 2.01.0000
(3)
User Guide
Key in the number in the To; box.
NOTE
You can key in the number in national format, starting with ZERO, e.g.
07777123456 or in international format starting with the international
code (44 for the UK), e.g. 447777123456.
If you want to add the number to an existing contact in the To; box, first key in a
semi-colon and then the number.
Issue 1.00 – 13 November 2007
Page 45 of 48
SMS Desk 2.01.0000
User Guide
(4)
To send a message to two or more numbers NOT in your contacts, add a semi-colon to the
end of the list and then the next number.
(5)
Proceed from Section 8.1.1 (Page 38), Step (5).
8.2
Receive Messages
When you subscribe to SMS Desk you will receive an Account Number and Verification Code,
which you enter as Section 4 (Page 3) describes.
You may also receive a (mobile) telephone number, which begins with 07, to which people can
send SMS text messages that SMS Desk receives.
NOTE
8.2.1
SMS Desk displays this number in the Branch box at the top of the Send an SMS
window when you send a message.
Notification of Received Messages
When SMS Desk receives a SMS text message, it may display the following notification. Click on
the X at the top right to close the window.
NOTE
See Section 6.3.3 (Page 20).
Issue 1.00 – 13 November 2007
Page 46 of 48
SMS Desk 2.01.0000
8.2.2
User Guide
Receive Messages as Emails
Your SMS Desk account may also be configured with your email address, so that you also receive
SMS text messages as emails.
8.3
Record of Sent and Received Messages
(1)
When you send or receive a message, SMS Desk keeps a record of it for two days.
Sent Messages are displayed in Black text.
Received messages are displayed in Blue text.
Below the list of messages is a preview pane. If no message is selected this previews the
earliest message, which is physically at the bottom of the list.
NOTE
You can log into your SMS Gateway account on www.vcsms.co.uk to see details of
sent and received messages over the previous six months.
Issue 1.00 – 13 November 2007
Page 47 of 48
SMS Desk 2.01.0000
(2)
Click on a sent message to select it and preview it.
(3)
Click on a received message to select it and preview it.
Issue 1.00 – 13 November 2007
User Guide
Page 48 of 48