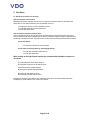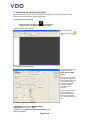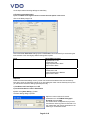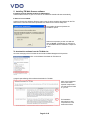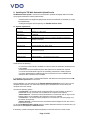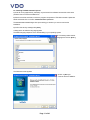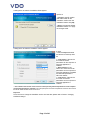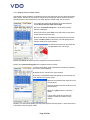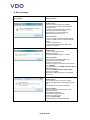
1
Continental Automotive Trading UK Ltd
TIS-Web Rapid Chart Scanner
Installation and user guide
PN 60730432
V 1.0
Page 1 of 40
The information contained in this documentation is subject to change without prior
notice. In providing this information, Continental Automotive Trading UK Ltd does not
enter into any obligation. The document is based on the information available at the
time this documentation was printed.
We reserve the right to change the technical details in the description, information
and illustrations in this manual. Continental Automotive Trading UK Ltd shall accept
no liability for program errors and for incorrect information in the documentation or for
any consequential damages arising from this.
Microsoft® Internet Explorer® is a registered trademark of the Microsoft® Corporation.
Windows® is a registered trademark of the Microsoft® Corporation.
Acrobat® Reader is a registered trademark of Adobe Systems Incorporated.
Downloadkey®, DTCO® 1381, Download Tedrminal®, TIS-Web® and TIS-Office® are
registered trademarks of the Continental Corporation.
In the following, the above trademarks are partly used without indicating their
respective owners.
© by Continental Automotive Trading UK Ltd. All rights reserved.
Continental Automotive Trading UK Ltd
36 Gravelly Industrial Park
Birmingham
England
B24 8TA
VDO - A trademark of the Continental Corporation
Page 2 of 40
Contents
1.
2.
Check List
First Steps
4
5
2.1.
Decide how scanner is to be used
Scan and analyse at one location
Scan at Fleet but analyse at another office.
3.
4.
5.
6.
Installing the Panasonic Scanner KV-S1025C
Configuring the Panasonic KV-S1025C
Installing TIS-Web Scanner software
Installing the TIS-Web Automatic Upload Service
6.1.
6.2.
7.
System requirements
Installing TIS-Web Automatic Upload
5
5
5
6
7
9
10
10
11
Configuring TIS-Web Automatic Upload
14
7.1.
To set up the application for automatic data transfer
7.2.
Configuring the Download Frequency
7.3.
Configuring the Internet connection
7.4.
Adding TIS-Web accounts
7.5.
Monitoring Data uploads to TIS-Web
Charts
Files
14
14
15
15
17
17
18
8.
Post-installation steps and changing installation settings
8.1.
8.2.
9.
Setting up service permissions
Changing installation settings
TIS-Web Scanner Client
9.1.
10.
11.
Configuring TIS-Web Scanner Client
Starting TIS-Web Scanner Client
Set the Chart Image Directory
Setting the chart parameters
Setting Scan Parameters
Exiting TIS-Web Scanner Client
Scanning Charts
11.1.
11.2.
11.3.
11.4.
11.5.
11.6.
11.7.
11.8.
11.9.
11.10.
11.11.
11.12.
11.13.
11.14.
11.15.
12.
19
20
21
Installing TIS-Web Scanner Client
10.1.
10.2.
10.3.
10.4.
10.5.
19
21
25
25
25
26
27
27
28
Scanning Process
Chart Preparation
Starting to scan
Starting the TIS-Web Scan Client
Completing Centre Field Data
Viewing the rear of the chart
Displaying the time and range of the chart
Adding faults
Adding Port Operations
Magnifying a portion of the chart
Displaying a linear graph of chart activities
Printing the current chart
Modifying Chart activities
Splitting a chart for multiple vehicles
Uninstalling the TIS-Web Scanner Client
Error messages
28
28
28
30
32
33
33
34
34
35
36
36
37
38
39
40
Page 3 of 40
This guide is provided to allow the setup of the TIS-Web rapid chart scanner so that analogue
chart data can be scanned accurately and quickly and then uploaded into a TIS-Web account.
Here you will find instructions on installing the software, configuring the Panasonic KVS1025C scanner and automatic upload software and monitoring the uploading of your data.
The guide does not cover installing or activating alternative scanners.
1. Check List
To enable the accurate and rapid scanning of analogue charts to TIS-Web, an appropriate
infrastructure must set up beforehand.
Required hardware To scan charts directly to TIS-Web you will require
• A Panasonic KV-S1025C scanner complete with Tachograph firmware upgrade (Note : This
upgrade is supplied by Panasonic. Any Panasonic scanners purchased from Continental
Automotive Trading UK will be supplied with the appropriate upgrade already installed)
• A computer with an Internet connection or a network card for integration with the company
network.
• An available USB port for connecting the Scanner.
Required software
• A TIS-Web account
• The TIS-Web account has been enabled to allow data transfers (Please contact your TISWeb support team)
• The PC must be using either Windows XP or Windows VISTA with the latest service packs
• The Internet Browser must be Microsoft Internet Explorer Version 6 or later.
• The drivers supplied with the Panasonic KV-S1025C as specified by this guide.
• The Continental TIS-Web Automatic Upload Service (Supplied with the scanner or available
as a free download from the TIS-Web service.)
• The Continental TIS-Web Scanner client (Supplied with the scanner or available as a free
download from the TIS-Web service. Note : This software is compatible only with TIS-Web)
TIS-Web Automatic Upload is a service for the automatic upload of tachograph data to TIS-Web.
The program transfers the following data formats:
• Download files from digital tachographs that have been transferred, for example, by using a
Downloadterminal,
• Analogue tachograph data analysed by the TIS-Web Scanner Client.
TIS-Web Scanner Client is an application for preparing scanned tachograph chart data for uploading
to TIS-Web.
Page 4 of 40
2. First Steps
2.1. Decide how scanner is to be used
Scan and analyse at one location
Most fleets will use the TIS-Web scanner to scan charts and process the data into TIS-Web at the
same office. In this case the following must be installed on the PC.
The Panasonic drivers for the KV-S1025C scanner
The TIS-Web Automatic Data Upload service
The TIS-Web Scan Client
Scan at Fleet but analyse at another office.
Some organizations will not want to process the scanned images at their premises but may wish to
scan the charts directly when available from the driver but send the images to another organization for
processing and loading into their TIS-Web account. In this case the following software must be loaded
At the fleet offices
The Panasonic drivers for the KV-S1025C
At the chart processing office eg. A tachograph bureau
The TIS-Web automatic upload service
The TIS-Web Scan client
When setting up the Rapid Chart Scanner the recommended installation sequence is
as follows.
1) Install Panasonic KV-S1025C Scanner
2) Configure Panasonic KV-S1025C Scanner
3) Install Automatic Upload software
4) Configure Automatic Upload Software
5) Install TIS-Web Scanner Client
6) Configure TIS-Web Scanner Client
Installing and configuring the software only needs to be done once. Once these steps have been
completed you will be ready to scan charts into TIS-Web.
Page 5 of 40
3. Installing the Panasonic Scanner KV-S1025C
Please follow the instructions supplied with the Panasonic KV-S1025C and install the necessary
drivers and RTIV software.
The CD for this software is enclosed with the scanner and is supplied by Panasonic.
When the software has been installed follow the Panasonic instructions for connecting the scanner to
your computer.
Page 6 of 40
4. Configuring the Panasonic KV-S1025C
Before you can start to scan charts into TIS-Web it is necessary to configure the scanner so that
images of the correct type and quality are generated.
1) Start Panasonic RTIV utility by
on the desktop or
– Double-clicking on the RTIV icon
– Selecting “[Start] > All Programs > Panasonic > RTIV”.
The RTIV main screen is opened.
2) To configure the
scanner click on the
icon
The Scanner settings page opens
1) If scanning both sides
of the chart set the
paper source to ADF
Duplex.
If sending the chart images
elsewhere for processing it
will be necessary allow both
sides of the charts to be
scanned so that vehicle
changes and driver
comments can be
assessed.
The Panasonic KV-S1025C
will scan both sides of a
chart simultaneously so
there is no need to batch
your charts up and repeat a
scan.
The following settings are mandatory
2) Image Type must be set to Black and White
3) Resolution must be set to 300 Dpi
4) Please Tick the Advanced Image Enhancements option
Select the paper tab
Page 7 of 40
On the Paper tab the following settings are mandatory
5) Tick the Custom Size option
6) Set both Width and Length to 123.0 and ensure the units option is set to mm
Click on the Binary Image Tab
Ensure the Front / Back Same settings option is not ticked. This is because if you are scanning the
front and back of the chart slightly different settings are required.
Front
Binary Mode Un-ticked
Brightness set to 128
Contrast set to 128
Image Emphasis set to None
Drop out set to None
Back
Brightness set to 128
Contrast set to 128
Image Emphasis set to Medium
Drop out set to None
Important
Please note that these settings are only correct if the charts are loaded onto the scanner feed tray
face down, as per the Panasonic manual. If you are loading the charts onto the feed tray face up then
you will need to reverse the settings specified previously.
7) Set White Level From Paper set to OFF
8) Set Noise Reduction to 3X3 for Black Noise
9) Click on the [Save Setting…] button.
The Save Setting dialog is opened
10) Give a name to this set of scanner
parameters such as TIS-Web Tachograph
Scanning and press [OK].
This is the scanner configuration that you must
use whenever scanning charts for TIS-Web. You
may create other sets of scan parameters to aid
scanning of non-standard charts.
Page 8 of 40
5. Installing TIS-Web Scanner software
If installing from the TIS-Web installer CD PN 60730431
Load the CD into a drive on your PC. If auto run is enabled the installer will start automatically.
If Auto run is not enabled.
Load the CD and using Windows Explorer switch to the CD drive containing the software for the TISWeb Scanner Client and Automatic Upload Service, double-click on the file “Setup.exe”.
The Installer will start and present the
installation options
Select the component you wish to install and
click on [Install…] Remember you will have to
run the installer twice to install each component
in turn.
To download the software from the TIS-Web site
Go to the home page of the TIS-Web site and locate the Data Management Help section.
Click on the Software Downloads for TIS-Web link
A page is opened listing all the software downloads for TIS-Web.
Click on the highlighted
link for each of the
required components in
turn and save to a folder
on your PC.
Full Installation
instructions for each
component are in the
sections that follow.
Page 9 of 40
6. Installing the TIS-Web Automatic Upload Service
TIS-Web Automatic Upload is a service for the automatic upload of tachograph data to TIS-Web.
The program transfers the following data formats:
• Download files from digital tachographs that have been transferred, for example, by using a
Downloadterminal,
• Analogue tachograph data analysed by the TIS-Web Scanner Client.
6.1. System requirements
Component
Requirement
Mainboard
Pentium 4, 1 GHz, 32 bit
Main memory
1 GB RAM
Hard disk memory
250 MB free hard disk memory for software installation and temporary
storage of chart files
Interfaces
• Stand-alone or server: USB 2.0 port for the connection of the scanner
Internet access
If using TIS-Web: min. ADSL / VDSL
Operating system
Stand-alone or client: Microsoft® Windows® XP or Vista™ (with
current Service Pack)
Installation program
Microsoft® Windows® Installer 3.1 or higher
Display program
Adobe® Reader®
Internet browser
TIS-Web: Microsoft® Internet Explorer® Version 6.0 or higher
(Recommended to access manuals)
Please ensure the following:
• A connection to the Internet is available from the PC where the Automatic upload service is
to be installed.
• Software and services installed as part of this system can be started when required
• You must have administrator rights or the necessary permissions to install programs.
• You have downloaded the installation file from the Internet or have an installation CD.
• Microsoft .NET Framework 2.0 is installed.
In consultation with your system or network administrator, first determine which permissions the TISWeb Automatic Upload Service is to have.
During installation you must select how the TIS-Web Automatic Upload Service is to log on to the
computer and the network. You select this to specify which permissions the service has on the
computer and on the network.
You have the following options:
• Local System – the service has full access permissions for the computer on which it is
installed and can log on with the account details of the computer to the network.
• Network Service – the service has the permissions of a normal user and can log on to the
network with the account details of the computer on which it is installed.
• Local Service – the service has the permissions of a normal user. The service logs on to
the network anonymously.
• Domain Account – the service has the permissions that are assigned to the user account
under which it logs on.
To use the TIS-Web Automatic Upload Service to retrieve data that is saved on a network drive, you
should select Local System or Network Service.
If necessary, consider sharing the directories (folders) to which the service is to have access.
Page 10 of 40
6.2. Installing TIS-Web Automatic Upload
1) Close all running applications, particularly any active antivirus software because this could cause
problems when it scans the installation file.
2) Switch to the drive and folder in which the program components of TIS-Web Automatic Upload are
saved and double-click on the file “TIS-Web Automatic Upload.exe”.
The User Account Control dialogue box opens asking you whether you want to continue the
installation.
3) Confirm the security message with [Allow].
A dialogue box to select the language appears.
The default language depends on the default setting in your operating system.
4) If necessary select another
language and click on [Next >].
The Welcome screen appears.
5) Click on [Next >] to
continue with the installation.
Page 11 of 40
A dialogue box to select the installation folder appears.
6) Click on
– [Change] to specify another
path and/or folder for the
installation. Confirm the new
installation location with [OK].
– [Next >] to accept the default
installation location or to apply
the changes made.
A dialogue box to select the installation version appears.
7) Select
– “Use Local System account”
and select from the drop down
list
> “Local System” if the service
is to have full access
permissions for the computer on
which the application is
installed.
> “Network Service” if the
service is to have normal user
permissions on the computer on
which the application is installed
and restricted permissions
within the network.
> “Local Service” if the service
is to have normal user
permissions on the computer on
which the application is
installed.
– “Use a domain user account” if the service is to have precisely restricted permissions on the computer
on which the application is installed. In this case specify the user name and password of the user account and
the domain that is allocated to the user account.
Important
To find out how to change the installation version at a later date, please refer to Section “Changing
installation settings”.
Page 12 of 40
8) Click on [Next >] to install TIS-Web Automatic Upload.
A progress bar shows how far the installation procedure has advanced.
Important
If the installation file finds a database already on your computer (e. g. when reinstalling or updating), a
message appears to ask whether you want to overwrite the existing database. Click on [No] to retain
the existing database.
When the installation is complete the Installation Wizard asks whether to restart the computer.
9) Select “Yes, I want to restart
my computer now” and click on
[Finish] to restart the computer.
This is highly recommended in
order to complete the
installation by modifying the
operating system's registry file.
After the computer has been restarted the
• Shortcut to TIS-Web Automatic Upload is on the desktop,
• The icon for the TIS-Web Automatic Upload Service is in the notification area on the task bar and
• The option to search automatically for updates in the InstallShield Update Manager (under [Start] >
Control Panel > Additional Options > Program Update) is available.
Important
The option to start the TIS-Web Automatic Upload Service via the notification icon on the taskbar is
only available under Windows XP.
Page 13 of 40
7. Configuring TIS-Web Automatic Upload
Condition
To use the TIS-Web automatic upload service application you must have a TIS-Web account and the
account must have been configured to accept data from the upload service.
Caution
With the Windows Vista operating system note that you can only start TIS-Web Automatic Upload
• by double-clicking on the icon on the desktop or
via [Start] > All Programs > TIS-Web > TIS-Web Automatic Upload
or
• only via “Run as administrator”.
In this case the application creates a separate database for administrator access.
7.1. To set up the application for automatic data transfer
1) Start TIS-Web Automatic Upload by
– Double-clicking on the TIS-Web Automatic Upload icon
on the desktop or
– Selecting “[Start] > All Programs > TIS-Web > TIS-Web Automatic Upload”.
TIS-Web Automatic Upload starts and opens by default with the Uploaded Files tab.
2) Switch to the “Settings” tab.
7.2. Configuring the Download Frequency
The TIS-Web Automatic Upload service serves two purposes. At set intervals it will download the
master data (Sites, Drivers and Vehicles) from your TIS-Web account for use in the Scanning
software. At the same time it will upload any newly scanned charts from the scanning software into the
TIS-Web account ready for analysis.
Page 14 of 40
By default the TIS-Web Automatic upload service will upload new data every four hours. You may
change this frequency to suit your requirements. You can select any interval from 1 minute up to 23
hours 59 minutes.
The more frequent the interval the quicker the scanned charts are available in TIS-Web for analysis
but the higher the network traffic on your internet connection.
To change the data upload frequency set a new value in Upload files / Charts at every box.
7.3. Configuring the Internet connection
Important
The Internet settings details must match the Internet Explorer connection details. Otherwise data
cannot be transferred to TIS-Web.
• To check whether your computer uses a dial-up connection or a proxy server,
– Open Internet Explorer,
– Select Tools > Internet Options,
The Internet Options dialogue box opens.
– Select the “Connections” tab.
The Internet Explorer connection details are displayed – unless Internet Explorer uses defined
automatic configuration settings.
Important
If in your company a proxy server is used as a communication agent for Internet access, please
contact your system or network administrator so that he can inform you of the proxy address (host),
the proxy port and, if necessary, the proxy user and password.
3) Under “Internet settings”, select
– “Automatically Dial Default Connection” if the dial-up connection defined in Microsoft Internet
Explorer is to be used for Internet access.
– “Use Proxy Server” if a proxy server is to be used for Internet access.
– “Auto Configuration” if the automatic configuration settings defined in Microsoft Internet
Explorer are to be used for Internet access.
4) Confirm the settings with [Apply].
A dialogue box appears that confirms that the settings have been saved.
5) Confirm the message with [OK].
7.4. Adding TIS-Web accounts
1) Switch to the “Account” tab.
Page 15 of 40
2) Click on [Add].
The TIS-Web Automatic Upload Setting dialogue box opens.
3) Enter the account data (account name,
user and password) for your TIS-Web
account.
4) Click on and select the Internet address
of the TIS-Web Server that you use for
your TIS-Web connection.
5) Click on [Browse]
The folder selection screen is opened.
Specify the folder on the computer or on the
network from which the download and chart
files are to be transferred to TIS-Web. If the
folder does not exist click the [Make New
Folder] button. This is the folder where any files
and charts to be transferred must be located.
- If you are handling chart data for more than
one company or account then it is
recommended that each company is set up with
its own folder. It is recommended that the folder
name clearly identifies the company.
- If using a Download Terminal the terminal
software will need to be configured to load the
Digital tachograph files into this folder or the
files will have to be manually transferred.
- If using a scanner this is folder that the
scanner must load its images into.
6) Click on [Test Connection] to check whether TIS-Web Automatic Upload can establish a
connection to the TIS-Web Server based on the access data entered. If the connection test fails,
either the access data or the Internet connection settings are not correct.
7) Click on [OK] to save the changes. You will find detailed information on TIS-Web Automatic Upload
in the program's Help.
Important
Whether you can transfer data from a directory from the network to TIS-Web depends on the
installation version you have chosen; see Section “Installing TIS-Web Automatic Upload”, keyword
“Installation version”. Normally this is only possible if the service logs on as a “Local System” or a
“Network Service”.
Page 16 of 40
7.5. Monitoring Data uploads to TIS-Web
Charts
To monitor the progress of uploading your charts click on the Uploaded Charts tab. All Charts will be
identified with the name of the Driver, the Vehicle Registration number and the date of the chart.
The Upload / Failed date column will only be completed when the chart has been successfully
uploaded or if the transfer of the chart has failed. It will be blank if no attempt has been made to
transfer the chart data to TIS-Web.
The Status column will display more details about the transfer of the chart when the mouse is moved
over the status tick.
Use the account selector to check the results of chart transfer for a particular account.
Set the From : To date range to check for charts within a specific date range. The dates used here
are the date the chart was created by the drivers operations, not the date the chart was scanned.
Page 17 of 40
Files
To monitor the progress of uploading your DTCO files click on the Uploaded Files tab. All Files will be
identified with the name of the Driver or the Vehicle Registration number, the download file name and
the date the file was originally downloaded.
The Upload / Failed date column will only be completed when the file has been successfully
uploaded or if the transfer of the file has failed. It will be blank if no attempt has been made to transfer
the file data to TIS-Web.
The Status column will display more details about the transfer of the file when the mouse is moved
over the status tick.
Use the account selector to check the results of file transfer for a particular account.
Set the From : To date range to check for files within a specific date range. The dates used here are
the date the file was originally downloaded, not the date the file was copied to the system.
Page 18 of 40
8. Post-installation steps and changing installation settings
8.1. Setting up service permissions
In order to use the application its service must have access to the application database. For this
appropriate permissions must be set up.
Important
You only have to set up the permissions if the service logs on as
• a Network Service,
• a Local Service or
• via a Domain Account (user account).
To set up the permissions for the service:
1) Open Microsoft Windows Explorer.
2) Open “C:\Users\All Users”.
(Windows XP: “C:\Documents and Settings\All Users\Application Data”)
3) Right-click on the “TIS-WebAutomaticUpload” folder.
A shortcut menu opens.
4) Click on “Properties”.
The TIS-WebAutomaticUpload Properties dialogue box opens.
5) On the “Security” tab, click on [Edit...].
The TIS-WebAutomaticUpload Permissions dialogue box opens.
6) Click on [Add...].
The Select Users, Computers, or Groups dialogue box opens.
7) Enter the user name under which the service logs on, e. g. “Local Service”.
• If necessary, select the domain the user belongs to via [Locations...].
8) Click on [OK] to add the user.
The Select Users, Computers, or Groups dialogue box closes.
9) In the “Group or user names” list select the added user.
10) Check the “Full access” check box in the “Allow” column.
11) Click on [OK] to confirm.
The security information is reset.
The TIS-WebAutomaticUpload Permissions dialogue box closes.
12) Click on [OK] to close the dialogue box.
You have assigned the permission to access the application database to the service.
13) Restart the computer.
This is highly recommended in order to complete the modification of permissions completely.
Page 19 of 40
8.2. Changing installation settings
1) Select “[Start] > Control Panel > System and Maintenance > Administrative Tools”.
The Administrative Tools window opens.
2) Double-click on “Services”.
The User Account Control dialogue box opens asking you whether you want to continue the
installation.
• Click on [Continue] to confirm the security query.
The Services window opens.
Right-click on “TIS-Web Automatic Upload”.
A shortcut menu opens.
4) Select “Properties”.
The TIS-Web Automatic Upload Properties dialogue box opens.
5) Select the “Log On” tab.
6) Under “Log on as”, select
– “Local System account” if the service is to have full access within the network.
– “This account” to restrict the service's access permissions and enter
> “Network Service”,
> “Local Service” or
> the user name and the password under which the service is to log on.
Important
You will find detailed information on the individual options in the Section “Installing TIS-Web Automatic
Upload”, keyword “Installation version”
7) Confirm the settings with [Apply] and close the dialogue box with [OK].
A message appears telling you that the settings will only apply after the service is restarted.
8) Confirm the message with [OK].
9) Select “TIS-Web Automatic Upload” and click on the Restart link to start the service again.
Page 20 of 40
9. TIS-Web Scanner Client
9.1. Installing TIS-Web Scanner Client
The following two conditions must be met:
• You must have local administrator rights or the necessary permissions to install programs.
• You have downloaded the installation file from the Internet or have an installation CD.
To install the application:
1) Close all running applications, particularly the active antivirus software because this could cause
problems when it scans the installation file.
2) Using Windows Explorer Switch to the drive and folder in which the program components of TIS-
Web Scanner Client heve been downloaded, or if you have an installation CD switch to the CD drive.
Double-click on the file “TIS-WEBSCANNERCLIENT-X.X.exe”. This is a self extracting ZIP file and
you will be asked to specify which folder to unzip the install files to.
3) Specify the folder and click on
[Unzip]. The installation set will be
created.
4) Using Windows Explorer switch to the drive and folder in which the program components of TIS-
Web Scanner Client have been unzipped and double-click on the file “setupTISWEBSCANNERCLIENT-X.X.exe”.
The User Account Control dialogue box opens asking you whether you want to continue the
installation.
5) Confirm the security message with [Allow].
Page 21 of 40
The dialogue box to select the language appears.
6) If necessary select another language and click
on [Next >].
The Welcome screen appears.
7) Click on [Next >] to continue with
the installation.
The dialogue box with the license agreement appears. Read the license agreement through carefully.
8) Select “I accept the agreement” to
continue with the installation and
click on [Next >].
Page 22 of 40
Detailed information on the pre-requisites for TIS-Web Scanner Client is displayed. Read the
information on the pre-requisites through thoroughly.
9) Click on [Next >] to continue with
the installation.
A dialogue box to select the installation folder appears.
10) Click on
– [Browse...] to specify another
path and/or folder for the
installation.
Confirm the new installation location
with [OK].
– [Next >] to accept the default
installation location or to apply the
changes made.
A dialogue box to create the desktop icon appears.
Desktop icon
11) Select the check box if the desktop icon (shortcut) is to be created.
12) Click on [Next >] to continue with the installation.
Page 23 of 40
A dialogue box to check the installation settings appears.
13) Click on
– [< Back] to go back to the previous
dialogue boxes to change one of the
settings.
– [Install] to start the installation of
TIS-Web Scanner Client based on
your parameters.
A progress bar shows how far the installation procedure has advanced. When the installation is
complete a dialogue box appears to finish the installation.
14) Click on [Finish] to complete the
installation.
TIS-Web Scanner Client is now installed.
Page 24 of 40
10.
Configuring TIS-Web Scanner Client
All of the conditions below must be met before you can use TIS-Web Scanner Client:
• The TIS-Web account is set up to upload analogue tachograph data and download the
master data. (Sites, Drivers and Vehicles)
- If you do not have a TIS-Web account please contact your service partner.
- If you already have a TIS-Web account you may need to contact your service
provider to have the necessary data upload service switched on for your account.
• Drivers and vehicles are saved in the TIS-Web account.
• TIS-Web Automatic Upload is already installed and configured.
• In TIS-Web Automatic Upload the TIS-Web account access data is stored and master
data was downloaded from the TIS-Web Server.
• A suitable scanner has been installed and configured to generate bitmaps that meet
the image requirements of the TIS-Web Scanner Client.
The master data from TIS-Web (Sites, Drivers and Vehicles) are also used in TIS-Web Scanner
Client.
To set up the program to analyse the scanned tachograph charts:
10.1. Starting TIS-Web Scanner Client
1) Start TIS-Web Scanner Client by
– Double-clicking on the TIS-Web Scanner Client icon
on the desktop or
– Selecting “[Start] > All Programs > TIS-Web > TIS-Web Scanner Client”.
The TIS-Web Scanner Client starts.
10.2. Set the Chart Image Directory
2) From the button bar at the top left hand Click on
.
A message appears telling you that there are no image files.
Page 25 of 40
3) Confirm the message with [OK].
The Account Selection dialogue box opens.
4) If necessary, click on
to select the correct TIS-
Web account.
5) Click on
to specify the directory from which the
image files of the tachograph charts for this account are
to be imported for analysis.
6) Confirm the settings with [OK].
The dialogue box closes and TIS-Web Scanner Client
loads the chart images stored in the specified directory.
10.3. Setting the chart parameters
7) Select the Background Colour tab and select Black
8) If using the Pansonic KV-S1025C to scan both sides of
the chart ensure that the Images Sorted By : box is set
to Name.
If the rear of the chart has also been scanned select the Chart rearside tab
9) Set Scan Rear of the Chart to TRUE if the rear of
chart has been scanned otherwise this setting must be
set to FALSE
10) Set the Chart Sequence
If you are loading the charts onto the feed tray facedown (Recommended setting) you must set the chart
sequence to Front-Rear-Front otherwise if the charts
are loaded onto the feed tray face-up the sequence must
be set to Rear-Front-Rear
11) Click on [Save] to apply the new settings
Page 26 of 40
10.4. Setting Scan Parameters
1) From the button bar at the top left hand Click on
. The Parameters dialog is displayed
Switch to the Scanner Software tab
2) Use the
are using.
button to locate the scan software you
If you have used the default settings to load the
Panasonic scanner drivers the settings will be as
shown here.
If you chose to load the Panasonic software in a
different folder you will need to use the settings you
have chosen.
If you have chosen to use a different scanner you can
still link to the scanner from the TIS-Web Scanner
Client but you will need to refer to the scanner
manufacturers documentation to locate the correct file.
Once the scanner has been linked into the TIS-Web
Scanner Client the scanner can be activated directly
from this software by pressing the
button.
3) Click on [Save] then [Exit] to apply your changes. The TIS-Web scan client is now ready to scan
charts.
10.5.
Exiting TIS-Web Scanner Client
1) Click on
to quit the application.
The application closes. Any changes that have not been saved will be lost.
Page 27 of 40
11. Scanning Charts
11.1. Scanning Process
The scan process has three stages
1. Convert the analogue charts to digital images using the Panasonic scanner.
2. Process the chart images to add information about Drivers, Vehicles and other centre field
data and convert to a format suitable for use in TIS-Web
3. Upload the converted chart data into TIS-Web
11.2. Chart Preparation
Before starting to scan the charts please ensure that your charts are of a suitable quality for scanning
ideally the charts should be scanner compatible and free of tears, scratches and hand written marks
on the front of the chart.
The charts should be sorted so that they are all the same way up and if possible sorted in driver and
date order. They will be loaded onto the scanner face down in batches of 15 – 25.
11.3. Starting to scan
If you have the TIS-Web Scan Client you can start scanning by starting the TIS-Web Scan Client and
then clicking on the
icon. If you have configured the Scan Client to link to the scanner the RTIV
software will load ready to start.
If you have not loaded the TIS-Web Scan Client, because you are sending the chart images to be
processed elsewhere you can start the RTIV software directly.
1) Start Panasonic RTIV utility by
– Double-clicking on the RTIV icon
on the desktop or
– Selecting “[Start] > All Programs > Panasonic > RTIV”.
The RTIV main screen is opened.
Select the correct scan
settings from the drop
down selection at the
top of the screen. Once
selected these will
remain the default
settings each time the
scan software operated.
2) Press the
Page 28 of 40
button
The screen that allows you to specify where the chart images are to be saved is displayed. If scanning
both sides of the chart two images will be generated for each chart that is scanned. If the charts are
loaded face down as recommended the odd numbered images will be for the front of the chart whilst
the even numbered charts will be the rear of the chart.
3) Using the “Save in” box select the
folder where the chart images are to
be saved. This should be the folder for
the company specified in the Account
settings tab of the Automatic Upload
Service. If you are processing charts
for more than one account each will
have a different folder.
4) In the File name box set the name
that will be used to identify the batch
of charts. Each chart image file will
start with the value set here.
5) The Save as type must be set to
Bitmap File
6) File Setting must be set as Single
Page
7) You can then set the Initial
Number to be used when generating
the file names for the chart images.
The Digit box allows you to determine
how many charts can be scanned in a
single batch, if set to 3 then 999 charts
can be scanned.
If the File name box was set to “Chart” and 25 charts were scanned starting from an initial number of 1
and using up to 3 digits then 50 chart images would be generated in the specified folder. The file
names would start with “Chart001.bmp” and the last file name would be “Chart050.bmp”
Chart001.bmp
Chart002.bmp
Chart003.bmp
..
..
Chart050.bmp
Front of first chart
Rear of first chart
Front of second chart
Rear of last chart
8) Ensure that the sorted batch of charts is loaded the correct way up onto the feed tray and press the
[Save] button. Scanning will start immediately.
A Counter will be displayed totaling the number of chart images generated
When the scanner has processed all the charts in the feed tray the Continue Scanning dialog is
displayed.
9) Load another batch of sorted charts onto the scanner
and click on [Continue] if you have more charts to
process for the account. The file name numbering will
continue from where the previous batch finished.
10) Press [End] if you wish to stop scanning charts
Page 29 of 40
When you finish scanning a list of the generated chart images is displayed. These can be viewed by
clicking on the file name. You may also change scan settings by selecting another set of saved
parameters or scan more charts by clicking on the
button.
If no more charts are to be scanned then the RTIV software may be closed and the TIS-Web Scan
Client can be opened.
11.4. Starting the TIS-Web Scan Client
1) Start TIS-Web Scanner Client by
– Double-clicking on the TIS-Web Scanner Client icon
on the desktop or
– Selecting “[Start] > All Programs > TIS-Web > TIS-Web Scanner Client”.
The TIS-Web Scanner
Client starts.
2) If necessary change to
the correct account by
pressing the
button
and selecting the correct
account from the drop
down list.
3) If you are sure you have
selected the correct
account press the
[Refresh] button to load
the latest charts.
Page 30 of 40
The first chart in the account folder will be loaded, automatically rotated, the driving activities on the
chart will be detected and analysed and the controls to allow completion of the centre field data will be
enabled at the left of the screen.
Across the top of the right
hand window are buttons that
allow the operator to navigate
through the list of charts and
save the centre field data for
each.
[<Back] Click to load previous
chart
[Next>] Click to load the next
chart
[Save and Next] Click to Save
the current chart and load the
next
[Delete and Next] Click to
delete the current chart without
saving and load the next chart
[Refresh] Click to load newly
scanned charts ready for
processing
At bottom left are the controls that allow the operator to complete the centre field data for the displayed chart. At
top left is a button bar that gives access to additional features of the software.
Launch the RTIV Scanner software
Re-analyse current chart image with new parameters
Show the time and range of the recording
Enable a magnifying tool
Record faults and port / ferry operations
Show Linear Graph of activities
Open Help
Close the scanner software
Adjust the rotation of the chart
Change chart analysis parameters
Modify the detected modes
Print a copy of the chart
Change the selected account
Page 31 of 40
11.5. Completing Centre Field Data
The operator must complete the centre field data to allow the chart to be assigned to the correct driver
and vehicle.
Important
New master data (Sites, Drivers and Vehicles) can only be added via the TIS-Web account. The TISWeb Automatic Upload Service will load the master data from the fleet into the TIS-Web Scanner
Client where they can then be added to each chart.
The following centre field items are available for addition to each
chart. Items that must be completed are highlighted.
1) Select the site to see a list of Drivers or vehicles that
belong to a depot.
2) Select the name of the driver on the chart from the
drop down list.
3) Complete the Start location in the From box
4) Complete the Finish location in the To box
5) Select the chart date
6) Tick the Double Manned box if the chart was recorded on
a vehicle that was double manned
7) Select the Vehicle Registration Number
8) Add a comment to the chart if required
9) Add the Finish Odometer to the End box
10) Add the Start Odometer to the Start box The Distance in
Km box will be calculated automatically. This can be
compared to the scanned distance reported at the top of
the screen to help detect if the vehicle may have been
driven without a chart.
Tip
If small activities are not analysed decrease the Filter setting to
allow the software to detect shorter activities. If you change the
Filter parameter you must then click on the
analyse the current image.
button to re-
11) When you have completed the centre field data click on the
[Save and Next] button to save the current chart and
automatically load the next chart.
The following sections explain how to use more advanced
features such as modifying modes, splitting charts and printing
the chart details.
Page 32 of 40
11.6. Viewing the rear of the chart
To view the rear of the displayed chart Right click on the [Next] button above the chart image. A
window will be opened showing the rear of the chart.
Buttons at the bottom of the window allow
the operator to rotate and magnify the chart
image so that vehicle changes and manual
entries can be read.
When finished reading the rear of the chart
press the [Close] button.
11.7. Displaying the time and range of the chart
To display the time and range of the displayed chart press the
button
By clicking on this button the operator can
check the accuracy of the automatic chart
rotation by comparing where the calculated
time indexes appear when superimposed
over the image of the chart.
Another benefit of this feature is that the
operator can check that the scan analysis
has correctly detected the start and end of
the shift. If scratches on the chart have given
an incorrect result the analysis can be
corrected.
Page 33 of 40
11.8. Adding faults
To register centre field faults against the current chart press the
button and select the Fault tab.
To add a fault code to the
current chart tick the box at
the left to select the
relevant fault.
Clicking on the [Clear
Faults] button will de-select
any fault codes already
selected
Press [OK] then [Close] to
save the selected faults.
11.9. Adding Port Operations
To register a port operation against the current chart press the
Operation tab.
button and then select the Port
You can add up to two port
operations per chart.
To add a port operation
tick the check box next to
the date and time you wish
to specify.
Specify the date and time
of each port operation.
The dates and times
cannot be outside the time
span of the chart.
Press [OK] then [Close] to
save the port operation.
Page 34 of 40
11.10. Magnifying a portion of the chart
To magnify a portion of the chart click on the
button
Move the mouse pointer over the chart image a hold down the left mouse button. A portion of the
chart will appear magnified. The area of chart subject to magnification can be changed by moving the
mouse around the chart Image.
To switch off the magnify tool click on the
button again.
Page 35 of 40
11.11. Displaying a linear graph of chart activities
button
To display a linear graph of the charts activities press the
To remove the linear graph display click the
[OK] button.
11.12. Printing the current chart
To print a report on the current chart press the
button
Select the items required on the report by
ticking the following options
Header – Prints Centre Field Information
Chart – Prints the Image of the chart
Graph – Prints the linear activity graph
Table – Prints a table of chart activities
The [Config.] button allows the operator to choose printer options whilst the [Font] button allows the
operator to choose a different font. Click on [OK] to print the report or [Preview] to see the report on
the screen.
To print the displayed report click on the
button.
To close the report click on the
buttons.
Page 36 of 40
or
11.13. Modifying Chart activities
To view all the activities on the chart in a format that can be modified press the
button.
The activities detected by the scanner
are indicated on the chart image.
Activities can be modified by clicking on
the mode to be changed.
Moving the mouse pointer over the
activity boundary will enable a pointer
that can be dragged to enlarge, reduce
or delete an activity.
This feature can be used to remove any activities that have been created because of scratches or
marks on the chart.
Page 37 of 40
11.14. Splitting a chart for multiple vehicles
Occasionally it will be necessary to indicate that a driver has used more than one vehicle during their
daily activities. TIS-Web will only allow one Vehicle to be recorded per chart so the Scanner Client
provides options to allow a single chart to be easily split into multiple charts, one per vehicle.
1) Complete the centre field information for the first vehicle as
normal. Do not save the chart as this stage.
2) Click on the Vehicle Change tab. A list of all the scanned
activities is displayed.
3) Using the mouse pointer Click on the first activity for the period
that the second vehicle was used.
4) Scroll down the list of activities to the last activity of the second
vehicle and Shift + Click on this activity. This will highlight all the
activities made on the second vehicle.
The activities of the second vehicle will also
be highlighted on the chart image.
5) Under the Vehicle tab select the vehicle registration of the second vehicle
6) Click on the [Vehicle Changed] button to register the second vehicle
7) Click on the List tab. A list of the different vehicle trips created for
the current chart is displayed.
8) Double Click on the list for the second vehicle.
9) A screen is opened that allows the operator to enter the start and
finish details for the second vehicle.
10) Enter the Odometer start and finish for the
second vehicle.
11) Enter the Start and Finish locations for the
second vehicle.
12) Click on [OK] to save the vehicle trip
details.
You can split a chart as many times as
needed to create new records for each
vehicle.
13) When you have finished splitting the chart press the [Save and New] button. A chart will be saved
to TIS-Web for each change of vehicle.
Page 38 of 40
11.15. Uninstalling the TIS-Web Scanner Client
1) Select “[Start] > Control Panel”.
2) Double-click on “Programs”.
3) Double-click on “Programs and Features”.
4) Select “TIS-Web Scanner Client”.
5) Click on [Uninstall] to uninstall TIS-Web Scanner Client.
The User Account Control dialogue box opens asking you whether you want to continue uninstalling.
6) Confirm the security message with [Continue].
You will now be asked to choose whether to uninstall the program or not.
7) Confirm with [Yes].
TIS-Web Scanner Client is uninstalled.
It is advisable to restart the computer after uninstalling the program.
Page 39 of 40
12. Error messages
Error message
Causes and action
Possible causes:
• TIS-Web Automatic Upload is not installed.
• The TIS-Web account is not saved in TIS-Web
Automatic Upload.
• All entries for TIS-Web accounts in TIS-Web
Automatic Upload have been deleted.
• Permissions for “C:\Users\All Users\TISWebAutomaticUpload” are missing.
Action to be taken:
– Install and configure TIS-Web Automatic Upload.
– Create a TIS-Web account in TIS-Web Automatic
Upload.
– Check the permissions for
“C:\Users\All Users\TIS-WebAutomaticUpload”.
Set these up if necessary.
Possible cause:
• The file “C:\Users\All Users\TISWebAutomaticUpload\
Settings\AccountMapping.XML” is corrupted.
Action to be taken:
– Recreate the “AccountMapping.XML” file:
• Start TIS-Web Automatic Upload.
• Switch to the “Account” tab.
• Select an entry from the TIS-Web accounts list and
click on [Modify].
• Check the entries in the TIS-Web Automatic Upload
Setting dialogue box.
• Close the TIS-Web Automatic Upload Setting
dialogue box with [OK].
• Repeat these steps for all entries in the TIS-Web
accounts' list.
Possible causes:
• The TIS-Web account is not set up to upload
analogue tachograph data and download the master
data.
• Master data has not yet been downloaded.
Action to be taken:
– Please contact your Service Partner for more
information about this.
– Download the master data:
• Start TIS-Web Automatic Upload.
• Switch to the “Account” tab.
• Click on [Transfer Data].
The data transfer and download starts.
Page 40 of 40