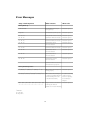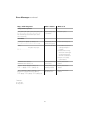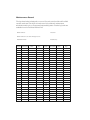
1
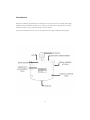
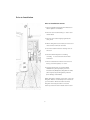
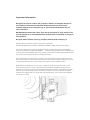
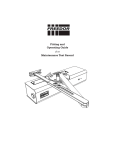
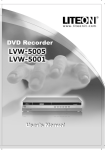
Fitting and
Operating Guide
plus
Maintenance Test Record
This is an important document detailing the correct
installation, usage and maintenance of the Dorgard.
This Guide must be read and fully understood before you start
installation and be kept in a safe place such as your Fire Risk
Assessment file.
Keep this Guide in a safe place.
Contents
Introduction
Page
2
Prior to Installation
3
Important Information
4
Batteries
5
Setting the Time
5
Night-time Release
6
Installation
7
Floorplate Installation
8
Dorgard Operation
9
Setting the Time
9
Testing Dorgard to the Fire Alarm
10
Sensitivity Adjustment
11
Trouble Shooting
12
Error Messages
14
Maintenance Schedule
16
Maintenance Record
17
Commissioning Certificate
18
Manufacturer’s Warranty
19
MANUFACTURED TO COMPLY WITH BS EN 1155:1997
The European Standard EN 1155:1997 has the status of a British Standard.
Manufacturer’s Classification:As Required By BS EN 1155:1997
ID of Certification Body:- 1121
Registered Address:- Fireco Ltd., 30 New Road, BRIGHTON BN1 1BN, UK
CE mark applied for:- 08
EC Certificate of Conformity Number:- AE0021
Power size:- Minimum 3 to Maximum 7
3
5 3 to 7 1
1
1
0
Introduction
Dorgard is a Battery Operated device designed to hold open a fire door safely and legally.
Dorgard will automatically release upon “hearing” the fire alarm. Dorgard can be used to
hold the fire door in any position between open or closed.
It is recommended that a fire door is not retained at an angle of less than 65 degrees.
2
Prior to Installation
Prior to installation ensure:
1. That a suitable Automatic Fire Detection
Alarm System is installed.
2. The fire door is self-closing i.e. has a door
closer fitted.
3. The fire door closes tightly against the
door jamb.
4. Where Dorgard is to be fitted, the floor and
door surface is smooth and flat.
5. You have determined the closing force of
the door.
6. The Fire Alarm System is working
correctly, i.e. the sounders work when
activated.
7. There is clearance under the fire door for
fitting of the Floorplate, i.e. 5mm.
8. Dorgard forms part of your Fire Risk
Assessment (as required by the Fire
Precautions [Workplace] Regulations 1997,
also required by the Regulatory Reform
(Fire Safety) Order 2006).
When Dorgard is holding a fire door open, the
Dorgard “listens” continually for the sound of
your fire alarm. When the alarm sounds,
Dorgard will verify the alarm over a 20
second period and then release the fire door.
3
Important Information
Dorgard must only be used for the purpose for which it is designed. Dorgard is
not suitable for external use. Read this Guide and follow the instructions
carefully, keeping it in a safe place e.g. in your Fire Risk Assessment file, for
future reference.
BS EN1155:1997 states that a door must not be retained at an open angle of less
than 65 degrees. It is recommended that the Floorplate be installed to comply to
this standard.
Dorgard, when installed correctly, complies with BS 7273-4 Category C.
Supplementary information about the sound of a fire alarm:
The British Standard for fire alarm installation, BS5839-1: 2002, (Clause 16.2), states: -
The sound pressure level of alarm signals should be generally, throughout all accessible
areas of the building not less than 65dB(A) . . . where the sound pressure level of background
noise is greater than 60dB(A), the sound pressure level of the fire alarm signal should be 5dB
above the sound pressure level of the background noise.
It is understood that there are some noises in everyday life that may be louder than a fire
alarm and persist for longer than 30 seconds, such as a vacuum cleaner. Although required
in the British Standard, it is often found that the alarm is not 5 decibels louder.
When Dorgard is holding a fire door open, it “listens” for the continuous sound of a fire
alarm. Dorgard needs to “hear” a fire alarm that exceeds 65 decibels for longer than 14
seconds. At a general noise level of 80 decibels Dorgard will release. This facility has been
built into the unit as a safety feature. Should the noise level in your premises exceed 80
decibels it is unlikely that you would hear a 65 decibel alarm, hence the Dorgard releases
the fire door to close.
4
Batteries - use 2 x C Size LR14 and Setting the Time
Batteries - Alkaline only, do not use
rechargeable batteries.
The 2 x C Size Procell Alkaline Batteries supplied
should last for at least 12 months. Dorgard continually
checks the battery life to ensure safe operation.
1. Open Battery Compartment using a screwdriver.
2. Insert the Batteries into the Battery Compartment
(+) positive side facing up. Inserting the Batteries
the wrong way could cause damage.
3. When closing the Battery Compartment take care
not to over tighten.
When the Batteries in the Dorgard unit require
changing it will Fail to Safe. A warning beep will
sound until the Batteries are exhausted, removed or
replaced with new ones.
Note. Battery life may be reduced in noisy
environments.
Setting the Time:
To set the Dorgard Internal Clock to 12:00 Noon
Dorgard must be powered up at 12:00 Noon.
Dorgard does not adjust automatically for daylight
saving time.
To reset Dorgard’s Internal Clock, remove the
Batteries, wait 10 seconds and re-insert them at 12:00
Noon.
Note. Each time the Batteries are removed and
re-inserted the Internal Clock will reset.
5
Night-time Release
Dorgard can be used to hold a fire door open 24 hours
a day. It is recommended however, that fire doors
are closed at night as the chance of a fire spreading
undetected is greater than during daylight hours.
To ensure that fire doors are closed at night, Dorgard
can be set to release at a pre-set time and then will
not operate as a hold open device until later.
Setting Night-time Release:
1. Ensure Dorgard Internal Clock is set to ‘real time’
(see Setting the Time).
2. Turn the Dorgard over to reveal the Dip Switches.
3. Using the small block Plastic Adjustment Tool
supplied to select the required Night-time Release
setting. Flicking the Dip Switch towards the number
will turn the function On.
Night-time Release
options are:
Dip
Release
Switch Time
Reset
Time
1
20:00
08:00
2
21:00
07:00
1&2
22:00
06:00
Note. Dip Switch 3
disables the Night-time
Release warning tone.
Dip Switch 4 has no
function.
Note. With all Dip Switches up Night-time
Release will not operate.
Night-time Release warning tone:
It is recommended that the warning tone is NOT
disabled. The warning tone is to alert persons
using the building that the door is about to close and
is a safety feature. It is recognised however, that in
some locations the warning tone at night may cause
a disturbance. It is for this reason alone that the
provision of disabling the night time tone has
been made.
After installing the Batteries, Dorgard sounds a long
tone, followed by a motor sound (Dorgard setting),
then 3 x single tones. These 3 tones indicate the Dip
Switch selection, Low tone = Off, High tone = On. For
example: the Dip Switches are selected; No:1 = On,
No:2 = Off, No:3 = Off. The tones will then sound High,
Low, Low.
6
Installation
1. Install Batteries and set any Night-time Release
settings as required.
2. Close the fire door. Place the Fitting Template
provided against the door on the side that shuts
against the door frame. Ensure the Fitting Template
matches your view of the door.
3. Please make allowance for differing floor surfaces.
4. Make pilot holes or mark the position for the holes
through the Fitting Template.
5. Using 2 of the 4 Screws supplied fix Dorgard to the
fire door, at points A and B on the Fitting Template.
This will allow Dorgard to be moved up and down
slightly for correct positioning. The correct position
is when the Dorgard Plunger is fully retracted, the
door can swing free. When the Dorgard Plunger is
depressed, contact with the floor or Floorplate holds
the door open. When Dorgard is in the correct
position fasten down all 4 Screws.
6. Affix a Fire Door Sticker both sides of the fire door,
at eye level.
Note. Dorgard will not operate until the Batteries have
been inserted.
Batteries can be removed or inserted when a Dorgard
is affixed to a door.
7
Floorplate Installation
IMPORTANT: Fit Dorgard to a door before
fitting Floorplate.
Warning! Before drilling holes or fastening
Screws into the floor, check the location of
waterpipes, electrical cables, gas pipes etc.
Failure to do so could cause disruption to the
building’s services and may result in serious
injury or death.
1. Open the fire door to 90 degrees or to the desired
open position greater than 65 degrees. Slide the
Floorplate under the fire door with the Bump Stop
side positioned behind the door and as close to an
adjacent wall as possible to avoid tripping hazards.
2. Depress the Plunger on Dorgard so that the Ferrule
sits in the recess of the Floorplate.
3. Slide/swivel the Floorplate so that the Bump Stop
comes into contact with the back of the door,
ensure that the Ferrule is still sitting centrally in
the recess of the Floorplate.
4. Mark the position of Floorplate holes on to the floor
surface.
5. Remove the Floorplate.
6. If the floor is concrete, drill 4 x 6mm holes
(approximately 40 mm deep) at the positions
marked and insert the Masonry Plugs supplied.
7. Position the Floorplate over the Masonry Plugs or
marked points and fasten the Floorplate to the floor
using the Screws supplied.
8. Open the fire door against the Bump Stop and
depress the Plunger. If you have positioned the
Floorplate correctly the Ferrule should fit neatly into
the recess of the Floorplate. If not go back to step 3
and reposition the Floorplate.
Note. The Floorplate allows Dorgard to withstand the strongest closing force as
defined in BS EN 1155 and it prevents slippage on smooth surfaces & in other
conditions such as where a wooden floor might deflect as persons walk by.
Note. A smaller Secondary Floorplate comes supplied with no Bump Stop. This
is for specific circumstances where it is not necessary for the door to be held
open flush to a vertical surface. The Secondary Floorplate can be fitted using
the instructions described above, omitting any reference to the Bump Stop.
8
Dorgard Operation and Self Test
To hold the door open:
1. Open the door to the required position.
2. Stand sideways to the door.
3. Depress the Plunger down using your foot. Greater
foot pressure may be needed depending upon the
force from the door closer or the type of floor surface.
4. Whilst depressing the Plunger, push/pull the door
gently in the direction of closing.
5. Remove your foot and let go of the door.
To release Dorgard, either:
A. Lightly tap the Plunger towards the fire door with
your foot.
or;
B. Push the door in the direction of opening.
Note. If the door has been pushed hard against
the Floorplate Bump Stop or a wall, then
Dorgard will only release by method A.
Self Test:
Dorgard conducts weekly Self Tests 12 hours after
Battery installation and then every 7 days after that.
During the Self Test, if the fire door is being retained,
Dorgard will release the door. Should Dorgard detect
an internal fault it will sound a warning tone and Fail
to Safe.
9
Testing Dorgard to the Fire Alarm
1. Open the fire door and press down on the Plunger.
2. Sound the fire alarm for a minimum of 30 seconds.
3. The LED on top of the Dorgard will flash every 1.3 seconds to show it is “hearing” the
sound of the fire alarm.
4. Dorgard will release the fire door in approx. 20 seconds.
5. When Dorgard is ready to release the door, it will sound a ‘High Low’ warning tone
repeated 8 times before releasing the door. After Dorgard has released its fire door and
the fire alarm has ceased, it will reset after 10 seconds, therefore allowing the door to be
held open once more.
Note. If Dorgard fails to react to the sound of the fire alarm the sensitivity of the
unit will need to be adjusted (see Sensitivity Adjustment).
Alterations to the premises i.e. new furniture, new carpets etc., may alter the
audibility of the fire alarm. Following alterations a fire alarm test must be
carried out to ensure that Dorgard responds.
Despite Dorgard self-testing every 7 days, weekly bell tests are highly
recommended. This will ensure that Dorgard is responding to the fire alarm.
10
Sensitivity Adjustment
Each environment will vary and Dorgard may need
adjusting to suit your individual environment.
On identifying a necessary adjustment use the small
black Plastic Adjustment Tool supplied. Take care not
to over adjust as this will render the unit inoperative.
Adjusting sensitivity if Dorgard is not sensitive
enough, i.e. does not respond to the fire alarm:
1. Carefully insert the Plastic Screwdriver into hole on
front of the unit.
2. Turn clockwise through no more than 5 degrees (a
small adjustment is equivalent to a large alteration
in sensitivity).
3. Test Dorgard to the fire alarm.
4. If problems persist repeat steps 1-3.
Note. The Adjustment Screw is limited in both
direction, once you can feel resistance against
turning - stop to avoid damaging the unit.
If Dorgard is too sensitive (responds to no apparent
sound) follow steps 1-4, but turn anti-clockwise in
Step 2.
11
Trouble Shooting
The following are the most frequently asked questions regarding Dorgard.
1. Why is Dorgard not releasing when the Fire Alarm sounds?
• Check fire alarm sounds for at least 30 seconds.
• Check fire door is free to close unhindered.
• Check that the Plunger has a minimum of 10mm of down travel before the Ferrule
contacts the floor or Floorplate.
• Check the fire alarm is louder than 65 decibels where the Dorgard is fitted.
• Adjust the sensitivity of the Dorgard unit (see Sensitivity Adjustment).
2. Why does Dorgard release if the fire alarm is not sounding?
• Check that Dorgard is fitted to the side of the door that closes into the door frame.
• Dorgard will release when the door is pushed in the direction of opening. To prevent
this happening fit the Floorplate supplied.
• As a safety feature, Dorgard has to release to any sound that it “hears” as being
continuous and louder than 65 decibels as this sound could be obscuring a potential
fire alarm.
• Dorgard will release every 7 days as part of its Self Testing routine.
• Check Night-time Release settings.
• Adjust the sensitivity of the Dorgard unit (see Sensitivity Adjustment).
• Check Batteries on Dorgard, is unit beeping?
12
Trouble Shooting continued
3. Why does my door creep closed with Plunger fully depressed?
• Check that the Ferrule is not worn or damaged. Replace as necessary.
• Check that Dorgard is positioned low enough that the Ferrule makes good contact with
the floor when the Plunger is depressed. A vertical Plunger movement of 10-15mm is
ideal. Re-position as necessary or fit the Floorplate supplied.
• Check that the overhead door closer does not shut the door with excessive force. If so, fit
the Floorplate supplied or adjust pressure on overhead closer (refer to manufacturers
instructions).
• Check that the Ferrule has enough grip on the floor surface i.e. floor surface is not too
slippery. If so, fit the Floorplate supplied.
4. Why does Dorgard not retain the door in an open position.
• Check that the Plunger is depressed.
• Check that the Battery Compartment is closed, the Batteries are correctly installed
and operating.
• Check that Dorgard is not fitted too low or high on the door. A vertical Plunger
movement of 10-15mm is ideal for the Plunger to lock down properly.
• Check that Dorgard is fitted to the side of the door that closes into the door frame.
• Check Dorgard has not Failed to Safe.
• Remove Batteries and wait 10 seconds before reinserting them in the Dorgard to reset
the unit.
If all the above points are satisfied and further assistance is required please contact the
Technical Advice Line.
13
Error Messages
Beep / Flash Sequence
What it means
What to do
LoHi-LoHi-LoHi
Indicates Battery Lift is open
during power up
No action required
Long Tone
Indicates start of power up test
No action required
Lo – Lo – Lo
No Dip Switch has been selected
No action required
Hi – Lo – Lo
Dip Switch 1 has been selected
No action required
Lo – Hi – Lo
Dip Switch 2 has been selected
No action required
Hi – Hi – Lo
Dip Switches 1 and 2
have been selected
No action required
Lo – Lo – Hi
Dip Switch 3 has been selected
No action required
Hi – Lo – Hi
Dip Switches 1 and 3
have been selected
No action required
Lo – Hi – Hi
Dip Switches 2 and 3
have been selected
No action required
Hi – Hi – Hi
Dip Switches 1, 2 and 3
have been selected
No action required
During Power up
Dip Switch 4 has no function and
will not affect beep sequence
During standard operation
*---(32secs)---*---(32secs)---*---(32secs)---*---etc.
LED indicates that the system is
working properly
No action required
*-(1.3secs)-*-(1.3secs)-*-(1.3secs)-*-(1.3secs)-*-etc
LED indicates that the Dorgard
is “hearing” a possible alarm (or a
continuous background noise
in excess of 65 decibels)
If no alarm is sounding
please refer to the
section on adjusting
the sensitivity of
Dorgard.
HiLo – HiLo – HiLo – HiLo – HiLo – HiLo – HiLo – HiLo
*-------*-------*-------*-------*-------*-------*-------*
Dorgard is about to release door
No action required
(If warning tone has been
disabled – then no tone will sound)
* LED flash
Lo – Low Tone
Hi – High Tone
14
Error Messages continued
Beep / Flash Sequence
What it means
What to do
During standard operation
LoHi – LoHI – LoHi – LoHi – LoHi – LoHi –LoHi – LoHi
*-------*-------*-------*-------*-------*-------*-------*
Tone and flash sequence Is followed by the sound
of the motor driving
Dorgard resetting ready
for re-activation
No action required
Lo – (2secs) – Lo – (2secs) – Lo – (2secs) – etc
*----------*----------*----------*----------*----------etc
Indicates Battery Lift is not
screwed down properly
1. Screw down Battery Lift
HiHiLo…………………
This pattern may repeat
* * * ……………………
Possible fault with Motor
1. Check Ferrule is not worn
or damaged. Replace if
necessary
2. Release tension on fixing
Screws and check Dorgard
is positioned flat against
door with no obstructions
3. Recycle or if necessary,
replace Batteries
HiHiHiHiLoLoLoLo---(4secs)--HiHiHiHiLoLoLoLo---(4secs)---etc
Indicates possible Plunger
movement fault
Same 3 points of action
as above
HiLoLoLo---(4secs)---HiLoLoLo---(4secs)---etc
Indicates possible problem
with Battery insertion
Same 3 points of action
as above
Low Battery mode or
miscellaneous error
Same 3 points of action
as above
Error Modes
**** -------(4secs)---****-------(4secs)--- etc
HiLo-------(17mins)------HiLo------(17mins)------etc
(Dorgard will repeat HiLo 8 times after 68mins)
****--(4secs)-- ****--(4secs)-- ****--(4secs)-- etc
* LED flash
Lo – Low Tone
Hi – High Tone
15
Maintenance Schedule
Preventative maintenance and regular testing will ensure that Dorgard functions correctly
at all times. Ensure you update the Maintenance Record.
Weekly
Check that the Dorgard Plunger is depressed and is holding the door open. Sound the fire
alarm, after the alarm has sounded for 20 seconds, the door should release to close. If the door
does not release refer to the Trouble Shooting section.
Monthly
Carry out the weekly test and in addition dust the unit checking that the 3 holes for the
Microphone are open and clear of any dust, dirt etc. Dorgard should be cleaned with a slightly
damp cloth. If fitted, check the Floorplate is securely attached and has not been damaged.
6 Monthly
Carry out the weekly and monthly schedule and in addition, check:
1. Under the unit for the condition of the Ferrule.
2. The Dorgard unit is firmly attached to the door.
If any items are worn, torn or damaged then replace immediately. For further assistance or
spare parts contact the Technical Advice Line.
Yearly
Carry out the 6 monthly schedule and replace the Batteries.
Note and Warning
• The unit is designed to detect low battery power or possible faults, it will give a continual
warning (sound a series of beeps) and will Fail to Safe (no longer operate as a hold open
device).
• Dorgard conducts a Self Test 12 hours after Battery insertion, thereafter it will Self Test on
a weekly basis. During the Self Test, if the fire door is held open, Dorgard will release the
fire door. Should Dorgard detect an internal fault it will sound a warning tone and Fail to
Safe.
• If the Self Test at midnight is unsuitable it is possible to change it by pushing the
Dorgard clock forward by re-inserting the Batteries 12 hours before the desired time. e.g.
for a Self Test to occur at Midday the Batteries should be re-inserted at Midnight.
16
Maintenance Record
The log sheet below is designed to cover a 12 month period and should be filled
out after each test. This log is a formal record of the test and maintenance
schedule carried out by a competent (responsible) person. Further log books are
available from the Technical Advice Line.
Serial Number:
Location:
Serial Number is on back of Dorgard unit.
Installation Date:
Week Result (tick)
1
2
3
4
5
6
7
8
9
10
11
12
13
14
15
16
17
18
19
20
21
22
23
24
25
26
Installed by:
Date
Sign
Week Result (tick)
27
28
29
30
31
32
33
34
35
36
37
38
39
40
41
42
43
44
45
46
47
48
49
50
51
52
17
Date
Sign
Commissioning Certificate
Certificate of commissioning for the electrically powered hold-open device(s) (please delete as
appropriate) at: Address:........................................................................................................................
..................................................................................................................................................................
..................................................................................................................................................................
I/we being person(s) responsible (as indicated by my/our signatures below) for the
commissioning of the above, particulars of which are set out below, CERTIFY that the
equipment and release arrangements I/we have commissioned complies to the best of my/our
knowledge and belief with the recommendations of BS 7273-4:2007 for the category of
actuation described below, except for the variations, if any, stated in this certificate.
Name (in block letters):.............................................................Position:...............................................
Signature:...................................................................................Date:....................................................
For and on behalf of:...............................................................................................................................
Address:...................................................................................................................................................
..................................................................................................................................................................
............................................................................................Postcode:......................................................
The extent of liability of the signatory is limited to the equipment and arrangements described
below.
(tick appropriate) O Category A (hardwired System X with Dorgard X)
O Category B (acoustically activated System X with Dorgard X)
O Category C (acoustically activated Dorgard)
Variations for the recommendations of BS 7273-4 (Clause 7).............................................................
..................................................................................................................................................................
..................................................................................................................................................................
Brief description of release mechanisms, method(s) of actuation (see 7273-4:2007, Clause 8)
and system design (see BS 7273-4:2007, Clause 10)............................................................................
..................................................................................................................................................................
..................................................................................................................................................................
O All equipment operates correctly.
O Installation work is, as far as can reasonably be ascertained, of acceptable standard.
O I/we have carried out commissioning in accordance with recommendations of
BS 7273-4:2007, 21.5)
O Suitability documentation has been completed before/after (delete as applicable) release
mechanisms become operational.......................................................................................................
..................................................................................................................................................................
..................................................................................................................................................................
..................................................................................................................................................................
Maintenance: It is strongly recommended that, after completion, Dorgard is maintained in
accordance with BS 7273-4:2007, Clause 22.
User Responsibilities: the user should appoint a responsible person to supervise routine testing
of release mechanisms in accordance with BS 7273-4:2007, 22.1 and to supervise all matters
pertaining to the associated fire detection and fire alarm system in accordance with
BS 5839-1:2002, section 7.
18
Manufacturer’s Warranty
Fireco Limited (“we” and “us”) warrants to the customer (“you” and “your”) that
the product will be free from defects in material and workmanship for a period of
24 months from the date of purchase. If the product is defective whilst under
warranty we will, at our option, repair the product or replace it free of charge.
If the product appears to develop a defect while under warranty please first check
that the product is being correctly used in accordance with this Fitting and
Operating Guide and that the Batteries are functioning. If this does not resolve the
problem please contact us in writing at the e-mail address shown below or
telephone the Dorgard Technical Advice Line.
The warranty does not apply to any defect in the product arising from fair wear
and tear, wilful damage, accident, negligence by you or any third party, abnormal
working conditions, failure to follow the instructions in this Guide, misuse or
alteration or repair of the product without our prior approval. The warranty does
not cover Batteries and Ferrules which may need to be replaced within the period
of the warranty. We will not be liable to you for any loss of profits, administrative
inconvenience or indirect or consequential loss or damage arising out of any
defect in the product.
Where the products are sold under a consumer transaction (as defined by the
Consumer Transactions (Restrictions on Statements) Order 1976) your statutory
rights are not affected by the terms of this warranty.
Version 3.0
For Technical Assistance contact the UK Technical Advice Line on:
0845 241 7575 (Local Rate) or +44 (0) 1273 320 688
e-mail us at [email protected]
www.dorgard.com
For all other queries please contact your supplier.