1
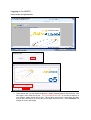
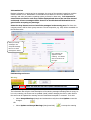
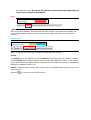
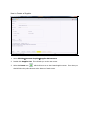
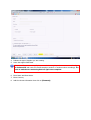
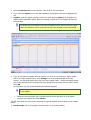
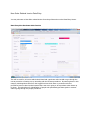
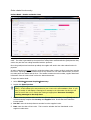
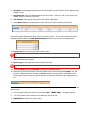
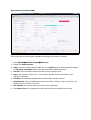
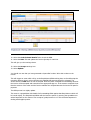
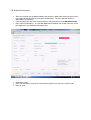
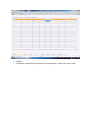
Accounts Payable e5 user guide Conventions used in this document Note: something for you to take note of. For example: Every Customer must have at least one address. Tip: a shortcut or tip to help you work quickly. For example: Remember you can double-click to activate a calendar in a date field. Important: something important for you to be aware of. For example: Always review the Period selection when using transaction drill down screens Warning of consequences – usually of omitting a step. [***] Menus keyboard – for example press [Enter], press [Shift]+[F3], press [F12] Navigation through menus is indicated with . For example: Select Edit Paste Special Paste Picture means select Edit menu, then Paste Special from the edit menu, then Paste Picture from the Paste Special options. Contents Project Background ............................................................................................ 5 Logging in to e5 WUI .......................................................................................... 6 Usernames and passwords................................................................................. 6 Menus and navigation ......................................................................................... 8 Screen layout ................................................................................................... 8 Finding/inputting data in e5 .............................................................................. 11 Prompt .......................................................................................................... 11 Command Line ............................................................................................... 13 Command Column .......................................................................................... 13 Calendar and Calculator ................................................................................... 14 Session management and windows ................................................................... 15 Chart of Accounts ............................................................................................. 16 Account Key ................................................................................................... 16 Analysis Key ................................................................................................... 17 Intra Company ............................................................................................... 17 Journal Batch Types ........................................................................................ 17 Invoice process ................................................................................................ 18 Overview – PO Invoice .................................................................................... 18 Overview – No Purchase Order Invoice.............................................................. 19 Overview – No Purchase Order Invoice/No Contact details................................... 20 No Purchase Order Invoice but either Prior Approval or Pre-Authorised ................. 21 Supplier Maintenance ....................................................................................... 23 How to Create a Supplier ................................................................................. 24 How to find new supplier from old Integra code and old from new ....................... 31 Data Entry ....................................................................................................... 34 Non-order related invoice logging ...................................................................... 38 Detailed Entry ................................................................................................ 41 Non-Order Related Invoice Data Entry............................................................... 43 Order-related invoice entry .............................................................................. 44 PA Authorised Invoices .................................................................................... 48 Pre-Authorised Invoices ................................................................................... 50 Entering multiple orders against a single invoice................................................. 53 Transaction Maintenance ...................................... Error! Bookmark not defined. Invoice Price Clearance......................................... Error! Bookmark not defined. Invoice Quantity Clearance ................................... Error! Bookmark not defined. Amendment ........................................................ Error! Bookmark not defined. Cancel Transactions ............................................. Error! Bookmark not defined. Suspend or Release a Transaction ......................... Error! Bookmark not defined. To Hold Payment From A Supplier ......................... Error! Bookmark not defined. Mismatches.......................................................... Error! Bookmark not defined. Mismatching: Quantity 1 ....................................... Error! Bookmark not defined. Mismatching Value - 2 .......................................... Error! Bookmark not defined. Mismatching Price - 3 ........................................... Error! Bookmark not defined. Mismatching Miscellaneous - 4 .............................. Error! Bookmark not defined. Opening up lines – Alternative views ...................... Error! Bookmark not defined. Credit Note .......................................................... Error! Bookmark not defined. Non Order related credit note................................ Error! Bookmark not defined. Staff Expenses ..................................................... Error! Bookmark not defined. Journal Entry ....................................................... Error! Bookmark not defined. Standard Journal entry ......................................... Error! Bookmark not defined. Journal Upload .................................................... Error! Bookmark not defined. Paperclip Function................................................ Error! Bookmark not defined. Copy a journal ..................................................... Error! Bookmark not defined. Copy a Transaction Line ....................................... Error! Bookmark not defined. Accounts Payable Enquiries ................................... Error! Bookmark not defined. Enquiries overview ............................................... Error! Bookmark not defined. Enquiry tips ......................................................... Error! Bookmark not defined. Searching............................................................ Error! Bookmark not defined. Exporting Data to Excel ........................................ Error! Bookmark not defined. 1 Supplier Transactions enquiry ............................. Error! Bookmark not defined. 2 Transactions by Supplier .................................... Error! Bookmark not defined. 3 Transactions by order ........................................ Error! Bookmark not defined. 4 Transactions by Reference ................................. Error! Bookmark not defined. 5 Transactions by GRN ......................................... Error! Bookmark not defined. 6 Transactions by Systems ref Number................... Error! Bookmark not defined. 7 Transactions by GL Account ............................... Error! Bookmark not defined. 8 Logged Transaction Enquiries ............................. Error! Bookmark not defined. Who raised the order? .......................................... Error! Bookmark not defined. Payment Processing.............................................. Error! Bookmark not defined. Handwritten Cheque Allocation .............................. Error! Bookmark not defined. Cancel a Payment ................................................ Error! Bookmark not defined. Appendix ............................................................. Error! Bookmark not defined. Payment Codes.................................................... Error! Bookmark not defined. Payment Methods ................................................ Error! Bookmark not defined. Action buttons and function keys ........................... Error! Bookmark not defined. Journal Batch Types ............................................. Error! Bookmark not defined. Project Background e5 – The University’s new Financial Information System Change is on its way. To ensure the effective and efficient provision of strategic financial information, accurate recording of income and payment of all suppliers, the Finance and Planning Information Directorate is reorganising our financial operations, re-engineering business processes and investing in new technology. The new technology will empower users, provide drill-down from the desktop and lead to enhanced business and dashboard reporting – enabling performance against Key Performance Indicators (KPIs) to be monitored via personalised portal pages. The current Integra system was implemented in 1999 and, whilst this system has performed successfully, changes in regulations and increased user requirements deemed a replacement system necessary, with capability of interfacing with research, TRAC, purchasing card, eprocurement, University trading areas, student records system and payroll. This also presented an opportunity to move from a Windows-based system to one which is fully web-enabled, with ecommerce functionality in the procurement ledger and links to peripheral systems. Alison Rankin - Finance and Planning Information Controller Logging in to e5 WUI Usernames and passwords 1. Users should open up their preferred browser (usually Internet Explorer) and from the “File” and “Open” menu enter the e5 URL. (to be provided at GO LIVE) If you have a shortcut on your desktop, simply double click on this. This will bring you into the screen above and after a short wait, will bring up a connect box in the upper left hand corner. Select Connect. The e5 Sign On screen will display. Tip: If you want to create a shortcut from your desktop, type in the URL and simply right click on this page and in the drop down menu click on Create Shortcut. When the small box pops up asking if you want to create on the desktop, click yes. 2. User: enter your user name – this is your staff number (no” e” prefix required). 3. Password: enter your password. This will be the same as your staff number initially but should be changed on initial logon. 4. Select [Retrieve and Clear]. Passwords Alpha-numeric – combination of numbers and letters. Maximum 8 characters. If your password/ID is entered incorrectly, on the third attempt, your account will lock and you will be required to answer a security question to reset. Screen lock Exit from e5 if you are away from your desk, or lock your screen using this procedure: 1. Press [Ctrl]+[Alt]+[Del]. 2. Select Lock Computer. 3. Enter your password (the password used to logon to the computer) again to access the computer. Menus and navigation Screen layout Menu and Action bar Content pane Navigation pane Command line Information bar General e5 has a Title bar at the top of the screen to identify the part of e5 currently displayed. This shows the screen code and name followed by the session number. In the above example; MZA2 e5 Hierarchical Menu – 1 is the screen and its description in session one. e5 has a Menu bar to access commands, and two Toolbars, providing shortcuts and actions to use in various parts of the system. The toolbar under the menus is called the Action bar. The second toolbar is at the bottom of the screen. The centre of the screen is divided into two panes: Navigation pane: shows the menu folder and screen structure which may be accessed. Content pane: shows the screens which has been opened from the Navigation pane. This will open a full size working window. Information bar Displays information, warning and error messages, the name of the company logged into, and the session number in use. Observation of information line at bottom of screen to indicate errors, warnings, and other information regarding actions performed or data entry. It is important to observe that one line for each error will be displayed and when a line has been viewed and closed, all error messages will be closed. You should check all fields which are in green before accepting any warnings. Select the drop down arrow to view all the messages in the warning area. For Ulster the company name is UG for Ulster group accounts. The sub companies, e.g. UEP, will be accessible via the Element codes. When you accept warnings it will accept all warnings. Be sure to check message box below One message will appear for each warning. You should click on the arrow at the right. Field warning and errors Warning A GREEN field represents a warning which means there could be something wrong with the content. The information bar will give a brief description of the warning message indicating what is wrong. As is it only a warning, the screen can be updated (saved) without changing the field or value. Before the screen can be updated the warning must be checked and accepted or corrected. To do this: Select Accept Warnings (triangle and exclamation mark) then select Update to save the changes. OR Select Update and Accept Warnings (triangle and tick) to accept the warning and update the screen. Do not use this option as it will accept all warnings which you may not have checked or investigated. Error A RED field represents an error which cannot be accepted or ignored. It must be resolved. An error often occurs when mandatory information has not been entered. The information bar displays the error message explaining what is wrong. A screen will not update until all the errors have been resolved. Format Error A BLUE field represents a formatting error. The message bar displays the error message explaining what is wrong. You will not be able to continue until this has been resolved. [Enter] The [Enter] key on your keyboard is used to validate information entered into a field, for example, pressing [Enter] after inputting a supplier account number will validate the number. If the number exists, e5 will retrieve the supplier name to confirm the correct number has been input. Validation will highlight any mandatory fields in red. Return is visible from some screens and is used to select the highlighted value and return you to the previous screen. Select the icon to return to the previous screen. Finding/inputting data in e5 Double clicks in screens can have a specific function. Single clicks should be used for entering information. Right clicking on an entry will produce a drop down list of menus. Right clicking on a transaction, and click Form will allow transactions to be viewed in a form format rather than columns. Prompt Much of the data that is input into e5 is in the form of codes to ensure that the data entered is correct and of good quality and can be used to run meaningful enquiries. This means that when you want to add information or run enquiries, you need to enter codes. The Prompt function enables you to look up a code (number or reference or other relevant information) when you do not know it, for example, you might know the supplier’s name but do not know their account number. Whenever you hover over a field which allows you to lookup a number (code), your mouse icon will change shape (as shown in the illustration above). To use the Prompt function: 1. With the prompt cursor displayed, double-click the field. 2. The next prompt screen displayed is determined by the field you prompted on. In the above illustration, the Supplier field was prompted and so the prompt screen enables you to input details that you know about the supplier such as their code, short name or name. Note: you cannot prompt for the code on certain fields. These will not display the prompt icon. 3. Select OK to view all values. In some Selection screens you must enter selection criteria before you can select OK. 4. Alternatively, you can enter some data to refine your lookup. For example, if you know part or all of the supplier’s name, you can enter this. Wildcards can be used to negate entering the entire description. The Wildcard (%) enables you to enter part of a word/phrase rather than the whole thing, which gives you a better chance of finding a matching description on the system. In the above example COLER% has been entered for the Short Name. e5 will find all suppliers where the first four letters in their name is COLER. It is good practice to enter key words and to use the wildcard (%). Some examples of wildcards: Coler%: Will look for all entries starting Coler; such as Coleraine Printing, Coleraine Borough Council etc. %Services: Will look for all entries ending in Services; such as Automobile Association Business Services and Action on Hearing Loss Services. %smith%: Will look for all entries containing smith anywhere in the description; it will find Smithers Rapra Technology Ltd and Thomas the Goldsmith Derry Ltd. 5. Once the correct item has been found, select it and select Return. Viewing search results Sometimes when you display your results, e5 will not show all items. This is indicated by the Purple CROSS on the tool bar and the message at the bottom. The number of items retrieved on a search is limited to increase the speed of retrieval. Clicking the purple cross (More button) until it goes grey means all items are available from the results table. Hover your mouse on the vertical scroll bar to discover how many items are currently displayed. Command Line This can be used to shortcut the menu if you know the specific commands. ARA takes you to the SPOOL where the reports are. AFC onto the command line will bring up a list of e codes onto the screen. This is useful for example in Diary events – put e code with message to identify source. Command Column The command column is at the side of journal lines and for example the list of nominals that are linked to a cost centre. It can be used for a number of different commands Copy 1. In Cmd (command) column for the line you want to copy type “ and then press [Enter]. The transaction information will be copied to the line below. Delete 1. In Cmd (command) column for the line you want to delete type D and then press [Enter]. The transaction information will be deleted. 2. If you want to delete a number of lines, type DD at the first line that you want to delete and the last file you want deleted and then press [Enter]. It will delete those lines and all those in between. Insert 3. In Cmd (command) column where you want a line inserted type I and then press [Enter]. The line will be inserted below this line. 4. If you want the line to be inserted above the line that you are at, type IP and then press [Enter]. It will insert a line above where you are at. Tip: With all these commands if you add a number after the command it will do the command twice e.g. so if you want to copy a line twice type “2 and so on Calendar and Calculator Calendar Whenever your mouse hovers over a date field, e5 will let you use the online Calendar to input a date. To use the Calendar function: 1. With the date cursor displayed, double-click the field. 2. You will be presented with a calendar. Use the Month and Year drop-down lists to select a month/year of your choice. 3. Once the required date is displayed, select it and select OK. The date will be inserted into the original field. You can, alternatively, enter the date in manually – entering 071111 for example will suffice as it will reformat the date as 07/11/2011 Calculator The calculator is available whenever your mouse hovers over a numeric field. e5 will let you use the online calculator and to insert the result if required. To use the Calculator function: 1. With the calculator cursor displayed, double-click the field. 2. You will be presented with a calculator. Use the online keys to enter your calculation. 3. Select Update to insert the total into the original field or Cancel to remove the calculator from the screen. Session management and windows You can start up multiple sessions (up to 5 maximum) in e5 allowing you to move easily from one screen to another. Please be advised that if you open more than 5 sessions, you risk freezing your screen and may have to restart your system. You start a new session by selecting the e5 Menu tab and start a new menu item. You can reference and/or copy and paste information from one screen to another. Each active session will display as a tab at the top of the screen: To go to another session, simply select on the session you want to go to. Close: close the current window/session you are working in by selecting on the X to the left of the session title. You will get the following warning: You can also use the Windows menu: Next: navigate to the other using this option. Previous: see Next. Preferences – Autofit. Tip: You can maximise, minimise or restore to original size. When a window isn’t maximised, you can resize it by dragging on the window edges. Chart of Accounts Account Key In e5, Cost centre, Funding Letter and Nominal make up the Account key. This information must be entered against all transactions. The Account key will be made up as follows: Cost Centre – 5 digits, Funding Letter – 1 letter, Nominal – 5 digits. Example: 40100 U 20100 Cost Centre Cost centre codes comprise five digits. Each subschool will have a range of cost centres assigned to them. If any income or expenditure is generated, it will be posted against their cost centres. For example, the Subschool – Biomedical General has the range of codes 80000 to 81499 assigned to it. So any new cost centre set up will be assigned a cost centre code within this range Funding Letter The Funding Letter is now a separate segment of the Account key. This allows the user to identify the Cost Centre type and make it meaningful. Additional letters are being used see complete list below C E F G H K Q R S T U Self Financing - Contract Endowment Faculty Recharges Research Off Own Res Strategy Holding KTP QR Research Strategy Research Self Financing - Non Contract University Trading University Funded Funding letters will be unique to Cost Centres. Nominal code Nominal codes are a mandatory field comprising five digits. Nominal codes are categorised by code range. Nominals must be either Profit and Loss or Balance Sheets codes. Examples of nominal code ranges are: Starts with 1 is Income Starts with 2 is Recurrent Expenditure e.g. 20100 = Expenditure consumables. Starts with 3 is Payroll Expenditure Starts with 4-9 Balance sheet There is a full list of nominals in the appendix In most modules the Nominal defaults from the Item code. Analysis Key This is a new key of up to 11 characters. This information can be made mandatory for specific transactions that require it and is used when a Cost Centre has a number of small projects or streams of income or expenditure without specific budgets that need to be analysed. This can be made mandatory at nominal or cost centre level with the nominal taking precedence in any data entry. Intra Company The University Group of companies is set up as one e5 company called UG and use is made of the e5 intra company (ICA) capability. Each Ulster company is set up with a BTZ – balance to zero entity and this allows each company’s set of accounts to be kept in balance. This is controlled at cost centre level by the use of ICA structure (see structures below). Company 1 is the main account =101 Company 3 is UEP = 103 Journal Batch Types Batch types or journal types (e.g. JV01 in Integra is now GJNL) are used to identify different kinds of transactions posted; and define the details that need to be entered against a transaction. The batch type defines whether the general ledger will be updated immediately with the transaction or if this is delayed until the update process is run. All transactions in e5 e.g. invoices, credits and adjustments belong to a batch type. See appendix for comparison between Integra and e5 Accounts Payable Batches Invoices are updated immediately Credit Notes are updated immediately Adjustments are updated immediately Goods Receipts are updated overnight. Invoice process Overview – PO Invoice Overview – No Purchase Order Invoice Overview – No Purchase Order Invoice/No Contact details No Purchase Order Invoice but either Prior Approval or Pre-Authorised 1. Invoices are date-stamped by the Finance department and then received into Accounts Payable. The invoices are then grouped in to no Purchase Order, pre-Approved and order-related invoices. Note: Non Purchase Order (NPO) invoices are in breach of University procedures. These will be returned to both supplier and the requester for explanation. 2. Invoices are entered in to e5 or logged if no coding is known or if authorisation is required. An invoice should only be entered as Non Purchase Order when an order should have been set up but was not. 3. In all circumstances where you are unable to identify the coding for a non-order related invoice, you should scan the invoice and then send it out for authorisation/coding. 4. Order-related invoices are entered into e5 and will be matched with the corresponding purchase order. The cost coding (GL coding) is detailed within the purchase order withheld in e5 and the authorised purchase order with the corresponding goods received note acts as authorisation. 5. Once an invoice (non-order or order-related) has been entered in e5, a unique system reference number is assigned to the invoice. The invoice should be stamped and the system ref number handwritten on the invoice. 6. All invoices must be entered in to e5 by the end of the day or by midday the following working day (at the latest) to allocate a system reference for queries. 7. All invoices will be scheduled for payment on the due date calculated by e5 based on the credit terms held for the supplier in e5. This due date may be amended if the supplier needed an urgent payment or a payment on an earlier date than that generated by the system. The Accounts Payable Administrator can amend this on request. 8. The order-related invoice will be scheduled for payment based on its due date providing there is a three-way-match. This means the invoice must match the original order by price/value, quantity and goods receipted against the order. If this is not the case, e5 will generate an event (task) using Business Event Manager which will be sent to the relevant person based on the type of mismatch below Quantity based – Goods Receipting – goes to Requisitioner/GRNr Value based – Goods Receipting for Services - goes to Requisitioner/GRNr Price based – go to Requisitioner for investigation then forwarded to the authorised signatory for approval. Goods/services price Miscellaneous e.g. carriage/postage etc. Supplier Maintenance The majority of Suppliers will be created by Procurement with only the bank details input by Payments. This means that users who create Suppliers will not be allowed to input and update invoices for payment. This segregation of duties is required by the Auditors. In some circumstances, Accounts Payable only suppliers will be created. Important: New Process – Any student receiving a refund, prior approval claim etc. Must have a student number. This student number will be used to pay the student by BACS. The prior approval form will be changed to accommodate the student number, bank details and also the school or faculty where the student studies. To avoid duplicate Supplier accounts it is vital that you do a thorough search first. It is only when you are totally satisfied that the supplier does not exist should you create a new one. If the postcode has already been entered into e5, the field will display a warning message to inform that this postcode already exists. Check the warning to determine if this is a different supplier or an existing supplier. Important: Sundry Suppliers – If a supplier will be paid more than once, then they should be set up as a standard supplier and given a supplier number. How to Create a Supplier 1. Select E5 MainAccounts PayableSupplier Maintenance. 2. Double-click Supplier List. This will take you to the next screen. 3. Select the Insert icon . which will move on to the Create Supplier screen. From here you should follow the yellow buttons at the bottom of each screen. 4. Indicate the type of Supplier you are creating. 5. Leave the supplier field blank. Important: If you are creating Employee or a Student supplier, make sure auto-numbering is switched off and enter the relevant employee number or student number accordingly. Be sure to switch auto-numbering back on again once complete. 6. Enter Name and Short Name. 7. Enter Currency. 8. Add the relevant information then click on [Elements]. Element 9. Add the Element required eg. 101 for University of Ulster (Company 1) and 103 for UEP (formerly UU Health or Company 8). 10. Click on [Address] and enter address details. Address ‘0’ is for Accounts Payable and will be the address where the remittance will be sent along with any other invoice related enquiries. Address 99 will be the Procurement address and will be the address where any queries regarding purchase orders or deliveries will be corresponded. 11. Enter the Address lines, telephone number and Contact Name. 12. Select the [Email Address] Tab. You will need to differentiate between email addresses that are used in orders, to be put against address 99 and email addresses used for Remittances, to be put against address 0. 13. Enter the email address. 14. Select [Web Address] Tab. 15. Enter the web address if this has been supplied. 16. Select the [Contact Email] Tab. 17. Enter the email address for additional information for the AP contact etc. This is the email address of the person within the Supplier’s company, who deals with accounts payable matters. 18. Select [Purchase Control]. Purchase Control 19. Enter discount terms and settlement terms and then click on [TAX] at bottom of screen although this button is not in yellow 20. In the TAX screen you should enter UK for the location, tax type and code e.g. STD, ZER etc 21. The Handling code which will usually be EN and put a ‘Y’ in the default column 22. Then follow the yellow buttons to [Pur Cntrl]. Which will take you back to the previous screen 23. You then click on the [PM Cntrl] screen. Although you don’t add anything in this screen, you need to open it to activate the supplier for purchasing 24. Click on [AP Cntrl] and add the required information such as payment method, code, and bank details 25. Enter the supplier’s category code, Supplier Category Codes Category Description Category Description BX Banner BACS PX BACS Payments EU Euro Payments RX Research Office BACS EX Employee BACS SC Sundry CHEQUES FP Foreign Currency Payments SX Sundry BACS HX Support Providers BACS UX UEP BACS MX Student Misc Payments VX Advances BACS PC Company 1 CHEQUES 90 Purchase Card Payment 26. Click [Update] to finish and receive the allocated supplier number You will now see a supplier number at the bottom of the screen in the Information Bar. Important: If you are unsure about Payment Method and Code, ask the Payments Supervisor as these entries are used to allocate Supplier transactions to Payment runs. Payment Method Description Payment Method Description 90 Purchasing Card EU Euro Payments BX BACS Payments FP Foreign Payment CQ Cheque Payments Note: If a Supplier is linked to both Company 1 and UEP the payment method is picked up from the Element during the payment run. If no element is entered it will default to UG (Company 1) How to find new supplier from old Integra code and old from new If you know the old Integra supplier number and you would like to find the new e5 supplier number 1. Select E5 MainAccounts PayableSupplier MaintenanceUser Defined Tables. 2. In the blank field beside Table enter SUNEW and [Enter]. This will display the screen above. 3. Click on [Display Data] and a list of old Integra supplier numbers will be displayed numerically. 4. Double Click on the required number and you will be presented with a screen with the new number in the User Data Field. In this example Integra supplier 00258800 Translink has an e5 supplier number of 0000000306. The same action applies if you are trying to get the old Integra number from the new e5 number. However, instead of entering SUNEW in the Table field, you should enter SUOLD. Data Entry To see what has been received when entering an invoice: When entering an invoice and you want to see what has been received on each line From the Purchase Order Enquiry screen 1. you can double click on your order number, 2. then right click, 3. [DISPLAY – Goods Receipt], this will display the lines and the information about them. This will produce the screen below Remember to scroll right to see all the information. 4. If you right click on any line, this will bring up an option of either viewing the line on the order 5. By clicking [VIEW ORDER] or if you right click and [EDIT – VIEW] this will bring up info on what has been received or is outstanding. This will produce the screen below. 6. Notice all the options you can enter to view different details by clicking on each tab. This will produce the screen below. Non-order related invoice logging A non-order related invoice is an invoice that is not related to a purchase order and/or has no GL coding and authorised signature. The invoice must show a department's or individual's name as a contact or else it is returned to the supplier. Do not log anything which has a purchase order. Any invoice with a purchase order or coded with a GL code should only be entered onto the system by data entry/enter invoice An invoice that needs further attention in order to be paid can be logged onto the system. This keeps a record that the invoice has been received and is stored until all the details have been received to allow payment. An invoice which has no GL code or authorised signature must be logged. This will then be scanned and sent out to the relevant department. When returned, coded and approved it can then be entered with the correct coding and updated for payment. It is important to remember that an invoice which is logged is only entered onto the system for future referral and enquiries. It has not been updated in the General Ledger and will never be progressed until Detailed entry has occurred. Select E5 MainAccounts PayableData entry. 1. Double-click Log Invoices. Tip: press [Enter] once you have entered information into a field (red fields are mandatory fields). e5 will validate your entry and move your cursor to the next mandatory field. If your entry is invalid, e5 will display a warning/error message in the Information line and you will need to resolve the error or accept the warning if appropriate. 2. On the Received column, double-click to bring up your calendar. 3. Select the Received date on the calendar. This will fill in the received box. 4. If you select the Return button, the next mandatory field (Supplier) will then be highlighted in red. 5. Supplier: enter the supplier account number here. After pressing [Enter], e5 will display the supplier name and address detail. Before proceeding, confirm the correct supplier account has been selected. Tip: When entering a supplier in data entry the postcode does not enter by default. If you double click in the field you will open the address screen, and if you hit the return button on the bottom of your screen this will enter the postcode in the required field. 6. If you do not know the supplier account number, you can look it up from here. Either doubleclick in the empty Supplier field or select Prompt. You will be presented with the Prompt window. Use the Name field to enter the start of the supplier name. Use the percentage symbol (%) to accommodate further letters/words which appear after the lookup text you have entered. Select OK. e5 will present you with a table containing all matching suppliers. Tip: if more than one supplier has the same name, use the Address lines to confirm the correct supplier. Select the required supplier (do not double-click as this will drill down in to the master record for the supplier) and select Return. This will close down the results screen and bring through the supplier account detail into the Header screen. 7. Document No: (this is the Supplier’s invoice number or document number) 8. Document Date: (date of document) 9. The company number will default to 101, company 1. If entering UEP invoices manually change the company number to 103. 10. Fill in the tax amount (VAT) 11. The Postcode field will be green warning you that you should enter the postcode. 12. To do this double-click on the field (this will show the address(es) for the supplier selected earlier. Select the appropriate address line if there are more than one and select Return. This should enter the postcode for you. 13. Select Update at the bottom of the screen to generate a system reference number. The system reference number should be written onto the document. 14. After the document has been logged it can then be filed away in numerical order. 15. Scan the invoice and email to the appropriate authorised signatory. Attach a copy of the Breach of Procedures document. 16. When the required information is received back, coded and authorised, the logged invoice is then ready for Detailed Entry. Tip: To enter the next invoice you click the Insert icon . It says “Insert Batch”. Or you can also click on the button at the bottom which says insert batch. Detailed Entry Invoice & Credit notes look the same apart from trans type 1. Select E5 MainAccounts PayableData entry. 2. Double-click Enter Logged Invoices. 3. Enter your system reference number and press [Return]. 4. All the details entered in the Logging screen will be displayed. 5. Select Enter Lines at the bottom of the screen. This will let you to enter the invoice details. Important: Note the invoice value is NET. 6. Select Update - and you will be presented with the GL Details screen with the Cost Centre, Funding and Nominal fields in red. 7. Enter the Cost centre. 8. Enter the Nominal code. 9. Enter Funding code, as appropriate. 10. Then select on Update again and status will change from Logged to Due. This will then be included in the next pay run after the due date. If Cost Centre, Funding and Nominal link do not exist, verification of the correct coding must be requested. Non-Order Related Invoice Data Entry You may also enter a Non-Order related invoice from the pull down box on the Data Entry Screen. Data Entry Non-Purchase Order Invoice _________________________________________________________________________________ This will be used for an invoice which should have had a purchase order but did not go through the correct procedure of setting one up according with the Finance procedures. By entering these in this category it distinguishes them from the Logged invoices which have no purchase order but procedures have not been broken because there was never going to be a purchase order drawn up for them. This also allows for identification of people who persistently purchase goods or services without going through the proper procedures. Order-related invoice entry Perfect Match - Header and Order Lines A supplier will send in an order-related invoice for payment once they have fulfilled part or all of an order. The order is generated by the system from a Requisition which details the goods/services they wish to buy and the cost coding associated with the purchase. Once the goods/services have been provided, the supplier will send in the order-related invoice for payment. An order-related invoice must quote the original purchase order number as this is used when entering the invoice. Inputting an order-related invoice is very similar to a non-order related invoice, there are two main parts: the header and the lines. The header contains the order number, supplier detail and information from the invoice itself such as the date and amounts. To input the header detail: 1. Select E5 MainAccounts PayableData entry. 2. Double-click Enter Invoices. Tip: press [Enter] once you have entered information into a field (red fields are mandatory fields). e5 will validate your entry and move your cursor to the next mandatory field. If your entry is invalid, e5 will display a warning/error message in the information line and you will need to resolve the error or accept the warning as appropriate. Be aware of multiple warning messages in the drop down. 3. Order: enter the purchase order number here (Format PO-nnnnnnnn). Press [Enter] and e5 will automatically complete the Currency and Supplier fields. Check that these match the invoice details. 4. Doc Ref: enter the invoice/reference number from the supplier invoice. 5. Date: enter the date of the invoice. This is used to calculate the Due Date based on the supplier’s credit terms. 6. Due Date: automatically populated once the invoice date has been entered. This is based on the Supplier record. 7. Gross Amount: enter the GROSS amount from the invoice. If there is VAT on the invoice, the GROSS amount is inclusive of the VAT. 8. Tax Amount: enter the tax amount from the invoice if applicable. 9. Select Enter Lines. e5 will populate the lines section with the line detail from the order. All lines that match perfectly will have a tick in the select column. . If you want to check the Goods Receipting (GRN), select the Order Related Details tab where you can see the GRN Quantity. 10. Invoice price: the unit amount taken from the order. If this is different, you MUST enter what is on the supplier invoice. 11. Line Tax Amount: entered from the order. This is the code which reflects the VAT. In the above illustration, this is 80.00. 12. Invoice Qty: the quantity taken from the purchase order. If this is different on the invoice, you must enter what is on the invoice. 13. From the Lines screen select Header to return to the Header screen. 14. Check the Gross amount matches with the original invoice amount and select Update. You will be given a System reference number (highlighted below in the blue field). If all details on the invoice agree with the order the Invoice will now be passed for payment in the appropriate pay run. If an order had been GRN’d more than once and you are entering an invoice which is for less than the GRN amount, 1. You must right click on the invoice line and then [GO – TRANS GRN] – to change quantity. 2. You must select the line which you are taking the goods off and 3. [DESELECT] the other lines on the order. No Goods Received Note (GRN) If the Invoice has not been goods receipted the following process must be followed: 1. Select E5 MainAccounts PayableData entry. 2. Double-click Enter Invoices. 3. Order: enter the purchase order number here. Press [Enter] and e5 will automatically complete the Currency and Supplier fields. Check that these details match the Invoice. 4. Doc Ref: enter the invoice/reference number from the supplier invoice. 5. Date: enter the date of the invoice. This is used to calculate the Due Date based on the supplier’s credit terms. 6. Due Date: automatically populated once the invoice date has been entered. 7. Gross Amount: enter the GROSS amount from the invoice. If there is VAT on the invoice, the GROSS amount is inclusive of the VAT. 8. Tax Amount: enter the tax amount from the invoice if applicable. 9. Select Enter Lines. e5 will populate the lines section with the line detail from the order. 10. Select the Order Related Details Tab to check the GRN. 11. Select the Main Tab and update the Invoice Quantity for each line. This will give you the warnings above. 12. Select the Accept warnings icon. 13. Select Update You should now see that you have generated a System Ref number. Write this number on the invoice. This will trigger an event which will go to the Requisitioner/GRNer asking them to Goods Receipt the remaining amount when it arrives and they are satisfied that payment should be released. The Invoice will be in Held status so will not be paid. Once they have receipted the outstanding amounts the invoice will be accepted and entered into the appropriate pay run. If the amount receipted is less than the amount of the order and the Invoice matches the receipted amount the invoice will pass for payment. The GRN process is a nightly update. This event is a spreadsheet with details of all outstanding GRNs against that Requisitioner which will be issued nightly. The Requisitioner/GRNer will also have the option of returning the spreadsheet to advise Payments for the reason of non receipt of goods/services in e5. This will assist Payments in dealing with Supplier queries. PA Authorised Invoices These are invoices such as McNeill Menary and Student or Staff conference fees which have a Prior Approval and therefore do not require authorisation. The prior approval serves as authorisation for payment. From the Data Entry click Enter Invoice and from the pull down list select PA Auth Invoice. Enter required information. You can add additional information such as the authorisor of the prior approval in the Additional Information box. Select Enter Lines Enter line description, net price on invoice and the [Return] to take you to the GL code. Enter GL code. UPDATE Transaction will be ACCPT for payment in the next payment run after the invoice is DUE. Pre-Authorised Invoices These are invoices which have been received already authorised and coded and are ready to be put through for payment. For example Library invoices, memos and requests for payment. From the Data Entry menu, select Enter Invoice. Enter required information and select Enter Lines. Enter Line description and select GL details or hit [Return] UPDATE. System Reference number is generated. Entering multiple orders against a single invoice Completing the Header and Lines Suppliers will sometimes send a consolidated invoice in to Accounts Payable for payment. This is one invoice asking for payment for more than one order. To enter a consolidated invoice: 1. Select E5 MainAccounts PayableData entry. 2. Double-click Enter Invoices. 3. Date Received: Enter today’s date. 4. Document Type: Select PO Related Invoice from the drop down 5. Order: Leave blank as you are matching the invoices to a number of orders not just one. 6. Supplier No: Find the Supplier by using the prompt facility. 7. Post Code: Double-click in this field and select the appropriate address line if more than one. Select Return. 8. Doc Ref: enter the invoice/reference number from the supplier invoice. 9. Doc Date: enter the date of the invoice. This is used to calculate the Due Date based on the supplier’s credit terms. 10. Due Date: automatically populated once the invoice date has been entered. This can be changed if required by the Accounts Payable Supervisor. 11. Gross Amount: enter the GROSS amount from the invoice. If there is VAT on the invoice, the GROSS amount is inclusive of VAT. 12. Tax Amount: enter the tax amount from the invoice if applicable. 13. Select Match to Multiple Orders. 14. Enter each order quoted on the invoice into a new row. In the illustration below, there are two orders. 15. Select Select All. 16. e5 will automatically select the Lines (Y appears in the Selection column). 17. Select Header followed by Enter Lines to see the lines from each order. 18. To deselect lines that do not need to be processed, highlight the line then select Deselect. Process the order in the normal way. Ensure the price and quantity matches with what is on the invoice. The order lines must reflect what is on the invoice. Tip: to see a history of when a purchase order was receipted, select Order Related Details 19. From the Lines screen select Header to return to the Header screen. 20. Check the Gross and Tax (if applicable) amount matches with the original invoice amount and select Update. Once the System reference has been generated, write this number on the invoice and file it away. 21. Select Insert Batch to add another invoice or Exit the window.