1
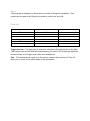
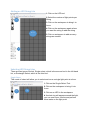
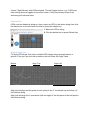
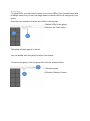
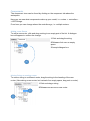
String Lite® Modeller
User Guide
Contents
Intro......................................................................................................................................................... 3
Controls ................................................................................................................................................... 3
Adding an LED String Lite ........................................................................................................................ 4
Selecting LED String Lites ........................................................................................................................ 4
Single Select ........................................................................................................................................ 4
Rectangle Select .................................................................................................................................. 5
Deselecting LEDs ............................................................................................................................. 5
Other Selection ............................................................................................................................... 5
Manipulating LEDs .................................................................................................................................. 5
Moving LEDs ........................................................................................................................................ 5
Anchoring LEDs ................................................................................................................................... 5
Deleting LEDs ...................................................................................................................................... 6
Aligning String Lites ............................................................................................................................. 6
Grouping ................................................................................................................................................. 7
Components ............................................................................................................................................ 8
Adding a new Router .......................................................................................................................... 8
Moving Strings to another router ....................................................................................................... 8
Loading and Saving ................................................................................................................................. 9
Saving .................................................................................................................................................. 9
Loading ................................................................................................................................................ 9
Other ....................................................................................................................................................... 9
Grid and workspace Settings .............................................................................................................. 9
“Toggle” Settings................................................................................................................................. 9
Control Reference ............................................................................................................................... 9
Intro
This program is designed to allow users to model a String Lite installation. This
model can be used in the String Lite renderer via the xml save file.
Controls
Action
Zoom in
Zoom out
Pan
Toggle Anchor
De-Select
Delete String
Control
Control 2
W
S
Arrow Keys
Space
D
Delete
Right Mouse
-
Toggle Anchor – If a light point is selected, using this will toggle forces on the light.
This means it will not fall and will hold wherever you move it to. Pressing it again will
resume forces on the light once it has been deselected.
Pan – The workspace is larger than the screen unless fully zoomed out. Pan will
allow you to move to the other areas of the workspace.
Adding an LED String Lite
1 Click on the LED tool
2 Select the number of light points per
String
1
3 Click on the workspace to bring it to
focus
3+4
4 Click on the workspace again where
you want the string to add the string
5 Click on workspace to add as many
strings as needed.
2
Selecting LED String Lites
There are two types of select. Single select, which is the second tool in the left hand
list, or Rectangle Select, which is the third tool.
Single Select
This mode of select will allow you to select and move a single light point at a time.
1 Click on the Single Select Tool.
2 Click on the workspace to bring it into
focus
1
2
3 Click on an LED in the workspace
4 A select ring will appear around the light,
you can now move, anchor and perform
other tasks on the light point
Rectangle Select
This mode of selection will allow you to use a rectangle toopl to select one or more
LED strings at a time. Once these strings are selected you can add them to a group,
anchor them, delete them, or align them.
1 Click on the rectangle select tool
2 Click left mouse and hold on the
workspace to start the rectangle.
2
3 Drag to the bottom right corner of
your rectangle.
1
3
4 Release left mouse and any LEDs
contained in the rectangle will have the
string selected
Note: Rectangle select only works when the select starts at the top left and ends in
the bottom right.
Deselecting LEDs
To deselect the LEDs you have selected, simply press the deselect key – ‘D’.
In single select mode you can also click on a blank section of the workspace to
deselect.
Other Selection
LEDs can also be selected by double clicking a group that the LEDs are in.
Manipulating LEDs
There are several ways to manipulate the LEDs, you can move them, anchor them,
delete them, align them top and/or left, or add them to a group.
Moving LEDs
To move an LED, you must be using the single select tool (you can find steps for this
in the appropriate section). Once selected, left click and drag on the LED, this will
make the LED follow your mouse. When the LED is moved, release left mouse.
Anchoring LEDs
To anchor LEDs, you must have some LEDs selected. Anchoring will work with
multiple LEDs and single LEDs. To anchor an LED, press the anchor key –
‘Space’,’Right Mouse’ with LEDs selected. This will toggle Anchor, e.g. if LEDs are
free moving and are toggled, they will be frozen, if they are already frozen then
anchoring will unfreeze them.
Deleting LEDs
LEDs must be deleted a string at a time, select an LED or the whole string then click
the delete tool on the left hand tool strip or press the delete key.
1 Select an LED or string
2 Click the delete tool or press Delete Key
1
2
Aligning String Lites
To align LED strings, first select multiple LED strings using rectangle select or
groups. Then you can click the buttons on the left under the ‘Align’ label.
Before
Align Top
Align Left
Align top will align the first point of each string to the Y coordinate (up and down) of
the leftmost string.
Align Left will align the X coordinate (left and right) of the first point to the first point in
the leftmost string.
Grouping
To group LEDs, you first need to select one or more LEDs. This is usually done with
rectangle select, but you can use single select to add an LED to its own group if you
desire.
Once they are selected, click the word ‘Add’ in the top right.
1 Select LEDs for the group
2 Click on the ‘Add’ button
1
2
The group will then appear in the list.
You can double click this group to select it’s contents.
To remove the group, click the group then click the remove button.
2
1 Click the group
1
2 Click the ‘Remove’ button.
Components
The component view can be found by clicking on the component tab above the
workspace.
Here you can see what components make up your model, i.e. routers -> controllers > LED Strings.
From here you can change where the controllers go, i.e. multiple routers.
Adding a new Router
To add a new router, click and drag a string to an empty part of the list. A dialogue
box will appear to confirm the change.
1 Click and drag the string
2 Release click over an empty
space
1
3 Accept dialogue box.
2
Moving Strings to another router
To move a string to a different router, drag the string to the heading of the new
router. (like making a new router, but instead of an empty space, drag onto a router)
1 Click and drag a string
2 Release mouse over a new router
1
2
Loading and Saving
Saving
To save a file, click the save button. This will prompt a save dialogue. Select where
you want to save the file, name the file, and click save. The program may take a little
time to save with big installations on slower computers.
Loading
To load an installation, click the ‘Open’ button. This will prompt you to save your
current file. Next, a dialogue will open. Navigate to the location of the file you wish to
load, select it, and click load.
The program may take some time to load larger installation on slower computers.
Other
Grid and workspace Settings
The background grid can be changed to your liking, e.g. number of lines and colour
of lines. This can be done via the options below the left hand tools.
These tools also contain settings for the rest of the workspace.
These are the background colour of the workspace, the colour of
the grid, and the amount of LEDs per string to add.
“Toggle” Settings
These settings can be found directly above the workspace, these are toggle settings
so that you can view the workspace how you feel is best for you.
These toggle the black lines that link the LED strings, toggle the left hand tool tray for
extra workspace, and toggle the background grid on and off if it is not needed.
Control Reference
By clicking the help icon or the help tab, you can access the basic controls page for
quick reference.