1
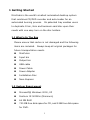
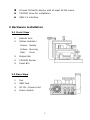
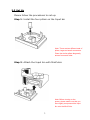
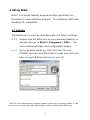
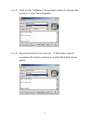
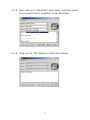
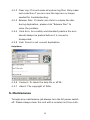
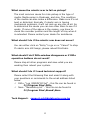
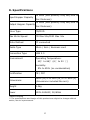
Datatronics Technology, Inc.
MiniCubis User’s Guide
Models:
DA5600-6030-CD, DA5600-7030-DVD
Version 1.5
Table of Contents
1. Getting Started
1.1
What Is In The Box
1.2 System Requirement
1
1
2. Hardware Installation
2.1 Front View
2
2.2
Rear View
2
2.3
Set Up
3
3. Software Installation
3.1 Installing Driver
5
3.2
5
Installing DiDo
3.3 Installing Nero Express
5
4. Using DiDo
4.1 Setting
6
4.2 Options
9
5. Maintenance
10
6. Uninstalling DiDo
11
7. FAQ
11
8. Specifications
13
9. Reference
9.1 Handling discs
14
9.2
Disc to avoid
14
9.3 Moving MiniCubis
15
9.4 Warranty
15
1 Getting Started
MiniCubis is the world’s smallest automated desktop system
that combines CD/DVD recorder and auto-loader for an
automated burning process. Its patented tray enables users
to duplicate 12cm, 8cm and business-card disc upon their
needs with one easy turn on the disc holders.
1.1 What’s In The Box
Please ensure that carton is not damaged and the following
items are included. Always keep all original packages for
future transportation needs.
MiniCubis
Input bin
Output bin
USB cable
Power Cable
Power Adapter
Installation Disc
Nero Express
1.2 System Requirement
Microsoft® Windows 2000, XP
Pentium III 500Mhz (Minimum)
64 MB RAM
700 MB free disk space for CD, and 9 GB free disk space
for DVD.
1
At least 800x600 display with at least 16 Bit colors
CD/DVD drive for installation
USB 2.0 interface
2 Hardware installation
2.1 Front View
1.
Robotic Arm
2.
Status Indicator
Green: Ready
Yellow: Burning
Red:
Error
3.
Output Bin
4.
CD/DVD Burner
5.
Input Bin
2.2 Rear View
1.
Fan
2.
USB Jack
3.
AC IN – Power Inlet
4.
Power Switch
2
2.3 Set Up
Please follow the procedures to set up:
Step 1: Install the four pillars on the Input bin
Note: There are two different sets of
pillars, large and small connectors.
Place the similar pillars diagonally
across from each other.
Step 2: Attach the Input bin with MiniCubis.
Note: Before turning on the
power, please make sure that you
have tightly compressed the Input
bin onto the MiniCubis.
3
Step 3: To use different discs just rotate the four pillars as
shown in the diagram below, then you can easily use 12cm,
8cm and card size medias for duplication.
8 cm
12 cm
Card Size
Step 4: Connect your USB cable A-male end to MiniCubis
USB slot and B-male end to your PC USB slot. Connect the
power adapter and power cable together.
Then connect the
adapter end to the AC In on MiniCubis and cable end to an AC
outlet.
4
3 Software Installation
In order to use MiniCubis, you will need to install Driver, DiDo,
and Nero Express. Please follow the instructions below to
install the software included in the installation disc.
3.1 Installing Driver
Step 1: Insert the installation CD into your CD/DVD drive.
Step 2: Connect MiniCubis to your PC, then turn it on.
Step 3: Windows will show a message box, “Searching the
driver for MiniCubis” please choose “Browse” to
find the driver.
Step 4: Choose “BREADUSB.INF” and click “OK”.
3.2 Installing DiDo
Step 1: Insert the installation CD into your CD/DVD drive.
Step 2: Go to My Computer > Click on the drive letter of
the CD/DVD drive > Click setup.exe
Step 3: Follow the prompts until you have finished
installing the software.
3.3 Installing Nero Express
If you do not have Nero Express installed on your PC, please
refer to the disc that comes with MiniCubis, and follow all
instructions to install it.
5
4 Using DiDo
DiDo* is a simple loading program written specifically for
MiniCubis to work with Nero Express. It is Windows 2000 and
Windows XP compatible.
4.1 Setting
The following is a step-by-step description of DiDo’s settings:
4.1.1 Double click the DiDo icon on your windows desktop, or
you can also go to Start > Programs > DiDo. The
main window will open and configuration begins.
4.1.2
As the window opens up, DiDo will scan for your
CD/DVD recorder and MiniCubis to make sure that you
have connected these devices on your PC.
*DiDo is not a stand-alone program capable of burning or guiding robots. It can
only work in conjunction with Nero Express while connected to MiniCubis.
6
4.1.3 Click on the “Software” drop-down button to choose the
version of your Nero Express.
4.1.4 Select MiniCubis from the list.
If Windows cannot
recognize MiniCubis, please re-install MiniCubis driver
again.
7
4.1.5 Now click on to “Recorder” drop down, and then select
the recorder that is installed in your MiniCubis.
4.1.6 Click on the “OK” button to finish the setting.
8
4.1.7 Now you can run the Nero Express to start a burning job
with MiniCubis.
Note: Please set the language of Nero Express in English. Run Nero Express,
select “More”>”Configure”>, then choose language preference.
Note: To ensure the maxium performance of DiDo, we recommend you do not
run any other application while burning process is in progress.
Note: DiDo does not support the following function of Nero Express:
Multi-session
Simulation
Erase
Verify
4.2 Options
File Menu
4.2.1 Save Log: All activities are saved as
“Log_MMDDYYYY.txt” file and is stored at the default
DiDo installation directory. To save file under a different
directory, click on “File” -> “Save log”.
9
4.2.2 Clear Log: This will erase all system log files. Only make
such selection if you are sure the logs are no longer
needed for troubleshooting.
4.2.3 Release Disc: If robotic arm fails to release the disc
during duplication, please click “Release Disc” to
solve the problem.
4.2.4 Park Arm: As a safety and standard practice the arm
should always be parked before it is moved or
transported.
4.2.5 Exit: Press to exit current duplication.
Help Menu
4.2.6 Content: To check the help file in HTML.
4.2.7 About: The copyright of DiDo.
5. Maintenance
To begin any maintenance job always turn the AC power switch
off. Please always clean the unit with a moisten lint free cloth.
10
6. Uninstalling DiDo
Step 1: Go to Start > Settings > Control Panel > Add
or Remove Programs.
Step 2: Select DiDo in the “Add or Remove Programs”
window and click “remove”.
Step 3: In some cases, you will find that when removing
software, there will be one or two files that the
operating system will ask if you want them removed
since they may be shared by other programs. If you
are unsure, always opt to keep these files.
7. FAQ
What should I do if the driver for MiniCubis cannot be
installed properly?
Please update the firmware of your motherboard to the
latest version as well as updating your Windows.
What is the best speed to duplicate audio disc?
Generally for best result, 16X or lower are recommended
for audio duplication.
How to eliminate burning coasters?
Make sure both the master and the blank discs are in good
condition. Keep the system level and stable. If burning
error persists, lower the burning speed.
What is the proper procedure for turning the system
On/Off?
Please allow 5 seconds interval between On and Off.
11
What cause the robotic arm to fail on pickup?
The most common cause for miss-pickup is the type of
media. Media varies in thickness, and size. The condition
of the media can also make a difference. Make sure it’s not
bent or distorted. Normally if robotic arm is having
mechanical problems, it will not pick up any disc at all. So
to determine the cause you can use other discs to see if it
works. If none of the above is the reason, you have to
check the recorder position and the length of tray when it
is extended. Please contact your dealer for assistance.
What should I do if the robotic arm does not move?
You can either click on “Retry” to go on or “Cancel” to stop.
If robotic arm still hangs, please reboot MiniCubis.
What should I do if DiDo window disappears or if DiDo
operation buttons do not work?
Please stop all other programs and save what you are
working then reboot your system.
What should I do if I need technical support?
Please collect the following files and email it along with
your questions or commands to the email address listed
below.
DiDo: “Log_MMDDYYYY.txt” - this file can be found in
C:\Program Files\DiDo
Nero: “NeroHistory.txt” - this file can be found in
C:\Program Files\Ahead\Nero
Tech Support: [email protected]
12
8. Specifications
Input Hopper Capacity
Output Hopper Capacity
25 discs (disc quantity may vary due to
disc thickness)
25 discs (disc quantity may vary due to
disc thickness)
Drive Type
CD/DVD
Max Write Speed
CD Max 52x/DVD Max 16x
Write Method
PC connected
Media Type
12cm / 8cm / Business card
Connection Type
USB 2.0
Environment
Operating Temperature:
42℉ to 86℉ (6℃ to 30 ℃)
Humidity:
5% to 85% (no condensation)
Certification
Dimensions
CE / FCC
15cm (H) x 21.5cm (W) x 37.5cm (L)
(dimensions included the arm)
Weight
5.0kg
Power
100V-240VAC, 50/60Hz
*Patent Pending
**The specifications and design of this product are subject to change without
notice, due to improvement.
13
9. Reference
9.1 Handling discs
When holding discs of any type, make sure not to leave
fingerprints, dirt or scratches on the disc surface. Hold the
disc by its edge or by the center hole and edge.
Damaged or dirty discs can affect playback and burning
performance. Please note, label side of the disc, although
not as fragile as the recording side, scratches can still render
the disc unusable.
9.2 Disc to avoid
Discs spin at high speed inside the RW recorder. If you can
see that a disc is cracked, chipped, warped, or otherwise
damaged, don’t risk using it —you could end up damaging
the recorder.
9.3 Moving MiniCubis
Remove the disc in tray.
1.
Go to DiDo > File > Park Arm, to park the arm.
2.
Turn off the power and remove the input bin.
3.
Disconnect the USB cable and the power cord.
Warning: Never move MiniCubis while it is in loading or burning mode, as it
may damage the disc inside.
14
9.4 Warranty
Datatronics Technology, Inc. offers a one-year standard
warranty program for the MiniCubis. For warranty service
please send the unit in its original shipping carton to the
store of purchase.
To insure a proper processing, please
contact the store purchased from for their RMA policy prior
to shipping.
15