1
RouteGadget Installation / User Guide
www.routegadget.net
www.routegadget.co.uk
How to install RouteGadget on your web site ................................................................................................ 2
Requirements ................................................................................................................................................ 2
Step1. Prepare files ....................................................................................................................................... 2
Step 2 Create directory structure and copy files to the server ........................................................................ 3
Step 3 Copy files to the server ....................................................................................................................... 3
Step 4 Set permissions (chmod if UNIX/Linux) .............................................................................................. 3
Step 5 Test..................................................................................................................................................... 3
Step 6 Password protection ........................................................................................................................... 3
Adding a new event ......................................................................................................................................... 4
The files you will need:.................................................................................................................................. 4
For possible problems, see Appendix 1...................................................................................................... 4
Using RG Manager: ...................................................................................................................................... 4
Add an event. ............................................................................................................................................ 5
Positioning the controls on the map. .......................................................................................................... 7
Adding a new event without splits or course data files .................................................................................. 9
Viewing / adding routes ................................................................................................................................ 15
Adding a route: ........................................................................................................................................... 16
Import from GPS:........................................................................................................................................ 16
Viewing routes: ........................................................................................................................................... 17
Appendix 1, Possible problems ..................................................................................................................... 18
Controls removed from the splits:................................................................................................................ 18
OE2003 ................................................................................................................................................... 18
Aut-O-Download..................................................................................................................................... 18
Alternative option.................................................................................................................................... 18
Java: ........................................................................................................................................................... 18
Copyright....................................................................................................................................................... 19
RouteGadget software copyright. ................................................................................................................ 19
Paul Frost, Route Gadget UK copyright...................................................................................................... 19
Paul Frost
RG Installation / User Guide Mar07
Page 1
How to install RouteGadget on your web site
Requirements
•
•
•
•
Web host that supports Perl language. You also need to determine location of the Perl program on the
server (/usr/bin/perl or c:\perl\bin\perl.exe).
Java needs to be installed in your web browser (see appendix 1).
Ftp client for transferring files to the server. You also need to know how to transfer files in binary and
ascii mode (although most FTP clients doe this automatically).
If you are using UNIX of Linux based system, you need to understand chmod'ing (setting permissions to
read, write and execute files and directories). On Windows based systems you will have to use other
ways to set these permissions.
Step1. Prepare files
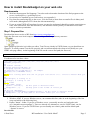
Download the latest version of RG from http://www.routegadget.net/
Unzip the files onto your local computer. You should get following directory structure:
Open /gadget/cgi-bin/reitti.cgi with a text editor. Text files are already in UNIX format, so you should not use
Notepad – it usually cannot view the file properly and can add unwanted code when saved (ideally use your
HTML web page editor). At the beginning of the file set the correct Perl path (the first row).
#!/usr/bin/perl
You then need to set three values:
## 1. Default language: (choices are currently
'ca','de','ee','en','es','fi','fr','lt','lv','no','ru','se')
$default_lang='en';
##
## Default charset:
$charset_default='ISO-8859-1';
# Language spesific charsets:
## $charset{'fi'}='ISO-8859-1'; ## example
$charset{'ru'}='WINDOWS-1251';
##
## 2. File locking (turn this off if you get lock errors or 500 errors no matter what you
do)
##
##$locking=1; # locking is on
$locking=0; # locking is off
##
## 3. Paths
## For UNIX, Linux:
$path='../kartat/';
## file path to "kartat" folder
$httppath='../';
## http path to the folder of reitti.jar
##
## For IIS (Windows):
# $path='C:/inetpub/wwwroot/gadget/kartat/'; ## file path to "kartat" folder
# $httppath='../'; ## http path to the folder reitti.jar is located
##
1. Default language
2. Windows mode. If you use Windows server, un-comment this line (take ## at the beginning of the line
away and add it to the following line).
3. Path to "kartat" –folder. If you use a Windows server, you usually need to use hard path (such
as"c:/inetpub/wwwroot/gadget/"). There are already two alternatives, one for UNIX/Linux, one for
Windows server. If you use UNIX/Linux you can usually use relative paths and the default path
'../kartat/' is correct.
Save the file.
Paul Frost
RG Installation / User Guide Mar07
Page 2
Open /gadget/cgi-bin/manager/reittimanager.cgi
Make the same settings: Perl path (first row), Windows mode and path to 'kartat'-folder and manager language.
You may also need to change the following:
When you upload map files (jpg/gif) some servers do not give read permissions to those uploaded files. If the
setting below is set to '1' (=true), the script will give those permissions. Or if it is set to '0', it will not add any
permissions to uploaded files. The default setting is ‘0’.
$RG_version='RouteGadget reittimanager.cgi version: 30.8.2006';
## Path to "kartat" -folder
##
1. Chmod
# $chmod='1'; # You can use chmod on your server (UNIX, Linux)
$chmod='0'; # You can not use chmod (windows)
##
Save the file.
Step 2 Create directory structure and copy files to the server
With your FTP client upload the directory structure to the web server. Make sure that you can execute perl
scripts in "cgi-bin” –folder and "kartat" –folder and "gadget" –folder can be seen with a web browser.
Some hosts require you to put the cgi-bin folder in a particular place on the server. If you do move it, you will
need to change the path settings to reflect the new location.
Step 3 Copy files to the server
Copy files to the server with the FTP client. Make sure that the transfer mode is set correctly for each file type:
.Extension = Mode (most FTP clients do this automatically)
- .txt = ascii
- .cgi = ascii
- .jar = binary
- .gif = binary
Step 4 Set permissions (chmod if UNIX/Linux)
- reitti.cgi chmod 755 (execute permission for all)
- reittimanager.cgi chmod 755 (execute permission for all)
- kartat –directory (!!! directory, not file) chmod 755 (read & write) *
- all files in kartat –directory chmod 755 (read & write) *
* You may not need to set these permissions, it depends on how server is configured. You can try first without
setting these.
Step 5 Test
Try opening “http://www.****/cgi-bin/reitti.cgi” (replace **** with your address) in your browser, can you
view the pre-installed event and can you save route drawings. If everything works fine try to install a new event
using demo data. If you can do that successfully, try to add an event using your own data. If you can do that
successfully, congratulations!
Step 6 Password protection
The "manager" –directory should be password protected. With UNIX/Linux you can usually use htaccess. If
you cannot use any separate password protection there is built in password protection in RouteGadget, but it is
not as reliable. If you do not know how to use htaccess, try to find help from the web with a search engine.
Paul Frost
RG Installation / User Guide Mar07
Page 3
Adding a new event
The files you will need:
1. A Raster map, a gif or jpg file of 100-200 dpi, higher resolutions will take longer to open and use more
bandwidth. Ideally, use the export option in OCAD. You can edit these files with any photo editing
software (Photoshop, Gimp etc). Aim for a file size of about 200-300KB, the dimensions should not be
much larger than 1500x1500 pixels.
2. The course data, use the XML course export from OCAD 9 or Condes.
If there are crossing points in the course file, remove them before creating the XML file. For timed
crossings see Appendix 1.
If you are using OCAD 8 do the following:
a. Step1: Move all course code numbers to default position
b. Courses > preview > Settings > default (all code texts will move to default position)
c. Step 2: Export all these control code texts (including start and finish codes) as dxf
d. Step 3: File -> export courses -> courses -> courses.txt
e. Now you should have two files: "courses.txt" and "anyname.dxf"
3. Results with split times, there are 8 different formats supported (see below). The most common one is
the SportIdent splits in CSV format (semicolon separated). This is the same format as for WinSplits.
You can export by Course or by Class. I suggest that you sort by course, as this gives the option to
compare routes with others on the same course and increases the usefullness.
For possible problems, see Appendix 1
Using RG Manager:
Open “http://www.****/cgi-bin/manager/reittimanager.cgi” in your browser (replace **** with your address).
If this is the first time RG Manager has been used you need to set up a Login & Password. Make a note of
these, as they will be needed every time you use RG Manager.
If the Login and Password have been saved successfully, you will be asked to enter them. If the system keeps
on asking for new ones, there is something wrong with the installation, check that the path to the "kartat"
directory is correct and that the write permissions in kartat directory are set to 755.
If you want to change the Login/Password, delete, using your FTP client. “uspsw.txt” in the kartat directory.
You will then be asked to set them up again next time you login.
Paul Frost
RG Installation / User Guide Mar07
Page 4
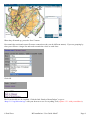
If you entered them correctly you should now see this:
Add an event.
Select “Add a new event”.
Select the file types that you wish to upload, click OK.
Paul Frost
RG Installation / User Guide Mar07
Page 5
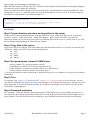
Fill in the event details and select the map source (new map / pre installed map) and browse to where the files
are located on your computer, repeat this for the results and course data. Choose if you want to group
competitors by class or course (you can’t change this later).
Click OK.
The data is now processed. Next, click on the link to adjust the placement of controls on the map.
Paul Frost
RG Installation / User Guide Mar07
Page 6
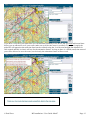
Positioning the controls on the map.
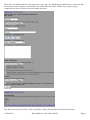
From Class/course menu select “All Controls”
You should now see all the controls on the map. Zoom out using the + & - buttons to make sure you can see all
the controls.
Now loop through the next steps until all the controls are in the correct positions.
1. Press "Fit" button
2. Click at one control on the top left side
3. Click at the correct position of that control
4. Click at one control on the bottom right side
5. Click at the correct position of that control
Controls should move to the new position. Repeat steps 1-5 until all the controls are at the right position. This
can sometimes take 5-6 attempts. If you get it almost right but then it doesn’t respond to moving a tiny amount,
try moving it a bit further away and then try again.
Note:
You can zoom and drag the map while taking these steps. If something goes wrong, you can start adjusting
from the beginning by reloading the page in your browser.
Paul Frost
RG Installation / User Guide Mar07
Page 7
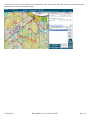
When they all match up, press the “Save” button.
Now match the result and course file name connections (they can be different names). If you are grouping by
class you will have a longer list and need to match the course to each class.
Click OK.
The Event should now be installed. Click the link “Back to RouteGadget” or go to:
“http://****/cgi-bin/reitti.cgi” with your browser to see if everything is ok (replace **** with your address).
Paul Frost
RG Installation / User Guide Mar07
Page 8
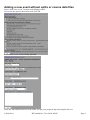
Adding a new event without splits or course data files
Select “Add a new event” from the main Manager menu
Now select the options show below and click OK.
You can also re-use a map already uploaded.
Name the map and then browse to the folder you put your prepared map and complete the rest.
Paul Frost
RG Installation / User Guide Mar07
Page 9
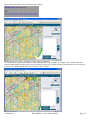
Now you need to add a course and draw the controls.
Select “Draw new course” and enter a course name in the box.
Use the mouse to point to the location of the start and left click, a triangle will appear. Now point to the first
control location and left click and a circle will appear. Repeat for all the controls, the last one you select will be
converted to a finish symbol after you click the “Save” button.
Paul Frost
RG Installation / User Guide Mar07
Page 10
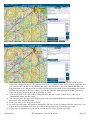
You can either enter another course or select “Manager Logout” to start using RG to record routes.
When you Logout you will see this:
Select “Back to RouteGadget” to start recording routes.
Select the event you want to use and the RG map page will open.
Select the course that you want to view.
Paul Frost
RG Installation / User Guide Mar07
Page 11
Click “Draw your route”, select the course used and enter a name.
•
•
•
•
•
•
Draw your route from the starting point to the first control by clicking the left mouse button in places
where you changed direction. (The program will create a continuous route between these points that you
plot.) Your route is drawn in red. The blue line shows the direction to your next control and there is a
halo round the circle. When you have created a point close to the centre of the ring marking the control,
the Blue line switches to the next control. If you make a mistake while plotting the points, you can go
back one or more points at any time by clicking on "undo".
Snap on/off, turn it off if you want to plot points near the centre of the control circle, otherwise it
automatically snaps it to the centre.
You can also move the map while drawing your route: Press and hold the left mouse button and move
the mouse in the desired direction.
Draw your entire route from start to finish.
In some cases the routes will speak for themselves, but there is also a comment field for you to use. You
can write to the comment field when you think of things while you are drawing your route.
If you make a mistake before you save it you can use the “Undo” button to go back.
Paul Frost
RG Installation / User Guide Mar07
Page 12
If you have a record of your split times you can add them manually in the boxes, but you must add a total time
before you are allowed to save your route (make one up if the time wasn’t recorded). If you don’t supply the
splits RG will apportion the total time between the controls using the % of the total straight-line distance for
each control and this is what it will use for the animation feature. As long as there is a finish (total) time entered
you will be allowed to save the route, but obviously the animation feature will not work.
Click the “Save” button when you have finished.
Paul Frost
RG Installation / User Guide Mar07
Page 13
You can now view the route and watch an animated re-run. You need to have the actual recorded splits for the
animation to be very meaningful though.
Paul Frost
RG Installation / User Guide Mar07
Page 14
Viewing / adding routes
You should now see a list of the events available to view.
Select the event that you want to look at and after a few seconds you may see the Java logo appear.
RG is a Java applet and Java must be installed for RG to work. If you don’t already have it on your computer
you may be asked if you want to download it. Java is used in a lot of web applications and very common on
mobile phones. You can find out more by visiting http://www.java.com.
So now you should see something like below.
Click in the dropdown menu to view the courses. The number in brackets after the course name indicates how
many routes have been added so far. You can select one to view the course controls. If you want to add your
own route, follow these instructions.
Paul Frost
RG Installation / User Guide Mar07
Page 15
Adding a route:
•
•
•
•
•
•
•
•
Check the box "Draw your route", which is located in the top-right corner of the screen.
Choose your class and name from the lists that appear when you click the box. Locate the starting point
(the triangle) on the map. You can move the map around by pressing and holding down the left mouse
button somewhere on the map while moving the mouse in the desired direction. You can also zoom in
using the + & - buttons on the right.
Draw your route from the starting point to the first control by clicking the left mouse button in places
where you changed direction. (The program will create a continuous route between these points that you
plot.) Your route is drawn in red. The blue line shows the direction to your next control and there is a
halo round the circle. When you have created a point close to the centre of the ring marking the control,
the Blue line switches to the next control. If you make a mistake while plotting the points, you can go
back one or more points at any time by pressing "undo".
Snap on/off, turn it off if you want to plot points near the centre of the control circle, otherwise it
automatically snaps it to the centre.
You can also move the map while drawing your route: Press and hold the left mouse button and move
the mouse in the desired direction.
RG spreads your time out evenly along the route that you draw for each leg. This may not be accurate,
particularly if you had trouble with any part of the leg. If you wandered around in some location make
sure to include a lot of fine detail in your drawing, even if you don't know exactly where you were. This
will appear to slow the animation in that area (and not on the part of the leg where you did well). You
can also artificially introduce a pause if, for example, you stood for a minute relocating. You can show
this by creating a small tick mark across your route and oscillated back and forth in place on the tick
mark for a while when you are drawing the route. Then the animation will also appear to pause at the
same location. You can also press the +3sec button once or more to add your thinking time at a
particular point (these points are displayed when viewing routes).
Draw your entire route from start to finish.
In some cases the routes will speak for themselves, but there is also a comment field for you to use. You
can write to the comment field when you think of things while you are drawing your route. This can be
particularly helpful for beginners looking at the animations and wondering what was going on. Was the
route planned or accidental? If it was planned, what was the thinking? Make sure to include the leg
number in the comment since the comment is associated with the entire course. For example:
•
•
•
•
•
1-2: Aimed for the fence corner to use it as an attack point.
4-5: Accidentally drifted much lower than planned. Saw the road and turned.
5-6: The undergrowth seemed much slower than mapped. So I switched to the stream bed for a
faster route.
9-10: Was planning to use the trail bend to attack, but found the boulder and used that instead.
If you make a mistake before you save it you can use the UNDO button to go back. The RouteGadget
administrator can remove your route if you realize that you made a drawing mistake after having saved
it.
Import from GPS:
You can also import a route recorded on your GPS. There are 5 different formats offered. Click the GPS button
at the top right of the page, there is a help button on the GPS import page that links to the developers website:
http://www.routegadget.net/grgpshelp/ This provides very detailed guidance through the process.
Your GPS route can be in addition to you manually plotted route. As the GPS route does not register the
individual control splits your time is averaged out over the whole course for the animation. It can also be
interesting to plot your route from memory then upload your GPS one and see how good you memory is!
Paul Frost
RG Installation / User Guide Mar07
Page 16
Viewing routes:
RG is quite intuitive and easy to use. Here's a short summary to give you a quick start:
•
•
•
•
•
•
•
•
•
First you need to select an event.
To view a race animation, you need to “Choose class/course” to select the course you want to view.
You can move the map around by pressing and holding down the left mouse button somewhere on the
map while moving the mouse in the desired direction. Now, locate the start triangle.
Next, “Choose competitors” whose routes you would like to view. Select up to 10 people who have
drawn their route (those with a '*' at the start of the name).
To start the animation, press “View animation” button, select “Mass start” option (on by default), and
press 'Start' button. Small squares representing the different competitors should start from the triangle.
During the animation you can move and zoom the map. You can also increase/decrease the animation
speed with “Speed + / Speed -“ buttons.
You can also view the competitors' routes, splits, and comments by clicking on “Show route”.
“Smooth scaling” improves the quality of the image when you zoom out.
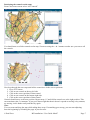
If the competitors have been grouped by class you can still view routes plotted on the same course but in
a different class by selecting “All classes” in the dropdown menu. This will show a list of all the
competitors who have plotted their route, just select people that were on the same course. The map will
show all the controls from all courses, then view the routes and the animation.
An example showing several routes and the course.
Paul Frost
RG Installation / User Guide Mar07
Page 17
Appendix 1, Possible problems
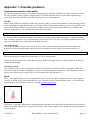
Controls removed from the splits:
RG will have problems if there was a timed crossing point or a faulty control that is removed from the results.
The files that RG creates contain a string of times in seconds from the start for each control, separated by a
semi-colon. It depends on the event software being used as to what happens.
OE2003
Removes the split time completely, and so the sequence in RG is missing one number. So the following control
times are brought forward and then there is one short. This is because the number of controls expected for each
course came from the XML course data file and that is what is shown on the map. Below is an example line
from the “kilpailijat.txt” file (found in the kartat directory folder):
2|1|Course 1|Thomas Wilson|6060|||18:06|72;145;314;452;655;773;893;1052;1086
You can just edit the file for the runners concerned by inserting a time for the missing one. If the third control
time is missing just insert 225; (a guessed time) between 145; and 314;. Now everything should work fine, but
you need to do this before people start plotting their routes.
Aut-O-Download
Leaves the excluded control in but gives it the same time as the previous control. This allows routes to be
plotted ok, but the animation stops when it gets to the offending control. Below is how that would look:
2|1|Course 1|Thomas Wilson|6060|||18:06|72;145;145;314;452;655;773;893;1052;1086
Here you just need to change the repeated time to 225 (a guessed time).
*Note: Ideally you should use a text editor (use your HTML web page editor) to edit these files as Word can
corrupt the formatting.
Alternative option
You could also remove the crossing point from the OACD/Condes course file before creating the XML file.
The control numbers on RG would then be out by one from that point on compared to the competitors map. As
long as you explain this to people before you send them to RG this should be ok.
Java:
RG is a Java applet and Java must be installed for RG to work. If you don’t already have it on your computer
you may be asked if you want to download it. Java is used in a lot of web applications and is very common on
mobile phones. You can find out more by visiting http://www.java.com.
Sometimes, if you have spent a bit of time going backwards and forwards on RG the map fails to load and get a
blank screen with “applet error” at the top left of the screen. If this happens, close down your browser and then
start it up again.
Paul Frost
RG Installation / User Guide Mar07
Page 18
Copyright
RouteGadget software copyright.
Copyright (c) 2003-2007 Jarkko Ryyppö - All Rights Reserved.
Software by: Jarkko Ryyppö
Distributed by: [email protected]
The software is free for non-commercial use.
The software can be used only for purposes related to the sport of orienteering.
This program comes as it is. Use it at your own risk.
This is software with ABSOLUTELY NO WARRANTY.
This program is distributed in the hope that it will be useful, but WITHOUT ANY WARRANTY; without even
the implied warranty of FITNESS FOR A PARTICULAR PURPOSE.
Developers of this software are not responsible for what the user does with help of this software.
THE USER MUST NOT USE SOFTWARE FOR ILLEGAL ACTIONS.
By installing and/or using our software, you agree with these terms of use.
Paul Frost, Route Gadget UK copyright
I have compiled this information from existing published material and new content written by me.
There is no intention of me profiting from the software written by Jarkko.
I am just providing an easy means to use his software and increase the use of RouteGadget in orienteering.
No liability is accepted for any loss of data that may occur whilst using it. You should always back-up
important files before use.
www.routegadget.co.uk
Paul Frost
RG Installation / User Guide Mar07
Page 19