1
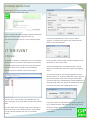
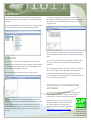
Document number: 3353
Version: 01
Date: Sept/2012
Retriever Recreator
SOFTWARE USER MANUAL
INTRODUCTION
Punch data transmitted by an Eider unit is sent to the
GPProjects servers, where it is stored in databases ready
for viewing by results / commentary / safety software.
The retriever and recreator software are provided to
retrieve the data stored on the GPProjects servers and
recreate a serial stream to a PC as if the timing hardware
was physically connected. This makes it suitable for
connecting into event commentary software.
BEFORE THE EVENT
SET UP EIDER ACCOUNT
Request an account on the GPProjects server, by contacting [email protected], if you don’t already have one.
Browse to http://eider.gpprojects.net/cpanel/ and login using the credentials supplied.
YOUR LOGIN DETAILS:
Username:
Password:
From the main page, select ‘update profile’ to amend your user name and password for logging on to the website.
Also in the ‘update profile’ page you will find the ‘API Key’, which you will need later in this process. The
API key can be amended to something more memorable should you wish.
CONFIGURE ACCESS TO DATA FROM RETRIEVER RECREATOR FOR YOUR EVENT
From the main menu select ‘Remote Data Access Rules’
Choose ‘Add new rule’
The ‘HTTP Post’ parameter defines if raw ‘packet’ data
(serial stream) or processed ‘punch’ data (interpreted
information) should be retrieved. For use with Receiver
Recreator, this should be ‘packet’
The optional ‘Event’ parameter allows you to push data
to event configuration (not necessary with Retriever
Recreator).
Repeat for each Eider control in use for your event.
CHECKING THE STATUS OF RADIO
CONTROLS
From the main menu select ‘Remote Data Access Rules’
The ‘serial number’ is the IMEI for GPRS data – i.e. a
unique number on the Eider which can be found on the
label below the LCD screen.
The “Action Status” view will show you a table of the
heartbeat records received from your radio control unit.
For example the battery status and location can be
viewed here.
The “Action Punch” view will show you a table of the
punch records in UTC received from your radio control
unit. This will show the control code and the chip (dibber
/ EMIT brick) number.
In the ‘name’ field you should provide your own term to
identify the rule.
The ‘Start…’ and ‘Stop Date Time’ are hard limits of the
time period you want to view data from. Select times
(UTC) which cover the duration of your event but
prevent data from other events contaminating your data
set. Remember to reset the ‘Start Date Time’ if you run
system tests ahead of your live event.
Provide a URL (e.g. your own web server) if you want the
GPProjects server to send new data as soon as new data
arrives. This reduces latency.
Test your system by turning on your Eider, attaching a
radio control, and punching the control. You should see
the Eider status & punch data appear on the “Action
status” and “Action punch” views, respectively, after a
few minutes.
SOFTWARE INSTALLATION
Download the file Ospreyinstaller.msi from the
GPProjects website downloads page.
This is a windows installer package, and will install both
Retriever and Recreator programs when run.
They will install under “Osprey” in the ‘Start>Program’
menu.
From the ‘Radio Controls’ menu, choose ‘add to
register’, or click the plus sign in the ‘Radio Controls’
panel on the left hand side.
AT THE EVENT
RETRIEVER
The retriever software is designed to run on a computer
with an internet connection. This software will connect
to the GPProjects servers and retrieve any data stored
there. This data is then stored in a local database.
Start the retriever software from the start menu
Enter the Eider serial number as before. Repeat for all
the Eiders in use at your event.
Each unit will appear in the “Radio Controls” panel.
Make sure all the Eider units have a green tick against
them.
You are now ready to start retrieving data from your
devices. Select ‘on’ from the ‘Subscribe’ menu. You will
be presented with a date time dialog to select when
you want data to be collected from. This will default to
the beginning of the day, which we would recommend
you use unless you have a good reason not to.
From the “File” menu create a new database for the
event, saving the ‘control.db’ file in a new event specific
folder.
From the “Edit” menu configure the server settings, or
click the tool icon in the “Radio Controls” panel. Make
sure your API key matches the one on your Eider
account.
If you don’t want to collect data from Eider at any time
(e.g. all data has been collected from this unit), select
the Eider number then click the red button
at the top of the panel to turn off this
connection.
The “Server read” count at the bottom of the Retriever
window will increase even if there is no new data to be
retrieved.
Retrieved data packets can be observed in the right hand
tree view. Eider units with new data will be bolded
RECREATOR
The Recreator software is designed to connect to the
database created by the Retriever software and produce
a serial datastream that feeds into timing software as if
the control was plugged in directly.
Start the Recreator software from the start menu.
In the port settings tab, bottom left, choose the
SportIdent or EMIT packet format and the COM port to
be used for the recreated data stream, then click the
‘open’ button.
Next, click the forward arrow icon (“Start Recreation”)
in the database selection panel to start outputting the
data.
You can see the details of the packets recreated over
the serial interface at the bottom of the Recreator
window.
Once the data has been recreated, it does not need to
be recreated again. So, if Recreator is accidentally
closed and reopened, data that has already been
recreated will not appear again, but it will still be seen
in the commentary software.
INTERFACING TO COMMENTARY
SOFTWARE
This serial port created by Recreator needs to be
connected back into the computer running the
commentary software using a null modem.
From the “Database” menu select ‘add new database’.
Browse to the database created from Retriever. This will
pull through the Eider details from Retriever into the
Database Selection panel. You will need to select the
databases for each of the radio controls you want to
recreate.
Alternatively you can use virtual null
modem software such as that written
by eltima to do this on computers
without physical serial port interfaces:
www.eltima.com/products/vspdxp/
8 Fredrick Sanger Road
Surrey Research Park
Guildford, GU2 7YD
Tel: +44 (0) 1483 685200
Fax: +44 (0) 1483 685201