1
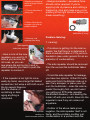
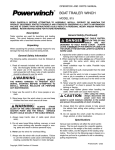
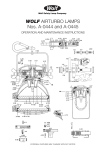
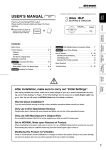
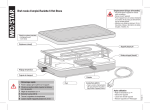
FITTING & TROUBLESHOOTING GUIDE:
SIDE REPEATERS
Generally speaking, fitting lights isn’t
that complicated; then again, anything’s
easy if you know how! This little guide
provides some general tips for fitting
various types of aftermarket lights, and
also what to look for to try and resolve
a problem if things don’t go according
to plan.
It won’t make you an auto electrician
overnight, nor does it claim to cover
every possibility, but if you’re not sure
where to start, it will certainly give you
some ideas to work with.
Before you begin, please note that
working on a car’s electrical system
can be dangerous – both to you and
the car. If you are in any doubt about
your ability to follow any of the techniques detailed below – don’t! Rather
seek professional assistance. This
leaflet is offered as a guide only, and
we cannot accept any responsibility if
something you attempt goes wrong.
Side Repeater with screw fitment
Fitting tips:
• Most side repeaters are easy to remove and don’t require a great deal of
force. Some of the early BMW side repeaters have a single retaining screw
which must be reSide Repeaters showing
moved, and the
spring clip (A) and fixed
clip (B)
other side of the
repeater unclipped
from the wing, but
almost all current
side repeaters
have a fixed clip
on one side and a spring clip (either
metal or plastic) on the other.
The repeater is removed by pushing
it in the direction of
the spring clip (i.e.
from the fixed clip side). This allows
the spring clip to compress, and the
fixed clip then
releases from the
wing so the repeater can be
pulled gently outwards and removed.
Sequence showing removal of a typical side
repeater:
1
1. Push in direction of
spring clip;
2
2. When fixed clip disengages, pull side repeater outward;
3
3. Remove side
repeater from wing
Side repeater
bulbholder removal
• Have a look at the new
repeaters you want to fit
before you remove the
old ones, so you can
see where the spring clip is and in
which direction you need to push the
repeater to remove it.
• If the repeater is too tight to move
easily by hand, use a large flat-bladed
screwdriver, but wrap a soft cloth round
the tip several times so
that the chance of
scratching or damaging anything is
minimized.
Side repeater
testing via
time-honoured method
• Always remember - excessive force
should not be required. If you’re
applying lots of pressure and nothing’s
happening, stop and make sure you’re
pushing in the right direction before you
break something!
Problem Solving:
Side repeater
bulbholder & o-ring
1. Leaking:
• If moisture is getting into the side repeater, the first thing is to determine if
there is actually a leak or if it’s just condensation (see under general for an explanation of condensation).
• The side repeater should be removed
from the car and the bulbholder taken
off.
• To test the side repeater for leakage,
you have two options: Either fill it with
water and hold it bulbholder side up to
see if any escapes; or place your lips
over the bulbholder - clean the side repeater thoroughly first, we don’t want
you getting an STD (side repeater
transmitted disease) – and sealing the
holder off with your mouth, blow into the
repeater to see if any air comes out
anywhere.
• If either of the above tests prove
negative, the side repeater itself is not
faulty, and the problem is either just
condensation or a problem with the
seal/o-ring between the bulbholder and
the repeater.
The basic scientific explanation is this:
There is always some moisture in the
air, and warm air can hold more mois• Check the bulbholder and ensure that ture than cold air. When the air inside
it is not damaged in any way, that it fits the light unit – which is warmed by the
the repeater securely (and has been fit- heat from the bulbs – touches the inted correctly and turned all the way until side of the lens (which is at a lower
it locks - but don’t overtighten as damtemperature because it is in contact
age can result) and that the o-ring/ seal with the colder air outside), the layer of
is not damaged or missing.
air against the inside of the lens cools
down as well, and as a result it can no
longer retain the moisture it is holding,
2. Item doesn’t fit:
which is deposited on the inside of the
lens to form condensation.
• This is usually because you have the
wrong part for the car (doh!), either be- The condensation will only disappear
cause it has been ordered or supplied
once the air inside the light unit warms
incorrectly. Double check the fitment
up enough to absorb the moisture
details in the catalogue listing and con- again, and in winter this can take some
tact your dealer for clarification if you’re time.
unsure.
Condensation is NOT indicative of a
fault with a light unit, and as such it isn’t
GENERAL INFORMATION
accepted as a reason for a warranty return.
• Know your left from your right: References to left-hand & right-hand are as
Condensation occurs in original equipviewed by someone sitting in the
ment lights as well, but aftermarket
driver’s seat.
lights often have clear lenses without
any patterns, so the condensation is
• What exactly IS condensation? Con- more obvious. On a patterned original
densation is caused by water vapour in equipment lens it might not be visible at
the air. The moisture on the windows in- all unless one looks closely.
side your house in winter is condensation – and when that happens, you
don’t start looking for leaks in your windows do you? (You’ll be a long time if
While the above information is offered in good
you do). In exactly the same way, con- faith and is believed to be correct, neither
AutoArt nor any of its dealers can accept any redensation inside a light unit is hardly
sponsibility for any consequences, howsoever
ever caused by a leak.
caused, resulting from the application of any of
the information detailed in this leaflet.
Copyright 2009 AutoArt Styling Limited.
Unauthorised duplication/distribution prohibited.