1
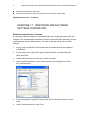
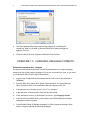
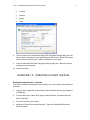
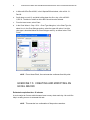
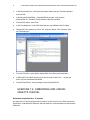
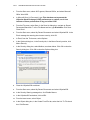
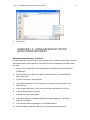
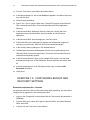
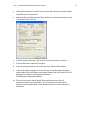
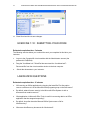
LAB 7
TROUBLESHOOTING OFFICE
APPLICATIONS
This lab contains the following exercises and activities:
■
Exercise 7.1: Restoring Default Menu Settings in Word 2003
■
Exercise 7.2: Removing Unneeded Components from Microsoft Office
■
Exercise 7.3: Changing Language Formats
■
Exercise 7.4: Creating a Chart in Excel
■
Exercise 7.5: Creating and Modifying an Excel Macro
■
Exercise 7.6: Embedding and Linking Objects in Excel
■
Exercise 7.7: Opening and Repairing an Office File
■
Exercise 7.8: Using Microsoft Office Application Recovery
■
Exercise 7.9: Configuring Backup and Recovery Settings
■
Exercise 7.10: Submitting Your Work
■
Lab Review Questions
■
Lab Challenge: Linking and Embedding Objects in PowerPoint
BEFORE YOU BEGIN
■
Start the Server virtual machine
■
Once the Server virtual machine is fully started, start the Computer01 and Computer02 virtual
machines
SCENARIO
You are with technical support at Contoso, a small stock brokerage. It is your job to help
employees with day-to-day issues with their computers and applications. The company has
recently upgraded to the Microsoft Office System.
After completing this lab, you will be able to:
■
Restore default settings for menus and toolbars
■
Add or remove components of Office 2003
■
Change language settings in Office 2003
■
Create and modify macros in Office 2003
1
2
SUPPORTING USERS AND TROUBLESHOOTING DESKTOP APPLICATIONS ON WINDOWS XP
■
Embed and link objects in Office 2003
■
Recover documents and configure backup and recovery settings in Office 2003
Estimated lesson time: 90 minutes
EXERCISE 7.1: RESTORING DEFAULT MENU
SETTINGS IN WORD 2003
Estimated completion time: 5 minutes
An employee has been assigned to a new department, but is keeping the same office and
computer. The old department customized the menus in Microsoft Office Word 2003, but the
new department uses the default menus. You need to reset the menus to their default
settings.
1.
Log on to the Computer02 virtual machine with the Student account (the password
is Pa$$w0rd).
2.
From the Start menu, select All Programs, Microsoft Office, and select Microsoft
Office Word 2003.
3.
In Microsoft Word, from the Tools menu, select Customize.
4.
In the Customize dialog box, in the Commands tab, in the Categories list, select
File, as shown below.
5.
In the Commands list, drag Web Page Preview into the File menu and drop it under
Close.
6.
In the Customize dialog box, click Close.
LAB 7: TROUBLESHOOTING OFFICE APPLICATIONS
7.
From the Tools menu, select Customize.
8.
In the Customize dialog box, in the Commands tab, click Rearrange Commands.
9.
In the Rearrange Commands dialog box, under Choose A Menu Or Toolbar To
Rearrange, verify that Menu Bar is selected. In the drop-down list adjacent to Menu
Bar, verify that File is selected. Click Reset.
3
10. In the Reset Toolbar message box, click OK. Note that the Preview Web Page
command has been removed from the File menu.
11. Close all open windows and programs. Do not save changes.
EXERCISE 7.2: REMOVING UNNEEDED
COMPONENTS FROM MICROSOFT OFFICE
Estimated completion time: 5 minutes
An employee doesn’t want unneeded components of Office installed, to save disk space and
reduce clutter on the Start menu. However, if she does need to use those components in the
future, she wants them available.
1.
Log on to the Computer02 virtual machine with the Administrator account (the
password is Pa$$w0rd).
2.
From the Start menu, select Control Panel.
3.
In Control Panel, double-click Add Or Remove Programs (switch to Classic view if
necessary).
4.
In the Add Or Remove Programs window, in the Currently Installed Programs scroll
window, select Microsoft Office Professional Edition 2003. Click Change.
5.
In the Microsoft Office 2003 Setup Wizard, on the Maintenance Mode Options
page, verify that Add Or Remove Features is selected and click Next.
6.
On the Custom Setup page, select the Choose Advanced Customizations Of
Applications check box. Click Next.
7.
On the Advanced Customization page, click the Microsoft Office Publisher node
drop-down list, as shown below. Select Installed On First Use. Click Update.
4
SUPPORTING USERS AND TROUBLESHOOTING DESKTOP APPLICATIONS ON WINDOWS XP
8.
The Now Updating Office page measures the progress of uninstalling the
component. When it is finished, a Microsoft Office 2003 Setup message box
appears. Click OK.
9.
Close the Add Or Remove Programs window and Control Panel.
EXERCISE 7.3: CHANGING LANGUAGE FORMATS
Estimated completion time: 5 minutes
An employee that translates Microsoft PowerPoint presentations into foreign languages
needs to be able to edit multiple languages. You are not sure how this is done, so you need
to use Microsoft Office Online Help to find a method.
1.
Log on to the Computer02 virtual machine with the Test account (the password is
Pa$$w0rd).
2.
From the Start menu, select All Programs, Microsoft Office, and select Microsoft
Office PowerPoint 2003. If the User Name dialog box appears, click OK.
3.
If the task pane is not present, press CTRL + F1 to activate it.
4.
In the task pane, in the drop-down list at the top, select Help.
5.
In the Assistance section, in the Search For text box, type language format.
6.
In the Results From Office Online scroll window, select Enable Editing Of Multiple
Languages In Office Programs.
7.
On the Enable Editing Of Multiple Languages In Office Programs help page, follow
steps 1 through 4 and add the following languages.
LAB 7: TROUBLESHOOTING OFFICE APPLICATIONS
❑
Croatian
❑
Galician
❑
Kyrgyz
❑
Tatar
8.
Take a screen shot of the Microsoft Office 2003 Language Settings dialog box, like
the one above, and paste it into a WordPad document saved in Shared Documents
with the name YourName Lab 7, where YourName, is your name.
9.
Close the Microsoft Office 2003 Language Settings dialog box, dismissing the two
message boxes that appear.
10. Close PowerPoint.
EXERCISE 7.4: CREATING A CHART IN EXCEL
Estimated completion time: 5 minutes
This chart is created to demonstrate macro creating, use, and editing in the subsequent
exercises.
1.
Log on to the Computer02 virtual machine with the Student account (the password
is Pa$$w0rd).
2.
From the Start menu, select All Programs, Microsoft Office, and select Microsoft
Office Excel 2003.
3.
From the File menu, select Open.
4.
Navigate to Shared Documents\share\Lab 7. Open the Lilliputian500 Microsoft
Excel worksheet.
5
6
SUPPORTING USERS AND TROUBLESHOOTING DESKTOP APPLICATIONS ON WINDOWS XP
5.
In Microsoft Office Excel 2003, in the Lilliputian500 worksheet, click cell A4: 31Dec-69.
6.
Scroll down to row 413, and while holding down the SHIFT key, click cell B413:
1,252.33. The block of cells from A4 to B413 should now be selected.
7.
From the Insert menu, select Chart.
8.
In the Chart Wizard – Step 1 Of 4 – Chart Type dialog box, in the Chart Type list,
select Line. In the Chart Subtype section, select the upper left option: Line (the
chart type is described below the Chart Subtype section), as shown below. Click
Finish.
NOTE Do not close Excel; the next exercise continues from this point.
EXERCISE 7.5: CREATING AND MODIFYING AN
EXCEL MACRO
Estimated completion time: 20 minutes
A stock analyst at Contoso adds the same items to many charts each day. He would like
help in creating a macro to automate this task.
NOTE This exercise is a continuation of the previous exercise.
LAB 7: TROUBLESHOOTING OFFICE APPLICATIONS
Creating a Macro in Excel
1.
Select the plot line in the chart by clicking it.
2.
From the Tools menu, select Macro, and select Record New Macro.
3.
In the Record Macro dialog box, in the Macro Name text box, type Trendliner. In
the Shortcut Key text box, type t, as shown below. Click OK.
4.
Right-click the plot line and select Add Trendline.
5.
In the Add Trendline dialog box, in the Type tab, under Trend/Regression Type,
verify that Linear is selected and click OK.
6.
Right-click the plot line and select Add Trendline.
7.
In the Add Trendline dialog box, in the Type tab, under Trend/Regression Type,
select Moving Average. In the Period text box, type 180. Click OK.
8.
Right-click the plot line and select Add Trendline.
9.
In the Add Trendline dialog box, in the Type tab, under Trend/Regression Type,
select Moving Average. In the Period text box, type 130. Click OK.
10. Right-click the plot line and select Add Trendline.
11. In the Add Trendline dialog box, in the Type tab, under Trend/Regression Type,
select Moving Average. In the Period text box, type 60. Click OK.
12. On the Stop Recording toolbar, click the Stop Recording button (the small square).
13. Click a blank area in the chart and press DELETE. This deletes the chart.
14. Re-create the chart according to steps 5 through 8 in Exercise 7-4.
Editing a Macro in Visual Basic
The following steps instruct you how to modify a macro in Visual Basic.
1.
From the Tools menu, select Macro and select Macros.
7
8
SUPPORTING USERS AND TROUBLESHOOTING DESKTOP APPLICATIONS ON WINDOWS XP
2.
In the Macro dialog box, verify that in the Macro Name text box Trendliner appears
and click Edit.
3.
In the Microsoft Visual Basic – Lilliputian500.xls window, verify that the
Lilliputian500.xls – Module1 (Code) window is the active window.
4.
From the Edit menu, select Find.
5.
In the Find dialog box, in the Find What text box, type 130 and click Find Next.
6.
Change the found instance of 130 to 120, as shown below. Click Cancel to close
the Find dialog box.
7.
From the File menu, select Save Lilliputian500. Close Microsoft Visual Basic.
8.
In Microsoft Excel, select the plot line in the line chart. Press CTRL + T to play the
macro you just recorded and modified.
9.
Close Microsoft Excel, saving changes to the Lilliputian500 file.
EXERCISE 7.6: EMBEDDING AND LINKING
OBJECTS IN EXCEL
Estimated completion time: 15 minutes
An employee at Contoso has been told to embed, not link objects in her Office documents.
She doesn’t understand the difference and has asked you to demonstrate how they behave
differently.
LAB 7: TROUBLESHOOTING OFFICE APPLICATIONS
1.
From the Start menu, select All Programs, Microsoft Office, and select Microsoft
Office Word 2003.
2.
In Microsoft Word, in Document1, type This data does not represent the
Lilliputian Stock Exchange (LPSE) performance as a whole, nor is it an
indicator of future performance of any part of the LPSE.
3.
From the File menu, select Save. In the Save As dialog box, navigate to Shared
Documents\Share\Lab 7. In the File Name text box, type Disclaimer. Click Save.
Close Word.
4.
From the Start menu, select My Recent Documents and select Lilliputian500. In the
Excel message box warning about macro security, click OK.
5.
In Excel, from the Tools menu, select Options.
6.
In the Options dialog box, in the Security tab, in the Macro Security section, click
Macro Security.
7.
In the Security dialog box, select Medium, as shown below. Click OK to close the
Security dialog box. Click OK to close the Options dialog box.
8.
Close the Lilliputian500 worksheet.
9.
From the Start menu, select My Recent Documents and select Lilliputian500.
10. In the Security Warning message box, click Enable Macros.
11. In the Lilliputian500 worksheet, click cell D4.
12. From the Insert menu, select Object.
13. In the Object dialog box, in the Create From File tab, select the Link To File check
box. Click Browse.
9
10
SUPPORTING USERS AND TROUBLESHOOTING DESKTOP APPLICATIONS ON WINDOWS XP
14. In the Browse dialog box, navigate to Shared Documents\Share\
Lab 7. Select Disclaimer and click Insert.
15. In the Object dialog box, click OK.
16. In the Lilliputian500 worksheet, click cell D7.
17. From the Insert menu, select Object.
18. In the Object dialog box, in the Create From File tab, ensure that the Link To File
check box is cleared, and click Browse.
19. In the Browse dialog box, select Disclaimer and click Insert.
20. In the Object dialog box, click OK.
21. From the Start menu, select My Recent Documents and select Disclaimer.
22. In the very beginning of the text, type Warning:. The text should now read:
Warning: This data does not represent the Lilliputian Stock Exchange (LPSE) as a
whole, nor is it an indicator of future performance of any part of the LPSE.
23. Press CTRL + S to save the Disclaimer document.
24. On the taskbar, click Microsoft Excel – Lilliputian500.
QUESTION What is the difference between the text inserted with the Link To
File check box selected?
25. Close all open windows, saving the changes to the Lilliputian500 worksheet.
EXERCISE 7.7: OPENING AND REPAIRING AN
OFFICE FILE
Estimated completion time: 5 minutes
You have received a corrupted Word document from an employee. You need to repair the
document.
1.
From the Start menu, select All Programs, Microsoft Office, and select Microsoft
Office Word 2003.
2.
In Word, from the File menu, select Open.
3.
In the Open dialog box, navigate to Shared Documents\share\ Lab 7\
4.
Select Disclaimer, but do not click Open. Instead, click the small, downward-pointing
triangle on the Open button, as shown below. Select Open And Repair.
LAB 7: TROUBLESHOOTING OFFICE APPLICATIONS
5.
11
Close Word.
EXERCISE 7.8: USING MICROSOFT OFFICE
APPLICATION RECOVERY
Estimated completion time: 15 minutes
An employee was using Word with a macro given to her by a friend. Unfortunately, the macro
has caused Word to stop responding. You need to recover the application enough to save
her data.
1.
Log on to the Computer02 virtual machine with the Student account (the password
is Pa$$w0rd).
2.
From the Start menu, select All Programs, Microsoft Office, and select Microsoft
Office Word 2003.
3.
From the Tools menu, select Options.
4.
In the Options dialog box, in the Security tab, in the Macro Security section, click
Macro Security.
5.
In the Security dialog box, in the Security Level tab, select Medium. Click OK.
6.
In the Options dialog box, click OK.
7.
From the File menu, select Open.
8.
In the Open dialog box, navigate to Shared Documents\share\Lab 7. Select Bad
Macro and click Open.
9.
In the Security Warning message box, click Enable Macros.
10. In the Bad Macro document, after Text:, type some text and press ENTER.
12
SUPPORTING USERS AND TROUBLESHOOTING DESKTOP APPLICATIONS ON WINDOWS XP
11. From the Tools menu, select Macro and select Macros.
12. In the Macros dialog box, ensure that BadMacro appears in the Macro Name text
box, and click Run.
13. Word will stop responding.
14. Press CTRL + ESC to open the Start menu. Select All Programs, select Microsoft
Office, select Microsoft Office Tools, and select Microsoft Office Application
Recovery.
15. In the Microsoft Office Application Recovery dialog box, ensure that in the
Application section Microsoft Office Word is selected, and click Recover
Application.
16. In the Microsoft Office Word message box, click Don’t Send.
17. A Microsoft Office Word message box appears and indicates the progress of
recovering your document. After this, Word is launched automatically.
18. In the Security Warning dialog box, click Disable Macros.
19. The Bad Macro document should appear with the text you added plus the line
“Microsoft Word will now stop responding.” On the left, the Document Recovery
toolbar has automatically opened.
20. In the Document Recovery pane, in the Available Files section, click the small,
downward-pointing arrow on the Bad Macro [Recovered] button and select Save
As.
21. In the Save As dialog box, in the File Name text box, type YourName Lab7Recovered. Click Save.
22. Close Word.
EXERCISE 7.9: CONFIGURING BACKUP AND
RECOVERY SETTINGS
Estimated completion time: 5 minutes
An employee has lost a number of files when Word stops responding. He wants Word
configured to be aggressive in document preservation.
1.
Log on to the Computer02 virtual machine with the Test account (the password is
Pa$$w0rd).
2.
From the Start menu, select All Programs, Microsoft Office, and select Microsoft
Office Word 2003.
3.
In Word, from the Tools menu, select Options.
LAB 7: TROUBLESHOOTING OFFICE APPLICATIONS
4.
In the Options dialog box, in the Save tab, under Save Options, select the Always
Create Backup Copy check box.
5.
Next to the Save AutoRecover Info Every check box, in the Minutes text box, type
1, as shown below. Click OK.
6.
In the Document1 document, type some text, and wait at least one minute.
7.
From the Start menu, select My Computer.
8.
In the My Computer window, from the Tools menu, select Folder Options.
9.
In the Folder Options dialog box, in the View tab, in the Advanced Settings list,
under Hidden Files And Folders, select Show Hidden Files And Folders. Click OK.
Navigate to the folder C:\Documents and Settings\
Test\Application Data\Microsoft\Word.
10. From the View menu, select Refresh. Note the AutoRecovery Save Of
Document1.asd file (as shown below). This is the file that would be used if
AutoRecovery were performed. Close all open windows, and save changes to
Document1.
13
14
SUPPORTING USERS AND TROUBLESHOOTING DESKTOP APPLICATIONS ON WINDOWS XP
11. Close Word and do not save changes.
EXERCISE 7-10: SUBMITTING YOUR WORK
Estimated completion time: 5 minutes
The following exercise allows you to submit the work you completed in this lab to your
instructor.
1.
Log on to the Computer02 virtual machine with the Administrator account (the
password is Pa$$w0rd).
2.
Drag the YourName Lab 7 WordPad document and the YourName Lab7Recovered file from the virtual machine window to the host computer.
3.
Submit the documents to your instructor.
LAB REVIEW QUESTIONS
Estimated completion time: 15 minutes
1. Will removing an Office application by choosing the Install On First Use option
remove a reference to it in the Microsoft Office programs group on the Start menu?
2.
By default, what will macro security in the Microsoft Office System do with a
document that contains macros?
3.
What application in Microsoft Office Tools is useful in recovering data in an Office
application that has stopped responding?
4.
By default, how often does the Microsoft Office System save a file for
AutoRecovery?
5.
Where are AutoRecovery documents for Word stored?
LAB 7: TROUBLESHOOTING OFFICE APPLICATIONS
15
LAB CHALLENGE: LINKING AND EMBEDDING
OBJECTS IN POWERPOINT
Estimated completion time: 25 minutes
You need to assist the marketing group at Contoso in creating a Microsoft Office PowerPoint
2003 document. The PowerPoint document needs to contain charts from the Lilliputian500
file. Each slide in the document needs to contain 10 years of the price history of the
Lilliputian500 Industrial Index in the form of a chart.
The charts should be created in Excel. Each chart should contain three moving-average
trendlines with periods of 6, 12, and 18 months. One linear trendline should also be added.
In order to automate the adding of these trendlines, you need to record a macro that adds
them to an existing chart. These charts should be linked into a PowerPoint document. Make
sure you do not embed the charts, as they need to change when the data in the Excel file
changes.
To increase data safety, you should also configure PowerPoint to save an AutoRecovery
document every minute.
COMPLETING THE LAB
1.
If there are files in the virtual machine that you want to save before closing,
drag them from the virtual machine window to the host computer.
NOTE
Any files that were added to a virtual machine during a lab will not be
saved when the virtual machine is closed.
2.
Shut down each virtual machine by selecting Action and then Close.