1
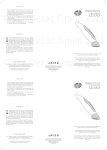
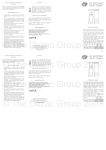
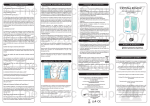
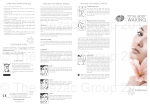
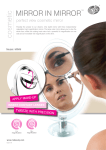
HAI R R EMOVAL 4 1 Reel of Cotton 1 2Powder 3 Mains Adapter REPLACING CO TTO N STEP 1 STEP 1 Connect the mains adapter into the power socket at the base of the unit and plug into your main power supply. Cut a piece of cotton to approx. 40cm and place it under the spring hook with an equal length of cotton each side. 4 Threading Arms 5 Safety Guard 6 Rotating Spring with hook 5 Bring the cotton through the hooks at the top of the threading arms from underneath. 7 Securing Screw 8 Main Unit 6 9 On/Off Switch 0 Power Socket 7 2 STEP 2 HAN DY TI P S • Trim any long hairs which do not need to be removed. This will ensure these hairs are not lying in the path of the cotton and avoid them being accidentally removed. • Use a magnifying mirror when treating areas on the face. • Only use Rio Cotton. Ordinary cotton is not generally suitable, and will lead to excessive thread breakage and poor hair removal performance. • For hygiene purposes we recommend replacing the cotton after each use. • When removing hair from the eyebrows or surrounding area, close the eye to prevent any hairs being “flicked” in. Also, hold the eyelashes down with the fingers of your free hand to protect them. GENER AL C AR E Push the ON/OFF upwards to turn the unit on. • Do NOT dismantle or repair. If you have any problems using the product, contact our Customer Care Department. © The Dezac Group 2010 © The Dezac Group 2010 © The Dezac Group 2010 1 • Only use this product with the mains adapter supplied. Do not use the adapter if damaged or if unit is malfunctioning. 8 • Store with care, so the threading arms don’t become bent. Store the unit at room temperature. • There are no user serviceable parts inside the unit. 9 • Unplug when not in use. STEP 2 3 2 STEP 3 Cross the two ends of cotton over the threading arms and bring back towards the securing screw. • The unit may be cleaned by wiping with a damp cloth. DO NOT use solvents or detergents or immerse in water. • Not for use in bathrooms. Place the cotton gently on the skin, at the base of the hairs you wish to remove. Best results are achieved when moving against the direction of hair growth. 3 0 Note: On uneven areas, use your free hand to stretch the skin. TRO UBLESHO O TI N G/ F AQ ’S PR E P A R A T IO N Pimples or redness appear on the treated area: Wash area to be treated with warm water and mild soap. This will remove any excess oil in the skin. STEP 3 Wrap each end of cotton under the securing screw. 4 Lightly dust fixing powder over the area to be treated. This will assist the cotton in gripping the hairs to be removed. The powder is specially formulated to be gentle and contains no perfume. As the twisted cotton moves up and down, hairs are entwined and lifted out. You will feel a pinch as the hair is being pulled out from the roots. With regular use this sensation will lessen. Ensure cotton is only trapped at the bottom under the securing screw. • You may be pressing the cotton too hard onto the skin. Hold the unit lightly against the skin. Only non targeted hairs were removed: • The unit may not have been positioned correctly. • The unit may need to be held more firmly to stop any vibrations. STEP 4 Hold the two ends of cotton in one hand while fully tightening the securing screw. Trim off any excess cotton. 5 STEP 5 After use, turn off and store away from children. Note: We recommend replacing the cotton each time your unit is used. Skin becomes grazed on the treated area: • The unit may have been used on loose or saggy skin – do not use on these areas. • Try stretching the skin with your free hand when next treating the area. Note: Some redness may appear, but will disappear after several hours. To reduce redness, cold water can be applied to soothe the skin. Avoid using any creams or lotions in the affected area for a few hours to reduce the likelihood of irritation and minor pimples. Important: Before moving to areas requiring high precision, like eyebrows, we suggest practising on an area of the forearm until you are confident with the process. Note: Hairs are lifted out where the entwined cotton meets the hair. STEP 4 • Use cold water on the affected area and avoid using any cosmetic products including creams and lotions for several hours. Some users have this initial reaction but with further use, this reaction lessens and can disappear completely. Note: For hygiene purposes we recommend replacing the cotton after each use. • Eyebrow hairs which spike upwards may not have been trimmed before hairs above it are removed. Targeted hairs have not been removed: • The skin, hair or cotton may be greasy – replace the cotton and wash the area to be treated with warm water and mild soap, then dust fixing powder lightly over the area and treat again. Results are always more effective when moving against the direction of hair growth. ELECTRIC THREADING ™ E L E C TRI C T H R E A D IN G Electric Threading™ is the traditional art of hair threading made easy. Threading is used primarily on the face, including the upper lip, chin, sideburns, cheeks and eyebrows. Previously, threading could only be done by people with experience who had spent years honing their skills. Even in Asia where threading originated, these masters have become increasingly scarce. Electric Threading™ takes care of the technique for you. With the combined motion of the rotating spring and retaining threading arms, hairs are entwined within the advancing twisted cotton and lifted out from the follicle. The process is completely natural and kind to all skin types, whether normal, sensitive, tanned or pale. It is inexpensive, safe, simple, fast and effective. Uniquely, it is possible to remove the finest of hairs (facial fluff) with threading which waxing and tweezers fail to remove effectively. © The Dezac Group 2010 © The Dezac Group 2010 © The Dezac Group 2010 direction of threading instructions C U S TO M E R C A R E If you have any questions, or if you experience any difficulties please call our Rio Careline on: 01242 702345 or email us at: [email protected] To register your two year guarantee online, visit: www.riobeauty.com/warranty_online.htm D I S P O SA L The Waste of Electrical and Electronic Equipment (WEEE) Directive (2002/96/EC) has been put in place to recycle products using best available recovery and recycling techniques to minimise the impact on the environment, treat any hazardous substances and avoid the increase in landfill. The product is classed as Electrical or Electronic equipment so please ensure that at the end of the life of this product it is disposed of in the correct manner in accordance with local authority requirements, or, returned to The Dezac Group Ltd., Cheltenham, PO Box 54, GL14 2WW, UK. It must NOT be disposed of with household waste. PRECAUTI O N S • Please retain this instruction leaflet for future reference. • Not for use by children under 14. When not in use, store responsibly in a safe place away from children and pets. • Do NOT use after drinking alcohol or if you are feeling unwell or fatigued. • Do NOT use on eyelashes. • Do NOT use on areas of damaged or diseased skin, inflamed acne, or where capillary vessels can be seen. Do NOT use on broken skin, rosacea, eczema, over moles or growths, or any other skin ailment. It is recommended that you consult a doctor if you are unsure. Discontinue use in the event of irritation. • Do NOT use on scars, moles or varicose veins. If using Retin-A or products containing Retinol, Glycolic or Salicylic Acids, discontinue use of these for 1 week prior to and 2 days after using your hair threader. • Do NOT use if you have multiple sclerosis. • Do NOT use on loose or saggy skin. Rio, Dezac and Electric Threading are trademarks of The Dezac Group Ltd © The Dezac Group Ltd 2010, PO Box 17, Cheltenham Spa, England GL53 7ET www.riobeauty.com 1-IN-HRTH-UK/1.2