1
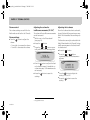
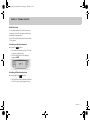
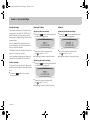
Titel_en_us.fm Seite 1 Mittwoch, 18. Juli 2007 6:14 18 Operating instructions > smart Radio 10 Order N°: 6522 6806 13 Part-N°: 451 584 31 81 smart_radio_10_ae.book Seite 2 Dienstag, 17. Juli 2007 1:52 13 www.smart.com smart - a brand of DaimlerChrysler smart_radio_10_ae.book Seite 3 Dienstag, 17. Juli 2007 1:52 13 Content Content Overview >> General . . . . . . . . . . . . . . . . . . . . . . . . . . 6 Special equipment . . . . . . . . . . . . . . . . . 6 General notes . . . . . . . . . . . . . . . . . . . . . 6 Warranty for accessories and replacement parts . . . . . . . . . . . . . 6 Specified normal operation . . . . . . . . . 7 Operating basics . . . . . . . . . . . . . . . . . . 8 Switching the radio on/off . . . . . . . . . . 8 Switching on. . . . . . . . . . . . . . . . . . . . . 8 Switching off . . . . . . . . . . . . . . . . . . . . 8 smart Radio 10 operating elements . . 9 Display . . . . . . . . . . . . . . . . . . . . . . . . . . 10 Displaying Radio/CD text . . . . . . . . . 10 Example: Radio mode . . . . . . . . . . . . . . . 10 Example: CD mode. . . . . . . . . . . . . . . . . . 10 Menu functions . . . . . . . . . . . . . . . . . . . In the Radio mode . . . . . . . . . . . . . . . In the CD mode. . . . . . . . . . . . . . . . . . Radio Data System (RDS). . . . . . . . . . . . Switching on/off the AF function (Alternative Frequency) . . . . . . . . . 11 11 11 11 12 Audio AUX mode . . . . . . . . . . . . . . . . . . Switching over to the AUX mode . . Switching on/off the AUX mode . . . . RESET function . . . . . . . . . . . . . . . . . . . 12 12 12 13 Audio >> Volume control . . . . . . . . . . . . . . . . . . . Volume settings . . . . . . . . . . . . . . . . . . Adjusting the volume for traffic announcements (TA VOL) . . . . Adjusting the Loudness . . . . . . . . . . . Mute function . . . . . . . . . . . . . . . . . . . . Switching on the Mute function . . . Switching off the Mute function. . . Sound settings . . . . . . . . . . . . . . . . . . . Default settings . . . . . . . . . . . . . . . . Bass and Treble . . . . . . . . . . . . . . . . . . Adjusting the Bass settings. . . . . . Adjusting the Treble settings . . . . Balance . . . . . . . . . . . . . . . . . . . . . . . . . Adjusting the Balance settings . . . 16 16 16 16 17 17 17 18 18 18 18 18 18 18 Radio mode >> Adjusting Radio mode and station . . . Adjusting the waveband. . . . . . . . . . . . Tuning to a station . . . . . . . . . . . . . . . . Tuning via station search . . . . . . . . Tuning via scan search . . . . . . . . . . 20 20 20 21 21 Starting the scan search . . . . . . . . . . . . 21 Stopping the scan search . . . . . . . . . . . 21 Tuning via manual tuning . . . . . . . . . 21 Tuning via PTY . . . . . . . . . . . . . . . . . . 22 Selecting a PTY ID and tuning to a station with the selected ID . . . . . . . . 22 Resetting the PTY ID . . . . . . . . . . . . . . . . 22 Program type ID (PTY) . . . . . . . . . . . . 22 Tuning via station presets . . . . . . . 23 Selecting from the number buttons . . . 23 Switching on/off the REGION mode . Storing a station . . . . . . . . . . . . . . . . . . Storing manually by number buttons . . . . . . . . . . . . . . Storing by using Autostore . . . . . . . 23 24 24 24 Starting the Autostore function. . . . . . 24 Cancelling the Autostore function. . . . 24 Content 3 smart_radio_10_ae.book Seite 4 Dienstag, 17. Juli 2007 1:52 13 Content CD mode >> General informations. . . . . . . . . . . . . . Tips on handling CDs . . . . . . . . . . . . . . Switching over to the CD mode. . . . . . Loading and ejecting CDs . . . . . . . . . . Loading CDs in the smart Radio 10 . . Loading single CDs . . . . . . . . . . . . . . Loading the CD changer completely . . . . . . . . . . . . . . . . . . . . . Ejecting CDs from the smart Radio 10 . . . . . . . . . . . . . . . . Ejecting a single CD from the smart Radio 10. . . . . . . . . . . . . . . . . . Ejecting all CDs from the CD changer . . . . . . . . . . . . . . . . . . . . Selecting a CD . . . . . . . . . . . . . . . . . . . . Playing tracks by using RANDOM . . . . Selecting a track . . . . . . . . . . . . . . . . . Selecting by using track skip . . . . . Selecting by using Fast-Track . . . . 26 26 27 28 28 28 29 29 29 29 30 30 30 30 31 Fast-Track function with Standard CDs 31 Fast-Track function with MP3 CDs . . . . 31 Selecting by using scan search . . . 31 Starting the scan search . . . . . . . . . . . 31 Stopping the scan search . . . . . . . . . . 31 4 Content Repeat track. . . . . . . . . . . . . . . . . . . . . Repeat CD . . . . . . . . . . . . . . . . . . . . . . . Audible fast forward/rewind . . . . . . . Displaying MP3 Text . . . . . . . . . . . . . . MP3 Text informations. . . . . . . . . . . 32 32 32 32 33 smart_radio_10_ae.book Seite 5 Dienstag, 17. Juli 2007 1:52 13 Overview >> smart_radio_10_ae.book Seite 6 Dienstag, 17. Juli 2007 1:52 13 Overview >> General General General notes Dear smart owner, thank you for choosing this smart Radio 10. Read these instruction carefully and keep them in a safe place. Always follow all safety instructions. We wish you a pleasant trip! As the scope of the delivery depends on the order placed, the equipment in your vehicle may deviate from that shown in some of the descriptions and illustrations. In order to adapt our vehicles to the ever-advancing technologies available, we must reserve the right to make changes to design, equipment and technology. Therefore no claims can be derived from any of the specifications, illustrations or descriptions in these operating instructions. Special equipment >Notice! * This asterisk indicates a special model. Not all models have the same factory-fitted equipment. It is possible that the equipment fitted to your vehicle differs slightly from that shown in the descriptions and illustrations in this manual. 6 Overview >> Warranty for accessories and replacement parts The smart marketing-corporation* grants a warranty of 24 months without distance limit for this accessory or replacement part. The warranty conditions printed in the smart Service Manual are valid. *Warrantor is the marketing-corporation in that country, the accessories and replacement parts have been bought (see table in the Service Manual). smart_radio_10_ae.book Seite 7 Dienstag, 17. Juli 2007 1:52 13 Overview >> General Specified normal operation Dear User, this device complies with Part 15 of the FCC Rules. Operation is subject to the following two conditions: (1) This device may not cause harmful interference, and (2) this device must accept any interference received, including interference that may cause undesired operation. Caution Change or modification not expressly approved by the party responsible for compliance could void the user's authority to operate this equipment. >Notice! This equipment has been tested and found to comply with the limits for the Class A digital device, pursuant to part 15 of the FCC Rules. These limits are designed to provide reasonable protection against harmful interference when the equipment is operated in a commercial environment. This equipment generates, uses and can radiate radio frequency energy and, if not installed and used in accordance with the instruction manual, may cause harmful interference to radio communications. >Notice! Operation of this equipment in a residential area is likely to cause harmful interference in which case the user will be required to correct the interference at his or her expense. Caution This equipment complies with FCC radiation exposure limits set forth for uncontrolled equipment and meets the FCC radio frequency (RF) Exposure Guidelines in Supplement C to OET65. This equipment has very low levels of RF energy that is deemed to comply without maximum permissive exposure evaluation (MPE). But it is desirable that it should be installed and operated with at least 20 cm (appr. 8 inches) and more between the radiator and person’s body (excluding extremities: hands, wrists, feet and legs.) Overview >> 7 smart_radio_10_ae.book Seite 8 Dienstag, 17. Juli 2007 1:52 13 Overview >> General Switching the radio on/off . Warning! In order to avoid distraction which could lead to an accident, the driver should enter system settings with the vehicle at a standstill and operate the system only when road, weather and traffic conditions permit. Before you start the ride, familiarize yourself with the functions of the smart Radio 10. Never try new functions while driving, you might become distracted from the traffic situation and cause an accident. Always operate the smart Radio 10 in a manner that you remain in full control of your vehicle, in all traffic situations. Bear in mind that at a speed of just 30 mph (approximately 50 km/h), your car is covering a distance of 44 feet (approximately 14 meter) every second. Warning Unqualified or unauthorized servicing of electronic components and software can cause operating faults. The electronic systems are connected to a network using special interfaces. Unauthorized modifications of this electronic system may also cause operating faults to other systems which have not been modified. These operating faults can endanger the safety of your vehicle and its occupants. Operating basics In this chapter we inform you about the general operating rules of the smart Radio 10. Detailed Information about the menus, sub menus and special functions are given in the corresponding chapters. >Notice! Take your time to get familiar with the operating functions of the smart Radio 10. 8 Overview >> Switching on 쮿 If the radio was already switched on when you switched off the ignition, turn the key in the steering lock to the "ACC" or the "ON" position. or 쮿 Press the ON button. >Notice! If you switch on the radio without inserting the key or if the key is in the "Lock" position, the radio will switch off automatically after 60 minutes. Switching off 쮿 Turn the key in the steering lock to the "Lock" position. or 쮿 Press the ON button. smart_radio_10_ae.book Seite 9 Dienstag, 17. Juli 2007 1:52 13 Overview >> smart Radio 10 operating elements smart Radio 10 operating elements Button 1 1 2 LOAD 6 CD slot 3 4 EJECT 5 ON 6 Function In the Radio mode: Station memory 1-6 In the CD mode: Selecting CD 1-6 from the CD changer CD laden Button 7 SRC 8 BASS TREB 9 BAL 10 MENU Eject CD On/Off 11 Display 12 SEEK Function Audio source (Radio, CD, AUX) Adjusting Bass/Treble Adjusting Balance Menu functions for PTY SEEK, TA VOL, RANDOM, REPEAT, RADIO/CD TEXT, LOUDNESS and MP3 TEXT Automatic station search Station search backwards Previous CD track Button 13 14 15 SCAN 16 MUTE 17 TA 18 AM FM Function Turning button: Change settings Pressing button: Save/confirm settings Station search forwards Next CD track Radio/CD scan search Radio/CD/AUX mute Activating traffic announcements function (not applicable in the US) Selecting waveband AM or FM Overview >> 9 smart_radio_10_ae.book Seite 10 Dienstag, 17. Juli 2007 1:52 13 Overview >> Display Example: Radio mode Display The display shows information about settings, stations, CD number, CD track etc. Depending on the audio source, this information varies. It will be described in detail in the corresponding chapters. Displaying Radio/CD text By activating this function, additional information in the Radio or CD mode can be displayed, e.g. title or artist, provided they are transmitted or saved respectively. 쮿 Press the MENU button. 쮿 Press the or button repeatedly until the TEXT menu appears. 왗NFOV왘 SBEJP!UYU!PO VTF!WPMVNF!LOPC 쮿 Turn the button to adjust the setting to ON or OFF. 쮿 Press the button to save the setting. GN2.Q3 SFHJPO UB UQ TXS 4 :6/61 Left: - FM1 = current wave band. - P2 = Memory preset of current station. - REGION = Region mode is activated.1 - TA = The volume increase for traffic announcements is activated.1 - TP = Traffic report standby is constantly activated. Depending on the station the traffic reports of the current station is broadcast.1 Middle: - SWR 3 = Name of the current station. Right: - 95.50 MHz = Frequency of the current station. 1. not applicable in the US 10 Overview >> Example: CD mode UB UQ USBDL 23 TXS!4 3 6 234567 12;57 DE!3 Left: - TA = The volume increase for traffic announcements is activated.1 - TP = Traffic report standby is constantly activated. Depending on the station the traffic reports of the current station is broadcast.1 Middle: - TRACK 12 = Track number of the currently played track. - Station for traffic announcements.1 Right: - 01:46 = Playing time of CD. - 1 2 3 4 5 6 = Content of CD changer. Inserted CDs are highlighted. In this example: Slot no. 2 and 5. - CD 2 = CD in slot 2 is being played. smart_radio_10_ae.book Seite 11 Dienstag, 17. Juli 2007 1:52 13 Overview >> Menu functions Menu functions The function of the menu button differs in the various modes. Detailed information about the function will be given in the corresponding chapters. In the Radio mode In the Radio mode the following menus are available: - PTY SEEK (see page 20)1 - TA VOL (see page 16)1 - RADIO TXT ON/OFF (see page 10) - LOUDNESS ON/OFF (see page 16). Sub functions: - AF (Alternative Frequency) ON/OFF (see page 12)1 - REGION ON/OFF (see page 23)1 - AUX ON/OFF (see page 12) - RESET ON/OFF (see page 13). In the CD mode In the CD mode the following menus are available: - RANDOM ON/OFF (see page 30) - REPEAT ON/OFF (see page 30) - CD TEXT ON/OFF (see page 10) - LOUDNESS ON/OFF (see page 16) - MP3 TEXT ON/OFF (see page 32). Radio Data System (RDS)1 The smart Radio 10 is equipped with a Radio Data System. The RDS provides non audible additional information. Most of the radio programs transmit this information. Examples of such data are: program name or alternative frequencies for the current station. The system stores this data and keeps the memory constantly up to date. So the audio receiver can quickly switch to a better alternative frequency. 1. not applicable in the US Overview >> 11 smart_radio_10_ae.book Seite 12 Dienstag, 17. Juli 2007 1:52 13 Overview >> Menu functions Switching on/off the AF function (Alternative Frequency)1 To get the best reception quality for a station, you can switch on the AF function. The smart Radio 10 tunes to a better receivable frequency, if needed. You can switch off the function at any time. 쮿 Press the MENU button at least three seconds. > The subfunctions appear. 쮿 Press the MENU button repeatedly until the AF menu appears. BG!PO Audio AUX mode You can connect an external audio source (Audio-AUX) to the smart Radio 10. For further information please contact your smart service center. Switching over to the AUX mode From the Radio or CD mode: 쮿 Press the SRC repeatedly until the AUX menu appears. > The AUX menu appears. If connected and switched on, you hear the external audio source. Switching on/off the AUX mode If you do not want to connect an external audio source, you can switch off the AUX mode. As a result, the smart Radio 10 switches over only between the Radio mode and the CD mode as soon as the button is pressed. You can switch off the function at any time. 쮿 Press the MENU button for at least three seconds. > The sub functions appear. 쮿 Press the MENU button repeatedly until the AUX menu appears. SRC BVY BVY!PO 쮿 Turn the button to adjust the setting to ON or OFF. 쮿 Press the button to save the setting. 1. not applicable in the US 12 Overview >> You can find information about the operation of the external audio source in the corresponding operating manual. The following functions are available in the AUX menu: - Volume (see page 16) - Balance (see page 18) - Bass and Treble (see page 18). 쮿 Turn the button to adjust the setting to ON or OFF. 쮿 Press the button to save the setting. smart_radio_10_ae.book Seite 13 Dienstag, 17. Juli 2007 1:52 13 Overview >> Menu functions RESET function With the RESET function all of your sound settings on the smart Radio 10 will be set back to the default settings. 쮿 Press the MENU button for at least three seconds. > The sub functions appear. 쮿 Press the MENU button repeatedly until the RESET menu appears. SFTFU!PO 쮿 Turn the button to adjust the setting to ON or OFF. 쮿 Press the button to save the setting. Overview >> 13 smart_radio_10_ae.book Seite 14 Dienstag, 17. Juli 2007 1:52 13 Overview >> Menu functions 14 Overview >> smart_radio_10_ae.book Seite 15 Dienstag, 17. Juli 2007 1:52 13 Audio >> smart_radio_10_ae.book Seite 16 Dienstag, 17. Juli 2007 1:52 13 Audio >> Volume control Volume control The volume settings are valid for the Radio mode as well as for the CD mode. Volume settings 쮿 Turn the button to adjust the volume. > Turn right = increases the volume > Turn left = decreases the volume. Adjusting the volume for traffic announcements (TA VOL)1 The volume of the traffic announcements can be increased. 쮿 Switch over to the FM waveband (see page 20). 쮿 Press the MENU button. 쮿 Press the or button repeatedly until the TA VOL menu appears. 왗NFOV왘 UB WPM 6 VTF!WPMVNF!LOPC 쮿 쮿 Turn the button to adjust the desired volume increase (5 stands for no volume increase, 18 for maximum volume increase). Press the button to save the settings. Adjusting the Loudness When the Loudness function is activated, low and high audio frequencies are amplified. This intensifies the sound impression. This function can only be activated in the Radio FM mode and in the CD mode. During traffic announcements the function will be deactivated. 쮿 Press the MENU button. 쮿 Press the or button repeatedly until the Loudness menu appears. 왗 NFOV왘 쮿 쮿 1. not applicable in the US 16 Audio >> MPVEOFTT PO VTF!WPMVNF!LOPC Turn the button to adjust the setting to ON or OFF. Press the button to save the setting. smart_radio_10_ae.book Seite 17 Dienstag, 17. Juli 2007 1:52 13 Audio >> Volume control Mute function In the Radio mode the Mute function interrupts the radio sound as well as the traffic announcements. In the CD mode the Mute function sets the CD to pause. Switching on the Mute function 쮿 Press the MUTE button. > The radio is muted and the CD is set to pause respectively. > On the right side in the display appears MUTE. GN2.Q3 SFHJPO UB UQ TXS 4 :6/61 NVUF DE Switching off the Mute function Press again the MUTE button. > The Mute function is deactivated and the CD is set to play respectively. 쮿 Audio >> 17 smart_radio_10_ae.book Seite 18 Dienstag, 17. Juli 2007 1:52 13 Audio >> Sound settings Sound settings Bass and Treble Balance The sound settings can be adjusted separately for the Radio FM, RADIO AM, CD and AUX modes. As soon as the sound settings are changed, they will be saved automatically. With the Bass and Treble settings the sound intensity can be adjusted according to the kind of music. The Balance sets the sound in the vehicle more to the right or the left. In the standard settings the Balance is adjusted to the middle of the vehicle. Adjusting the Bass settings 쮿 Press the BASS button repeatedly until TREB the BASS menu appears. Adjusting the Balance settings 쮿 Press the BAL button repeatedly until the BALANCE menu appears. Default settings If required, you can set back all sound settings to the default values (all values to 0). 쮿 Press the BASS button for at least TREB three seconds. CBTT 1 쮿 쮿 Adjust the desired setting with the button (-7 to +7). Press any button to leave the menu. Adjusting the Treble settings Press the BASS button repeatedly until TREB the TREBLE menu appears. 쮿 USFC 1 VTF!WPMVNF!LOPC 쮿 쮿 18 Audio >> CBMBODF 1 VTF!WPMVNF!LOPC Adjust the desired setting with the button(-7 to +7). Press any button to leave the menu. VTF!WPMVNF!LOPC 쮿 쮿 Adjust the desired setting with the button(-7 to +7). Press any button to leave the menu. smart_radio_10_ae.book Seite 19 Dienstag, 17. Juli 2007 1:52 13 Radio mode >> smart_radio_10_ae.book Seite 20 Dienstag, 17. Juli 2007 1:52 13 Radio mode >> Adjusting Radio mode and station Adjusting Radio mode and station Adjusting the waveband Tuning to a station 쮿 쮿 You can use one of the following methods: - Tuning via station search. - Tuning via scan search. - Tuning via manual tuning. - Tuning via PTY (program type).1 Depending on your interests you can choose stations with special contents. These can be chosen by the PTY ID. The PTY list contains the PTY IDs of all currently receivable stations (see page 22). Only one entry is displayed at a time. - Tuning via station presets. Press the ON button to switch on the smart Radio 10. > The smart Radio 10 switches over to the last active mode. > If the last active mode was the Radio mode then the Radio menu appears. You hear the last station selected. GN2.Q3 SFHJPO UB UQ 쮿 TXS 4 TXS 4 GN3 UB UQ 9:/81 9:/81 DE :6/61 DE If the smart Radio 10 was in a different mode, press the SRC button repeatedly until the Radio menu appears. > The smart Radio 10 switches over to the Radio mode. You hear the last station selected. GN2.Q3 SFHJPO UB UQ Press the AM button repeatedly until FM the required waveband appears. > The display shows the wavebands FM1, FM2, or AM1, AM2 in turn. 쮿 Select a waveband. The following wavebands are available: FM waveband (Stereo): - 87.5 - 108 MHz AM waveband (only Mono): - 531 - 1620 kHz :6/61 DE 1. not applicable in the US 20 Radio mode >> smart_radio_10_ae.book Seite 21 Dienstag, 17. Juli 2007 1:52 13 Radio mode >> Adjusting Radio mode and station Tuning via station search The station search is available in all wavebands. The search always proceeds forwards. 쮿 Switch over to the desired waveband. 쮿 Press the SEEK button to start the station search. The search proceeds forwards. > The search stops at the first available station. > At the end of the waveband the search proceeds at the beginning of the waveband. > If no available station is found, the search stops at the end of the waveband. Tuning via scan search The scan search is available in all wavebands. The search always proceeds forwards. Starting the scan search 쮿 쮿 Switch over to the required waveband. Press the SCAN button to start the scan search. > The scan search function will play each identifiable RDS station for approximately eight seconds and will stop automatically at the station listened to before the start of the scan. > At the end of the waveband the search proceeds at the beginning of the waveband. Tuning via manual tuning The manual tuning is available in all wavebands. 쮿 Switch over to the desired waveband. 쮿 Press the or button for forward or backward search and hold the button pressed down at least two seconds. > The manual tuning function is activated and the frequency changes in the adjusted direction. 쮿 Hold the button pressed down until the required frequency is found. 쮿 For fine tuning release the button and press it repeatedly until the desired frequency is reached. Stopping the scan search 쮿 Press again the SCAN button. > If you stop the scan search before a new station is found, the radio turns to the last identified station. Radio mode >> 21 smart_radio_10_ae.book Seite 22 Dienstag, 17. Juli 2007 1:52 13 Radio mode >> Adjusting Radio mode and station Tuning via PTY1 The PTY list is only available in the FM waveband. Selecting a PTY ID and tuning to a station with the selected ID Example: PTY ID POP M 쮿 Switch over to the FM waveband. 쮿 Press the MENU button. 쮿 Press the or button repeatedly until the PTY menu appears. > If the currently selected station does not have the POP M ID, the system will automatically switch over to a station with the POP M ID. In all other cases, the currently selected station will remain selected. > In the station list, only stations with the POP M are available. Select another station by using the station list. Resetting the PTY ID 쮿 왗 NFOV왘 QUZ!TFFL VTF!WPMVNF!LOPC 쮿 Choose with the button the PTY ID POP M from the list. TFMFDU UZQF왘 왗 QPQ!N VTF!WPMVNF!LOPC 쮿 Press the setting. button to confirm the 1. not applicable in the US 22 Radio mode >> 쮿 Switch over to the FM waveband. Press any button. > The PTY ID is reset. > In the station list, all stations are available. > When you switch the smart Radio 10 off and on, the PTY ID is also reset. Program type ID (PTY) - AFFAIRS - Politics and current affairs - CHILDREN - Children's programs - CLASSICS - Classical music - COUNTRY - Country and western music - CULTURE - Culture, religion and society - DOCUMENT - Documentaries - DRAMA - Radio plays and literature - EASY M - Easy listening - EDUCATE - Education - FINANCE - Business and financial information - FOLK M - Folk music - INFO - Service programs - JAZZ - Jazz music programs - LEISURE - Leisure reports - LIGHT M - Light music smart_radio_10_ae.book Seite 23 Dienstag, 17. Juli 2007 1:52 13 Radio mode >> Adjusting Radio mode and station - NATION M - National folk music NEWS - News programs OLDIES - Oldies OTHER M - Special music programs PHONE IN - Interviews POP M - Pop music RELIGION - Religious and ethical reports ROCK M - Rock music SCIENCE - Science programs SOCIAL - Social reports SPORT - Sports TRAVEL - Travel reports VARIED - Humor, entertainment WEATHER - Weather reports Tuning via station presets For each waveband there are 6 station presets available. For each preset the system has stored one station. You can turn to a stored station by pressing one of the number buttons. If you like to store other stations the presets will be overwritten (see page 24). Selecting from the number buttons 쮿 쮿 Switching on/off the REGION mode1 By activating the Region function you can hear actual regional information e.g. regional news, events etc. You can switch off the Region function at any time. 쮿 Press the MENU button for at least three seconds. > The sub functions appear. 쮿 Press the MENU button repeatedly until the REGION menu appears. Switch over to the desired waveband. Press one of the 1 to 6 buttons. > The radio tunes to the stored station. 왗 NFOV왘 SFHJPO!PO VTF!WPMVNF!LOQPC 쮿 쮿 Turn the button to adjust the setting to ON or OFF. Press the button to save the setting. 1. not applicable in the US Radio mode >> 23 smart_radio_10_ae.book Seite 24 Dienstag, 17. Juli 2007 1:52 13 Radio mode >> Storing a station Storing a station To store a station you can use one of the following methods: - Storing manually by number buttons - Storing by using Autostore Storing manually by number buttons For each waveband there are six presets available, corresponding to the number buttons. 쮿 Tune to the station to be stored. 쮿 Press one of the 1 to 6 buttons and hold it down for at least three seconds. > A short beep indicates that the station is stored in the chosen memory preset. 24 Radio mode >> Storing by using Autostore The Autostore function is available in all wavebands. The search always proceeds forwards. The Autostore function assigns six stations according to their reception quality. These will be stored in the preset memories in turn in the AM2 and FM2 band respectively. If less than six stations were found, the remaining preset memories will stay unchanged. Starting the Autostore function 쮿 쮿 Switch over to the desired waveband. Press the AM button for at least FM three seconds. > The Autostore seeks over the waveband and stores the identified stations. > After finishing the search, the smart Radio 10 switches over to the AM2 and FM2 band respectively and tunes in to the station stored in memory preset 1. Cancelling the Autostore function 쮿 Press any button. > The Autostore function is cancelled and the identified stations will not be stored. > The smart Radio 10 switches over to the last tuned in station. smart_radio_10_ae.book Seite 25 Dienstag, 17. Juli 2007 1:52 13 CD mode >> smart_radio_10_ae.book Seite 26 Dienstag, 17. Juli 2007 1:52 13 CD mode >> General information General information Accident hazard! Only carry out the following when the vehicle is stationary: - Inserting a disc - Ejecting a disc There is a risk of accident by being distracted from road and traffic conditions if you load a CD while the vehicle is in motion. Injury hazard! smart Radio 10 is classified as a Class 1 laser product. You must not open the casing. There is a risk of exposure to invisible laser radiation if you open the casing, or if the casing is faulty or damaged. smart Radio 10 does not contain any parts that you are able to maintain yourself. For safety reasons, all maintenance work must be carried out by qualified technicians. 26 CD mode >> >Notice! The CD drive is able to play CDs of the types CD-DA (Digital Audio), CD-R , CD-RW and MP3. The system might have problems with playing Audio-CDs with copy protection. When playing copied CDs, there may be playback problems. Use only round CDs with a diameter of 12 cm (appr. 5 inches) not smaller, even with a CD adapter. >Notice! The CD drive is designed to accept EN 60908 standard CDs only. Only use CDs which are up to 1.3 mm thick. If you insert thicker CDs (e.g. those with data recorded on bother sides) into the drive, this will damage the drive and it will not be possible to eject the CD. Tips on handling CDs - In order to ensure trouble-free playback, handle CDs with care. - Avoid scratching or leaving finger marks and dust on the CD. - Do not stick labels on CDs. Do not write on CDs. - Clean the CDs occasionally with the special cleaning clothes sold in record stores. Do not wipe the CDs with a circular motion. Wipe in straight lines from the center outwards. - After use, return the CD to its box. - Do not expose CDs to heat and direct sunlight. smart_radio_10_ae.book Seite 27 Dienstag, 17. Juli 2007 1:52 13 CD mode >> Switching over to the CD mode Switching over to the CD mode From the Radio or AUX mode: 쮿 Press the SRC repeatedly until the CD menu appears. > The smart Radio 10 switches over to the CD mode. The inserted CD will be played. 23 3 4 56 7 12;57 DE!3 ! UB UQ USBDL 23 TXS!4 ! ! ! ! > If an MP3 CD is inserted, the Display shows MP3 on the left. > If there is a folder structure saved on the MP3 CD, the selected folder with the folder number is shown. NQ4 12 UB UQ TXS!4 234567 ! OP!DE ! ! ! ! QSFTT!MPBE > After two seconds the smart Radio 10 switches over to the last active mode. or 쮿 Insert an Audio-CD in the smart Radio 10. > The smart Radio 10 switches over to the CD mode. The inserted CD will be played. > Additional information will be shown in the display if stored on the CD. 23 3 4 56 7 12;57 DE!3 ! USBDL 23 > If no CD is inserted in the CD player, the display shows NO CD. ! ! ! ! CD mode >> 27 smart_radio_10_ae.book Seite 28 Dienstag, 17. Juli 2007 1:52 13 CD mode >> Loading and ejecting CDs > The display shows INSERT CD. Loading and ejecting CDs The integrated CD changer in the smart Radio 10 can load up to six CDs. It is upon your decision, in which slot the CDs are loaded and later you can play the CDs by pressing one of the number buttons. Loading CDs in the smart Radio 10 Loading single CDs 쮿 Press the LOAD button. > The display shows SELECT SLOT. 234567 ! TFMFDU!TMPU 쮿 ! ! ! ! > While the smart Radio 10 prepares loading, the display shows CD MOVING for a moment. Press one of the 1 to 6 buttons to select a slot. 234567 ! JOTFSU!DE 쮿 ! ! ! ! Insert an Audio-CD in the CD slot with the printed side facing upwards. > The smart Radio 10 draws the CD into the slot. > The smart Radio 10 switches over to the CD mode and plays the CD. > The display switches over to the CD display and the loaded slot is highlighted. 23 34567 12;57 DE!3 ! UB UQ USBDL 12 TXS!4 ! ! ! ! or 쮿 Press one of the number buttons 1 to 6 in which you want to load the CD. > The display shows CD MOVING for a moment and then INSERT CD. 234567 ! JOTFSU!DE 쮿 28 CD mode >> ! ! ! Insert an Audio-CD in the CD slot with the printed side facing upwards. > The smart Radio 10 draws the CD into the slot. > The smart Radio 10 switches over to the CD mode and plays the CD. > The display switches over to the CD display and the loaded slot is highlighted. 23 34567 12;57 DE!3 ! >Notice! If you do not select a slot, the CD will be loaded in slot 1 automatically. ! UB UQ USBDL 12 TXS!4 ! ! ! ! smart_radio_10_ae.book Seite 29 Dienstag, 17. Juli 2007 1:52 13 CD mode >> Loading and ejecting CDs Loading the CD changer completely 쮿 Press the LOAD button more than three seconds. > The display shows CD MOVING for a moment and then INSERT CD. 234567 ! JOTFSU!DE ! ! ! ! MPBE!BMM 쮿 Insert six CDs in the CD slot one after another. > The smart Radio 10 draws in the CDs. The CDs will be loaded in the slots 1-6 in turn. > The smart Radio 10 switches over to the CD mode and plays the CDs beginning with CD 1. Alternatively you can select a CD while INSERT CD is shown in the display. 쮿 Press thereto one of the 1 to 6 buttons. > After loading all CDs, the smart Radio 10 plays the selected CD. 쮿 Ejecting CDs from the smart Radio 10 Ejecting a single CD from the smart Radio 10 쮿 Press the EJECT button. 쮿 Press one of the 1 to 6 buttons to eject a specific CD. or 쮿 Press one of the 1 to 6 buttons at least three seconds for the slot you like to eject the CD. > The display shows EJECTING. Ejecting all CDs from the CD changer Press the EJECT button at least three seconds. > The smart Radio 10 ejects all CDs that are inserted in the CD changer. 쮿 234567 ! FKFDUJOH Remove the CD from the CD slot. > If you do not remove the CD from the CD slot within 15 seconds, the smart Radio 10 will draw it back in. > If no more CD is in the CD changer, the smart Radio 10 switches over to the last active mode. ! ! ! ! > The smart Radio 10 ejects the CD, the display shows REMOVE CD. 234567 ! SFNPWF!DE ! ! ! ! CD mode >> 29 smart_radio_10_ae.book Seite 30 Dienstag, 17. Juli 2007 1:52 13 CD mode >> Selecting a CD Selecting a CD Playing tracks by using RANDOM Selecting a track Example: CD no. 6 in the CD changer 쮿 Press the button 6 . > You hear the selected CD. If you select a not available CD, the CD does not change. > The display shows SLOT EMPTY. If you do not want to listen to a specific track on the CD but to all tracks randomly: 쮿 Press the MENU button. 쮿 Press the or button repeatedly until the RANDOM menu appears. - Selecting by using track skip - Selecting by using Fast-Track - Selecting by using scan search 왗 NFOV왘 TMPU!FNQUZ TFMFDU!TMPU 쮿 쮿 쮿 Turn the button to adjust the setting to ON or OFF. Press the button to save the setting. When playing the selected CD, the display shows RANDOM. SBOEPN UB 30 CD mode >> SBOEPN!PGG VTF!WPMVNF!LOPC UQ 23 34567 12;57 DE!3 ! USBDL 12 TXS!4 ! ! ! ! Selecting by using track skip 쮿 Select a CD with one of the 1 to 6 buttons. Tracking forwards 쮿 Press the or the SEEK button. > The next track on the CD will be played. Tracking backwards 쮿 Press the button within the first two seconds the actual track is played. > The previous track on the CD will be played. > If the current track was played longer than two seconds, the current track will be repeated. smart_radio_10_ae.book Seite 31 Dienstag, 17. Juli 2007 1:52 13 CD mode >> Selecting a CD Selecting by using Fast-Track For standard CDs as well as for MP3 CDs, the Fast-Track function is available. It serves for selecting a track and when playing MP3 CDs also for selecting a folder. Fast-Track function with Standard CDs 쮿 쮿 Press the button. > The track selection appears. Turn the button right to track forwards or left to track backwards. > As soon as the desired track is reached, press again the button and the track will be played. MP3 CD with folder structure: 쮿 Press the button. > The folders appear. 쮿 Turn the button to select a folder. > After selecting a folder, press the button to confirm the selection. 쮿 Turn the button to select a track in the selected folder. > After selecting a track, press again the button and the track will be played. Selecting by using scan search During the scan search, each track on the current CD is played for approximately ten seconds. The scan search will automatically end at the track you were listening to when the scan search started. You can also stop the scan search manually. Starting the scan search 쮿 쮿 Fast-Track function with MP3 CDs MP3 CD without folder structure: 쮿 Press the button. > The track selection appears. 쮿 Turn the button right to track forwards or left to track backwards. > As soon as the desired track is reached, press again the button and the track will be played. Select a CD with one of the 1 to 6 buttons. Press the SCAN button. > The display shows the number of the actual track. TDBO UB UQ DE!6 TXS!4 3 6 234567 12;57 DE!6 Stopping the scan search 쮿 Press the SCAN button. > The last track heard when stopping the scan search will be played. CD mode >> 31 smart_radio_10_ae.book Seite 32 Dienstag, 17. Juli 2007 1:52 13 CD mode >> Selecting a CD > The display shows REPEAT on the left. Repeat track 쮿 Press the button. The last heard track will be repeated. > If the track was playing less than two seconds, the previous track will be played. SFQFBU UB 왗 NFOV왘 SFQFBU!PGG VTF!WPMVNF!LOPC 쮿 쮿 Turn the button to adjust the setting to ON or OFF. Press the button to save the setting. 32 CD mode >> DE!6 TXS!4 > When playing MP3 CDs, the tracks of the selected folder will be repeated. Repeat CD When playing standard CDs, the selected CD will be repeated, when playing MP3 CDs, the tracks of the selected folder are repeated. 쮿 Press the MENU button. 쮿 Press the or button repeatedly until the REPEAT menu appears. UQ 3 6 234567 12;57 DE!6 Displaying MP3 Text If a CD was saved in MP3 format, the information saved on the CD can be displayed. 쮿 Press the MENU button. 쮿 Press the or button repeatedly until the MP3 TEXT menu appears. Audible fast forward/rewind 쮿 쮿 Press the button to fast-forward or the button to rewind and hold the button pressed down. To stop the function, release the button. 왗 NFOV왘 NQ4!UFYU!PO VTF!WPMVNF!LOPC 쮿 쮿 Turn the button to adjust the setting to ON or OFF. Press the button to save the setting. > While playing the MP3 CD, the text information is shown in the display. smart_radio_10_ae.book Seite 33 Dienstag, 17. Juli 2007 1:52 13 CD mode >> Selecting a CD MP3 Text information The following methods are available to show the MP3 text information: - MP3 Filetext: The file information will be shown. - MP3 ID3: The information about the performer and the information saved corresponding to the tracks will be shown respectively. > The display shows the selected text information while playing the CD. 왗NFOV왘 BMCVN!OBNF QFSGPSNFS USBDLJOGP CD mode >> 33 smart_radio_10_ae.book Seite 34 Dienstag, 17. Juli 2007 1:52 13 CD mode >> Selecting a CD 34 CD mode >>