1
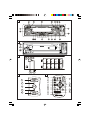
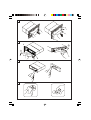
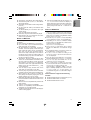
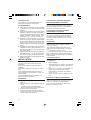
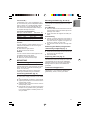
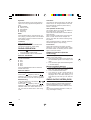
SCH
A/PS
MMC
REL
PTY
VOL
MODE
PUSH
SEL
AF/
REG
LOUD
SCAN
TA
MUTE
1
CD 1737X
RPT
INT
RND
2
3
4
10
5
+10
6
DISP
BAND
A
B
C
F 15A
AUX
Ant.
Lout Rout
D
Lin
Rin
E
1
16
1
2
2
3
4
3
5
15
14
13
6
4
7
5
8
12
11
10
9
3
F
G
3
1
2
188mm
58mm
4
H
1
I
4
2
1
3
4
J
K
A
3
2
1
B
L
M
5
INTRODUCTION
Before Starting
Thank you for purchasing this VDO Dayton
product which has been designed and manufactured according to applicable Safety Regulations, following the highest standards and subjected to rigorous testing. Kindly familiarise
yourself with the product by reading this user
manual carefully. Use the product as intended,
and keep this manual handy in your car for
future reference.
Environment
This booklet is printed on low-chlorine recyclable paper.
PREVENTIVE MAINTENANCE
To ensure good connection between the set
and the detachable front, it is advisable to clean
the connectors with a cotton swab slightly
moistened with cleaning fluid or alcohol periodically.
CONTENT PAGE
INTRODUCTION ....................................... 7
Before Starting ......................................... 7
Environment ............................................ 7
PREVENTIVE MAINTENANCE .................. 7
CONTENT PAGE ....................................... 7
GENERAL INFORMATION ......................... 8
Disclaimer ............................................... 8
Class 1 Laser Product ............................ 8
FEATURES ................................................ 8
RDS (Radio Data System) ...................... 8
Notes on audio CDs ............................... 8
Notes on MP3 files .................................. 9
Notes on WMA files .................................. 9
Notes on OGG files ............................... 10
Notes on Folders ................................... 10
Notes on Bluetooth® ............................. 11
INSTALLATION ....................................... 12
Installation ............................................. 12
Connection in vehicles equipped with
standard ISO connectors ...................... 12
Connection in vehicles without
standard ISO connectors ...................... 12
Preparation ............................................ 12
Connectors (fig. C) ................................ 12
Electronic or Motorised Antenna ........... 12
MOUNTING ............................................. 13
Metal Sleeve (fig. F and G ) .................... 13
Connecting the Radio (fig. C) ................ 13
Mounting the Radio (fig. G and H) ......... 13
Removing the Radio (using the two
removal keys supplied) (fig. J) .............. 13
Replacing the Fuse (fig. C) ................... 13
Interference Suppression ..................... 13
FRONT PANEL AND REMOTE CONTROL14
Front Panel Remote Control
Function(s) ............................................ 14
SECURITY .............................................. 15
Removing the Front (fig. A and I) ........... 15
Replacing the Front (Fig. K and L) ........ 15
GENERAL OPERATION .......................... 15
Switching On/Off .................................... 15
Setting the Start-up Volume ................... 15
Selecting a Source ................................ 15
Sound Controls ..................................... 15
RADIO OPERATION ................................ 16
Select a waveband ................................ 16
Select a station ...................................... 16
FM Stereo Operation (Remote Control
only) ....................................................... 16
Memorising Radio Stations ................... 16
RADIO DATA SYSTEM (RDS) ................. 16
Display of Station Name (PS) ................ 17
Automatic frequency (AF) ....................... 17
Traffic Announcements (TA) .................. 17
Programme Type Selection (PTY) ......... 17
CD OPERATION ...................................... 17
Loading CD in the CD player ................ 17
Pausing a CD ........................................ 17
Ejecting a CD ......................................... 17
CD playback .......................................... 17
Compressed Audio playback ................ 17
Playing a CD-R or CD-RW .................... 18
Playing a “copy protected” nonconforming audio CD ............................ 18
Listening to CD/MP3/WMA/OGG ........... 18
Track/File Selection ............................... 18
SD/MMC/USB OPERATION .................... 18
General .................................................. 18
Pausing ................................................. 18
File Selection ......................................... 18
7
Designs and specifications are subject to
changes without prior notice.
z Do not damage cables of the safety systems
(airbag etc.). (Lines are normally specially
marked, e.g. by labels.)
z Do not use inspection lamps to test the voltage, since excessively high currents can damage / destroy electronic components.
z Do not use any pinch or cut connectors. Solder all cable connections. Insulate all solder
points with shrinkable hose or insulating tape.
z If there are earth connections on the chassis,
insert toothed washers. Remove paint and dirt
first, if necessary.
z Use only the parts included with the unit to
ensure proper installation. The use of unauthorized parts can cause malfunctions.
z Avoid installing the unit where it would be
subject to high temperature, such as from direct sunlight, or from hot air, from the heater,
or where it would be subject to dust, dirt or
excessive vibration.
Class 1 Laser Product
FEATURES
BLUETOOTH® CAR UNIT ....................... 19
General .................................................. 19
Controls (fig. D) ..................................... 19
Pairing your cell phone and Bluetooth®
remote box ............................................. 20
Answering an incoming call .................. 20
Re-dialling last called number .............. 20
Ending a call .......................................... 20
State of the LED on the Bluetooth® car
unit ......................................................... 20
TROUBLESHOOTING ............................. 21
Symptoms Cause/Remedy ................... 21
GENERAL INFORMATION
Disclaimer
RDS (Radio Data System)
Any inappropriate use of the device may expose the user to invisible laser rays. Which
exceed the limits for Class 1 laser products.
Caution:
Any inappropriate use of the device may
expose the user to invisible laser rays.
Which exceed the limits for Class 1 laser
products.
Important Information
z Only trained specialists may install the system.
z Observe the automotive industry quality standards.
z Fire hazard. During drilling, be careful not to
damage hidden cable harness, the fuel tank
and fuel lines.
z Never drill into supporting or safety-relevant
chassis parts.
It is essential to observe the following when
installing components in the passenger compartment:
z Ensure that the driver has a clear all-round
view.
z Increased risk of injury in the event of an accident. Do not install components in the inflation range of the airbag or in areas where the
head or knees may knock against them.
8
Many VHF stations transmit RDS information.
The navigation radio evaluates the RDS telegram and offers the following advantages:
z PS (Program Service name): Display of station name.
z Radio text: Display of additional information
concerning the radio station.
z PTY (Program TYpe): Station selection by program type.
z AF (Alternative Frequency): Automatic re-tuning to best alternative frequency.
z TA (Traffic Announcement): Traffic announcements.
z EON (Enhanced Other Networks): Automatic
fade-in of traffic announcements of other stations.
z NEWS: Fading in of messages and items of
news.
Notes on audio CDs
You can play 12 cm CDs on your CD player.
The use of 8 cm CDs (with or without adapter)
and of CDs with irregular shapes is not recommended.
CD formats
The following CD formats are supported by the
CD player:
z CD Audio (CD-DA in accordance with the Red
Book Standard);
A maximum of 22 CD Text titles is displayed in
the title list.
z CD-ROM (in accordance with Yellow Book)
z CD-ROM XA (mode 2, form 1, in accordance
with Green Book)
z CD-R/RW (in accordance with Orange Book,
part 2/3)
z CD Text with CD Audio (in accordance with
Red Book)
z CD Mixed Mode (in accordance with Light
Yellow Book);
Only the audio tracks are played.
z CD-Extra; Only the audio tracks are played.
z Multi-session CD (in accordance with multisession CD specification 1.0)
Notes on MP3 files
The following MP3 files are supported by the
CD player:
z Files conform with MPEG1/2 or 2.5-Layer 3.
z Up to 345 titles in up to 99 directories (each
data name with 32 characters).
z Bit rate: Maximum of 320 kbit/s, constant or
variable. The sound quality of MP3 files generally becomes better with an increased bit
rate. This unit can play recordings with bit
rates from 8 kbps to 320 kbps, but in order to
be able to enjoy sound of a certain quality, we
recommend using only discs recorded with a
bit rate of at least 128 kbps.
z Text display: ID3 tag V1 and ID3 tag V2. MP3
tracks can contain addition information such
as artist, track and album names (ID3 tags
with maximum not more than 12 characters).
Characters other than uppercase/lowercase
letters (“Aa to Zz”) and underscore (“_”) may
not be displayed.
z The unit may not play the first track in the
order that you wrote them to the disc.
z The unit plays only the first session if the disc
contains both CD audio tracks and MP3 files.
z When playing a disc of 8k bps or variable bit
rate (VBR), the elapsed playing time in the
display window may not be correct.
z Make sure that a MP3 CD-R/CD-RW is burned
that is formatted as a data disc and NOT as an
audio disc.
z MP3 files are not compatible with packet write
data transfer.
z There is no m3u play list compatibility.
z There is no compatibility with the MP3i (MP3
interactive) or mp3 PRO formats.
z The MP3 symbol will be shown in the display if
a MP3 is being played.
z Files are compatible with the ID3 Tag Ver. 1.0,
1.1, 2.2, 2.3 and 2.4 formats for display of
album (disc title), track (track title), artist (track
artist) and comments. Ver. 2.x of ID3 Tag is
given priority when both Ver. 1.x and Ver. 2.x
exist.
Notes on WMA files
z WMA is short for Windows Media ™ Audio and
refers to an audio compression technology that
is developed by Microsoft Corporation. WMA
data can be encoded by using Windows Media
Player version 9 or lower.
z This unit may not operate correctly depending
on the application used to encode WMA files.
z Depending on the version of Windows Media
Player used to encode WMA files, album names
and other text information
may not be correctly displayed.
z There may be a slight delay when starting
playback of WMA files encoded with image
data.
z The maximum number of characters which can
be displayed for a folder name is 64.
z In case of files recorded according to the
Romeo file system, only the first 64 characters
can be displayed.
z This unit plays back WMA files encoded by
Windows Media Player version 7, 7.1, 8 and 9.
z You can only play back WMA files in the
frequencies 32, 44.1 and 48 kHz.
z The sound quality of WMA files generally
becomes better with an increased bit rate. This
unit can play recordings with bit rates
from 48 kbps to 320 kbps (CBR) or from 48
kbps to 320 kbps (VBR), but in order to be able
to enjoy sound of a cer tain quality, we
recommend using discs recorded with a higher
bit rate.
This unit doesn’t support the following
formats.
z Windows Media Audio 9 Professional (5.1ch)
z Windows Media Audio 9 Lossless
z Windows Media Audio 9 Voice
9
Notes on OGG files
The following OGG files are supported by the
CD player:
z Files conform with Vorbis I specifications.
z Up to 99 titles in up to 99 directories (each
data name with 32 characters maximum).
z Bit rate: Maximum of 192 kbit/s encoding. The
sound quality of OGG files generally becomes
better with an increased bit rate. This unit can
play recordings with bit rates from 8 kbps to
192 kbps.
z Text display: *0.60 + 1em format (Vorbis I). OGG
information can contain information such as
title, artist, track-number, album name, version,
etc. Characters other than digits (“0 to 9”)
uppercase/lowercase letters (“Aa to Zz”) and
underscore (“_”) may not be displayed.
z The unit may not play the first track in the order
that you wrote them to the disc.
z The unit plays only the first session if the disc
contains both CD audio tracks and OGG files.
z When playing OGG files, the elapsed playing
time in the display window may not be correct.
z Make sure that a OGG CD-R/CD-RW is burned
that is formatted as a data disc and NOT as an
audio disc.
z When playing discs with MP3/WMA/OGG files
and audio data (CD-DA) such as CD-EXTRA
and MIXED-MODE CDs, both
types can be played only by switching mode
between MP3/WMA/OGG and CD-DA.
z The folder selection sequence for playback
and other operations becomes the writing
sequence used by the writing software. For
this reason, the expected sequence at the
time of playback may not coincide with the
actual playback sequence. However, there
also is some writing software which permits
setting of the playback order.
z Some audio CDs contain tracks that merge
into one another without a pause. When these
discs are converted to MP3/WMA/OGG files
and burned to a CD-R/CD-RW/CD-ROM, the
files will be played back on this player with a
short pause between each one, regardless
of the length of the pause between tracks on
the original audio CD.
Notes on Folders
z An outline of a CD-ROM with MP3/WMA/OGG
files on it is shown below. Sub folders are
shown as folders in the folder currently selected.
Important
z When naming a MP3/WMA/OGG file, add the
corresponding file name extension (.mp3,
.wma or .ogg).
z This unit plays back files with the file name
extension (.mp3, .wma or .ogg) as a MP3/
WMA/OGG file. To prevent noise and
malfunctions, do not use these extensions for
files other than MP3/WMA/OGG files.
z This unit allows playback of MP3/WMA/OGG
files on CD-ROM, CD-R and CD-RW discs. Disc
recordings compatible with level 1 and level 2
of ISO9660 and with the Romeo and Joliet file
system with sector format in Mode 1 or Mode
2 Form 1 can be played back. Other formats
cannot be played reliably.
z It is possible to play back multi-session compatible recorded discs.
z MP3/WMA/OGG files are not compatible with
packet write data transfer.
z The maximum number of characters which
can be displayed for a file name, including the
extension (.mp3, .wma or .ogg), is 64, from
the first character.
01
(ROOT)
02
(001.mp3/001.wma/001.ogg)
(010.mp3/010.wma/010.ogg)
03
(011.mp3/011.wma/011.ogg)
(020.mp3/020.wma/020.ogg)
04
(021.mp3/021.wma/021.ogg)
(030.mp3/030.wma/030.ogg)
05
L1
L1 = Level 1
10
L2
L3
L2 = Level 2
L3 = Level 3
Notes
z This unit assigns folder numbers. The user
cannot assign folder numbers.
z It is not possible to check folders that do not
include MP3/WMA/OGG files. (These folders
will be skipped without displaying the folder
number.)
z MP3/WMA/OGG files in up to 8 tiers of folders
can be played back. However, there is a delay in the start of playback on discs with numerous tiers. For this reason we recommend
creating discs with no more than 2 tiers.
z It is possible to play back up to 99 folders on
one disc.
®
Notes on Bluetooth
Bluetooth® is a short-range wireless radio connectivity technology used mainly for mobile
phones, hand-held PCs and other devices.
Bluetooth® operates in 2.4 GHz frequency
range and transmits voice and data at speeds
up to 1 megabit per second within a range of
about 10m (about 30 feet). Bluetooth® was
launched by a special interest group (SIG) that
comprises of Ericsson Inc., Intel Corp., Nokia
Corp., Toshiba and IBM in 1998.
z The Bluetooth ® word mark and logos are
owned by the Bluetooth SIG, Inc. and any use
of such marks is under license. Other trademarks and trade names are those of their respective owners.
Protecting your unit from theft
The front panel can be detached from the head
unit and stored in the provided protective case
to prevent theft.
z If the front panel is not detached from the head
unit within five seconds of turning off the ignition, a warning tone will sound and the front
panel will open.
Important
z Never use force or grip the display and the
buttons too tightly when removing or attaching.
z Avoid subjecting the front panel to excessive
shocks.
z Keep the front panel out of direct sunlight and
high temperatures.
z A few seconds after turning the ignition switch
to on or off, the front panel automatically
moves. When this happens, your fingers may
become jammed in the panel, so keep your
hands away from it.
CD player and care
z Use only CDs that have either of the two Compact Disc Digital Audio marks as shown below.
z Use only normal, round CDs. If you insert irregular, non-round, shaped CDs they may jam
in the CD player or not play properly.
z Check all CDs for cracks, scratches or warping before playing. CDs that have cracks,
scratches or are warped may not play properly. Do not use such discs.
z Avoid touching the recorded (non-printed)
surface when handling the disc.
z Avoid leaving fingerprints on the CD when
removing it.
z Always store audio CDs in their protective
covers when not in use.
z Always ensure that CDs are clean and dry
before inserting.
z Keep discs out of direct sunlight and do not
expose the discs to high temperatures.
z Do not attach labels, write on or apply chemicals to the surface of the discs.
z To clean a CD, wipe the disc with a soft cloth
outward from the centre.
z If the heater is used in cold weather, moisture
may form on components inside the CD player.
Condensation may cause the CD player to
malfunction. If you think that condensation is a
problem turn off the CD player for an hour or
so to allow it to dry out and wipe any damp
discs with a soft cloth to remove the moisture.
z Road shocks may interrupt CD playback.
11
Cleaning the unit
Do not clean using cleaning fluid, alcohol or
other solvents. Use only a damp cloth.
CD-R/CD-RW discs
z When CD-R/CD-RW discs are used, playback
is possible only for discs which have been
finalized.
z It may not be possible to play back CD-R/CDRW discs recorded on a music CD recorder or
a personal computer because of disc characteristics, scratches or dirt on the disc, or dirt,
condensation, etc., on the lens of this unit.
z Playback of discs recorded on a personal
computer may not be possible, depending on
the application settings and the environment.
Please record with the correct format. (For
details, contact the manufacturer of the application.)
z Playback of CD-R/CD-RW discs may become
impossible in case of direct exposure to sunlight, high temperatures, or the storage conditions in the vehicle.
z Titles and other text information recorded on a
CD-R/CD-RW disc may not be displayed by
this unit (in the case of audio data (CD-DA)).
z Read the precautions with CD-R/CD-RW discs
before using them.
INSTALLATION
Use the supplied mounting sleeve and the strap
bracket to mount the car radio firmly in the
dashboard.
Only use the supplied screws and nets for
installation.
Keep leftover installation equipment for future
use.
If the installation requires drilling of holes or
other modifications to the vehicle, contact your
nearest dealer.
This set is designed for the installation in the
radio space in the dashboard.
Installation
1. If the space is to small, enlarge it as shown in
figure F.
2. Install the sleeve in the dashboard (see figure G).
z Slide the sleeve in the dashboard.
z Push the tabs down with a screw driver.
3. Insert the radio into the sleeve.
4. Connect the cables as shown in figure C.
5. Attach the bracket to the radio and mount it
an the chassis (see figure H).
12
Connection in vehicles equipped
with standard ISO connectors
The radio may be installed without major preparation in vehicles equipped with ISO connectors. Some signals may have to be adapted or
connected to the ISO connectors.
Connection in vehicles without
standard ISO connectors
For vehicles with different connection requirement, ask your dealer for an adaptor cable. If
no adaptor cable is available for your vehicle,
connect the radio as describe in the "Connectors" section.
Preparation
The device must be connected to a 12V DC
electrical system with a negative terminal to
earth (car chassis).
Warning: Installation that does not conform to these requirements may result in
malfunction, damage or fire!
To avoid the risk of a short circuit during installation, disconnect the negative terminal of the
battery until the set has been securely installed
and connected.
Connectors (fig. C)
Connector A 1)
a- Power Supply
1
2
3
Yellow/red wire A4: Connect to the switched
12V supply (switched on/off by the car ignition.
Red wire A7: Connect to a permanent 12V
supply. This is the main power supply.
Ensure that this connection can handle a
current of 15A.
Brown wire A8: Connect to earth (car chassis).
Electronic or Motorised Antenna
Connect pin A5 to the power supply for an
electronic antenna or the control wire for the
relay of an automatic motorised antenna.
Do not use this connection for direct power
supply to the antenna motor.
Connector B 1)
Mounting the Radio (fig. G and H)
Loudspeakers (use 4 ohm loudspeakers only)
Do not connect any of the loudspeaker leads to
earth or directly to a booster/amplifier without
high level input or via an external fader! You
can connect the loudspeaker leads directly to
an amplifier with high level input:
This radio can be properly installed either from
conventional Front Mounting and/or from Rear
Mounting.
Connecting 4 loudspeakers
Side & pol. Front/colour Pin
Left (+)
Left (-)
Right (+)
Right (-)
1
Green
[B5]
Green/black [B6]
Grey
[B3]
Grey/black [B4]
Rear/colour Pin
White
White/black
Blue
Blue/black
[B7]
[B8]
[B1]
[B2]
) For this accessory, contact your dealer.
Line out
You can connect a power amplifier with 2 or 4
additional loudspeakers to this set using the
labelled RCA cable.
z Red socket to right channel
z White socket to left channel.
Audio In
You can connect external audio equipment via
the labelled AUX-in RCA cables.
z Red wire for Right Channel input
z White wire for Left Channel input.
MOUNTING
Metal Sleeve (fig. F and G )
Install the metal sleeve in the dashboard. For
optimal performance of the CD player, the metal
sleeve should be positioned horizontally (between -10° and +30°).
Fix metal sleeve into place by pressing the
metal tags outwards using a screwdriver.
Front Mounting
z Slide the radio into the metal sleeve until the
springs at either side of the radio snap into the
openings of the sleeve.
z Finally reconnect the negative car battery terminal.
Rear Mounting
z Choose a position where the screw holes of
the mounting bracket and the screw holes of
the radio become aligned and tighten the
screws at 2 places on each side.
z Only use M5 screws that are not longer than
6 mm.
Removing the Radio (using the two
removal keys supplied) (fig. J)
z Press the REL button and open the front panel.
z Insert both removal keys into the holes on the
front of the set until they lock.
z Pull out the radio.
Replacing the Fuse (fig. C)
z Replace with a 15A blade-type fuse.
The new fuse must be of exactly this value and
type otherwise the set will not be adequately
protected. Ignoring this procedure may lead to
damage to the set, which will invalidate the
guarantee.
Interference Suppression
Most modern cars have sufficient interference
suppression. If you experience interference
generated by the car, consult your dealer.
Connecting the Radio (fig. C)
z Ensure the battery is disconnected.
z Insert power supply connector A’ into socket
A.
z Insert loudspeaker connector B’ into socket B.
z (Optional) Insert the line-out connector into the
corresponding socket.
z (Optional) Insert the AUX connector into the
corresponding socket.
z Insert aerial plug into the aerial socket (good
reception is only possible with a good aerial).
If an antenna adaptor is needed, please consult your dealer.
13
FRONT PANEL AND REMOTE
CONTROL
8. DISP
5.
Toggle the display modes
9. VOL/SEL
15.
Turn: increase/decrease
volume
Short press: select sound
controls (VOLume,
BALance, FADer)
Long press: select special
functions (Start IN,
VOLume, Time ADJust,
TA VOLume, EON,
DSP None/Classic/Rock/
Pop/Flat)
See fig. A and E.
Front Panel Remote Control
Function(s)
1.
1.
Switch On / Off the set
2. PTY
10.
Select stations by program
type
3. BAND/ENT
3.
Change FM/AM band/
Enter (in function
selection)
4. TA
9.
Activate/deactivate Traffic
Announcement Search
5. M1...M6
16.
6. AF/REG
7.
14
8.
13.
Radio:
Short press: recall
memorised radio
stations
Long press: store
selected radio
stations
SD/MMC/USB/CD:
Press to activate
special control functions
(Play/Pause, Repeat,
Introduce (10 sec.),
Random, Skip 10 tracks
back, Skip 10 tracks
forward)
Toggle AFREGionalisation
Radio:
Short press: auto-seek a
station (auto mode)/
stop the frequency
(manual mode)
Long press:
activate manual tuning
mode
SD/MMC/USB/CD:
Short press: select
the previous or next
track/file
Long press: Review/
Fast-forward the current
track
10. USB Port
Port for inserting USB
devices
11. SD/MMC Slot
Slot for inserting Flash
Memory Cards
12. Mute
12.
Mute/demute audio level
13. SCH/A/PS
4.
Radio:
Short press: Scan the 6
preset radio stations for 5
sec. per station
Long press: Search and
store six radio stations
SD/MMC/USB/CD:
Activate track/file search
(song selection mode)
14. MODE
2.
Change source between
the FM/AM, CD, USB, SD/
MMC and Auxiliary modes
16. CD Load Slot
Slot to load/unload CD
17. EJECT Button
Eject/reload CD
18. LCD Screen
Shows all information and
functions
19. REMOTE CONTROL
Sensor
Receives signal from the
IR Remote Control
20. RESET Button
Reset if the unit is
malfunctioning
21. SCAN / LOUD 6.
Short Press: scan for a
radio station broadcast for
5 sec. then scan for the
next station, press again
to stop
Long Press: toggle
loudness
7.
11.
Short press: select Mono/
Stereo
Long press: select Local/
Distant Reception
Toggle sound equalization
14.
Increase/decrease
volume
Selecting a Source
Your car radio is designed for different types
of sources.
z RADIO
z CD
z USB
z SD/MMC
z AUX
Press the MODE button to select the source.
SECURITY
Sound Controls
Removing the Front (fig. A and I)
Volume
1. Press the REL key, to flip-down the front.
2. Pull the front towards you. Follow the diagram mounted on the back of the detachable
unit.
3. Take the detachable front with you when you
leave the car.
4. Keep the front in its protective cover.
Please make sure you can still hear the traffic
(horns, sirens..….)
z Turn the volume knob to adjust the volume.
Note: You can adjust the start-up volume (IN
VOL). When the start-up volume is set to maximum level, it may be extremely loud when you
switch on the set.
See: Setting the Start-up Volume
Replacing the Front (Fig. K and L)
1. Take the front from its protective cover.
2. Insert the front into radio until it clicks into
position.
3. Close the front until it clicks into position.
Note 1:
If you hear a warning signal, the front is not
properly replaced!
Note 2:
To ensure good connection between the set
and the detachable unit, it is advisable to clean
frequently the connections with a cotton swab
from time to time!
Note 3:
Do not touch the electrical contacts when removing or replacing the front panel!
GENERAL OPERATION
Switching On/Off
Press
button to switch the set on or off.
Setting the Start-up Volume
1. Long press the VOL/SEL knob to enter the
special functions mode.
2. Press the knob till you see "IN VOL XX", where
"XX" is the starting volume.
3. Turn the knob to adjust the IN VOL to a comfortable level.
Note: If the radio was previously at a higher
volume level when you turned off the radio:
After you turn on the radio, the radio will use
the starting volume. Otherwise the radio will
remember the previous volume level.
Balance
To change the balance between the amount of
sound output on the left and right side.
1. Press the VOL/SEL knob to select the sound
control Balance (BAL).
2. Turn the knob to adjust the level of sound
output to the left and right speakers.
Bass (only when DSP is off)
To change the enhancement of low frequency.
1. Press the VOL/SEL knob to select the sound
control Bass (BAS).
2. Turn the knob to adjust the level of bass enhancement.
Treble (only when DSP is off)
To change the enhancement of high frequency.
1. Press the VOL/SEL knob to select the sound
control Treble (TRE).
2. Turn the knob to adjust the amount of treble
enhancement.
Fader
To change the amount of sound output to the
front and rear speakers.
1. Press the VOL/SEL knob to select the sound
control Fader (FAD).
2. Turn the knob to adjust the level of sound
output to the front and rear speakers.
15
Equalizer
Auto Store
Press the EQ button on the remote control to
select one of the programmed equalizer settings.
z None (NONE)
z Classic (CLAS)
z Rock (ROCK)
z Pop (POP)
z Flat (FLAT)
Long press the SCH/ A /PS button, the radio will
search for the six strongest stations and store
them automatically under the preset memory
buttons 1 through 6.
Mute
Press the Mute button to mute the sound. If a
CD is playing, it will be paused. Press the Mute
button again to restore the sound and the CD
will continue playing.
Loudness
Radio and Remote Control
Long press the Loud button to enhance the
high and low frequency sound quality.
RADIO OPERATION
1. Press the
button to switch the set on.
If the set is not in RADIO mode:
2. Press the MODE button to select RADIO.
Select a waveband
Your radio is designed for reception of the FM
and AM wavebands.
z FM 1
z FM 2
z FM 3
z AM 1
z AM 2
Press the BAND/ENTER button to select the
desired radio band.
Scan (Remote Control only)
This function allows you to scan the stations or
the presets of the current band.
Short Press the SCAN button and the radio will
start scanning.
When it receives a radio signal, the screen will
flash 10 times and show the reception frequency. The radio will continue scanning using
this pattern.
When the desired station is reached, press the
SCAN button again to stop scanning.
Preset Scan
Short Press the SCH/ A /PS button, the radio
pauses for 5 sec. at each preset station. When
the desired station is reached, press the button
again to select this station.
FM Stereo Operation (Remote
Control only)
If the stereo signal becomes to weak (bad reception of the radio station):
1. Press the ST/LOC button on the remote control until MONO appears in the display of the
radio.
2. Press this button again and STEREO appears
in the radio display.
Memorising Radio Stations
Press button
(frequency down) or
(frequency up) to seek for a station. The tuner
will scan down or up to the next strong station.
1. Press the Band Button to select the desired
band, FM1, FM2, FM3, AM1 or AM2.
2. Tune in the desired radio station.
3. Long press any of the 6 Preset buttons to
store the radio station. The number will be
displayed next to the radio frequency. For
each band you can store up to six radio stations.
Manual Tuning
RADIO DATA SYSTEM (RDS)
Long press either one of the buttons
or
to select manual tuning.
Press button
(frequency down) or
(frequency up) until the desired radio station is
selected. If there is no further action for 10
sec., the radio will switch back to auto tuning
mode.
This feature is only available with the FM band!
Many FM stations broadcast RDS information.
All RDS related features e.g. TA, NEWS etc...
will be deactivated when option ‘RDS’ is set to
‘OFF’.
This set uses the RDS information to offer you
many advantages including:
Select a station
Seek tuning
16
Display of Station Name (PS)
The radio displays the name of the station instead of its frequency.
Automatic frequency (AF)
The set remains tuned to the current station by
continually searching for the best possible alternative frequency for reception.
Note: The AF function is preset. You can
switch off AF if not required. Press the AF/REG
button and select OFF.
Traffic Announcements (TA)
You can activate the TA mode to give priority to
hear announcements related to these subjects
(even if you do not listen to the radio).
This function is only available with RDS on.
Presetting TA Volume
With this option the volume for Traffic Announcements can be preset to the required
level.
1. Long press the knob to select the TA VOL
setting.
2. Turn the VOL knob clockwise to set volume
“louder” and counter-clockwise “softer” depending on your requirements.
Activate/deactivate TA
Press TA button to activate/deactivate TA.
When traffic announcement is selected and
information is received TP appears in the display.
Interrupting Traffic Announcement
If you do not wish to continue listening to a
particular Traffic Announcement mode, you can
interrupt it without switching off the mode.
1. Press TA button once, the set will return to
the previous operating mode.
Note: You can switch off RDS features if not
required.
2. Press the AF/REG button and select the option OFF.
Programme Type Selection (PTY)
This function is available with FM only. It enables you to select stations by programme type.
There is a coding of up to 28 pre-defined programme types – e.g. (in Europe): PTY1 News,
PTY6 Drama, PTY11 Rock music.
1. Short press this button to display the PTY
information, the display is flashing.
2. Press either the
or
button to search
for PTY stations.
3. Long press the PTY button to display the programme type. Turn the VOL knob to select
the programme required.
4. Press the PTY button again to confirm the
selection.
CD OPERATION
Loading CD in the CD player
1. Press the
button to switch the set on.
2. Press REL button to open the front.
3. Insert the CD (label facing up) into the CD
slot.
When a disk is loaded it will be played automatically.
Note: If a CD does not automatically load, DO
NOT FORCE it into the slot, this could damage
the CD and the set.
4. Close the front.
Pausing a CD
Radio:
1. Short press the
to pause or resume playing.
Remote Control:
1. Long press the
on the remote control to
pause or resume playing.
Ejecting a CD
1.
2.
3.
4.
Press REL to open the front.
Press the EJECT button to eject the CD.
Remove the disc.
Close the front.
CD playback
This CD player is suitable only for 12 cm disc
and can read both audio and MP3/WMA/OGG
format CD. Please do not use irregular shaped
CD.
Compressed Audio playback
You are able to listen to MP3 files that conform
to MPEG1/2 & 2.5-Layer 3 at bit rate up to 320
kbps or Variable Bit Rate (VBR) burned with ID3
tag. You are also able to listen to WMA files that
conform to version 9 or below at bit rate up to
320 kbps and OGG files that conform to Vorbis I
at bit rate up to 128 kbps. The files can be
burned on a CD-R or CD-RW disc in ISO9660
level 1 and 2 format are also supported.
17
Playing a CD-R or CD-RW
Skipping Track or Files
Depending on the type of CD-R/CD-RW CD,
surface condition of the disc, as well as the
performance and condition of the CD writer,
certain CD-R/CD-RW CD may not operate normally on this unit.
1. Long press the –10 button to skip backward
10 tracks or files.
2. Long press the +10 button to skip forward 10
tracks or files.
Playing a “copy protected” nonconforming audio CD
1. Long press the SCH A/PS button.
2. Use the VOL knob (radio) or buttons (remote
control) to select the desired track or file.
3. Long press the ENTER button to play the selected track or file.
Due to use of copy protection schemes of
some audio CDs, which are non-conformance
to international audio CDs standards (Red
Book), these type of copy protected disc(s)
may not play on this set.
Select a Track or File
SD/MMC/USB OPERATION
Listening to CD/MP3/WMA/OGG
General
If the first track is a data track, the disc will be
treated as MP3/WMA/OGG disc. (If no MP3/
WMA/OGG file was found throughout the disc,
then it will treat as audio disc). If first track is
an audio track, the disc will be treated as audio
disc.
If TA are set to ON, announcements will interrupt CD playback.
You can use the smart card or multimedia card
or an USB device to play music files.
1. Press the
button to switch the set on.
2. Insert the USB device into the USB port or the
SD/MMC card into the SD card slot.
When an USB device or SD/MMC card is inserted it will be played automatically.
Track/File Selection
Track Advance
1. Short press the
or
button to skip to
the next track or file, forward or backward.
Fast Forward
1. Long press the
or
button to skip to
fast forward or backward the track or file,
once it reaches the next track or file the fast
forward function is terminated.
Repeating a Track or File
To continually repeat the current track.
1. Long press the RPT (REPEAT) button to repeat the track/file currently playing.
Random Feature
1. Long press the RDM (RANDOM) button to play
the tracks or files in random order.
Intro Feature
1. Long press the INT button to scan the track
or files. Each track or file will be played for 10
seconds.
To stop scanning, press the button again and
the current track or file will be played.
18
Pausing
Radio:
1. Short press the
to pause or resume playing.
Remote Control:
2. Long press the
(Pause) button on the remote control to pause or resume playing.
File Selection
File Advance
1. Short press the
or
button to skip to
the next file, forward or backward.
Fast Forward / Review
1. Long press the
or
button to skip to
fast forward or backward the file, once it
reaches the next file the fast forward function is terminated.
Repeating a File
To continually repeat the current track.
1. Long press the RPT (REPEAT) button to repeat the file currently playing.
Random Feature
1. Long press the RDM (RANDOM) button to play
the files in random order.
Intro Feature
Important Notes on SD/MMC/USB
1. Long press the INT button to scan the files.
Each file will be played for 10 seconds.
2. To stop scanning, press the button again and
the current file will be played.
Smart Card or Multimedia Card
Skipping Files
1. Long press the –10 button to skip backward
10 files.
2. Long press the +10 button to skip forward 10
files.
Select a File
1. Long press the SCH A/PS button.
2. Use the VOL knob (radio) or buttons (remote
control) to select the desired file.
3. Long press the ENTER button to play the selected file.
Search for File Name/Title
To search for a file name or a title (using 3 letters) follow the procedure below.
1. Press the SCH A/PS button twice. AÄÄwill
appear in the display.
2. Turn the VOLUME knob to select the first letter.
3. Press the VOLUME knob to enter the first
letter.
4. Turn the VOLUME knob to select the second
letter.
5. Press the VOLUME knob to enter the second
letter.
6. Turn the VOLUME knob to select the third
letter.
7. Press the BAND/ENT button to search for the
file name.
8. If more than one name or title has the same
letters turn the VOLUME knob to select the
desired name or title.
9. Long press the BAND/ENT button to start playback.
Root Search for Directories
1. Press the SCH/A/PS/ button three times.
ROOT/ will appear in the display.
2. Turn the VOL/SEL knob to select the directory.
3. Press the BAND/ENT button to playback the
first song in the selected directory.
z The unit can read up to 2 Gb.
Insert the flash memory card into the SD/MMC
slot on the front of the set.
Notes:
z This unit may not play all SD cards with lock
function.
z Some SD/MMC devices may not operate correctly using this unit.
z This unit is not responsible any data loss.
Please backup your data!
USB Stick
Plug in the USB device into the USB port on the
front of the set.
Notes:
z This unit can connect to MP3 player/USB device (Microsoft® WindowsTM System only).
z This unit can direct search the *.MP3 file in the
USB device.
z This unit can support WMA files.
z This unit can play the 48K byte - 320K byte
rate music files.
z This unit cannot operate some special USB
devices, e.g.. Mac system or security lock systems.
z Some USB devices may not operate correctly.
BLUETOOTH® CAR UNIT
(Available on CD1737X only)
General
You can use the Bluetooth® car unit in your car
to call hands free.
To do so, you have to connect your cellular
phone (must have the Bluetooth® function) by
pairing to the Bluetooth® car unit.
Controls (fig. D)
1. VOL+
2. LED
3. TALK
4. MIC
5. VOL-
increase the volume
shows that the cellular phone is
connected
press to accept /to reject a call
microphone to talk with the other
party
decrease the volume
Interrupt play
1. Press the "1"/PLAY (PLAY/PAUSE) button to
pause the track being played.
In pause mode the display is flashing.
2. Press the "1"/PLAY (PLAY/PAUSE) button
again to or resume playing.
19
Pairing your cell phone and
Bluetooth® remote box
1. Press the VOL+ on the Bluetooth® remote box.
The LED on the remote box will start flashing
fast, the pairing mode is activated.
z Refer to cell phone’s user manual to learn
who to put your cell phone into pairing
mode.
z The default PIN is 0000
2. After pairing, the LED on the car unit will flash
every 3 or 4 seconds to indicate that the unit
is in call waiting mode for receiving and making calls.
Answering an incoming call
1. The ring tone will sound from the car radio
speaker.
2. Short press the TALK button to answer the
call.
3. Now you can talk hands free via the microphone of the Bluetooth® car unit and listen
from the car audio speaker instead of your
cellular phone.
During talking, the LED on the Bluetooth® car
unit light continuously.
4. You can adjust the volume by means of the
VOL+ and VOL- button on the car radio.
5. To receive a call directly on your cell phone,
press the TALK button longer then 3 seconds.
Re-dialling last called number
1. In call waiting mode, press the TALK button
twice, the last called number will be re-dialled.
Ending a call
1. Press the TALK button once and the Bluetooth® car unit will return to the call waiting
mode.
State of the LED on the Bluetooth®
car unit
State
Pairing
Not connected
Connected
Ringing
Talking
20
LED Status
flashes fast
Off
Lights every 4 sec. for
2 sec.
Lights continuously
Lights continuously
Note:
The Bluetooth® compatibility depends on the
solution integrated into the Bluetooth® car unit
and the cell phone to be paired with. The
firmware of the cell phone may vary from region to region and manufacturer to manufacturer.
TROUBLESHOOTING
CD ERRORS Verify:
May be, it will happen that your car radio will
not functioning as you expected it to. Before
calling for service, please read this user
manual and review carefully the setting values:
you may find that a function cannot work properly with the value, you defined.
Nevertheless, if you need to send your set for
reparation, always send it complete with detachable front (do not try to open the car radio
to service it yourself).
During the use of the CD player, the set does
not function and displays CD ERROR.
z The CD is properly inserted into the CD player.
z The player contains at last one CD.
z The CD is correctly inserted; no dirty, exotic or
damaged disc; the front of the of the player is
properly shut.
Symptoms Cause/Remedy
NO POWER Verify:
The radio does not function.
z The set is well inserted in the dashboard (see
MOUNTING).
z The set is well connected (see INSTALLATION).
The set does not function and the display
screen does not light up.
z Switch off the set.
z Check the fuse (see INSTALLATION).
SD/MMC/USB ERRORS Verify:
The set can not connect to the MP3 player/USB/
SD/MMC device.
z The inserted device must use the Microsoft
Windows System.
z The inserted device must support 48 Kb – 320
Kb rate music files.
NO SOUND Verify:
The display screen lights up but the set gives
no sound (or only a whistle).
z Increase the volume: if you are listening to the
radio, move to an area where the reception of
the station is better.
z Check the antenna and its connection (see
INSTALLATION).
z Check if the station search is finished.
Verify the speakers connections (see INSTALLATION) and the speakers balance (SOUND
SETTINGS)
There is no sound from the loudspeakers (front
and rear), either from the radio or from CD.
There is no sound from the subwoofer after
having connected an external amplifier.
Verify your external amplifier installation:
z Connection of the external amplifier on LINE
OUT (see INSTALLATION).
SOUND TROUBLE Verify:
The sound level is to low during traffic announcements.
Adjust the volume setting for traffic announcements (see Presetting TA Volume).
21


![front cover_CD1107_1327 new [Geconverteerd].ai](http://vs1.manualzilla.com/store/data/007414261_1-964964ba40677a53b0ff9d76767674e5-150x150.png)