1
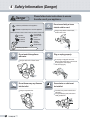
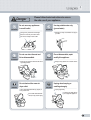
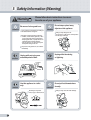
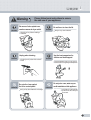
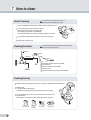
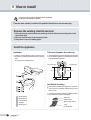
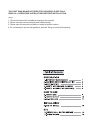
THIS UNIT WAS MANUFACTURED FOR HOUSEHOLD USE ONLY.
READ ALL OPERATING INSTRUCTIONS BEFORE INSTALLATION.
Notes
1. This product should be installed according to this manual.
2. Please read this manual carefully and install properly.
3. Please save this manual and place an easily accesible location.
4. Do not attempt to service this appliance yourself. Doing so could void warranty.
1 Important Safeguards
When using electrical products, especially when children are present, basic safety
precautions should always be followed, including the follwing:
1. Read all instructions before using
DANGER - To reduce the risk of electrocution:
1. Do not place or store this appliance where it can fall or be pulled into a tub or sink.
2. Do not place in, or drop into water or other liquid.
3. Do not reach for a product that has fallen into water. Unplug immediately.
WARNING - To reduce the risk of burns, electric shock, fire or injury to persons.
1. Close supervision is necessary when this appliance is used by or near the very young, the elderly or in invalid. Childern
should not be permitted to use or touch this appliance. do not leave children unattended in any room where this product
has been installed. Be sure to adjust the temperature of the toilet seat for the elderly, those who are incapacitated or
persons with sensitive skins.
2. Use this appliance only for its intended purpose as described in this manual. Do not use attachments not recommended
.
by the manufacturer.
3. Never operate this appliance if it has a damaged cord or plug, if it is not working properly, if it has been dropped, damaged
or dropped into water.
4. Install the unit properly by following the installation procedure.
5. Only authorized persons can install or repair the unit. Do not attempt to service this appliance yourself. Doing so could
avoid warranty.
6. Keep the cord away from heated surfaces.
7. Never drop or insert any objects into any opening or hose.
8. Do not use outdoors or where aerosol spray products are being used or where oxygen is being administered.
9. Always follow the gounding instruction in this manual before plugging in the unit.
2 Cautions before installation
1. Note the following important points
1. Do not install in a location where water might be splashed on this appliance or in a location exposed to such excessive
moisture that condensation forms on the products surface.
2. To avoid damage to electronic components due to high levels of humidity, provided adequate ventilation by opening
a window and/or door when bathing. You may find operating an exhaust ventilating fan during these times
of high humidity beneficial.
2
2
3. Use a water supply having a water pressure of 0.5kgf/cm to 7.5kgf/cm
4. Connect the product to a pipe carrying potable water. Do not connect to an industial water line or other water supply
that does not carry water of drinking quality.
5. In areas where water freezes in pipes in winter amke arrangements to keep the pipes warm.
The water emaining in the unit may sometimes freeze during storage in winter. In that case, warm the unit in the
room before installation.
6. The thermal protector in the water tank may sometimes trip during storage or transportation in warm weather causing
non-operation. In that case, cool the unit in the room before installation.
.
.
7. The rated power voltage is 220V AC, 50Hz.and the rated power consumption is 735W. Use wiring and an electrical
outlet appropriate for this level of power.
8. Do not supply electrical power to the unit until the plumbing installation work has been completed; it could cause
malfunction.
2
3 Identification
Main Unit
Cover
Caution Label
Deodorizer
(SB-635 only)
Power Supply
Cord
Control Panel
Dryer (SB-620, 635 only)
Nozzle
Seat
Accessory
Tee Valve
Mounting Bolts
(2pcs)
Washers
(2pcs)
Water Supply Tude
To Main Unit
Ground Wire
Screw
Cone Packing
(2pcs)
Nuts
(2pcs)
Water Supply Tude
To Flush Tank
User manual
3
4 Safety Information (Danger)
Danger
Please follow basic instructions to ensure
the safe use of your appliance.
indicates a prohibited use of the appliance.
indicates a required step in the use of this appliance
PROHIBITED
Do not use a faulty or loose
electric outlet or cord.
Doing so may result in a shock circuit,
electiric shock or fire.
Prohiition
Do not throw
any firearms
Do not wash
Do not handle
with wet hands
Do not
disassemble
Ground
connection
Required step
Meaning of symbols
DO NOT
WASH
Do not wash this appliance
with water.
Plug or unplug properly.
NO
WET HANDS
Doing so result in fire or electric shock.
NO
FIREARMS
Do not throw away any firearms
into the toilet.
Doing so may result in fire.
4
GROUND
CONNECTION
Do not plug or unplug with wet hands.
Doing so may result in injury or short circuit.
Do not grap the cord to unplug.
Pull out the plug only.
Ground wire or outlet must
be installed.
If avoided, it may result in short shock or
malfunction.
If not grounded plug used, make sure to
install gounded wire.
Danger
PROHIBITED
Please follow basic instructions to ensure
the safe use of your appliance.
Do not use many appliances
in a multi outlet
PROHIBITED
Not doing so may occur irritation or injury to
your skin.
Doing so may result in fire or damage.
Be sure to use a dry and clean outlet.
Do not use a faulty or loose outlet.
DO NOT
DISASSEMBLE
Do not use when the seat and
lid are disassembled.
DO NOT
DISASSEMBLE
Doing so may result in electric shock due to
high voltage inside.
REQUIRED
Do not obstruct the warm air
dryer outlet.
If the outlet obstructed with any objects, it
may result in fire.
If the outlet obstructed with
hands, it may result in injury.
Use tap potable water only.
(ground water)
Do not disassemble, repair
modify this appliance.
Doing so may result in fire or electric shock.
REQUIRED
Unplug when beeping or
smelling strangely.
Unplug right away.
Contact your dealer where
you bought this appliance.
5
5 Safety Information (Warning)
Warning
Please follow basic instructions to ensure
the safe use of your appliance.
Be aware of a low-grade burn.
PREHIBITED
It may result in a low-grade burn if sitting on
the heated seat for a long time.
PREHIBITED
Do not step or place heavy
objects on this appliance.
Doing so may damge the unit.
Do not step on a lid, seat or control panel to
avoid injury or damage.
Be aware of being used by the following :
- Children, senior citizens, patients, or who
cannot control the grade of temperature.
- Sleeping pills users, or people who are on
medication that causes drowsiness.
- Who are drunk or very tired and may fall
asleep while sitting on the unit.
If injured in a low-grade burn, see a doctor
immediately.
REQUIRED
REQUIRED
Unplug while not using over
extended period of time.
Use this appliance in a toilet
only.
Not doing so may result
in fire, injury or electric shock.
6
REQUIRED
PREHIBITED
Unplug while thundering
or lightning.
Do not pull out the waterhose
forcedly.
Doing so may cause the water leakage.
Warning
REQUIRED
Please follow basic instructions to ensure
the safe use of your appliance.
Be aware of urine splash on a
nozzle or warm air dryer outlet.
Do not force to close the lid.
REQUIRED
Doing so may cause malfuction.
Not doing so may result in smelling or
malfuction.
Unplug when cleaning.
REQUIRED
Not doing so may result in fire or electric
shock.
REQUIRED
Use the low temperature for
children and handicapped.
If high temperature sets up, it may result in
burns due to not recognizing the temperature.
LO
PREHIBITED
Do not sit or lean against
the lid or control panel.
Doing so may cause malfuction or breakage.
PREHIBITED
HI
Do not put a vase, water cup or
small materials on this appliance.
If the water or small materials
go into the unit, the unit may be
out of order.
7
6 How to use
Stop
Water Spray / Seat Temperature Adjustment
Press "STOP" to stop all operation.
When a user stands up, all operation will stop automatically. (Seat Switch model only)
Water temperature can be adjusted to your desired level by pushing "'WATER".
Seat temperature can be adjusted to your desired level by pushing "SEAT"
There are 4 levels (room temp, low, middle and high).
Two LEDs are turned on when middle temperature set.
Cleansing
Press "CLEANSING" to clean the posterior. The function stops in a minute automatically.
Moving wash activates automatically. The nozzle moves back and forth automatically to widen
cleansing area.
Press "CLEANSING" again to stop moving wash.
Bidet
Press "BIDET" for front cleansing. The function stops in a minute automatically.
Moving wash activates automatically to widen cleansing area.
Press "BIDET" again to stop moving wash.
SB-620
Water Pressure / Dry temperature Adjustment
(SB-620 only)
The strength of water spary pressure for cleansing / bidet can be adjusted by pushing "HI" or
"LO" to your desired level.
The temperature of air dry can be adjusted by pushing "HI" or "LO" to your desired level.
There are 5 levels for each fuction.
Nozzle Position Adjustment
The postion of nozzle can be adjusted by pushing "FR" or "BK" to your desired position.
There are 5 positions.
Nozzle Cleansing
Dry
(SB-620 only)
Press "DRY" button after "CLEANSING" or "BIDET". Warm air comes out from dry outlet for
three minutes. Dry function stops in 3 minutes automatiocally.
To alter the temperature of air drying, press "HI" or "LO".
Press "CLEANSING" that locates next to "SEAT" to clean the nozzle manually while not
sitting on the seat (not occupying, seat switch model only)
Press "STOP" to return the nozzle. (stand by mode)
Do not forcefully push or pull the nozzle or bend it while cleansing.
Consecutive Use
During "CLEANSING" or "BIDET" operation, press "DRY" to operate "DRY" after "CLEANSING"
or "BIDET" consecutively.
Whille in use of "DRY", press "STOP" to stop the current operation.
Self-cleaning
Power
Press "POWER" to turn on the appliance. Press "POWER" again to turn off the appliance.
While the appliance is turned off, all buttons do not work and heating does not work either.
Convenient to power off while not in use without pulling out the power cord.
This appliance keeps clean itself automatically by rinsing off the nozzle before and after
operation of BIDET or CLEANSING.
Self-diagnosis System
This appliance has a self-diagnostic system. Whenever the appliance has a problem, a LED
of seat temperature or water temperature will blink.
Unplug the electric power cord immediately and contact to your dealer or us.
8
9
7 How to clean
Nozzle Cleansing
Do not forcefully push or pull the nozzles, or bend it.
Make sure to use "CLEANSING" when cleaning.
Press "CLEANSING" that locates next to "SEAT", then the nozzle comes out.
Do not forcefully push or pull out nozzles, or bend it.
Use a toothblush or soft cloth to clean the nozzle.
After cleaning, press "STOP" or "CLEANSING".
The nozzle restracts itself. For a long time cleaning, unplug for your safety.
Do not restract nozzles without a nozzle tip. It may result in malfunction.
Be aware the nozzle tip for lost .
Cleaning the strainer
The appliance will not be operated properly if the strainer is clogged.
Be sure to clean the strainer regularly.
Water tank
Strainer
Water hose
Nut
Shutoff valve
Close the shutoff valve by turning clockwise.
Unscrew the unt.
Clean the strainer with a small brush.
RE-screw the nut.
Open the shutoff valve by turning counter clockwise.
Cleaning the body
Regularly wipe off the body with a dry soft cloth or sponge, or dampened with neutral detergent.
Release the lid.
1. Pull left and up the left hinge part.
2. Release the right hinge part. (Be aware your fingers not to be caught)
For care of plastic body, do not use any cleansers which are not safe to use
in the toilet seats
(toilet cleanser, home cleanser, bleach, bezene, paint thinner, cresol etc)
Toilet cleanser
10
Thinner
Benzebe
Bugs killer
Sand paper
8 Maintenance
Water draning - when not using the unit for a long time
Unplug the power supply cord.
Not doing so may be in fire.
Lift up the seat and push the drain
button. Completely drain the water.
Close the shutoff valve.
Close the seat.
Refer to the trial operation method in oder to use
this appliance again.
Drain button
Preventing freezing
Make sure the power code is
plugged in properly.
Not using the unit for a long time
in winter, unplug and drain the
water from the water tank and
pipes thoroughly.
Set the temperature of water as low or
middle in the control panel. (Freezing
can be prevented by thermal effciency
of water tank.)
FYI. If there is no heating system in the toilet, wrap
pipes with cloth or other materials.
Refer to the water drain method.
11
9 How to install
Do not plug the power cord until installation finished completely.
Not doing so could damage the appliance.
If electric work needed, contact to the qualified electrician or serviceman only.
Remove the existing toilet lid and seat
1. Remove the nuts, washers and cone packings from the toilet seat mounting bolts in the
back of the toilet.
2. Remove the toilet seat, lid and mounting bolts.
3. Keep them in case of installing again.
Install the appliance
Installation
Insert the mounting bolts through the mounting holes,
and slide cone packings and washers into the mounting
bolts.
Then put the nuts and tighten them.
Toilet size (elongated & round front)
The toilet demensions must be within those shown below.
Do not install this appliance on a toilet that does not meet
those demational requirements.
140mm ~ 250mm
Round Front type
Elongated type
420mm ~ 440mm
450mm ~ 470mm
280mm
280mm
Seat Switch (for safety)
Seat switch is installed in this appliance. If nobody sits
on the seat or the seat switch is placed wrong, the unit
does not work.
If user stands up during "Cleansing" or "Bidet" operation,
the unit stops the operation immediately.
Mounting bolts
Mounting holes
Cone packings
Washers
Mounting nuts
12
Warm seat
Seating switch
(Built in rubber inside)
Toilet
(sectional view)
Connecting the water hose and grounding wire
Close the shutoff valve by turning clockwise.
Empty the water tank completely by flushing.
Remove existing the water supply hose from the tank.
Install the T-valve on the top of stop valve.
Connect one of flexible hose from the T-valve to the water tank.
Water tank
Connect another flexible hose from the T-valve to the main
appliance.
Open the shutoff valve by turning counter clockwise.
Check for any water leaking or dripping.
To the unit
Main unit
Grounding wire (if needed)
Trial operation
1. Preparation
Open the shutoff valve and check for any water leaking or dripping.
Plug the power cord in the outlet.
Press the "BIDET" or "CLEANSING", then water tank will be filled with water after about 2 minutes.
2. Checking all function
Cover the toilet bowl using the plastic wrapping sheet of the unit to prevent the washing water from being sprayed
out of the toilet.
Then check for all function described in this manual.
3. There are possibilities of water coming out that remains in the unit while heating.
13
10 Before calling for service
Problem
Possible cause
Solution
Completely fails to work
Is there a power cord outage?
Does the power cord unplug?
Are you sitting on the seat correctly?
Check for a power cord failure or a tripped breaker
Plug the power cord properly
Sit on hte seat completely (seat switch model only)
Water does not spray
Is the water shutoff valve closed?
Is the strainer clogged?
Are the nozzles clogged?
Check for any water leaking or dripping
Clean the strainer
Clean the nozzles
Water is leaking or dripping
Check for all hoses are tightened properly
If wateris still leaking or dripping, contact to your dealer
Seat, water or air is
not enough warm
Is the temperature set to OFF?
Reset the temperature
11 Specifications
Model
Standard power supply
Way of connection
Water pressure
Water
supply
Cleansng
Spray for cleansing
Spray for bidet
Water tank capacity
Spray temperature
Heater capacity
Dry
Safety feature
Air temperature
Heater capacity
Safety feature
Seat temperature
Heated
seat
Heater capcacity
Safety feature
Seat Mechanism
SB-620
AC110V
60Hz
600W
Direct Connection to tap water
1.0
Room temp ~ 40 C (104 F)
500W
Thermal switch, Thermal fuse, Floating switch
Room temp ~ 50 C (140 F)
500W
Termal fuse
Room temp ~ 40 C (104 F)
70W
Thermal Fuse
Hydraulic seat
Circuit breaker
Length of power cord
Within 15mA 0.1 second
Dimensions
(elongated)
Weight
14
SB-610
1.5 ~ 1.8m
11.7lbs (elongated) / 11.0lbs (round front)
(round front)
WARRANTY
USPA Personal Hygiene Appliance Limited Warranty
USPA(we) warrant our products to be free from manufacturing defects under normal use and service for a period of one (1)
year from date of your purchase. Only the ORIGINAL PURCHASE you may make a claim under this limited warranty.
Our obligation to you under this warranty is limited to repair or replacement, at our option, of defective products or parts,
provided that the products were properly installed and used in accordance with instructions. We reserve the right to make
inspections in order to determine the cause of the defect. We will not charge for labor or parts in connection with warranty
repairs or replacement. We are not responsible for the cost of removal, return and/or reinstallation of prodcuts.
This limited warranty does not apply to:
a) Damage or loss from a fire, earthquake, flood, storm, etc
b) Damage or loss resulting from any unresonable use, abuse, negligence, or improper maintenance.
c) Damage or loss from improper installation, removal, repair, or modification.
d) Damage or loss resulting from sediment or other matters contained in your water system.
This warranty gives you specific legal rights.
For warranty or service information, please contact your dealer where you bought this appliance or us.
Only the original purchaser may submit a claim under this limited warranty. To activate your warranty, complete this form.
This limited warranty is our only warranty covering your product. Repair or replacement as provided under this warranty shall
be the exclusive remedy available to you. We shall not be responsible for loss of the product or for other incidental, or consequantial damage or expenses you may incur or for labor or other costs due to installation or removal, or cost or repairs by
others, or for any other expense not specifically stated above. Except to the extent prohibited by applicable law, any implied
warranties, including that of merchantability or fitness for use, are expressly limited to the duration of this warranty.
Warning! We are not responsible or liable for any failure of, or damage to, this plumbing product or product component caused
by in-tank bowl cleaners containing chlorine(calcium hypochlorite).
Note : The use of high concentration of chlorine related products can seriously damage the fittings. This damage can cause
leakage and serious property damage.
For more information, please contact your dealer or us.
Purchase Date
Purchased From
Invoice #
Amount Paid
Address
City
Phone
Serial #
State
Fax
Country
Zip
E-mail
Mail, email or fax the warranty form to :
YOUR LOCAL DEALER FIRST where you bought this appliance
if your dealer is unable to assist you,
SAMHONGTECH CO., LTD
WOOJUNGTOWN 9F, 1488-7, KWANYANG-DONG, DONGAN-KU, ANYANG-CITY, KOREA 431-060
TEL : +82-31-420-2341~5, FAX:+82-31-426-8666
E-MAIL : [email protected] http://www.samhongtech.co.kr
Great products for your healthy living !