1
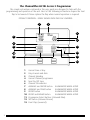
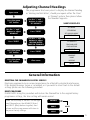
ChannelPlus H21XL Series 2 User Operating Instructions Two Channel Central Heating and Hot Water Programmer The ChannelPlus family of electronic programmers offer a range of advanced features coupled with simplified ‘menu driven’ programming all designed to help save energy. The Horstmann ChannelPlus H21XL series 2 is designed to give independent time control over heating and hot water on a 24 hour programme. Each channel offers up to 3 programmed On/Off operations per day. For day to day operation each channel has a manual 1 or 2 hour boost button as well as an advance button to bring forward the next programmed operation. The back lit display, automatic clock and menu driven programming are all features designed to make the operation of the ChannelPlus H21XL as simple as possible to use. All series 2 ChannelPlus programmers are direct replacements for earlier ChannelPlus models. 1 The ChannelPlus H21XL Series 2 Programmer The simple instructions contained in this user guide are designed to help with the programming and operation of the unit. Most of the following instructions require the front flap to be lowered. Please replace the flap when normal operation is required. PRODUCT OVERVIEW - DETAIL SHOWN WITH THE FLAP LOWERED 1 2 4 3 5 6 8 7 10 12 11 9 13 1 Current time of day 2 Day of week and date 3 Channel Heading 4 Current Channel programme 5 Next On/Off time 6 Channel ON indicator 7 ADVANCE and ENTER button ILLUMINATED WHEN ACTIVE 8 ADVANCE and PLUS button ILLUMINATED WHEN ACTIVE 9 BOOST button ILLUMINATED WHEN ACTIVE 10 BOOST and MINUS button ILLUMINATED WHEN ACTIVE 11 Programme Select buttons (Coloured Blue) 12 SET button (Coloured Green) 13 Front Flap (Lowered) 2 Display Information The ChannelPlus H21XL Series 2 programmer has a fully graphical, backlit display. In the normal run mode the display is divided into 2 sections, each section represents a controlled channel. The information displayed will change depending upon the settings made and which mode you are in. During different programming modes and/or setting screens the current time, day/date, holiday indicator will only appear when necessary, this is to reduce confusion during the programming process. This is explained further in later sections of this guide. Time Channel header Day Date Holiday function active WATER Channel/ Zone status Channel/ Zone status ACTIVATING THE BACK–LIT DISPLAY The display will illuminate for approximately 1 minute whenever a button is pressed. To illuminate the display for viewing purposes only press the green menu button under the front flap twice. SETTING AND ADJUSTING When setting or adjusting, the programmer will automatically return to the running mode if no buttons are pressed for approximately 1 minute. If the setting or adjusting has not been finished, please start the procedure again. TIME OF DAY The ChannelPlus H21XL incorporates a factory set clock and calendar which means that no adjustments should be necessary to the time of day and BST/GMT time changes take place automatically. 3 Manual Overrides BOOST FUNCTION - 1 OR 2 HOUR TEMPORARY OVERRIDE The boost facility will allow the user to either activate a channel which is currently ‘OFF’ for 1 or 2 hours, or to extend a current ‘on’ period by 1 or 2 hours. To indicate the boost being activated the ‘BOOST’ button under the selected channel will stay illuminated for the duration of the boost/extension period. The display will also indicate the extension to the time visually on the display. Press BOOST button once for 1 hour of hot water or central heating Press BOOST button twice for 2 hours of hot water or central heating Press BOOST button a third time to cancel the period and return to the normal programme ADVANCE FUNCTION - BRINGS FORWARD THE NEXT ON OR OFF OPERATION The advance facility will allow the user to either bring a channel ‘ON’ which is currently ‘OFF’ or switch a channel ’OFF’ which is currently ‘ON’. To indicate the advance feature being activated the ‘ADVANCE’ button under the selected channel will stay illuminated until the next programme switching time, the user display will change to also indicate the status of the channel and the next switching time. Press ADVANCE button once to move to the next ON/OFF time 4 To cancel the advance press the ADVANCE button again. This will return the unit to its normal programme Programme Override Facilities With the ChannelPlus H21XL Series 2 programmer operating in the normal running mode it is possible to alter the functionality of the programme on each individual channel by means of the blue ‘select’ buttons under the front flap. The options include; AUTO - Programmer follows all programmed ‘ON’ and ‘OFF’ times. ALL DAY - Channel operates from 1st ‘ON’ time until 3rd ’OFF’, ignoring all switching times in between. ON - Channel will be constantly ‘ON’. OFF - Channel will be constantly ‘OFF’, there is the ability to turn off heating during summer without altering the programme times. 1 or 2 hour boost still available. All of the settings above will be permanent, i.e. unaffected by programme times, until alteration by the user. The diagram below illustrates how to alter the setting, it assumes that the channel is in the AUTO mode to begin with. As both channels are totally independent it is possible to have them set differently if necessary*. Press SELECT once. Programme goes from AUTO to ALL DAY Press SELECT again. Programme goes from ON to OFF Press SELECT again. Programme goes from OFF to AUTO Channel will operate from first ON until last OFF period Press SELECT again. Programme goes from ALL DAY to ON Channel will be continuously ON Channel will be continuously OFF Programme will return to normal ON and OFF times * It may not be possible to programme heating and hot water independently on certain systems. 5 Setting the Programme Times The programme times have been preset as shown in the chart below. Default Time settings - am/PM 1st ON 1st OFF 2nd ON 6.30AM 8.30AM 12.00PM 12.00PM 4.30PM 2nd OFF 3rd ON If any changes are required to the programme times please complete the operation as described in the flowchart left. Open cover Use the ‘+’ and ‘-‘ buttons to adjust required on time SAMPLE DISPLAYS Select ‘Set ON/OFF times’ Select the required channel setting Press the green ‘SET’ button 3rd OFF 10.30PM SET WATER Press ‘ENTER’ SET HEATING SET HOLIDAY MODE SET DEFAULTS Adjust OFF time Repeat process for the 2nd and 3rd time settings Press ‘ENTER’ Press ‘ENTER’ Select the day to set SETTING WATER FOR WEDNESDAYS Enter the required on and off times Press the green ‘SET’ button SETTING WATER - WEDNESDAYS Press the green ‘SET’ button ON 06.30 ON 12.00 ON 16.30 Close cover OFF 08.30 OFF 12.00 OFF 22.30 PERIOD 1 PERIOD 2 PERIOD 3 ADJUSTING SETTINGS When carrying out any alterations to the programmed times and settings the programmer will return to its normal run mode in 1 minute if no adjustments are made in that time. 6 Setting the Holiday Mode The holiday mode can be used to suspend the program function of the ChannelPlus programmer, it can be set in advance of your departure date and for as long a period as required. The holiday function operates from mid-day to mid-day, this means it can be easily set to ensure your home is warm for your return. When the holiday mode has been set a smiley face will appear on the display. When the holiday mode is active only the day/date and smiley face will be displayed. Open cover PLEASE NOTE: Any alteration to the current time or date will cancel any Holiday programme set. Press the green ‘SET’ button Use the ‘+’ and ‘-’ buttons to select ‘HOLIDAY MODE’ Use the ‘+’ and ‘-’ buttons to adjust start date Press ‘ENTER’ Press ‘ENTER’ Use the ‘+’ and ‘-’ buttons to adjust start month Use the ‘+’ and ‘-’ buttons to adjust start year N.B. Do not use the holiday programme when conditions are such that frost damage to the heating system is possible (unless a frost protection thermostat is fitted to your system). To cancel an active holiday period please press any of the Select buttons under the front flap. SAMPLE DISPLAYS Press ‘ENTER’ Repeat process for end period Press the green ‘SET’ button Press ‘ENTER’ Close cover Display when holiday mode is set Press ‘ENTER’ SETTING HOLIDAY MODE START AT MID-DAY ON 1 SEPT 2009 FINISH AT MID-DAY ON 21 SEPT 2009 Enter holiday dates thurs 16 SEPT Press the green ‘SET’ button 7 Adjusting Default Settings The ChannelPlus H21XL Series 2 has a number of default settings which are normally installed. These settings are designed to reduce the need for user intervention upon installation of the programmer. However it is possible to customise the user display by following the procedures in the following pages. The factory default normally installed are illustrated below; Time and Date Clock Options Headings Time and calendar are factory set Time displayed in 24hr clock format Channel heading set to standard installation i.e. Hot Water and Heating 22.42 8 10.42 Options Options Options The programmer has been set with the current time and date during manufacture. No alteration should be required to the time and date. However, if any modification is required please refer to the flowchart on page 9 24 hour or AM/PM Heating/Water Zones Channels Adjusting Time and Date The ChannelPlus H21XL Series 2 programmer has been set with the current time and date during manufacture. No alteration should be required to the time and date, however if any modification is required please refer to the flowchart below. PLEASE NOTE: Any alteration to the current time or date will cancel any Holiday programme set. It will also cause any Boost or Advance operations to be cancelled. Open cover Use the ‘+’ and ‘-’ buttons to select ‘SET DEFAULTS’ Use the ‘+’ and ‘-’ buttons to adjust ‘TIME AND DATE’ Press ‘ENTER’ Press the green ‘SET’ button SET WATER Press ‘ENTER’ Use the ‘+’ and ‘-’ buttons to adjust THE CURRENT TIME Use the ‘+’ and ‘-’ buttons to adjust THE DAY Use the ‘+’ and ‘-’ buttons to adjust THE MONTH Press ‘ENTER’ Press the green ‘SET’ button Press the green ‘SET’ button Close cover SET DEFAULTS SET DEFAULTS Press ‘ENTER’ SET HOLIDAY MODE TIME AND DATE CLOCK OPTIONS HEADINGS Use the ‘+’ and ‘-’ buttons to adjust THE YEAR SET HEATING Press ‘ENTER’ Press ‘ENTER’ SAMPLE DISPLAYS 30 SEP 2009 TIME AND DATE 23.00 30 SEP 2009 9 Adjusting Clock Options Use the ‘+’ and ‘-’ buttons to adjust ‘CLOCK OPTIONS’ buttons to select ‘SET DEFAULTS’ SAMPLE DISPLAYS Press the green ‘SET’ button The programmer has been preset to display the time in 24 hour clock format, should you prefer AM/PM format then please use the procedure given in the flowchart opposite. Use the ‘+’ and ‘-’ Open cover SET WATER Press ‘ENTER’ SET DEFAULTS Press the green ‘SET’ button Use the ‘+’ and ‘-’ buttons to adjust 24 HRS OR AM/PM TIME AND DATE Press ‘ENTER’ CLOCK OPTIONS SET DEFAULTS HEADINGS Press ‘ENTER’ Press the green ‘SET’ button SET HEATING SET HOLIDAY MODE CLOCK OPTIONS Close cover 24 HOURS AM/PM General Information BATTERY The programmer is fitted with a non-rechargeable, non-serviceable long life battery, which will maintain the clock and programmed time settings with the mains supply disconnected. THIS RESERVE SHOULD BE SUFFICIENT TO COVER POWER INTERRUPTIONS DURING THE LIFE OF THE UNIT. During power interruptions the display will be blank. SERVICE AND REPAIR This programmer is NOT user serviceable. Please do not dismantle the unit. In the unlikely event of a fault developing please refer to the RESETTING THE CHANNELPLUS H21XL section on the right. If this fails to resolve the problem please contact a local heating engineer or a qualified electrician. 10 Adjusting Channel Headings Use the ‘+’ and ‘-’ buttons to adjust ‘HEADINGS’ SET WATER SET HEATING Press ‘ENTER’ SET HOLIDAY MODE Use the ‘+’ and ‘-’ buttons to adjust HEATING/WATER ZONES OR CHANNELS TIME AND DATE Press the green ‘SET’ button SAMPLE DISPLAYS SET DEFAULTS Press ‘ENTER’ buttons to select ‘SET DEFAULTS’ Press the green ‘SET’ button The programmer has been preset to display the channel heading as ‘Heating and Hot Water’, should you require either the ‘Zone’ or ‘Channel’ options then please follow the flowchart opposite. Use the ‘+’ and ‘-’ Open cover CLOCK OPTIONS SET DEFAULTS HEADINGS Press ‘ENTER’ HEADINGS Press the green ‘SET’ button NONE Close cover HEATING WATER General Information RESETTING THE CHANNELPLUS H21XL SERIES 2 Electronic equipment can in some circumstances be affected by electrical interference. If the display becomes frozen or scrambled; or if you wish to revert back to the default settings please use the following procedure: RESET PROCEDURE PLEASE NOTE: Using this procedure will restore the ChannelPlus to the original factory programme settings, the time setting will remain correct. ADVANCE RESET BOOST SELECT Lower the front flap of the unit. On the right hand Channel press the ADVANCE (Enter) and SELECT (Blue) buttons together, then release and the programmer will return to the preset factory settings. 11 What is a programmer? ... an explantion for householders. Programmers allow you to set ‘On’ and ‘Off’ time periods. Some models switch the central heating and domestic hot water on and off at the same time; while others allow the domestic hot water and heating to come on and go off at different times. Set the ‘On’ and ‘Off’ time periods to suit your own lifestyle. On some programmers you must also set whether you want the heating and hot water to run continuously, run under the chosen ‘On’ and ‘Off’ heating periods, or be permanently off. The time on the programmer must be correct. Some types have to be adjusted in Spring and Autumn at the changes between Greenwich Mean Time and British Summer Time. You may be able to temporarily adjust the heating programme, for example, ‘Override’, ‘Advance’ or ‘Boost’. These are explained in the manufacturer’s instructions. The heating will not work if the room thermostat has switched the heating off. And, if you have a hot-water cylinder, the water heating will not work if the cylinder thermostat detects that the hot water has reached the correct temperature. Email: [email protected] Website: www.horstmann.co.uk Horstmann Controls Limited, Bristol BS4 1UP 12 Leaflet number P82721 – Issue 2