1
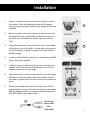
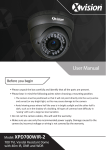
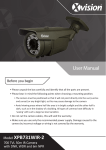
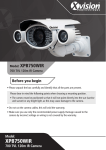
IQC600V High Resolution Vandal Resistant Mini IR Dome Camera, 650 TVL, 20m IR USER MANUAL TECHNICAL SUPPORT: For Technical Support please contact your local distributor. LIMITED WARRANTY: This product is supplied with a 1 Year warranty. The Warranty excludes products that have been misused, (including accidental damage) and damage caused by normal wear and tear. In the unlikely event that you encounter a problem with this product, it should be returned to the place of purchase. Before you begin: Please unpack the box carefully and identify that all the parts are present. Make sure you use only the recommended power supply. Damage caused to the camera by incorrect voltage or wiring is not covered by the warranty. Do not cut the connectors of the camera cables, this will void your warranty. Before operating this product, please read this instruction manual properly. Caution 1. 2. 3. 4. 5. 6. DO NOT ATTEMPT TO DISASSEMBLE THE CAMERA HANDLE THE CAMERA WITH CARE DO NOT EXPOSE AN INDOOR CAMERA TO RAIN OR MOISTURE, OR TRY TO OPERATE IT IN WET AREAS - Take immediate action if the camera becomes wet. Turn the power off to the camera and contact a CCTV professional. Moisture can damage the camera and also create a danger of electric shock. DO NOT USE STRONG OR ABRASIVE DETERGENTS WHEN CLEANING THE CAMERA BODY. NEVER POINT THE CAMERA TOWARD THE SUN - Whether the camera is used outdoors or not, never point it towards the sun. Use caution when operating the camera in the vicinity of spot lights and light reflecting objects. DO NOT OPERATE THE CAMERA BEYOND ITS TEMPERATURE, HUMIDITY OR POWER SOURCE RATINGS. - Do not use the camera in an extreme environment where high temperature of high humidity exists. Use the camera under conditions where temperatures are between 14℉ to 122℉ (-10℃ to 50℃), and humidity is below 85%. For the correct power supply, refer to the specification sheet. 2 Installation 1. Select a suitable position on the wall or ceiling to install the camera. Take the mounting bracket off the dome camera by unscrewing the fixing screw using the Allen key supplied. 2. Rotate the upper ring of the camera, it will unscrew from the dome base. Be careful when handling the camera as the parts are not fixed to the upper ring or the camera ‘ball’. 3. Using the Dome base as a guide, drill a hole in the middle of the base circle on the wall or ceiling where the camera is to be mounted, to allow the power and video cable to be fed through. 4. Screw the Dome base to the wall or ceiling using the Wall Plugs and screws supplied. 5. Feed the Camera’s cable through the hole and adjust the Camera ‘ball’ so the camera is positioned in the correct direction and at the correct angle. 6. When the camera is in the correct position, put the upper and lower ring of the camera back into position. Secure the upper ring back onto the base to secure the camera in place. 7. Connect the power terminal of the camera to a 12V DC regulated power supply. Connect the camera video output and the video input on the control or viewing equipment with RG59 (BNC) video signal cable. 7 1 2 12v DC Input Power Cable BNC Video Cable 3 IQC600V Style: Weather Resistant: IP Rating Operating Temperature: Vandal Resistant: Mounting Type: Dimension : Weight: Warranty: Sensor Type: DSP Type: DSP Functions: Resolution: Minimum Illumination: Night Vision: Lens Type: Lens Size: Viewing Angle: Operating Voltage: Power Consumption: Video Output: Audio Output: Power Input: Specifications Vandal Resistant IR Dome Camera Yes IP65 -10 to 50°C Yes Wall or Ceiling 75 x 93mm (DxH) 0.33 Kg 1 Year Xvision X650 - 1/3" Digital Imaging Sensor Xvision XE Automatic Electronic Iris Automatic White Balance Automatic Gain Control 650 TVL 0 Lux (IR on) 0.1 Lux (IR off) 20m IR Night Vision True Day/Night (Mechanical IR Filter) Fixed 3.6mm 78° 12v DC 300mA BNC Socket N/A DC Socket 4