1
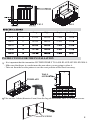
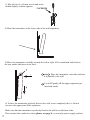
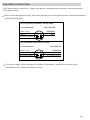
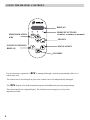
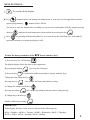
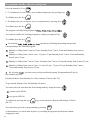
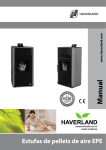
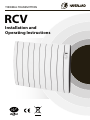
THERMAL TRANSMITTERS
RCV
Installation and
Operating Instructions
DANGER:
or any qualify personal.
1
The appliance hasn´t a ground connection.
2
The RCV can work with external programming devices or any other device of exterior control,
providing that the period of electrical disconnection is not superior to 24 hours.
Children of less than 3 years should be kept away unless continuously supervised.
Children aged from 3 years and less than 8 years shall only switch on/off the appliance provided that it has
been placed or installed in its intended normal operating position and they have been given supervision or
instruction concerning use of the appliance in a safe way and understand the hazards involved. Children aged
from 3 years and less than 8 years shall not plug in, regulate and clean the appliance or perform user
maintenance.
CAUTION — Some parts of this product can become very hot and cause burns. Particular attention
has to be given where children and vulnerable people are present.
FIG.2
Power
Elements
Large
FIG.1
High
Depth
Net Weight
INSTRUCTIONS FOR THE INSTALLATION
- It is important that the transmitter IS FIXED FIRMLY TO A SOLID AND LEVELLED WALL.
- Make sure that theres is a socket near the area where you are going to place it.
- Take out from the box the pattern to see the exact position of the bores necessary.
WALL
SUPPORTS
TEMPLATE
Take out the 4 cleats (diameter 8 mm) from the bag od accessories, the 4 5,5 x 60 mm screws.
4 SCREWS
3) Take the two 6 x 40 mm screws and screw
of them lightly on both supports
2 SCREWS
4) Place the transmitter on the lower side of the wall separators.
5) Move the transmitter carefully towards the left or right till is centralized and fixed on
the two canals which are on its back.
and
Place the transmitter vertically and once
it is parallel to the wall.
Let it fall gently till the upper separators get
into both canals.
6) To have the transmitter perfectly fixed to the wall, screw completely the 6 x 40 mm
screws in the upper part of the separators.
Make sure that the transmitter is perfectly fixed to the wall to avoid future risks,
Then connect the conductive wires (please, see page 4 ) to a nearby power supply (socket).
ELECTRIC CONNECTION
This heater must be used on an ~ supply only and the voltagemarked on the heater must correspond to
the supply voltage.
Before wiring the appropriate plug, please note that the wires in this mains lead are coloured inaccordance
with the following code:
INSTALLATION WITHOUT FILOT WIRE
Cord Thansmitter
Blue or Grey
Brown
Pilot Wire (black)
230 V HOUSE
NEUTRAL
LIVE
INSTALLATION WITH FILOT WIRE
Cord Thansmitter
Blue or Grey
Brown
Pilot Wire (black)
230 V HOUSE
NEUTRAL
LIVE
FILOT WIRE (CENTRAL)
If the power supply cable is damaged, it should be substituted by another one provided by the
manufacturer or its Technical Assistance Service.
USING THE HEATER. CONTROLS
DISPLAY
PROGRAMATION
KEY
ON/OFF LUMINOUS
DISPLAY
MODE FUNCTIONS
(comfort, economy or manual)
OK KEY
MANUAL KEY
STANDBY
For new housing, regulation of RCV is managed through a central programming with over 6
orders pilot wire.
The control can to be managed in part or the control can to be independently managed.
The
RCV dispone of 4 predetermined programs and additional personal programming.
The control panel has a digital display. The luminescent screen goes to sleep, after
adjustments made.
KEYS FUCTIONS:
To switch off the display
Key
(manual mode) can manage the temperature of your device to the application without
special programming:
manual (blue LED lit)
You lower or raise the temperature according to your presence and rhythm of life by simply pressing
the keys
Keys
until the desired temperature, then confirm by pressing the key
.
: by pressing both buttons pedant 2s, you can activate the child lock (key lock) and off
(possible function even when the display is off).
To enter the basic parameters of the
RCV (hours, minutes, day):
1) Press the key On / Off Heating
The digital display shows the time or the temperature.
By pressing the button
2) Press the key
, you swap the 2 displays.
to inform the different parameters (hours, minutes, day)
Change the time using the keys
Pressing the key
you validate the hours and minutes setting.
3) Change the minutes to the keys
Pressing the button
you validate the minutes and proceed to setting the day.
4) Change day wih the keys
Finally confirm by pressing
IMPORTANT:
In the display, the days of the week are shown in the following way:
dd Lu = Monday / dd MA = Tuesday / dd ME = Wednesday / dd JE = Thursday /
dd UE = Friday / dd SA = Saturday / dd di = Sunday
Programme mode, choose a program:
Press the button for 2 sec
t º C is displayed, you can choose your comfort temperature by pressing keys
To validate press the key
t º E is displayed, you can choose your eco temperature by pressing keys
To validate press the key
The program currently being displayed
You can now modify the existing program by simply pressing the keys
To validate press the key
In selecting
corresponding to the selected program:
your device following the heating time periods
Monday to Friday from 14 pm to 23 pm -Saturday from 7 am to 12 am and Sunday from 8 am to
23 pm.
Monday to Friday from 6 am to 9 am - 15 pm to 23 pm Saturday from 7 am to 12 am and Sunday
from 8 am to 23 pm.
Monday to Friday from 7 am to 23 pm - Saturday from 7 am to 12 am and Sunday from 8 am to 23 pm.
Monday to Friday from 6 am to 9 am - 11 am to 14 pm - 17 pm to 23 pm, Saturday from 7 am to
12 am and Sunday from 8 am to 23 pm.
By selecting
, you can create your personalized program. Programming will day by
day and hour by hour.
[Periods 00 hours from Monday (Lu: 00) to Sunday 23 hours (Di: 23)]
To get started, displayed Lu: 00 (Monday, 00 hours)
You must select for each hour the first heating mode by using the arrows
comfort (red LED lit)
eco (green LED lit)
To confirm by pressing the key
(Di: 23)
to go to the next hour. Repeat until Sunday 23 hours
You can always go back to programming in pressing
At that moment, you check hour by hour, by scrolling the program upside down without
changing its state.
Override mode:
The program follows a thermostat spéfifié (switching between comfort and eco pedant specified time
slots).
At any time you can depart from the current program by simply pressing buttons
the desired temperature:
and selecting
Manual (blue LED flashes)
It will remain active until the next change of time slot.
Control mode by pilot wire:
RCV has a pilot wire control that allows management through a central programming. This function takes
precedence over the mode, longer follow-up programs, not manage hours, related to menu functions
disabled.
Display order:
-
comfort (solid red LED): Comfort reference (that you set the temperature of comfort)
-
eco (solid green LED): -1 º C setpoint Comfort (Automatic modes comfort and eco)
- LED flash green 1 short: Comfort reference -1 º C (automatic adjustment mode comfort and eco)
- LED flash green 2 short: Comfort reference -2 º C (automatic adjustment mode comfortable and eco).
- LED flashing green: 50% on / off 50% (anti-freeze)
Override mode:
The thermostat is following orders from the programming unit (switching between comfort and eco
during specified time slots). At any time you can depart from the current pilot-wire mode by simply
pressing the buttons
by selecting the desired temperature and which will remain active
until the next change order on the pilot wire.
The comfort temperature is adjustable at any time, simply press the button 2 s
you can choose your comfort temperature by pressing the keys
And press the OK button
.
t º C is displayed,
Safety – overheat protection
For your safety, this appliance is fitted with a thermal cut-out. In the event that the product overheats,
the cut-out switches the heater off automatically.
To bring the heater back into operation, remove the cause of the overheating, then unplug or turn off
the electrical supply to the heater for a few minutes.
When the heater has cooled sufficiently, re-connect and switch on the heater.
Important Notes
The sides plastics may become discoloured with use – this is caused by UV rays of the sun.
Cleaning and User Maintenance
WARNING – ALWAYS DISCONNECT FROM THE POWER SUPPLY BEFORE CLEANING
THE HEATER.
Do not use detergents, abrasive cleaning powder or polish of any kind on the body of the heater.
Allow the heater to cool, then wipe with a dry cloth to remove dust and a damp cloth (not wet)
to clean off stains. Be careful not to allow moisture into the heater.
After Sales Service
Your product is guaranteed for two years from the date of purchase.
Within this period, we undertake to repair or exchange this product free of charge provided it has
been installed and operated in accordance with these instructions.
Your rights under this guarantee are additional to your statutory rights, which in turn are not
affected by this guarantee.
Should you require after sales information or assistance with this product please go to
www.haverland.co.uk where you will find our help guide by clicking on “Contact Us” or ring our
helpdesk:
Haverland UK Limited,
The Mill House, Congyre Farm,
Easton Royal, Pewsey, Wiltshire SN9 5LU
Customer Service Tel: 01672 811940
Fax: 01672 811944
email: [email protected]
Please retain your receipt as proof of purchase.
Marsan Industrial, S. A.
Crta. San Martín de Valdeiglesias, Km, 2,2
28925 Alcorcón (Madrid)
Spain
amor@2013_rcvuk Issue2