1
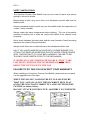
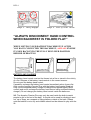
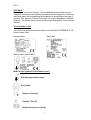
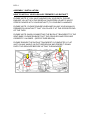
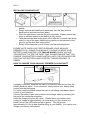
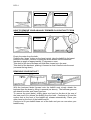
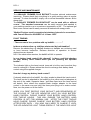
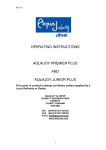
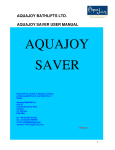
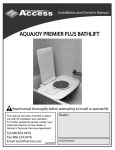
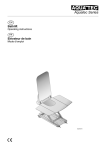
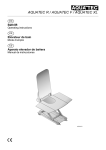
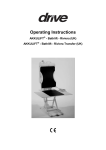
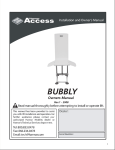
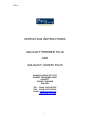
REV.4
OPERATING INSTRUCTIONS
AQUAJOY PREMIER PLUS
AND
AQUAJOY JUNIOR PLUS
AQUAJOY BATHLIFTS LTD
CONSETT BUSINESS PARK
CONSETT
COUNTY DURHAM
DH8 6BN
TEL: (0044) 01207 501555
FAX: (0044) 01207 599789
Email: [email protected]
www.aqua-joy.com
1
REV.4
Dear Customer
Congratulations on purchasing your AquaJoy Premier Plus Bathlift.
The AQUAJOY PREMIER PLUS BATHLIFT has been designed to help the
end user bathe in complete safety and comfort. The AQUAJOY PREMIER
PLUS BATHLIFT can be used in the home, in multi user environments and by
healthcare professionals. A severely disabled person should not use the
bathlift unless another person / carer is nearby to help if necessary.
Please read the operating instructions carefully before using your bathlift.
Please follow all instructions, particularly the safety instructions at all times.
The AquaJoy Premier Plus comes with a complete three year warranty
(excluding Battery Hand Control & Cover Mat which carry a one year
warranty). The warranty begins on the day of purchase.
We hope the AQUAJOY PREMIER PLUS makes a difference to your life and
that having a bath is now much easier and safer for you.
The following components are part of the AQUAJOY PREMIER PLUS.
Back Frame
1. Seat back
2. Actuator
3. Actuator holder
4. Spindle shaft
5. Battery hand control
6. Hand control cable
7. Actuator cable
7
5
6
17
2
Complete Seat(base)
8. Seat base
9. Side flaps
10. Scissor parts
11. Slider
12. Base plate
13. Front suction cups
14. Middle suction feet
15. Rear suction cups
16. Tilting structure
17. Charger
1
3
8
9
10
4
16
11 14
13
2
12
15
REV.4
SAFETY INSTRUCTIONS
The AquaJoy Premier Plus Bathlift may only be used to assist one person
getting in and out of a bath.
Before taking a bath, carry out a trial run to familiarise yourself with how the
bathlift works.
Severely disabled people should only use the bathlift under the supervision of
a carer / family member.
Always check the water temperature before bathing. The use of excessive
amounts of bathing oils or salts will require the bathlift to be cleaned more
frequently.
Never reach between the base plate and the seat (hazard of hand becoming
trapped in the scissor lifting mechanism).
Always check there are no obstructions in the mechanism before use.
N.B. IF YOU HAVE HANDLES ON YOUR BATH, PLEASE ENSURE YOU
ATTACH THE SIDEFLAP DIVERTERS (PLASTIC WHITE STRIPS PACKED
WITH YOUR BATHLIFT) TO YOUR BATH HANDLES. FAILURE TO DO
THIS MAY CAUSE OBSTRUCTION TO THE MECHANISM.
IF SIDEFLAPS JAM UNDER BATH HANDLE “STOP” TAKE
LIFT DOWN, REMOVE THE INTERFERENCE AND THEN
BRING THE LIFT BACK TO THE TOP
FAILURE TO DO THIS COULD AFFECT YOUR WARRANTY
When installing your AquaJoy Premier Plus Bathlift, please ensure you place
it at the opposite end of the taps.
WHEN INSTALLING YOUR BATHLIFT, PLEASE ENSURE
THAT YOU ALWAYS ALIGN THE BACKREST PEGS FLAT
ONTO THE SEAT BASE CORRECTLY AND LIFT FROM THE
CENTRE (as shown below).
DO NOT ATTACH COVERS UNTIL ASSEMBLY IS COMPLETE.
Image 1 : Alignment Direction
Image 2 Closer look
3
REV.4
Image 3 : Fully Engaged
Image 4 : Lift up front centre
“ALWAYS DISCONNECT HAND CONTROL
WHEN BACKREST IS FOLDED FLAT”
WHEN LIFTING YOUR BATHLIFT BACKREST UP AFTER
YOU HAVE CONNECTED THE BACKREST, ALWAYS ENSURE
IT GOES BACK INTO THE FULLY RECLINED POSITION
BEFORE OPERATING.
40 Degrees
20 Degrees
BATTERY AND CHARGER
The battery hand control must not be thrown into a fire or stored in the vicinity
of a fire. Dispose of old battery hand controls in the correct manner.
Do not open the battery hand control.
If possible, recharge the battery hand control immediately when it goes flat.
Only use the AquaJoy Premier Plus with the battery hand control supplied.
Only use the supplied battery charger to charge the supplied battery hand
control (and never recharge the battery hand control using a different battery
charger). Do not charge your battery hand control inside the bathroom.
NB: The AquaJoy Premier Plus may only be used inside the bath to assist
people to get in and out of the bath. It should not be used for climbing in and
out, up or down, as a support or lifting platform outside of the bath. Please
note the bathlift is not a toy and children should not be allowed to play with the
lift.
4
REV.4
DISPOSAL
On expiry of service life, battery – driven Bathlifts, battery hand controls,
chargers, accessories and packing material should be disposed of correctly.
Individual parts can be separated and disposed of according to the type of
material. The AquaJoy Premier Plus does not contain dangerous materials.
However, the battery hand control should not be disposed of via household
rubbish.
Serial Number Label
You will find all the main technical data on the AQUAJOY PREMIER PLUS
serial number label
Actuator label
Seat label
Battery hand control label
What do the symbols on the labels mean?
Storage temperature range
Recyclable
Dispose correctly
Caution 13.2v DC
Read instructions carefully
5
REV.4
ASSEMBLY / INSTALLATION
HOW TO INSTALL YOUR AQUAJOY PREMIER PLUS BATHLIFT
PLEASE NOTE: IF YOU HAVE HANDLES ON YOUR BATH, PLEASE
ENSURE YOU ATTACH THE SIDEFLAP DIVERTERS (PLASTIC WHITE
STRIPS PACKED WITH YOUR BATHLIFT) TO YOUR BATH HANDLES.
PLEASE NOTE: PLEASE ENSURE WHEN INSTALLING YOUR AQUAJOY
PREMIER PLUS BATHLIFT THAT YOU PLACE IT AT THE OPPOSITE END
OF THE TAPS.
PLEASE NOTE: WHEN CONNECTING THE BATHLIFT BACKREST TO THE
SEAT BASE, PLEASE ENSURE THAT THE GROOVES AND PEGS ARE
CORRECTLY ALIGNED. (SEE PICTURE BELOW)
PLEASE ENSURE THE BATHLIFT BACKREST IS COMPLETELY FLAT
(NOT ON ANY ANGLE) AS PICTURE BELOW AND PRESS IT DOWN
ONTO THE GROOVES BEFORE LIFTING THE BACKREST
6
REV.4
INSTALLING YOUR BATHLIFT
•
•
•
•
•
Please ensure your bath tub is clean and dry before installing your
bathlift.
Simply remove the bathlift parts separately from the box (remove
backrest first and then the seat (base).
Place the seat (base) onto the flat part of the bath. Please ensure that
there is sufficient space for the bathlift to fully recline.
Take the backrest and simply place it flat (with the covermat side facing
down) on top of the seat, matching the grooves on the backrest to the
grooves on the seat (See earlier point).
Simply lift the backrest up until it locks into the reclined position.
PLEASE NOTE: WHEN YOU FIRST PURCHASE YOUR AQUAJOY
PREMIER PLUS / JUNIOR PLUS BATHLIFT, PLEASE CHARGE YOUR
BATTERY HAND CONTROL FOR TWELVE HOURS. WHEN YOU USE
YOUR BATHLIFT AFTER THE FIRST TIME, PLEASE ENSURE THAT YOU
CHARGE YOUR BATTERY HAND CONTROL UNTIL THE LED INDICATOR
LIGHT ON THE BATTERY HAND CONTROL TURNS FROM RED TO
GREEN.
HOW TO CHARGE YOUR AQUAJOY PREMIER PLUS BATHLIFT
If already connected, separate the cable of the battery hand control from the
bathlift (backrest) cable. If not connected, simply remove your battery hand
control from the packaging.
For safety reasons, please ensure that you do not charge your battery hand
control in your bathroom.
Connect the battery hand control cable to the charger cable by matching the
flat part of the connections together.
Insert the charger plug into the mains. Please leave your battery hand
control to charge for approximately 12 hours when you first receive your
bathlift (even if the LED indicator light is green). This will provide
approximately 15 lifts, up and down(at 80kg) on your bathlift. You cannot over
charge your battery hand control.
7
REV.4
We recommend that you charge your battery hand control after every bath. If
you wait more than one week between baths, we recommend that you charge
your battery hand control before bathing. The LED indicator light will turn red
to let you know if you do not have sufficient battery charge.
BATHING WITH YOUR AQUAJOY PREMIER PLUS
HOW TO BATHE WITH YOUR AQUAJOY PREMIER PLUS BATHLIFT
After easily installing your AQUAJOY PREMIER PLUS BATHLIFT connect
the cable of the fully charged battery hand control to the cable on the back of
the backrest. (Match the flat parts of the connections together).
Take hold of the battery hand control and press the “up” button. Continue to
press and the bathlift will rise up. When the bathlift becomes flush with the
top level of your bath, release your finger from the “up” button and the bathlift
will stop moving.
Sit on the sideflap of the bathlift seat (this will be resting flat on the side of
your bath) with your legs against the bath. Slide / shuffle over to the middle of
the seat and lift one leg at a time over the side of the bath. Swivel round so
that you are sitting in the correct position for comfortable bathing. (If you have
problems sliding/shuffling over, why not try our “AQUAJOY SWIVEL & SLIDE
ACCESSORY”.)
By pressing the “down” button on your hand control the bathlift will lower you
to your required bathing position.
The bathlift will take you safely and comfortably to the bottom of the bath. At
the bottom, you will still be sat in at 20 degree angle.
If you want to recline when you are at the bottom of the bath, simply continue
to press the “down” button and the bathlift backrest will recline. (You can
recline up to a maximum of 40 degrees)
You can stop reclining at any time if you simply stop pressing the “down”
button.
When you have finished bathing, simply press the “up” button on your battery
hand control. Continue to press the “up” button until the bathlift has reached
the top of your bath. The sideflap will rest flat on the side of the bath.
8
REV.4
20 Degrees
40 Degrees
HOW TO REMOVE YOUR AQUAJOY PREMIER PLUS BATHLIFT FROM
YOUR BATH TUB
27 Degrees
Empty the water from the bath.
Pressing the “down” button on the hand control, take the bathlift to its lowest
position in the bath, continue to press the down button until the backrest
reaches an angle of approximately 27 degrees or more.
Take hold of the two side flaps and fold them inward onto the seat.
Take hold of the backrest, pushing it forward so that it lies flat onto the seat
(covermat facing down).
REMOVING YOUR BATHLIFT
With the backrest folded forward onto the bathlift seat, simply detach the
backrest from the base by lifting it upwards (as above). The backrest grooves
will detach from the seat (base) grooves.
To remove the seat (base), simply place one hand on the bar at the rear of
the base and lift to release the bathlift from the bath. Continue to lift and the
suction feet at the front of the bathlift will release automatically. Place your
other hand on the front of the bathlift and lift.
Continue to lift your bathlift base out of the bath and you can now store your
bathlift away.
9
REV.4
SERVICE AND MAINTENANCE
The AQUAJOY PREMIER PLUS BATHLIFT requires minimal maintenance
/servicing. Please check that everything is in good working order at regular
intervals. To clean the bathlift, simply use a normal household cleaner and a
damp cloth.
The AQUAJOY PREMIER PLUS BATHLIFT can be used with or without
covers. The standard covermats can be easily removed and washed in
your washing machine up to a maximum temperature of 60°. The optional gel
filled cover mat set can be easily removed & washed with soapy water.
"Medical Devices must be examined at statutory intervals in accordance
with Council Directive 93/42/EEC of 14 June 1993"
FAULT FINDING
“ There seems to be a problem with my bathlift…………..”
Is there an obstruction e.g sideflaps obstructed by bath handles?
Remove the obstruction e.g sideflap diverters on handles are not being used
or have become ineffective. Reverse direction of operation to ensure
obstructions are cleared.
N.B. If the obstruction remains, the bathlift will fail to operate.
Is your battery hand control fully charged? Is there a red light showing
on your battery hand control when you are pressing the up/down
button?
The indicator light on the hand control turns red to let the user know that they
need to recharge it. Please advise the client to recharge their battery hand
control using the supplied charger.
How do I charge my battery hand control?
If already attached to the bathlift, the client needs to detach the hand control.
The hand control is attached to the bathlift by the yellow and red adaptors at
the end of the cable. Separate these / pull them apart and the hand control
will detach. Now, attach the supplied black charger adaptor to the hand
control in the same way and plug the three point plug into a mains socket.
Now, turn the power on at the mains.
WHEN YOU FIRST RECEIVE YOUR BATHLIFT AND REGARDLESS OF
THE COLOUR OF THE LED INDICATOR LIGHT ON YOUR BATTERY
HAND CONTROL, PLEASE CHARGE YOUR BATERY HAND CONTROL
FOR TWELVE HOURS. THIS WILL ENSURE THE BATTERY HAND
CONTROL IS SET FOR NORMAL USE. AFTER THE FIRST TWELVE
HOUR CHARGE, PLEASE CHARGE YOUR BATTERY HAND CONTROL
AFTER EVERY BATH – YOU NOW ONLY NEED TO CHARGE IT UNTIL
THE LED INDICATOR LIGHT TURNS GREEN. IF THE INDICATOR LIGHT
10
REV.4
ON THE HAND CONTROL TURNS RED, PLEASE CHARGE YOUR
BATTERY HAND CONTROL IMMEDIATELY.
If there is no red or green light on the battery hand control when attached to
the powered mains or if after 12 hours the bathlift will still not move up or
down, a new charger or battery hand control may be required.
ADVICE & SUPPORT
How do I wash my covermats?
The AQUAJOY PREMIER PLUS BATHLIFT can be used with or without
covers. The standard covermats can be easily removed and washed in
your washing machine up to a maximum temperature of 60°. The covermats
cannot be used in a tumble dryer, please hang them up to dry. The optional
gel filled cover mat set can be easily removed & washed with soapy water.
Can I use emollients, aqueous creams, oils in the bath with my bathlift?
Yes, however, please ensure that you thoroughly rinse / clean away any
residue from the base of the bath and the suction feet. We also recommend
that you wash your covermats more often.
If I leave my battery hand control on charge will I damage it?
No, charge your battery hand control for 12 hours when you first receive your
bathlift. Then after every bath pop it back on charge until the LED indicator
light on battery hand control turns green. A fully charged battery will provide
approximately fifteen full lifts up and down.
There is also a safety mechanism on the lift to ensure it will not go down
unless there is enough charge to raise it back up. This will ensure you will not
become stuck at the bottom of the bath. NB: Please do not worry if your
battery charger becomes warm, this is normal.
TECHNICAL DATA
Length of seat: 580 mm ( 22.8 inches)
Width of seat with extended seat side flaps: 686 mm ( 27 inches)
Width of seat with seat side flaps folded in: 390 mm ( 15.3 inches)
Height of seat in its lowest position: 90 mm ( 3.5 inches)
Height of seat in its highest position: 465 mm ( 18.3 inches)
Depth of seat measured from
Backrest to front seat edge: 490 mm ( 19.3 inches)
Height of backrest: 604 mm ( 23.8 inches)
Width of backrest: 340 mm ( 13.4 inches)
Carrying capacity: 170kgs (26.7 stone)
Total Weight without battery: 13.64kg (30 lb)
Weight of seat: 7.70kg (16.94 lb)
Weight of sideflaps: 0.94kg (2.07 lb)
Weight of backrest: 5kg (11 lb)
11
REV.4
Weight of battery hand controller: 670g
Duration of stroke (80 kg load): Up approx. 50sec, Down approx. 35sec
Operating voltage: 13.2V DC
Maximum current consumption: 5.9A
Nominal Input: 13.2V DC
Motor noise with no load : approx. 50dB
(according to DIN 3746)
Medical equipment type B
Class Protection: IP 66
Duty cycle: Max. 5%, Max. 3min./hour
Battery: 13.2V 1300mAh(Ni-MH)
Battery Charger
Input : 240V AC/50Hz, 230V AC/60Hz, 110V AC/60Hz
Output : 18V DC 250mA/ 4.5VA
Weight : 0.3kg(UK 282g /EU 285g /USA 275g)
Charging time with flat battery : approx. 4-6h
ACCESSORIES
SWIVEL AND SLIDE UNIT
The AquaJoy Premier Plus transfer disk will assist you to get on and off your
bathlift easily and safely. It is ideal for people who have problems shuffling on
and off the bathlift and allows them to slide and turn into the middle of the
bathlift seat
CARRYING BAG
The Carrying bag is the ideal and easy way to store your bathlift. Or if you go
on holiday, why not take your bathlift with you!
HEADREST
The AquaJoy Premier Plus Headrest provides extra support and comfort
whilst bathing.
12
REV.4
AQUAJOY JUNIOR BATHLIFT (FOR CHILDREN & YOUNG ADULTS)
TO FIT THE POMMEL
Place the pommel into the seat (base) locating holes and push down.
The pommel will now sit in place
TO REMOVE THE POMMEL
Simply pull upwards and the pommel will release
TO FIT THE WING SUPPORTS ON BACKREST
Simply locate the guides on the wings into the location points on either side
of the backrest.
TO REMOVE THE WING SUPPORTS ON BACKREST
Simply pull upwards from the location points and the wing supports will
release.
TO FIT THE CHEST & LAP HARNESS
The chest harness fixing bracket should be attached to the back of the
backrest. It is adjustable by sliding the bracket up and down the backrest
so that the belt can be positioned at the most suitable height for the client.
The harness is secured by screwing the knob into the fixing bracket as
shown in the attached diagram. (The short part of the two piece chest
harness should be attached to the side where the client is transferring for
easy, quick release). The chest harness size is adjustable from the side by
pulling the material through the buckle (as with a belt). To secure the user,
simply insert the chest harness clip into the buckle.
13
REV.4
The lap harness should be attached to the rear underside of the seat base.
(The short part of the two piece lap harness should be attached to the side
where the client is transferring for easy, quick release). The harness is
secured by screwing the knob into the boss insert as shown in the attached
diagram. The lap harness size is adjustable from the side by pulling the
material through the buckle (as with a belt). To secure the user, simply
insert the lap harness clip into the buckle.
14