1
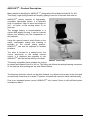
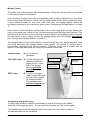
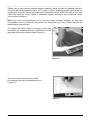
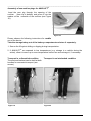
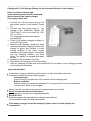
Operating Instructions AKKULIFT® - Bathlift - Riviera (UK) AKKULIFT® - Bathlift - Riviera Transfer (UK) ________________________________________________________________________________________ Content AKKULIFT® - Product Description .......................................................................................... 3 For Your Own Safety .............................................................................................................. 4 Important Information ...................................................................................................................... 4 Important Safety Regulations .......................................................................................................... 5 Installation and Use ................................................................................................................ 6 Unpacking....................................................................................................................................... 6 Instructions for use of side flap protectors for bathlifts ..................................................................... 6 Inserting the AKKULIFT® into the Bathtub ....................................................................................... 7 Operating the AKKULIFT® in the bath ............................................................................................. 9 Manual Control ............................................................................................................................. 10 Removing the lift from the bathtub ................................................................................................ 11 Maintenance and Care ......................................................................................................... 13 Maintenance of the AKKULIFT® .................................................................................................... 13 Assembly of new cushion plugs for AKKULIFT®............................................................................ 15 Maintenance of the Charging Unit ................................................................................................. 16 Charging of 12-Volt Storage Battery (to be connected directly to the charger) .............................. 17 Supplement .......................................................................................................................... 18 Technical Data .............................................................................................................................. 18 Troubleshooting ............................................................................................................................ 19 Disposal ........................................................................................................................................ 20 Warranty ....................................................................................................................................... 20 Spare Parts and Accessories for AKKULIFT® ............................................................................... 21 Explanation of symbols ................................................................................................................. 22 Type Labels .................................................................................................................................. 22 Information about this manual ....................................................................................................... 22 Index - in Alphabetical Order ................................................................................................ 22 Addresses ............................................................................................................................ 24 2 of 24 ________________________________________________________________________________________ AKKULIFT® - Product Description Many thanks for deciding for AKKULIFT ®, designed by Drive Medical GmbH & Co. KG. This sturdy, high-quality product will simplify getting in and out of the bath from now on. AKKULIFT® mainly consists of high-quality, recyclable light-weight plastic. It is therefore easy to transport, easy to store and simple to use - at home, at the nursing home, or on journeys. The storage battery is accommodated in a robust ABS plastic housing. It can be inserted without any difficulty into the compartment in the backrest. Using the manual control, which floats on the water, comfortable raising and lowering is possible in the normal sitting position. AKKULIFT® can also be adjusted to variable positions. The drive is housed in a sealed hood, the control electronics in the sealed manual control. It is therefore also possible to use AKKULIFT® with the shower facility in the bath. Akkulift® Riviera (UK) The sturdy collapsible frame enables the chair to be raised and lowered from 8 to 42 cm. The lifting rod effects the raising/lowering movement of the seat top after pushing the Up- and Down-buttons. The backrest and drive, which can be tilted forward, is notched into the seat of the chair and automatically locks when it is raised. Therefore, the backrest cannot be tilted unintentionally. Due to an integrated power control, AKKULIFT ® only lowers if there is still sufficient power available to raise it. 3 of 24 ________________________________________________________________________________________ For Your Own Safety Attention! Safe bathing with AKKULIFT ® is only ensured if the operating instructions are read carefully and the given information is strictly observed. Important Information AKKULIFT® must not be used as a ladder, or as a means for getting into and out of any place other than the bath; nor should it be employed as a stand, lifting device or for any other similar purpose. It may only be used for bathing persons inside the bath. AKKULIFT® must be inaccessible to children and animals. Repairs must only be undertaken by authorised specialists or the manufacturer. Further information, e.g. the circuit diagram, is available from the authorised specialists at Peter Endres GmbH & Co. KG. On non-compliance, any guarantee claims will become invalid. For further information please read the supplement. Only raise or lower the lifting rod when the backrest is upright and notched in! Always remove the storage battery before transporting AKKULIFT ®. If AKKULIFT ® has been exposed to low temperatures for a longer period of time (e.g. longer storage in a vehicle during the winter), allow it to warm up to room temperature before use, in order to avoid damages. AKKULIFT® must be cleaned directly after use (preferably under a hot shower) in order to avoid unforeseen defects and to maintain AKKULIFT ® in a perfect, hygienic condition. Do not use any detergents containing acetic acid for cleaning the AKKULIFT ®. The charging unit must only be used outside the bathroom in a dry environment. The charging unit must only be used for charging the storage battery supplied together with AKKULIFT®. Please read the enclosed instructions for the battery charger thoroughly before use. The charging unit must not be connected to the mains until the storage battery has been correctly inserted/connected. The battery has to be charged before the first use of AKKULIFT ® and should be charged after each use! 4 of 24 ________________________________________________________________________________________ Only use the storage battery supplied with AKKULIFT® to operate it. The contacts of the storage battery must not come into contact with metal parts (danger of exploding or catching fire). Used storage batteries must be disposed of in the proper manner. Storage batteries must not come into contact with open fire (danger of exploding!) The AKKULIFT®, charging unit and storage battery are of robust construction, but should not be allowed to fall. Should any visible or audible damage be detected, AKKULIFT ® must no longer be used. In this case please contact your specialist dealer (the address can be found in the supplement of these operating instructions). Please note: The suction cups on the underside of the AKKULIFT ® must be clean and dry when placing the bathlift onto a clean dry bath surface. We recommend that you frequently clean the suction cups and bathtub to ensure optimum suction is achieved. For further information, technical details and addresses, please read the supplement to these operating instructions. In the event of a failure, please read the supplement to these operating instructions and the "Troubleshooting" chapter. Make sure to observe the information and instructions given there. For your own safety you should not use AKKULIFT ® in the meantime, until the fault has been remedied. Important Safety Regulations a) Always sit in the middle of the lift , stretch your legs forward slightly and place your free hand either on the edge of the bath or on your lap. Using the other hand, regulate the AKKULIFT® movement up or down. b) Whilst raising or lowering AKKULIFT ®, do not place your hands between the edge of the bathtub and AKKULIFT® or under the seat of the chair, as this can cause injuries. c) Persons with severe physical handicaps or mentally disturbed persons should never be left unattended in the bath. d) Before using the bathlift, a test run should be carried out (for raising, lowering and stopping, and also for checking the Emergency-Stop, the red button on the manual). e) If a malfunction has occurred, please do not operate AKKULIFT ®, but contact your distributor and ask him to remedy the problem. f) Do not take any objects into the bathtub when bathing! These operating instructions should be kept in a safe place! 5 of 24 ________________________________________________________________________________________ Installation and Use Unpacking Please check the shipping carton for completeness. The carton should contain the following parts: 1. Backrest with drive and manual control unit 2. Collapsible frame with base-plate incl. central suction cup (black) 3. Charging unit 4. Storage battery 5. Operating instructions 6. 4 x Suction cup (transparent) for mounting on the underside of base-plate 7. 2 x Side flap protector Please note that the two side flap protectors are only supplied for USE in the UK market! If one of these parts should be missing, please inform your dealer. Unpack the charging unit first, then unpack the remaining parts. The shipping carton should be kept for later use (i.e. transporting and storing AKKULIFT ®). Prior to starting up the device for the first time we recommend to charge the storage battery. Please observe the information given in section „Charging the Storage Battery‟ on page 17. Instructions for use of side flap protectors for bathlifts The side flap protectors must be used on baths fitted with handles! Note: Failure in using the side flap protectors on integral bath handles, may result in damage to your bathlift, which can not be covered under fair wear and tear. 1. Place hooked end of side flap protector over bath handle and pull downwards, as shown. 2. The side flap protector acts as a guide rail and prevents the hand support rail from obstructing the side flap when raising the bathlift. 6 of 24 ________________________________________________________________________________________ Inserting the AKKULIFT® into the Bathtub 1. Make sure that the bottom of the empty bathtub is clean. Remove any non-slip mats from the bathtub. 2. Insert the seat frame into the empty bathtub. The rear suction cups should be located at the bevelled edge of the bathtub. 3. Press down the suction lever of the front mid suction cup. This automatically adjusts the mid suction cup to the bottom of the bathtub and fixes it into position (see Figure 1). 4. Place the backrest with cover on the frame in the bathtub. Then insert the guide pins of the backrest into the bearing blocks of Figure 1 the frame, as shown in Figure 2. Attention: Always make sure that both guide pins are inserted in the bearing blocks! 5. Take the manual control lever in one hand and pull it away from the lift until the cable is slightly tensioned. 6. Take the hand grip with the other hand and fold up the backrest until it reaches the stop position of the base-plate (see Figure 3). Figure 2 Figure 3 7 of 24 Bearing block Guide pin (red) Hand grips ________________________________________________________________________________________ 7. Make sure that the unlock ramp is in its correct position (see Figure 4+5). Figure 4 Figure 5 8. Insert the storage battery in the battery compartment (Figure 6). Note: If the bathtub wall on the side of the backrest is vertical and, consequently, there is a risk that the backrest is pushed against it, the lift must be installed outside the bathtub and must be driven to its upper position before it is placed into the bathtub again. However, it may be possible that the backrest can no longer be tilted back during the bath, because the distance between the backrest and bathtub wall is too close. Figure 6 Battery 8 of 24 Battery compartment ________________________________________________________________________________________ Operating the AKKULIFT® in the bath 1. Before starting up your AKKULIFT ®, make sure that the battery is inserted in the battery compartment and the manual control is correctly connected (plug-type connection – see figure 7). Press the ON-button at the manual control. The green lamp is illuminated. 2. Press the orange key (“UP”-button). The backrest is moved into an upright position first; then the lift moves up to its end position and switches off automatically. When the button is released, the lift is stopped, thus making it possible to move to intermediate stop positions. 3. Fold out the side flaps until they rest on the sides of the bathtub. Figure 7 4. Help the disabled person to sit down on AKKULIFT®. 5. To lower AKKULIFT®, press the blue key (“DOWN”-button). The lift moves down until it reaches its end position and switches off automatically. When the button is released, the lift is stopped, making it possible to move to intermediate stop positions. Attention: Release the blue button immediately if the backrest is pushed against the wall of the bathtub! In case of an emergency, press the red button on the manual control. Then all movements come to a halt. To reset you have to press the “ON”-button again! 6. After bathing, press the orange key (“UP”-button) of the manual control in order to move the lift back to a convenient height (the max. position is the upper stop position). Make sure that the slide flaps do not get caught at any bathtub fittings or handles. 7. Help the disabled person to leave the bathtub. The bathlift switches off automatically after 30 minutes, but if you want to switch it off manually then use the red button (LED is then off). Note: When moving up or down, the disabled person should lean back against the backrest and put his or her hands on the lap. If the lift is to remain inside the bathtub, then remove the battery from the battery compartment. This will prevent unintended discharging of the storage battery. 9 of 24 ________________________________________________________________________________________ Manual Control The green control lamp shows a fully charged battery. During the use the green con trol lamp of the manual control is illuminated. As soon as the charging level of the storage battery falls to factory-defined value, the colour of the control lamp changes to yellow, and the lamp flashes slowly, which means that there is only sufficient power for one more bath. After that, the storage battery should be recharged according to the instructions given under “Charging the Storage Battery“ on page 17. If the device is used during the yellow phase of the control lamp of the storage battery, the colour of the lamp may change to red, and the lamp may start flashing at fast intervals. This indicates that the lift will now move upward to ensure that the handicapped person can leave the bath safely. If this condition occurs, the storage battery must be charged immediately (see “Charging the Storage Battery“ on page 17). The charging status of the storage battery is monitored by electronic control elements. After one lifting movement the storage battery needs approx. 30 seconds to recover and is subsequently checked by the control elements. Therefore, at the end of a bath, wait for approx. 20 seconds and check the colour of the manual control lamp. GREEN Lamp: Lift is ready for operation. YELLOW Lamp: Limited readiness for operation (sufficient power for just 1 more bath).The storage battery should be charged now. RED Lamp: Emergency Stop (red) Control lamp UP-Button (orange) DOWNButton (blue) The lift is no longer ready for operation and will only move upward for leaving the bath. The storage battery must be charged now. ON-Button Figure 8 Emergency Stop-button (red): If there is any situation in which it is necessary to stop all functions of the bathlift, press the red emergency button. To reset you have to press the “ON”-button again. The bathlift switches off automatically after 30 minutes, but if you want to switch it off manually then use the red button. 10 of 24 ________________________________________________________________________________________ Removing the lift from the bathtub Using the manual control, first drive AKKULIFT ® to its lowest position. Tilt back the backrest until the drive stops automatically in its end position. Make sure that the backrest does not push against the wall of the bathtub. Then remove the battery from the battery compartment. 1. The backrest is unlocked by pressing the red button at the top of the backrest downwards (Figure 9). Figure 9 2. Then fold downwards the backrest by still pressing the red button and simultaneously folding the backrest towards the seat until it rests on the seat (Figure 9+10). Use the provided handle. Figure 10 11 of 24 ________________________________________________________________________________________ 3. The backrest can now be removed from the frame in the direction of the arrow shown in Figure 11. Note: The backrest cannot be removed from the frame when it is completely folded down to the seat, because the backrest is then in a locked position again! 4. Remove all 5 suction cups from the base-plate by pulling at the venting clips and take off the frame. Figure 11 5. Make sure that the lifting bar is retracted (Figure 12+13). Figure 12 Figure 13 12 of 24 ________________________________________________________________________________________ Maintenance and Care The simple maintenance tasks below can be performed by a dealer or a user who has the dexterity and ability to perform the tasks. It is recommended that the bathlift has an annual maintenance service which is performed by your specialist dealer to ensure the reliability and safety of your bathlift. Copies of the servicing guide are available upon request. Maintenance of the AKKULIFT ® AKKULIFT® is equipped with bearings and running surfaces which are completely maintenance-free and do not require any lubrication. However, the lift should be cleaned thoroughly under the shower after each bath. To clean the bathlift without covers either use disinfectant or bathroom cleaner. To remove the cover of the backrest, hold the backrest at its lower end and pull it up (Figure 14). This releases the backrest and makes it possible to pull it off towards the front and to remove the cover. Figure 14 The cover of the seat can be removed by pulling the fastening knobs from the side flaps and seat with two fingers (Figure 15). Figure 15 13 of 24 ________________________________________________________________________________________ Taking care of your covers requires frequent cleaning, either by hand or washing machine. They can be machine-washed up to 60°C using a non-bio washing powder which does not contain any enzymes. Please be aware any oil based products, which you add to your bath water may stain the covers, failure to undertake regular cleaning of your covers will cause your covers to discolour. Note: Any form of discolouration is not covered under warranty scheme, as they are consumables. Do not tumble-dry the covers, but hang them up to dry. Please observe the manufacturer‟s instructions. To replace the cover, place it correctly on the seat and press the fastening buttons completely into the openings of the seat and side flaps (Figure 16). Figure 16 The cover can be removed very easily for cleaning (just use the buttons shown in Figure 17). Figure 17 14 of 24 ________________________________________________________________________________________ Assembly of new cushion plugs for AKKULIFT ® Lead the new plug through the opening of the cushion (from top to bottom) and press it into the washer at the underside of the cushion (see Figure 18). Figure 18 Please observe the following instructions for mobile use of the device Take the storage battery out of the battery compartment and store it separately. 1. Secure the lift against sliding or slipping during transportation. 2. If AKKULIFT® was exposed to low temperatures (e.g. storage in a vehicle during the winter), allow it to warm up to room temperature before use and recharge it, if necessary. Transport in a dismantled condition The seat and backrest can be held at both handles for convenient transport (see arrows). Transport in an interlocked condition Figure 19 Figure 20 15 of 24 ________________________________________________________________________________________ Maintenance of the Charging Unit The charging unit does not require any maintenance. The housing must only be cleaned with mild detergents, which are free from solvents, or by means of a damp cloth. Make sure that no liquid penetrates the charging unit. Before starting up the charging unit again, always make sure that the unit is completely dry. If necessary, store the unit in a dry, ventilated place for several hours without connecting it to line power. Attention: Always pull the line power plug before cleaning the charging unit! 16 of 24 ________________________________________________________________________________________ Charging of 12-Volt Storage Battery (to be connected directly to the charger) Due to technical changes and improvements please read the enclosed instructions for the battery charger thoroughly before use! 1. Connect the 3,5 mm phone plug to the associated socket of the battery (Figure 21). 2. Connect the line power plug of the charger (Type 400UK450, Model HKF304-T144) to the line socket UK: 220230 V-/ 50 Hz The charging process will be started automatically. 3. Check if the battery charging indicator is lit up (LED lights red). 4. After the final charging voltage has been reached the battery charging indicator will change to green and indicate a trickle charge condition. If the trickle charge condition period lasts longer it is possible that the charging indicator will flash green. The battery is charged and ready Figure 21 for use. 5. Always pull the line power cord first. 6. Disconnect the charging unit from the battery. 7. After the charging unit has been dis-connected from line power a new charging process can be started immediately. Important Remarks! If the battery charging indicator should not be lit up after the battery has been connected, please check the following points: - Interconnection (check if the DC jack has been fully inserted into the charging unit) - Battery condition (batteries that have remained uncharged for a longer period of time may sulphatise and lose their ability to be charged) Always use the unit indoors and protect it against water and humidity. Never use the instrument in bathrooms. Never attempt to charge non-chargeable batteries. WARNING! Explosive gases may develop when charging lead batteries. Do not expose to open fire and avoid sparks. If the battery charger should be damaged, please return it to the supplier for examination. 17 of 24 ________________________________________________________________________________________ Supplement Technical Data ® AKKULIFT Overall length (backrest in reclined position) Overall width (seat incl. side flaps) Width of seat Depth of seat Overall length of seat Sitting height min. Sitting height max. Height of backrest Width of backrest Angle of inclination (backrest) Width of base plate Length of base plate Load, max. Weight, incl. storage battery Motor unit (without battery) Seat unit Duration of lifting/lowering movement Operating voltage Storage battery 860 mm 700 mm 370 mm 450 mm 580 mm approx. 80 mm approx. 420 mm approx. 560 mm approx. 320 mm 12 to 40 approx. 310 mm approx. 545 mm 140 kg approx.14,8 kg approx. 7.0 kg approx. 7,7 kg approx. 25 seconds (each) 12 V 12 V 2 - 2.6 Ah (rechargeable) Battery Charging Unit for 12-V Storage Batteries, black Type Model HK-F304-T144 Input voltage UK: 230 V-/50 Hz Output voltage 12 V-/300 mA 3.6 VA Charge termination 14.4 V +/- 2% Voltage limit fixed at 14.4 V Connection 3.5 mm phone plug Housing material ABS Dimensions 45 x 64 x 28 mm Indicators LED red, fast charge LED green, trickle charge or no battery connected Weight approx. 0.1 kg General Operating Conditions (of AKKULIFT) Ambient temperature Relative air humidity Air pressure +10...+ 50 C 10...100 % 700 hPa...1060 hPa Transport and Storage Temperature Relative air humidity Air pressure +10...+ 30 C 10...100 % 700 hPa...1060 hPa 18 of 24 ________________________________________________________________________________________ Troubleshooting Error Possible Cause Remedy Lift does not work No storage battery in the battery compartment Insert storage battery into the battery compartment Storage battery is empty Charge the storage battery Contacts are contaminated Remove the storage battery; clean the contacts with a dry cloth, and insert the storage battery again. Manual control is not correctly Check the plug-type connected connection. Lift stops repeatedly Storage battery is empty Charge the storage battery Excessive lifting load Reduce the lifting load (max. 140 kg) Drive failure Contact your specialist dealer. DO NOT USE THE DEVICE ANY LONGER. Manual control failure Contact your specialist dealer. DO NOT USE THE DEVICE ANY LONGER. Storage battery failure Insert new storage battery Lift creates loud noise Drive failure Contact your specialist dealer. DO NOT USE THE DEVICE ANY LONGER. Lift creates a rattling noise Lifting mechanism has run in No remedy, since this is irrelevant When in its upper and/or lower stop position, the lift creates a loud, jolting noise Defective stop switch Contact your specialist dealer. DO NOT USE THE DEVICE ANY LONGER. Storage battery cannot be charged Charging unit is not connected to line power Connect the charging unit to line power. Defect within the charging unit Have fuses replaced by specialist dealer Defective storage battery Replace the storage battery Contacts are contaminated Clean contacts with a dry cloth. Important Remark for Troubleshooting: Should it not be possible to operate AKKULIFT ® despite observing all of the abovementioned information, please contact the specialist dealer who sold you the device. 19 of 24 ________________________________________________________________________________________ Disposal At the end of the product life, all components of the AKKULIFT ® and storage battery should be disposed of in an appropriate manner. Please separate the different materials carefully in accordance with the material designation shown on the individual components. AKKULIFT® does not include any hazardous substances. The base-plate, backrest, collapsible frame, drive compartment and electrical drive are fully recyclable. Electronic boards and storage battery must be disposed of in an appropriate recycling procedure. The storage battery must not be disposed of in the regular domestic waste! Proper and complete disposal of AKKULIFT ® is offered by the manufacturer against a disposal fee. We estimate this product has a life expectancy of 6 years, provided that: It is used in strict accordance with manufacturer‟s instructions All service and maintenance requirements are met The estimated life expectancy may be exceeded that the device is used and maintained as above. Failure to do this can reduce the device life expectancy. The life expectancy does not constitute an additional warranty. Warranty Our warranty for AKKULIFT® will be in accordance with legal stipulations and/or regulations valid in the different countries. (To qualify for our warranty, the customer must present an original invoice, delivery note or date stamp of the authorised dealer). Damage due to natural wear or improper treatment is not part of our warranty. Damage caused by defective material or manufacturing errors will be remedied by repair or replacement free of charge. Our warranty will be become invalid if the device is changed or manipulated by unauthorised persons or in an unauthorised manner. Warranty claims can only be accepted if the complete device is returned to the manufacturer. The device must not be dismantled! Any further claims are excluded, unless there are any binding national rules and regulations. We cannot be held liable for any direct or indirect defects or damages resulting from defects, or any losses or costs in connection with the use or unusability of the device for any purpose. Tacit agreements regarding the use or suitability for a specific purpose are explicitly excluded. 20 of 24 ________________________________________________________________________________________ Spare Parts and Accessories for AKKULIFT® The correct order numbers of original spare parts and accessories are given in the table below. Article Order Number Seat and backrest covers Cover Set AKKULIFT® Riviera (UK) Classic, white Cover Set AKKULIFT® Riviera (UK) Classic, blue Cover Set AKKULIFT® Riviera (UK) Comfort, white Cover Set AKKULIFT® Riviera (UK) Comfort, blue 410 000 252 410 000 312 410 100 252 410 100 312 Spare parts Manual Control Charging unit, black Stopper and washer for Cover Classic/Comfort white Stopper and washer for Cover Classic/Comfort white Stopper and washer for Cover AKKULIFT® (set of 10 each) Suction cup 50 mm, transparent Suction cup 75 mm, black Suctuion cup set (4 transparent + 1 black) Replacement storage battery (to be connected directly to the charger) 400 600 400 uk 350 415 252 415 312 416 252 400 855 400 900 400 856 400 351 Accessories Height adapter 2 cm (set of 6 each) Height adapter 4 cm (set of 6 each) Height adapter 6 cm (set of 6 each) Headrest Side flap protectors (set of 2 each) 401 536 401 542 401 552 410 200 312 400 570 Rotating and transfer aid VITATURN L, white 101 385 Rotating aid VITATURN K, white 102 385 21 of 24 ________________________________________________________________________________________ Explanation of symbols CE label Alternating current Direct current Protection Class II Type B Medical instrument Type Labels Seat and backrest The type label of the seat is provided underneath the seat; the type label of the backrest is provided at the rear side, next to the drive unit. Next to the inspection labels and general technical remarks on the type label, there are two entries which are important for maintenance, repair and guarantee claims: Year of construction Lift No. Indicates the year and week of production of AKKULIFT ® Indicates the serial number of AKKULIFT ® Charging unit There are two entries which are very important for maintenance, repair, or warranty. These entries are provided next to the inspection label and general technical remarks: Year of construction Charging unit no.: Indicates the year and week of production of charging unit Indicates the serial number of charging unit Information about this manual These instructions were produced with special care. We do not assume liability for the correctness of figures, graphs, technical data and electrical values or for typographical errors. Any form of reproduction of these instructions requires our prior written permission. Subject to technical changes or errors. Index - in Alphabetical Order 22 of 24 Accessories ...................................................................................................................................... 21 Addresses ........................................................................................................................................ 24 AKKULIFT® - Product Description ....................................................................................................... 3 Backrest ........................................................................................................................................... 13 Bathtub ............................................................................................................................................... 7 Blue key.............................................................................................................................................. 9 Charging of 12-Volt Storage Battery (to be connected directly to the charger) .................................. 17 Charging Unit.............................................................................................................................. 16, 17 Control lamp ..................................................................................................................................... 10 Disposal............................................................................................................................................ 20 DOWN-button ..................................................................................................................................... 9 Emergency Stop-button .................................................................................................................... 10 Emergency-Stop ................................................................................................................................. 5 Error ................................................................................................................................................. 19 Explanation of symbols ..................................................................................................................... 22 GREEN Lamp ................................................................................................................................... 10 Hand grip ............................................................................................................................................ 7 Height adapter .................................................................................................................................. 21 Inserting the AKKULIFT® into the Bathtub........................................................................................... 7 Installation and Use ............................................................................................................................ 6 Maintenance of the AKKULIFT® ........................................................................................................ 13 Maintenance of the Charging Unit ............................................................................................... 16, 17 Manual Control ................................................................................................................................. 10 Mobile use of the device ................................................................................................................... 15 ON-button ........................................................................................................................................... 9 Operating the AKKULIFT® in the bath ................................................................................................. 9 Orange key ......................................................................................................................................... 9 RED Lamp ........................................................................................................................................ 10 Removing the lift from the bathtub .................................................................................................... 11 Safety ................................................................................................................................................. 4 Side flap protectors ............................................................................................................................. 6 Spare Parts and Accessories for AKKULIFT® ................................................................................... 21 Starting up your AKKULIFT® ............................................................................................................... 9 Suction cups ....................................................................................................................................... 7 Technical Data.................................................................................................................................. 18 Transport .......................................................................................................................................... 15 Troubleshooting ................................................................................................................................ 19 Type Labels ...................................................................................................................................... 22 Unpacking .......................................................................................................................................... 6 UP-button ........................................................................................................................................... 9 Venting clips ..................................................................................................................................... 12 Warranty ........................................................................................................................................... 20 YELLOW Lamp ................................................................................................................................. 10 ________________________________________________________________________________________ Addresses D DD UK DD Drive Medical GmbH & Co. KG Leutkircher Straße 44 D-88316 Isny/Allgäu (Germany) Drive Medical Limited Ainleys Industrial Estate, Elland, West Yorks HX5 9JP Phone Fax Web Mail Phone Fax Web Mail +49 (0) 7562 - 9724 -0 +49 (0) 7562 – 9724-25 www.drivemedical.de [email protected] +44 (0) 1422 31 44 88 +44 (0) 1422 31 44 89 www.drivemedical.co.uk [email protected] Please enter your specialist dealer‟s address: Art. No. WBAAK0026/0608 · As of: 08/2011 Copyright 2008 by Drive Medical GmbH & Co. KG · 88316 Isny/Allgäu (Germany) 24 of 24