1
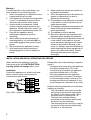
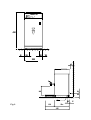
Operating instructions
GB
HOT WATER BOILER
HEETWATERAPPARAAT
HWA 20
1
HWA 20
2
3
5
4
Fig. 1
4
OPERATING INSTRUCTIONS
(ENGLISH)
To operate this appliance properly and safely, read the following instructions carefully.
INTRODUCTION
This appliance, model HWA 20, is a water boiler with connection to the water mains and can be
used to heat water to fill a cup, a jug, etc.
When you push the on/off switch the water will heat.
Once the water in the dispenser is at the correct temperature, the temperature of the water drawn
off will always be correct when the dispenser is being used normally. The reservoir is only refilled
when all the water present is at the desired temperature. When the temperature drops too far as a
result of additional cold water, the refilling procedure is stopped. The water is first heated before
proceeding further.
Should the water boiler threaten to overflow, a safety relay will switch the entire system off.
Figure 1 shows the main components and controls.
Figure 2 shows the appliance's dimensions.
Figure 1:
1.Lid, hot water reservoir
2.On/off switch
3.Tap
4. Electrical and water connections
5. Temperature setting
The following accessories are supplied with the appliance:
-
Drip tray
Water reservoir lid
Connecting hose, length ± 1.2 m.
Screwdriver
1 Sachet RENEGITE (descaler)
Technical data
Model
Water reservoir capacity
Capacity
Discharge capacity
Minimum water pressure
Maximum water pressure
Water connection
Cord length
Supply voltage (50/60 Hz)
Rating
Protection
: HWA 20
: 4.5 l.
: 18 l/h
: 3 litres
: 0.5 bar
: 10 bar
: via hose with G 3/4" unions
: ± 150 cm
: 220-..-240V≈
: 1900-..-2260W
: 16 A
1
Warning !
For safe operation of the water boiler, pay
close attention to the following points:
1. When the appliance is in operation, some
components will get very hot.
2. If the appliance is unused for a long period
of time, it is advisable to disconnect the
electricity and close the water supply.
3. Under normal circumstances, a small
quantity of water always remains in the
appliance. Please keep this in mind if it is
to be exposed to temperatures below 0° C.
4. Stay with the appliance during
maintenance operations (such as
descaling).
5. When working with strong cleaning or
descaling agents, it is most advisable to
wear safety goggles (face protector) and
gloves.
6. Never immerse the appliance in water.
7. After working with strong cleaning or
descaling agents, be sure to wash your
hands.
8. Make sure that all repairs are carried out
by qualified technicians.
9. When the appliance has to be opened for
repairs or maintenance, be sure to
disconnect the electricity.
10. The appliance must always be connected
to the mains in such a way that it can be
easily disconnected.
11. The appliance should be connected to the
water mains with the hose attached to a
hand-operated tap.
12. The appliance must be earthed.
13. Be sure to observe local regulations and
standards when installing the appliance.
14. Prevent spillage of the descaler solution on
to the outside of the machine, this can
cause permanent damage to the exterior
surface of the machine housing. In the
event of a spillage, wipe area affected dry,
whilst observing the safety regulations as
given in the Users Instructions. Directly
afterward the area must be cleaned
thoroughly.
INSTALLATION AND INITIAL OPERATING PROCEDURE
When installing the appliance, keep the
instructions given in the INTRODUCTIONwarning (points 10 through 13) in mind.
Installation
Position the appliance on a solid level base
where it can be easily connected to the
electrical and water mains.
Fig.3 (220V 1 phase with plug connection)
2
Please take note of the following in regard to
figure 3:
- If equipped with a fuse plug, the appliance
must be protected with a 13 A fuse.
- If another plug is installed, the appliance
must be protected with a 15 A fuse.
- If the plug supplied with the appliance
does not fit into your socket, it should be
cut off and replaced with a new plug The
old plug should then be disposed of, as it
can be dangerous if inserted into a socket.
Keep the following instructions in mind when
installing a new plug:
- The yellow-green core (earth) must be
connected to the terminal marked with
the letter E or the earth symbol ( ) or
coloured green or yellow-green.
- The blue core (neutral) must be
connected to the terminal marked with
the letter N or coloured black.
- The remaining brown core (live) must be
connected to the terminal marked with
the letter L or coloured red.
Important !
The triple-core supply cord in fig. 3 is colourcoded as follows:
Green and yellow
- earth
Blue
- neutral
Brown
- live
Adjustment
Using the screwdriver supplied, the hot water
temperature can be adjusted on the left side
of the appliance. For a higher temperature,
turn the screwdriver to the right. For a lower
temperature, turn the screwdriver to the left.
Initial operating procedure
The following procedure is to be carried out
when operating a new appliance for the first
time:
1. Clean the inside of the reservoir carefully
with a damp cloth.
2. Switch on the appliance (switch 2, fig. 1)
and make one full reservoir of hot water.
3. Then the hot water can be drained.
4. Empty the water via the drain cock and
dispose of it.
The appliance is now ready for normal use.
CAUTION !
Adjust the temperature only when the
reservoir has been filled up to the next to the
highest electrode. The water in the reservoir
should not be allowed to boil.
Fig. 4
OPERATION
Set switch 2 (fig. 1) in the on position.
The water boiler will now be filled
automatically and the water will be heated to
ca. 95 °C.
Hot water can now be drawn out of the tap.
When the water level in the reservoir falls, it
will automatically be refilled step by step and
the water will be heated.
MAINTENANCE
Warning !
Always stay with the appliance during
maintenance tasks (such as descaling or
cleaning) and keep the instructions given in
the INTRODUCTION-warnings (points 4
through 9 and 14) in mind.
Cleaning
The appliance can be cleaned with a damp
cloth. The drip tray, etc., can be washed in
the usual way.
Pay special attention to removing the
calcium deposits from the two highest
electrodes. (Scrape them off with a small
knife.)
For descaling purposes we advise
RENEGITE, a descaling agent which we
have tested ourselves. The following
instructions are based on the use of one
100 gr. sachet or two 50 gr. sachets of
RENEGITE (read the instructions on the
packet as well).
Descaling
Under normal operating circumstances,
calcium deposits will appear in the appliance.
The appliance must be regularly descaled in
order to function properly. When the system
has switched itself off, it is most advisable to
give it a really good descaling.
3
The descaling procedure is as follows:
1. If the system is switched OFF and the
water is cold, drain off as much water as
possible via the hot water tap.
2. If the system is switched ON it must be
switched off and as much hot water as
possible drained. Cool the system by
pouring 3 litres of cold water into the
reservoir and draining it off again.
3. Dissolve 100 gr. descaling agent in ± 0.5
litre lukewarm water.
4. Pour the solution carefully into the hot
water reservoir.
5. Switch on the appliance again.
6. When the reservoir has been filled up to
the next to the highest electrode, wait ten
minutes.
7. Meanwhile, draw off a cup of descaling
solution every minute from the usual hot
water tap (thereby giving the tap a good
descaling as well.)
8. Switch off the appliance once the ten
minutes is up and draw off as much
solution as possible via the usual tap.
9. Then pour ± 3 litres cold water into the
reservoir (to cool the system quickly).
10. To drain the reservoir quickly, the entire
appliance can be carefully tilted.
11. Now pour ± 5 litres of water into the
reservoir. Make sure it doesn't overflow.
12. Drain as much water as possible via the
usual hot water tap and dispose of it.
13. Then drain the reservoir entirely
according to instructions 10.
14. Dispose of the water and repeat
operations 11 and 12 at least twice, but
now with ca. 4 litre water.
15. Switch on the water boiler.
16. Before using the hot water for
consumption, it is advisable to rinse the
tap well once more by first drawing off
another litre or so of hot water via the hot
water tap.
4
Important:
If you do not use the step 10 to empty the
entire reservoir, the 4 litre rinsing procedure
has to be repeated more often before the
machine is switched on for normal use again.
See the last 3 instructions for the descaling
process.
CAUTION !
- Leave the reservoir uncovered during the
entire descaling process.
- Prevent the descaling agent from touching
the top electrode.
- Due to the violent reaction which occurs
when the descaling agent comes into
contact with the calcium deposits, the water
may touch the topmost (safety) electrode,
thus switching off the system. In that case,
switch the system off manually using switch
2 (fig. 1). Wait ca. 20 seconds and switch
the system on again in order to continue
the descaling process.
(SUBJECT TO MODIFICATION)
HWA 20
430
E
55
40
W
205
45
140
W
60
45
Fig. 2
225
130
355
E
700.403.118 E
COFFEE BREWING MACHINES
© 10-1997