1
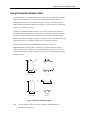
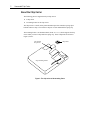
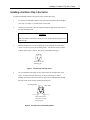
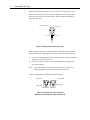
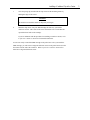
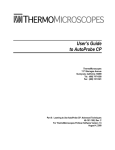
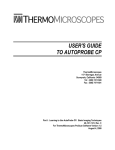
Unmounted Chip Carrier
Operating Instructions
ThermoMicroscopes
1171 Borregas Avenue
Sunnyvale, California 94089
Tel: (408) 747-1600
Fax: (408) 747-1601
48-101-1018, Rev. C
For AutoProbe CP, LS and M5
August 5, 2000
Copyright Notice
Copyright © 1993-2000 by ThermoMicroscopes. All rights reserved.
No part of this publication may be reproduced or transmitted in any form or by any means
(electronic or mechanical, including photocopying) for any purpose, without written
permission from ThermoMicroscopes.
Trademarks
AutoProbe, Ultralever, Microlever, ThermoMicroscopes, and the ThermoMicroscopes
logo are trademarks of ThermoMicroscopes.
Using Unmounted Cantilever Chips
Using Unmounted Cantilever Chips
ThermoMicroscopes’s Unmounted Chip Carrier allows you to use unmounted cantilever
chips in your AutoProbe CP, LS, or M5 system. Unmounted cantilever chips are
individual chips that are not premounted on cantilever cassettes. ThermoMicroscopes
supplies unmounted cantilever chips in several forms: as a strip of chips, as a half-wafer
of chips, or as a full-wafer of chips.
In order to use unmounted cantilever chips in your system, you must first separate an
individual cantilever chip from the strip, half-wafer, or full-wafer. Then you must insert
the cantilever chip in the chip carrier, which in turn is inserted on your SPM cartridge
(either an AFM/LFM, NC-AFM, or liquid cell cartridge). Lastly, you install the cartridge
in the probe head of your AutoProbe system just as you normally would do.
The chip carrier holds either a ThermoMicroscopes Microlever chip, or a
ThermoMicroscopes Ultralever chip. A Microlever chip and an Ultralever chip are
shown in figure 1, below. When you use unmounted cantilever chips, you will need to
realign the deflection sensor more frequently than when you use premounted, prealigned
cantilever cassettes.
A
L
3.6 mm
W
B
1.6 mm
C
E
D
F
Cantilevers
Microlever Chip
A
L
B
W
3.6 mm
0.6 mm
1.6 mm
C
D
0.3 mm
Ultralever Chip
Cantilever
Figure 1. Microlever and Ultralever chips.
Note:
See your cantilever data sheet for the parameters associated with your
Microlevers or Ultralevers.
1
2
Unmounted Chip Carrier
About the Chip Carrier
The following parts are supplied with your chip carrier:
♦
a chip carrier
♦
a mounting fixture for the chip carrier
The chip carrier is a small, nickel-plated aluminum piece that includes a spring clip to
hold the cantilever chip. The cantilever chip sits in a slot underneath the spring clip.
The mounting fixture is an aluminum block (about 2½" x 2½") which supports the chip
carrier while you insert a chip under the spring clip. These components are shown in
Figure 2, below.
pins to hold
chip carrier
chip carrier
chip mounting fixture
Figure 2. The chip carrier and the mounting fixture.
Installing a Cantilever Chip in the Carrier
Installing a Cantilever Chip in the Carrier
To install an individual cantilever chip in the carrier, follow these steps:
1.
To separate an individual cantilever chip, follow the instructions that accompany
your strip of 15 chips, or your half-wafer or full-wafer .
2.
Using a pair of tweezers, place the separated cantilever chip on the top surface of
the chip mounting fixture.
CAUTION
Make sure that the side with the cantilevers faces up and that nothing touches the
cantilever tips.
3.
Position the chip carrier on the mounting fixture by fitting the two holes in the
carrier over the two pins on the mounting fixture. The location of the two holes
is shown in the Figure 3, below. The spring clip should be facing up.
Two holes for the
mounting pins
Figure 3. The underside of the chip carrier.
4.
Use your thumb and forefinger to press down on the left and right sides of the
carrier, on either side of the spring clip, as shown in the Figure 4, below.
Pushing down on the carrier forces the two pins in the mounting fixture through
the holes in the carrier, thereby opening the spring clip.
mounting fixture
chip carrier
Press down on the
chip carrier to open
the spring clip.
Figure 4. The chip carrier on the mounting fixture.
3
4
Unmounted Chip Carrier
5.
While pressing down on the chip carrier, use tweezers to grasp the sides of the
chip, as shown in Figure 5, below. Slide the chip under the open spring clip so
that it sits in the slot at the end of the carrier. Slide the chip in until it hits the
back edge of the slot.
mounting fixture
chip carrier
Figure 5. Mounting a chip onto the chip carrier.
6.
Before closing the spring clip, adjust the position of the chip so that it lines up
against either the left or right edge of the slot (as you face the open spring clip).
♦
If you are using ThermoMicroscopes’s Microlever chip, the chip should line
up against the left edge of the slot.
♦
If you are using Psi’s Ultralever chip, the chip should line up against the
right edge of the slot.
Note:
If the chip doesn't line up with the edges of the slot, it will be more
difficult to align the laser beam at the end of the cantilever.
These two chip positions are illustrated in Figure 6, below.
chip carrier
chip carrier
spring clip
spring clip
Microlever
Ultralever
Figure 6. Top view of chip carrier, shown with
Microlever (left) and Ultralever (right) chips mounted.
Installing a Cantilever Chip in the Carrier
7.
Close the spring clip, and then lift the chip carrier off the mounting fixture by
holding the edges of the carrier.
CAUTION
Be careful not to touch the cantilever chip with your fingers.
8.
Install the chip carrier onto your SPM cartridge the same way you install a
cantilever cassette. Three slots in the carrier oriented at 120° to each other line
up with the three balls on the cartridge.
If you are unfamiliar with the procedure for installing a cantilever cassette, refer
to your User’s Guide to AutoProbe for detailed instructions.
You are now ready to install the SPM cartridge in the probe head. After you install the
SPM cartridge, you will need to realign the deflection sensor in the probe head to steer the
laser beam onto the end of the cantilever. Refer to your User’s Guide to AutoProbe to
learn how to align the deflection sensor.
5
6
Unmounted Chip Carrier