1
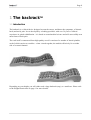
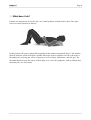
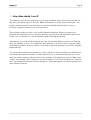
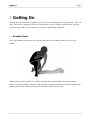
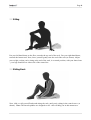
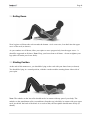
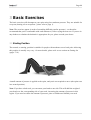
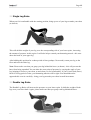
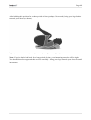
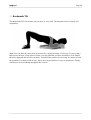
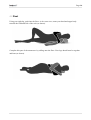
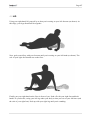
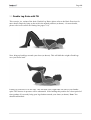
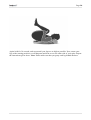
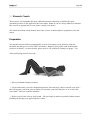
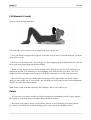
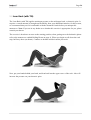
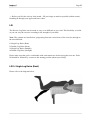
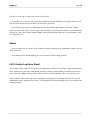
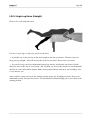
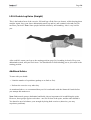
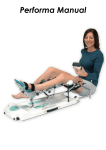
Operating Instructions
Table of Contents
IMPORTANT INFORMATION
1-2
1 The backrackTM
Introduction
What does it do?
How do I use it?
How often should I use it?
3-6
3
4
5
6
2 Getting On
7-10
3 Basic Exercises
Starting Position
Single Leg Raise
Double Leg Raise
Backwards Tilt
11-14
11
12
12-13
14
4 Getting Off
15-17
5 Advanced Exercises
18-31
19-20
21-23
24-25
26-31
Double Leg Raise with Tilt
Stomach Crunch
Lean Back (with Tilt)
Reverse Leg Raise
Page 1
IMPORTANT INFORMATION
Before using the backrack, please read the following information carefully:
Contraindications
In general, the backrack can be used by anyone. However, the backrack should not be used if you
have one of the following conditions:
A vertebral fracture (that isn't healed).
! Severe scoliosis (Cobb angle > 45°).
! A malignant, spinal tumour.
! A spinal infection (e.g. meningitis).
!
Note: In medical terms, these conditions are referred to as contraindications.
Cautionary Advice
In addition to this, the following advice should be noted:
You should not use the rack if you're pregnant (beyond 6 months).
! You should not use the backrack if it's either damaged or broken.
! The elderly or infirm may find it difficult to use - this is due to the fact that most of the
exercises are performed on the floor.
!
Height Restrictions
The following height restrictions should also be observed:
The small backrack is suitable for anyone between 1.55m and 1.75m tall (5' 1" to 5' 9").
! The large backrack is suitable for anyone between 1.75m and 2.00m tall (5' 9" to 6' 6").
!
Page 2
Professional Advice
If you are in any doubt as to whether the backrack is appropriate for you, please consult your
doctor.
Storage
The backrack should be stored and used in a cool, dry environment. The ambient temperature
should not exceed 40°C.
Maintenance
There are four external screws in the backrack. If necessary, these can be tightened to prevent
distortion. The backrack can be cleaned using a damp cloth. Afterwards, remove any moisture
using a dry towel.
Page 3
1 The backrackTM
1.1 Introduction
The backrack is a clinical device designed to treat the causes, and hence the symptoms, of chronic
back (and neck) pain. It was developed by a leading specialist, with over 30 years of clinical
experience in spinal rehabilitation - it is based on sound medical science and will successfully treat
most forms of back pain.
The rack itself is constructed from high-quality wood. It consists of a number of lateral spindles,
each of which carries two nodules – when viewed together, the nodules effectively lie on either
side of a central channel:
Depending on your height, you will either need a large backrack (top), or a small one. Please refer
to the Height Restrictions on page 1 for more details.
Page 4
1.2 What does it do?
Patients are instructed to lie on the rack, in a central position, with their knees bent. The spine
rests in a neutral position (as shown).
In this position, the spine is physically suspended in the channel (mentioned above). The nodules
push up under the joints of the back, and this allows the spine to lengthen. In effect, the spine is
decompressed, reversing the effects of gravity (as well as injury, bad posture, and old age). The
backrack therefore treats the causes of back pain; as a result, the symptoms, such as stiffness and
muscular pain, are also treated.
Page 5
1.3 How do I use it?
To begin with, patients are instructed to lie on the rack, in a central position, with their knees bent
(as shown previously). Achieving this position is actually very easy. For more details, please refer
to our section on Getting On (pages 7-10). Once in the starting position patients are encouraged to
perform a series of exercises. These have been carefully designed to increase the pressure on the
joints (allowing the spine to lengthen further).
When you first lie on the backrack, you may have severe back pain, and your spine will not be
accustomed to this pressure. There are no side-effects, but your spine will react to the upward
force of the nodules - although your symptoms will almost certainly improve, you may feel sore
the next day. Note: This reaction is not the same as back pain - it is simply a natural response from
joints that are currently stiff and dysfunctional.
In view of this predictable (and necessary) response, the spine needs to be decompressed in stages.
To begin with, a low-moderate pressure will be sufficient to lengthen the spine (and provoke a
reaction). However, as your spine adapts to the backrack, you will need to increase the pressure,
using more advanced techniques.
For this reason, we have designed a comprehensive range of exercises designed to increase the
pressure in stages.
The Basic Exercises (pages 11-14) decompress the spine using low-moderate pressure. They are
suitable for everyone (barring a few exceptions, or contraindications). The Advanced Exercises
(pages 18-31) will decompress the spine using moderate-high pressure (two of them will also help
to strengthen the deep, stabilising, muscles that support the spine). The Advanced Exercises should
not be attempted until you are comfortable with the basic manoeuvres.
Page 6
1.4 How often should I use it?
The backrack can be used as frequently as your body will allow. After each session (possibly the
day after) you should expect to feel sore. Note: This reaction is not the same as back pain - it is
simply a natural response from joints that are currently stiff and dysfunctional. It is also a
necessary response (without it, you won't get better).
This reaction actually provides a very useful feedback mechanism. When you return to the
backrack and repeat the exercises, you may find that your back feels uncomfortable and too sore.
In this case, you should rest - use the backrack on the following day instead.
Alternatively, you could use the backrack every day, but perform different exercises on different
days. For example, on day 1 you could focus your attention on your lower back, using the Single
(or Double) Leg Raise; however, on day 2 you could switch your attention to your neck, using the
Backwards Tilt.
You can use the backrack as frequently as you like (and for as long as you like) provided that you
can tolerate the amount of soreness. To start with, however, we recommend that you use it every
other day, and for relatively short periods of time (perhaps 5-10 minutes per session). Note: After
a while, you should be able to regulate your own treatment. If you use the backrack on a frequent
basis, you should find that your soreness disappears - when this happens, you should progress to a
more advanced exercise.
Page 7
2 Getting On
Getting on to the backrack is actually very easy. The recommended way is given below - there are
other ways to do it, but please follow our instructions - they will help to minimise the strain on
your back (note: this is very important if you have a particularly bad back).
2.1 Kneeling Down
Place the backrack on the floor. Kneel down at the bottom, left-hand, corner of the rack (as
shown).
Note: In this context, bottom left is defined looking down the backrack, from top to bottom.
Ideally, the floor should be carpeted - this will help to cushion your knees (it will also help when
getting off the rack); alternatively, place the backrack on an exercise mat.
Page 8
2.2 Sitting
Put your left hand down on the floor, towards the top end of the rack. Put your right hand down,
towards the bottom end. Next, lower yourself gently onto the end of the rack (as shown). Adjust
your weight, so that you're sitting at the end of the rack, in a central position, with your knees bent
- your legs should be on either side of the centre-line.
2.3 Sliding Back
Next, slide, or roll yourself backwards along the rack, until you're sitting in the central curve (as
shown). Note: The lateral spindles are designed to roll - this will help you in this manoeuvre.
Page 9
2.4 Rolling Down
Now, begin to roll down the rack towards the bottom. At the same time, lean back into the upper
curve of the rack (as shown).
As you continue to roll down, allow your spine to move progressively into the upper curve - it
should be supported at all times. Note: Keep your knees bent at all times - do not straighten your
legs (this will strain your lower back).
2.5 Starting Position
At the end of this manoeuvre, you should be lying on the rack with your knees bent (as shown).
You should be lying in a central position, with the wooden nodules running down either side of
your spine.
Note: The nodules on the last roller should not be in contact with any part of your body. The
nodules on the penultimate roller (second down from the top) should be in contact with your upper
neck, just below the back of the head. As a result of this, the last spindle should rotate freely (as
shown).
Page 10
LifeART image copyright (2001) Lippincott Williams & Wilkins. All rights reserved.
When you're in the starting position, you can check this by placing your hands behind your neck,
and trying to rotate the last spindle - if it won't rotate, you need to move down the rack. If you are
too far down the rack, the nodules on the penultimate roller will push into your skull (you will
know if this happens) - to correct this, you need to slide back up the rack.
Page 11
3 Basic Exercises
The basic exercises will decompress your spine using low-moderate pressure. They are suitable for
everyone (barring a few exceptions - please refer to page 1).
Note: The exercises appear in order of ascending difficulty (and/or pressure) - we therefore
recommend that you're comfortable with each manoeuvre, before trying the next one. If you are in
any doubt as to whether the backrack is appropriate for you, please consult your doctor.
3.1 Starting Position
The neutral, or starting, position is suitable for people with moderate-severe back pain. Achieving
this position is actually very easy - for more details, please refer to our section on Getting On
(pages 7-10).
A small amount of pressure is applied to the spine, and you're not required to move (the spine rests
in a neutral position).
Note: If you have a bad neck, you can rotate your head to one side. This will shift the weight of
your head over the corresponding side of your neck, increasing the amount of pressure in this
region. If you need to reduce the amount of pressure, place a folded towel behind your neck.
Page 12
3.2 Single Leg Raise
When you feel comfortable with the starting position, bring up one of your legs towards your chest
(as shown).
This will shift the weight of your leg over the corresponding side of your lower spine, increasing
the amount of pressure in this region. It will also help to stretch your hamstring muscle - this runs
down the back of your upper leg.
After holding this position for a short period of time (perhaps 30 seconds), return your leg to the
floor and raise the other leg.
Note: Please make sure that you grasp your leg behind the knee (as shown) - this will prevent the
knee from being squashed. You can alter the exact point of pressure by varying the angle of your
leg, bringing it closer to your chest, as and when you feel comfortable. If you've had a bad (lower)
back for a long period of time, your hamstring muscles will be tight. You should therefore
approach this exercise carefully - bring your leg towards your chest in small increments.
3.3 Double Leg Raise
The Double Leg Raise will increase the pressure on your lower spine. It shifts the weight of both
legs over your lower back. Again, please make sure that you grasp each leg behind the knee.
Page 13
After holding this position for a short period of time (perhaps 30 seconds), bring your legs further
towards your chest (as shown).
Again, hold for 30 seconds, and repeat until your legs are as high as possible.
Note: If you've had a bad back for a long period of time, your hamstring muscles will be tight.
You should therefore approach this exercise carefully - bring your legs towards your chest in small
increments.
Page 14
3.4 Backwards Tilt
The Backwards Tilt will increase the pressure on your neck. The diagram below is largely self
explanatory.
Note: You can alter the exact point of pressure by varying the angle of your legs. If you've had a
bad (lower) back for a long period of time, you may find that you have weak knees. You should
therefore approach this exercise carefully - don't hold the position for too long. It is better to hold
the position for a short period of time, and to do a larger number of reps (or repetitions). Finally,
remember to keep breathing throughout the exercise.
Page 15
4 Getting Off
Getting off the backrack is actually very easy. The recommended way is given below - there are
other ways to do it, but please follow our instructions - they will help to minimise the strain on
your back (note: this is very important if you have a particularly bad back).
4.1 Starting Position
Return to the starting position (as shown). Both feet should rest on the floor, no more than
shoulders' width apart.
Next, extend your left leg, with the heel of your foot resting on the floor (as shown). Keep your
right leg bent.
Page 16
4.2 Pivot
Using your right leg, push into the floor. At the same time, rotate your head and upper body
towards the left hand side of the rack (as shown).
Complete this part of the manoeuvre by rolling onto the floor. Your legs should now be together
and bent (as shown).
Page 17
4.3 Lift
Using your right hand, lift yourself up so that you're resting on your left forearm (as shown). At
this stage, your legs should still be together.
Next, push yourself up with your forearm until you're resting on your left hand (as shown). The
sole of your right foot should rest on the floor.
Finally, put your right hand on the floor in front of you. Push off with your right foot and both
hands. As you do this, swing your left leg under your body so that you rest on your left knee (and
the sole of your right foot). Push up with your right leg until you're standing.
Page 18
5 Advanced Exercises
The Advanced Exercises will decompress your spine using moderate-high pressure. They are
suitable for everyone (barring a few exceptions - please refer to page 1).
Note: You should not attempt the Advanced Exercises until you have partially mobilised (or
decompressed) your lower spine. In order to do this, you will need to perform the Basic Exercises
for at least three months. During this time, the backrack should be used on a regular basis (3-4
times a week), for at least 20 minutes per session. If you are in any doubt as to whether the
backrack is appropriate for you, please consult your doctor.
The Advanced Exercises are as follows:
1. The Double Leg Raise with Tilt is a variant of the basic, Double Leg Raise (please refer to the
Basic Exercises for more detail). This exercise will apply maximum pressure to your lumbar spine.
2. The Stomach Crunch will strengthen the deep, abdominal muscles that stabilise the spine.
Moderate pressure is applied to the lower back.
3. The Lean Back (with Tilt) applies maximum pressure to the mid-upper back, or thoracic spine.
It requires a certain amount of strength and flexibility from your abdominal muscles; for this
reason, we recommend that you feel comfortable with the Stomach Crunch before you attempt this
manoeuvre.
4. Finally, the Reverse Leg Raise strengthens the lower back muscles. It is actually performed
without the use of the backrack, but it will help to strengthen your spine and prevent further injury.
It will also help to balance the strength of your abdominal muscles (developed using the Stomach
Crunch).
Note: All exercises for the back should be carried out while lying down.
Page 19
5.1 Double Leg Raise with Tilt
This exercise is a variant of the basic, Double Leg Raise (please refer to the Basic Exercises for
more detail). Begin by lying on the rack in the neutral position (as shown) - for more details,
please refer to our section on Getting On (pages 7-10).
Next, bring up both legs towards your chest (as shown). This will shift the weight of both legs
over your lower back.
Finally, tip yourself over to one side - this will shift your weight onto one side of your lumbar
spine. The increase in pressure will be substantial. After holding this position for a short period of
time (perhaps 30 seconds), bring your legs further towards your chest (as shown). Note: You
should remain tilted.
Page 20
Again, hold for 30 seconds, and repeat until your legs are as high as possible. Next, return your
legs to the starting position (second diagram) and lean over to the other side of your spine. Repeat
the instructions given above. Note: Please make sure that you grasp each leg behind the knee.
Page 21
5.2 Stomach Crunch
This exercise will strengthen the deep, abdominal muscles that help to stabilise the spine
(moderate pressure is also applied to the lower back). Note: If you are in any doubt as to whether
this exercise is appropriate for you, please consult your doctor.
The whole movement can be broken down into a series of distinct phases: preparation; lift; and
return.
Preparation
You should warm up before attempting this exercise. Decompress your spine by using the
backrack and then go for a brief walk (10 minutes). Begin by lying on the rack in the neutral
position (as shown) - for more details, please refer to our section on Getting On (pages 7-10).
After positioning yourself correctly:
!
Place your hands behind your head.
Locate and isolate your lower abdominal muscles; draw them up, and in, towards your spine this will support your back, prior to lifting. Do not tense your neck muscles, or over-arch your
lower back - these are common mistakes.
!
Before you lift, take a deep, slow breath - fill your lungs as much as possible (within reason),
breathing in through your upper and lower chest.
!
Page 22
Lift (Stomach Crunch)
Please refer to the diagram below.
Lift your upper torso (upper back, shoulders and neck) off the rack.
Use your hands to support the weight of your head. As you can see from the diagram, you don't
need to lift very far.
!
Do not use your arms to lift - this will stop you from targeting your abdominal muscles. Do not
tense your neck (supporting your head will help).
!
When you lift, focus your eyes on the ceiling - this will help to keep your neck (and back) as
straight as possible. You should try to avoid bringing your head towards your chest - this will
round your neck and upper back too much (it will also encourage you to lift using your arms).
!
As you lift, keep your lower abdominals tensed (up and in) and breathe out slowly. Exhale,
until you come to the end of your breath - this will help you to keep the tension in your abdominal
muscles in a safe and reliable manner.
!
Note: Some people hold the tension by not breathing - this is very bad for you.
Return
As you lower your torso, breathe in slowly (keeping your abdominals tensed). Again, support
the weight of your head using your hands. Do not tense your neck.
!
Do not use your arms to lower yourself down, and try to avoid bringing your head towards
your chest. You should aim to finish inhaling just as you return to the starting position.
!
Page 23
Additional Advice
To start with you should:
!
Limit the number of repetitions (perhaps to as little as five or ten).
!
Perform the exercise every other day.
When you feel comfortable with this exercise, you should begin to strengthen your back (using the
Reverse Leg Raise).
Note: Both muscle groups (abdominal and back) play an important role in stabilising the spine.
However, these groups oppose each other - one sits in front of the spine, and the other behind it.
You therefore need to balance your strength by doing both exercises (otherwise, you may
experience problems).
If you've had back pain for a reasonable length of time (whether the pain is intermittent, or
constant) you will probably have weak, and tight, abdominal muscles. You therefore need to
decompress your spine before you attempt to strengthen your back - and you need to build up your
strength and stamina gradually (as with any other exercise).
If you feel that you've strained your muscles (at any stage) you should stop. This probably means
that your lower spine is too stiff, and your muscles are too tight. Continue to use the backrack until
you feel ready to try this exercise again.
Page 24
5.3 Lean Back (with Tilt)
The Lean Back (with Tilt) applies maximum pressure to the mid-upper back, or thoracic spine. It
requires a certain amount of strength and flexibility from your abdominal muscles; for this reason,
we recommend that you feel comfortable with the Stomach Crunch before you attempt this
manoeuvre. Note: If you are in any doubt as to whether this exercise is appropriate for you, please
consult your doctor.
The exercise is best done en-route to the starting position, when getting on to the backrack (please
refer to the manoeuvre entitled Rolling Down on page 9). When you begin to roll down the rack
stop, half-way down (as shown). Continue to breathe and don't strain your neck.
Next, put your hands behind your head, and lean back into the upper curve of the rack - this will
increase the pressure on your thoracic spine.
Page 25
After holding this position for a short period of time (perhaps 30 seconds), roll down the rack a
short distance. This will allow you to target the next vertebra along your back. Again, hold for 30
seconds and repeat until the pressure on your spine begins to fade (or, until you feel your
abdominal muscles tiring).
Note: You can increase the pressure still further by tilting over to one side - this will shift your
weight onto one side of your upper spine. Please continue to breathe throughout the exercise. Do
not tense your neck or over-arch your lower back – these are common mistakes.
Page 26
5.4 Reverse Leg Raise
This exercise strengthens the lower back muscles. It requires a certain amount of strength and
flexibility from your abdominal muscles; for this reason, we recommend that you feel comfortable
with the Stomach Crunch before you attempt this manoeuvre. Note: If you are in any doubt as to
whether this exercise is appropriate for you, please consult your doctor.
The whole movement can be broken down into a series of distinct phases: preparation; lift; and
return.
Preparation
You should warm up before attempting this exercise. Decompress your spine by using the
backrack and then go for a brief walk (10 minutes).
Sit on the edge of your bed. Lie down, bringing your knees up towards your chest at the same time
- this will prevent strain on your lower back. Roll over, and straighten out your legs so that they
hang off the edge of the bed (as shown). If possible, your toes should touch the floor.
After positioning yourself correctly:
!
Place your arms on the bed in front of you, so that your hands touch just in front of your head.
Locate and isolate your lower abdominal muscles; draw them up, and in, towards your spine this will support your back, prior to lifting. Do not tense your neck muscles, or over-arch your
lower back - these are common mistakes.
!
Page 27
Before you lift, take a deep, slow breath - fill your lungs as much as possible (within reason),
breathing in through your upper and lower chest.
!
Lift
The Reverse Leg Raise can be made as easy (or as difficult) as you wish. This flexibility is useful,
as you can vary the exercise according to the strength of your back.
Note: The variants are listed below, progressing from the easiest form of the exercise, through to
the most difficult:
1. Single Leg Raise (Bent)
2. Double Leg Raise (Bent)
3. Single Leg Raise (Straight)
4. Double Leg Raise (Straight)
Please make sure that you're comfortable with each manoeuvre before trying the next one. Each
lift should be followed by a return to the starting position (shown previously).
Lift 1: Single Leg Raise (Bent)
Please refer to the diagram below.
Page 28
Lift one of your legs, so that your toes leave the floor.
If possible, try to lift your leg to the same height as the bed. Bending your leg (as shown) will
help to lower the strain on your back. Do not tense your neck.
!
As you lift, keep your lower abdominals tensed (up and in) and breathe out slowly. Exhale,
until you come to the end of your breath - this will help you to keep the tension in your abdominal
muscles in a safe and reliable manner. Note: Some people hold the tension by not breathing - this
is very bad for you.
!
Return
As you return your leg to the floor, breathe in slowly (keeping your abdominals tensed). Do not
tense your neck.
!
!
You should aim to finish inhaling just as you return to the starting position.
Lift 2: Double Leg Raise (Bent)
This variant of the single lift is largely self explanatory: lift both of your legs, whilst keeping them
bent. Again, keep your lower abdominals tensed (up and in), and continue to breathe out. Do not
tense your neck. Note: Some people hold the tension by not breathing - this is very bad for you.
After each lift, return your legs to the starting position (page 26), breathing in slowly. Keep your
abdominals tensed, and your neck loose. You should aim to finish inhaling just as you return to the
starting position.
Page 29
Lift 3: Single Leg Raise (Straight)
Please refer to the diagram below.
Lift one of your legs, so that your toes leave the floor.
If possible, try to lift your leg to the same height as the bed (as shown). This time, however,
keep your leg straight - this will increase the strain on your back. Do not tense your neck.
!
As you lift, keep your lower abdominals tensed (up and in), and breathe out slowly. Exhale,
until you come to the end of your breath - this will help you to keep the tension in your abdominal
muscles in a safe and reliable manner. Note: Some people hold the tension by not breathing - this
is very bad for you.
!
After each lift, return your leg to the starting position (page 26), breathing in slowly. Keep your
abdominals tensed, and your neck loose. You should aim to finish inhaling just as you return to the
starting position.
Page 30
Lift 4: Double Leg Raise (Straight)
This is the hardest form of the exercise: lift both legs off the floor (as shown), whilst keeping them
straight. Again, keep your lower abdominals tensed (up and in), and continue to breathe out. Do
not tense your neck. Note: Some people hold the tension by not breathing - this is very bad for
you.
After each lift, return your legs to the starting position (page 26), breathing in slowly. Keep your
abdominals tensed, and your neck loose. You should aim to finish inhaling just as you return to the
starting position.
Additional Advice
To start with you should:
!
Limit the number of repetitions (perhaps to as little as five).
!
Perform the exercise every other day.
As mentioned above, we recommend that you feel comfortable with the Stomach Crunch before
you attempt this manoeuvre.
Note: Both muscle groups (abdominal and back) play an important role in stabilising the spine.
However, these groups oppose each other - one sits in front of the spine, and the other behind it.
You therefore need to balance your strength by doing both exercises (otherwise, you may
experience problems).
Page 31
If you've had back pain for a reasonable length of time (whether the pain is intermittent, or
constant) you will probably have weak (and tight) abdominal and back muscles. You therefore
need to decompress your spine before you attempt to strengthen your back - and you need to build
up your strength and stamina gradually (as with any other exercise).
If you feel that you've strained your muscles (at any stage) you should stop. This probably means
that your lower spine is too stiff, and your muscles are too tight. Continue to use the backrack until
you feel ready to try this exercise again.
Tel (UK): 0870 241 7697
Tel (Int.): + 44 870 241 7697
UK patent no. GB2333036
Worldwide patents pending
Back Rack Ltd
Company Registration No. 4781911
www.backrack.co.uk
Published by Back Rack Ltd.
Copyright © 2003 Back Rack Ltd.
All rights reserved.