1
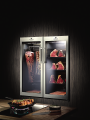
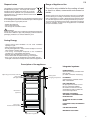
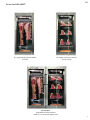
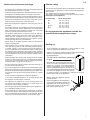
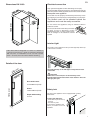
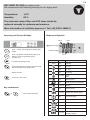
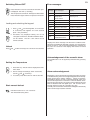
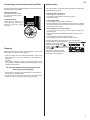
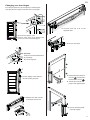
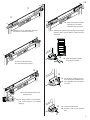
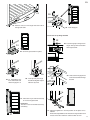
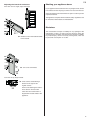
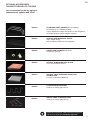
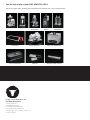
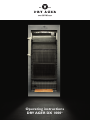
Operating instructions
DRY AGER DX 1000®
2
DRYAGING
Dry Aging is no longer a mystery. You too can
produce succulent and tasteful meat for yourself
with the
DRY AGER DX 1000®
When this technique is used, the result is a quality piece of
meat that brings out a natural, but a more intensive flavour.
The texture of the matured meat is tender, yet firm and has
a perfect bite.
You will notice that when the Dry Aged meat is grilled or pan
fried, there are hardly any meat juices and that the fat surrounding it gives off a spicy aroma.
The younger the animal the better the result. It is always
recommended to buy a piece of meat that has a good fat
content and a high rate of internal marbling.
It is advisable to mature the meat on the bone either
hanging or in the largest possible joints. The reason for
this is to minimise the pure meat exposed to the air, reducing weight loss.
The Dry Aging period is recommended for at least
21 days, then the maximum tenderness is reached.
Thereafter, only the flavour becomes more intense.
Please note : A maturing period of up to 6 weeks is possible.
MEAT QUALITY
The best meat recognised for Dry Aging is rib-eye on
the bone. It is always best to purchase from a dealer
who sources their meat from a good quality abattoir.
The hygienic handling of food should always be addressed
for best results.
When the process is complete, the thin crust is trimmed
off ready to be de-boned or cut into steaks.
We trust you have fun and enjoy the
pleasure of using the DRY AGER DX1000 ®
From the manufacturing team
Landig + Lava Gmbh & Co. KG
3
EN
Disposal notes
Range of Appliance Use
The appliance contains reusable materials and should
be disposed of properly - not simply with unsorted
household refuse. Appliances which are no longer
needed must be disposed of in a professional and
appropriate way, in accordance with the current local
regulations and laws.
The unit is only suitable for the cooling of meat
or food in a home, commercial environment or
similar.
When disposing of the appliance, ensure that the refrigerant circuit
is not damaged to prevent uncontrolled escape of the refrigerant
it contains (data on type plate) and oil.
• Disable the appliance.
• Pull out the mains plug.
• Cut through the connection cable.
All other types of use are not permitted. The unit is not suitable
for the storing and cooling of medicines, blood plasma, laboratory preparations or similar - Medical Devices Directive 2007
/47 / EC with regards to the underlying materials and products .
Any misuse of the appliance may result in damage to the stored
goods or spoilage . Furthermore, the appliance is not suitable
for use in hazardous areas.
WARNING
Danger of suffocation due to packing material and plastic film!
Do not allow children to play with packaging material. Take the
packaging material to an official collection point.
Saving Energy
- Always ensure good ventilation. Do not cover ventilation
openings or grill.
- Always keep fan louvres clear.
- Do not place appliance in areas of direct sunlight or next to a
stove, heater or similar object.
- The energy consumption depends on the installation
conditions, e.g. the ambient temperature.
- Keep the time the appliance is open to a minimum.
Accumulated dust increases the energy consumption:
- Once a year, hoover the refrigerating unit together with the
metal grill of the heat exchanger at the back of the appliance.
Operating and control elements
Interior light
(LED light strip)
XH200
Description of the appliance
-888
8888
Lock
Integrated systems
UVC-System
HUMICONTROL©
electronic humidity controller from
60% to 90%
(no water connection necessary)
set
temp.
set
%RH
Hanging rail optional
DX AIRREG©
optimal airflow, activated carbon
filter & sterilization
LED LIGHTING DX
the light spectrum does not contain any ultraviolet radiation,
the result is a minimum of heat
generated and will not affect the
core meat temperature.
Grid shelves
(optional)
DEFROST AUTOMATIC,
AUTOMATIC CONDENSATION
EVAPORATION
OPTIC AND ACUSTIC ALARM
ALERT
LOCKABLE DOOR, REVERSIBLE
DOOR
Type plate
Activated charcoal filter
CAN BE INTEGRATED
MAGNETIC DOOR SEAL
Adjustable- height feet
4
To use the DRY
EN
AGER®
DX 1000®
Dry aging hanging entire saddle
(our tip!)
DX 1000®
Dry aging of joints on shelves
(more waste)
2 x DX 1000®
Integrated mounting solution
Ideal for a commercial display area
5
EN
Safety Instructions and warnings
Climate rating
• To prevent injury or damage to the unit, the appliance should
be unpacked and set up by two people.
The climate rating indicates the room temperature at which the
appliance may be operated in order to achieve full refrigeration
performance.
The climate rating is indicated on the type plate.
The position of the type plate is shown in the section entitled
Description of the appliance.
• In the event that the appliance is damaged on delivery, contact
the supplier immediately before connecting to the mains.
• To guarantee safe operation, ensure that the appliance is set up
and connected as described in these operating instructions.
• Disconnect the appliance from the mains if any fault occurs.
Pull out the plug, switch off or remove the fuse.
• When disconnecting the appliance, pull on the plug, not on
the cable.
• Any repairs and work on the appliance should only be carried
out by the customer service department, as unauthorised
work could prove highly dangerous for the user. The same
applies to changing the mains power cable.
• Do not allow naked flames or ignition sources to enter the
appliance. When transporting and cleaning the appliance,
ensure that the refrigerant circuit is not damaged. In the
event of damage, make sure that there are no ignition sources
nearby and keep the room well ventilated.
• Do not stand on the plinth, drawers or doors or use them to
support anything else.
• This appliance can be used by children of 8 years old and
over, and also by persons with restricted physical, sensory
or mental capacity or lack of experience and knowledge, if
they are supervised or have been instructed on safe use of
the appliance and understand the resulting risks. Children
must not be allowed to play with the appliance. Cleaning and
user maintenance must not be carried out by children without
supervision.
• Avoid prolonged skin contact with cold surfaces or chilled/
frozen food. This could cause pain, numbness and frostbite.
In the case of prolonged skin contact, protective measures
should be taken, e.g. gloves should be worn.
• Do not consume food which has been stored for too long, as
it could cause food poisoning.
• Do not store explosives or sprays using combustible propellants such as butane, propane, pentane, etc. in the appliance.
Electrical components might cause leaking gas to ignite. You
may identify such sprays by the printed contents or a flame
symbol.
• Do not use electrical appliances inside the appliance.
• If you have a lockable appliance, do not keep the key near
the appliance or within reach of children.
• The appliance is designed for use in enclosed areas. Do
not operate the appliance outdoors or in areas where it is
exposed to water or damp conditions.
• The LED light strip illuminates the interior of the appliance. It
is not suitable for lighting a room.
Climate rating
Room temperature
+10 °C to +32 °C
+16 °C to +32 °C
+16 °C to +38 °C
+10 °C to +38 °C
+16 °C to +43 °C
+10 °C to +43 °C
SN
N
ST
SN-ST
T
SN-T
Do not operate the appliance outside the
specified room temperature range.
Setting up
• Avoid positioning the appliance in direct sunlight or near
cookers, radiators and similar sources of heat.
• The floor on which the appliance stands should be horizontal
and level. Compensate for uneven floors with
the adjustable feet.
•
Do not cover ventilation openings
or grill..
• Standard EN 378 specifies that the room in
which you install your appliance must have a
volume of 1 m3 per 8 g of R 600a refrigerant
used in the appliance, so as to avoid the formation of inflammable gas/air mixtures in the
room where the appliance is located in the event
of a leak in the refrigerant circuit. The quantity
of refrigerant used in your appliance is indicated on the type
plate on the inside of the appliance.
• Always install the appliance directly
against the wall.
• Place the appliance in its final position
at the place of installation. Extend the
adjustable foot at the bottom hinge
bracket until it rests on the floor and
then make a further 90° turn.
• When transporting or operating the appliance at an altitude
of more than 1500 m above sea level, the glass pane in the
door can break due to the reduction in air pressure. Broken
fragments are sharp-edged and can cause serious injury.
6
Electrical connection
Dimensions DX 1000®
EN
Only operate the appliance with alternating current (AC).
The permissible voltage and frequency are indicated on the type
plate. The position of the type plate is shown in the section entitled
Description of the appliance.
The socket must be properly earthed and protected by a fuse.
The tripping current of the fuse must be between 10 A and 16 A.
1650 mm
The socket must not be situated behind the
appliance and must be easily accessible.
Do not connect the appliance using an extension cable or
extension socket.
Do not use stand-alone inverters (conversion
of direct current to alternating current/
threephasecurrent) or energy-saving plugs.
Risk of damage to the electronic control
system!
Interior Light
XH200
If the device will be integrated in a wall or in a kitchen, it
is necessary that there is a good air-ventilation (minimum
300 cm²). This air-ventilation can be set with a plinth
panel + air-holes, like in the normal kitchen-building.
The interior of the appliance is lit by an LED light strip at the top
of the interior container.
-888
88
88
Details of the door
6
set
temp.
set
%RH
mm
6
8
56
8m
The light intensity of the LED light corresponds to laser
class 1/1M.
Important
If the cover is removed, do not look directly at the
light through optical lenses from close distance. This can
damage your eyes.
m
57
m
1399 mm
1614 mm
Door with frame:
1614 x 686 mm (H x B)
m
Glass:
1399 x 568 mm (H x B)
Depth with sealing:
57 mm
Safety lock
The lock in the appliance door is equipped with a safety
mechanism.
Locking the appliance:
• Insert the key as shown by
arrow 1.
• Turn the key 180°.
To unlock the appliance, the
same procedure must be
repeated
7
EN
DRY AGER DX 1000® is ready to use
We recommend the following settings for dry aging beef:
Temperature:
Humidity:
1,5°C
82 %
The activated carbon filter and UVC lamp should be
replaced annually for optimum performance.
More information at: [email protected] / Tel: (+49) 07581 48959-0
Operating and Control Settings
Display and Symbols
LED 3
LED 2
Temperature display
set
temp.
View / change the temperature setting (SET_
TEMP)
set
%RH
View / change the humidity setting (SET_RH);
Select or confirm a parameter during
programming
Humidity display
LED 4
MODE
FUNCTION
ON
Standby
Press and hold button for 3 seconds: Start manual
defrost. Decreases the display value
ON
°C-Unit
ON
°F-Unit
Without function
ON
A cooling
FLASHING
delay
Cool
ON
defrost active
ON
A defrost active, 4 times daily
FLASHING
defrost
ON
heating active
FLASHING
default level for the
temperature setting (Temp.)
ON
A Acoustic alarm
ON
Fans running
ON
RH% - humidity
ON
A dehumidifying active
ON
A adding humidity
FLASHING
default level for the
humidity setting
Increases the displayed value
LED / SYMBOL
LED 4
Power ON / OFF switch
LED 3
Key combination
+
LED 3
Lock and seal keyboard
8
EN
Switching ON and OFF
bol
Press the button once for 5 seconds and the OFF sym-
is displayed. The LED 4 (= standby)
The compressor is turned off. All relays are deactivated.
Press the button again and the compressor will restart.
Locking and unlocking the keypad
1. Press
and
and hold together, for a minimum
of 3 seconds, POF appears for a few seconds
(POF = OFF parameter)
2. Thereafter, only displayed setting can not be
changed. Furthermore, the MIN and MAX values
can be viewed.
further activated.
Unlock
Press
and
The ON / OFF switch can be
hold the two keys for a minimum of 3 seconds.
Error messages
Message
Reasons for
error messages
Outputs
"P1"
Room sensor error
Cooling and Heating OFF
"P2"
Evaporation
temperature
sensor Failure
Defrost by time
"P3"
Humidity Sensor error
moisture control OFF
"HA"
High temperature alarm
regulation unaffected
"LA"
Low temperature alarm
regulation unaffected
"HHA"
Moisture-HIGH alarm
regulation unaffected
"HLA"
Moisture-LOW alarm
regulation unaffected
"dA"
Door alarm
regulation unaffected
"EAL"
External alarm
regulation unaffected
"BAL"
Serious
unaffected external
regulation unaffectedt
Displays the alarm message until the alarm conditions exist.
All alarms are displayed alternately with the room temperature
except for the P1. EE can be acknowledged by pressing any
key “rSt” for 3 seconds in the display, then returns to normal
operation.
Acknowledgement of the acoustic alarm
Setting the Temperature
set
The audible alarm can be (optional) switched off by pressing
any key.
1. Press SET key: The set value is displayed and the
LED’s flash
2. Now to change the settings, within 10 seconds,
use the
and
arrow keys
3. To confirm press SET button or wait 10 seconds
Start manual defrost
Alarm acknowledgement
Message P1, P2 and P3 after about 30 seconds; after correction
or troubleshooting, the error message disappears automatically.
Check probe sensor before replacing. Check connections.
Temperature alarms HA and LA will automatically reset once
the normal temperature is reached or when the defrost starts.
DA goes off when the door is closed. External alarms EAL and
BAL are disabled after the digital input. PAL acoustic alarm:
Through Device Turning off or standby ON / OFF.
Humidity alarms HHA and LHA are acknowledged automatically
when normal range has been reached.
Hold down button for a min. 2 seconds
The manual defrosting starts
9
EN
Air exchange with activated charcoal filter
We recommend that you replace the filter once a year. Filters can
be obtained from your dealer.
Malfunctions
You may be able to rectify the following faults by checking the
possible causes yourself.
Changing the filter:
Take the filter by the handle.
Turn it 90° to the left or right
and remove.
• Appliance does not function:
– Is the appliance switched on?
– Is the plug correctly fitted in the mains socket?
– Is the fuse intact?
Inserting the filter:
Insert with the handle in a
vertical position. Turn it 90° to
the left or right until it clicks
into place.
• Loud running noise:
– Is the appliance set up firmly on the floor?
– Does the appliance cause nearby items of furniture or objects
to vibrate? Please note that noises caused by the refrigerant
circuit cannot be avoided.
• The temperature is not low enough:
– Is the temperature setting correct (see "Setting the
temperature")?
– Does the separately installed thermometer show the correct
reading?
– Is the ventilation system working properly?
– Is the appliance set up too close to a heat source?
Cleaning
Before cleaning always switch off the appliance. Pull out the
mains plug or remove/unscrew the fuse.
If none of the above causes apply and you cannot rectify
the fault yourself, contact the nearest
customer service department
stating the type designation
,
service number
and appliance
number
as indicated on the
type plate.
The position of the type plate
is shown in the section entitled
Description of the appliance.
• Clean the inside and outer walls with lukewarm water and a
little detergent. Do not use abrasive or acid cleaners or
chemical
solvents.
• Use a glass cleaner to clean the glass surfaces and a
commercially available stainless-steel cleaning agent for the
stainless-steel surfaces.
Do not use steam cleaners because of the
risk of injury and damage.
• Ensure that no cleaning water penetrates into the electrical
components or ventilation grill.
• Do not damage or remove the type plate on the inside of the
appliance. It is very important for servicing purposes.
10
EN
Changing over door hinges
Door hinges should only be changed by a trained expert.
Changing the door hinges must be done by two people.
2
6
6.Unscrew lock and re-fit on the
oppossite side.
1. Open the door approx. 130°.
1
2. Remove screw from hinge bracket and
screw 3 to 4 turns into the hinge pin.
7
7. Click cover into place.
3
Important
The door must now be held secure
by somebody.
3. Pull out hinge pin.
4
9
4. Tilt door slightly to the side and
8
remove by lifting upwards.
8. Release pressure plates at
the front
and pull them
backwards to remove
9. Transfer door handle and
.
plugs to the opposite side.
5. Release cover with a small
screwdriver and remove.
5
10
10. Push on pressure plates
until they engage.
11
EN
11
11
t p.
se m
te
t
se RH
%
XH200
t p.
se m
te
XH200
t
se RH
%
88
-88888
16. Slide cover (with the smaller
88
-88888
11. Release covers on the inside, slide them
towards the outside and remove.
opening) from outside to
inside and click into place.
17. Guide cover with the larger opening over the hinge
bracket, slide it from outside to inside and click
into place.
12
t p.
se m
te
XH200
t
se RH
%
88
-88888
18
13
12. Unscrew hinge bracket.
18. Undo adjustable foot with
the spanner provided.
13. Unscrew closing bracket.
14
19
19. Pull hinge pin upwards and unscrew it from the adjustable foot.
20. Pull adjustable foot downwards
to remove.
t p.
se m
te
XH200
t
se RH
%
88
-8888
8
14. Re-fit closing bracket on the
15
opposite side.
15. Re-fit hinge bracket on the opposite
side. Insert screws in the marked
openings.
22
21. Unscrew hinge bracket.
22. Transfer cover to the opposite
side.
21
12
EN
23
28
23. Remove cover, turn it through 180° and re-fit on
the opposite side.
28. Insert hinge pin.
Front view of top hinge bracket
29
29. Push in hinge pin until groove in
24
the pin lines up with bore hole in
the hinge bracket.
24. Screw hinge bracket into place.
26
25
25. Fit adjustable foot
from underneath and
attach hinge pin to it.
26. Insert pin fully into hinge
of it to the hinge bracket.
Important
The door must now be held secure by
somebody.
27
30
screw into bore hole in hinge
bracket.
bracket and tighten adjustable foot by hand.
27. Place door on pin and move the top
30. Undo screw in hinge pin and
31
31. Place the appliance in its final position at the place of installation.
Extend the adjustable foot at the bottom hinge bracket until
it rests on the floor and then make a further 90° turn.
13
EN
Adjusting the lateral tilt of the door
If the door is at an angle, adjust the angle.
Shutting your appliance down
If your appliance is to be shut down for any length of time, switch
it off and disconnect the plug or switch off or unscrew the fuse.
Clean the appliance and leave the door open in order to prevent
unpleasant smells.
The appliance complies with the relevant safety regulations and
EC Directives 2004/108/EC and 2006/95/EC.
Disclaimer
32
32. Release cover on the inside and slide
to the outside.
The manufacturer accepts no liability for any spoilage to the
refrigerators content, not even when the device is within the
warranty period. Similarly, the manufacturer accepts no liability
for personal injury due to incorrectly stored goods, which are
for personal consumption or re-sale.
33. Turn cover downwards.
33
Front view of top hinge bracket
34. Undo screws and slide hinge
34
bracket to the right or left.
Re-fit cover following the instructions above in reverse order.
Tighten screws.
Close door and check that it is
aligned with the side walls of the
appliance.
14
EN
OPTIONAL ACCESSORIES THOUGHT THROUGH TO THE END
Our accessories for the dry aging of
complete beef saddles and joints.
DX0010
STAINLESS STEEL HANGER (for up to 80 kg)
Per hanger up to 2 saddles possible
Can be adjusted in height and position in the refrigerator
Per height position upto 2 hangers possible
DX0020
SHELVES FOR INDIVIDUAL JOINTS
(max. weight 40 kg)
Max.5 shelves possible in the refrigerator
DX0040
LABELS FOR THE MEAT (set of 20)
Including a nylon tie
DX0050
SALTAIR© HIMALAYAN SALT BLOCK
For a more intensive flavour
DX0070
SALTAIR© TRAY (STAINLESS STEEL) FOR
THE BOTTOM
For max.4 salt blocks (DX0050)
DX0090
S-HOOK STAINLESS STEEL
Holds up to 100 kg (160 x 8mm)
DX0095
SWIVEL HOOK STAINLESS STEEL
Holds up to 100 kg (180 x 8mm)
Additional accessories, meat processing equipment
and vacuum packing at: www.dry-ager.com
15
You like the quality of your DRY AGER DX 1000®?
Ask for more high-quality products and accessories from Landig & Lava – here a small overview:
Meat-Mincers
Sausage-Fillers
Electric Band
Bone Saws
Sous-Vide
Stirrers
Knife
Sharpeners
Bone Saws
Slicing Machines
Sous-Vide Waterbaths
Vacuum-Machines
Cleavers
Magnetic-Knife Holders
Landig + Lava GmbH & Co. KG
DRY AGER Manufaktur
Valentinstraße 35-1
D-88348 Bad Saulgau
Tel. (0049) 075 81/4 89 59-0
Fax (0049) 075 81/4 89 59-29
[email protected] I www.dry-ager.com
Version 03/2014