1
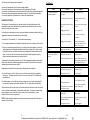
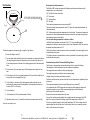
AFTER CARE
Your fitting has a high quality finish and should be treated with extra care to prevent the
visible surfaces.
All surfaces will wear if not cleaned correctly. Use a soft damp cloth with clean soapy water to
clean the surfaces. Stains can be removed with using washing up liquid. Do not use any
other cleaning solution or abrasive cloths or wire cleaners as this may damage the surface of
the tap.
If the cloth used to clean the tap has previously been used with a cleaner that contains
bleach take special care to thoroughly rinse the cloth with clean water before use.
INSTALLATION AND OPERATING INSTRUCTIONS FOR
THERMOSTATIC BASIN MIXERS COMPLYING WITH N.H.S
ESTATES MODEL ENGINEERING SPECIFICATION D08
THE VALVE COVERED IN THIS BOOKLET HAS BEEN TESTED AND APPROVED TO N.H.S
ESTATES MODEL ENGINEERING SPECIFICATION D08
SF1056CP - Sola Wall Mounted Safetouch Surgeon’s Mixer
SF1057CP - Sola Deck Mounted Safetouch Surgeon’s Mixer
LP - WE
HP - WE
LOW PRESSURE WASH BASIN
HIGH PRESSURE WASH BASIN
Note : These basin mixers are factory fitted with 2.75l flow limiter
(hot side) and 10l flow limiter (cold side), this is stated to comply
with BREEAM flow rates less than 6.0l/min at 3.0 bar. Please refer to
page 6 in these instructions prior to installation and for the removal
of flow limiters for use in Low Pressure installations and changing
the Hot side flow limiter used in High Pressure installations when
BREEAM flow rates are not required.
TMV3 approval information available on request
WRAS approval information available on request
Twyford Bathrooms
Lawton Road
Alsager
Stoke-on-Trent
ST7 2DF
UK
UK Technical Helpline
Telephone: 0844 412 5951
Fax: 0844 412 5922
Email: [email protected]
800441A
For latest prices and delivery to your door visit MyTub Ltd - www.mytub.co.uk - [email protected]
INTRODUCTION
NOTES
It has been recognised that users of hot water in care establishments are at risk from
scalding. This risk has been reduced by the use of thermostatic mixing valves. In order to
assure the performance of thermostatic mixing valves N.H.S. Estates Model Engineering
Specification DO8 was written. The valves listed in the following pages have been tested and
approved to this standard by a third party as part of the BUILDCERT scheme for use within
their designated applications.
The following abbreviated designation codes are used throughout this booklet. Detailed
descriptions are given below:HP
LP
S
B
W
T44
T46
High pressure
Low pressure
Shower
Bidet
Washbasin
Bath with fill temperature of 44°C max
Bath with fill temperature of 46°C max
THE SF1056CP & SF1057CP BASIN MIXERS HAVE BEEN APPROVED FOR USE IN
THE FOLLOWING TMV3 DESIGNATIONS :-
CODE
LP-WE
HP-WE
OPERATING PRESSURE APPLICATION
LOW PRESSURE
BASIN MIXER
HIGH PRESSURE
BASIN MIXER
For full installation instructions and method of temperature adjustment see General
Assembly and Servicing Guide.
INSTALLATION RECOMMENDATIONS
The following general recommendations should be observed.
1) The thermostatic mixing valve should be installed in such a position that maintenance and
the commissioning and testing of the TMV can be undertaken.
2) Always flush both supply pipes fully before connecting mixing valve to ensure no pipe
debris enters the inlets. Always fit filters provided.
3) All installations must comply with current local Water Company Regulations.
CONDITIONS FOR NORMAL USE
In order to give compliance with N.H.S. specification DO8 scheme. The tables below list the
conditions for normal use, the valves may perform adequately outside these parameters but
the TMV3 scheme approval does not apply. If they are required to work with other supply
.conditions an engineer must carry out a risk assessment and satisfy themselves that the units
are still suitable for use.
1
14
For latest prices and delivery to your door visit MyTub Ltd - www.mytub.co.uk - [email protected]
Table 1: Conditions for normal use
NOTES
Operating Pressure Range
Low Pressure High Pressure
Maximum Static Pressure (bar)
10
10
Flow Pressure , Hot & Cold (bar)
0.2 to 1
1 to 5
Hot Supply Temperature (°C)
52 to 65
52 to 65
Cold Supply Temperature (°C)
5 to 20
5 to 20
Minimum temperature differential
between mixed temperature and
10°C
10°C
either supply
COMMISSIONING
Since the installed supply conditions may differ from those used in testing and setting the
valves during final inspection and a valve may have several designations, it is necessary to
reset the mix temperature. The following procedure should be used after ensuring:a) The designation of the thermostatic mixing valve matches the intended application (i.e. if
a shower is to be supplied at 2 bar then the valve must have a HP-S designation).
b) The supply pressures match those for which the valve has been approved, see table1 and
valve details.
c) The supply temperatures are such that they are within the permitted range (see table1)
and comply with guidance information on the prevention of legionnella.
Note:- If the supply conditions are not within the parameters for normal use the valve may
still be suitable, but individual engineers must carry out their own risk assessment and satisfy
themselves that the units are still suitable for use. Adjust the mixed water temperature in
accordance with table 2, the method of adjustment is covered in the section Temperature
Setting.
Table 2: Mixed Water Temperature
Application
Bidet
Shower
Washbasin
Bath (44°C fill)
Bath (46°C fill)
Abbreviated Designation
-HP-B, BE,-LP-B, BE
-HP-S,SE;-LP-S, SE
-HP-W,WE: -LP-W, WE
-HP-T44; -LP-T44
-HP-T46; -LP-T46
Mixed water temperature °C
38 max
41 max
41 max
44 max
46 max
Note 1: For washbasins, washing under running water is assumed.
Note 2: Bath fill temperatures of more than 44°C should only be available when the bather is
always under the supervision of a competent person (e.g. nurse or care assistant)
Note 3: A thermostatic mixing valve having multiple designations (i.e. it is capable of
satisfying the requirements of this specification for more than one application) should
be re-set on site to suit the designation required.
13
2
For latest prices and delivery to your door visit MyTub Ltd - www.mytub.co.uk - [email protected]
The following set of tests should be carried out.
a) record the temperature of the hot and cold water supplies.
b) record the temperature of the mixed water at the largest draw-off flow rate
c) isolate the cold water supply to the mixing valve and monitor the mixed water temperature.
d) record the maximum temperature achieved as a result of (d) and the final temperature.
e) record the equipment, thermometer etc. used for the measurements.
Faultfinder
Fault
No or reduced flow and/or
fluctuating temperature
IN-SERVICE TESTING
The purpose of in-service testing is to regularly monitor the thermal performance of the
thermostatic mixing valve. Deterioration in performance can indicate the need for service
work to be carried out on the system.
If the authority concerned does not have a planned test and maintenance schedule then the
suggestions below should form the basis of a new system.
Cause
Repair
One or both isolating valves not
fully open
Open both valves fully
Flow limiters incorrectly fitted
Check information and refit
correctly
Inlet pressures below specified
values
Alter system to increase supply
pressures
Supply pipes blocked
Rectify system fault
Waterways in tap blocked
Clear debris or call service
department
Supply pressures unequal
Check maximum pressure
differential, and check if flow
limiters correctly fitted
Reset temperature see
calibration section
Reset temperature see
calibration section
At intervals of 6 - 8 weeks and 12 - 15 weeks after commissioning:1. Check supply parameters are still within the expected values if not check system for faults.
2. Carry out commissioning procedures a) to c) using the same test equipment, if the mixed
water temperature has changed a significant amount (by more than 1K) check to ensure
in-line filters are clean, that the check valves are working and all isolating valves are fully
open. If no fault can be found check and record the mixed water temperatures and re
-adjust mixed water temperature to the values in table 2.
Maximum outlet temperature
too hot
Maximum outlet temperature
too cold or runs cold after a
short time
Maximum mixed water
temperature incorrectly set
Maximum mixed water
temperature incorrectly set
Hot water temperature too low
Complete the commissioning procedure a) to f) if the mixed water temperature exceeds the
values of the maximum recorded temperature by more than 2K the need for service work is
indicated (see relevant instruction leaflet.)
Depending on the results of these two tests the following should be adopted
a) If a small change (e.g. 1K to 2K) occurs in one of these tests or there is no significant
change (e.g. 1K maximum) then the next in service test should be 24 to 28 weeks after
commissioning.
Mixed water flow too high
Only hot or cold water at outlet
Tap will not shut off or dripping
Flow limiters incorrectly fitted
Maximum mixed water
temperature incorrectly set
Increase water temperature by
adjusting storage temperature or
power input to the system
See section on flow limiters
Reset temperature see
calibration section
Inlet supplies reversed
Seal damaged or worn
Re pipe supplies
Renew seals from spare parts kit
Service and descale fitting
b) If small changes occur in both test or a larger change occurs in one test (exceeding 2K)
then the next in service test should be carried out 18 to 21 weeks after commissioning.
Scale build up in body
These results can then be used to set a service interval which tests have shown can be used
with no more than a small change in mixed water temperature. This method of determining
service intervals is used to take into account various in-service conditions (I.e. water
condition) that the valve may experience.
Inlet pressure above maximum
static pressure rating
Inlet temperatures outside
specification
Reset boiler or recirculation
temperatures
Debris trapped in mechanism or
mechanism jammed
Strip and clean unit or call the
service dept
Inlet supplies reversed
. Re pipe supplies
NOTE: Valves operating outside these conditions cannot be guaranteed by the Scheme to
operate as Type 3 valves.
3
No thermostatic fail safe
12
For latest prices and delivery to your door visit MyTub Ltd - www.mytub.co.uk - [email protected]
Reduce pressure possibly by
fitting reducing valve
Recommended outlet temperatures
Pasturisation
The BuildCert TMV scheme recommends the following set maximum mixed water outlet
temperatures for use in all premises:
44°C for bath fill but see notes below;
TO PASTURISE THE WATER WAYS SCREW
OUT TILL LEVEL WITH BASE AS SHOWN. 19
41°C for showers;
41°C for washbasins;
38°C for bidets.
The mixed water temperatures must never exceed 46°C.
Fig.6
3
The maximum mixed water temperature can be 2°C above the recommended maximum set
outlet temperatures.
46°C is the maximum mixed water temperature from the bath tap. The maximum temperature
takes account of the allowable temperature tolerances inherent in thermostatic mixing valves
and temperature losses in metal baths.
It is not a safe bathing temperature for adults or children.
The British Burns Association recommends 37 to 37.5°C as a comfortable bathing
temperature for children. In premises covered by the Care Standards Act 2000, the maximum
mixed water outlet temperature is 43°C.
The following steps are required using fig. 4 (page 6) & fig.6 (above): 1)
Ensure the fitting is turned off
2)
The cold water isolator should be closed, this is accessed by unscrewing the shroud
(54) and pulling it back along the elbow taking care not to scratch the chrome, the
2.5mm hexagon wrench is inserted in the isolating plug and rotate it clockwise until it
locks.
The fitting of isolation valves is required as close as is practicable to the water supply inlets of
the thermostatic mixing valve.
The fitting of strainers is recommended as close as is practicable to the water supply inlets of
the thermostatic mixing valve.
Commissioning notes for Thermostatic Mixing Valves.
The first step in commissioning a thermostatic mixing valve is to check the following:
The designation of the thermostatic mixing valve matches the application.
3)
The back cover (3) is unscrewed using a 2.5mm hexagon wrench and put to one
side.
4)
The flushing screw (19) is unscrewed downwards till it is level with the bottom of the
body (do not remove completely) see Fig 6.
Isolating valves (and strainers preferred) are provided.
Turn the fitting on, hot water at the inlet temperature will pass through the unit
pasteurising the waterways and flow straightener. (the temperature must reach a
minimum of 60°C for 5 minutes).
The mixed water temperature at the terminal fitting must never exceed 46oC.
The supply pressures are within the valves operating range.
The supply temperatures are within the valves operating range.
5)
If all these conditions are met, proceed to set the valve out temperature as stipulated in these
instructions.
6)
Turn the fitting off.
It is a requirement that all TMV3 approved valves shall be verified against the original set
temperature results once a year. When commissioning/testing is due the following
performance checks shall be carried out.
7)
The flushing screw (19) is screwed upwards till it locks.
Measure the mixed water temperature at the outlet.
8)
Replace the back cover (3) , reinstate the cold water and replace the shroud (54).
Carry out the cold water supply isolation test by isolating the cold water supply to the TMV,
o
wait for five seconds if water is still flowing check that the temperature is below 46 C.
If there is no significant change to the set outlet temperature (±2°C or less change from the
original settings) and the fail-safe shut off is functioning, then the valve is working correctly
and no further service work is required.
The unit is now ready for use.
11
4
For latest prices and delivery to your door visit MyTub Ltd - www.mytub.co.uk - [email protected]
Notes
Operation
If there is a residual flow during the commissioning or the annual verification (cold water
supply isolation test), then this is acceptable providing the temperature of the water seeping
o
from the valve is no more than 2 C above the designated maximum mixed water outlet
temperature setting of the valve.
The unit has a single control lever that turns the unit on and off and adjusts the temperature.
Turning the handle anti clockwise from the off position firstly gives cold water flow then
increases the temperature to the maximum set value.
Temperature readings should be taken at the normal flow rate after allowing for the system to
stabilise.
Maintenance
The sensing part of the thermometer probe must be fully submerged in the water that is to be
tested.
This product is designed to be easily serviced, it has integral isolation, integral hot water
flushing to pasteurise the mixed water chambers reducing the incidence bio film growth and
unions that allow the complete body to be removed for servicing in the workshop.
Any TMV that has been adjusted or serviced must be re-commissioned and re-tested in
accordance with the manufacturers' instructions.
The installation of thermostatic mixing valves must comply with the requirements of the Water
Supply (Water Fittings) Regulations 1999.
Specifications
Minimum pressure drop through fitting for mixing
Dynamic pressure drop through fitting for mixing
Maximum static pressure to be applied to fitting
Maximum pressure loss ratio
Temperature stability with normal variation of
supply temperatures and pressures
Factory standard blend temperature
Maximum hot supply temperature
0.1 bar
5 bar
10 bar
20:1 either supply
Isolating and removal of the valve
Using Fig.3 & 4 as a reference (page 6) The valve has integral isolation this is accessed by
unscrewing the shroud (54) and pulling it back along the elbow taking care not to scratch the
chrome, the 2.5mm hexagon wrench is inserted in the isolating plug and rotating it clockwise
until it locks. The securing nut (52) is then removed whilst supporting the valve to stop it
falling and damaging the surface below it. The valve can then be replaced or serviced as is
most convenient. The valve is replaced by reversing the above procedure ensuring the Oring is undamaged and in place.
Cleaning integral filters
The integral filters are fitted into the inlet elbows to the fitting. The fitting should be removed
from the bases as described in the previous section the filters are then accessible for
servicing as shown in Fig3. They are a friction fit into the adaptors and should be care fully
prizes out washed and refitted. Failure to refit the filters may invalidate the guarantee.
± 2°C from set temperature
43°C
80°C
The sensitive wax capsule will shut down the operation of the valve if either the hot or cold
water supply fails, provided a minimum differential of 10°C exists between the mixed water
temperature and the remaining supply.
FLOW RATES
The flow rates (L/min) for the tap with and without flow limiters are quoted in the table below
Pressure Drop Bar
Low Pressure Flow Rate without Limiters
High Pressure Flow Rate with limiters
(Grey 6l Hot side &
Yellow 10l cold Side)
High Pressure that conforms to
BREEAM flow rate for Basin
Mixers < 6.0l/min at 3.0 Bar
Flow Rate with limiters
(Lime Green 2.75l Hot side &
Yellow 10l cold Side)
Supplied Factory Fitted
0.1
0.2
0.4
0.6
4.0
5.8
8.0
10.0 11.6
0.8
1.0
1.5
2.0 3.0 4.0
5.0
Not recommended, use flow
regulators as below.
Use Low Pressure
Setup
8.5
9
9.3
9
9
9
Use Low Pressure
Setup
4
4.3
4.6
4.9
4.8
4.8
5
10
For latest prices and delivery to your door visit MyTub Ltd - www.mytub.co.uk - [email protected]
Calibration
Flow limiters
Due to variations in supply parameters from those used to set and test the products in our
factory the outlet temperature will require resetting on site. The temperature will need to be
set between 39ºC and 41ºC in order to comply with TMV3 approval this is done by fully
opening the valve, using a thin blade remove the targa button (58). Then inserting a 2.5mm
hexagon wrench into the holes and unscrewing a 5mm grub screw, the lever (57) can be lifted
showing the adjusting screw. Using a 2.5mm allen key and turning the screw clockwise will
give a cooler temperature and anti clockwise for a warmer temperature see Fig. 5.
As supplied the fitting has flow limiters fitted to both inlets so it is suitable for high-pressure
use. For use on low pressure they may need to be removed see table below. The procedure
described above for cleaning the filters should be followed. After removal of the filter the flow
limiters are visible and should be removed using a small pointed instrument.
47
SUPPLY PRESSURES
52
* BREEAM compliant Flow - Hot
Rate < 6.0l/min at 3.0 bar - Cold
54
Fig.3
FLOW LIMITERS
Green 2.75l in hot side
Yellow limiter 10l in cold side
High Pressure Hot
Low Pressure Cold
Grey 6l in hot side
Remove Limiter
Low Pressure Hot
High Pressure Cold
Remove Limiter
Yellow limiter 10l in cold side
Low Pressure Hot
Low Pressure Cold
Remove both limiters
High Pressure Hot
High Pressure Cold
Grey 6l in hot side
Yellow limiter 10 in cold side
* Please note this product is factory fitted with both a lime green 2.75l
flow limiter (hot side) & yellow 10l flow limiter (cold side).
NOTE: High Pressure = Greater than 1.0 Bar
Use of flow limiters
Cooler
Temperature
57
Warmer
Temperature
47
This product will be factory fitted with a 2.75
litre & 10 litre flow limiters and also supplied
with a standard 6 litre flow limiter for reduced
flow economy rates. The 2.75l flow limiter is
fitted to comply with BREEAM flow rates for
a basin mixer of no less than 6l/min at 3.0
bar.
50
51
The Green 2.75l flow limiter (48) is
positioned in the hot side and the Yellow 10l
flow limiter (49) positioned in the cold side,
this is required when a high pressure system
is used.
58
52
53
54
Changing flow Limiters
Fig.5
9
49
48
To replace the flow limiters on the hot side
only; unscrew the shroud (54) and pull it
back along the elbow taking care not to
scratch the chrome, unscrew the securing
nut (52) which will then split the parts into two
assemblies. The assembly needed is shown
in Fig.3 (above), now remove the filter (47)
using a small flat bladed screw driver and
this will expose the Green 2.75l flow limiter
(48), now replace this part with the Grey 6.0l
flow limiter (55) which will first be inserted
into the supplied spacer (56) making sure
the limiter is inserted in the correct way with
the O-ring on the top side. Now re-assemble
the parts as per notes using Fig.4 as a
reference.
Fig.4
55
56
6
For latest prices and delivery to your door visit MyTub Ltd - www.mytub.co.uk - [email protected]
Installation
A competent person must always carry out the installation of this product in accordance with
these instructions. The installation must comply with the current local water company
regulations.
The following points should always be considered when carrying out an installation
1)
SF1056CP
Care must be taken to prevent any risk of injury or damage to persons or property.
Hot Side
2)
The product has integral isolation for servicing the unit, further isolation could be
included if considered necessary.
3)
To eliminate pipe debris entering the valve the system must always be thoroughly
cleaned and flushed particularly if it is new, or extensive modification has taken
place. The product must never be used without the in line filters fitted; failure to fit the
filters may invalidate the guarantee.
4)
The fitting is supplied with a single check valve in each inlet; it should be fitted so
that the relevant air gap specified in the water regulations is achieved above the
spillover level of the basin or trough.
5)
The surface to which the unit is to be fixed needs two holes minimum 23mm
diameter maximum 30mm diameter (see page 8 for centres).
6)
If fitted in a health care environment the relevant Health Technical Memorandum
must be consulted to ensure correct positioning of the outlet in relation to the basin
or trough.
7)
The unit is supplied suitably configured for fitting onto a high pressure system if a low
pressure system is to be used the flow limiters must be removed see page 6 for flow
limiter information.
8)
Cold Side
SF1057CP
When viewed from the front and the unit is connected to the supplies the Hot supply
must be connected to the left hand inlet and the cold to the right hand inlet.
Hot Side
7
Cold Side
8
For latest prices and delivery to your door visit MyTub Ltd - www.mytub.co.uk - [email protected]