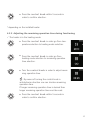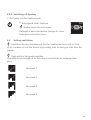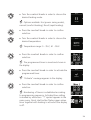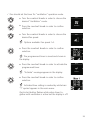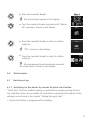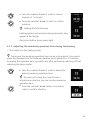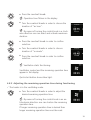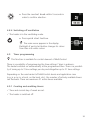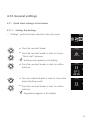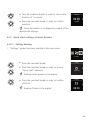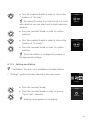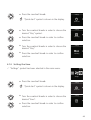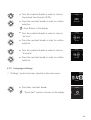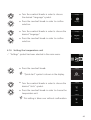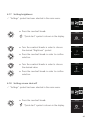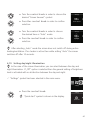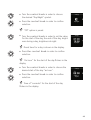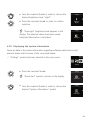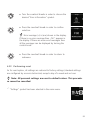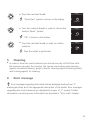
1
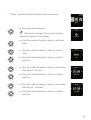
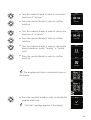
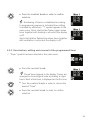
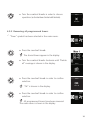
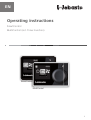
EN
Operating instructions
SmartControl
MultiControl (incl. Timer-Function)
+HDWLQJ
+HDWLQJ
SmartControl
MultiControl
1
Contents
1Introduction
6
1.1
The aim of the document
6
1.2
The way of handling this document
6
1.3
Use of symbols and emphases
6
1.4
Warranty and responsibility
7
2Safety
7
2.1
Intended use
7
2.2
Safety instructions
7
3Overview
9
3.1
9
Control element and menu structure
3.2Symbols
3.3
Buttons and control
9
11
3.3.1Back-function
11
3.4
Status display
11
3.5
Passive display mode
12
4
Operating and setting
13
4.1
Start display after switching on
14
4.2
Air heaters
14
2
4.3
Heating set-up
14
4.3.1
Switching on the heater by means of quick start button
14
4.3.2
Switching on the heater through heating menu
15
4.3.3
Temperature set during operation
16
4.3.4
Setting heating mode during operation
16
4.3.5
Adjusting the remaining operation time during functioning
17
4.3.6
Switching off heating
18
4.4
Setting ventilation
18
4.4.1
Switching on ventilation by means of quick start button
19
4.4.2
Setting ventilation through main menu
19
4.4.3
Adjusting the remaining operation time during functioning
20
4.4.4
Setting fan speed during operation
21
4.4.5
Switching off ventilation
21
4.5
Timer programming
22
4.5.1
Creation and activation of timers
22
4.5.2
Deactivation, editing and removal of the programmed timer
26
4.6
Water heater
27
4.7
Heating set-up
27
4.7.1
Switching on the heater by means of quick start button
27
4.7.2
Switching on the heater through heating menu
28
4.7.3
Adjusting the remaining operation time during functioning
29
4.7.4
Switching off heating
30
3
4.8
Setting ventilation
30
4.8.1
Switching on ventilation by means of quick start button
30
4.8.2
Setting ventilation through the ventilation menu
30
4.8.3
Adjusting the remaining operation time during functioning
31
4.8.4
Switching off ventilation
32
4.9
Timer programming
32
4.9.1
Creating and enabling timers
32
4.9.2
Deactivation, editing and removal of the programmed timer
35
4.9.3
Removing all programmed timers
36
4.10
General settings
37
4.11
Quick start settings of air heaters
37
4.11.1 Setting the heating
37
4.11.2 Setting ventilation
38
4.12
40
Quick start settings of water heaters
4.12.1 Setting heating
40
4.12.2 Setting ventilation
41
4.13
Setting the day of the week
42
4.14
Setting the time
43
4.15
Language settings
44
4.16
Setting the temperature unit
45
4.17
Setting brightness
46
4.18
Setting screen shut-off 46
4
4.19
Setting day/night illumination
47
4.20
Displaying the system information
50
4.21
Displaying stored error information
51
4.22
Performing reset
52
5Cleaning
53
6
Error message
53
6.1
Error codes
54
7Disposal
55
8
Technical support and customer service
55
9
Technical data
55
5
1
Introduction
1.1
The aim of the document
This instruction manual is a part of the device and it contains information for the
user enabling safe use of the device.
All the functions of the heater are explained in the instruction manual. The actual
availability of these functions depends on each installed heater and installed
additional devices.
If you have any questions please consult the technical support and/or customer
service (see chapter “Technical support and customer service”)
1.2
The way of handling this document
XXBefore
starting to use this heater please read the following instruction manual and heater instruction manual.
XXPlease pass the instruction manual on to the later owners and users of this
device.
XXOnly authorized and skilled personnel can perform an assembly.
XXPlease use only original Webasto parts.
1.3
Use of symbols and emphases
An emphasis
Explanation
WARNING
Type and source of danger
Effect: Failure to follow the instruction manual guidelines can lead
to serious injuries or death
XXActions
protecting against dangers
33
The requirement for this operating manual.
XX
Operating manual
Note
Control element
Name of control elements
6
1.4
Warranty and responsibility
Webasto company does not take on the responsibility for defects and damaged
caused by not following assembly and instruction manual as well as tips contained
in them.
The above-mentioned liability exclusion is applicable in particular for:
■■ Incorrect use
■■ Repairs which are not performed by Webasto technical support staff
■■ Use of non-original parts
■■ Modification of the device without Webasto’s consent
2
Safety
2.1
Intended use
Installed control element serves for controlling the heater.
2.2
Safety instructions
Danger of explosion in an area of flammable fumes and dust and hazardous substances (e.g. on the petrol stations, nearby fuel systems, petrol
warehouses, coal, timber or corn)
XXDo not turn on and operate the heater.
The danger of poisoning and suffocation caused by the exhaust fumes
in the enclosed areas
XXDo not turn on and operate the heater.
Flammables or fluids in the stream of hot air pose the risk of fire
XXDo not block the stream of hot air.
7
Risk of injuries because of faulty device
XXDo not use the faulty heater.
XXContact Webasto technical support.
8
3
Overview
3.1
Control element and menu structure
Heating
1
Menu name
4
Hour
2
Menu symbol
5
3
Activated time settings
Quick start button with status
display
6
Control knob
The following function settings are at the disposal in the main menu: timer,
heating, ventilation and settings.
3.2
Symbols
Symbol
Description
Symbol
Description
Timer
Ventilation
Heating
Settings
9
Symbol
Description
Symbol
Description
Heating-Normal
Heating-Eco
Heating-Boost
Fan speed (level 1-4)
Add timer
Activate timer
Deactivate timer
Delete timer
Delete all timers
Active timer
Quick start
Day of the week
Time
Language
Temperature unit
Day/Night
System information
Error information
Reset
Service required
To the left
Note
Back
To the right
12 hour format
OK
Undervoltage
ADR
10
3.3
Buttons and control
Button
Control and function
Quick start button with status display (backlight)
Control knob (turn/push button) for selection and confirmation of the selected
functions.
3.3.1 Back-function
By means of back-function one can always leave the chosen
menu and go to the previous menu level.
Back
3.4
Status display
Status of the heater is indicated by means of the colour backlight of the quick
start button.
Status
LED backlight
Heating mode
GREEN
permanent
Ventilation mode
BLUE
permanent
Switched off heater-control element is activated
WHITE
permanent
Error-no heating mode
RED
flashing
Preprogrammed heating mode- control element in stand-by
mode*
GREEN
flashing
Preprogrammed ventilation mode- control element in
stand-by mode*
WHITE
flashing
* If a user does not make any entry by means of the control element for 60
seconds and the heater is switched off then the control element will go into the
stand-by mode (display and LED are switched off).
11
3.5
Passive display mode
If the heater is activated by other Webasto control element (e.g. by a radio remote
control) then MultiControl/SmartControl wake up from the sleep mode and the
operation mode is shown on the display by other control element (heating, ventilation). Displayed information depends on the connected heater.
Display
Operation mode
Heating
The passive mode can be deactivated by pressing quick start button.
The heater is switched off.
Ventilation
The passive mode can be deactivated by pressing quick start button.
The heater is switched off.
Heating and ventilation
There is a possibility of combined display of ventilation and heating
symbols depending on the connected heater.
12
4
Operating and setting
WARNING
Danger of explosion caused by the fumes and dust and hazardous substances
Serious burns
XXSwitch
off the heater on the petrol stations, nearby fuel systems in
the area of petrol warehouses, coal, timber or corn.
WARNING
Inhaling poisonous gases in the enclosed rooms
Poisoning and suffocation
XXNever
use the heater also in the case of programmed heater in the
enclosed rooms, e.g. garages or workshops without exhaust fume
extraction system.
In order to make it possible for you to enjoy the full comfort of using Webasto
heater you are requested to make yourself familiar with the instruction manual.
Questions connected with the assembly and functioning of the device should be
addressed to the seller or the installation workshop. They will provide you with
reliable and competent advice.
You can also contact one of our offices. You can find address data in the chapter
“Technical support and customer service”.
Please keep this instruction manual.
Have a nice trip!
13
4.1
Start display after switching on
The following information about the connected heater and control
element is shown in the start display:
MultiControl
■■ Name of the connected control element
■■ Name of the connected heater
ThermoPro
50 Eco
SW: 1.2.2
HW: 1.1
■■ Software version of the connected control element
■■ Hardware version of the connected control element
The view returns to the main menu after 1.5 seconds.
4.2 Air heaters
4.3
Heating set-up
Three heating modes* can be selected:
Eco
(energy saving mode)
Normal
(comfort heating)
Boost
(rapid heating)
They differ in terms of energy consumption and time during which the set temperature is reached. Eco heating programme needs the least energy. However, it
takes more time to reach the set temperature.
* depending on the installed heater.
4.3.1 Switching on the heater by means of quick start button
“Quick start” function enables heating or ventilation by simply pressing the button. In heating mode one can preset heating mode, temperature, operating time.
Instruction manual and description of the settings can be found in the chapter
“Setting the quick start”.
14
In delivery condition this function is preset with the standard values.
33 Quick start button is programmed for heating.
XXPress
quick start button.
Heating starts functioning.
Heating symbol is shown in the display as well as
initially set heating temperature.
Quick start button shows green light.
4.3.2 Switching on the heater through heating menu
33 Heating symbol has been selected in the main menu.
Heating
XXPress
the control knob.
Heating
Heating mode is shown in the display. If only
one heating mode is available then this menu item is
not displayed.
Normal
XXTurn
Heating
the control knob in order to choose the
desired heating mode.
XXPress
the control knob in order to confirm
selection.
Heating
Heating temperature is shown in the display.
Temperature
15
XXTurn
the control knob in order to choose the
desired temperature.
Heating
XXPress
Temperature
the control knob in order to confirm
selection
Heating starts functioning.
Heating symbol and selected heating temperature
are shown in the display.
Quick start button shows green light.
4.3.3 Temperature set during operation
33 The heater is in the heating mode.
XXTurn
the control knob in order to choose the
desired temperature.
XXPress
the control knob within 5 seconds in
order to confirm selection.
4.3.4 Setting heating mode during operation
33 The heater is in the heating mode.
XXPress
the control knob in order go from temperature selection to heating mode selection.
XXTurn
the control knob in order to choose the
desired heating mode*.
16
XXPress
the control knob within 5 seconds in
order to confirm selection.
* depending on the installed heater.
4.3.5 Adjusting the remaining operation time during functioning
33 The heater is in the heating mode.
XXPress
the control knob in order go from temperature selection to heating mode selection.
XXPress
the control knob in order go from
heating mode selection to remaining operation
time selection.
XXTurn
the control knob in order to adjust remaining operation time.
By means of turning the control knob in
anticlockwise direction one can shorten remaining
operation time.
If longer remaining operation time is desired then
longer remaining operation time must be reset.
XXPress
the control knob within 5 seconds in
order to confirm selection.
17
4.3.6 Switching off heating
33 The heater is in the heating mode.
XXPress
quick start button.
Display shows the main menu.
Backlight of quick start button changes its colour
from green into white colour.
4.4
Heating
Setting ventilation
Ventilation function activates only the fan, heating function is still on. First
of all, it enables to cool the interior by providing fresh air during air inlet from the
outside.
There are four fan speeds available.
They differ in the strength of air flow and in how fast the air exchange takes
place.
Fan speed 1
Fan speed 2
Fan speed 3
Fan speed 4
18
4.4.1 Switching on ventilation by means of quick start button
“Quick start” function enables heating or ventilation by simply pressing the button. In ventilation mode one can initially set fan speed, operating time. Instruction
manual and description of the settings can be found in the chapter “Setting the
quick start”.
33 Quick start button is programmed for ventilation.
XXPress
quick start button.
Ventilation starts functioning.
Fan speed and operating time are shown in the
display.
Quick start button shows blue light.
4.4.2 Setting ventilation through main menu
33 “Ventilation” symbol has been selected in the main menu.
Ventilation
XXPress
the control knob.
Ventilation
The set fan speed is shown in the display.
Level 2
XXTurn
the control knob in order to choose
the desired fan speed.
Ventilation
XXPress
Level 4
the control knob in order to confirm
selection.
Duration flickers in the display.
19
XXTurn
the control knob in order to choose the
desired duration of “an hour”.
By means of turning the control knob in clockwise direction one can select and activate maximum
duration.
Ventilation
Duration
XXPress
the control knob in order to confirm
selection.
XXTurn
the control knob in order to choose
duration of “a minute”.
Ventilation
XXPress
Duration
the control knob in order to confirm
selection.
Ventilation starts functioning.
Fan speed and selected duration are shown in the
display.
Quick start button shows blue light.
4.4.3 Adjusting the remaining operation time during functioning
33 The heater is in the ventilating mode.
XXTurn
the control knob in order to adjust the
desired remaining operation time.
By means of turning the control knob in
anticlockwise direction one can shorten remaining
operation time. If the longer remaining operation
time is desired then the longer operation time must
be reset.
20
XXPress
the control knob within 5 seconds in
order to confirm selection.
4.4.4 Setting fan speed during operation
33 The heater is in the ventilating mode.
XXPress
the control knob in order go from
remaining operation time selection to fan speed
selection.
XXTurn
the control knob in order to choose fan
speed.
XXPress
the control knob within 5 seconds in
order to confirm selection.
4.4.5 Switching off ventilation
33 The heater is in the ventilating mode.
XXPress
quick start button.
Display shows the main menu.
Backlight of quick start button changes its colour
from blue into white colour.
Ventilation
21
4.5
Timer programming
This function is available for control element of MultiControl.
There is a possibility of programming the time settings 7 days in advance. The
heater switches on automatically at the programmed time. There is a possibility
of saving up to 3 time settings per day and altogether up to 21 time settings.
Depending on the used variant of MultiControl device and application case
(e.g. in a car, in a truck, on the boat, etc.), the number of actively available timers
can fluctuate. There are maximum 21 active timers available.
4.5.1 Creation and activation of timers
33 Time and current day of week are set.
33 The heater is switched off.
33 “Timer” symbol has been selected in the main menu.
Timers
XXPress
the control knob.
“Add timer” message (in no timer has been
saved yet) appears in the display.
Timers
Add timer
XXPress
the control knob in order to add new
timer.
XXTurn
the control knob in order to choose
”Day”.
Timers
XXPress
Day
the control knob in order to confirm
selection.
22
XXTurn
the control knob in order to choose the
switch-on time of “an hour”.
Timers
XXPress
Start time
XXTurn
Timers
XXPress
Start time
the control knob in order to confirm
selection.
the control knob in order to choose
switch-on time of “a minute”.
the control knob in order to confirm
selection.
XXTurn
the control knob in order to choose the
switch-off time of “an hour”.
Timers
XXPress
Stop time
the control knob in order to confirm
selection.
XXTurn
the control knob in order to choose
switch-off time of “a minute”.
Timers
XXPress
Stop time
the control knob in order to confirm
selection.
In respect to the desired operation modes (“heating” or “ventilation”) one should
set the desired temperature ( “heating” operation mode) or fan speed (“ventilation” operation mode).
33 One should set the timer for “heating” operation mode.
23
XXTurn
the control knob in order to choose the
desired heating mode.
Timers
Options available: Eco (power saving mode),
normal (comfort heating), Boost (rapid heating).
Normal
XXPress
the control knob in order to confirm
selection.
XXTurn
the control knob in order to choose the
desired temperature.
Temperature range: 5 - 35oC, 41 - 95oF.
Timers
Temperature
XXPress
the control knob in order to confirm
selection.
The programmed timer is saved and shown in
the display.
XXPress
the control knob in order to activate the
programmed timer.
“Activate” message appears in the display.
Timers
Activate
XXPress
the control knob in order to confirm
selection.
Numbering of timers is established according
to programming sequence. Activated time setting
is marked by white bars. “T” symbol appears in the
main menu. Quick start button flashes green when
timer together with heating is active but the display
is off.
Timers
24
33 One should set the timer for “ventilation” operation mode.
XXTurn
the control knob in order to choose the
desired “Ventilation” mode.
Timers
XXPress
Ventilation
XXTurn
Timers
the control knob in order to confirm
selection.
the control knob in order to choose the
desired fan speed.
Options available: Fan speed 1-4.
Level 2
XXPress
the control knob in order to confirm
selection.
The programmed timer is saved and shown in
the display.
XXPress
the control knob in order to activate the
programmed timer.
“Activate” message appears in the display.
Timers
Activate
XXPress
the control knob in order to confirm
selection.
Activated time setting is marked by white bars.
“T” symbol appears in the main menu.
Quick start button flashes white when timer together with ventilation is active but the display is off.
25
4.5.2 Deactivation, editing and removal of the programmed timer
33 “Timer” symbol has been selected in the main menu.
Timers
XXPress
the control knob.
The stored timers appear in the display. Timers
are arranged in chronological order according to
days/hours. Next active timer is displayed as the first
one.
XXTurn
the control knob in order to choose the
desired “Timer”.
XXPress
the control knob in order to confirm
selection
the control knob in order to choose operation (activate/deactivate/edit/delete).
Timers
XXTurn
Deactivate
Remove all programmed timers.
33 “Timer” symbol has been selected in the main menu.
Timers
26
XXPress
the control knob.
The stored timers appear in the display.
XXTurn
the control knob clockwise until “Delete
all” message is shown in the display.
Timers
Delete all
XXPress
the control knob in order to confirm
selection.
“OK” is shown in the display.
Timers
Delete all
XXPress
the control knob in order to confirm
selection.
All programmed timers have been removed.
The main menu is shown in the display.
4.6
Water heater
4.7
Heating set-up
Timers
4.7.1 Switching on the heater by means of quick start button
“Quick start” function enables heating or ventilation by simply pressing the button. Operation time can be initially set. Instruction manual and description of the
settings can be found in the chapter “Setting the quick start”.
33 Quick start button is programmed for heating.
27
XXPress
quick start button.
Heating starts functioning.
Heating symbol and preset remaining operation time
appear in the display.
Quick start button shows green light.
4.7.2 Switching on the heater through heating menu
33 Heating symbol has been selected in the main menu.
Heating
XXPress
the control knob.
Operation time flickers in the display.
XXTurn
the control knob in order to choose
the duration of “an hour”.
Heating
By means of turning the control knob in a clockwise direction one can select and activate maximum
duration.
Duration
XXPress
the control knob in order to confirm
selection.
28
XXTurn
the control knob in order to choose
duration of “a minute”.
Heating
XXPress
Duration
the control knob in order to confirm
selection.
Heating starts functioning.
Heating symbol and preset remaining operation time
appear in the display.
Quick start button shows green light.
4.7.3 Adjusting the remaining operation time during functioning
33 The heater is in the heating mode.
During use the remaining operation time can be only reduced. One cannot
make any changes from the minimum duration which amounts to 10 minutes.
Increasing the operation time is possible only after performing switching off and
restarting the device earlier.
XXTurn
the control knob in order to adjust the
desired remaining operation time.
By means of turning the control knob in
anticlockwise direction one can shorten remaining
operation time.
XXPress the control knob within 5 seconds in
order to confirm selection.
29
4.7.4 Switching off heating
33 The heater is in the heating mode.
XXPress
quick start button.
The main menu appears in the display.
Backlight of quick start button changes its colour
from green into white colour.
4.8
Heating
Setting ventilation
4.8.1 Switching on ventilation by means of quick start button
“Quick start” function enables heating or ventilation by simply pressing the button.
Operation time can be preset. Instruction manual and description of the settings
can be found in the chapter “Setting the quick start”.
33 Quick start button is programmed for ventilation.
XXPress
quick start button.
Ventilation starts functioning.
Ventilation symbol and the remaining operation time
appear in the display.
Quick start button shows blue light.
4.8.2 Setting ventilation through the ventilation menu
33 “Ventilation” symbol has been selected in the main menu.
Ventilation
30
XXPress
the control knob.
Operation time flickers in the display.
XXTurn
the control knob in order to choose the
duration of “an hour”.
By means of turning the control knob in a clockwise direction one can select and activate maximum
duration.
Ventilation
Duration
XXPress
the control knob in order to confirm
selection.
XXTurn
the control knob in order to choose
duration of “a minute”.
Ventilation
XXPress
Duration
the control knob in order to confirm
selection.
Ventilation starts functioning.
Ventilation symbol and the remaining operation time
appear in the display.
Quick start button shows blue light.
4.8.3 Adjusting the remaining operation time during functioning
33 The heater is in the ventilating mode.
XXTurn
the control knob in order to adjust the
desired remaining operation time.
By means of turning the control knob in an anticlockwise direction one can shorten the remaining
operation time.
If longer remaining operation time is desired then
longer remaining operation time must be reset.
31
XXPress
the control knob within 5 seconds in
order to confirm selection.
4.8.4 Switching off ventilation
33 The heater is in the ventilating mode.
XXPress
quick start button.
The main menu appears in the display.
Backlight of quick start button changes its colour
from blue into white colour.
4.9
Heating
Timer programming
This function is available for control element of MultiControl.
There is a possibility of programming the time settings 7 days in advance.
The heater switches on automatically at the programmed time. There is a possibility of saving up to 3 time settings per day and altogether up to 21 time settings.
Depending on the used variant of MultiControl device and application case
(e.g. in a car, in a truck, on the boat, etc.), the number of actively available timers
can fluctuate. There are maximum 21 active timers available.
4.9.1 Creating and enabling timers
33 Time and current day of week are set.
33 The heater is switched off.
32
33 “Timer” symbol has been selected in the main menu.
Timers
XXPress
the control knob.
“Add timer” message (if no timer has been
saved yet) appears in the display.
XXPress
Timers
Add timer
the control knob in order to add new
timer.
XXTurn
the control knob in order to choose
”Day”.
Timers
XXPress
Day
XXTurn
Timers
XXPress
Start time
XXTurn
Timers
XXPress
Start time
the control knob in order to confirm
selection.
the control knob in order to choose the
start time of “an hour”.
the control knob in order to confirm
selection.
the control knob in order to choose the
start time of “a minute”.
the control knob in order to confirm
selection.
33
XXTurn
the control knob in order to choose the
stop time of “an hour”.
Timers
XXPress
Stop time
XXTurn
Timers
XXPress
Stop time
XXTurn
Timers
the control knob in order to confirm
selection.
the control knob in order to choose the
stop time of “a minute”.
the control knob in order to confirm
selection.
the control knob in order to choose the
desired operation mode (“heating” or “ventilation”).
the control knob in order to confirm
selection.
Normal
XXPress
Timers
Ventilation
The programmed timer is saved and shown in
the display.
XXPress
the control knob in order to activate the
programmed timer.
“Activate” message appears in the display.
Timers
Activate
34
XXPress
the control knob in order to confirm
selection.
Numbering of timers is established according
to programming sequence. Activated time setting
is marked by white bars. “T” symbol appears in the
main menu. Quick start button flashes green when
timer together with heating is active but the display
is off.
Quick start button flashes blue when timer together
with ventilation is active but the display is off.
4.9.2 Deactivation, editing and removal of the programmed timer
33 “Timer” symbol has been selected in the main menu.
Timers
XXPress
the control knob.
Stored timers appear in the display. Timers are
arranged in chronological order according to days/
hours. Next active timer is displayed as the first one.
XXTurn
the control knob in order to choose the
desired “Timer”.
XXPress
the control knob in order to confirm
selection.
35
XXTurn
the control knob in order to choose
operation (activate/deactivate/edit/delete).
Timers
Deactivate
4.9.3 Removing all programmed timers
33 “Timer” symbol has been selected in the main menu.
Timers
XXPress
the control knob.
The stored timers appear in the display.
XXTurn
the control knob clockwise until “Delete
all” message is shown in the display.
Timers
Delete all
XXPress
the control knob in order to confirm
selection.
“OK” is shown in the display.
Timers
Delete all
XXPress
the control knob in order to confirm
selection.
All programmed timers have been removed.
The main menu is shown in the display.
Timers
36
4.10 General settings
4.11 Quick start settings of air heaters
4.11.1 Setting the heating
33 “Settings” symbol has been selected in the main menu.
Settings
XXPress
the control knob.
the control knob in order to choose
“Quick start” submenu.
Settings
XXPress
Quick start
Heating mode appears in the display.
XXPress
the control knob in order to confirm
selection.
Settings
XXTurn
Heating
XXPress
Normal
the control knob in order to choose the
desired heating mode*.
the control knob in order to confirm
selection.
Temperature appears in the display.
37
XXTurn
the control knob in order to choose the
desired temperature.
Heating
XXPress
Temperature
the control knob in order to confirm
selection.
Duration flickers in the display.
the control knob in order to choose
the duration of “an hour”.
XXTurn
By means of turning the control knob in a clockwise direction one can select and activate maximum
duration.
Heating
Duration
XXPress
the control knob in order to confirm
selection.
XXTurn
the control knob in order to choose the
duration of “a minute”.
Heating
XXPress
Duration
the control knob in order to confirm
selection.
Quick start button is configured by means of the
appropriate settings.
4.11.2 Setting ventilation
33 “Settings” symbol has been selected in the main menu.
Settings
38
XXPress
the control knob.
the control knob in order to choose
“Quick start” submenu.
Settings
XXPress
Quick start
Heating mode appears in the display.
XXTurn
the control knob in order to choose the
desired “Ventilation” mode.
Settings
XXPress
Level 2
the control knob in order to confirm
selection.
Four fan speeds appear in the display.
XXTurn
the control knob in order to choose the
desired fan speed.
Ventilation
XXPress
Level 2
the control knob in order to confirm
selection.
Duration flickers in the display.
XXTurn
the control knob in order to choose the
duration of “an hour”.
By means of turning the control knob in a clockwise direction one can select and activate maximum
duration.
Ventilation
Duration
XXPress
the control knob in order to confirm
selection.
39
XXTurn
the control knob in order to choose the
duration of “a minute”.
Ventilation
XXPress
Duration
the control knob in order to confirm
selection.
Quick start button is configured by means of the
appropriate settings.
4.12 Quick start settings of water heaters
4.12.1 Setting heating
33 “Settings” symbol has been selected in the main menu.
Settings
XXPress
the control knob.
the control knob in order to choose
“Quick start” submenu.
Settings
XXPress
Quick start
Heating mode appears in the display.
XXPress
the control knob in order to confirm
selection.
Settings
Duration flickers in the display.
40
XXTurn
the control knob in order to choose the
duration of “an hour”.
By means of turning the control knob in a clockwise direction one can select and activate maximum
duration.
Heating
Duration
XXPress
the control knob in order to confirm
selection.
XXTurn
the control knob in order to choose the
duration of “a minute”.
Heating
XXPress
Duration
the control knob in order to confirm
selection.
Quick start button is configured by means of
the appropriate settings.
4.12.2 Setting ventilation
“Ventilation” function is not available in all water heaters.
33 “Settings” symbol has been selected in the main menu.
Settings
XXPress
the control knob.
the control knob in order to choose
“Quick start” submenu.
Settings
XXPress
Quick start
Heating mode appears in the display.
41
XXTurn
the control knob in order to choose the
desired “Ventilation” mode.
Settings
XXPress
the control knob in order to confirm
selection.
Duration flickers in the display.
XXTurn
the control knob in order to choose
the duration of “an hour”.
By means of turning the control knob in a clockwise direction one can select and activate maximum
duration.
Ventilation
Duration
XXPress
the control knob in order to confirm
selection.
XXTurn
the control knob in order to choose the
duration of “a minute”.
Ventilation
XXPress
Duration
the control knob in order to confirm
selection.
Quick start button is configured by means
of the appropriate settings.
4.13 Setting the day of the week
33 “Settings” symbol has been selected in the main menu.
Settings
42
XXPress
the control knob.
Settings
“Quick start” symbol is shown in the display.
Quick start
XXTurn
the control knob in order to choose the
desired ”Day” symbol.
Settings
XXPress
Weekday
XXTurn
Settings
XXPress
Weekday
the control knob in order to confirm
selection.
the control knob in order to choose the
desired ”Day”.
the control knob in order to confirm
selection.
4.14 Setting the time
33 “Settings” symbol has been selected in the main menu.
Settings
XXPress
the control knob.
Settings
“Quick start” symbol is shown in the display.
Quick start
XXTurn
the control knob in order to choose the
desired “time”.
Settings
XXPress
Time
the control knob in order to confirm
selection.
43
XXTurn
the control knob in order to choose
the desired time format (12/24).
Settings
XXPress
Time mode
the control knob in order to confirm
selection.
Hour flickers in the display.
XXTurn
the control knob in order to choose
“an hour”.
Settings
XXPress
Set time
XXTurn
Settings
XXPress
Set time
the control knob in order to confirm
selection.
the control knob in order to choose
“a minute”.
the control knob in order to confirm
selection.
4.15 Language settings
33 “Settings” symbol has been selected in the main menu.
Settings
XXPress
the control knob.
Settings
“Quick start” symbol is shown in the display.
Quick start
44
XXTurn
the control knob in order to choose
the desired “Language” symbol.
Settings
XXPress
Language
XXTurn
Settings
XXPress
Language
the control knob in order to confirm
selection.
the control knob in order to choose the
desired “language”.
the control knob in order to confirm
selection.
English
4.16 Setting the temperature unit
33 “Settings” symbol has been selected in the main menu.
Settings
XXPress
the control knob.
Settings
“Quick start” symbol is shown in the display.
Quick start
XXTurn
the control knob in order to choose the
desired “Units” symbol.
Settings
XXPress
Units
the control knob in order to choose the
temperature unit.
Settings
This setting is taken over without confirmation.
Units
45
4.17 Setting brightness
33 “Settings” symbol has been selected in the main menu.
Settings
XXPress
the control knob.
Settings
“Quick start” symbol is shown in the display.
Quick start
XXTurn
the control knob in order to choose
the desired “Brightness” symbol.
Settings
XXPress
Brightness
XXTurn
Settings
XXPress
Brightness
the control knob in order to confirm
selection.
the control knob in order to choose
the desired value.
the control knob in order to confirm
selection.
4.18 Setting screen shut-off
33 “Settings” symbol has been selected in the main menu.
Settings
XXPress
the control knob.
Settings
“Quick start” symbol is shown in the display.
Quick start
46
XXTurn
the control knob in order to choose the
desired “Screen timeout” symbol.
Settings
XXPress
Screen timeout
XXTurn
Settings
XXPress
Day/Night
the control knob in order to confirm
selection.
the control knob in order to choose
the desired time or “Auto” mode.
the control knob in order to confirm
selection.
After selecting „Auto” mode the screen does not switch off during active
heating/ventilation. If no heater is active then while setting “Auto” the screen
switches off after 10 seconds.
4.19 Setting day/night illumination
In the case of the screen illumination you can select between the day and
night illumination. If „Off” option is selected then the general setting of brightness
level is activated with no distinction between the day and night.
33 “Settings” symbol has been selected in the main menu.
Settings
XXPress
the control knob.
Settings
“Quick start” symbol is shown in the display.
Quick start
47
XXTurn
the control knob in order to choose
the desired ”Day/Night” symbol.
Settings
XXPress
Day/Night
the control knob in order to confirm
selection.
“Off” option is preset.
XXTurn
the control knob in order to set the value
for the start of the day, the end of the day, brightness during a day, brightness at night.
Settings
Day/Night
Preset time for a day is shown in the display.
XXPress
the control knob in order to confirm
selection.
“An hour” for the start of the day flickers in the
display.
XXTurn
the control knob in order to choose the
desired start of the day “an hour”.
XXPress
the control knob in order to confirm
selection.
Settings
Start of
daytime
Time of “a minute” for the start of the day
flickers in the display.
48
XXTurn
the control knob in order to choose the
desired start of the day “a minute”.
XXPress
the control knob in order to confirm
selection.
Settings
Start of
daytime
Time of “an hour” for the end of the day flickers
in the display.
XXTurn
the control knob in order to choose the
desired end of the day “an hour”.
Settings
XXPress
End of daytime
the control knob in order to confirm
selection.
Time of “a minute” for the end of the day
flickers in the display.
XXTurn
the control knob in order to choose
the desired end of the day “a minute”.
Settings
XXPress
End of daytime
the control knob in order to confirm
selection.
“Day” brightness level appears in the display.
XXTurn
the control knob in order to choose the
desired brightness level ”day”.
Settings
XXPress
Brightness
(Day)
the control knob in order to confirm
selection.
“Night” brightness level appears in the display.
49
XXTurn
the control knob in order to choose the
desired brightness level ”night”.
XXPress
the control knob in order to confirm
selection.
“Day/night” brightness level appears in the
display. The selected values have been saved.
Day/night illumination is activated.
Settings
Brightness
(Night)
Settings
Day/Night
4.20 Displaying the system information
There are data in the system information regarding software status and control
element status and the name of the connected heater.
33 “Settings” symbol has been selected in the main menu.
Settings
XXPress
the control knob.
Settings
“Quick start” symbol is shown in the display.
Quick start
XXTurn
the control knob in order to choose the
desired “System information” symbol.
Settings
System
information
50
XXPress
the control knob in order to confirm
selection.
The heater name is shown in the display.
XXTurn
the control knob in order to switch
between the names of the heater and information
regarding control element (the name of the control element, status of software and equipment).
Settings
Heater
Settings
4.21 Displaying stored error information
If heaters and other connected components show malfunctioning then such
error information codes) is saved and displayed here. Current error information is
additionally marked with “!” symbol.
When an error occurs, error information must be confirmed by pressing the control knob. The main menu is displayed once again only after confirmation.
33 “Settings” symbol has been selected in the main menu.
Settings
XXPress
the control knob.
Settings
“Quick start” symbol is shown in the display.
Quick start
51
XXTurn
the control knob in order to choose the
desired “Error information” symbol.
Settings
Error
information
XXPress
the control knob in order to confirm
selection.
Settings
Error message (-s) is (are) shown in the display.
If there is no error message then „OK.” appears in
the display. If there are more error messages then
all the messages can be displayed by turning the
control knob.
XXPress
the control knob in order to return to
submenu.
4.22 Performing reset
As for reset option, all settings are restored to factory settings (standard settings
are configured by a service technician) except a day of a week and an hour.
Note: All personal settings are reset to default values. This procedure cannot be cancelled.
33 “Settings” symbol has been selected in the main menu.
Settings
52
XXPress
the control knob.
Settings
“Quick start” symbol is shown in the display.
Quick start
XXTurn
the control knob in order to choose the
desired “Reset” symbol.
“OK” is shown in the display.
XXPress
the control knob in order to confirm
selection.
Then the restart is performed.
5
Settings
Reset
Settings
Reset
Cleaning
XXIn
order to clean the control element you should use only soft lint-free cloth.
No moisture can enter the housing. You cannot use window pane cleaning
agents, household cleaners, sprays, solvents, cleaning agents contining alcohol
and scouring agents for cleaning.
6
Error message
Error messages regarding the heater will be displayed starting from “F”
marking and they are in the appropriate description of the heater. Error messages
rregarding the control element are displayed by means of „T” symbol. Further
information concerning error information are provided in “Error code” chapter.
53
33 Error message is shown in the display.
XXPress
the control knob in order to confirm
error message.
Error message is stored in error memory. If error
message is not confirmed then it will be displayed
during each restart/waking up from the stand-by
mode.
6.1
Error codes
XXIf
error message appears in the display, please contact the technical support/
customer service.
NOTE:
Inspections and repairs can only be carried out by trained
personnel!
Examples of error messages for control elements:
Code
Description
T84
Undervoltage (supply voltage is below 8V)
XXCharge
the battery and check car electrical installation.
Te4
Defective LED status
XXContact technical support/customer service.
Te5
Temperature sensor failure (temperature sensor in MultiControl/SmartControl is damaged)
XXContact technical support/customer service.
54
Code
Description
Teb
Wrong time (internal clock chip of MultiControl/SmartControl device lost
its time)
XXIn
case of voltage interruption amounting to more than 8 minutes: Enter
date/hour again.
XXIn
case an error appears without voltage interruption: Contact technical
support/customer service.
Tec
Jamming control knob (control knob pressed longer than 10 seconds).
XXContact
7
technical support/customer service.
Disposal
Control elements cannot be thrown to household waste.
XXYou are requested to obey the local regulations concerning disposal of the
electronic products.
8
Technical support and customer service
Do you have any technical questions or problem with the device?
National phone numbers of our representatives are provided on the following
web site: www.webasto.com.
9
Technical data
Operating voltage range: 12 V to 24 V
Permissible ambient temperature:
■■ Operation: -40 °C to +75 °C
■■ Storehouse: -40 °C to +90 °C
At temperatures below –20 °C protective function of control element display
is active. Display and background illumination are switched off, heating status is
indicated by status of LED diode. The heater can be tuned on and off by quick
start button without any limits.
55
Webasto Thermo & Comfort SE
Postfach 1410
82199 Gilching
Germany
Visiting Address:
Friedrichshafener Str. 9
82205 Gilching
Germany
Internet: www.webasto.com
The telephone number of each country can be
found in the Webasto service center leaflet or the
website of the respective Webasto representative
of your country.
Ident-Nr. 9030550A01 • 04/14 • Errors and omissions excepted • Printed in Germany • © Webasto Thermo & Comfort SE, 2014
In multilingual versions the German language is binding.