1
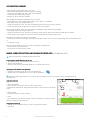
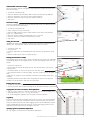
Location Based Solutions
4TS dSeal®
USER MANUAL
4TS dSeal R120™
4TS Finland Oy
Parantolankatu 11
FI-05800 HYVINKÄÄ, FINLAND
www.4ts.com
Tel. +358 19 453 200
Fax +358 19 453 204
DECLARATION OF CONFORMITY
Hereby 4TS Finland Oy declares that this 4TS dSeal® device is in compliance with the essential requirements and
other relevant provisions of Directive 1999/5/EC. The declaration of conformity may be consulted at www.4ts.com/
downloads.
Pb
This symbol means that this product complies with the RoHS Directive 2002/95/EC.
RoHS stands for Restriction of Hazardous Substances and it specifies the maximum levels for certain materials found
in electrical and electronic products.
This crossed-out wheeled bin symbol on the product means the product is covered by the European Directive
2002/96/EC. All electrical and electronic products should be disposed of separately from the municipal waste stream
via designated collection facilities appointed by the government or the local authorities. For more detailed information
about disposal of your old appliance, please contact your city office, waste disposal service or the company where
you purchased the product.
COPYRIGHT AND TRADEMARKS
© 2008 4TS Finland Oy
4TS, 4TS dSeal and 4TS dMonitor are registered trademarks or trademarks of 4TS Finland Oy. Other trademarks are the property of their
respective owners.
4TS Finland Oy has taken every effort to ensure that the information in this user manual is correct, but accepts no liability for any
errors or omissions. 4TS Finland Oy is not responsible for any loss of data, income or any consequential damage.
4TS Finland Oy reserves the rights to modify the product specification without prior notice. Therefore, the contents of this user manual
are subject to change without prior notice.
PACKAGE CONTENTS
The following items should be found in the sales package:
- 4TS dSeal data logger
- USB cable
- AC power adapter with a USB connector
- miniSD memory card with a miniSD to SD adapter
- SD memory card reader
- Rechargeable battery
- This user manual
!
Note! If any of the above items is damaged or missing, please contact the retailer from whom you purchased the product for
assistance.
2
4TS dSeal R120™ User Manual
CONTENTS
INTRODUCTION
3
SAFETY
4
GETTING STARTED
4
Components
SIM Card Installation
miniSD Memory Card Installation
Battery Installation
Charging the Battery
Activating the Device
Aborting Activation
Deactivating the Device
4
4
5
5
5
5
5
5
LED INDICATION SUMMARY
6
MAKING CONNECTION SETTINGS AND READING RECORDED DATA (4TS dMonitor Lite™)
6
Connecting the miniSD Memory Card to a PC
Opening the 4TS dMonitor Lite Application
Application Window
Changing the Device ID
GSM and GPRS Connection Settings
ASP Service Settings
Setting Time and Date
Reading Recorded Data as Graphs
Reading Alert Event Lists
Copying Alarm List Events to be Used in Other Applications:
Log History
Opening Log Files in Spreadsheet Applications
6
6
6
7
7
7
7
7
7
7
7
7
WIRELESS CONNECTION (4TS dMonitor™)
8
MORE INFORMATION
8
Light Sensor Explained
Shock Sensor Explained
Free Fall Sensor Explained
UTC Time
Operating Time
8
8
8
8
8
SPECIFICATION
8
INTRODUCTION
4TS dSeal R120™ Devices
4TS dSeal R120™ devices contain multiple sensors that monitor the environmental conditions; these include temperature, shock,
humidity, air pressure and light, and location. The embedded sensors enable user to predefine limit values (minimum and maximum)
that should not be exceeded. If a limit value is exceeded, e.g. if the temperature is too high, the device automatically sends a message to the monitoring application or records the event into its memory. Device specifications can be found at the end of this user
manual and at www.4ts.com.
4TS dMonitor™ WebWeb-based Application
4TS dMonitor™ is a web-based monitoring application for 4TS dSeal R120™ devices. Key functions of the application include the
ability to receive real time alerts from the devices, to change device settings and to download data collected by the sensors. Using
either the GPS satellite positioning or mobile phone positioning, the application can also be used to position the devices on a map.
4TS dMonitor Lite™ PC Application
4TS dMonitor Lite™ PC software is an easy-to-use application for making settings and for extracting recorded data from 4TS dSeal
data loggers. This comprehensive software is included in every 4TS dSeal device. The data gathered by the device sensors is recorded
on a miniSD memory card. The user can simply insert the memory card into a memory card reader and view the data on a computer.
The data view displays the device information, a summary of the logging session, data graphs with time stamps and a list of alert
events.
4TS dSeal R120™ User Manual
3
!
SAFETY
!
Please read these guidelines. Failing to follow them may be illegal or dangerous.
Activate safely
Do not switch on the device where GSM use is not allowed or when it may cause interference or danger.
Charging the Battery
Use only approved batteries and power chargers. Always disconnect the charger before removing the battery.
Warning: Use only the batteries and power chargers/adapters approved by 4TS Finland for this device. The use of any other types
maybe dangerous and may invalidate any approval or warranty.
Aircraft
Follow restrictions about GSM devices in aircrafts. This device is equipped with a patented system that switches the GSM module off
during the take-off of an airplane. To safely use this device on airplanes, see “MORE INFORMATION” at the end of this user manual.
Fuel, Chemicals and Explosives
Do not use the device near fuel, chemicals, explosives or where blasting is in progress.
Hospitals
Switch the device off near medical equipment and where GSM use is prohibited.
WaterWater-Resistance
This device is NOT water-resistant.
BackBack-Up Copies
Remember to make back-up copies of important data stored in the memory card.
Connecting to Other Devices
Do not connect to incompatible devices. When connecting to any other device, always read its user manual for safety guidelines.
Privacy of Other People
Please respect the privacy of other people. Do not use the device to follow the location of any person or their property without their
consent.
4
GETTING STARTED
Components
1. Battery cover
2. miniSD memory card slot
3. Battery contacts
4. Battery
5. SIM card slot
6. Battery holders
7. Right light sensor
3
5
7
1
6
2
9
8. RESET button
9. LED indicator
10. Temperature and humidity sensors
11. mini USB connector
12. Left light sensor
12
11
SIM Card Installation
! Note! The SIM card should support GPRS connection, and roaming if the device is used in more than one country.
1. Before installing the SIM card, disable the PIN code query.
2. Remove the battery.
3. Insert the SIM card in its slot, with the card contact side down and the cut corner on the left side.
4. Press the card until it locks in place.
5. To remove the card, press it in until the lock releases and the card slides out.
4
10
8
4TS dSeal R120™ User Manual
miniSD Memory Card Installation
Note! Always remove the battery before inserting or removing the memory card.
1. Before installing the memory card, make sure you have made the correct GSM connection settings to it with “4TS dMonitor Lite™”
2. Insert the memory card in its slot, with the card contact side down and the cut corner on the left side.
3. Press the card until it locks in place. A pen can be used to press the card carefully until it locks in place.
4. To remove the card, press it in until the lock releases and the card slides out.
Battery Installation
1. Place the battery in its place contact side first, with the batteries contacts facing left and small grooves facing down.
2. Press the other end down to lock it in place.
3. To remove the battery, push it slightly from the right side towards the contacts and lift.
! Note! If the LED starts double flashing in red after installing the battery, the miniSD memory card is not in place or it is defective.
Reinstall the memory card and try again.
Charging the Battery
The battery has to be in place when charging. The charging time from empty to full is approximately 12 hours.
1. Connect the USB cables mini USB connector to its corresponding connector on the device.
2. Connect the other end to its corresponding connector on the USB power charger/adapter.
3. During charging the LED blinks every 3 seconds:
- Red when the battery has less than 30% power remaining.
- Orange when the battery has 30% - 90% power remaining.
- Green when the battery is fully charged.
!
Note! Use only approved batteries and power chargers/adapters. Always disconnect the charger before removing the battery.
!
Important notice: Use only the supplied AC power charger for charging the device.
! Note! Charging rises the temperature inside the device which affects temperature and humidity readings. The rise of temperature
increases in relation to how discharged the battery is. Temperature readings are valid 20min after the charger has been disconnected.
Activating the Device
The device needs to be activated before it starts recording.
1. With the memory card and battery installed, press the RESET button once.
2. The LED indicator flashes shortly and then stops flashing:
- Red: the battery needs to be charged before use.
- Orange: the battery has 30% - 90% power remaining.
- Green: the battery is fully charged.
3. The device will now download its settings profile from 4TS dMonitor™.
4. The device will turn active after a delay time, that is set in the settings profile, has passed.
! Note! If the device is activated during charging, the LED flashes green and stops indicating the charging status. The actual charging continues.
Aborting Activation
If the activation process needs to be aborted (within the above mentioned delay time):
1. Press the RESET button until the LED starts flashing.
2. The LED starts flashing green to indicate a successful deactivation.
3. The device can now be activated again by following the “Activating the Device” instructions.
Deactivating the Device
! Note! To avoid unnecessary alerts being sent to 4TS dMonitor, deactivate the device in 4TS dMonitor before doing something
that might cause an alert e.g. causing an integrity alert by opening a shipment package. This will prevent alerts from appearing in the
alert monitoring list. To stop recording, the device also has to be deactivated by following instructions below.
1. Deactivate the device by pressing the RESET button until the LED starts flashing.
2. The LED starts flashing rapidly:
- Red if there have been alerts.
- Green if there have been no alerts.
3. Remove the battery before removing the miniSD memory card for further assessment with 4TS dMonitor Lite.
4TS dSeal R120™ User Manual
5
LED INDICATION SUMMARY
During charging the LED flashes every 3 seconds:
- Red when the battery has less than 30% power remaining.
- Orange when the battery has 30% - 90% power remaining.
- Green when the battery is fully charged.
- No light: the device has been activated.
After installing the battery the LED flashes every 3 seconds:
- Double flashes in red: the miniSD memory card is not in place or it is defective.
- Red: battery needs to be charged before use.
- Orange: the battery has 30% - 90% power remaining and the device is ready to be activated.
- Green: the battery is fully charged and the device is ready to be activated.
After pressing the RESET button once (activation) the LED flashes shortly and then stops flashing:
- Red: battery needs to be charged before use.
- Orange: the battery has 30% - 90% power remaining, and the device will turn active after the delay time has passed.
- Green: battery is fully charged, and the device will turn active after the delay time has passed.
No light with the battery and memory card installed:
- The device is active and recording. To test this, press the RESET button once to see the battery charge level as mentioned above.
or
- The battery is empty.
After pressing the RESET button for 5 seconds (deactivation) the LED flashes:
- Red: the device has recorded alerts.
- Green: the device has recorded no alerts.
MAKING CONNECTION SETTINGS AND READING RECORDED DATA (4TS dMonitor Lite™)
!
Note! 4TS dSeal uses Coordinated Universal Time (UTC).
Connecting the miniSD Memory Card to a PC
1. Remove the battery cover and battery from the device.
2. Remove the miniSD card
3. Place the card into the miniSD USB adapter or to a miniSD reader in a PC.
Opening the 4TS dMonitor Lite Application
1. Follow the instructions of the PC to open the miniSD card.
2. Double click on “4TS dMonitor Lite” icon to start the application.
! Note! Java Runtime Environment™ 6.0 or newer must be installed on the PC. The software can be downloaded free at
www.java.com.
1
2
Application Window
1. Device Information:
- Device ID: users can define a name or code for each device.
- Battery Status: indicates the charge level of the battery, when the device was deactivated.
2. Alert Summary
- Indicates the number of alerts recorded
3. Tabs
- View data graphs and alert lists, change connection settings and update the device
time by choosing the appropriate tab.
Changing the Device ID
1. Enter a device identification name or code in the “Device ID” textbox.
2. Click Save.
6
4TS dSeal R120™ User Manual
3
GSM and GPRS Connection Settings
The communicates with the 4TS dMonitor web-application by GPRS. Alerts are sent in
SMS text messages.
1. Choose the “Connection” tab.
2. Enter the “GPRS Access Point Name (APN)” which is provided with the SIM card.
3. Enter the “Username” (only used by some mobile operators).
4. Enter the “Password” (only used by some mobile operators).
5. Click “Save”.
ASP Service Settings
The device default settings are set for 4TS Finland’s ASP service. If a different service is
to be used, follow these instructions.
1. Choose the “Connection” tab.
2. Select “I want to use my own service”.
3. Enter the GSM number for alerts in “SMS number for the alerts” in international
format e.g. +358401234567.
4. Enter the “Server IP address (for GPRS data)” e.g. 12.34.567.89
5. Enter the “Server port number (for GPRS data)” e.g. 9900
6. Click “Save”.
Setting Time and Date
! Note! 4TS dSeal devices feature an internal UTC clock that is updated from the
memory card. The application notifies when the time needs to be reset.
1. Choose the “Time” tab.
2. Click “Set time”.
3. Close the application and immediately insert the memory card back to the dSeal
device.
4. Place the battery to the device to update the time.
Reading Recorded Data as Graphs
Data recorded by the device can be viewed as graphs for each sensor. The application
automatically shows the last logging session. To view older logging session see “Log
History”.
- Choose the “Graphs” tab.
-. Use the slider to scroll all the graphs by time, from the start to the end of the recording session.
- Use “Browse alerts” to move to the previous or next alert event.
- Use “Graph time frame” to scale the graphs. Enter the number of hours and press
Enter.
- Right click on a graph to see its functions. Functions include printing, saving and
zooming.
- By holding the left mouse button down and moving the mouse to the right, it is
possible to scale the graph to that time and value frame.
Reading Alert Event Lists
1. Choose the “Alert list” tab.
2. Click on the “Time, Alert or Value” headings to sort the table ascending or descending.
Copying Alert List Events to be Used in Other Applications
1. Click on a row to select it or hold left mouse button down to select multiple rows.
2. Use keyboard shortcut “ctrl + c” to copy the selection.
3. Go to the designated application and use paste to add the selection.
Log History
The device stores the last four logging sessions in the memory card. The last logging
session is named “LOG.CSV” and previous sessions “LOG1.CSV, LOG2.CSV, LOG3.CSV,
LOG4.CSV” where LOG4.CSV is the oldest logging session. The 4TS dMonitor Lite application automatically opens the file “LOG.CSV”, to view older logging sessions in the
application the file name has to be changed to LOG.CSV.
Opening Log Files in Spreadsheet Applications
All “.CSV” log files can be opened in spreadsheet applications.
4TS dSeal R120™ User Manual
7
WIRELESS CONNECTION (4TS dMonitor™)
To use 4TS dMonitor web-based application on 4TS dSeal R120 devices, please follow the instructions supplied by the company you
purchased the device from. More information can be found from our website www.4ts.com.
MORE INFORMATION
Light Sensor Explained
The light sensors, that monitor integrity, are situated on both sides of the device. To optimize their performance, the device should be
placed so that at least one of the sensors is not covered or obstructed in any way. When the light sensor is used, it is important to
prevent ambient light from entering the package or other object that is being monitored.
The integrity levels must be set, with 4TS dMonitor Lite™, to suit packaging material as follows:
1. For conditions where there is no light e.g. a thick cardboard box that is thoroughly closed.
2. ...
3. ...
Shock Sensor Explained
The shock sensor measures acceleration and expresses it in gs (g-force). To get exact g readings, the device should be packed or
affixed in the same way as the object that is being measured.
Examples of a 1 kg cardboard box, with some filling inside, dropped from different heights:
- 20 cm: ~ 8,5 g
- 50 cm: ~ 8,8 g
- 80 cm: ~ 9,4 g
- 100 cm: over 10 g
Free Fall Sensor Explained
The free fall sensor measures the distance of free fall that exceeds 10cm. The sensor also reacts to throws but the measurement is
not exact. To get exact free fall readings, the device should be packed or affixed in the same way as the object that is being measured.
UTC Time
Universal Coordinated Time (UTC) is the same as Greenwich Mean Time (GMT) in casual use. Local time is UTC plus the time zone
offset for that location.
Operating Time
The operating time is affected by how active the device is. A longer operating time can be achieved by switching off unused sensors
and using longer recording intervals on pressure, temperature and humidity sensors. Cold operating environment temperatures
shorten the operating time.
SPECIFICATION
8
SIZE
WEIGHT
CONNECTION &
INTERFACE
134 * 79 * 18 (mm)
145 g
miniSD memory card
Data access: 4TS dMonitor Lite™
Wireless monitoring: 4TS dMonitor™
Dual-band EGSM module 900/1800 MHz
SENSORS
Temperature
Shock
Free fall
Humidity
Air pressure
Integrity/ light
OTHER
Battery: Li-Polymer 1000mAh
Operating time: Up to 2 weeks
Operating temperature: –20˚C to +60˚C
TRACKING
Mobile Positioning System
Global Positioning System
4TS dSeal R120™ User Manual