1
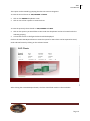
2011 1 User Manual EPILEPSY SOUTH AFRICA WESTERN CAPE Content Management System User Manual team Group Members: Rebecca Goba Olinda Mombeyarara Phumlani Majozi Azola Mda Sekai Muvembi Page 1 2011 2 User Manual Contents 1. GENERAL INFORMATION ................................................................................................................ 3 1.1 SYSTEM OVERVIEW ..................................................................................................................... 3 2 GETTING STARTED ........................................................................................................................... 3 2.1 Login ........................................................................................................................................ 3 Initial ............................................................................................................................................... 3 Forgot Password ............................................................................................................................. 3 Change Password ............................................................................................................................ 4 3 SERVICES .......................................................................................................................................... 4 3.1 ENQUIRIES ............................................................................................................................... 4 3.2 EAP .......................................................................................................................................... 6 3.3 COUNSELLING ......................................................................................................................... 7 3.4 EMPLOYEE RECORDS ................................................................................................................... 7 3.5 MEMBERS.................................................................................................................................... 8 3.6 CLIENTS ....................................................................................................................................... 8 3.7 REPORTS ...................................................................................................................................... 9 4 3.7.1 SUPPORT GROUP REPORTS ............................................................................................... 11 3.7.2 Enquiry Reports................................................................................................................. 11 HELP .............................................................................................................................................. 12 4.1 GENERAL ............................................................................................................................... 13 4.2 ONLINE .................................................................................................................................. 13 4.3 GOOGLE MAPS ...................................................................................................................... 13 4.4 INFORMATION .......................................................................................................................... 13 Page 2 2011 3 User Manual 1. GENERAL INFORMATION The User Manual provides the information necessary for the user to effectively use the automated information system. 1.1 SYSTEM OVERVIEW This Content Management System is intended for the social workers of Epilepsy South Africa Western Cape (ESAWC). It is used primarily for the purposes of capturing field data and producing reports which assist ESAWC and the government in negotiating a budget for the upcoming financial year. The main system for management is a client/server architecture which runs on a windows based platform Note: All the ID’s in this system are Auto generated and the user does not need to enter any of these. Before using the system, the user should have Microsoft packages installed as various Microsoft components were used in the functionality of the system, such as Word and Excel. A package that accepts PDF format should also be available, e.g. Adobe. 2 GETTING STARTED 2.1 Login Initial The system can only be used by authenticated users (ESAWC Social Workers). Please enter your username and password. After you log in with your designated username and password, you have access to the system and can change your password. NOTE: Not all the system’s functionality will be available for unauthenticated users Forgot Password A user can only retrieve their password if they give the accurate username. This is to ensure security of data as the system has multiple users You will be asked a security question to which you must answer correctly. Page 3 2011 4 User Manual Your password will be displayed in the text box. A system message will be displayed should there be an issue with the retrieving of a user’s password. Change Password Once logged in, a user can change their password by clicking on the “change password text”. Enter the required information in the relevant textboxes and click on “change password” to effect the changes. 3 SERVICES The services tab located on the menu bar contains the links to the subsystems that ESAWC currently provides to the community. Hover over the services tab on the menu bar to display the various subsystems 3.1 ENQUIRIES A user accesses the enquiry page to record a new enquiry and to save its data in the database. Click on the Enquiries option within the Services drop down panel. The grid view displays the data that is currently in the database You can use the search and filter functionality that is provided to trawl through records in the database(Type in the textbox in the relevant grid view column) To move to a NEW PAGE of data in the grid view, click on the NEXT arrow located at the bottom of the grid view To choose how many records you want to be displayed on a page, click on the PAGE SIZE drop down arrow located at the bottom of the gridview and select the appropriate number. To ADD a new record , click on the You are then redirected to the record enquiry page where you are required to enter the details located at the top right of the screen of a particular enquiry. To enter a date, click on the Date textbox and a calendar will appear Click on the relevant calendar date to select it. To enter EMPLOYEE, AGE GROUP, RACE, FORM OF COMMUNICATION AND DISTRICT INFORMATION, click on the respective drop down lists and select the relevant option. To select NATURE OF ENQUIRY, check the relevant checkboxes and click SAVE to save the information. Page 4 2011 5 User Manual NOTE: A user may select more than one checkbox. Click the BACK button to return to the Enquiries page. To EDIT a record, select a row on the grid view and click on the located at the top right of the screen To DELETE a record, select a row on the grid view and click on the sign located at the top right of the screen. To export the displayed records to Excel, PDF or Word, click on the relevant icons located above the grid view. Below is a screen shot of the enquiry records page. Page 5 2011 6 User Manual 3.2 EAP Clicking this tab allows the users to ADD, EDIT and DELETE records of events. A grid view is displayed which depicts the data currently held in the database You can use the search and filter functionality that is provided to trawl through records in the database(Type in the textbox in the relevant grid view column) To move to a NEW PAGE of data, click on the NEXT arrow located at the bottom of the grid view To ADD a new record , click on the You are then redirected to the record EAP page where you are required to enter the details of a located at the top right of the screen particular EAP event Click on the date textbox to record a date for the event To select the type of assistance and the district, select the various options under the dropdown lists. Enter the relevant information in the textboxes that are located within the panels Click SAVE to save the data to the database(The user will be prompted to confirm this action) To clear all the data in the textboxes, click the CLEAR ALL button. Click the BACK button to return to the EAP RECORDS page. To EDIT a record, select a row on the grid view and click on the located at the top right of the screen To DELETE a record, select a row on the grid view and click on the sign located at the top right of the screen. You will be prompted to confirm the delete of this record To export the displayed records to Excel, PDF or Word, click on the relevant icons located above the grid view. Page 6 2011 7 User Manual 3.3 COUNSELLING Click on the Enquiries option within the Services drop down panel. Once on the Counseling page, enter the client name in the client name text box Under the dropdowns, select the appropriate type of intervention and the form of communication Enter appropriate data into all the fields and click the SAVE key to commit it to the database. 3.4 EMPLOYEE RECORDS Click on the EMPLOYEE tab on the menu bar to access the Employee records. The grid view displays the data that is currently in the database You can use the search and filter functionality that is provided to trawl through records in the database(Type in the textbox in the relevant grid view column) To move to a NEW PAGE of data, click on the NEXT arrow located at the bottom of the grid view To ADD a new record , click on the You are then redirected to the record enquiry page where you are required to enter the details located at the top right of the screen of a particular enquiry. Enter the relevant information in the EMPLOYEE DETAILS page and click SAVE Click the BACK button to return to the EMPLOYEE RECORDS page. To EDIT a record, select a row on the grid view and click on the located at the top right of the screen To DELETE a record, select a row on the grid view and click on the sign located at the top right of the screen. To export the displayed records to Excel, PDF or Word, click on the relevant icons located above the grid view. Page 7 2011 8 User Manual 3.5 MEMBERS This tab allows the user to change the Members’ records Click on the MEMBER tab on the menu bar to access the MEMBER records. The grid view displays the data that is currently in the database You can use the search and filter functionality that is provided to trawl through records in the database(Type in the textbox in the relevant grid view column) To move to a NEW PAGE of data, click on the NEXT arrow located at the bottom of the grid view To ADD a new record , click on the You are then redirected to the Member details page where you are required to enter the details located at the top right of the screen of a particular Member. Enter the relevant information in the MEMBER DETAILS page. The user then needs to specify whether the Member is subscribed or unsubscribed and charge them the agreed upon amount. After filling in all the spaces in the form, click SAVE to commit the changes to the database Click the BACK button to return to the MEMBER RECORDS page. To EDIT a record, select a row on the grid view and click on the located at the top right of the screen To DELETE a record, select a row on the grid view and click on the sign located at the top right of the screen. Confirm the delete by clicking on yes when the dialogue box appears To export the displayed records to Excel, PDF or Word, click on the relevant icons located above the grid view. 3.6 CLIENTS Click on the CLIENT tab on the menu bar to access the CLIENT records. The grid view displays the data that is currently in the database You can use the search and filter functionality that is provided to trawl through records in the database(Type in the textbox in the relevant grid view column) Page 8 2011 9 User Manual To move to a NEW PAGE of data, click on the NEXT arrow located at the bottom of the grid view To ADD a new record , click on the You are then redirected to the record Clients page where you are required to enter the details of located at the top right of the screen a particular Client. Enter the relevant information in the CLIENT DETAILS There is an option to upload a picture from your hard drive To upload it, click on the select button and browse your hard drive for a picture To enter the details of a next-of-kin, click the icon and enter the details in exactly the same way as you did for the Client. page and click SAVE Click the BACK button to return to the CLIENT RECORDS page. To EDIT a record, select a row on the grid view and click on the located at the top right of the screen A pop-up window appears where the user can edit this data. Click the EDIT button to enable the textboxes within this window. Click on the UPDATE button to change the data in the database Close the pop-up window . To DELETE a record, select a row on the grid view and click on the sign located at the top right of the screen. To export the displayed records to Excel, PDF or Word, click on the relevant icons located above the grid view. 3.7 REPORTS The reports page is where the Social workers can view reports of the various services ESAWC provides. Click on a specific report to view it. Page 9 2011 10 User Manual This report can be viewed by grouping the data into various categories: To view the annual charts on AGE, GENDER and RACE Click on the ANNUAL dropdown arrow Click on one of the 3 options to view the chart To view the quarterly charts based on AGE, GENDER and RACE Click on the quarter you would like to view under the drop down list that is located under the relevant grouping A chart like the one in the figure below should be displayed Click on the View EAP Reports button to view the reports for EAP. These can be exported to word, excel and PDF format by clicking on the relevant button. After clicking the View EAP Report button, the form should look similar to the one below Page 10 2011 11 User Manual 3.7.1 SUPPORT GROUP REPORTS This report can be viewed by grouping the data into various categories: To view the annual charts on AGE, GENDER and RACE Click on the ANNUAL dropdown arrow Click on one of the 3 options to view the chart To view the quarterly charts based on AGE, GENDER and RACE Click on the quarter you would like to view under the drop down list that is located under the relevant grouping. A chart appears revealing the data set you just selected. This chart can be exported to PDF, printed and saved to the hard drive 3.7.2 Enquiry Reports This report can also be viewed by grouping the data into various categories: To view the annual charts on AGE, GENDER and RACE Click on the ANNUAL dropdown arrow Click on one of the 3 options to view the chart Page 11 2011 12 User Manual Data in this form can be viewed in multiple ways. Data comparisons can be done based on the categories selected by the user For a drill down of the reports, click on the arrows that appear on the right-hand side of the chart. To view the quarterly charts based on AGE, GENDER and RACE Click on the quarter you would like to view under the drop down list that is located under the relevant grouping. A chart appears revealing the data set you just selected. This chart can be exported to PDF, printed and saved to the hard drive Below is a visual representation of the Enquiry reports page 4 HELP To access the different options within the help tab, point the mouse over the HELP TAB This displays the various options. Page 12 2011 13 User Manual 4.1 GENERAL The HELP tab shows a video of how to navigate through the website and displays general epilepsy information 4.2 ONLINE This tab allows the user to search Google without having to close the ESAWC website The user can also seek help from other sources on the internet. 4.3 GOOGLE MAPS C licking on this tab transfer s the user to the find location page. They have to enter the details of their destination within this form When the user clicks on “show map’, they are linked to the Google maps home page where they can finish their request. 4.4 INFORMATION Clicking on the “Information “tab directs the user to the Technical information page. The user should double click on a word they want to find the meaning of. Page 13