1
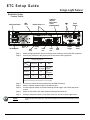
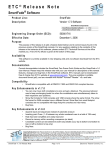
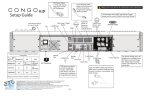
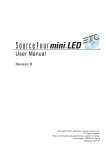
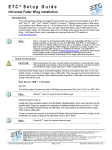
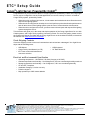
ETC® Setup Guide Congo ® Light Server, Powered By Cobalt ® Congratulations on your purchase of the ETC Congo Light Server, powered by Cobalt. The Congo Light Server may be configured to run the Cobalt application as a server, backup, or client in a Cobalt or Congo Family system, powered by Cobalt. • When the unit is configured as a server, it is the master and maintains the show file and controls output to the lighting system. • When the unit is configured as a backup, the unit will perform synchronized backup with a server and will take control of the lighting system upon the loss of communication with the server. • When the unit is configured as a client, you can access real time inputs and outputs of the lighting system through the server. This document will guide you in the setup and simple operation of the Congo Light Server for use with Cobalt systems, and Congo Family systems, powered by Cobalt. For more information, please consult the Cobalt User Manual, provided with the Congo Light Server on the included CD-ROM, or download the manual from www.etcconnect.com/cobalt. Ch eck Shipping Contents Check the shipping carton to ensure all contents have arrived and are undamaged. Your Light Server ships with the following items: • USB Mouse • USB Keyboard • Congo Family User Manual (on CD) • 19” Rack Mount Kit • IEC Power cords with International connector selection Electrical and Environmental Specif ication • • • • • • • Operating temperature - 100-240VAC, 50-60Hz (2 amps at 120 VAC) Ambient temperature and humidity - 0 to 40 degrees C, 95% non-condensing humidity maximum Storage temperature and humidity - 0 to 40 degrees C, 95% non-condensing humidity CE and ETL Compliant Installation Category II, Indoor use only Pollution degree 2 May operate up to 2000 meters altitude Corporate Headquarters 3031 Pleasant View Road, P.O. Box 620979, Middleton, Wisconsin 53562-0979 USA Tel +608 831 4116 Fax +608 836 1736 London, UK Unit 26-28, Victoria Industrial Estate, Victoria Road, London W3 6UU, UK Tel +44 (0)20 8896 1000 Fax +44 (0)20 8896 2000 Rome, IT Via Pieve Torina, 48, 00156 Rome, Italy Tel +39 (06) 32 111 683 Fax +44 (0) 20 8752 8486 Holzkirchen, DE Ohmstrasse 3, 83607 Holzkirchen, Germany Tel +49 (80 24) 47 00-0 Fax +49 (80 24) 47 00-3 00 Hong Kong Rm 1801, 18/F, Tower I Phase 1 Enterprise Square, 9 Sheung Yuet Road, Kowloon Bay, Kowloon, Hong Kong Tel +852 2799 1220 Fax +852 2799 9325 Service: (Americas) [email protected] (UK) [email protected] (DE) [email protected] (Asia) [email protected] Web: www.etcconnect.com QSF 4.1.9.1 Copyright © 2014 ETC. All Rights Reserved. Product information and specifications subject to change. 7310M2210 Rev C Released 2014-05 ETC intends this document to be provided in its entirety. C on go L ig ht Se r ver S et up G ui de Pag e 1 of 3 El ect r on ic T he at r e C on t ro ls , I nc . ETC Setup Guide Congo Light Server Hardware Setup Connect Cables Hard Power Switch USB Ports Audio Out (Audio In Reserved for Future Implementation) Ethernet Ports 1 & 2 DMX x2 PUSH Phone Remote PUSH MIDI In Phone Remote 100-240VAC 50/60 Hz 2A@120VAC DMX 1 MIDI Out DMX 2 US 3060167 IEC Receptacle Step 1: Step 2: eSATA Port Display Port USB Ports DVI-I Port DVI-D Port USB Ports www.etcconnect.com Remote Trigger C ETC 2U Processor Unit Electronic Theatre Controls, Inc. Middleton, WI USA Remote Trigger Midi In & Out Attach the appropriate IEC power cord to the power connector, then to the IEC receptacle. Connect any monitors to the proper ports on the back of the Light Server. Congo Light Server supports up to 2 monitors using the following combinations: Signal Type Physical Port Display Port DVI Yes with Adapter Display Port Yes DVI-I Port No Yes DVI-D Port No Yes VGA Yes with Active Adapter Yes with Adapter No Multitouch monitors need to be Windows 7 or 8 Compatible. Step 3: Step 4: Step 5: Step 6: Step 7: Connect the USB mouse and keyboard to the USB connectors. Attach a network ethernet cable to the ethernet port. Connect optional cables as desired including remote trigger, midi, DMX, and phone remote. When all connections are made, switch the hard power switch on. Press the soft power switch, on the front of the unit, to power up the Light Server. Note: C on go L ig ht Se r ver S et up G u id e If the unit does not power up, check the rear panel to insure the hard power switch is on. Page 2 of 3 El ect r on ic T he at r e C on tr o ls , I nc. ETC Setup Guide Congo Light Server Co nnector Pinouts DMX 512 connector pinout Pin 1 Remote Trigger connector pinout S1 1 Use Common (shield) 2 Data - 3 Data + 9 Relay Out, Normally Closed 10 Relay Out, Normally Open 11 Relay Out, Common 2 S2 3 Push 8 7 6 5 4 3 2 1 15 14 13 12 11 10 9 4 S3 5 4 4 no connection 5 no connection 12 1 5 2 13 3 6 S4 Ground Ground 14 + 12Vdc 7 15 8 + 12Vdc Operation Overview 20 command keypad buttons removable label strip 1 Esc Ch 2 Thru Soft Power Switch backlit indicators 3 Mod 4 Ins 5 Live All + Del @ GoTo Outp Go 6 Frmt 7 Tab Mast Pause 8 Brws 9 . C Rec GoBa Macro 0 LdPly Shift USB Server Backup Client Master Sync Offline Backlit indicators identify the operating status of the light server. LEDs indicate which mode the unit is operating (server, backup, client) and the status of the operation (master, backup sync or offline). • • • • • • The “Server” LED will illuminate when the unit is configured as a server. The “Backup” LED will illuminate when the unit is configured as backup. The “Client” LED will illuminate when the unit is configured as a client. The “Master” LED will illuminate when the unit is controlling the lighting system, and will blink when the Backup is in control. The “Sync” LED will illuminate when the unit is synchronized with a server and will blink when the connection to the server has been lost. The “Offline” LED is illuminated when the unit is running offline. 20 command keypad buttons are configured for single Congo commands. The 20 command buttons are set to default button assignments for optimal operation. Press and hold the [Shift] button to select the alternate function of any button (for example: [Shift] [1] to Escape). USB port is provided for easy show loading to or from a USB storage device. C on go L ig ht Se r ver S et up G u id e Page 3 of 3 El ect r on ic T he at r e C on tr o ls , I nc.