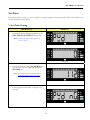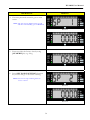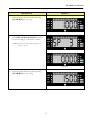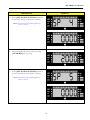
1
DI-300SS User Manual
USER MANUAL
DI-300SS
EDITION 02
COPYRIGHT © 2006 TERAOKA WEIGH-SYSTEM PTE LTD
17/01/06
DI-300SS User Manual
Table of Content
Notice ............................................................................................................................................1
Safety Information .........................................................................................................................2
Specifications.................................................................................................................................3
General............................................................................................................................................................... 3
Digital Section................................................................................................................................................... 3
Analog Section .................................................................................................................................................. 3
Interface ............................................................................................................................................................. 3
Overall View of DI-300SS ..............................................................................................................5
Product Layout ..............................................................................................................................6
Display Panel and Key Sheet Layout............................................................................................................. 6
Indicators...................................................................................................................................................... 6
Keys Function ............................................................................................................................................. 7
Interface ............................................................................................................................................................. 9
Interface........................................................................................................................................................ 9
Start Up And Segment Check...................................................................................................... 10
Date And Time View & Setting................................................................................................... 11
Tare Operation ............................................................................................................................ 14
ONE TOUCH TARE................................................................................................................................... 14
DIGITAL TARE ........................................................................................................................................... 16
Tare Value Exchange .................................................................................................................. 17
TARE ACCUMULATION.......................................................................................................................... 17
TARE SUBTRACTION............................................................................................................................... 19
Weighing Mode ........................................................................................................................... 21
PLU Call -Up In Weighing Mode ...............................................................................................22
DI-300SS User Manual
PLU Programming ......................................................................................................................24
General Set Point Password Setting ............................................................................................30
Functions Operation....................................................................................................................32
Example of Function and Indicator Layout............................................................................................... 32
Weight Conversion......................................................................................................................................... 33
Accumulation and Subtraction ..................................................................................................................... 35
1. Accumulation ........................................................................................................................................ 35
2. Subtraction............................................................................................................................................. 40
Sequence Number .......................................................................................................................................... 44
Net/Gross ....................................................................................................................................................... 46
Lot Number .................................................................................................................................................... 47
Hold.................................................................................................................................................................. 49
1. Peak Hold .............................................................................................................................................. 49
2. Normal Hold ......................................................................................................................................... 50
Counting and Quantity .................................................................................................................................. 52
Set-Point .......................................................................................................................................................... 55
1. Set-Point Setting ................................................................................................................................... 55
2. Weighing Operation with Set Point ................................................................................................... 59
IP Address Setting ....................................................................................................................... 61
Server IP Address Setting ............................................................................................................63
Error Messages Description........................................................................................................65
Notes............................................................................................................................................67
DI-300SS User Manual
Notice
DIGI®
The material contained in this document is proprietary and for information only and is subject to change
without notice. Teraoka Weigh-System assumes no responsibility for any errors or damages arising from
misinterpretation of any procedure.
Screen displays, operating procedures and supporting features might vary with different software version
releases.
This document shall not be reproduced whether in part or whole without the written consent from
Teraoka Weigh-System Pte Ltd.
Teraoka Weigh-System Pte Ltd
4, Leng Kee Road
#06-01 SIS Building
Singapore 159088
1
DI-300SS User Manual
Safety Information
The operator of the equipment shall comply with the safety and warning indications and procedures
outlined in this document. Teraoka Weigh-System Pte Ltd assumes no responsibility or liability for failure
to comply with these requirements.
•
To avoid electric shock, use only the supplied power cords and ensure product is connected to a
properly grounded supply.
•
For continued protection against fire hazard replace only with fuse of same rating and type.
•
Ensure product is placed on a firm and level surface before operation.
•
Avoid overloading the product beyond its rated maximum capacity
•
Repair and servicing of product shall only be carried out by trained and qualified personnel.
Disclaimer:
Specifications are subject to change without notice. All dimensions shown are approximate. Please be
aware that Teraoka has indicated that its hardware and software used in the product may require
additional updates in the future as our product is continually under development. The need for such
updates most likely applies to the Printer software.
CAUTIONS:
1. FOR PLUGGABLE EQUIPMENT, THAT THE SOCKET-OUTLET SHALL BE
INSTALLED NEAR THE EQUIPMENT AND SHALL BE EASILY ACCESSIBLE.
2. FOR CONTINUED PROTECTION AGAINST RISK OF FIRE, REPLACE IT ONLY
WITH SAME TYPE AND RATING OF FUSE.
3. DANGER OF EXPLOSION IF BATTERY IS INCORRECTLY REPLACED.
REPLACE ONLY WITH THE SAME OR EQUIVALENT TYPE THAT
RECOMMENDED. DISPOSE OF USED BATTERY ACCORDINGS TO THE
MANUFACTURER’S INSTRUCTIONS.
2
DI-300SS User Manual
Specifications
General
Model
: DI-300 SS
: DI-300C-SS (Bar-graph)
: DI-300D-SS (Bar-graph and LCD display)
Power Source
: AC 110V - 240V (50 / 60 Hz)
Operation Temperature
: - 10ºC – 40ºC
Humidity
: 15 % to 85 % RH
Memory
: 100 Items
Digital Section
Function Key
: 24 Keys
Indicator Sign
: 8 Indicators
Display Resolution
: 50,000 counts
Main Display
: 7 Segment 6 digit LED at 24.5mm
Analog Color bar
: 8 X 3 Color = 24 LED (DI-300C-SS only)
LCD Display
: Alphanumeric 16 Digits (DI-300D-SS only)
Analog Section
Zero adjustment range
: 0.35mV – 24mV
Max Load Cell input voltage
: 36mV
A/D Conversion Method
: Delta Sigma
A/D Resolution
: 600,000 counts
A/D Conversion Rate
: 200 times/sec (maximum)
Interface
Interface
: AC Inlet
: Set Point Interface
: RS 232/RS 485 Interface
: Ethernet Interface
3
DI-300SS User Manual
: Scale (load cell) Interface
*Specifications are subject to change without notice
4
DI-300SS User Manual
Overall View of DI-300SS
DI-300SS
DI-300SS Schematic Drawing
5
DI-300SS User Manual
Product Layout
Display Panel and Key Sheet Layout
Indicators
NET
: Light when Main Display is showing NET Weight or Tare Value is
being applied to the current Gross Weight reading.
ZERO
: Light when Scale at the zero point.
MOTION
: Light when weight is unstable. Or off when the scale is stable.
SET
: Light when the scale is in Set Up Mode, when doing rezero or when
6
DI-300SS User Manual
entering numeric data.
Weight Unit
FNC 1, 2 & 3
Set Point Lamp
Weight Unit (2)
: Weight unit indicator. (g, kg and Lb)
Light when using the assigned function in function keys, except some
:
function which do not light when using the function key.
: Lighted when weight reach set point limit.
: Weight unit indicator, used when Weight Conversion function is
enabled
Keys Function
NUMERIC KEYS
to
MODE KEY
: Enter numeric data.
:
Toggle in Programming Mode, Password Mode, Date and Time Mode
and Weighing Mode.
RE-ZERO KEY
: Reset weight to ZERO.
CLEAR KEY
: Clear numeric data, cancel and go to previous.
TARE KEY
: Set or Clear Tare value.
CODE KEY
: Call up PLU.
DOT KEY
: To enter Decimal point.
ENTER KEY
: - Sending weighing data
- Save and exit in PLU programming, Spec mode, IP setting, Subnet
setting.
- Password entering.
7
DI-300SS User Manual
SET POINT SETTING KEY
:
- Set point setting.
- Decrease Spec number for selection.
FUNCTION 1 KEY
- To run function assigned for function 1 key (depend on spec 44)
: - Enter key in Date and Time setting.
- Up and down in Spec selection
FUNCTION 2 KEY
:
- To run function assigned for function 2 key (depend on spec 45)
- Up and Down in Spec selection.
FUNCTION 3 KEY
:
- To run function assigned for function 3 key (depend on spec 46)
- Increase Spec number for selection.
8
DI-300SS User Manual
Interface
Interface
1
Span Switch
2
Boot Switch
3
AC Power Inlet
4
Set Point Interface
5
RS 232/ RS 485 Interface (optional)
6
Ethernet Interface
7
Scale (Load cell) Interface
9
DI-300SS User Manual
Start Up And Segment Check
OPERATION
DISPLAY
1. Connect to AC plug supply and remove any
item on platforms and then turn "ON" the
power switch.
Note: The Software Version Number will
appear on the display.
2. After finish segment check, Scale on Stand By - Status. (Picture 1)
Note 1: If any items on the Platforms and it
exceeds scale start range, following error message
will appear, press [CLEAR] key to exit or
remove the item from platforms. Also happen if
platform not connected (Picture 2)
Picture. 1
Picture 2
10
DI-300SS User Manual
Date And Time View & Setting
Date and time is user programmable.
OPERATION
DISPLAY
1. At Stand-by-Status (Weighing Mode)
2. Press [MODE] key three times to go to Date
& Time view/setting mode
Note: First it display Screen 1, then
automatically change to Screen 2 and
then automatically change to screen 3
Note: Time displayed on scale screen 3 e.g.
12:00pm (as current time)
Screen 1
Screen 2
Screen 3
11
DI-300SS User Manual
OPERATION
DISPLAY
3. Press [FNC 1] key to view Current Date on
scale e.g. 02.01.25 (yymmdd)
4. Press [FNC 1] key again, it display Current
Day on scale. e.g. Friday
5. Press [FNC 1] key again, it display Date
Format
6. Enter a valid date by using [NUMERIC] key
e.g. 050616 (yymmdd)
12
DI-300SS User Manual
OPERATION
DISPLAY
7. Press [FNC 1] key again, it display Time
Format
8. Enter a valid time by using [NUMERIC]
key e.g. 142500 (hhmmss)
9. Press [FNC 1] key
10. Enter a valid day by using [NUMERIC] key.
E.g. 3, then press [ENTER] key to save and
exit.
No.
0
1
2
3
4
5
6
Days
Monday
Tuesday
Wednesday
Thursday
Friday
Saturday
Sunday
13
DI-300SS User Manual
Tare Operation
There are two ways to set Tare Weight, One Touch Tare and Digital Tare. Usage of Tare depending on
SPEC 215 “Tare Operation” and the limit of Tare Weight is depending on SPEC 214 “Tare Range”
setting. The following operation examples show two ways of subtracting the Tare Weight of a 20g tray.
Note: To enable this function, set SPEC 215 to “1” or “3” in advance.
Note: SPEC 202 “Zero Lamp” is set to 1 “Net” (Zero Lamp display depend on this spec)
ONE TOUCH TARE
This function is to weight the actual weight of the tare then subtract its weight to get the tare value.
OPERATION
DISPLAY
1. At Stand-by-Status (Weighing Mode)
Put a Weight on to the Platform e.g. 20g
2. Press [TARE] key
3. Remove Weight
14
DI-300SS User Manual
OPERATION
DISPLAY
4. Press [TARE] key to clear the tare weight.
15
DI-300SS User Manual
DIGITAL TARE
This function can be used when tare weight is decided/known in advance. Tare subtraction can be
performed by enter numeric value. Usage of Tare depending on SPEC 215 “Tare Operation” and
Digital Tare Rounding method is depending on SPEC 217 “Digital Tare Rounding” setting.
Note: To enable this function, set SPEC 215 to “2” or “3” in advance.
Note: SPEC 202 “Zero Lamp” is set to 1 “Net” (Zero Lamp display depend on this spec)
OPERATION
DISPLAY
1. At Stand-by-Status (Weighing Mode), enter
the tare weight by [NUMERIC] key (e.g.
20g)
2. Press [TARE] key to subtract the tare
weight.
3. Press [TARE] key to clear the tare weight.
16
DI-300SS User Manual
Tare Value Exchange
There are two ways to do tare value exchange, Tare Accumulation and Tare Subtraction. One Touch
Tare and Digital Tare can be used to do Tare Accumulation or Tare Subtraction.
Note: To use both One Touch Tare and Digital Tare function at same time must enable SPEC 218
“Digital Tare When Loaded”
TARE ACCUMULATION
To enable this function, SPEC 216 “Tare Exchange” and SPEC 219 “Tare Increase”, must be set to 1
“Yes” in advance.
OPERATION
DISPLAY
1. Stand-by-Status (Weighing Mode)
Put a Weight on to the Platform e.g. 20g
Note: Also can use digital tare.
2. Press [TARE] key to subtract the tare weight
3. Place another tare weight on the platform
(Ex. 50g).
Note: Also can use digital tare.
Note: For Digital Tare, the next tare
accumulation value should not be lower
than the previous tare value.
17
DI-300SS User Manual
OPERATION
DISPLAY
4. Press tare to subtract the weight.
5. Remove (whole) Weight
6. Press [TARE] key to clear the tare weight.
18
DI-300SS User Manual
TARE SUBTRACTION
To enable this function, SPEC 216 “Tare Exchange” and SPEC 220 “Tare Decrease”, must be set to 1
“Yes” in advance.
OPERATION
DISPLAY
1. Stand-by-Status (Weighing Mode)
Put a Weight on to the Platform e.g. 100g and
Press [TARE] key to subtract the tare weight
Note: Also can use digital tare.
2. Remove 20g from the platform
Note: For Digital Tare, subtracted tare value
should not be bigger than the total tare
value.
3. Press [TARE] to subtract the weight.
19
DI-300SS User Manual
OPERATION
DISPLAY
4. Remove 50g from the platform
Note: For Digital Tare, subtracted tare value
should not be bigger than the total tare
value.
5. Press [TARE] key to subtract the weight.
6. Remove balance weight and press [TARE]
key to clear the tare weight.
20
DI-300SS User Manual
Weighing Mode
It works by weighing any weight/item on the platform and the display will show the weighing data. It is
not required to program any plu in advance.
OPERATION
DISPLAY
1. At Stand-by-Status (Weighing Mode)
2. Put a Weight on to the Platform e.g. 1Kg
3. Press [ENTER] key to send out the
weighing data.
Note: [ENTER] key used to send data to ID
Manager, PC or etc.
Note: When connect to some application, it
might show other screen before this
screen, For e.g. ID MANAGER, when
press [ENTER] key, it display SENT
first, then show the value screen and later
show ACK (acknowledged)
21
DI-300SS User Manual
PLU Call -Up In Weighing Mode
To call up PLU in weighing mode, the plu must be programmed in advance. PLU can be called up from
application like ‘ID MANAGER’ or database within the scale. The selection of plu source depends on
the SPEC 51 ‘PLU Source’. Please refer to PLU Programming to program plu data.
Note: SPEC 402 “Weight Checking type” currently set to 0 “Sequence weight check”.
OPERATION
DISPLAY
1. At Stand-by-Status (Weighing Mode)
2. Press PLU number to call plu by using
[NUMERIC] key e.g. 123
3. Press [CODE] key to call up the plu
22
DI-300SS User Manual
OPERATION
DISPLAY
4. Load desired weight e.g. 2kg
5. Press [ENTER] key to send out the
weighing data.
Note: [ENTER] key used to send data to ID
Manager, PC or etc.
Note: When connect to some application, it
might show other screen before this
screen, For e.g. ID MANAGER, when
press [ENTER] key, it display SENT
first, then show the value screen and later
show ACK (acknowledged)
23
DI-300SS User Manual
PLU Programming
To program plu data within the scale database.
OPERATION
DISPLAY
1. At Stand-by-Status (Weighing Mode), Press
[MODE] key once to enter PLU Programming
mode.
2. Enter new PLU number e.g. 123 by pressing
[NUMERIC] key
3. Press [CODE] key
24
DI-300SS User Manual
OPERATION
DISPLAY
4. Enter Tare value ex. 0.100, and press
[TARE] key
5. Press [FNC 1] key to set set-point value
Note: Screen non-stop switching between
screen 1 and 2
Screen 1
Screen 2
6. Enter correct password by using
[NUMERIC] key e.g. 112
Note: To program password, please refer to
General Set Point password setting
25
DI-300SS User Manual
OPERATION
DISPLAY
7. Press [Enter] key to go to next screen.
Note: Screen non-stop switching between
screen 1 and 2
Screen 1
Screen 2
8. Enter new/edit Set Point 1 data by using
[NUMERIC] key e.g. 0.500g
9. Press [FNC 1] key to save and go to next set
point number
Note: Screen non-stop switching between
screen 1 and 2
Screen 1
Screen 2
26
DI-300SS User Manual
OPERATION
DISPLAY
10. Enter data for all set point and press
[FNC 1] key until exit and return to PLU file
programming main screen
Example: Set point 2 = 1.000
: Set point 3 = 1.500
: Set point 4 = 2.000
: Set point 5 = 2.500
11. Press [FNC 2] key to set Lot No
Note: The first screen displayed few second
and then automatically goes to Screen 2.
Screen 2
12. Enter Lot No data by using [NUMERIC]
key e.g. 12345
Note: Max number of data allowed for entry is
20 digits.
27
DI-300SS User Manual
OPERATION
DISPLAY
13. Press [FNC 2] key to save and return to PLU
file programming main screen
Note: Press [C] key to exit without saving
14. Press [FNC 3] key to set Part No
Note: The first screen displayed few second
and then automatically goes to Screen 2.
Screen 2
15. Enter Part No data by using [NUMERIC]
key e.g. 4560
Note: Max number of data allowed for entry is
20 digits.
28
DI-300SS User Manual
OPERATION
DISPLAY
16. Press [FNC 3] key to save and return to PLU
file programming main screen
Note: Press [C] key to exit without saving
17. Press [ENTER] key to save programmed
plu file
Note: Press [Mode] or [C] key to exit without
saving
18. Press [MODE] key 3 times to return to
Stand-by-Status (Weighing Mode)
29
DI-300SS User Manual
General Set Point Password Setting
General Set Point password setting is used for general set point protection.
OPERATION
DISPLAY
1. At Stand-by-Status (Weighing Mode), Press
[MODE] key two times to enter password
mode.
Note: The first screen displayed few second
and then automatically goes to Screen 2.
Screen 2
2. Enter old password by using [NUMERIC]
key e.g. 111 (max up to 6 digit) and then press
[ENTER] key,
3. If wrong password entered, it display error
message
30
DI-300SS User Manual
OPERATION
DISPLAY
4. If correct password entered it goes to next
screen.
5. Enter new password by using [NUMERIC]
key e.g. 112
6. Press [ENTER] key to save the password.
And then press [MODE] key 2 times to
return to stand-by-status mode.
Note: If you forget your password, please contact your distributor for assistant.
31
DI-300SS User Manual
Functions Operation
Different type of function available for selection, and the indicator set on scale depend on the function
selected. Only can select three different functions (FNC 1, FNC 2 and FNC 3).
Function selection depend on SPEC 44 ‘Function 1 Keys Mode,
SPEC 45 ‘Function 2 Keys Mode,
SPEC 46 ‘Function 3 Keys Mode,
Example of Function and Indicator Layout
FNC 1
FNC 2
FNC 3
: Weight Conversion
: N/A
: N/A
FNC 1
FNC 2
FNC 3
: Accumulation
: Subtraction
: Sequence Number
* When use weight conversion, FNC 2 and FNC 3
cannot be used
* For subtraction used the same indicator as
Accumulation
* For Sequence Number no functions indicator is used
FNC 1
FNC 2
FNC 3
FNC 1
FNC 2
FNC 3
: Gross
: Lot Number
: Hold
: Counting (sample)
: Quantity
: Set Point
* Quantity is used to display current quantity for
sampling weight and no indicator is used for quantity
* For set point no functions indicator is used
32
DI-300SS User Manual
Weight Conversion
Weight conversion used for converting of current weight unit to other weight unit with the same weight
used.
Note: when select weight conversion, other function cannot be set, FNC 2 and FNC 3 key will be disabled
OPERATION
DISPLAY
1. At Stand-by-Status (Weighing Mode), Load
Weight e.g 1kg
2. Press [WEIGHT CONVERSION]
function key (1 times) to view weight in gram
3. Press [WEIGHT CONVERSION]
function key (2 times) to view weight in
pound (lb)
33
DI-300SS User Manual
OPERATION
DISPLAY
4. Press [WEIGHT CONVERSION]
function key (3 times) to view weight in
ounce (oz)
5. Press [WEIGHT CONVERSION]
function key (4 times) to view back, weight in
kg (original weight unit)
34
DI-300SS User Manual
Accumulation and Subtraction
Accumulation and subtraction is used for calculation of weight/item.
1. Accumulation
OPERATION
DISPLAY
1. At Stand-by-Status (Weighing Mode),
2. Call up PLU e.g. 123 by using [NUMERIC]
key and [CODE] key
3. Put a weight on to the platform e.g. 300g
35
DI-300SS User Manual
OPERATION
DISPLAY
4. Press [ACCUMULATION] function key to
add item to accumulation mode
Note: When press accumulation key it display
Screen 1, then automatically change
Screen in sequence until Screen 3
Note: Screen 2 displays the total value of
accumulated item weight.
Note: When connect to some application, it
might show extra screen
Screen 1
Screen 2
Screen 3
5. Press [C] key to clear PLU and remove
weight from platform
6. Call up PLU e.g. 456 by using [NUMERIC]
key and [CODE] key
36
DI-300SS User Manual
OPERATION
DISPLAY
7. Put a weight on to the platform e.g. 500g
8. Press [ACCUMULATION] function key to
add item to accumulation mode
Note: When press accumulation key it display
Screen 1, then automatically change
Screen in sequence until Screen 3
Note: Screen 2 displays the total value of
accumulated item weight.
Note: When connect to some application, it
might show extra screen
Screen 1
Screen 2
Screen 3
9. Press [C] key to clear PLU and remove
weight from platform
37
DI-300SS User Manual
OPERATION
DISPLAY
10. Put a weight on to the platform e.g. 350g
(Non-PLU)
11. Press [ACCUMULATION] function key to
add weight to accumulation mode
Note: When press accumulation key it display
Screen 1, then automatically change
Screen in sequence until Screen 3
Note: Screen 2 displays the total value of
accumulated item weight.
Note: When connect to some application, it
might show extra screen
Screen 1
Screen 2
Screen 3
12. Press [ENTER] key to send out the
weighing data and exit Accumulation Mode
Note: When press accumulation key it display
Screen 1, then automatically change
Screen in sequence until Screen 3
Note: Screen 2 displays the total value of
accumulated item weight.
Note: When connect to some application, it
might show extra screen
Screen 1
38
DI-300SS User Manual
OPERATION
DISPLAY
Screen 2
Screen 3
39
DI-300SS User Manual
2. Subtraction
OPERATION
DISPLAY
1. At Stand-by-Status (Weighing Mode),
Put a weight on to the platform e.g. 1kg
2. Press [ACCUMULATION] function key to
add weight to accumulation mode
3. Remove weight from platform
4. Put a weight on to the platform e.g. 200g
40
DI-300SS User Manual
OPERATION
DISPLAY
5. Press [SUBTRACTION] function key to
subtract weight from accumulation mode
Note: When press subtraction key it display
Screen 1, then automatically change
Screen in sequence until Screen 3
Note: Screen 2 displays the total value of
accumulated item weight.
Note: When connect to some application, it
might show extra screen
Screen 1
Screen 2
Screen 3
6. Remove weight from platform
7. Put a weight on to the platform e.g. 500g
41
DI-300SS User Manual
OPERATION
DISPLAY
8. Press [SUBTRACTION] function key to
subtract weight from accumulation mode
Note: When press subtraction key it display
Screen 1, then automatically change
Screen in sequence until Screen 3
Note: Screen 2 displays the total value of
accumulated item weight.
Note: When connect to some application, it
might show extra screen
Screen 1
Screen 2
Screen 3
9. Press [ENTER] key to send out the
weighing data and exit Accumulation Mode
Note: When press accumulation key it display
Screen 1, then automatically change
Screen in sequence until Screen 3
Note: Screen 2 displays the total value of
accumulated item weight.
Note: When connect to some application, it
might show extra screen
Screen 1
Screen 2
42
DI-300SS User Manual
OPERATION
DISPLAY
Screen 3
43
DI-300SS User Manual
Sequence Number
Sequence number function key used to view current sequence number and modifies current number
value. Sequence number only operational during printing (each time do printing, sequence number
increased by 1). Max sequence number is 999999, once reach it, it will reset the number back to 0.
Note: Set Spec 52 “Output Type”, to 2 “Label Printer”, in advance.
OPERATION
DISPLAY
1. At Stand-by-Status (Weighing Mode)
2. Press [SEQUENCE NUMBER] function
key
Note: The first screen and Screen 2 will
toggled non stop
Screen 2
3. Enter new Sequence Number value e.g. 55
44
DI-300SS User Manual
OPERATION
DISPLAY
4. Press [SEQUENCE NUMBER] function
key to save the sequence number value
Note: When print it increase the sequence
number value
Note: Press [C] key to clear entered data
45
DI-300SS User Manual
Net/Gross
Gross function is used to display total weight (tare weight + net weight) of item on platform.
OPERATION
DISPLAY
1. At Stand-by-Status (Weighing Mode),
Assign a tare (digital tare) value e.g. 50g
Note: If do one touch tare, it display as zero.
2. Put a Weight on to the Platform e.g. 300g
3. Press [NET/GROSS] function key to view
gross weight (tare weight + net weight)
4. Press [NET/GROSS] function key again to
exit gross mode and view back net weight
46
DI-300SS User Manual
Lot Number
Lot number function key used to view and temporarily modifies PLU lot number. Also used to program
lot number for weighing mode (non-Plu). Max number of data allowed for entry is 20 digits.
OPERATION
DISPLAY
1. At Stand-by-Status (Weighing Mode)
2. Press [LOT NUMBER] function key
Note: The first screen displayed few second
and then automatically goes to Screen 2.
Screen 2
3. Enter lot number value e.g. 2268
47
DI-300SS User Manual
OPERATION
DISPLAY
4. Press [LOT NUMBER] function key to
save the lot number value
Note: For Plu only temporarily save, when
recall the plu, it display the original plu
lot number
Note: Press [C] key to clear entered data
48
DI-300SS User Manual
Hold
Hold function is used to hold/capture weight for unstable weigh (e.g. when weighing animal and etc), also
used to view weight (e.g. for recording data purpose and etc). There is two type of hold function (peak
hold and normal hold), selection depend on the SPEC 50 Hold Method
Note: Must set SPEC 50 Hold Function to 1:Enable in advance
1. Peak Hold
Peak hold function work by detecting the peak/highest weight reached when item placed on platform
OPERATION
DISPLAY
1. At Stand-by-Status (Weighing Mode)
2. Press [HOLD] function key to enable
holding function
3. Press the platform and release it. e.g. the
weight reach 1.736 kg
49
DI-300SS User Manual
OPERATION
DISPLAY
4. The hold function hold the pick weight e.g.
1.736 kg
Note: If when do pressing platform and release
with a weight on platform the zero
lamps will be off.
5. Display return to normal after few seconds.
(The hold weight and lamp cleared)
Note: If a weight is on platform, it display the
weight value
2. Normal Hold
Normal hold function work by detecting the stable weight when item placed on platform
OPERATION
DISPLAY
1. At Stand-by-Status (Weighing Mode)
50
DI-300SS User Manual
OPERATION
DISPLAY
2. Press [HOLD] function key to enable
holding function
3. Put a weight on platform e.g. 2 kg
4. After weight stabled, remove the weight
Note: Hold function work only when the
weight is stable.
5. Display return to normal after few seconds.
(The hold weight and lamp cleared)
51
DI-300SS User Manual
Counting and Quantity
Counting is used to create simple mode of counting/sampling of unit weight for item. Quantity is used to
view current quantity of weight (when unit weight is available).
OPERATION
DISPLAY
1. At Stand-by-Status (Weighing Mode), Load
Weight e.g. 200 g
2. Enter known quantity number for 0.200g
e.g. 10 pcs using the [NUMERIC] key
3. Press [COUNTING] function key to do
count sample weight
Note: When do counting, it do computation as
“weight/pcs”, so 0.200g/10 pcs =
0.020g/per pcs (unit weight)
52
DI-300SS User Manual
OPERATION
DISPLAY
4. Press [QUANTITY] function key view the
quantity value x current weight
Note: The first screen displayed few second
and then automatically goes to Screen 2.
Note: Press [C] key to return back to Stand-byStatus (Weighing Mode)
Screen 2
5. Remove (all) Weight from platform
Note: It still will be in counting operation mode
6. Load weight example 500g and press
[QUANTITY] function key
Note: It will display the quantity of current
weight
Note: The first screen displayed few second
and then automatically goes to Screen 2.
Note: Press [C] key to return back to Stand-byStatus (Weighing Mode)
Screen 2
53
DI-300SS User Manual
OPERATION
DISPLAY
7. Remove (all) Weight and press [C] key to
clear/exit counting function
54
DI-300SS User Manual
Set-Point
General Set Point setting is used to program or change weight Set Point data (Non-PLU item) which to be
used in Stand-By-Status Mode.
1. Set-Point Setting
OPERATION
DISPLAY
1. At Stand-by-Status (Weighing Mode), press
[SET POINT SETTING] function key.
Note: Screen non-stop switching between
screen 1 and 2
Screen 1
Screen 2
2. Enter password by using [NUMERIC] key
e.g. 112 (max up to 6 digit) and then press
[ENTER] key
Note: To change password, please refer to
General Set Point password setting
3. If wrong password entered, it display error
message
55
DI-300SS User Manual
OPERATION
DISPLAY
4. If correct password entered it goes to next
screen.
Note: The first screen displayed few second
and then automatically goes to Screen 2.
Screen 1
Screen 2
5. Enter new/edit Set Point 1 data by using
[NUMERIC] key e.g. 500 g
6. Press [SET POINT SETTING] function
key to save and go to Set Point 2 setting
Note: Screen non-stop switching between
screen 1 and 2
Screen 1
Screen 2
56
DI-300SS User Manual
OPERATION
DISPLAY
7. Enter new/edit Set Point 2 data by using
[NUMERIC] key e.g. 1 kg
8. Press [SET POINT SETTING] function
key to save and go to Set Point 3 setting
Note: Screen non-stop switching between
screen 1 and 2
Screen 1
Screen 2
9. Enter new/edit Set Point 3 data by using
[NUMERIC] key e.g. 1.5 kg
57
DI-300SS User Manual
OPERATION
DISPLAY
10. Press [SET POINT SETTING] function
key to save and go to Set Point 4 setting
Note: Screen non-stop switching between
screen 1 and 2
Screen 1
Screen 2
11. Enter new/edit Set Point 4 data by using
[NUMERIC] key e.g. 2 kg
12. Press [SET POINT SETTING] function
key to save and go to Set Point 5 setting
Note: Screen non-stop switching between
screen 1 and 2
Screen 1
Screen 2
58
DI-300SS User Manual
OPERATION
DISPLAY
13. Enter new/edit Set Point 5 data by using
[NUMERIC] key e.g. 2.5 kg
14. Press [SET POINT SETTING] function
key to save and go to/return to Stand-ByStatus mode.
2. Weighing Operation with Set Point
It works by weighing the weight/item on the platform and set point used to indicate reaching of
target/requested weight, where the set point lamp (or with buzzer) will be activated.
Note: To enable Weighing Operation with Set Point, SPEC 240 “Weight Checking” set to 1 “Yes”.
Note: There is Internal (On Scale) and External Set Point Lamp (Connect to Set Point interface).
Note: For Internal Set Point Lamp when weight above set point 3 value, the last led lamp will blink.
Note: External Set Point Lamp display, depend on SPEC 235 “Set Point Latch”, currently set to 1 “YES”.
Note: SPEC 402 “Weight Checking type” currently set to 0 “Sequence weight check”.
OPERATION
DISPLAY
1. At Stand-by-Status (Weighing Mode)
59
DI-300SS User Manual
OPERATION
DISPLAY
2. Put a Weight on to the Platform e.g. 500g
Note: Internal and External Set Point 1 lamp is
ON
Note: Press [ENTER] key to send out the
weighing data.
3. Add another 500g on the Platform.
(Equal to 1 kg)
Note: Internal Set Point 2 lamp is ON and
External Set Point 1 & 2 lamp is ON
Note: Press [ENTER] key to send out the
weighing data.
4. Add another 500g on the Platform.
(Equal to 1.5 kg)
Note: Internal Set Point 3 lamp is ON and
External Set Point 1, 2 & 3 lamp is ON
Note: Press [ENTER] key to send out the
weighing data.
Note: Internal set point lamp only support for
3 set point
5. Remove all the Weight from Platform
60
DI-300SS User Manual
IP Address Setting
DI 300 SS features with TCP/IP network connection. IP set up is described as follow: e.g. 192.168.0.1
(get a valid IP from your IT Administrator)
OPERATION
DISPLAY
1. At Stand-by-Status (Weighing Mode)
2. Press 0416 (use [NUMERIC] key) while
pressing [REZERO] key.
3. Enter 1st byte of the IP e.g.192
61
DI-300SS User Manual
OPERATION
DISPLAY
4. Press [ENTER] key,
Then enter 2nd byte of the IP e.g.168
5. Press [ENTER] key,
Then enter 3rd byte of the IP e.g. 0
6. Press [ENTER] key,
Then enter the 4th byte of the IP e.g. 1
7. Press [ENTER] key to save and exit
62
DI-300SS User Manual
Server IP Address Setting
Other than IP setting, Server IP set up is described as follow: e.g. 192.168.0.2
OPERATION
DISPLAY
1. At Stand-by-Status (Weighing Mode)
2. Press 0417 (use [NUMERIC] key) while
pressing [REZERO] key.
3. Enter 1st byte of the Server IP e.g.192
63
DI-300SS User Manual
OPERATION
DISPLAY
4. Press [ENTER] key,
Then enter 2nd byte of the Server IP e.g.168
5. Press [ENTER] key,
Then enter 3rd byte of the Server IP e.g. 0
6. Press [ENTER] key,
Then enter the 4th byte of the Server IP e.g. 2
7. Press [ENTER] key to save and exit
64
DI-300SS User Manual
Error Messages Description
Error message
Error description
ID Mgr Communication Error
ERRC 1
Ethernet no connection
ERRC 2
Send error
ERRC 3
Receive timeout
ERRC 4
Receive error
ERRC 5
Database write error
ERRC 6
Database memory error
ERRC 7
Ethernet board error
Weight Measure Error
ERR 1
Calibration error
ERR 2
Calibration map error, not follow the setting table
ERR 3
data entered is great than capacity
ERR 4
AD error
ERR 5
Can’t enter float data or no data entered
ERR 6
Keying in resolution map error
ERR 7
Set RTC error. E.g.set month>12..
ERR 8
Set point configure error/ data enter > capacity/ sp[i+1]<=sp[i]
ERR 9
Decimal is 0. Maybe memory corrupt
ERR 10
Gross < Zero raw, tare operation error, clear tare if tare on
ERR 11
When one touch only, can't enter data except 0
ERR 12
When digit tare only, can't enter "TARE" except clear tare
ERR 13
Digital tare when loaded can't fulfill
ERR 14
Enter data or weight is great than tare range
Weight not stable when tare or rezero operation need stable.
Spec 11 set to 0
Spec setting is tare can't increase or decrease
ERR 15
ERR 16
65
DI-300SS User Manual
ERR 17
tare condition error
ERR 18
Neg weight send to ID Mgr error
ERR 19
ID Client send stable timeout
ERR 20
Wait for stable timeout error
ERR 21
Haven’t get dry weight (for Vietnam request)
ERR 22
Can’t change set point value when not in first unit
ERR 23
Accumulation error
Digit numbers after decimal point greater than No of decimal
setting when do tare operation
Error scan barcode
ERR 24
ERR 25
66
DI-300SS User Manual
Notes
67