1
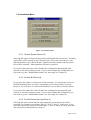
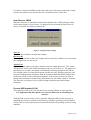
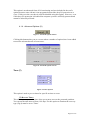
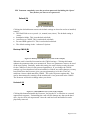
The Protector
16K Version
User Manual
Ver. 2.2.3
January 2003
© SecuriQuest 2002
Page 1 of 33
Thank you for purchasing the 'Protector'. We are sure that it will be a valuable tool in
providing you with stable computing.
We would also like to thank SecuriQuest for their work in creating this user manual.
For further information on SecuriQuest's technical writing and other services, please
contact us at eSupportLive Technologies Ltd..
If you have a problem and your supplier is unable to help you, please feel free to
contact us at :
eSupportLive Technologies Limited
Westwood Park
London Road,
Little Horkesley
Colchester
Essex,
CO6 4BS
Phone: +44 (0)870 080 0680
Fax: +44 (0)870 130 9408,
Email: [email protected],
This manual has been written to present the installation and usage of the Protector
card in a user friendly, easily understandable format. This step was taken due to the
amount of feedback received from eSupportLive on the installation and usage of this
product.
The installation of the Protector requires technical skills and knowledge of the
computer's hardware and operating system. If you have any doubts, please consult
your supplier or eSupportLive for assistance. If you are inexperienced, do not attempt
installation as it could result in data loss.
If there is any problem during installation, please stop and consult your supplier or
eSupportLive for further assistance.
eSupportLive and The Manufacturer are not liable for any damage to valuable data
resulting from the installation process.
Page 2 of 33
Copyright Notice
The Protector product is the property of Radix Technologies Ltd. (henceforth
"Radix") referred to in this manual as the manufacturer. Radix owns the property for
purposes of its application utility, trademark, copyright, or other intellectual
properties covered in this documentation, or has patent
rights being applied for.
Page 3 of 33
Table of Contents
Table of Figures ______________________________________________________6
1. Introduction ______________________________________________________7
1.1.
Benefits __________________________________________________________ 7
1.2.
Features of the Protector __________________________________________ 8
1.2.1.
1.3.
How the Protector Works ________________________________________________8
System Requirements _____________________________________________ 9
2. Before Installation________________________________________________10
2.1.
Disclaimer _______________________________________________________ 10
2.2.
General__________________________________________________________ 10
2.3.
Some Points to Note: _____________________________________________ 10
2.4.
Partition Planning ________________________________________________ 11
2.4.1.
2.4.2.
Data Saved to Local Hard Drive __________________________________________11
Data Saved to Network Server ___________________________________________11
3. Installation______________________________________________________13
3.1.
Installation Procedure ____________________________________________ 13
3.1.1.
3.1.2.
3.1.3.
3.1.4.
3.2.
Installation Menu_________________________________________________ 15
3.2.1.
3.2.2.
3.2.3.
3.2.4.
3.2.5.
3.3.
BIOS Settings ________________________________________________________13
Driver Installation _____________________________________________________13
Card Installation ______________________________________________________14
Program Installation ___________________________________________________14
Protect System Drives (S) _______________________________________________15
Protect All Drives (A) __________________________________________________15
Do Not Protect the Last Drive (L) _________________________________________15
Custom (C) __________________________________________________________16
Normal Boot (B) ______________________________________________________16
Finishing Installation _____________________________________________ 16
4. Function Description _____________________________________________17
4.1.
The Administration Screen________________________________________ 17
4.1.1.
Partition Information (P) ________________________________________________18
4.1.2.
Recovery Type (R) ____________________________________________________18
No Recovery _______________________________________________________________19
Auto Recovery______________________________________________________________19
Manual Recovery____________________________________________________________19
Timer _____________________________________________________________________19
Save ______________________________________________________________________19
Miscellaneous (M)_____________________________________________________________20
Installation Mode____________________________________________________________20
Auto Recover CMOS ________________________________________________________21
Prevent HDD Against I/O (H) __________________________________________________21
4.1.4.
Advanced Options (O)__________________________________________________22
Timer (T) __________________________________________________________________22
Miscellaneous ® ____________________________________________________________23
Default (D)_____________________________________________________________24
Backup CMOS (B) __________________________________________________________24
Uninstall (U) _______________________________________________________________24
5. Using the card ___________________________________________________25
Page 4 of 33
5.1.
How to install new apps (good practice) ___________________________ 25
5.2.
Downloading from the internet (quarantine directory) (good practice) 25
6. How do I?_______________________________________________________26
6.1.
Install a new application __________________________________________ 26
6.2.
Use it on a dual boot machine with Linux __________________________ 26
6.3.
Turn it off? ______________________________________________________ 26
6.4.
Uninstall it?______________________________________________________ 27
6.5.
Keep my e-mails? ________________________________________________ 27
6.6.
Store my internet cache? _________________________________________ 27
6.7.
Handle e-mail attachments? ______________________________________ 28
6.8.
Change the protection on a partition? _____________________________ 28
7. FAQs __________________________________________________________29
7.1.
Isn’t there a time overhead in boot up? ____________________________ 29
7.2.
What if I format the hard drive?____________________________________ 29
7.3.
I want to still have anti virus software but you say I should uninstall it 29
7.4. Can a Hard Drive that has already had the Protector installed be moved
to another computer? __________________________________________________ 29
7.5. Will there be any degradation of performance of my Hard Drive if I
install the Protector____________________________________________________ 29
7.6.
What about low level sector operations? ___________________________ 29
8. Troubleshooting _________________________________________________30
8.1.
I can’t save my data ______________________________________________ 30
8.2.
I’ve forgotten my password _______________________________________ 30
8.3.
I can’t find the card in the Start Menu ______________________________ 30
8.4.
I can’t get the administrator screen up _____________________________ 30
8.5.
The card does nothing at all ______________________________________ 30
8.6.
The system has not detected the Protector_________________________ 30
8.7. The Protector indicates some wrong hard disk parameters and offers
right ones, but the system cannot be started up _________________________ 31
8.8.
The system crashes after installing the protector ___________________ 31
8.9. After installing a card into a Windows 2000/XP system, it takes a long
time for the login screen to appear. _____________________________________ 31
8.10. When running the “Save” command, I receive an error which reads
“buffer overflow, cannot save”. _________________________________________ 32
8.11.
The network card stops working after I install the Protector:_______ 32
8.12.
I get an error message from Outlook after installing the card ______ 32
8.13. After using the Protector card on manual mode I can’t log in to the
server from my NT workstation now I have reset it to automatic ___________ 32
Page 5 of 33
8.14. The card is installed but is not recovering my Windows NT/XP/2000
system 33
Table of Figures
Figure 1: Installation Menu ....................................................................................................................15
Figure 2: Administration Screen.............................................................................................................17
Figure 3: Partition Information...............................................................................................................18
Figure 4: Recovery Type ........................................................................................................................18
Figure 5: 'Miscellaneous' options ...........................................................................................................20
Figure 6: Changed CMOS Settings ........................................................................................................21
Figure 7: Advanced Options button........................................................................................................22
Figure 8: Advanced Options Screen .......................................................................................................22
Figure 9: Timer Options .........................................................................................................................22
Figure 10: Miscellaneous Advanced Options.........................................................................................23
Figure 11: 'Default' Button .....................................................................................................................24
Figure 12: Backup CMOS Button (Greyed out in the example) ............................................................24
Figure 13: Uninstall Button (Greyed out in the example) ......................................................................24
Page 6 of 33
1. Introduction
Congratulations on the purchase of your computer Protector card. This is a superb
piece of hardware which should save you a lot of heartache and effort. It is an easy
means of protecting system and application files (and any other files which rarely
need updating).
Only those users with administration rights can make any permanent changes. If you
are a support technician the use of the card will make your role much easier by
enabling you to deal easily with any system corruption issues.
In order to get the best out of your Protector card there are several things which need
to be considered, therefore we recommend that you read this manual thoroughly
before you start.
It is most important that you understand the use of partitions on your computer. If
you save data to your computer’s hard drive (and not to a network server, for
example) you will need at least two partitions
1. For system files and applications. This is where your Operating System will
reside and where you will install programs. This partition will need protecting by
the Protector
2. For data. You will need to back this partition up regularly in the normal way. If
this partition were to be covered by the Protector you would not be able to save
data to it.
If your hard drive needs to be partitioned and you are not confident to do this use an
expert – your supplier should be able to do this for you.
If you are interested in exploring this yourself you may want to give it a try first.
There are Internet Sites where you can download a trial version.
1.1. Benefits
Using the Protector will bring you a number of benefits:
• It will protect you from virus damage
• It will prevent Trojans and worms from taking up residence in your system
• It will automatically repair any damage you inadvertently cause eg by deleting
files, changing configuration settings
• It will automatically recover the PC from a crash or from damage caused to files
by a power failure
• Corrupted files don’t need to be reinstalled – they are restored automatically at
next boot up
• The card will enable to you to install software or hardware, live with it for a while,
and if the new software or hardware is causing problems to your system you can
restore the system to the state it was in before you installed the software/hardware.
• Once you have a stable system, the card maintains the stable system for you
• It will give you peace of mind.
Page 7 of 33
•
•
•
•
•
•
•
1.2. Features of the Protector
The Protector works on all Microsoft operating systems from MS-DOS through to
the latest versions of Windows. It makes no difference as to whether the
computer runs one operating system or more. In protecting all the MS operating
systems it supports the DOS, FAT16, FAT32 and NTFS file formats.
The card protects hard drives and removable hard drives: MFM, RLL, MCA, IDE,
EIDE, SCSI. It cannot protect media such as floppy discs, CD, Zip disks or
LS120 media, however these can all be used as normal on a machine fitted with
the Protector.
The Protector is a PCI card and therefore requires an available PCI slot but it does
not require an IRQ.
You can decide which partitions to protect – you can protect the system and
applications partition or you can protect the whole hard drive – this is useful in
those cases where you don’t want anyone saving to the local drive (eg when using
a computer in a public access environment such as a library, classroom or
training centre or in those situations where users should be saving to a server). It
is also possible to prevent anyone writing any data to part (or all) of the hard drive
at all – for example this might be useful at exhibitions.
Installation of the card is quick and easy – follow the instructions! During set up
you are offered four different protection modes. These are explained later in the
manual.
On a single hard drive you may have a number of logical drives. The Protector
will protect up to 24 concurrent logical drives.
The Protector supports multiple boot startups, even those created by partition
management tools (eg System Command, Partition Magic, BootIT, Qmagic etc)
1.2.1. How the Protector Works
When installed, the Protector dynamically allocates space on the Hard Drive during
normal use of the PC. This space is called the Dynamic Reserved Area. This is
preferable to a fixed reserved area as there is no chance of it becoming corrupted and
it leaves more space on the Hard Drive for the user. The Protector takes a snapshot of
the system pointers (FAT, Boot Sector, Partition Table and so on) and copies them to
the Dynamic Reserved Area which also holds the Protector program.
The mapping of all protected files and data onto the Hard Drive is done for two
reasons:
1. To be able to "recover" all files, i.e. use the original pointers when needed and
bring them back to work.
2. Mapping all files on the Hard Drive protects them from being overwritten – no
writing is possible to that area, so even if you “delete”, “format”, “kill” a file, you
will not be able to overwrite that area.
The Protector monitors any changes to the protected area of the Hard Drive and,
should the system become corrupted, or files accidentally be deleted, will restore the
protected area to its original status when the system is re-booted. The restoration
actually takes place immediately after hardware initialisation and before the operating
system boots up.
Protection is at hardware level and the "Low Level" area of the HDD is also
protected, so there is no way to harm the data protected.
Page 8 of 33
1.3. System Requirements
•
•
•
•
•
80486 or higher PC
spare PCI slot
2Gb Hard Drive
BIOS supported Hard Drive
MS Operating System (MS-DOS, Windows 3.x, Windows 9x, Windows
Millennium, Windows NT, Windows 2000, Windows XP)
NB: it is also essential that you prepare for the installation by planning your
partitioning and protection.
Page 9 of 33
2. Before Installation
2.1. Disclaimer
This product has been extensively tested and proven in the field, however neither
eSupportLive Technologies, SecuriQuest, the manufacturer nor your supplier can
accept any responsibility for any loss of or damage to data. If you do not agree to this
do not install this product.
a)
b)
c)
d)
e)
f)
g)
h)
i)
2.2. General
Before you begin the installation procedure you should read this manual
thoroughly so you know what the card does and what you need to do.
Check that your system meets the system requirements
As with any installation you should make a full backup of your computer.
Ensure that your system is clear of viruses by using a virus scanner. Clean and fix
any viruses if you found any.
If your operating system has SCANDISK and defrag utilities we suggest that you
run them and fix any corrupted files you may find.
We suggest that you also password protect your BIOS if this has not already been
done – but make sure you note down the password in a place where you can
find it again.
Plan and prepare your partitions - see section ‘Partition Planning’. Changing
partitions is not a task for the technically naïve. If you are not confident to do
this, consult an expert – your supplier can probably do this work for you.
Your supplier accepts no liability for any damage to any data which results from
the partitioning or installation process. If you do not accept these terms, please do
not install the Protector.
Some anti-virus software conflicts with the card so we suggest that all anti-virus is
disabled prior to the installation of the card. You will need to alter the settings of
your anti-virus software as follows:• Disable the Master Boot Record (MBR)/Boot Sector
• Disable the Boot Sector virus warning
If this is unsuccessful then we suggest that all anti-virus software be uninstalled
before installation of the card. This does not leave you unprotected – simply reinstall the anti-virus software after you have installed the card.
It is also helpful if you disable any virus checking capability provided by your
computer’s mainboard, since it is likely that it will mistaken the Protector for a
virus. (see Section 3.1)
2.3. Some Points to Note:
1) If the Protector card is making a ‘save’ operation, ie is saving data to the protected
part of the hard drive, do not power down the computer as data will be lost
2) Under normal usage there is no noticeable time difference in booting up the
computer. Where you will notice the Protector taking time to work is when it is
performing the save operation – for example when you have installed new
software and you have told the card to remember the new configuration, it will
have to save the new configuration. If there is a lot of data on the system when
you first install the card you may also notice the card taking a while to perform its
save operation at that point, too. The time taken for this save operation can be
Page 10 of 33
reduced by defragmenting the hard drive (if the OS has a defrag utility) before
installation of the card.
2.4. Partition Planning
If you only have one partition on your Hard Drive and you protect it using the card,
you will find that any data you save will be lost at the next boot-up. If you need to
save data to your Hard Drive then you will need an unprotected partition which you
back up in the normal way. Example partition configurations might be:
2.4.1. Data Saved to Local Hard Drive
This may be a home PC, or a business PC where users can save data to the local Hard
Drive. In this case you will need partitions along the following lines:
Partition
C:\
Files
System and
applications
Protection
On – set to
automatic
D:\
Data
Off
Content
Operating System files,
application files – Word
Processor, Spreadsheets,
databases, web browser etc etc
User data, e-mails – NB, back
this partition up in the normal
way
If this is a home PC which is used for games, you may want to have a separate
section to hold games data.
2.4.2. Data Saved to Network Server
There are several situations where this configuration might be appropriate:
• Business where users save to their own space on the server
• Schools, colleges, universities – in these situations users typically are not allowed
to save to the local Hard Drive and have to save their data onto their personal
space on the server. If users are allowed to save to the local Hard Drive then use
the partition example above (Section 2.4.1)
• Internet Cafés: this is, like schools, colleges and universities, a situation where all
the PCs are a standard format and each is used by a number of users. It is clearly
a place where there is scope for a user to corrupt the system or introduce a virus,
however there is no reason for a user to save any data on the Hard Drive at all so
one partition will be enough and it can be protected. Any problems created by a
user will be eradicated when the machine is rebooted
Page 11 of 33
Partition
C:\
Files
System and
applications
Protection
On – set to
automatic
(recovery every
time the PC is
re-booted)
Content
Operating System files,
application files – Word
Processor, Spreadsheets,
databases, web browser etc etc
Page 12 of 33
3. Installation
Make sure you have already read Section 2 ‘Before Installation’
Please note. It is extremely important that you follow these instructions exactly.
A system running Win 95/98/Me may be forgiving but a system running
Windows NT/2000/XP will not. In this case your system will be unprotected even
if the card appears to have installed correctly. Do not test or risk losing any files
that you cannot afford to lose
Once you have completed installation we suggest that you test that the card is
installed and functioning correctly by creating a test file (eg a Word Document)
and saving it to the protected partition. Then reboot. If the file has disappeared
you know that the card is functioning.
Please also ensure that you are able to access the Admin Screen without
errors or other problems occurring.
3.1. Installation Procedure
3.1.1. BIOS Settings
There are several different groups of BIOS on the market and it may be the case that
some of them need the settings changing.
Set the following BIOS parameters:
Virus Warning:
Boot from Network:
Shadow RAM C800, D000, D800
Disabled
Enabled
Disabled
If not all the BIOS parameters are present, set the ones you can and try to continue the
installation. If the installation fails and you are unable to solve the problem using the
Troubleshooting section run the BIOS dump utility (rxbios) on the accompanying
floppy disk and pass the output to your supplier.
3.1.2. Driver Installation
Install the software driver from the floppy disk.:
a) a) Insert the floppy disk with the driver into drive a: and run setup. A message
will appear which reads "Would you like to install the Protector".
Choose the <Install> option.
b) A screen will appear with a running progress meter at the bottom which takes a
few moments to complete prior to displaying the message 'Protector installation
completed successfully. The changes will take effect the next time you restart your
computer. Would you like to restart your computer".
c) Click on <Restart Later> and then shutdown your computer through Windows.
NB: choose ‘Shutdown’ not ‘Restart’
Page 13 of 33
3.1.3. Card Installation
a)
b)
c)
d)
e)
Once the computer is switched off disconnect the electricity supply.
Remove the PC case.
Insert the card into an unused PCI slot
Replace the PC cover, connect the electricity supply and switch on the PC.
The installation menu should appear on the screen. If it doesn’t, try the card in a
different PCI slot.
NB: the mouse is not functional at this stage, you will need to use the TAB key to
move from button to button. Make your selection using the ENTER key
3.1.4. Program Installation
a) Restart your computer ensuring that the floppy disk is removed from drive a. The
computer will display this message on booting - "Please insert the setup disk into
drive A: press <OK> button to install." When you do this, after a few moments,
this message is displayed - "Program loaded OK. Please remove the setup disk,
press any key to continue the installation...."
b) The card is now installed and you can now customise its operation. To finalise the
installation, please choose menu option <Custom (C)>. The Administration
Screen will now be displayed (this screen is described in greater detail in Section
4.1).
c) Please check the "Installation" option is checked and then click on "Save and
Exit". The computer will then indicate that it is in Installation Mode before
booting into the operating system. The final step is to reboot the computer, access
the Administration Screen, set the Recovery Type and uncheck the Installation
Mode option.
Page 14 of 33
3.2. Installation Menu
Figure 1: Installation Menu
3.2.1. Protect System Drives (S)
Selecting this option will protect the partition which holds the system files. Normally
system files will be located on the C partition, but if for some reason they are on a
different partition, eg D, then both the C partition and the partition with the system
files will be protected. Other partitions will not be protected.
If you select this option the card will make the configuration automatically and
proceed to start the operating system. If you want to change the configuration you
will need to go into ‘Administrator Mode’ at a later stage (see Chapter 4)
3.2.2. Protect All Drives (A)
If you select this option, it will protect all the partitions. As noted in the section on
Partition Planning, there are some circumstances where this would be necessary.
However, if you need to save data to the Hard Drive you will not select this option.
If you select this option the card will make the configuration automatically and
proceed to start the operating system. If you want to change the configuration you
will need to go into ‘Administrator Mode’ at a later stage (see Chapter 4)
3.2.3. Do Not Protect the Last Drive (L)
Selecting this option means that all of the partitions except the last one will be
protected, for example you may have Drives C, D, E, F and G. In this case, if you
select this option, the system will assume that ‘G’ drive is where you keep your data
and will protect all the partitions except ‘G’.
Page 15 of 33
If you select this option the card will make the configuration automatically and
proceed to start the operating system. If you want to change the configuration you
will need to go into ‘Administrator Mode’ at a later stage (see Chapter 4)
3.2.4. Custom (C)
This option gives you much more flexibility regarding which partitions you protect.
Select this option and then select ‘Option 2’– it allows you to manually set for each
partition whether it is to be protected or not. It will also allow you to set other system
parameters (see chapter 4).
After you finish making your settings, press the ‘Save and Exit (S)’ button or press
the F10 key.
3.2.5. Normal Boot (B)
This allows you to change your mind about installing the card at this stage: it
bypasses the installation and allows the Operating System to boot. The installation
menu will appear again when re-booting next time.
3.3. Finishing Installation
After you have made your choice from the installation menu the operating system will
start directly. It may then ask you to re-boot.
Page 16 of 33
4. Function Description
To the end user the use of the card should be invisible. However, as the person who
installs the card, there will be occasions when you need to go into the card’s
administration screen to change parameters. This section of the manual describes the
configuration parameters and when you might need to use them
To access the card’s administration screen:
1. Reboot the computer
2. Type ‘Ctrl’ and ‘Home’ immediately after the hardware has initialised. This
happens after the BIOS Power-On Self Test (POST). Timing is critical at this
point. If the computer continues to Windows you have missed it – reboot and try
again. If you find the timing difficult to achieve you can extend the time that the
card waits before it boots the computer. You can change this timing under the
‘Advanced’ section of the admin menu (Section 4.1.4)
3. Enter the administrator password
4. The administration screen will appear.
4.1. The Administration Screen
Figure 2: Administration Screen
The mouse is not operational at this time. You will need to use the TAB key to move
through the fields. Within a field you can use the up and down arrow keys and you
can use the space bar to make a selection (eg in the ‘radio buttons’ in the Recovery
Type field.
Page 17 of 33
4.1.1. Partition Information (P)
Figure 3: Partition Information
This section of the screen displays the Windows partitions of the current Hard Drive.
It shows the name of each partition, the system format type (eg FAT 16, NTFS etc),
the size of the partition and how much of the partition has been used. At the left of
the section it also tells you whether this partition is protected or not.
If you select ‘Custom’ on installation, this is the screen you will see and where you
will select the partitions to be protected.
When you access the administration screen, the partition information is greyed out –
you can only access the partition information on installation. Clearly the partition
information is too crucial to the card’s operation to be changeable when it is
uninstalled. If you need to change the protection on a partition, click the uninstall
button and uninstall the card. This is very easy and is simply a matter of clicking the
‘uninstall’ button. The next time you reboot, the system will detect the card and ask
for the setup disk after which you can continue with the reinstall. However this time
you will select the ‘custom’ option where you can select which partitions to protect.
4.1.2. Recovery Type (R)
Figure 4: Recovery Type
The Protector allows you to select between five different modes of operation. Once
you have tabbed into this field, use the up and down arrow keys to move between
options and use the space bar to make your selection.
Page 18 of 33
No Recovery
If you select this option it means that the computer functions simply as if the Protector
was not installed – any changes made by users will be saved and will not be lost when
they next boot up.
Auto Recovery
This is the mode which you will probably use most often. The protected partitions are
restored each time the computer is booted. This process is invisible to the end user.
Manual Recovery
If you select this option the computer will present the user with two options when the
computer starts:
Recover Data (R):
If the user selects this option, the protected partition will be restored to as it was when
you installed the card, or, if you have made and saved changes to the configuration
the protected partition will be restored to the last saved configuration.
Reserve Data (M)
This is saying to the card ‘Just remember how the Hard Drive was configured. Don’t
actually restore it’
An example of how you might use the manual recovery mode would be if you wanted
to install new software onto the protected partition. If you simply installed it, the
installation would be lost at the next re-boot. However, if you first go into manual
mode and tell the computer to ‘Reserve Data’ it will just ‘remember’ the computer
configuration as it was before you installed the software. If you find the software is
causing problems, at the next re-boot you can tell the computer to ‘Recover Data’ and
the computer will be restored to what it was before you installed the software. If,
after you have lived with the new software for a few days, you are satisfied that it has
not affected the computer’ stability you can go back into the administrator mode and
tell the card to save the new configuration and return to auto mode.
It must be emphasised that you should not use this mode unless absolutely necessary
(eg for installing new software). Once you are satisfied with the stability of your
system you should return your protection to automatic.
Timer
This option allows you to set specific intervals for the card to automatically update the
configuration which is saved, eg you can set it to save the configuration every 7 days.
Save
This is telling the card to save any changes which have been made to the
configuration of the protected partitions. This becomes the configuration to which the
computer is restored. For example you might have set the card to manual mode and
installed a piece of software. After a while you may be satisfied that the system is
Page 19 of 33
still stable so you tell the card to save this new configuration and then you reset the
card to automatic mode.
If you select this option and then tell the system to save the changes to the admin
screen (by pressing the button ‘Save and Exit f10’) it will give you three options.
Basically it is asking you for confirmation:
Recover Data
If you select this option it will restore the state of the protected partitions to the state
they were in when you last saved the configuration
Reserve Data
This option is basically saying, ‘no, don’t make any changes. Just remember the last
configuration you saved’
Save Data
This option confirms that you wish to save the new configuration. You will be asked
to confirm again by entering the administrator password.
In order to prevent the ‘Save’ dialogue appearing each time the computer is booted,
you will need to make another selection once you have made the save. For example
you may wish to set it back to automatic.
4.1.3. Miscellaneous (M)
Figure 5: 'Miscellaneous' options
Installation Mode
There are two uses for the installation mode:
(1) it is used during the installation process (Section 3.1.4)
(2) It also has uses when installing new software.If you select this option a box will
appear each time you boot up informing you that the system is operating in
‘installation mode’. This mode is to allow you to install new software – in effect
it is like bypassing the card and not having it installed – your system is completely
open and its use is not recommended. If you wish to install new software you
are better using manual mode as described earlier.
Page 20 of 33
If you have selected installation mode and wish to go back to protected mode, simply
return to the admin screen and deselect the ‘installation mode’ check box
Auto Recover CMOS
When the Protector is installed it checks and remembers the CMOS settings. It then
checks them again at every boot up. If changes have been made the Protector will
warn you and ask you what you want to do:
Figure 6: Changed CMOS Settings
Save (S)
This tells the card that to confirm the changes
Recover (R)
This tells the card not to allow the changes and to restore the CMOS to as it was when
the configuration was last saved.
Analyze (A)
If you select this option you will be asked to enter the admin password. The system
will then auto-analyse the CMOS parameters and proceed to boot up. The purpose of
this function is to reduce the chance of mistakenly detecting changes to the CMOS.
For example, there are some BIOS options (such as the way Windows interacts with
the power management) which may lead the system to think that BIOS changes have
been made, when, in fact, nothing has changed. If the system presents you with a
change and you think no changes have been made you can run the ‘analyze’ function.
The first time you choose to save a BIOS change should stop mistake change
detections.
Prevent HDD Against I/O (H)
This option prevents low level activities from causing damage to protected data.
It is important that this option is not selected when you are installing new
software
With the 16K version of the card it is possible (although unlikely) that you may be
installing the card on a machine which has not yet had an operating system installed.
If this is the case this option must not be activated whilst an operating system is being
installed.
Page 21 of 33
This option is an advanced form of I/O monitoring and was included in the card’s
options because some old anti-virus programs detected the deep I/O protection as a
virus. If this were the case then it could be disabled using this option. However, even
if this deep I/O protection is disabled the computer system is still fully protected and
cannot be adversely affected.
4.1.4. Advanced Options (O)
Figure 7: Advanced Options button
Clicking this button takes you to a screen where a number of options have been added
to meet the advanced needs of some users.
Figure 8: Advanced Options Screen
Timer (T)
Figure 9: Timer Options
This option is used to pre-set times for specific actions to occur.
(T) Recover Timer
This allows you to preset the time when you want to recover the protected partition.
You can set the time interval from 1-99 days. For this option to function the recovery
type (Fig 4) must be set to ‘Timer’
Page 22 of 33
(W) Wait Hotkey Time
This is the time window you have to press <Ctrl> + <Home> to reach the
administrator screen during boot up. You can set it to be anywhere between 1 and 99
seconds. It is basically an extension to the BIOS and allows you to configure how
long it gives you before booting the operating system or the Protector
Reserve/Recover options.
© Detect CMOS Time
The card detects the time it takes to make changes to the CMOS parameters. If they
are changed within this time frame the card will assume that they were changed by the
system and will ask you to confirm the changes. The purpose of this function is to
provide an added degree of protection to the user in the event of a virus accessing the
CMOS. It is unlikely that you would need to change these settings.
The time interval can be set anywhere between 1 and 99 seconds.
Miscellaneous ®
Figure 10: Miscellaneous Advanced Options
® Prompt when XX% Free Space Used
This option asks the card to inform you if the free and usable space has been filled to
the defined amount after the installation of the Protector. It will only do so if you
have defined a value. It will also inform you what to do to resolve the relevant
problems.
The value can be set between 0 and 99
(D) Prompt when XX% data saved
The system will inform the user when the amount of data which is to be saved on the
Hard Drive reaches a pre-set level of fragmentation. This option allows the
administrator to set the level at which the warning should be given. As well as the
warning the user/administrator is given guidance as to how to resolve the problem.
The value of XX can be set from 1 to 99.
(A) Administrator Password
This is where the administrator can set the administrator password. The password can
be up to eight digits or characters. It is case sensitive. If no password is set it will
revert to the factory default.
When the cursor is moved into the password field the password becomes visible, ie
the administrator can see the password instead of asterisks.
The default password is 12345678
Page 23 of 33
NB: You must completely erase the previous password (including the ‘Space’
bar) before you enter a new password
Default (D)
Figure 11: ‘Default’ Button
Clicking the default button restores the default settings at when the card was installed,
namely:
• The Hard Disk recovery mode (ie, manual, auto, timer). The default setting is
<auto>
• Installation Mode. This is unchecked at default.
• Auto Recover CMOS. This is unchecked at default.
• Prevent HDD against I/O. This is unchecked at default.
• The default settings in the ‘Advanced’ Options
Backup CMOS (B)
Figure 12: Backup CMOS Button (Greyed out in the example)
When the card is installed it memorises the CMOS settings. Clicking this button
updates the parameters that were memorised. These new parameters can now be used
as the new backup. Basically, under this setting, the card is doing exactly the same
for the CMOS as it does for the protected partition(s). If you change the CMOS
settings (eg if new hardware has been installed, or indeed, any other changes you may
have made) then the Protector gives you an opportunity to save this. There are
malicious viruses which attack the CMOS. The card will protect against this. This
can be demonstrated by turning off the mainboard’s virus protection in the CMOS.
The Protector will detect a change when you reboot.
Uninstall (U)
Figure 13: Uninstall Button (Greyed out in the example)
Clicking this button uninstalls the Protector, leaving the PC to function as a normal
unprotected computer. Uninstalling the card will not damage any data on the hard
drive, but it will be left unprotected. Once the card has been uninstalled it can be
physically removed.
Page 24 of 33
5. Using the card
5.1. How to install new apps (good practice)
If you install a new application onto the protected partition you will find that the next
time you start the computer you will have lost the application. To install new
applications you need to set the Protector to ‘Manual’ mode.
(a) To access the admin screen press Ctrl and Home immediately after hardware
initialisation (Timing is critical at this point)
(b) Enter the administrator password
(c) At the administrator screen check the radio button against ‘Manual’ under the
‘Recovery Type’ section.
(d) This means that when the computer is started you will be asked if you want to
(a) recover data or (b) reserve data
(e) choose the ‘reserve data’ option
(f) install your application.
(g) For a period of time you can live with the new software and ascertain whether it is
causing you problems.
(h) If you are satisfied the computer is still stable after the installation of the new
software then you can go back to the admin screen and choose ‘Save’ to save the
new configuration. Once it has been saved you can then go back to the admin
screen and put the Protector back into automatic mode.
(i) If, however, you find that the new software is adversely affecting the stability of
your computer system you can decide that you do not want it installed. You do
not have to go through an uninstall – simply choose the ‘recover data’ option and
then go back to the admin screen and put the card into automatic mode.
As you can see, using the Protector gives you the opportunity to safely evaluate
software and ascertain its effect on your system.
5.2. Downloading from the internet (quarantine directory) (good
practice)
We recommend that you also run a virus scanner with the Protector. In conjunction
with a virus scanner, the Protector can give you almost total protection. We suggest
that you set up a ‘Quarantine’ directory on your protected partition. When you
download any files from the Internet or attachments to e-mails (or indeed, any files
you are suspicious of), put them in this ‘Quarantine’ directory. Then run the virus
scanner over them. If you are satisfied that they are virus free then you can move
them to wherever you want. However, by keeping them on the protected partition you
can be sure that if they had caused any ill-effects then those effects will disappear
when you reboot the system.
Of course, if the whole PC is protected then if you get a virus it doesn’t matter – you
don’t have to do any disinfecting – just reboot the PC and the virus and all its effects
will have disappeared.
Page 25 of 33
6. How do I?
6.1. Install a new application
If you install a new application onto the protected partition you will find that the next
time you start the computer you will have lost the application. To install new
applications you need to set the Protector to ‘Manual’ mode.
(a) To access the admin screen press Ctrl and Home immediately after hardware
initialisation (Timing is critical at this point)
(b) Enter the administrator password
(c) At the administrator screen check the radio button against ‘Manual’ under the
‘Recovery Type’ section.
(d) This means that when the computer is started you will be asked if you want to
(i) recover data or (ii) reserve data
(e) choose the ‘reserve data’ option
(f) install your application.
(g) For a period of time you can live with the new software and ascertain whether it is
causing you problems.
(h) If you are satisfied the computer is still stable after the installation of the new
software then you can go back to the admin screen and choose ‘Save’ to save the
new configuration. Once it has been saved you can then go back to the admin
screen and put the Protector back into automatic mode.
If, however, you find that the new software is adversely affecting the stability of your
computer system you can decide that you do not want it installed. You do not have to
go through an uninstall – simply choose the ‘recover data’ option and then go back to
the admin screen and put the card into automatic mode.
Another point to remember is that you will need to be able to specify where the
program saves data. You will need to specify that the save location is on an
unprotected partition (which, of course, you will back up in the usual way). If
however you cannot specify where the program saves its data you will need to install
the program itself on an unprotected partition. However you will still need to go
through steps (a) to (h) above as the installation will still make changes to the
registry and put some files (eg .dll .ini and .vxd files) into the system partition.
6.2. Use it on a dual boot machine with Linux
The Protector can be used on a dual boot machine with Linux, however it will not
protect the Linux partition. At installation point it will not even display the Linux
partition information so you will not be able to select the protection for Linux, only
Windows. It is similar to having multiple partitions and only protecting one.
6.3. Turn it off?
If for some reason you do not want to take advantage of the security of the card and
want to turn it off for a while there are two things you can do.
You will need to access the administration screen. Enter Ctrl and Home immediately
after hardware initialisation (timing is crucial).
Enter the admin password.
Page 26 of 33
At the admin screen you can either
(a) choose ‘No Recovery’ under the Recovery Type section or
(b) simply uninstall the card. Reinstallation is a very simple procedure.
6.4. Uninstall it?
Please note, before uninstalling the card, please ensure that you have saved the system
to the configuration that you require. This is important since when you uninstall the
card, it will restore your system to the last saved configuration, which may not
necessarily be what you require if you had reserved any changes etc
Go to the admin screen (press Ctrl+Home immediately after the POST – Power On
Self Test, and enter the admin password - default password is 12345678)
Click the ‘Uninstall’ button.
The card can now be physically removed.
This will not have removed the software so if you want to reinstall the card you
should be able to put it in again and the software will recognise it and take you
through the install procedure again.
If you also want to uninstall the software run ‘Setup’ again from the floppy disk. It
will ask if you want to uninstall the software.
If you uninstall the software and at a later stage wish to re-install a card you will have
to go through the full install procedure outlined in Sections 2 and 3.
6.5. Keep my e-mails?
If your e-mails are stored on the protected partition any new mails will be lost when
the PC is restarted. You will need to go through the configuration of your e-mail
client and change the location where mails are stored and store them on an
unprotected partition (which of course you back up in the normal way). For example,
if your e-mail client is Outlook Express
• Click on the ‘tools’ menu
• Choose ‘Options’
• Click on the ‘Maintenance’ tab
• Click on the ‘Store Folder’ button.
• You can then select a new storage folder by clicking on the ‘Change’ button.
6.6. Store my internet cache?
If your Temporary Internet Files are held on a protected partition they will be lost
each time the machine is restarted. Therefore you may want to store your Temporary
Internet Files on an unprotected partition. For Example, if your Internet Browser is
Internet Explorer you can do this by the following procedure:
• Click ‘Tools’
• Click ‘Internet Options
• Click the ‘General’ tab (if it is not already at the front)
• Under the ‘Temporary Internet Files’ section click the ‘Settings’ button
• Click the ‘Move Folder’ button
Page 27 of 33
•
•
Browse to where you want the new cache folder to be situated.
OK your actions.
In Internet Explorer there is no way to specify the location of where cookies are
saved. If you really want to keep your cookies you will need to install the browser on
an unprotected partition. (See end of Section 6.1)
6.7. Handle e-mail attachments?
This depends to some degree on how your e-mail program handles e-mail
attachments. What we are suggesting here is ‘good practice’ rather than trying to
advise on specific e-mail programs.
As e-mail attachments can transport viruses, worms and trojan horses we suggest that
when you have an e-mail attachment come in, that you save it to the ‘Quarantine’
directory that you have created. Scan it with your anti-virus software. If there is a
virus you can delete it. When you reboot you will be safe in the knowledge that
nothing can have happened to your PC, and if it is clean you can view it and then
move it to an unprotected partition if you want to keep it.
6.8. Change the protection on a partition?
You can’t actually change the protection on a partition once it has been set – however
there is a very simple way round this: If you do want to change the protection on a
partition
• Go to the administration screen
• Click the Uninstall button
• Reboot the computer
• Go through the install process but choose the ‘Custom’ option and choose exactly
which partitions you want to protect
Page 28 of 33
7. FAQs
7.1. Isn’t there a time overhead in boot up?
Yes but it is minimal. Without specialised performance benchmarking software it is
unlikely you will notice any difference.
7.2. What if I format the hard drive?
If you format a protected partition it will be recovered at the next boot up. As part of
the testing we set up a hard drive with three partitions on it and protected them all.
We formatted the C drive and the card recovered from that. We also went into fdisk
and deleted all the partitions (don’t forget we had protected them all). The card
recovered them all immediately.
7.3. I want to still have anti virus software but you say I should
uninstall it
We say that you should disable the anti-virus software to start with and uninstall it if
necessary before you install the card. Once the card is installed we recommend that
you re-install your anti-virus software. Install it just the same as you would any other
application ie use the ‘manual’ mode and live with it for a while to see whether it
affects the stability of your system. If there is no problem save the new configuration
and set the card back to ‘automatic’ mode.
7.4. Can a Hard Drive that has already had the Protector installed be
moved to another computer?
No. First you must uninstall the card. Then the hard drive can be removed and put in
a different computer.
7.5. Will there be any degradation of performance of my Hard Drive if I
install the Protector
Obviously this will be different for each system. During the testing of the card we
found no obvious difference in performance, however if you were to use specialist
benchmarking software you would probably record some performance decrease. It
has been tested with benchmarking software and it showed a mere 4% decrease in
performance on the system tested. We would expect this to vary from system to
system.
7.6. What about low level sector operations?
To do this you need to be in the BIOS – eg for a low-level format. The card cannot
protect against this as the card is loaded between the BIOS and the operating system.
Therefore we recommend that you password protect your BIOS.
There are viruses and software which can perform similar sector editing low level
operations, however these need the operating system before they can run and at this
stage the card will have been loaded and will be providing its protection
Page 29 of 33
8. Troubleshooting
8.1. I can’t save my data
By this we presume that you can save your data but that when you re-boot the data
has disappeared. In this case you are saving data to a protected partition and the card
is doing what it is supposed to do. Save your data to an unprotected partition
8.2. I’ve forgotten my password
Run the readpwd.exe utility. It will output a stream of letters and numbers. Send this
output to your supplier who will pass it to the manufacturer. They will decode the
output and tell you what your password is
8.3. I can’t find the card in the Start Menu
You won’t find the card in the Start menu or in any file or directory that you can
access or view. To access the administrator screen you will need to press the Ctrl and
Home keys immediately after hardware initialisation. Don’t forget – timing is critical
8.4. I can’t get the administrator screen up
As we have said before – the timing is critical. Try this: As hardware initialisation
(POST) comes to an end press the Ctrl key. Keep it depressed. Keep pressing the
Home key time and again until the password box for the Protector appears.
8.5. The card does nothing at all
If the card has not been detected try moving it to a different PCI slot.
If this does not work try changing the following BIOS settings:
Virus Warning:
Disabled
Boot from Network:
Enabled
Shadow RAM C800, D000, D800
Disabled
If this does not work contact your supplier who will provide you with a BIOS dump
utility. We can then send the output of this program to the manufacturers who can
advise us further. If the card has been detected and is still not doing anything (ie you
can save to a protected partition and the data is still there after a re-boot) the card may
be faulty and will be replaced. There is a three year guarantee on the card.
8.6. The system has not detected the Protector
Great care has been taken with the development of this product but there are almost
limitless hardware combinations in modern PCs so some slight adjustments may be
necessary.
If your card has not been recognised you will know because the system will have not
asked you to run the install disk. There are several things you can try.
Ensure the card is properly seated in the PCI slot.
Try moving the card to a different PCI slot.
If you have other Protector Cards, try using one which you know is not faulty
Page 30 of 33
If this does not work try changing the following BIOS settings:
Virus Warning:
Disabled
Boot from Network:
Enabled
Shadow RAM C800, D000, D800
Disabled
If your BIOS offers different boot sequences try setting the first boot option to LAN.
Wording will differ depending on the BIOS but if the option is there it will be
something like:
a) First boot device – network
b) Boot from LAN
c) First boot device – option ROM
If this does not work contact your supplier who will provide you with a BIOS dump
utility (RXBIOS). We can then send the output of this program to the manufacturers
who can advise us further.
8.7. The Protector indicates some wrong hard disk parameters and
offers right ones, but the system cannot be started up
This indicates a BIOS incompatibility. Contact your supplier who will provide you
with a BIOS dump utility. We can then send the output of this program to the
manufacturers who can advise us further.
8.8. The system crashes after installing the protector
It may be that you did not run scandisk or did not defragment the drive before
installing the card, in which case, uninstall the card, run Scandisk, defragment the
drive and re-install the card.
8.9. After installing a card into a Windows 2000/XP system, it takes a
long time for the login screen to appear.
Windows 2000/XP recognise the Protector card as a LAN card and therefore tries to
send access commands at login to the network. To resolve this, please perform the
following steps:Right click the “My Network Place” icon and choose Properties.
Right click the local area connection referring to the “Winbond based LAN card” and
choose Properties.
Remove the check from all network components and click OK.
DO NOT DISABLE THE WINBOND SETTINGS IN THE DEVICE MANAGER
OR THE CARD WILL STOP PROTECTING THE SYSTEM.
Page 31 of 33
8.10.
When running the “Save” command, I receive an error
which reads “buffer overflow, cannot save”.
This indicates that the fragmentation limit has been reached and it will be necessary to
defrag the system through MS Windows before using the card. You will need to
uninstall the card and defrag the hard disk before reinstalling the card.
8.11.
The network card stops working after I install the Protector:
Before I installed the card I could get onto a network with the computer. Since I
installed the Protector I can’t get onto the network – my network card isn’t working:
The first thing to do is to uninstall the Protector card and see if this restores
functionality to the network card.
If this shows that the problem does lie with the Protector, try installing the Protector
into a different PCI slot
If that fails to solve the problem, uninstall and reinstall the network services
8.12.
I get an error message from Outlook after installing the card
Since I installed the Protector, Outlook tells me that I am using an old outlook.ost file
and that I should delete it. It then goes to default file view.
This may happen when you are on a network and running Outlook. MS Exchange
creates an offline message store on the client PC and recreates or updates it each time
you log on. You have installed the card and Exchange recognises that the .ost file is
there but that it is an old one. You will need to go into the card’s admin screen, go
into manual mode and then boot into the operating system. Navigate to the
outlook.ost file (eg if you are running NT it should be in
NT/profiles/<username>/local settings/application data/microsoft/outlook ) and
rename the outlook.ost file to something else eg outlookbak.ost. Go back to the
admin screen and tell the card to save the new configuration. You can then set it to go
back to automatic.
The next time you boot up, Exchange will not find the outlook.ost file and will make
one. Of course, when you boot up each time the outlook.ost file will be lost and it will
make a new one.
8.13.
After using the Protector card on manual mode I can’t log in
to the server from my NT workstation now I have reset it to
automatic
The scenario where this problem occurred was as follows:
The Protector had been installed and was working with no problem
The user had used it on ‘manual’ mode for 10 days.
In preparation for re-setting the card to automatic he had cleared out the re-cycle bin
and temp files and had reset the card to automatic mode.
He could no longer log in to the domain, as the computer presented an error message:
'system cannot log you on to the domain because the system computer account in the
primary domain is missing or the password in that account is incorrect'.
He could log on to the Primary Domain from any other machine.
He tried re-setting the card to manual and he tried setting it to 'none' but neither
worked.
Page 32 of 33
This is a common issue and is not just related to the card but is part of NT security:
For each Windows NT Workstation that is a member of a domain, there is a discrete
communication channel (for example, the secure channel) with a domain controller.
The secure channel's password is stored along with the computer account on the
primary domain controller (PDC), and is replicated to all backup domain controllers
(BDCs). Every seven days, the workstation sends a secure channel password change
and the computer account password is updated
Solution:
He changed this machine into a workgroup and rebooted.
Then added it again to the domain and added administrator user & password
It worked on reboot.
8.14.
The card is installed but is not recovering my Windows
NT/XP/2000 system
This is a problem which occasionally occurs in Windows NT, XP and 2000. To
resolve this problem, please uninstall the card and then reinstall it ensuring that you
run the setup.exe file prior to installing the hardware. To check if this is the cause of
the problem, do a search in your Windows directory for yzidiot.sys, which is the
driver for these versions of Windows. If it is not present, then this is likely to be the
cause of the problem.
Page 33 of 33